Do-it-yourself mini-greenhouse. 700 photos, step by step instructions
 how to make a mini greenhouse
A mini-greenhouse is, above all, a great way to grow plants, and a mini-greenhouse to ensure seed germination in comfortable conditions. Do not know, how to make a mini greenhouse? Very simple, everyone can do it with their own hands. Home mini greenhouses can be installed anywhere on the windowsill or balcony, and mini-greenhouses for germinating seeds for the first time do not need sunlight at all. They will help grow plants and vegetables in a very effective way.
Mini greenhouse is a generic term that encompasses a wide range of designs. Many gardeners use mini-greenhouses to plant seedlings before the onset of the season. Or install mini-greenhouses at home for growing plants that need high humidity. Here are only 25 examples with step-by-step photos of how to make a mini-greenhouse or do-it-yourself mini-greenhouse. In fact, you need to understand the principle of how it works, but there can be as many options as you like.
Content
- Mini greenhouse for home
- Do-it-yourself greenhouse on a windowsill
- Mini-greenhouse from improvised materials
- Greenhouse for seeds
- Mini greenhouse drawing
- Greenhouse on the window
- Mini greenhouse on the windowsill
- Mini greenhouse in a cardboard box
- Mini greenhouse for a balcony
- Mini greenhouses from plastic bottles
How to make a mini greenhouse with your own hands
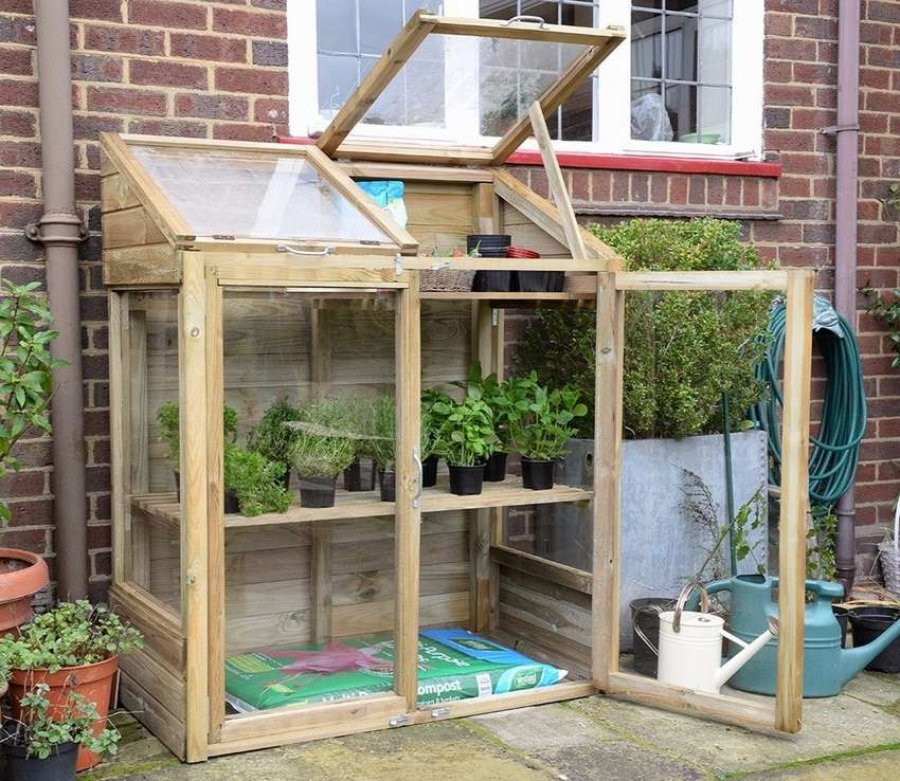
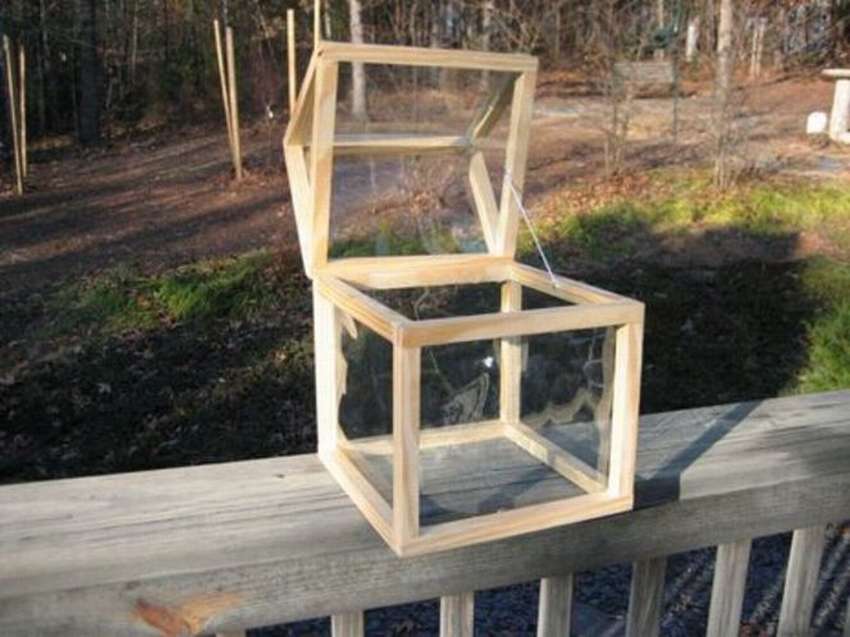
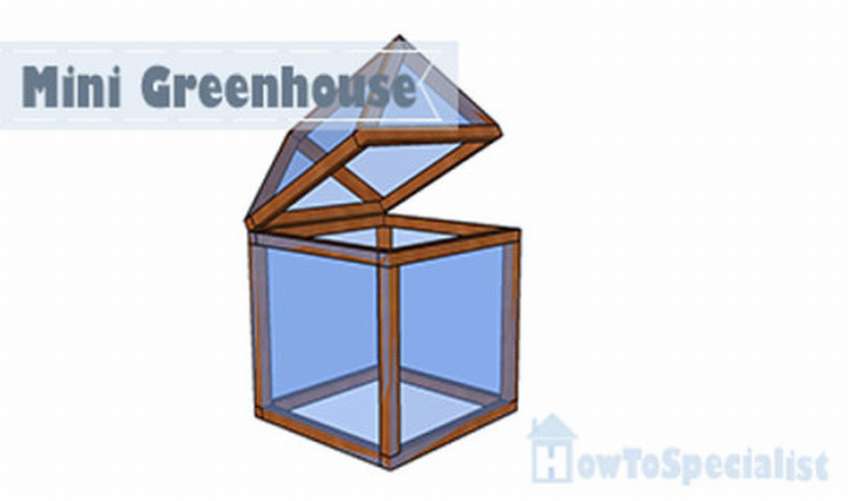
 This mini greenhouse, perhaps, is not suitable for those who want to grow a large number of plants. However, for a few small pots a great option.
Make a mini greenhouse not much work. In principle, this is a neat wooden box with glass walls and a small door. How to assemble a greenhouse is described in detail on the author’s website. It is advisable to read the instructions, because there were some difficulties during the assembly, therefore, recommendations on how to avoid unnecessary errors will come in handy.
 The greenhouse was designed to be placed on top of the sewing cabinet. Therefore, the author does not give accurate design plans, since it was intended for a unique situation in the house.
You can use your own sizesso that they match your table or another place where you are going to install a mini greenhouse.
See the master class in step-by-step photos below.


https://i.expert-h.com/en/parniki-teplitsy/1122#sigFreeId7b101f063c
Home greenhouse for seedlings
 This home greenhouse for seedlings will give your plants a better chance of survival. When planting seedlings requires careful humidity and temperature control. The photo shows a clay pot of 7 and 10 cm. Adjust the size of the frame to suit your needs. For work, you need 30 cm plastic sticks with a diameter of about 4 mm. Trim length by rolling under the multi-purpose knife. For sides longer than 30 cm, stick two sticks in length. Cut the plastic film to the size of the structure. How to assemble a mini greenhouse for the house, see below on step by step photos.


https://i.expert-h.com/en/parniki-teplitsy/1122#sigFreeIdaae97d9324
Do-it-yourself greenhouse on a windowsill
Here's how to make simple but effective. greenhouse on a saucer for a multi-section tray for plants with their own hands. This greenhouse can be used to collect moisture and, therefore, reduce the process of seed germination.
 The finished greenhouse is 28 x 11 x 14 cm and fits well in the 2 x 5 cell tray with dimensions of 28 x 11 cm. You can read the detailed instructions on the website. See below the master class on step by step photos..


https://i.expert-h.com/en/parniki-teplitsy/1122#sigFreeId9370e4db5f
How to make a mini greenhouse
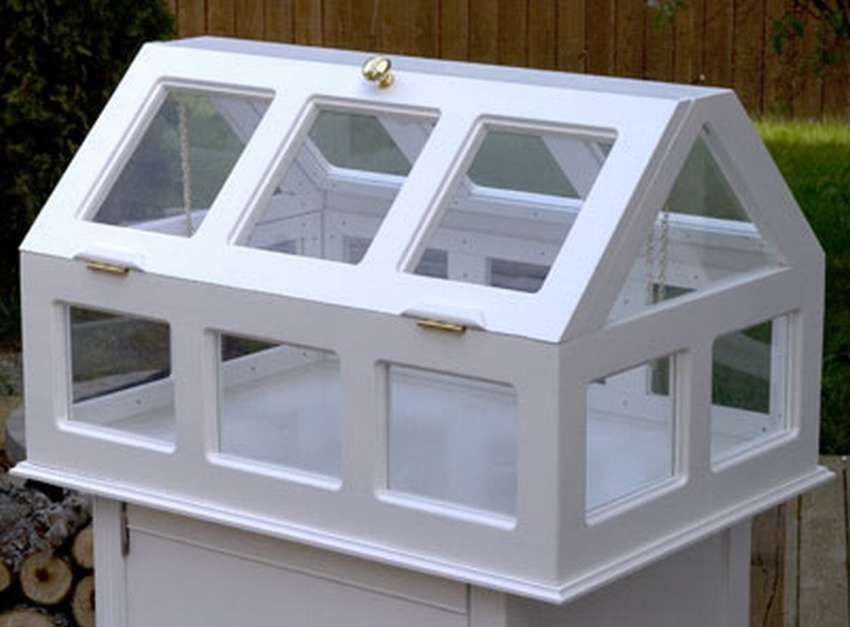
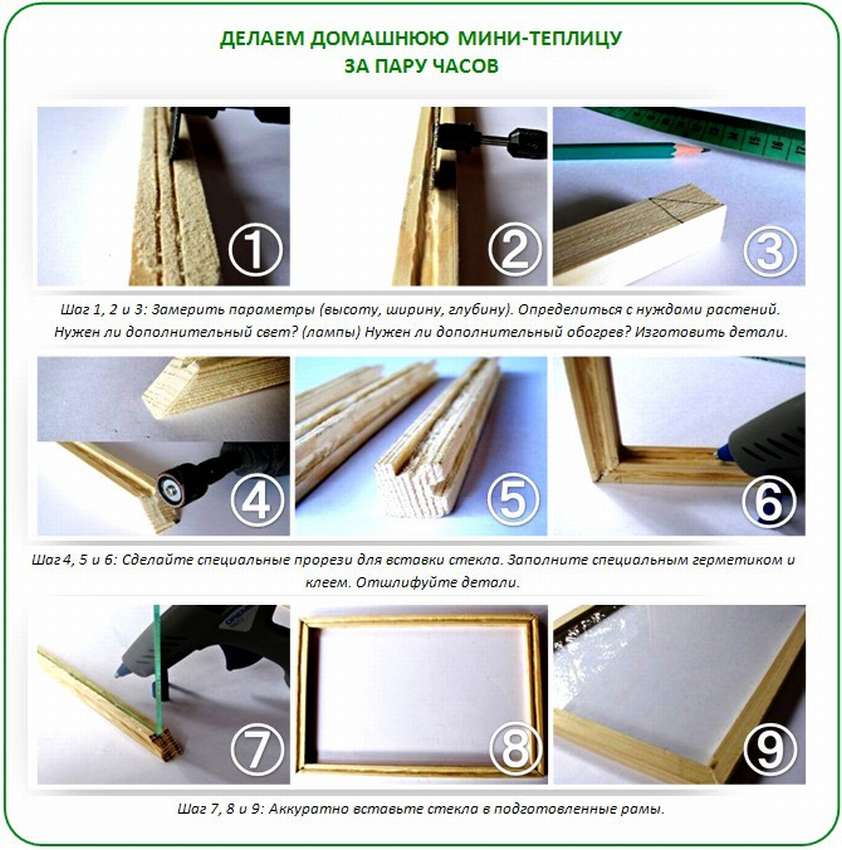
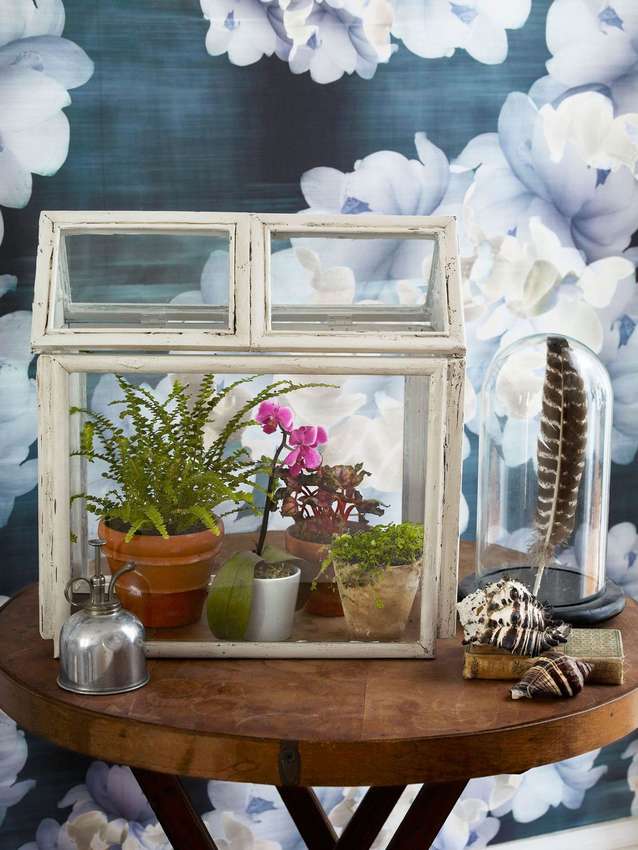 Give your ferns, orchids and other greenhouse plants a wonderful place. Here's how make a mini greenhouse from picture frames. True, such a glass house requires some effort, at least a few free hours, but the result is a wonderful oasis in the Victorian style.
In fact, everything is simple, in short:
- remove the glass from 8 frames and lightly sand the surface;
- align the frames as shown in the figure;
- install two frames face down;
- drill guide holes and fasten with screws;
- repeat with the two remaining frames;
- attach a corner bracket inside each end of the cornice;
- cut two triangles from plywood;
- make a roof and line with the base and paint.
All this is shown in master class on step by step photos.


https://i.expert-h.com/en/parniki-teplitsy/1122#sigFreeId03279a3dff
Mini greenhouse for home
 Such a mini greenhouse is designed for flower pots. All parts are made of simple wood, plastic and hot glue. The greenhouse has a width and depth of 27 cm and a height of 39 cm. It is conveniently placed in it. four small pots (diameter 8 cm), and the height has a sufficient margin for plant growth. How to make a mini greenhouse for your own home See below for step-by-step photos. If you have questions, on the author’s website, the link is under the gallery, there is a detailed instruction with a detailed description of the assembly process.


https://i.expert-h.com/en/parniki-teplitsy/1122#sigFreeId60437310f5
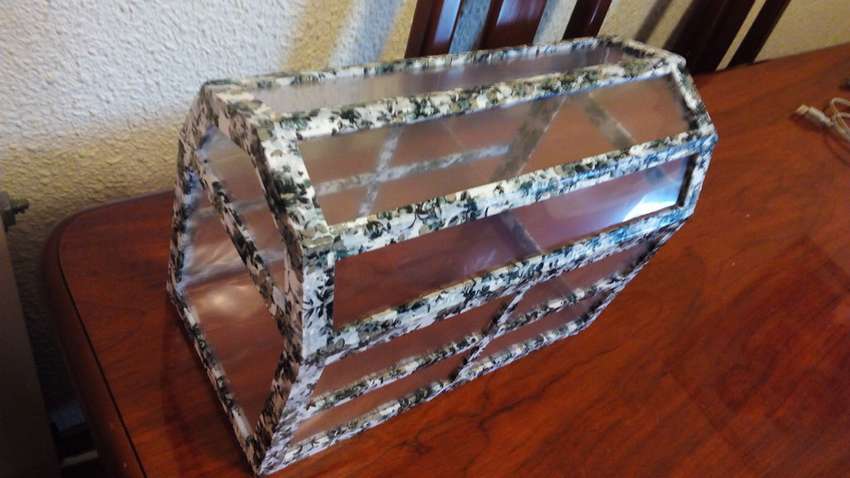
Small greenhouse from improvised materials
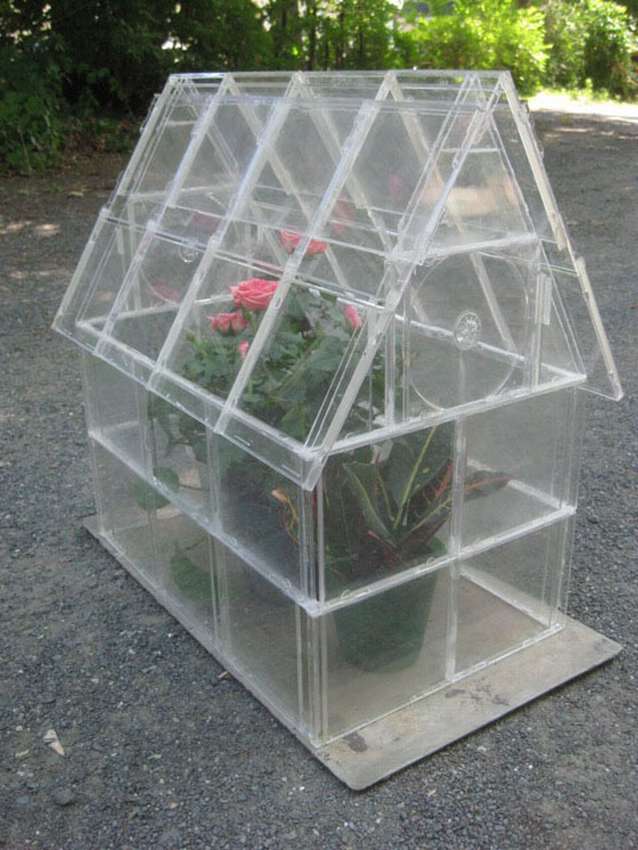 Have you ever seen greenhouse from disk boxes? Take a look. You will not only see, but also learn how to make such a mini greenhouse with your own hands. This is a small design. In fact, the photo shows that the greenhouse contains only about 3 large plants. But you can resize to suit your individual needs.
Here is what you need to make a mini greenhouse:
- Old CD cases - about 40 pieces are needed to make a greenhouse of this size.
- Adhesive for plastic that dries transparent.
- Tweezers
- Craft knife, ruler and cutting board, and an even larger flat surface for drying boxes.
Below you can see master class on step by step photos, and it’s better to read the instructions, it is quite long, but do not be alarmed, the greenhouse is really not difficult to make. There are simply many details that need to be clearly explained. The hardest part of the whole project, cut plastic boxes at different angles. And even this is not so difficult to do, you just need a little patience. The rest of the project just glue all the details.


https://i.expert-h.com/en/parniki-teplitsy/1122#sigFreeId34d3c21252
Mini greenhouse for an apartment
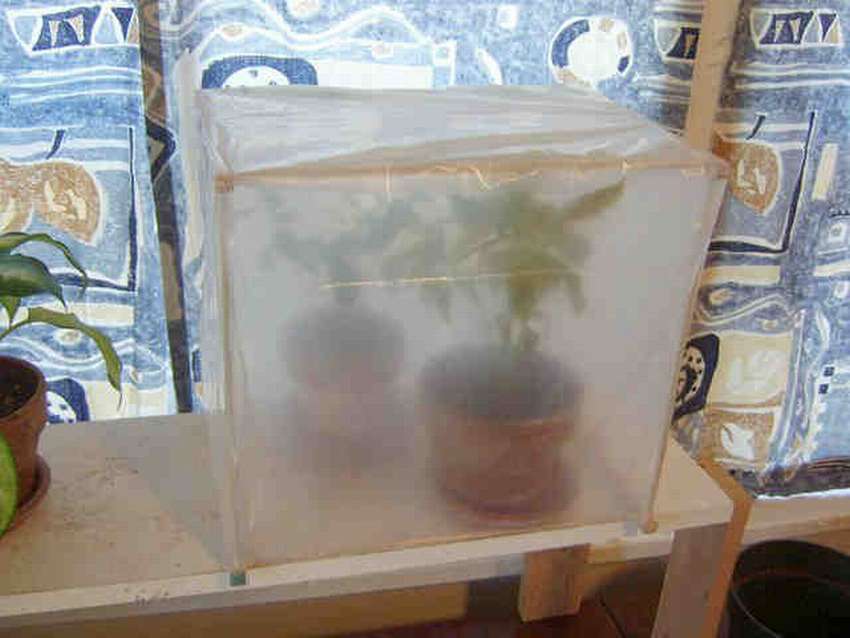
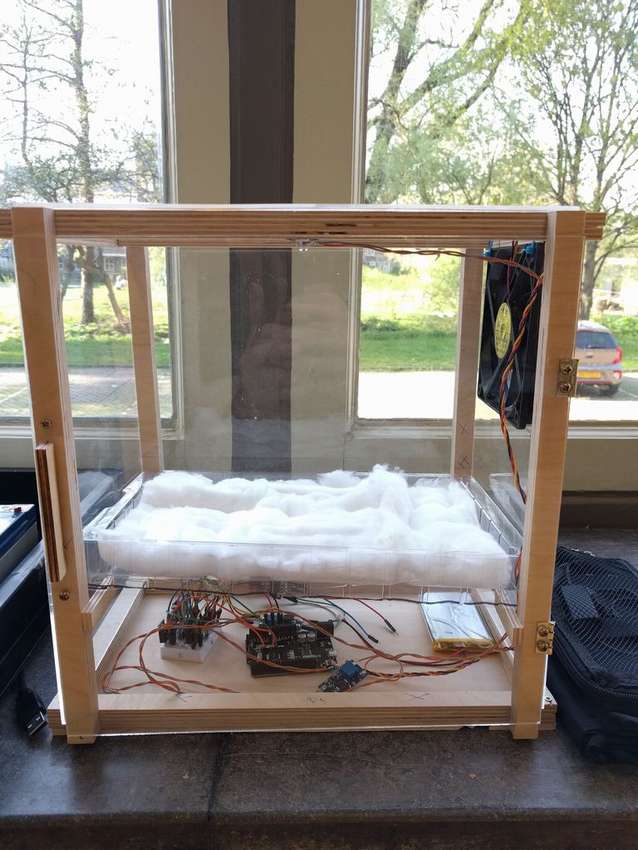 This mini greenhouse for an apartment developed by the author as a demonstration model, and not as a project for the production of a significant amount of herbs or vegetables.
First of all, this is a frame that represents functional design. All elements of the frame are cut from one sheet of plywood, which is a multilayer wood panel. You need to make 8 pieces of size 20x20x300 mm and 4 pieces of size 20x20x170 mm. To assemble the frame, 4 long side members and all small side members should have a small symmetrical groove at both ends. You can do this by cutting the bars and then using a chisel to remove excess. Just be careful, so as not to chop wood at this stage. You can make adjustments to the process by grinding the bars.
How to make a mini-greenhouse with your own hands, as well as install the necessary equipment for ventilation and heating, read on the site.


https://i.expert-h.com/en/parniki-teplitsy/1122#sigFreeId455ee9deca
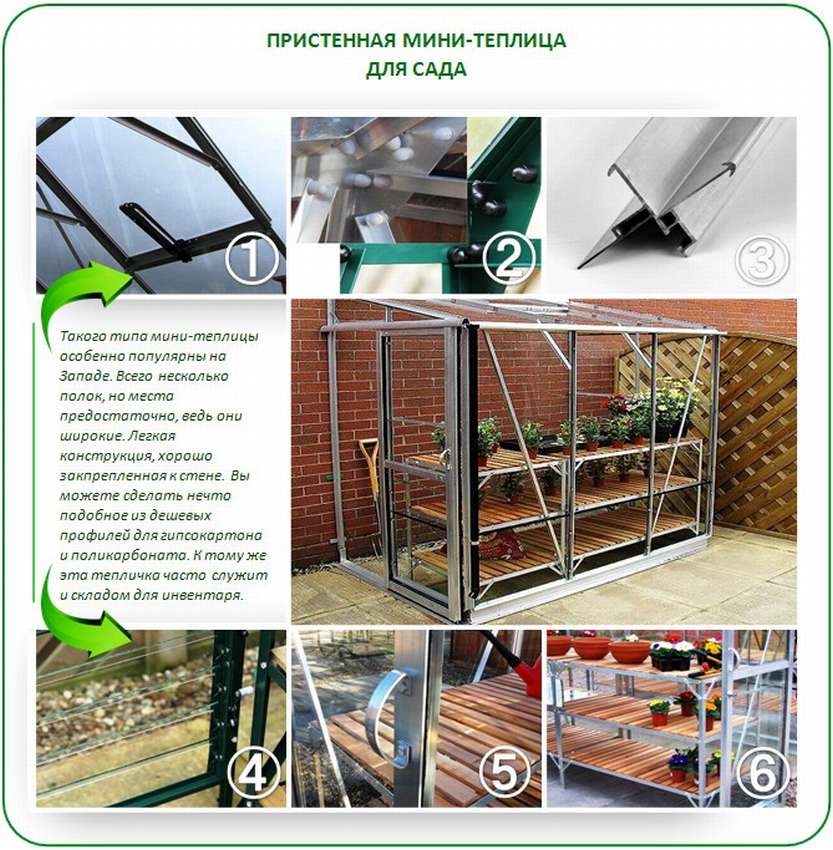
Greenhouse by the wall
Here is an example of how to build a small 4 meter greenhouse against the wall your house.
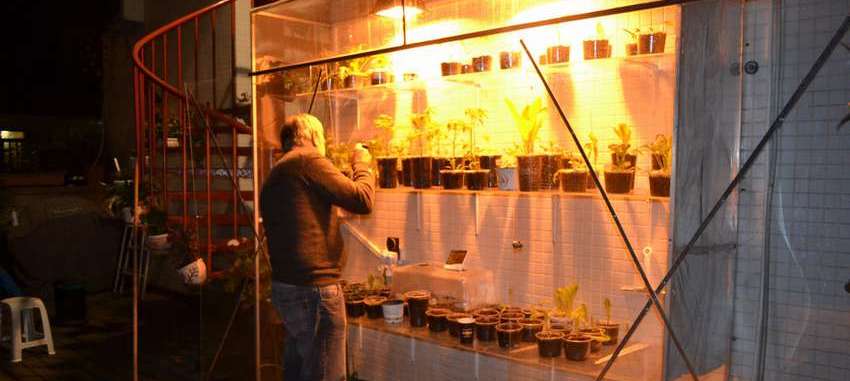 The construction took about two weeks of work on the weekend, but, as you can see, in the end it paid off. How to make a greenhouse with your own hands, as well as about all the necessary materials can be found on the website, link under the gallery.


https://i.expert-h.com/en/parniki-teplitsy/1122#sigFreeIdd6f1692195
Greenhouse pipe rack
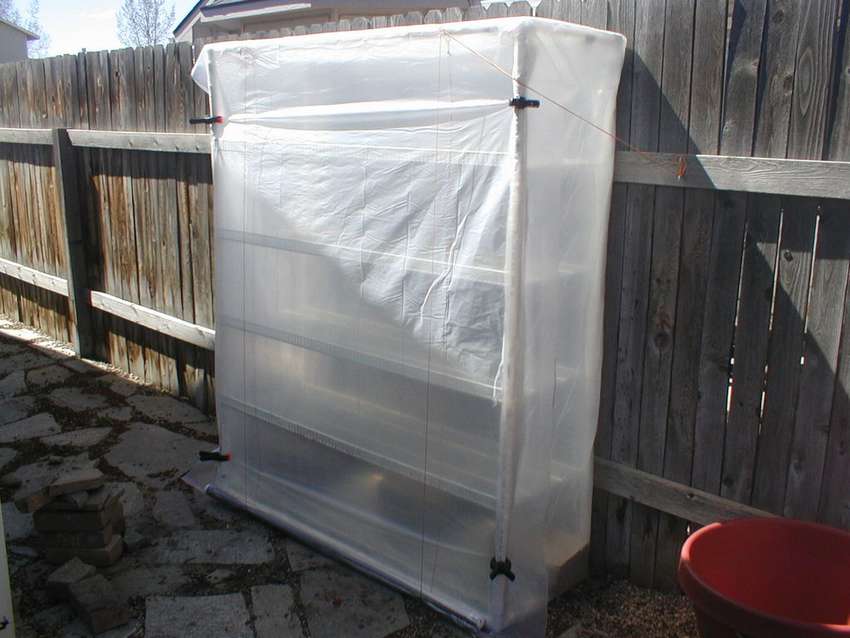 All you need from tools to make a greenhouse - This is a hacksaw, tape measure and razor blade. Thus, you cut the PVC pipe into 5 sections of 150 cm. Then take 2 sections and cut into 4 pieces of 6 cm. After that, take the corner joints and twist. You now have two boxes, that is upper and lower parts. Twist the joints from 1/2 "to 3/4" into the corner positions.
Make racks. The remaining sections of 150 cm are placed in the corner parts of both the upper and lower sections. In essence, build a large cube. Wrap it in plastic wrap and seal the edges with duct tape. Find a piece of pipe, plugs and fill them with sand to hold the front valve down. For shelves you can use several metal sheets, as is done in this case. The clamps hold the shutter in place and protect it from the wind.


https://i.expert-h.com/en/parniki-teplitsy/1122#sigFreeIde10d6e0f25
Home mini greenhouse
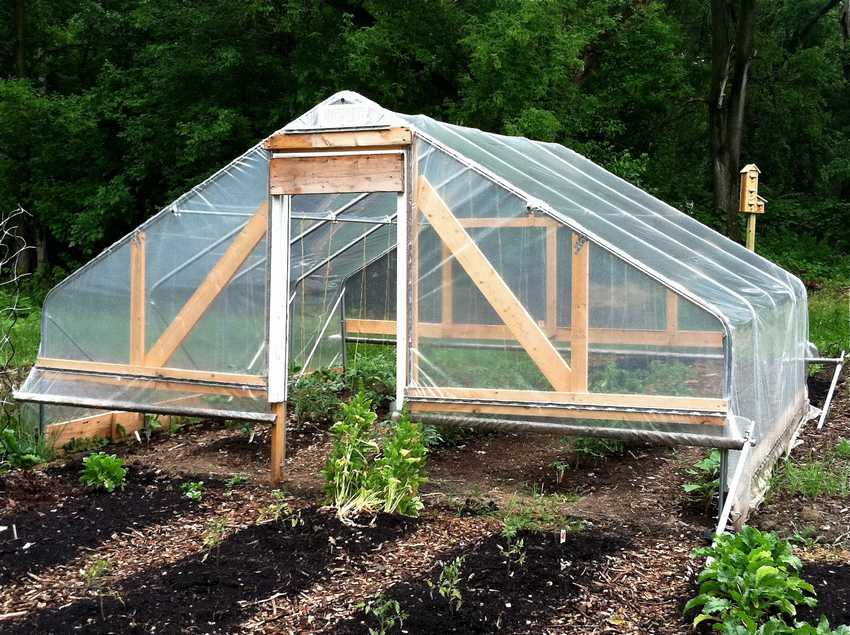
 A greenhouse is a structure with a roof and walls made of glass or plastic. Mainly used for growing vegetables, fruits, plants and flowers, which protect crops from too high temperature or cold. Greenhouses create protected environment for plantsusing solar radiation to retain heat. This heating and air circulation system helps to createIn an enclosed space, an artificial environment that can support plants if the outdoor temperature is too low or variable. Heat enters the greenhouse through a coating of glass or plastic and begins to heat objects, soil and plants inside. Heated air near the soil begins to rise and is immediately replaced by cooler ambient air, which begins to heat up. This cycle raises the temperature inside the greenhouse faster than the outside air, creating a sheltered, warm microclimate. It's a theory to see how it works, do your home mini greenhouse. At least the one shown in these step-by-step photos.


https://i.expert-h.com/en/parniki-teplitsy/1122#sigFreeId94ac05f87a
Greenhouse for seeds
Shown here how to make a small greenhouse under the seeds for the first weeks of germination of seedlings.

 Make sure the design matches your goals. In this case, it is small decorative greenhouse for the first weeks of germination. This type of cardboard was chosen only because it was the cheapest option. Wrap all parts with paper. You can choose your paper design and stick more or less. Make a window out of plastic. Use more paper and patience to hide the joints! It's all! You have a small greenhouse for seeds!


https://i.expert-h.com/en/parniki-teplitsy/1122#sigFreeId51dc512e03
Mini greenhouse drawing
 If you want to know how to build a small greenhouse for several plants, this project is what you are looking for. Follow the instructions that you can read on the site, you will find the link under the gallery with step-by-step photos, which are schematically shown, how to make a greenhouse with your own hands.
Also see the diagram where the details are indicated by letters and the sizes of sawing below.
Materials
 A - 2 bars 1 × 1 12 inches (30.5 cm) long, 1 pc. 10 1/2 "(27 cm) long
B - 4 bars 1 × 1 length 10 1/2 "(27 cm)
C - 4 bars 1 × 1 8 "(20 cm) long for rafters
D - 1 block 1 × 1 length 10 1/2 ″ (27 cm)


https://i.expert-h.com/en/parniki-teplitsy/1122#sigFreeId177745fb89
 Look another one an example with drawings, how to build a mini-greenhouse with your own hands. This larger design, made in the form of whatnot, and designed for several pots. In a small gallery you will find drawings of a mini greenhouse with dimensions and a diagram with the designation of design details.
Dimensions in Drawings in Incheshow much is in centimeters, see below.
materials
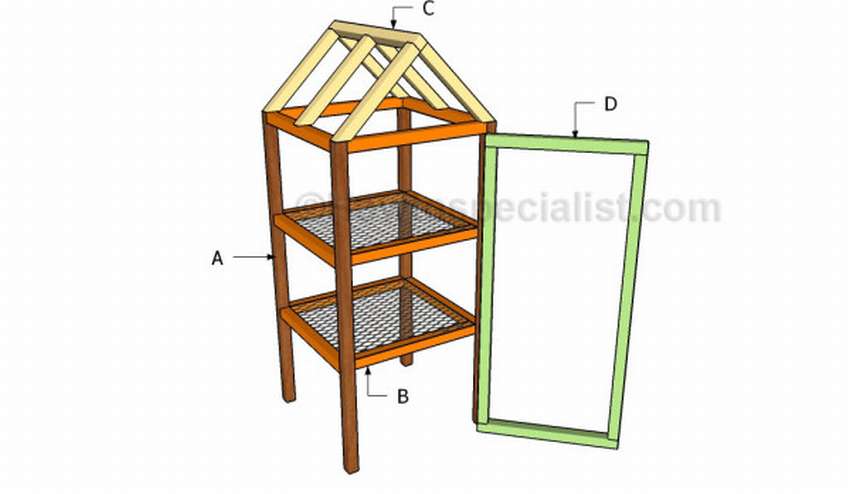 A - 4 bars 2 × 2 48 ″ (122 cm) long
B - 12 pcs. slats 1 × 1 21 ″ (53 cm) long
C - 6 bars 2 × 2 length 15 3/4 ″ (40 cm), 1 pc. - 24 ″ (61 cm) long
D - 2 bars 2 × 2 21 3/4 ″ long (55 cm), 2 pieces 43 1/2 ″ long (111 cm)


https://i.expert-h.com/en/parniki-teplitsy/1122#sigFreeId54e5f431e2
How to make a home mini-greenhouse in a couple of hours
 Continuation
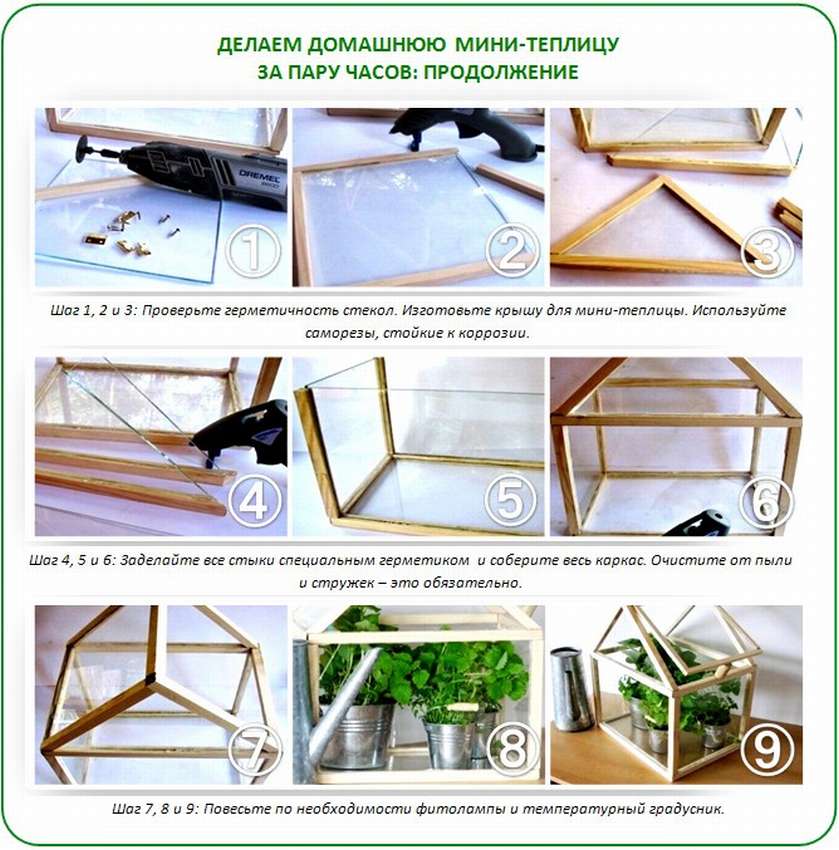
Drawings and sketches of mini-greenhouses


https://i.expert-h.com/en/parniki-teplitsy/1122#sigFreeId4fa7de5a2c
Tepitaph on the window
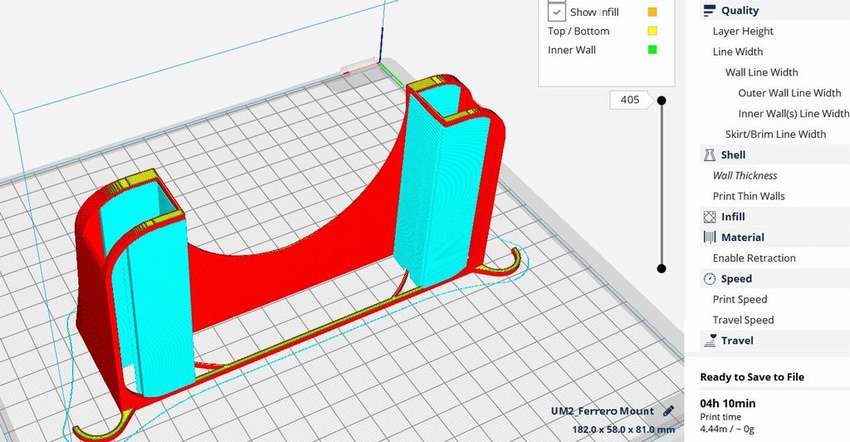
 If you want to grow plants at home, but you do not have a window sill, then here is a great solution to this problem. Shown here how to make a mini greenhouse, which can be fixed to the window with a few suction cups, candy boxes and a 3D printer. Once you find a 3D printer for printing window braces, the rest of the tools will be easy to assemble. You will need another drill and tweezers. The author printed the window bracket on Ultimaker 2, but you can use any printer you want.
You also need to prepare the container. Use the shallow portion of the container for landing and the tall portion as the lid.
- Drill holes in the upper part to circulate air and prevent fogging of the internal surfaces. You can put a plank so that the container does not crack.
 After drilling, it is important to clean the container to prevent mold and create a healthy growth environment.
- Put cotton in a shallow part of the container and moisten in tap water. After that, you can add some more cotton wool if you think this is necessary. Just remember that more cotton wool means more water and a heavier greenhouse.
- Moisten the two suction cups and fasten to the window until the bracket hangs at the same level.
- Once you are sure that the suction cups are strong enough, install a seed container.


https://i.expert-h.com/en/parniki-teplitsy/1122#sigFreeIdf8c8de4b91
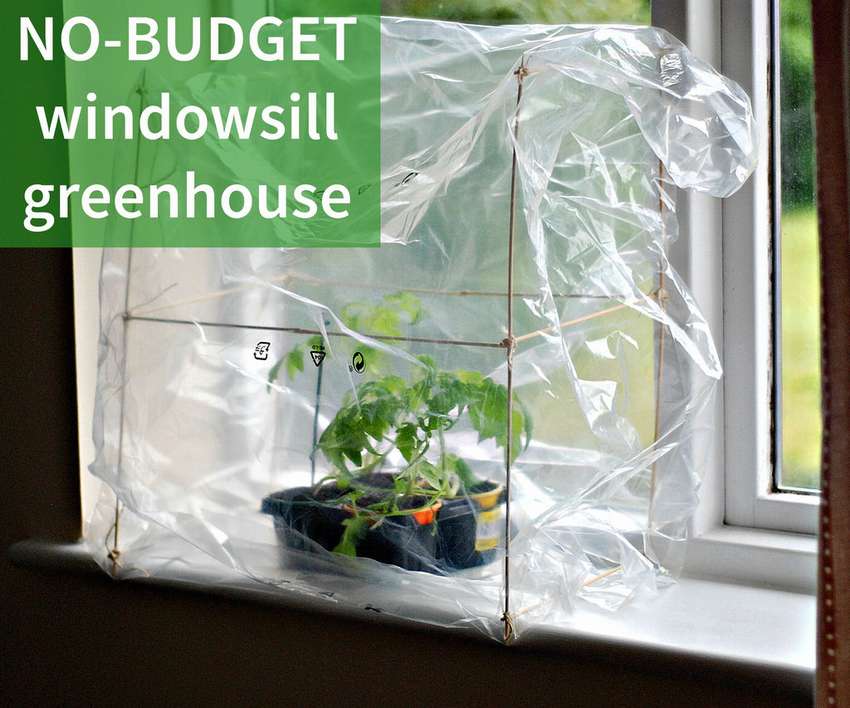
Mini greenhouse greenhouse
 This mini greenhouse guysto in food plastic boxes. You will need 4 pieces of wooden sticks, tape and polyethylene. Work will take a maximum of 10-15 minutes. Just make two U-shaped frames from one stick (or more if necessary), which will be on each of the short sides. The lower part of the U structure should be roughly the width of your drawer, and the legs have the height of the greenhouse + a few centimetersmeters. Cut the two sticks a little shorter than the box and attach to the film to make right angles. Leave a few centimeters at the bottom of the leg. Cut the polyethylene in the direction of the joint between the U-handle and the long handle. That's all you did small greenhouse greenhouse, cheap and easily adaptable to various purposes.


https://i.expert-h.com/en/parniki-teplitsy/1122#sigFreeId5659d8a3db
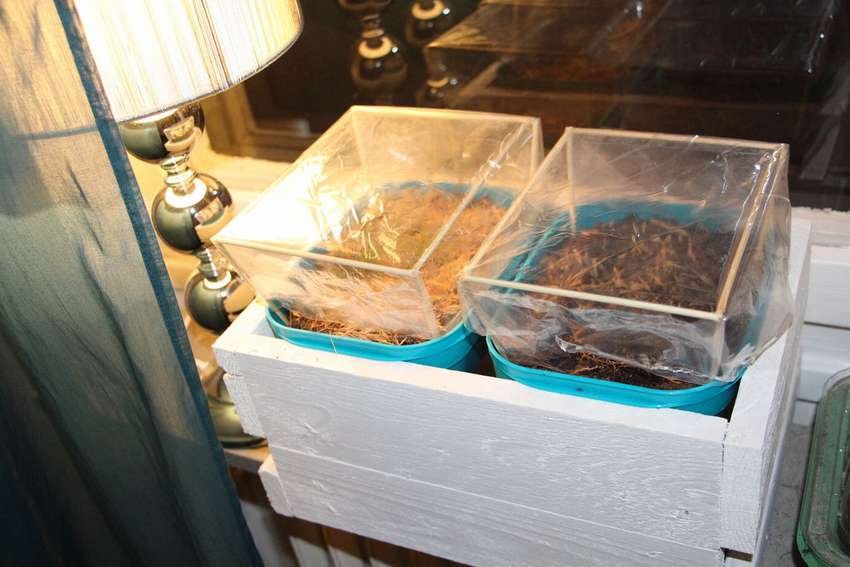
Mini-greenhouse on the windowsill
 Greenhouse on the windowsill - A great way to care for plants or sprouting seedlings. The simple design allows you to increase humidity and temperature inside and mitigate temperature changes. From the instructions that you can read on the website of the author of this project, you will find out how easy it is to make convenient mini-greenhouse on the windowsill do it yourselfand using only improvised materials. The greenhouse has a sufficient supply of height, in addition, the design is quite simple, so depending on the amount of space that you have, you can easy to change design according to your needs. If everything is not clear on step-by-step photos, detailed instructions can be read on the website, links below.


https://i.expert-h.com/en/parniki-teplitsy/1122#sigFreeId318674e2c5
Mini greenhouse for tomatoes
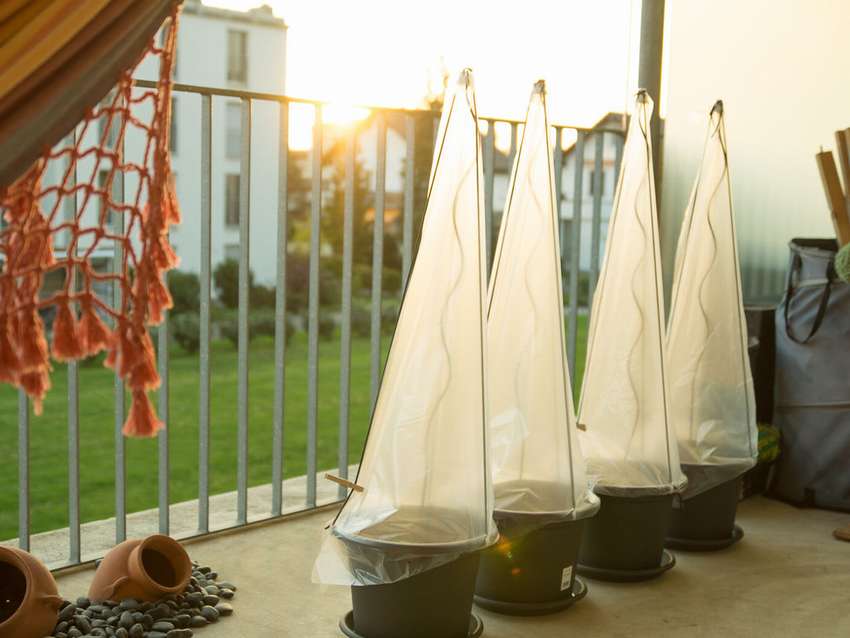 See an example how to make a mini greenhouse on the balcony for growing tomatoes. The design is very simple - a flower pot for soil, a support and a plastic film. This is the most common view of a greenhouse for tomato seedlings. There are many ways to assemble a design, here the author offers his own version.
We will not describe the whole process, all this is well shown in step-by-step photos. There is, however, some know-how, but you can read about this in the instructions on the site.


https://i.expert-h.com/en/parniki-teplitsy/1122#sigFreeId5f51365b10
Mini greenhouse in a cardboard box
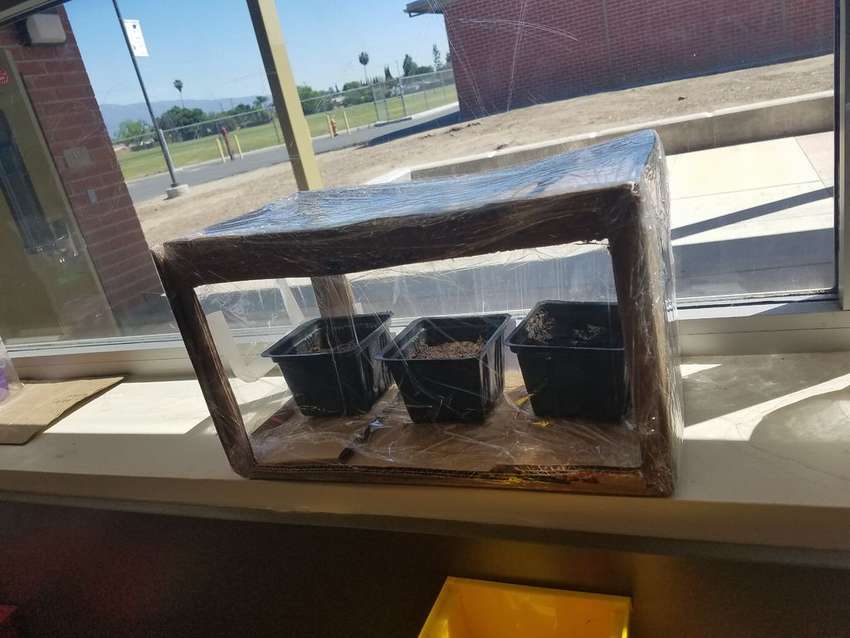 You need to cut the box, that is, simply remove the side walls, leaving large windows. Make a mini greenhouse in a cardboard box very simple.
- Take a few sticks and glue them together.
- Then put a long stick on top of the box, so that it does not bendwhen you pull the plastic wrap.
- Wrap the film around the cut box.
- Wind the tape so that the film fits properly on the box
- The final step is to make a small door so you can plant plants and water.


https://i.expert-h.com/en/parniki-teplitsy/1122#sigFreeId0ff5aef1e4
Greenhouse for cardboard seedlings
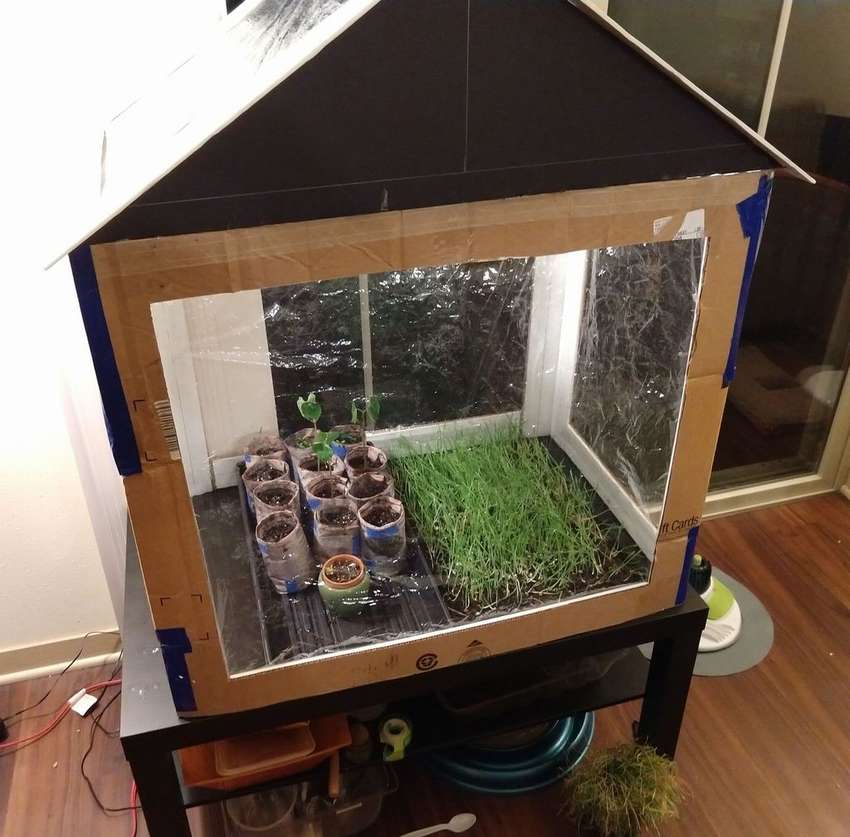 There is no suitable material to make a home greenhouse for seedlings? Make a greenhouse for seedlings from a cardboard box - simple, cheap and effective. You will also need scotch tape, a hot glue gun, a paper knife, scissors, a pencil and a ruler. A clear plastic film and some polystyrene are also useful. If the box is not in the best condition, reinforce all corners and the frame by simply pulling the corners together with threads as shown in the photo. The roof for the greenhouse also does not hurt, especially if you have animals at home. Making a roof is pretty simple, glue the foam and join it into a triangular shape, then just cut two triangles to fit the height and length of the greenhouse. At the end, pull the plastic film, glue it to the windows from the inside. If you want, you can carry out lighting and install a lamp for heating.


https://i.expert-h.com/en/parniki-teplitsy/1122#sigFreeIdc1cd2957fe
Germination container
See how to make it simple DIY seed container.
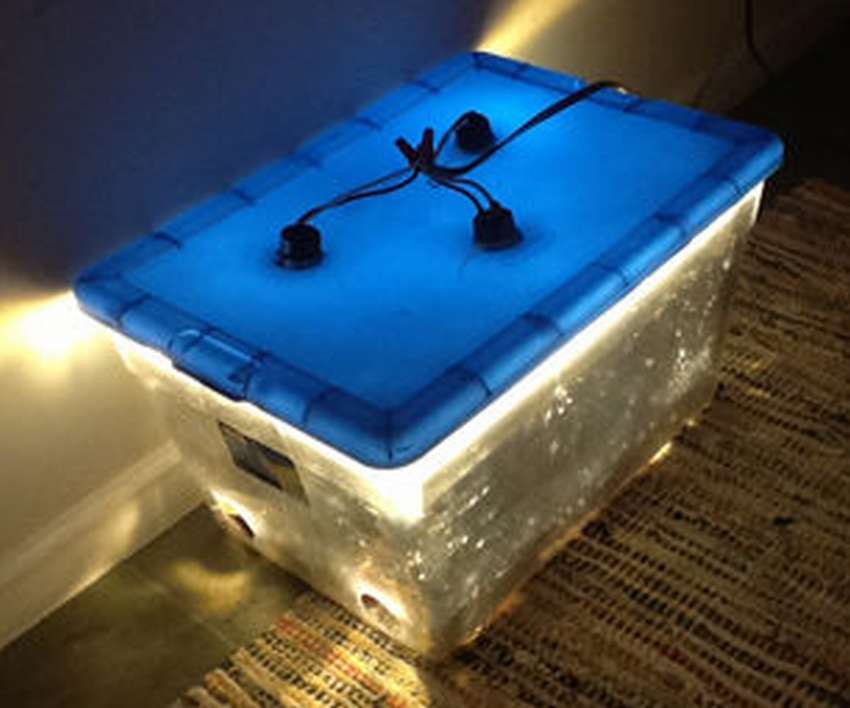
 The design is very simple, it is a plastic box, with lamps for heating and ventilation. How to do this, you can read on the site.


https://i.expert-h.com/en/parniki-teplitsy/1122#sigFreeIdc0216716f0
DIY greenhouse
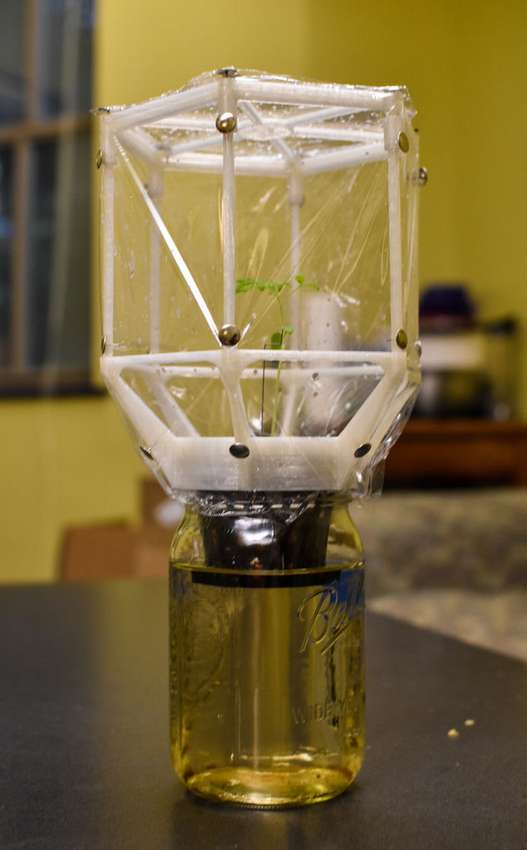 If you are fond of passive hydroponics, make yourself this DIY greenhouse. This is a modular system that is screwed onto a wide-necked jar, allowing the plant to grow vertically freely.
For this project you will need:
- 3D printer
- Blueprints
- Plastic box
- Wide neck jar
- Mesh cup
How to make a base using a 3D printer, you better read on the site, this is an interesting but long story. Now how to add a cover to the frame. Take a large piece of plastic film and a few drawing buttons. Wrap the outer part of the frame with film, using the buttons to hold the film in place. Then with scissors cut off excess polyethylene. When turning the top of the frame, be sure to make several holes so that there is enough air. If the buttons are too weak, add some super glue. In addition, be sure to cut off the parts of the buttons that stick out of the frame so as not to get hurt.
Now that the frame is assembled, it remains only to plant a plant! Separate the frame from the can and place the plant of your choice. This frame is designed both for hydroponics and for traditional planting in the soilso choose what you like best. As you grow, add extra vertical rings and legs so that plants can grow freely!


https://i.expert-h.com/en/parniki-teplitsy/1122#sigFreeIdab8f8a6d37
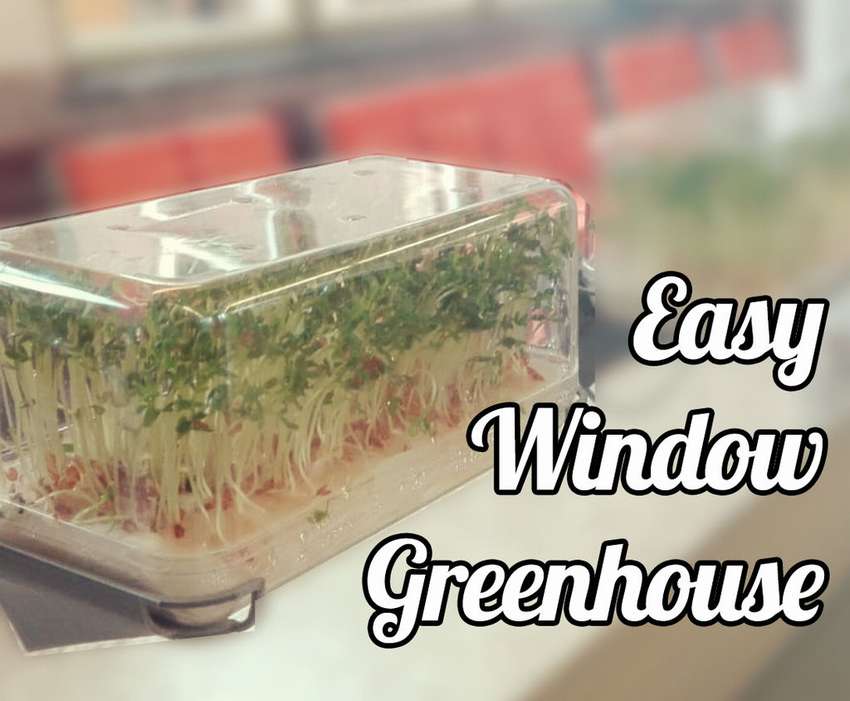
How to make a mini-greenhouse in 2 minutes
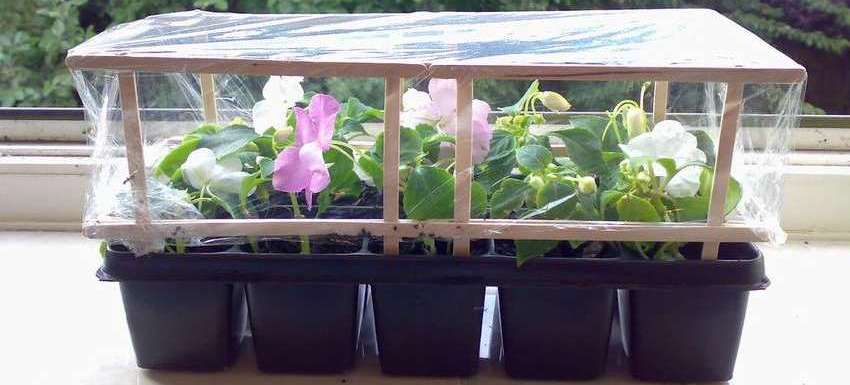
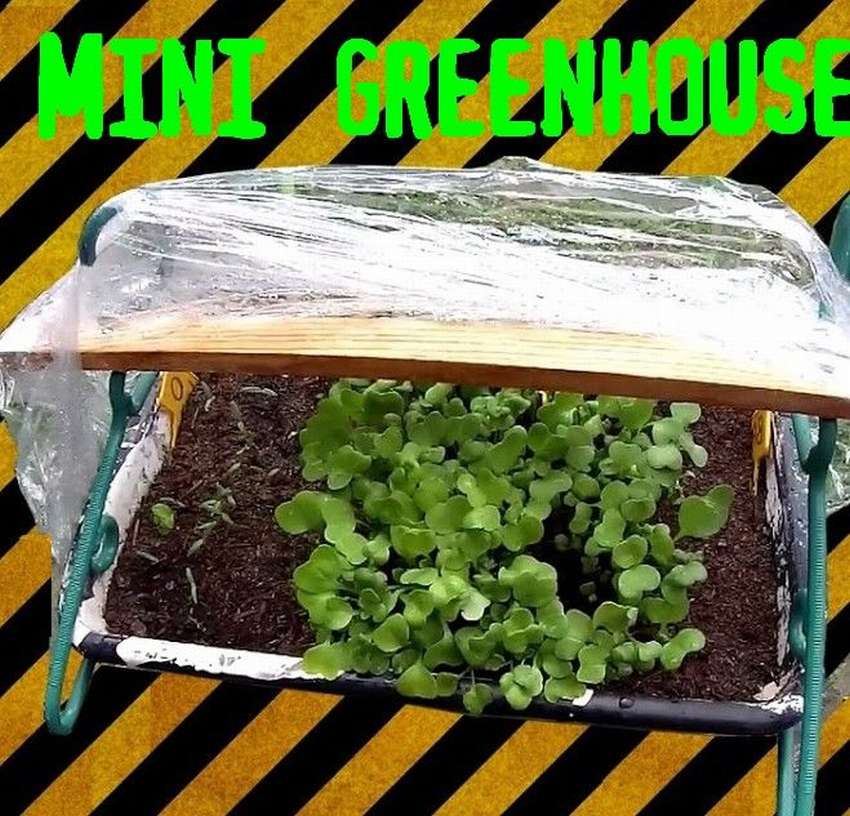 Shown here how to make a mini greenhouse in less than 2 minutes and without tools for seed germination. You probably already have everything you need to create this mini-greenhouse. The principle of the greenhouse It is to promote the development of crop plants, protecting them from the weather and controlling temperature and humidity. You will need a plastic container, 2 plastic hangers, a bar and a stretch film. Fasten the hangers on the short sides of the plastic container. Install a wooden plank from above. Sprinkle earth, plant seeds and water. Wrap the structure with plastic wrap. One layer is enough, maximum two, so that light and heat pass. After that, you will not need to open the greenhouse again. Now it remains only to wait until the seeds sprout.


https://i.expert-h.com/en/parniki-teplitsy/1122#sigFreeId2a640da569
Mini greenhouse for a balcony
Here is another example of how to make a very simple mini greenhouse from a plastic container of milk.
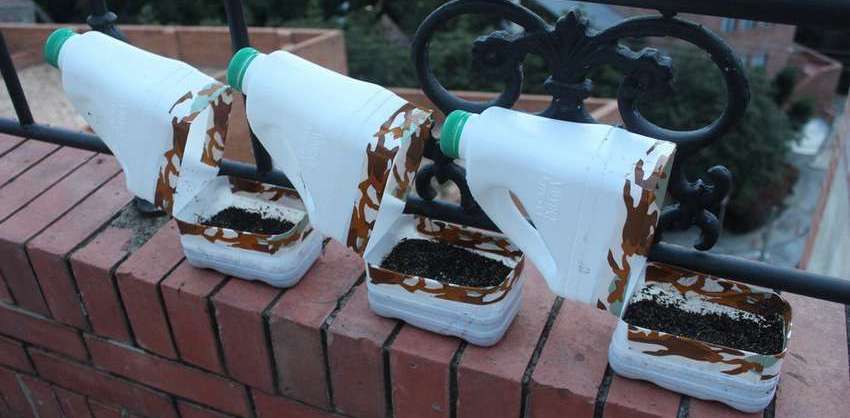 Cut the milk jug 3/4, leaving the handle on the uncut side so that the mini-greenhouse can be easily moved. You can edge the tape or camouflage masking tape, it doesn’t matter. Then, using a small nail, do drainage holes in the lower part of the tank and the same holes in the upper part for ventilation. Now just fill the soil, plant the seeds, close and leave in a sunny place. Lids from the tank can be removed so that rain watered the soil, or can be left if there is heavy rain in your area.


https://i.expert-h.com/en/parniki-teplitsy/1122#sigFreeId9dcd3476e5
How to make a mini greenhouse out of a plastic bottle
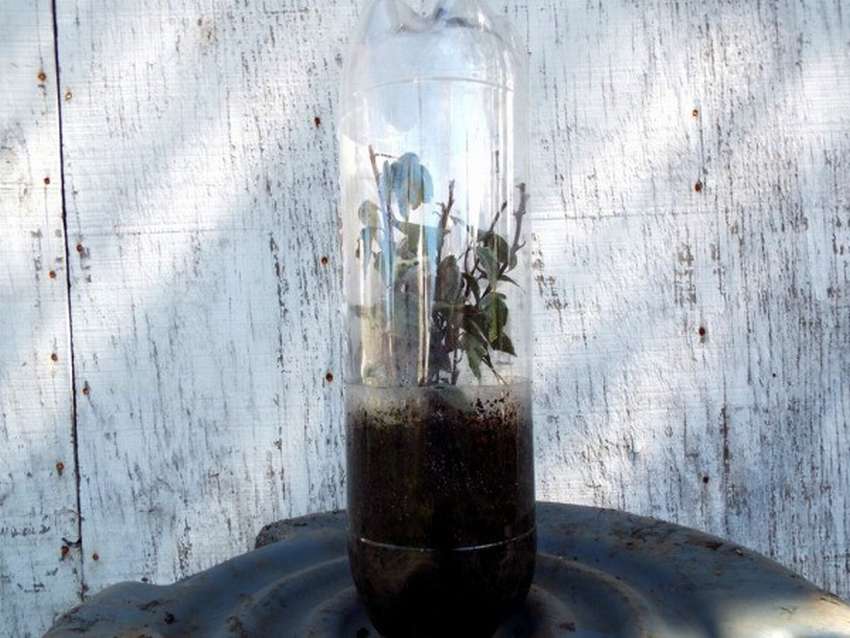 Transparent plastic beverage bottles can be reoriented to create a controlled environment for seedlings and root cuttings. Shown here how to make a mini-greenhouse from a plastic bottle with your own hands. You can use a 2 liter bottle, just the right size for seedlings. Making a mini-greenhouse is very easy, it’s shown in step by step photos. Remember to make a drain hole in each leg of both bottles, and then check the correspondence of two bottles. The upper half of the mini-greenhouse with a slight bend at the opening should fit approximately a centimeter into the lower half.


https://i.expert-h.com/en/parniki-teplitsy/1122#sigFreeId2cdf729ee2
Mini greenhouse made of plastic bottles
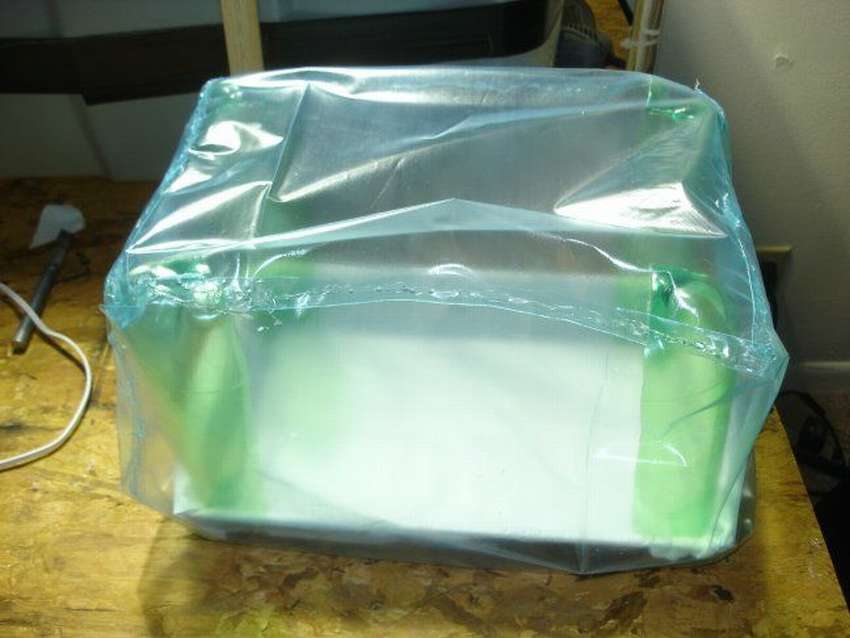 Here is an example how to make a mini greenhouse for the house from improvised materials. Find an old baking sheet or something like that. Cover with plastic wrap and glue. If you have epoxy at hand, then this is a good option. Make racks for the parties. Cut off the top of the bottle, then the rest along the length so that they can be use as supports. Then attach them to the tray. Prepare a film coating as shown in the photo. The idea is to make an airtight seam that will retain moisture. Well that's all, fix the film and the mini greenhouse is ready.


https://i.expert-h.com/en/parniki-teplitsy/1122#sigFreeId37c27fcfe2
Meiko Tenkawa
Greenhouse for seedlings from a plastic bottle
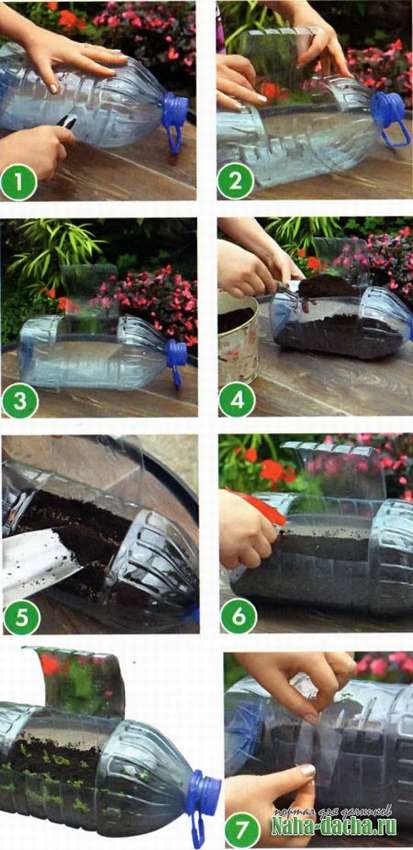
 It is very simple. greenhouse for seedlings from plastic bottleswhich you can easily do in half an hour.The idea is to make a case for a greenhouse out of a large plastic bottle, and place a few small bottles with seedlings. All this can be done completely free, you need a few plastic bottles and scissors, or a blade.
The process of making a mini greenhouse, see below for step-by-step photos.


https://i.expert-h.com/en/parniki-teplitsy/1122#sigFreeId0a4c17abb0
Or this way, a mini greenhouse from a plastic bottle
Very small greenhouse
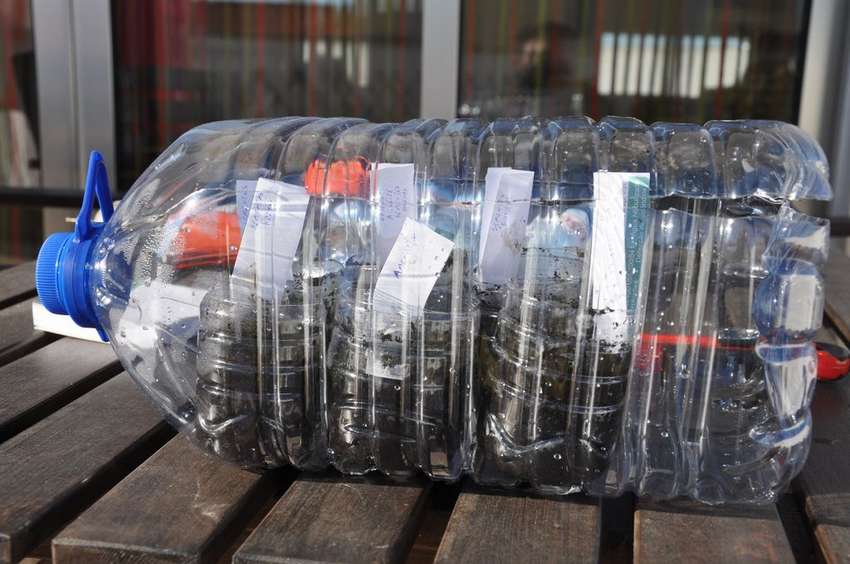
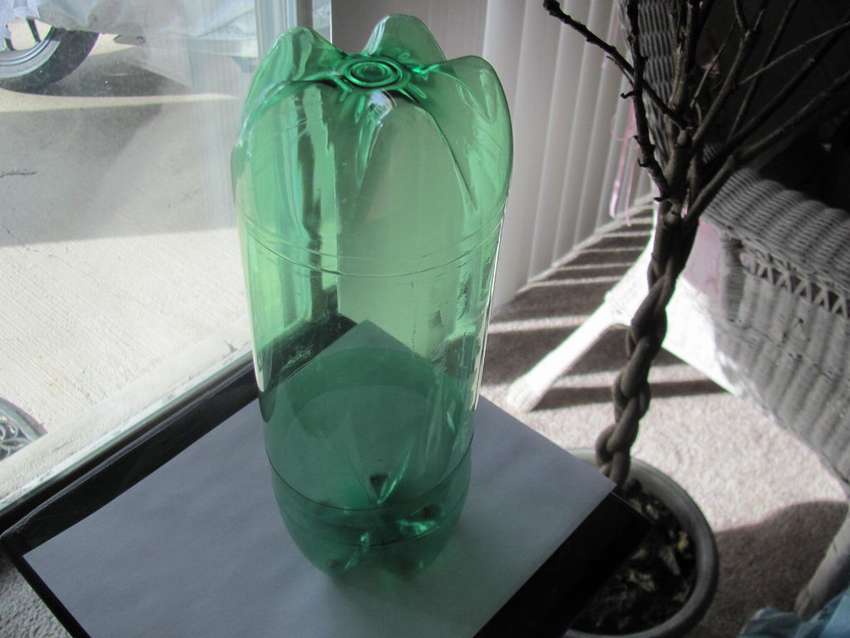
 When it is cold, plants grow very slowly. Therefore, if you want to grow something in a greenhouse in early February, there are two solutions: make a heating or use the greenhouse inside the greenhouse. Look at a very small manufacturing project small greenhouse from a plastic bottle 8 liters.
What you need is a plastic bottle and a good knife. Cut off the neck, then the top of the bottle. Cut the bottom, put some earth, water and plant the seeds: done. Due to its shape, when the weather is cold, the moisture condenses on the top and falls to the ground, so it uses very little water.


https://i.expert-h.com/en/parniki-teplitsy/1122#sigFreeId5dc20cc11f
Greenhouse for cuttings from a plastic bottle
 Do very simple mini greenhouse from a two liter plastic bottle for cuttings of roses. It is very simple. The instruction, if you need it, can be read on the website. When the mini greenhouse is ready, dip the stem into the root hormone and shake off the excess. Place the cuttings in the potted soil at the bottom of the mini greenhouse, making sure that so that the leaves do not touch the inside of the plastic bottle. Dig a hole in the garden at the end of October or November and plant the pot inside, laying the soil on the sides of the pot. Dig a greenhouse in the spring and cut the walls of the pot to the holes with scissorsto extract a young plant. The roots of the rose are very delicate and will not tolerate strong shocks, so try to carefully remove them from the pot.


https://i.expert-h.com/en/parniki-teplitsy/1122#sigFreeIdda65d3a4d1
Mini greenhouses from plastic bottles 50 photos


https://i.expert-h.com/en/parniki-teplitsy/1122#sigFreeId52be91c215
How to grow cucumbers at home
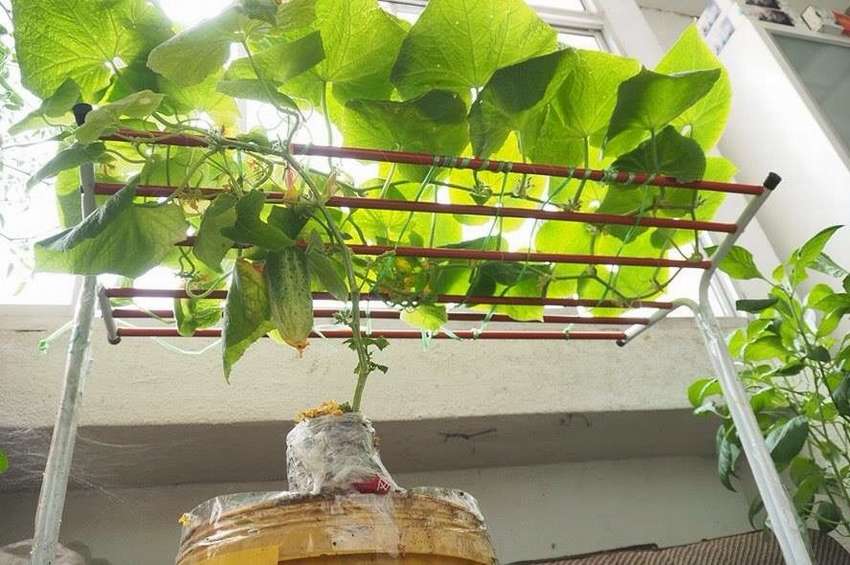 Love cucumbers, but don't have your own garden? Then read how to grow cucumbers at home directly on the windowsill. Any old bucket of 20 liters is suitable for soil, and a towel hanger can be used for a rack. Since cucumbers constantly need water, make a big plastic bottle something like automatic watering.
If it is not clear how to do this using step-by-step photos, read the instructions on the site, everything is quite simple.


https://i.expert-h.com/en/parniki-teplitsy/1122#sigFreeId146517e7d3
Mini greenhouses and greenhouses 100 photos


https://i.expert-h.com/en/parniki-teplitsy/1122#sigFreeIdfbf9ffa732
50+ greenhouse pics
Below you can view the gallery of greenhouses with an opening lid, which you can do yourself. We collected photos from all over the Internet, below we indicated the sources from which we could determine the authorship.
-

-
-
-
-
-
-
-
-
-
-
-
-
-
-
-
-
-
-
-
-
-
-
-
-
-
-
-
-
-
-
-
-
-
-
-
-
-
-
-
-
-
-
-
-
-
-
-
-
-
-
-
-
-
View the embedded image gallery online at:
https://i.expert-h.com/en/parniki-teplitsy/1122#sigFreeIdc5beefab98
https://i.expert-h.com/en/parniki-teplitsy/1122#sigFreeIdc5beefab98
Mounting Methods
How to fix the opening greenhouse cover
|
Here is one reliable way.
|
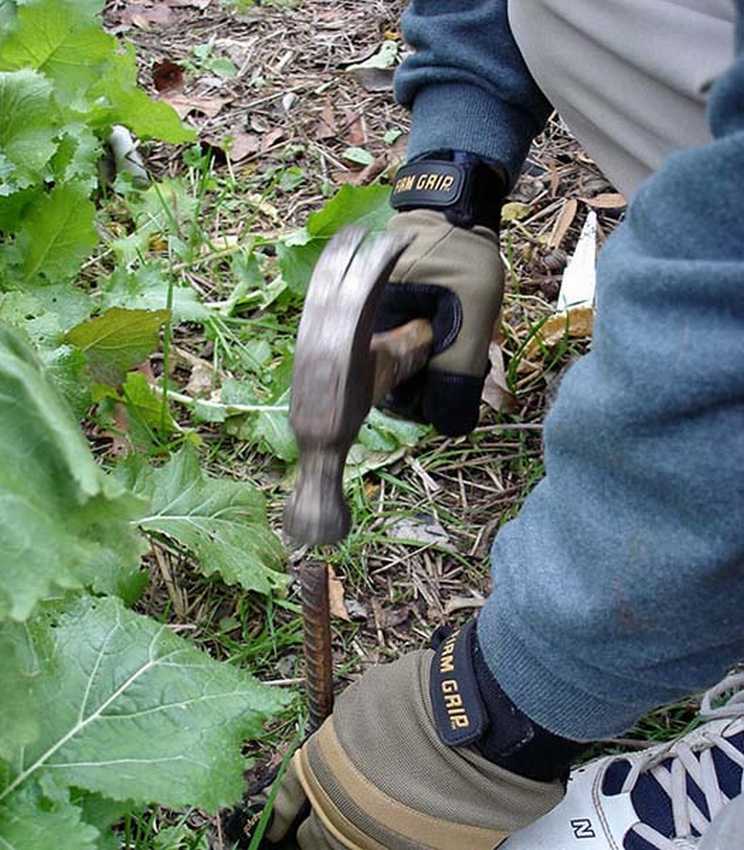
How to fix arches or PVC pipes of a greenhouse under a film
|
Clamps |
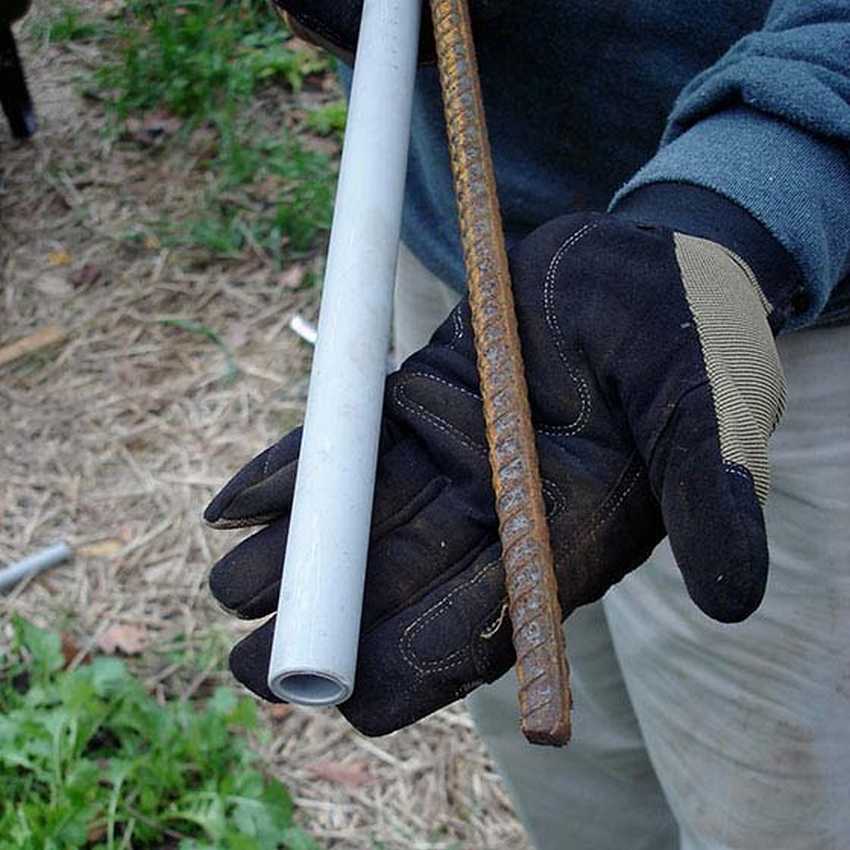
Insert into the ground The method consists in the fact that we are installing PVC pipes on fittings driven into the ground. Instead of reinforcement, wooden rods can come off (enough for a season) Click on the photo to enlarge
|
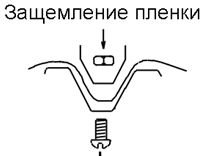
How to fix a film in a greenhouse
|
Hose lengths
|
 |

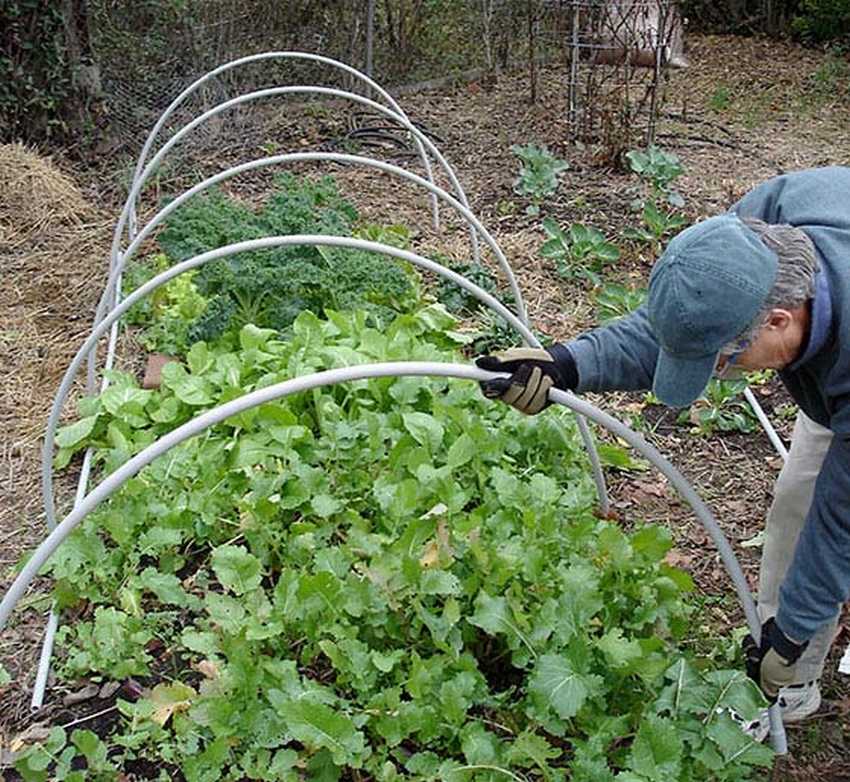
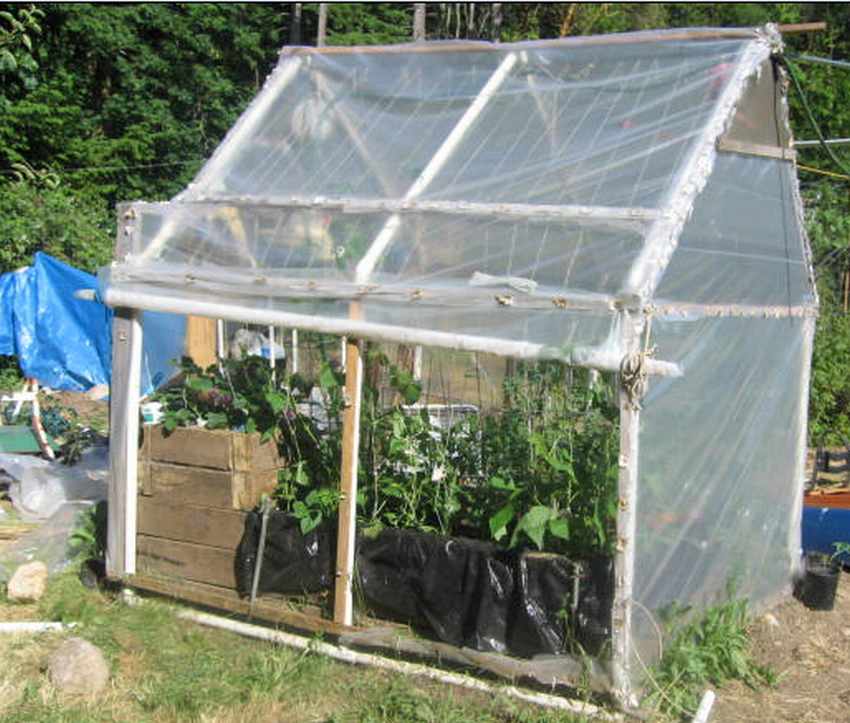
The easiest PVC pipe greenhouse

Very simple greenhouse design. Easy to assemble, and just as easy to disassemble. It can be moved, increased, reduced.
It is cheap and easy to manufacture..
ADVISE this greenhouse
Step by step photos. Click on them

https://i.expert-h.com/en/parniki-teplitsy/1122#sigFreeIdfca49e1727
How to make a greenhouse from willow or cedar branches.
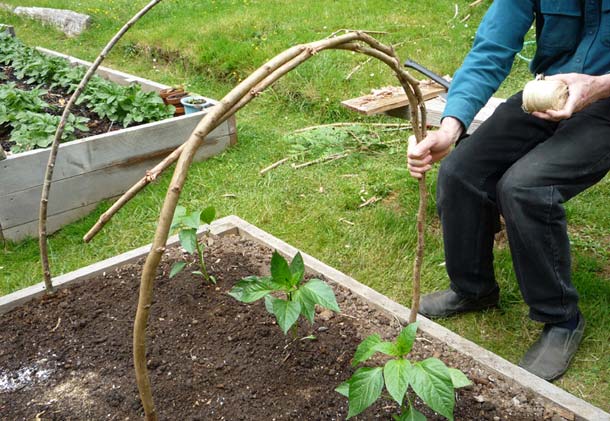
Such a greenhouse is suitable for those who did not expect sudden frosts.
This mini greenhouse can be done in 45 minutesaccording to the author of the photo. 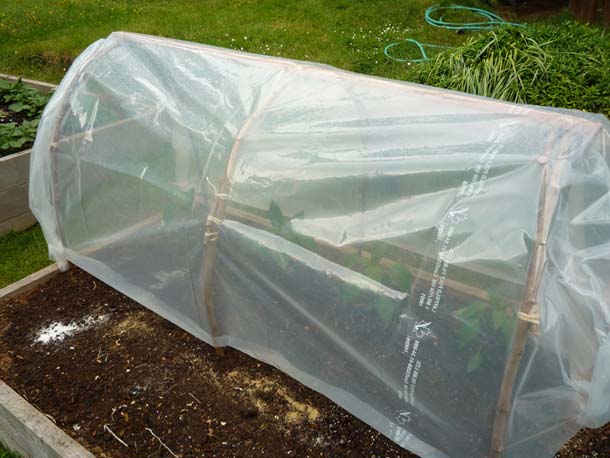
For the manufacture of arcs, not PVC pipes were used, but cedar branches, but I think that willow branches will come down in our conditions. The branches are interconnected by a nylon thread (not fundamentally what) to give an arcuate shape.When arcs from branches are stuck in the ground, a bar is attached over them, to give one damage, which is also attached to each arc.
In order to transfer such a greenhouse to another place, the author advises putting two long bars along the base of the arcs, then link each arc to these bars. As a result, we get something like a stretcher. Taking such stretchers from both ends, it is quite easy to pull our greenhouse out of the ground and move it to another place.
Below you can see step-by-step photos, to enlarge, just click on them.
-
-
-
-
-
-
-
-
View the embedded image gallery online at:
https://i.expert-h.com/en/parniki-teplitsy/1122#sigFreeIdfec62abad9


https://i.expert-h.com/en/parniki-teplitsy/1122#sigFreeIdfec62abad9
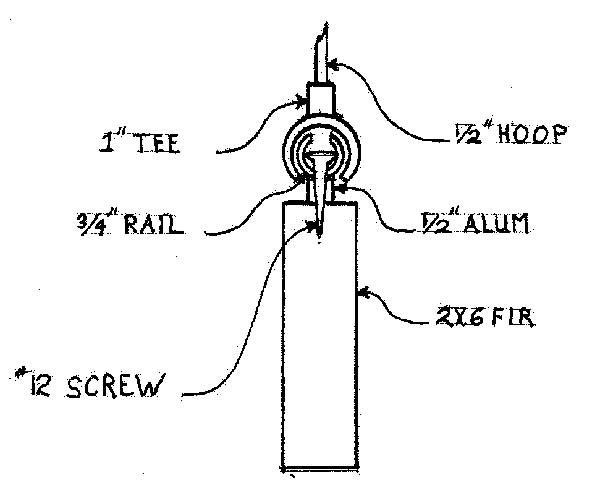
Telescopic greenhouse or greenhouse
And here is a very interesting variation of a telescopic greenhouse or greenhouse. I moved the arcs and nothing interferes, below you can see the mounting mechanism, click on it to enlarge.
DIY Convertible Hotbed
See step-by-step photos of making such a greenhouse. First we make a pallet for soil, then we make a frame on which we will fix the arcs, and which will recline. Then we fasten this frame to the pallet on the hinges and cover with a film.
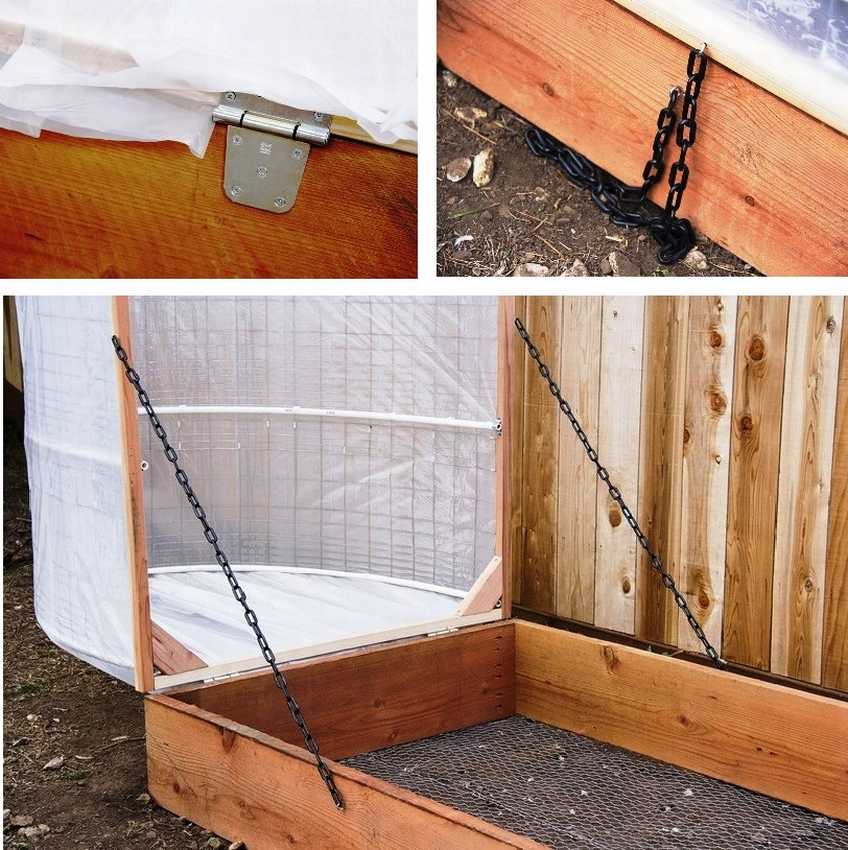
Step-by-step photo of the manufacture.
Click on the gallery to enlarge
-
-
-
-
-
-
-
View the embedded image gallery online at:
https://i.expert-h.com/en/parniki-teplitsy/1122#sigFreeId967c9b6600


https://i.expert-h.com/en/parniki-teplitsy/1122#sigFreeId967c9b6600
A greenhouse made of straw or hay.
As we see in the photo there is a greenhouse whose walls are made of briquettes (or bales) of straw (hay). A frame with an opening top is simply piled on the walls of straw. The film rolls onto a bar. These greenhouses are usually directed south. Such a design helps well when the slope of the soil in your area is directed to the north side, in such cases the sun weakly heats the earth. Such a greenhouse will help you out in this situation..
Greenhouse to collect water
(Roots Up Dew Collector Greenhouse System)
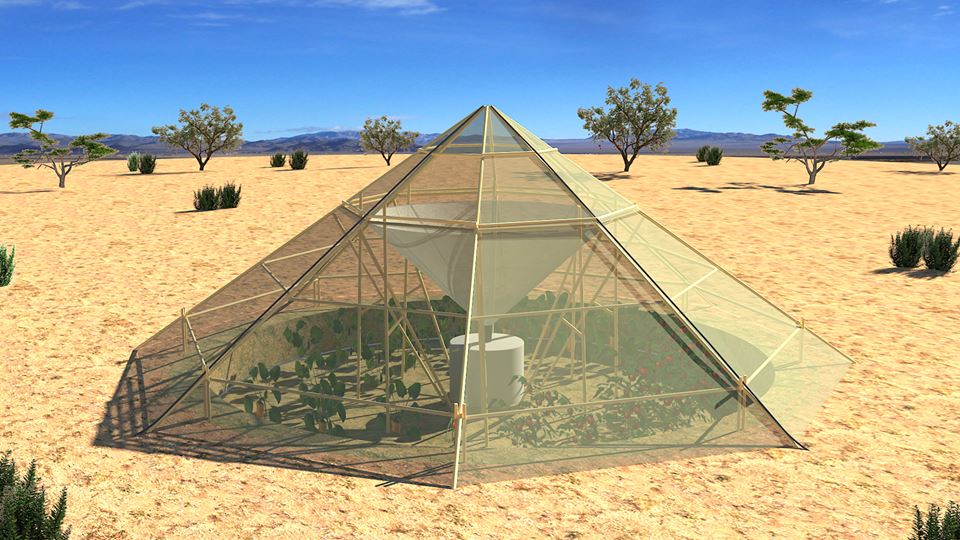 In a day, the greenhouse condenses to 80 liters of water !!!
Thanks to such greenhouses, Ethiopia will soon flood the world with food. The greenhouse was created for arid countries to solve the problem of drought.
In the afternoon, steam accumulates in the upper part of the greenhouse. When night falls, special valves are opened for intake of cold air, thanks to which water vapor is cooled and condensed, after which the liquid enters a special storage tank.
Excess water left after watering can be used for drinking.
-
-
-
-
-
-
-
View the embedded image gallery online at:
https://i.expert-h.com/en/parniki-teplitsy/1122#sigFreeId5e342fb7f8


https://i.expert-h.com/en/parniki-teplitsy/1122#sigFreeId5e342fb7f8
Portable greenhouse (greenhouse) from a barrel
Easy and simple to make (45 minutes)
This portable greenhouse is suitable for growing seedlings, or plants such as parsley, cilantro, etc.
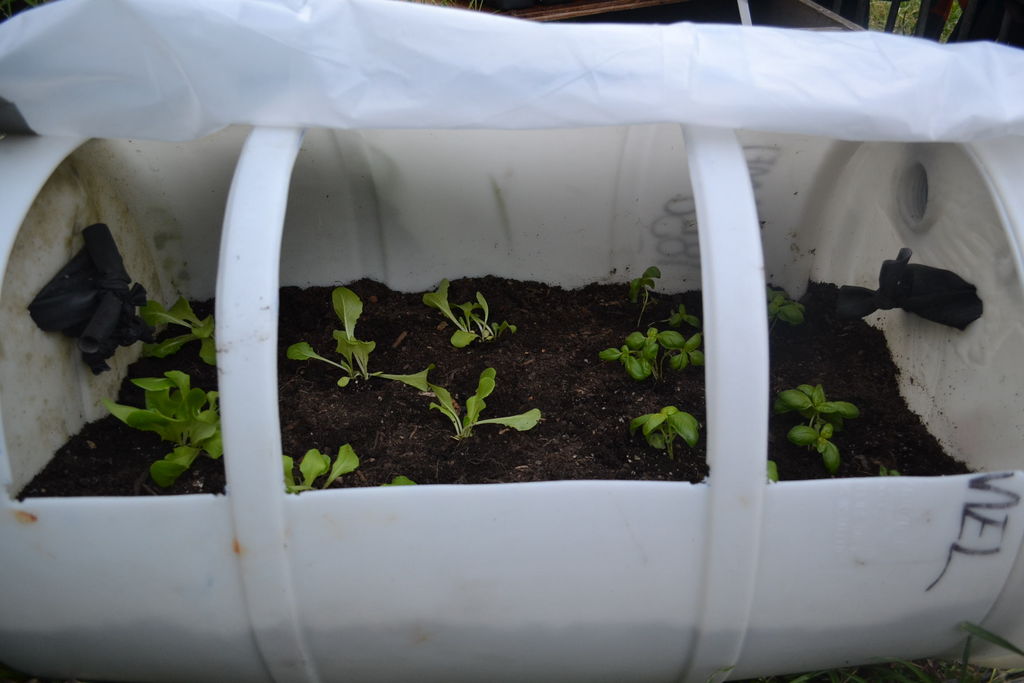
- 2 photos - cut square holes with a jigsaw in 1 quarter of the circumference of the barrel.
- 3 photos - a hole with a drill so that a jigsaw could be inserted.
- 4 photos - holes in the bottom to drain water from the drainage.
- 5-6 photos - attach the handles on the sides for transfer.
- 7-12 photos fasten the film.
- 14 photos - drainage.
The greenhouse can be painted green to blend in with the landscape of the cottage
-
-
-
-
-
-
-
-
-
-
-
-
-
-
-
-
View the embedded image gallery online at:
https://i.expert-h.com/en/parniki-teplitsy/1122#sigFreeId588bd29eff


https://i.expert-h.com/en/parniki-teplitsy/1122#sigFreeId588bd29eff
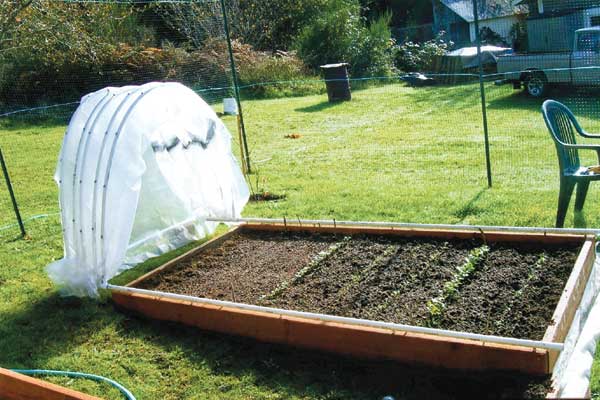
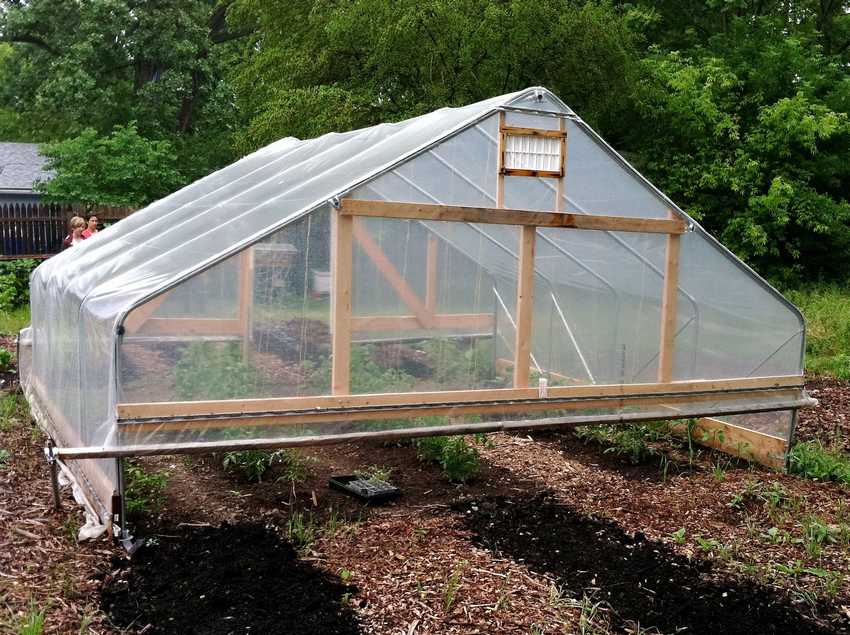
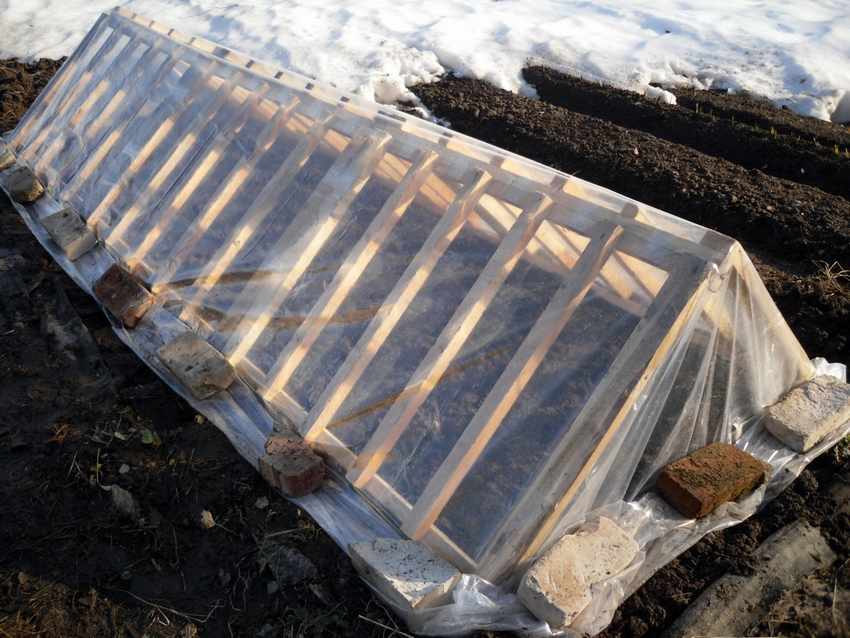
Portable film greenhouse
As you can see from the photo, the greenhouse has a lightweight version. It does not have a massive base; it is attached to the ground by reinforcement fixed on the base. It is transported as on a stretcher with the help of two long boards pinned to the base. A gardener will come in handy when it becomes necessary to close some weak plants at the time of cooling.
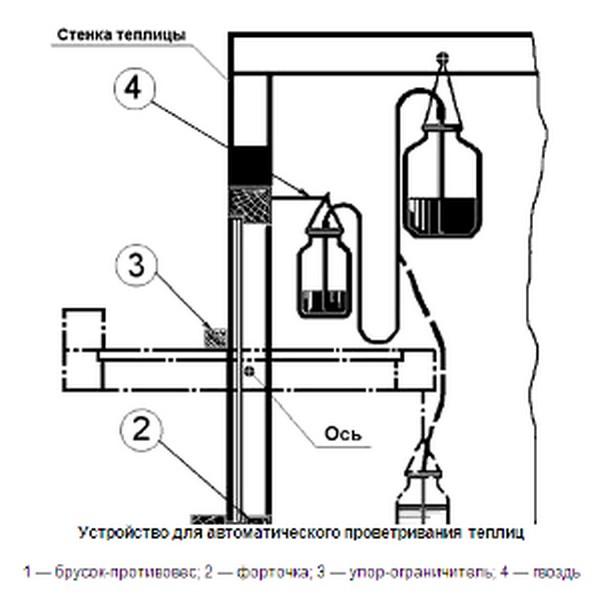
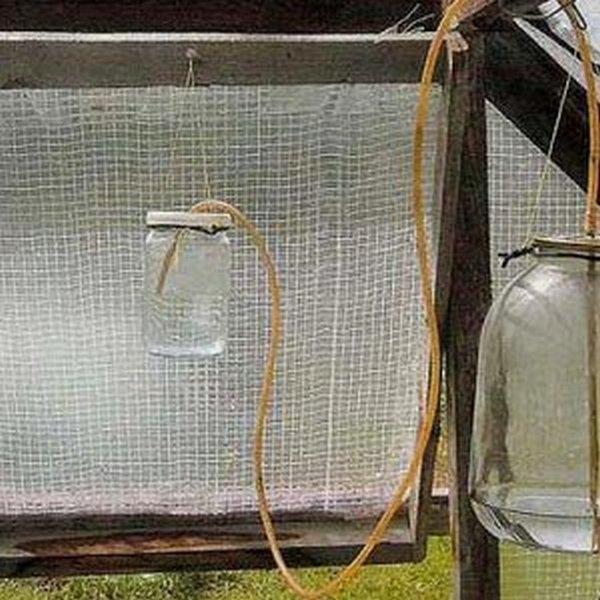
Greenhouse butterfly
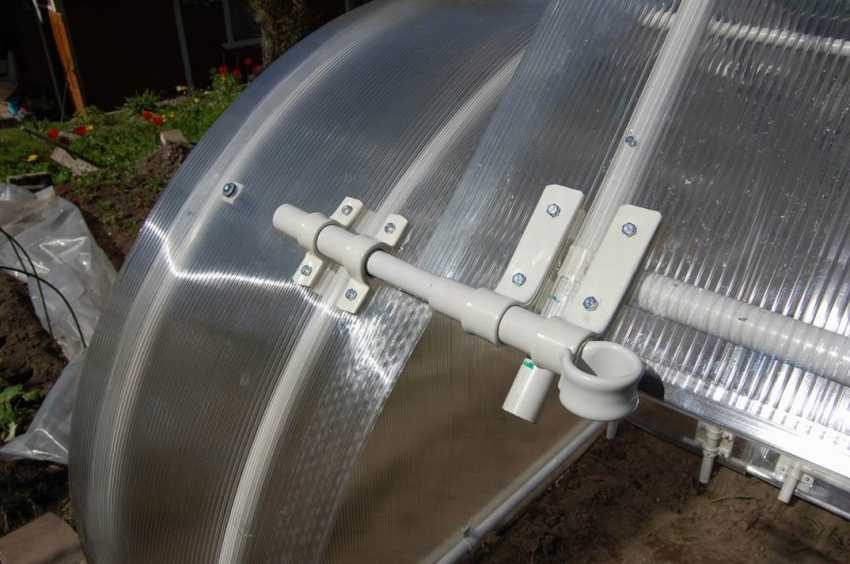
How to do automatic opening window leaves in a greenhouse?
Very interesting and simple design to automatically open the window, depending on weather conditions. The principle is as follows. A tube in the form of a communicating vessel passes between the large (3l) and small (0.5l) cans. A large jar is suspended from the base of the greenhouse, and a small one from the window. Moreover, the small one must be balanced with the window in such a way that, with a minimum amount of water in it, the window must be closed. In a hermetically sealed large jar with increasing temperature in the greenhouse. water due to atmospheric pressure moves into a small can, opening the window
A simple version of the greenhouse side opening.
As you can see, a very simple design of the film greenhouse. Such a greenhouse can be easily moved and put into a new place.
Dome greenhouse from scraps of pipes
it's ugly but it works
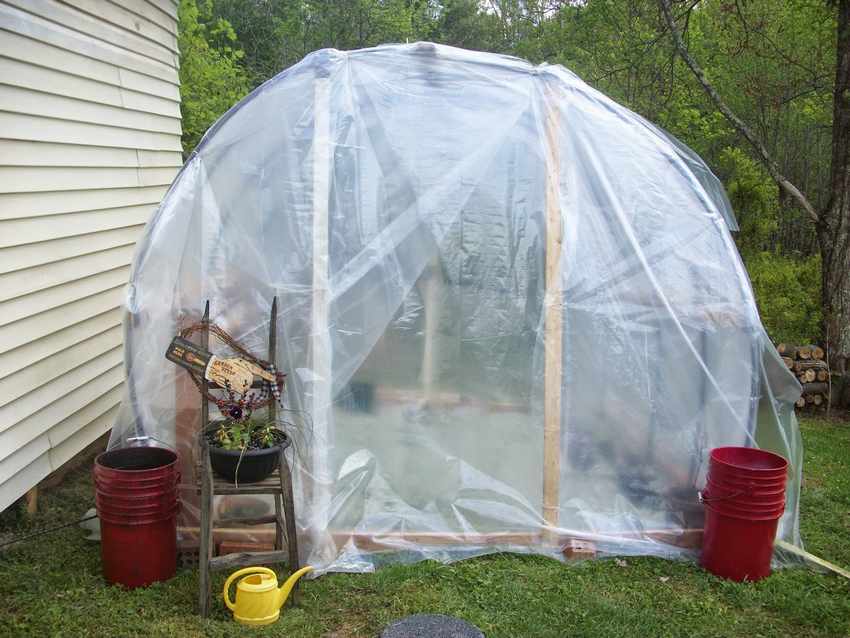 The authors of the blog booth555.com moved to a new home, and they had to independently sew themselves. As a result, they left a lot of pipe scraps, and they were used by an enterprising young family to create this greenhouse. The advantages of these pipes are that they are easy to bend and at the same time they are stable and easy to pin.
See step-by-step photos of creating a greenhouse.
-
-
-
-
-
-
-
-
-
View the embedded image gallery online at:
https://i.expert-h.com/en/parniki-teplitsy/1122#sigFreeId2d1e4b1eb3


https://i.expert-h.com/en/parniki-teplitsy/1122#sigFreeId2d1e4b1eb3
As I understood from the translation of the article from English, the pipes are attached to the wooden crossbars athelp tape. I didn’t really understand about the film, somehow the film scraps were fastened together, the cord was most likely threaded through the holes, and there is also a hint for 6 photos.
The film below is pressed to the ground by bricks, this makes it possible to pull the film up on hot days.
I could not translate the purpose of the star (in 4 photos), but suggested that it was attached to the dome to make the structure more stable.
Write your star assignment options in the comments.
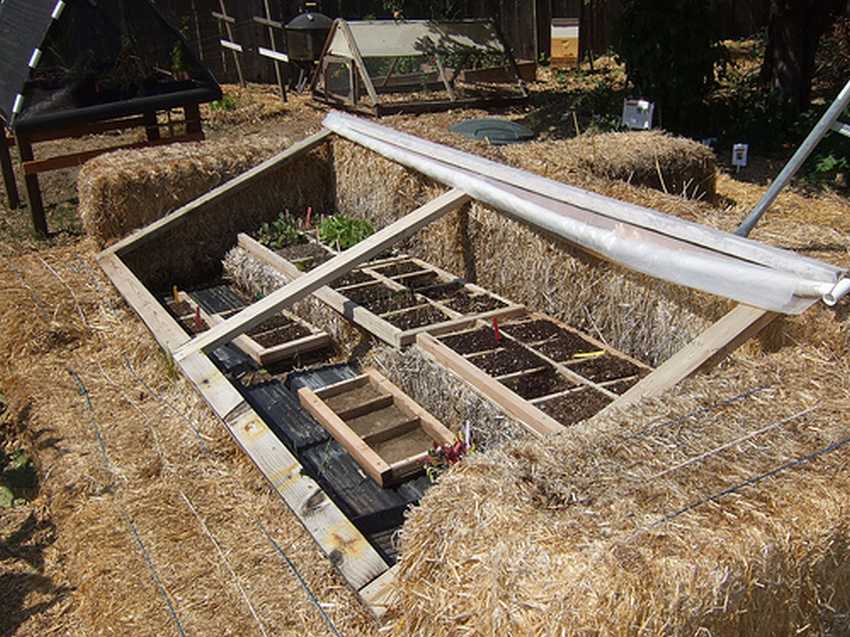
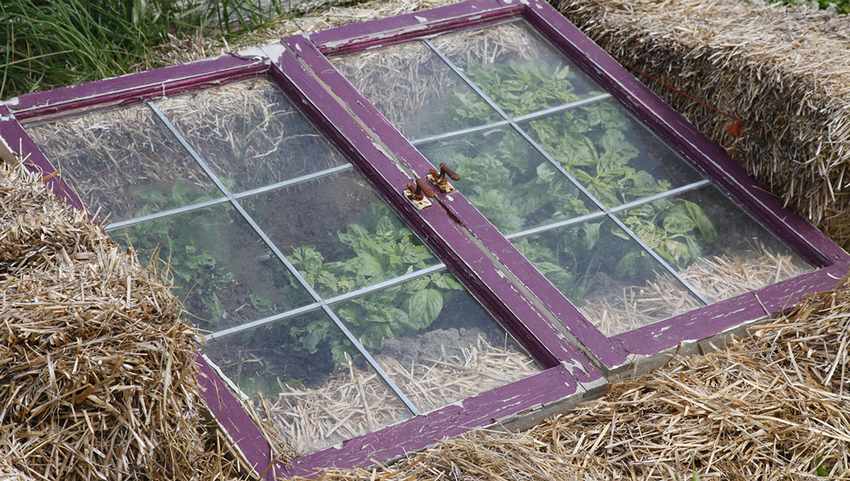
Greenhouse from a double-glazed window or frames
The author of the doorgarden.com blog made here such a recumbent greenhouse from a glass door (double-glazed window), into which a stone from a lawn mower accidentally fell.
According to the author, such a hotbed allows him to collect greens for salads in January, well, America, I can’t say exactly what kind of staff it is.
See the drawing of this greenhouse. Everything is very simple. As we see from the photo, the double-glazed window is not attached to any hinges, it just lies, resting against the side board from slipping.
The double-glazed window can be replaced with any large glass or window frame.
-
-
-
-
-
-
View the embedded image gallery online at:
https://i.expert-h.com/en/parniki-teplitsy/1122#sigFreeIdd949a42e36


https://i.expert-h.com/en/parniki-teplitsy/1122#sigFreeIdd949a42e36
In summer, in hot weather, when there is no need for such a greenhouse, you can throw it on strawberries to protect the berries from birds.
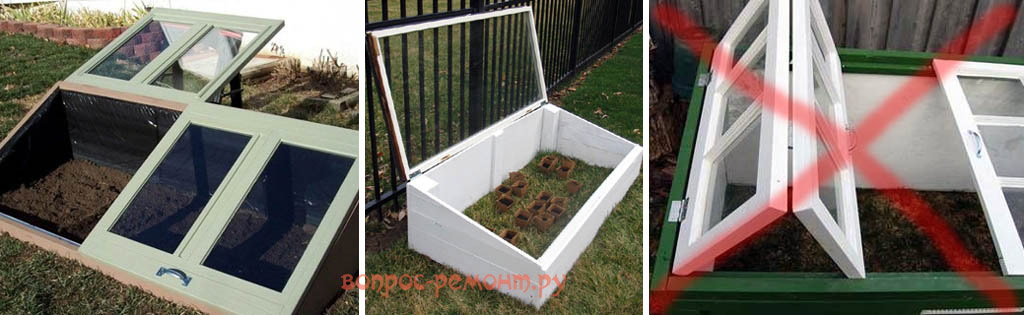
Attention!!! An important point about greenhouses from window frames
Whatever frames you have at your disposal, you need to make the transparent roof folding (lifting up), and not hinged or folding, as on the right in Fig. Through any vertical gap, all the warm air will instantly disappear and the plants will strike cold, and the horizontal one can be adjusted with supports according to the weather and local conditions.
What should be the inclination of the greenhouse cover ???
Note: the optimal slope of the roof slope of a single-pitch greenhouse from the vertical (90 degrees) –φ, where φ is the geographical latitude of the place; and (90 degrees) –φ is the angular height of the Sun at noon of the spring / autumn equinox. See below for a greenhouse with a heat accumulator.
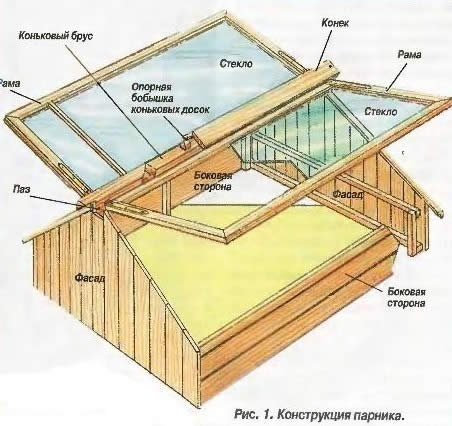
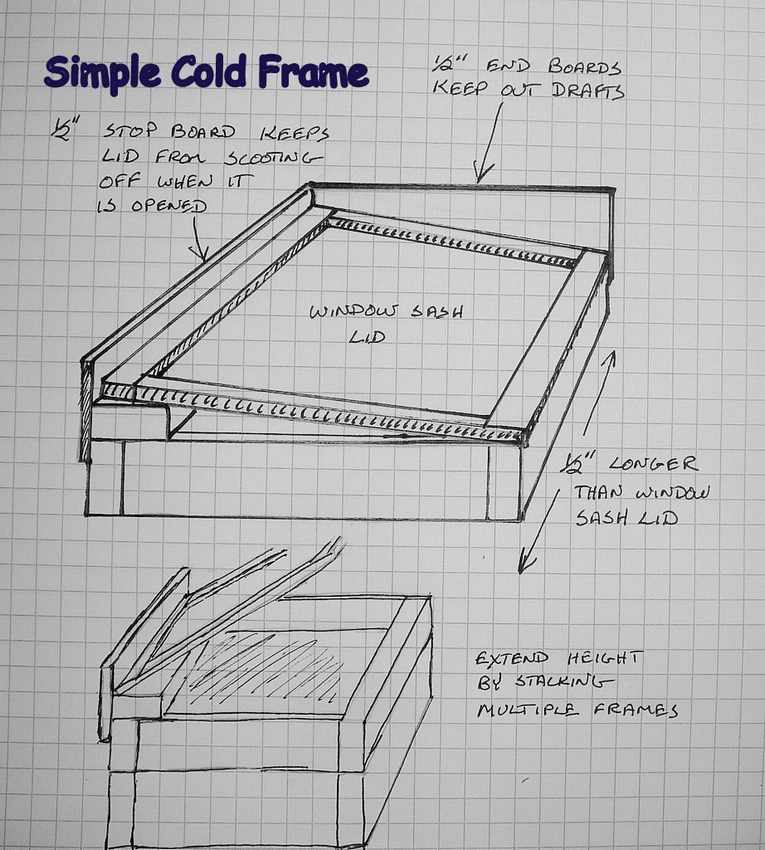
Cold greenhouse. (drawing diagram)
Do it yourself
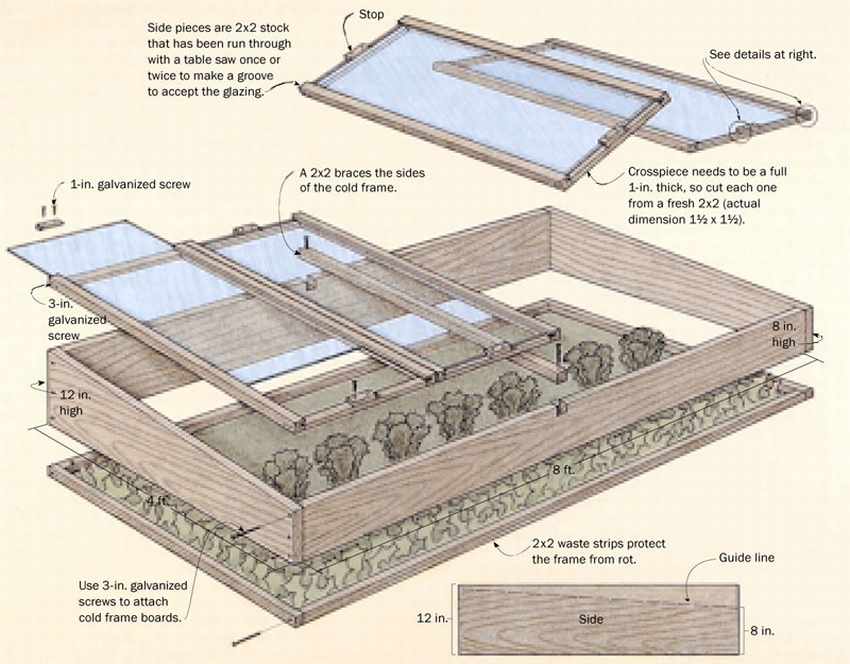
The greenhouse consists of a wooden frame and a glass lid. The glass of the lid should always be inclined to catch as many rays of the weak winter sun as possible.
The author claims that even in winter during sunny weather, this greenhouse can heat up to very high temperatures, so the lid must be able to open upward. In order to regulate the temperature, a thermometer must be placed in the greenhouse (see photo 5), and a mechanism for fixing the open cover at different angles was made (see photo 4).
Vegetables that can be grown in the early winter in a cold greenhouse
BUT, nevertheless, the main secret of such a greenhouse is not in its arrangement, but in the plants grown in it. These should be plants that easily tolerate cold. According to the author's research, five crops: spinach, green onions, mache, claytonia, and carrots can be successfully grown in the northern states of the USA. As well as arugula, Escarole, Mizuna, parsley, sorrel, European salad, mustard, spinach and turnips.
The author sows vegetables usually from mid-August to mid-September.
-
-
-
-
-
-
View the embedded image gallery online at:
https://i.expert-h.com/en/parniki-teplitsy/1122#sigFreeIdc6a1d9f617


https://i.expert-h.com/en/parniki-teplitsy/1122#sigFreeIdc6a1d9f617
My advice: make a cardboard sheet glued on one side with foil. At night, you can cover the greenhouse with this foil, which will reflect the heat coming from the earth back into the greenhouse.
Window frame and hay greenhouse
Greenhouse (greenhouse) IN plastic bottle
or "How to grow seedlings if the apartment is cold"
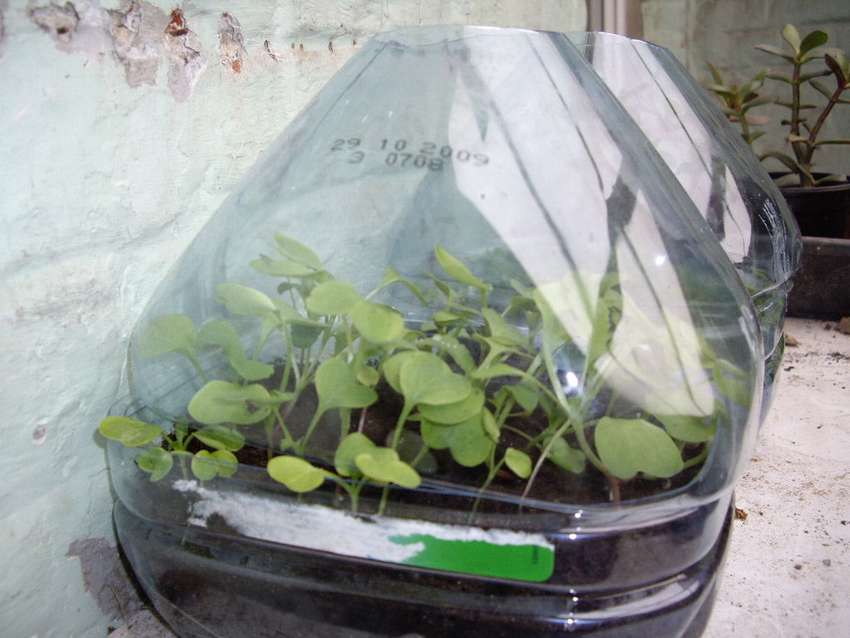
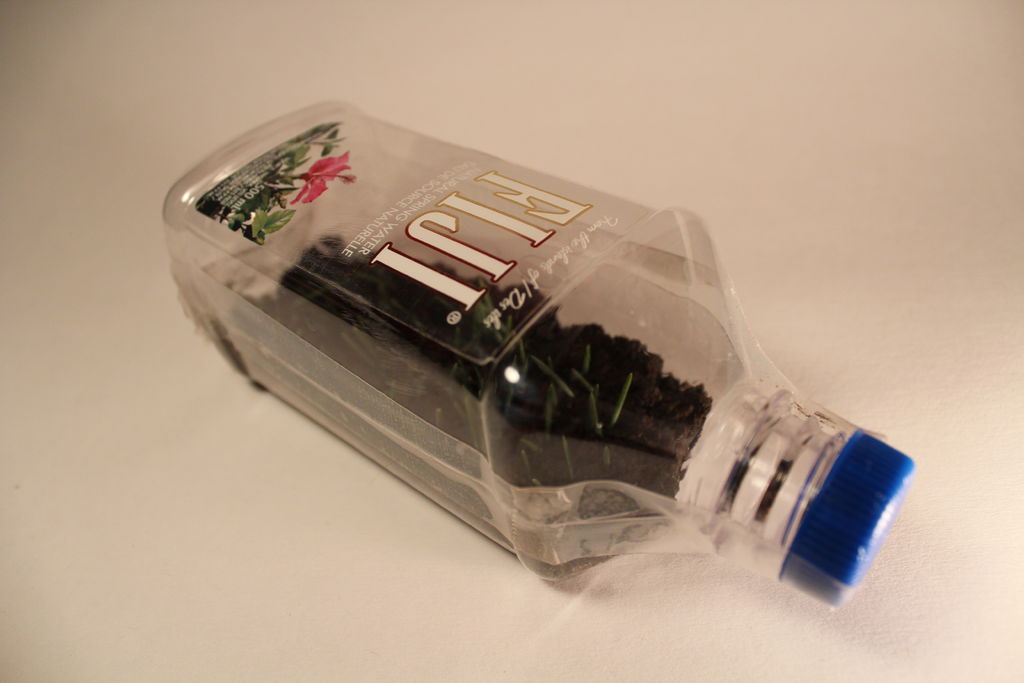 It often happens in our domestic apartments that for growing seedlings the room is not warm enough. Such a greenhouse in a plastic bottle can serve as a way out of this situation.
When sunlight enters such a greenhouse, the air in the greenhouse begins to heat up and remains warm for a very long time, even after sunset.
An important plus will be high humidity inside the bottleand, which will be created by heating pre-moistened soil. Such humidity significantly accelerates the process of seedling maturation.
The manufacturing process is simple.: Cut the bottle, rinse, place the soil with the seeds inside and seal it tightly with tape.
-
-
-
-
-
-
-
-
-
-
-
-
View the embedded image gallery online at:
https://i.expert-h.com/en/parniki-teplitsy/1122#sigFreeId2ec7d391ec


https://i.expert-h.com/en/parniki-teplitsy/1122#sigFreeId2ec7d391ec
How to do quick DIY greenhouse
Greenhouse made of wooden trellises
Advantages of such a greenhouse:
- - quickly build
- - is steady
- - easy to manufacture
Minuses:
- not suitable for tall plants, you can use for growing early greens and seedlings.
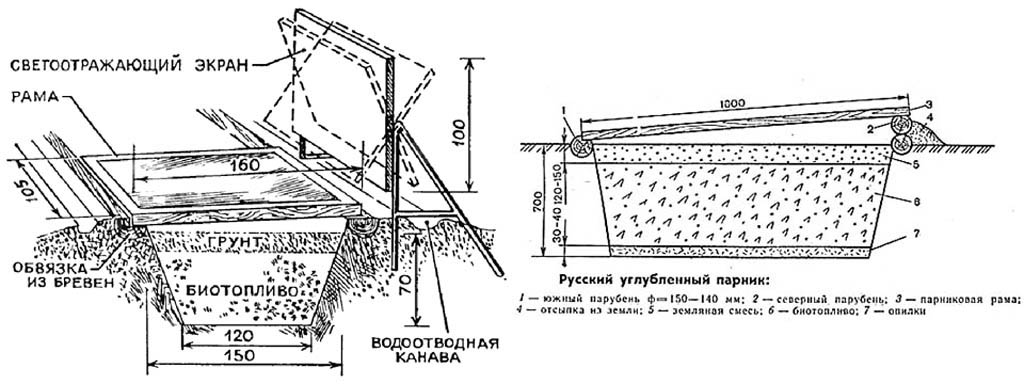
Russian in-depth greenhouse on biofuel
About Russian pits
The simplest greenhouse is a single-pitch greenhouse, recessed into the ground, with biological heating. For its construction choose a dry, well-lit and sheltered from the winds place. It is desirable that this was a low slope with a direction to the south. To protect the greenhouse from the wind, green spaces, fences or special reflective screens that are arranged on the north side can serve. Particularly convenient are swivel flat screens painted with white paint, which allow maximum use of solar energy. Illumination with reflected light increases the temperature in the beds by 2-3 °, which is equivalent to transferring your site, for example, from the Moscow region to the black earth regions of the country: Lipetsk or Voronezh.
Note: any flat panels glued with aluminum foil can be usedoh for baking.
Construction begins with a strapping device around the perimeter of the greenhouse of four sanded logs with a diameter of 10-14 cm. The north side of the strapping should be slightly higher than the south. On the south side in the harness, a groove (quarter) is selected to support the frames.
At one time, the Russian greenhouse was a revelation to European farmers. It was from the “Russian pits” that the nobility of the time received in the winter a green onion, lettuce, dill, parsley, radish, and strawberry.
The foundation pit is dug to a depth of 70 cm. In cross section, it has the shape of a trapezoid. In dense soils, the walls can not be fastened, and in loose and floating soils, fastening with horizontal boards is used. To ensure that the greenhouse is not washed away by rain, a drainage groove is arranged around it, which can be closed with wooden shields that facilitate approaches.
Frames for the greenhouse are most convenient in the size of 160x105 cm. They are made of 6x6cm bars, joined for strength with wooden studs, and then properly stained with weather-resistant varnish PF-166 (“6 = s”). Glass reinforced with putty or glazing bead. To drain rainwater in the lower bindings, grooves are cut.
Biofuel in greenhouses is horse or cow dung.. Horse is considered the best, it gives more heat. Harvest it in the fall. Manure is collected in piles and carefully insulated on all sides with straw, sawdust, peat and covered so that the manure does not freeze. In the spring, before stuffing the greenhouse, it is transferred to another, more loose pile and warmed up. To do this, make several holes in it and pour a bucket of hot water into each, after which the stack is covered with burlap or matting. In two to four days, when the manure warms up to a temperature of 50-60 °, they fill a greenhouse. It is laid colder at the bottom, and hot from above and from the sides. After precipitation, after two to three days, a new portion is added. The manure must lie loose, and only at the walls it is necessary to slightly compact it so that voids do not form.
Greenhouses - pits were usually made 3-4, which ensured year-round use: while 1 pit was heated after refueling, the rest gave production. An indispensable condition for the successful operation of the Russian greenhouse is the stroke of the entire complex with a clay castle with a drainage ditch, otherwise the biofuel will become acidic.
Click on it to enlarge it.
After stuffing, the greenhouse is covered with frames and mats made of matting, straw or burlap. From above, on heated manure, soil is poured - garden or sod soil, compost or fertilized peat. An average of 0.2 cc per frame. m of land. Exceeding this amount is not recommended, since under the weight of the earth manure is compacted, air flow is hindered to it, and it ceases to burn. For the same reason, do not over-moisten the soil.
A greenhouse of even such a simple design will make it possible to grow vegetables much earlier than expected.
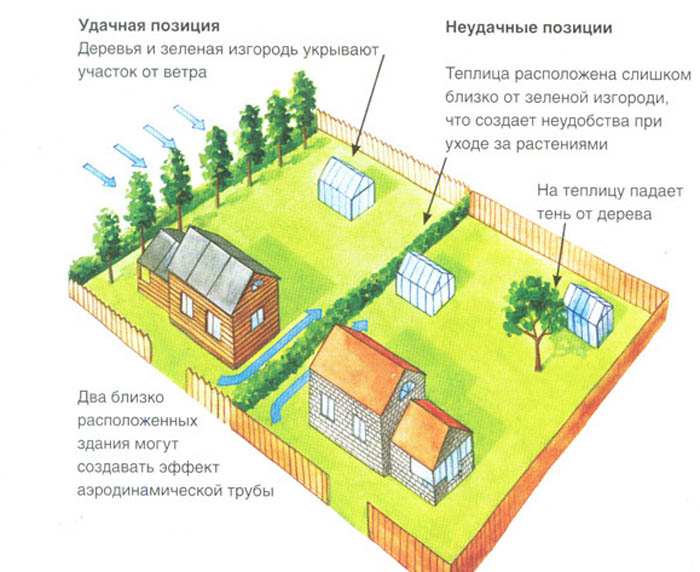
Greenhouse layout
where it is better to put a greenhouse on the site
Hello, I am the author of this article, so I look forward to asking questions for this article in the comments below, I will answer all !!!
If you have questions on another topic, ask them on our forum, we will answer you
- Two baskets of paper in 5 minutes (Master class)
- How to make a simple and compact table for a milling cutter from plywood
- How to make a soft headboard tile (Instructions + step by step photos)
- Cinder block benches: a convenient bench in 55 minutes
- How to make a bed with a niche: saving space (Master class)