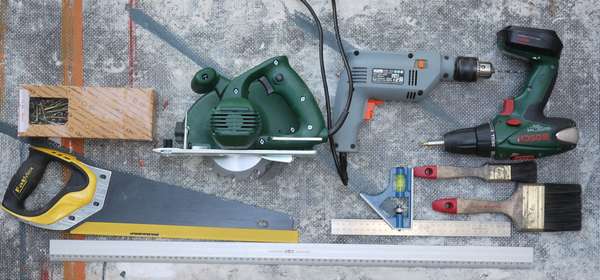
Bench with a backrest do it yourself. Photos, drawings, step by step instructions
 how to make a bench with a wooden back
Your garden or courtyard will be more attractive if there is an equipped place to relax, where you can sit and relax. Garden benches with backrestAs can be seen from the examples presented here, they can vary from classical designs requiring a sufficient amount of materials and experience in the field of woodworking, to simple benches that require a little effort, can be made from used materials and quite simple to assemble.
If you want to know how to make a bench with a backrest do it yourself from wood, here you will find 50 examples of wooden benches of various shapes and sizes with step-by-step photographs and drawings. As well as benches from chairs, doors, old beds and other interesting solutions, and original ideas.
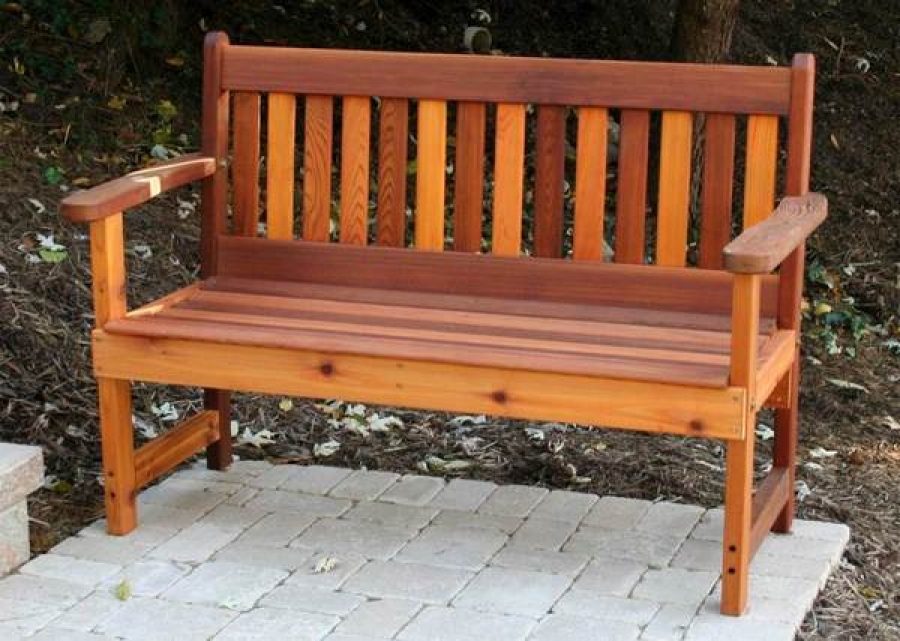
Garden bench with a backboard do-it-yourself drawing
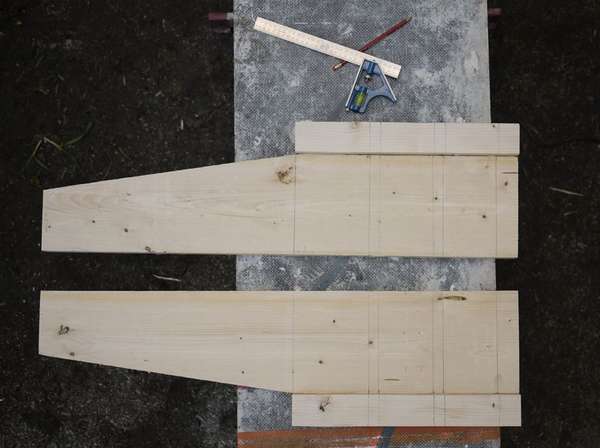
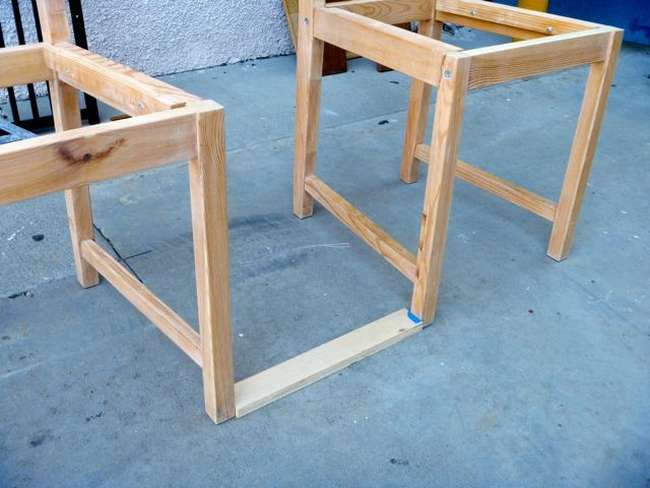
 A classic garden bench is a composition of many garden benches. Presented here garden bench with backrestmade from hardwood. How to make a bench and drawings can be viewed below on step by step photos.
It is very important to make sure that the legs are fixed at right angles to the frame. The stand is mounted with screws.
The first step is to drill holes for the screws. Between the leg supports, seat supports are installed.
Corner brackets are used to assemble and strengthen the seat. The back stops are attached to the upper ends of the legs.
 The rear planks are cut on a band saw and mounted on the upper and lower supports.
Then the seat rails are mounted on the seat supports.


https://i.expert-h.com/en/lavki/1067#sigFreeIdb1347d6225
Drawing of a garden bench with a wooden back
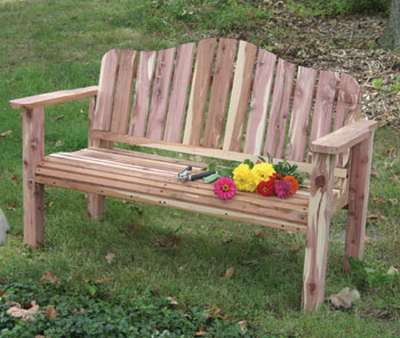
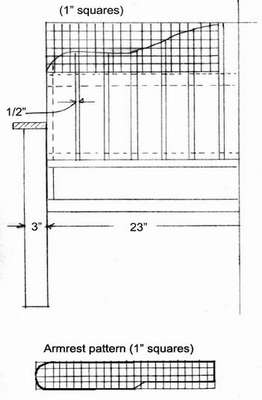
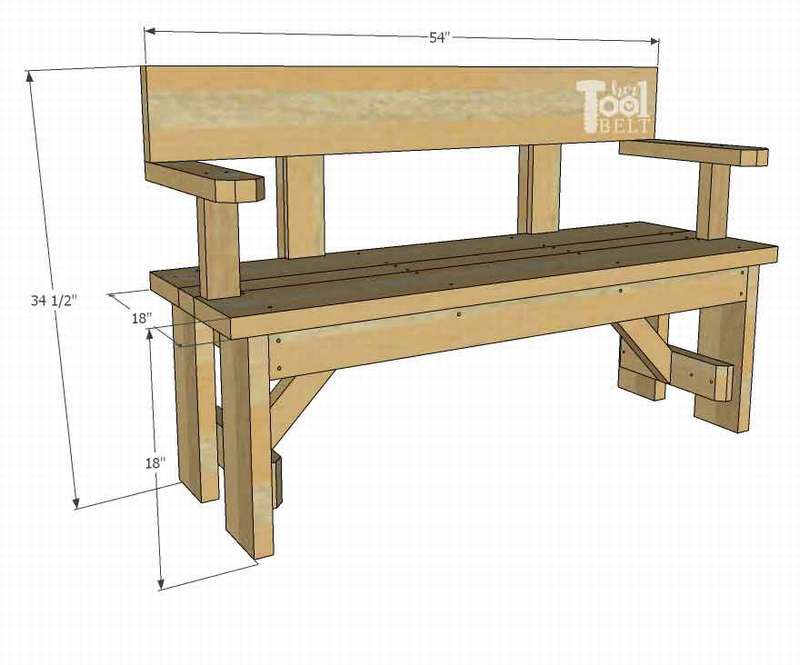
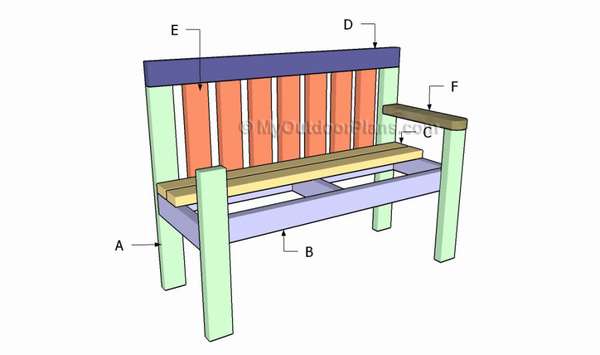
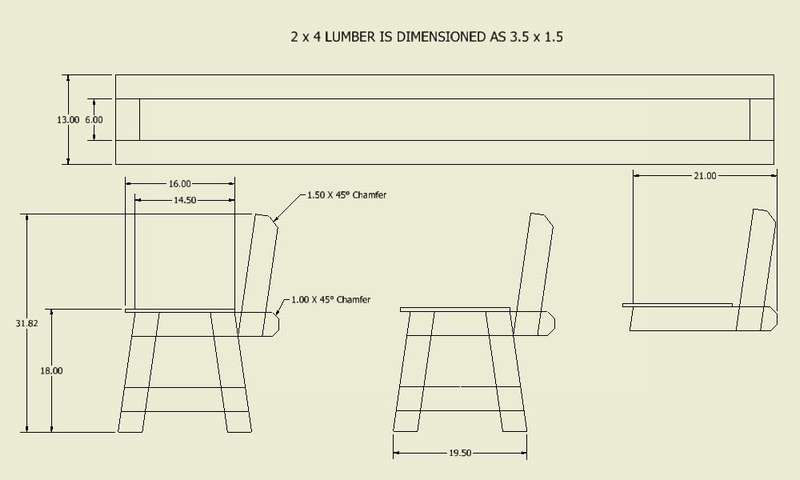
 The author saw a cute wooden bench in a local restaurant and wanted to do exactly the same for his yard. Pretty comfortable design, as it has back support and armrestsIdeal for relaxing outdoors. Presented here drawing of a garden bench with back with step-by-step schemes, I hope they come in handy if you want to make the same bench for your home. The length of the structure is 138 cm, but you can easily change the dimensions for your place where you are going to install the bench with the back. In the drawings, the dimensions are in inches, so multiply the figures by 2.54 and get the dimensions in centimeters.
How to make a wooden bench with backrest and armrests. The diagram below shows the dimensions of the parts into which the boards need to be cut.
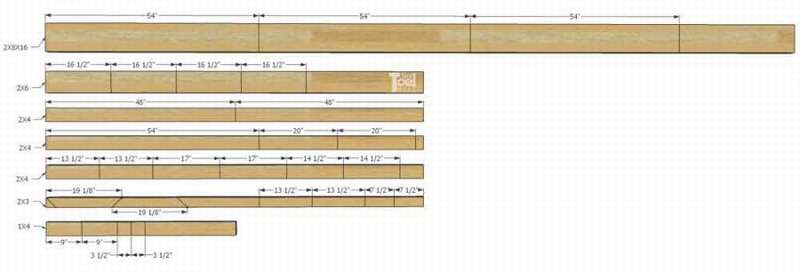 In addition, you will need
 wood glue
- sandpaper
- primer paint
- brush
- 8 cm screws
- Circular Saw
- drill with a set of drills
- countersink bit
- roulette
- clamps
To facilitate assembly, pre-drill all the holes for the screws. it's the same help prevent splitting of boards. After that, polish all the details, which is more practical and better than doing this work after assembly.


https://i.expert-h.com/en/lavki/1067#sigFreeId165cab16b7
 One more example garden bench with backrest with drawings. Here are the simple steps to complete this project.
Make wireframe
Install seat boards. Screw the boards to the frame with screws. Start with the front and back boards (150 cm), then go inside (168 cm), leaving a gap of 5 mm between each board.
Make the back frame of the bench. Cut 2x4 boards with a length of 48 and 40 cm by 15 degrees. Drill holes for the pocket and tighten with screws.
Fasten the back boards. Screw the boards to the backrest frame with screws, leave 5 mm gaps between the boards.
Attach the back to the seat.
Screw the bars to the back for support
Fill the holes, sand and paint the bench.


https://i.expert-h.com/en/lavki/1067#sigFreeIdebd5f17a13
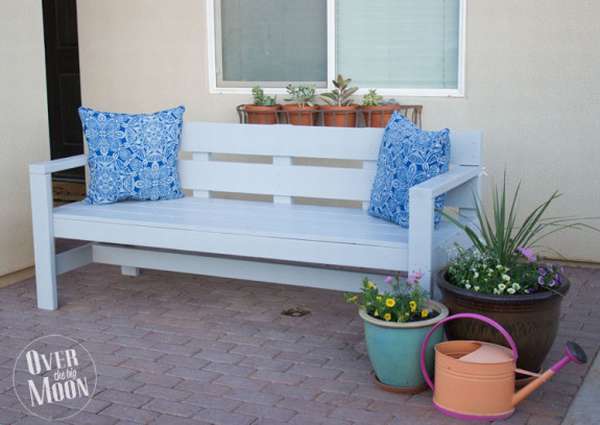
Outdoor bench with backrest
 Complexity: average. Approximate time: 3 hours. Help needed: 2 assistants.
Adults and children like to have plenty of places to sit next to playgrounds. It is more convenient for parents to watch their children sitting on a cozy bench, while little fidgets also need to rest sometimes. In general, the thing is necessary and useful, look, how to make a street bench with your own hands - it’s not at all difficult. The manufacturing procedure is shown schematically, however, the dimensions are in inches, you need to convert them to centimeters. To do this, simply multiply the figures by 2.54, this is if you convert one inch to centimeters, and one foot is 30.48 cm.
Materials:
4x4 beam 10 '(348 cm) long
- 2 4x4 bars 8 '(244 cm) long
- 3 boards 2x6 8 '(244 cm) long
- 4 boards 2x6 10 '(348 cm) long
2x4 board 8 '(244 cm) long
- 2 ½ "spindle bolts, 8" (20 cm) long
- 4 ½ "spindle bolts, 6" (15 cm) long
- 8 angle brackets
Necessary tools: miter saw, pencil, tape measure, drill, screwdriver, ½ "long drill
Sort all materials
Take a 4x4 bar with a length of 8 (224 cm). Saw 4 parts as shown in the 19 ¾ "pattern (50.16 cm). Take the second 4x4 block with a length of 8 (224 cm). Cut 2 pieces of 19 ¾ "(50.16) and 3 parts of 18" (45.72 cm).
 Saw a 4x4 block with a length of 10 (348 cm) into 3 pieces 37 ¼ "(94.62 cm).
![]() Now take 2 2x6 boards with a length of 8 (244 cm), and cut each into 2 pieces of 40 "(101.6 cm), for a total of 4 pieces.
Now take 2 2x6 boards with a length of 8 (244 cm), and cut each into 2 pieces of 40 "(101.6 cm), for a total of 4 pieces. ![]() Take the remaining 2x6 board with a length of 8 (244 cm) and cut 2 pieces of 26 ¾ "(68 cm)
Take the remaining 2x6 board with a length of 8 (244 cm) and cut 2 pieces of 26 ¾ "(68 cm) ![]() Then cut 4 2x6 boards 10 '(348 cm) long so that a total of 8 pieces 51 "(129.5 cm) are obtained.
Then cut 4 2x6 boards 10 '(348 cm) long so that a total of 8 pieces 51 "(129.5 cm) are obtained.![]() Take a 2x4 board with a length of 8 (244 cm). Cut 2 pieces at 18 ¾ "(47.6 cm).
Take a 2x4 board with a length of 8 (244 cm). Cut 2 pieces at 18 ¾ "(47.6 cm).![]() Corner cuts:
Corner cuts:
Take 4 sawn parts of 2x6 40 "(101.6 cm) boards cut in step 5. Set the miter saw to 15 ° and cut the corner at both ends of each part. 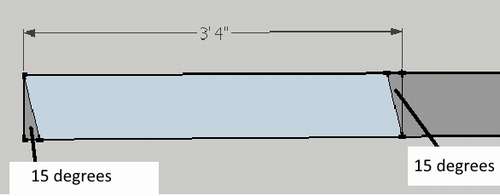
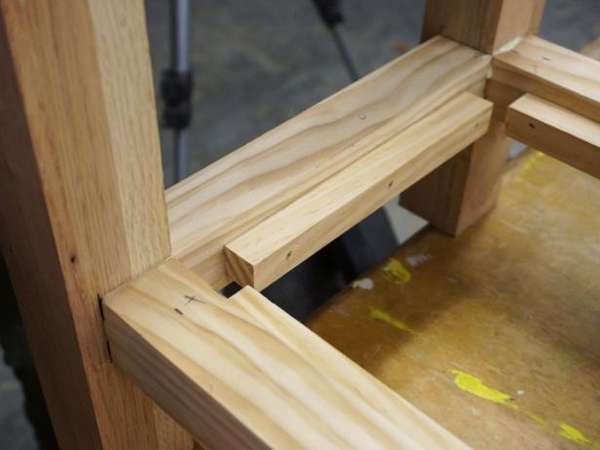
Assembly instructions
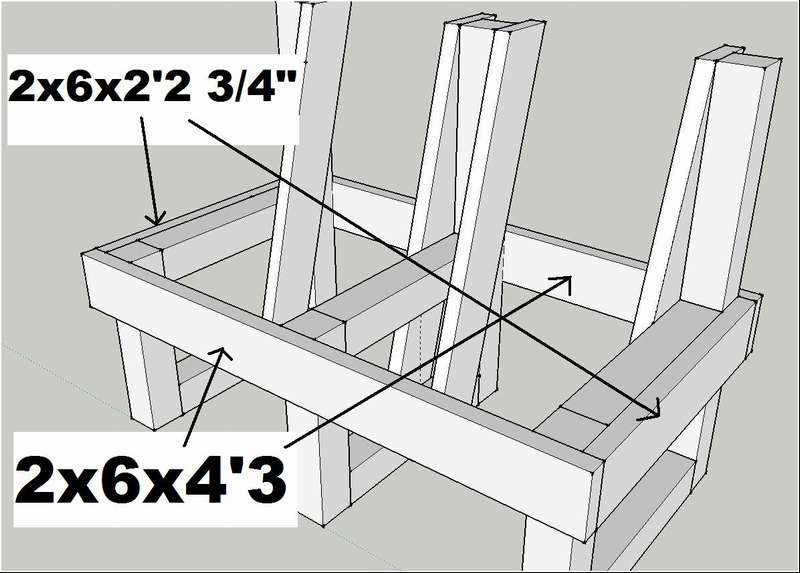 Take two 4x4 pieces with a length of 19 ¾ "(50 cm) and fasten with angle brackets. Fasten the two curly braces both on one side and flush with opposite ends.
- Then fasten one of these parts between 4x4 length 37 ¼ "(95 cm) and 4x4 length 18" (46 cm).
- Finally, secure the second part with brackets to close the rectangle.
- Repeat this step two more times so that you have a total of three seats for one bench.
- Install a 2x6x40 parallelogram so that its upper edge is completely flush with the upper edge of the seat support.
- Then use a ½ "long drill to drill a hole through the top and bottom of the seat support with the rear supports fixed
 The remaining two 2x6 parts are mounted in the same way as on the other two seat supports. Use 15 cm hex bolts to secure these rear supports to the seat supports.
- Then use two 2x4 18 ¾ "(48 cm) boards as spacers between the three seat supports. Measure 28 cm in front of each seat support and cut a 2x4 board so that it is between the mark and the bottom edge of the back support. Screw the screws under angle to the 4x4 seat support: Seat support with a back support on the left side will be installed on the right end of the bench, and with a back support on the right side will be installed on the left end.
- To finish attaching all the supports, grab a 2x6 board with a length of 51 (129.5 cm) and fasten to the front of the 4x4 bars 18 "(45.72 cm) long. Make sure that there is a 1 ½ inch (4 cm) ledge on both edges. .
- Fasten two 2x6x26 ¾ "pieces on each side of the bench. Also fasten a 51" (129 cm) 2x6 board on the back of the foot so that it aligns with the last three pieces of the 2x6 boards you recently tied to the structure.
- Fasten the three rear rails to the frame.


https://i.expert-h.com/en/lavki/1067#sigFreeId98b7914804
How to make a wooden bench with a back
 If you want to learn how to make a bench, check out this guide. The presence of a bench makes it possible to sit quietly in the yard, and you can tell everyone that this is your job. Here's a quick way, how to make a wooden bench with your own hands. If you have basic knowledge of how to use tools, everything will be all right. Here five steps with step by step diagramshow to make a simple bench. Remember the safety precautions.
 Stage 1 Training
- Choose the type of wood.
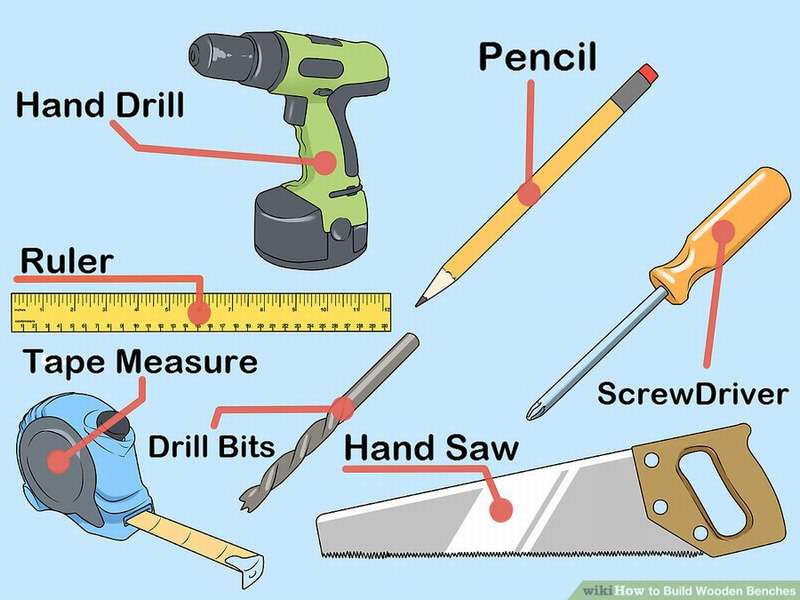
- Prepare the tools:
- hand drill, miter or hand saw, tape measure, pencil, drill and drill, ruler.
You will also need:
- 40 metal plates with a length of 10 cm and screws for their fastening.
- Make sure that the screws are no more than 2.5 cm.
- 34 screws 5 cm long
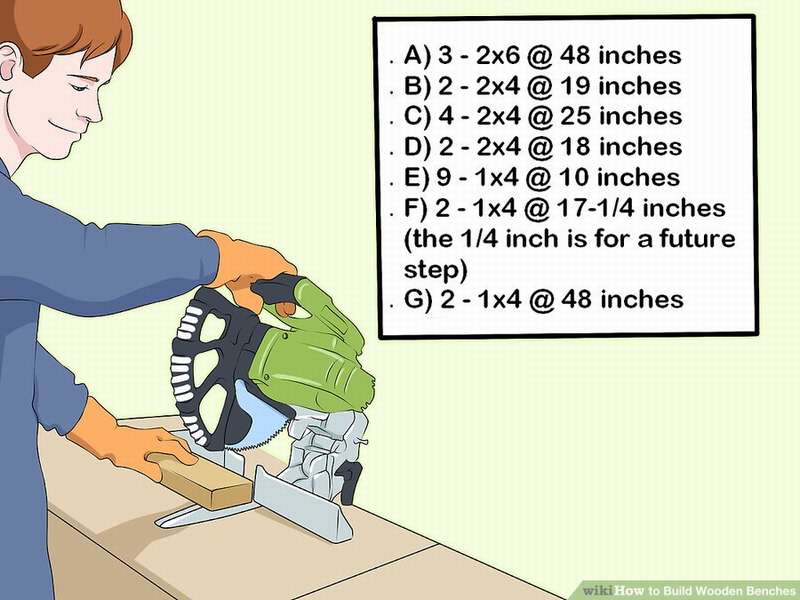 Saw boards in the following sizes:
A) 3 pcs 2x6 length 48 inches (122 cm)
B) 2 pcs 2x4 length 19 inches (48 cm)
C) 4 pcs 2x4 length 25 inches (63.5 cm)
D) 2 pcs 2x4 length 18 inches (46 cm)
E) 9 pcs 1x4 length 10 inches (25.5 cm)
F) 2 pcs 1x4 length 17 (19.5 cm) plus 1/4 inch (6 mm) for the next step
G) 2 pcs 1x4 length 48 inches (122 cm)
Stage 2 Leg assembly
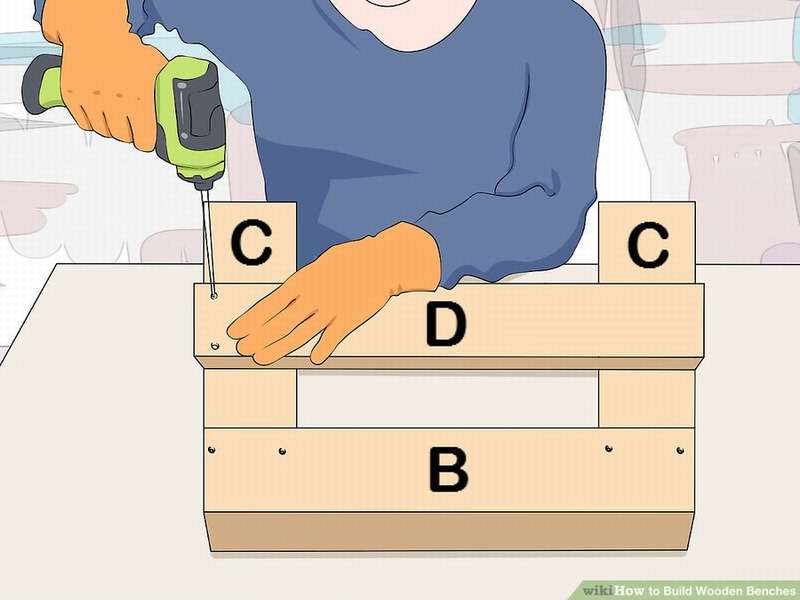 You will need bars from the list - B, C, D
- Screw the end (B) to the joint (C) with two screws.
- Attach the other end (C) to the bar (B)
- Attach (D) so that the top of this part is 42 cm from the bottom of the legs.
- Repeat all steps to make the second set of legs.
Stage 3. Assembly seat.
- Attach the board (A) on top (D) to one leg
Do the same with the other end (A) on the opposite end of the cross member (D). - Install the third board (A) between the two already attached.
- Attach the other end of each board in the same way to the other leg, on the piece (D).
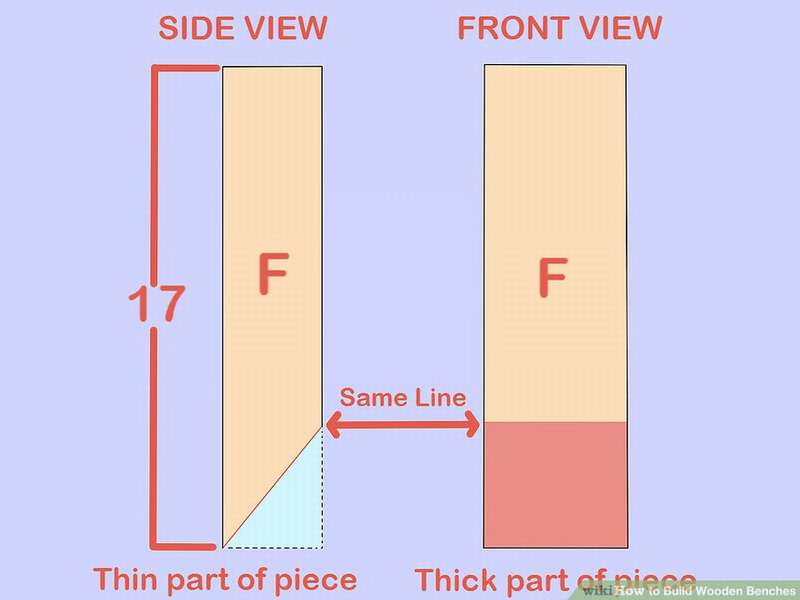 Stage 4. Backrest assembly
- To make a comfortable back, cut the corner at both ends of the board (F).
- Measure 9-11 / 16 "(41 cm) on one side and 17" (43 cm) on the other
- Cut a line.
- Attach (G) between the two boards (F) at the square end.
- Set the center of one of the boards (E) in the middle of what you just created.
- Install the second board (E) 1-5 / 8 "(20 cm) from the edge of the center.
- Follow the same interval for the rest of (E).
- Attach the second board (G) to the ends (E).
Part 5 Backrest mount
Attach the corner of the backrest (F) to the back of the legs (C) using at least two screws on each side so that the bottom (G) rests on the seat (A).


https://i.expert-h.com/en/lavki/1067#sigFreeIdcd4df67f9d
Porch bench
 Let your porch be cozy - do it do-it-yourself wooden bench with back and put in a convenient place. Everything is really very simple, this shop was made in two hours. Here's how to do it.
First make the main seat.
Then attach the front and rear legs.
To fasten the boards, screw the front board and back panel first. Then measure how much space is left between the boards, they should be evenly distributed across the frame.
Take a manual grinder, make the surface pleasantly smooth, make sure that there are no sharp edges.
Put on a bench with a back cushion.


https://i.expert-h.com/en/lavki/1067#sigFreeId44536e04e7
How to make a bench with a backrest do it yourself
 See how to make it light and comfortable do-it-yourself bench with backrest. This design is very convenient and compact, and since it is not difficult to assemble it, you can make a few pieces. After making the first sample, things will go much faster.
You see the order of work in step-by-step photos.
Few notes.
- Parts that form the side and rear supports are sawn off at an angle of 15 or 90 degrees.
- Four boards are sawn in half to form parts of the seats.
- When doing the legs, use a piece of 2 × 4 board to determine the distance between two horizontal elements. After the completion of the first stage use it as a template to create a second.
 Attach the back support to each leg. Be careful if both sides have the same angles when the boards are twisted together.
- Decide which boards will be used for the seat.
- Place the boards on the work panel, aligning the ends. To center on the seat rails, subtract the distance between the bars from the total length of the seat.
- Grind the boards (top and edges) with a grinder - make sure they are slightly rounded at the edges. Fasten the boards, leaving a distance of 5 mm between each board.
- When assembling the bench, first attach the upper rear panel of the seat, making sure that both rear support rails are vertical and parallel (when viewed from the front).
Materials
- 8 boards 2 × 4 2.5 m long
- wood screws
- waterproof glue
- Miter saw
- drill
- tape measure, pencil
- Sander


https://i.expert-h.com/en/lavki/1067#sigFreeIdb725868b36
How to make a garden bench drawing
 You think that the one who ordered the most famous gardens in the world will provide people with a place to relax and enjoy all this beauty. Look at the garden in the Palace of Versailles, it’s hard to find a place to sit on the royal territory. Perhaps this is because Louis XIV had his minions who carried his bench for daily walks. But if you don’t have footmen yet, make it simple but comfortable. garden bench, and set in a shady place to reflect on kings and servants in your free time. You can find many similar offers in garden catalogs and various sites.
Below in the photo you can see the drawing, with emphasis on every detail of the bench.
Creating seat curves may take some time, but the assembly itself is very simple.


https://i.expert-h.com/en/lavki/1067#sigFreeId3f40e31d4c
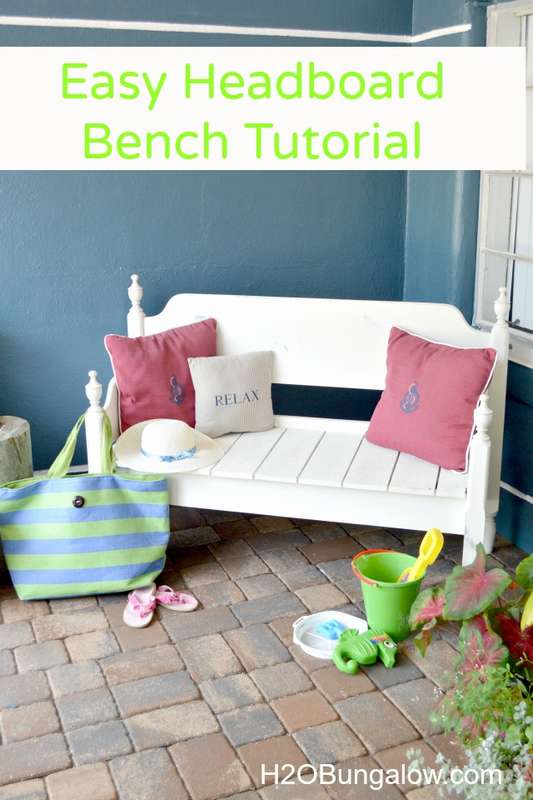
How to make a wooden bench with your own hands
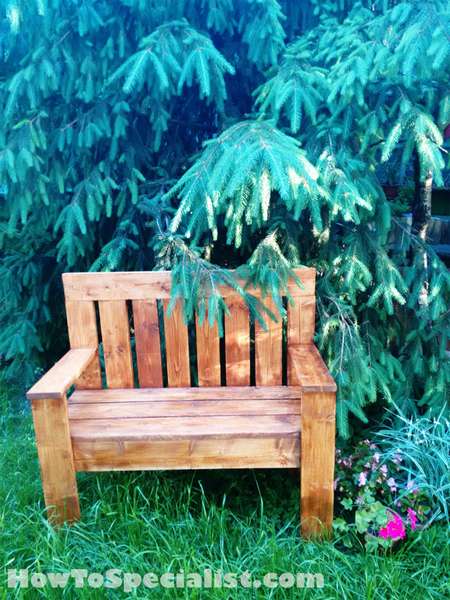 Good example with step by step photos, how to make a wooden bench with your own hands. This project is ideal for creating a cozy relaxation area in the garden, on a summer cottage or in the courtyard of your house. This is not a complex structure, so do not worry if you do not have experience or professional knowledge in the carpentry. Just before you start, you need to calculate everything exactly, preferably make a drawing and of course use quality materials and serviceable tools.
The photo in the gallery shows in detail the assembly order, so there should not be any special difficulties.
- First of all, you need to prepare all the details by sawing the boards to the required sizes. Then assemble the seat frame. Connect the parts and tighten with screws.
- Before tightening the screws, make sure that all angles are straight.
- Install the middle support to the frame.
- Attach the rest of the seat frame.
- Add glue to the joints and remove excess before it dries.
- Attach the straps to the frame.
- The next step is fixing the legs. Place your feet on a flat surface and attach the seat frame as shown in the photo.
- Screw the rear legs
- Then attach the upper bar to the hind legs to lower the back.
- Now all I have to do is attach the backs and armrests.
- Secure the end of the armrests with screws.
- Then screw the backrest trims. Drill holes at one end and press firmly against the upper bar. Install a wooden block between the planks to create even gaps.
That's basically all, it is surprising that several planks and screws can do. To make such wooden bench with backIt took the author about three hours. If you need detailed drawings, you can see them here.


https://i.expert-h.com/en/lavki/1067#sigFreeIdffca49f436
Wooden bench with backrest for garden
 If you got the idea to make your own wooden bench for a summer residencelook at this cute model. You will need only a few simple tools: saw, screwdriver, grinder.
Make a simple drawing of what a bench with a back should look like. It’s not necessary, but it’s great if you don’t make benches every day. In this case, the dimensions: width 200 cm, depth 60 cm and a height of 30 cm with a back support of 70 cm.
Need to cut:
- 6 legs
- 3 horizontal leg supports
- 2 long legs for back
- 1 horizontal bar back support
How to do
- First drill holes and assemble the base.
- Then attach the seat and backrest frames.
- For this part, prepare 10 boards measuring 200 x 10 cm. 6 of them will become a place for sitting, the remaining 4 - on the back.
- Drill holes in the boards and screw them to the frame.
- Grind well. Finishing according to your desire.


https://i.expert-h.com/en/lavki/1067#sigFreeId253dfc8f79
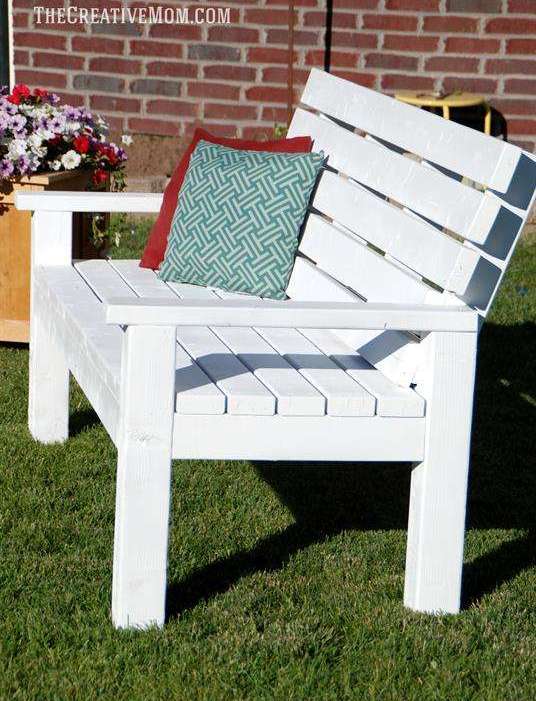
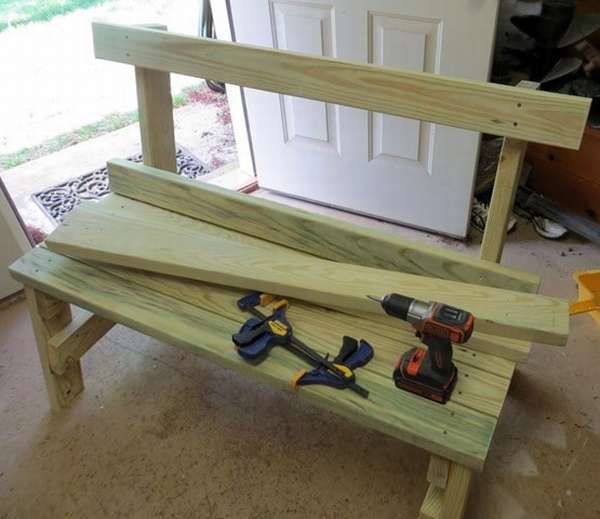
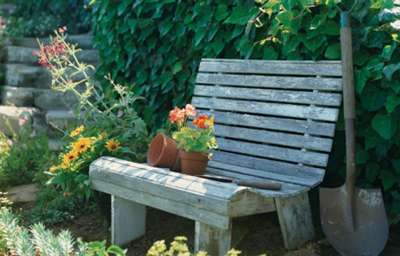
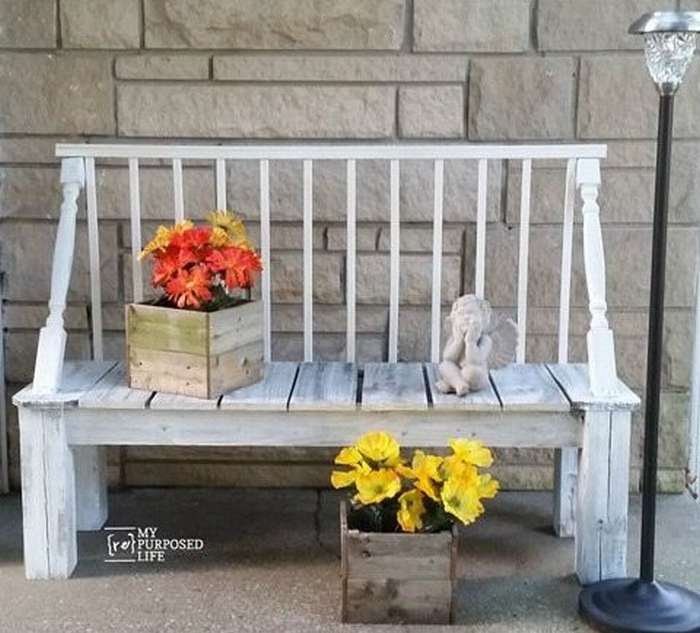
A simple bench with a backrest do it yourself
 Elegantly and without complaints. Such bench with back It will look great on the porch of your summer house, in the gazebo or on the open veranda.
Here list of materialsto be chopped
Boards 1 × 3 long:
- 14 5/8 "(37 cm) 2 pieces for side rails
- 35 "(89 cm) 6 pcs. 4 for the back of the bench and 2 for the front and rear jumpers
- 38 3/4 "(98 cm) 6 pcs. For seat
2 × 2 long bars:
- 35 "(89 cm) 2 pieces for the hind legs (and back)
- 16 7/8 "(43 cm) 2 pcs. For the front legs
- 14 5/8 "(37 cm) 2 pieces
- 35 "(89 cm) cross bracket
- 15 3/8 (39 cm) for the middle support post
Tools:
- Drill (bit and head)
- Rubber mallet
- Roulette
- Combined Miter Saw
- Kreg jig
- Screws for pocket holes 1 1/4 "(3 cm)
- Wood screws 1 5/8 "(4 cm)
- Wood glue
- Skin
- Paint (optional)
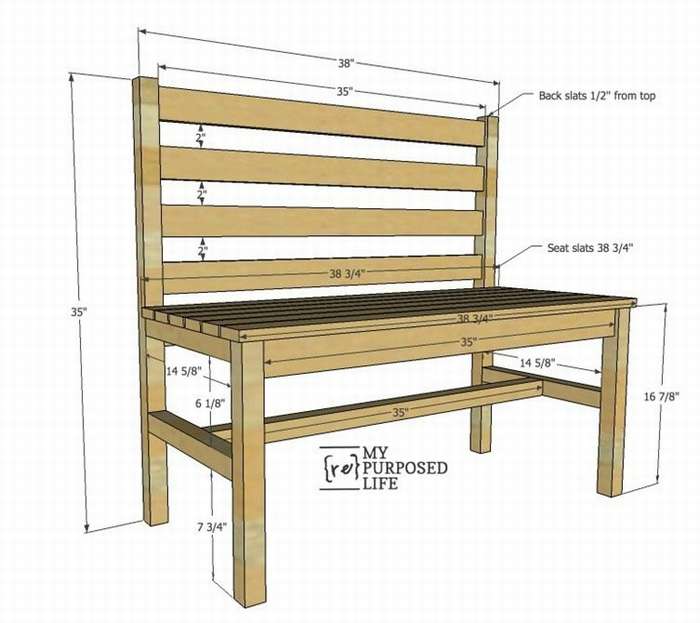 Left photo with a drawing of a bench with a back
Assembly sequence:
- Saw off the legs and lower rails
- Drill holes
- Assemble the bench frame, including the back
- Saw wood planks, drill holes for screws and assemble
- Screw the seat
- Install the side and bottom longitudinal bar
- I polished all rough edges with a grinder
- Paint the finished bench (optional)


https://i.expert-h.com/en/lavki/1067#sigFreeIdecf85716ae
 DIY wooden bench for the garden
An interesting project. Look how to make a wooden garden bench do it yourself. It may not be the best sample to carry to an exhibition of furniture art, but it fits the garden perfectly.
It’s not difficult to make a bench, though step-by-step photos aren’t very good, but on the author’s website you can read the instructions, the link can be found below.
The bench is made from old boards and wooden grill. Suitable from a bed or other furniture that you no longer need.


https://i.expert-h.com/en/lavki/1067#sigFreeIda99f1abdaf
Old wooden bench
 Often, old boards are in no way inferior in quality to new ones, and sometimes you can get them completely for free. You may need to tinker with processing a little longer. But look, is this bench from old boards not beautiful.
The most difficult part of the job was grinding all the seats and rear planks. It took the author just one day off to put together this shop, a total of about ten hours.
The whole process is laid out in step-by-step photos. Beautiful boards, you don’t even need to paint, you can simply varnish. And to put pillows - a new bench, what can I say.


https://i.expert-h.com/en/lavki/1067#sigFreeId2817f8826a
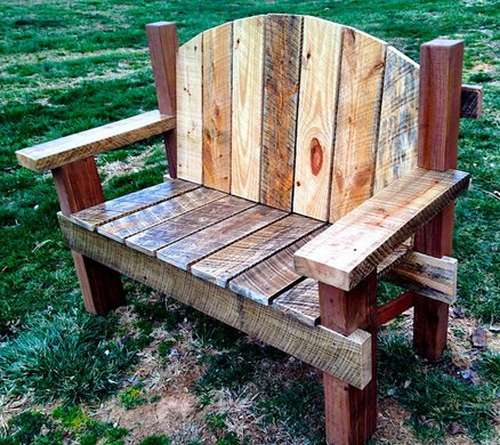
Country bench with back
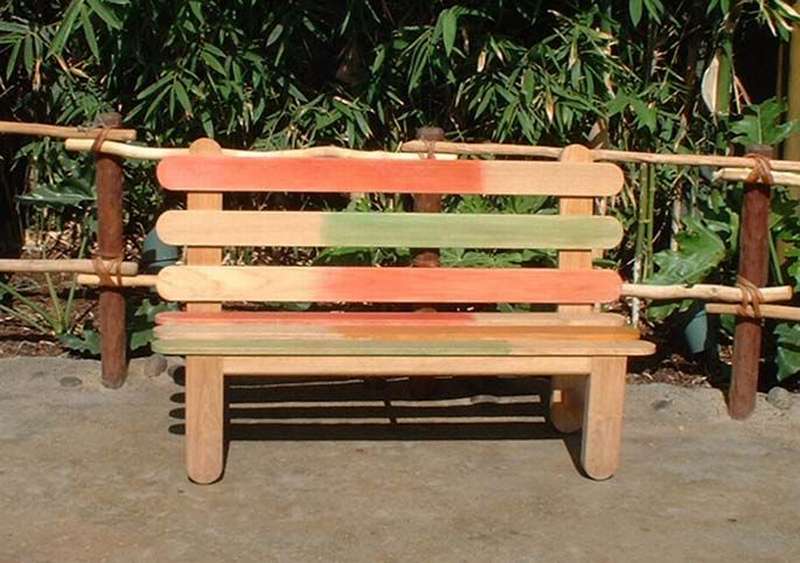 Cheerful multi-colored bench with backrest cheers you up. By the way, made by a novice master.
You will need
- 6 slats 1x6 2.5 m long
- 3 boards 2x6 2.5 m long
- 2 2x4 boards also 2.5 m long
- 5 cm wood screws
- Primer, paint or varnish, optional
Here are the step-by-step photos, how to make a bench with a backrest do it yourself, the instruction is on the site


https://i.expert-h.com/en/lavki/1067#sigFreeId4409b3cb62
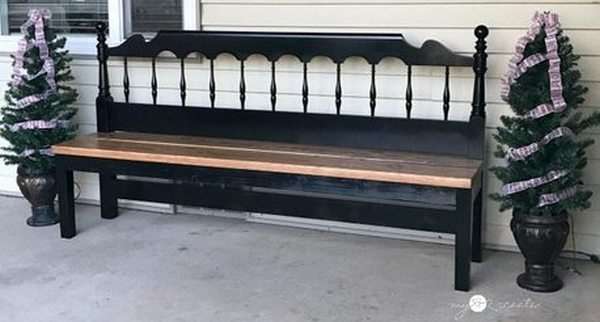
 Wooden bench with a back
This unique bench with back and asks in the garden or on the porch. Simple assembly will take an hour. Great example of garden furniture. And it doesn’t matter whether you paint it or leave it like that, in any case, the shop looks very attractive.
Necessary tools:
- Miter saw,
- table saw
- drill,
- roulette,
- pencil.
Material List
- 7 boards of 180 cm each
- 2 bars 5 x 10 cm, 3 m long
- Fixing screws, screws
Assembly order of shops on step by step photos. On the site you can read what sizes of boards are needed for assembly and detailed instructions.


https://i.expert-h.com/en/lavki/1067#sigFreeId52138cb6e3
 A simple do-it-yourself bench from the boards
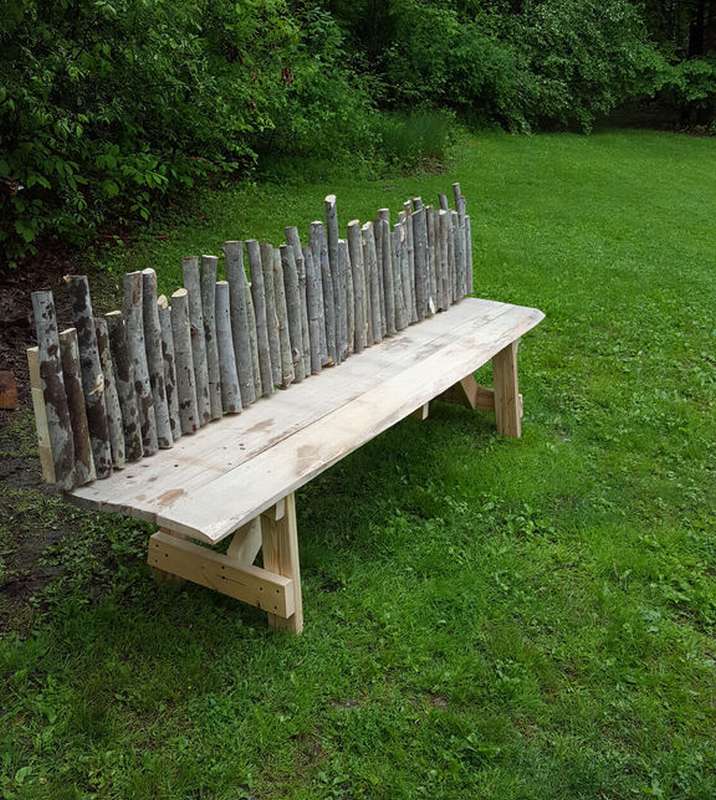
This plank bench with an original back is ideally suited for the seasonal dacha. The base is a bit heavy, but overall it’s good, because the bench will be solid. It took only 5 hours to make, and you may need much less time if you use the drawing and instructions.
Design and materials of a bench with a back
As you can see in the photos, you will need:
coarse cut boards, lumber the size of a wrist, preferably with smooth bark, 2 x 4 boards, long screws
Raw boards are used here, so the tree can rot, but it is easy to fix if you are willing to spend extra money on polyurethane varnish. You can remove the bark from the poles of the back, or leave if you like. Of course, there is an uncomfortable moment, the back is uneven, so you can find poles thicker and gently split with an ax. Then process a little, and you get a more or less smooth surface.
 After preparing all the necessary lumber make a 2x4 frame. Drill holes, twist the frame with screws and additionally fasten with waterproof wood glue.
45 cm - ideal height for the bench. Feet should be curved outwards.so that the bench does not tip over. Use the same angle for the back. To fasten the backrest to the seat, use at least 4 screws. Finish the job by grinding so that no one gets a splinter in an interesting place.


https://i.expert-h.com/en/lavki/1067#sigFreeId7af46caf74
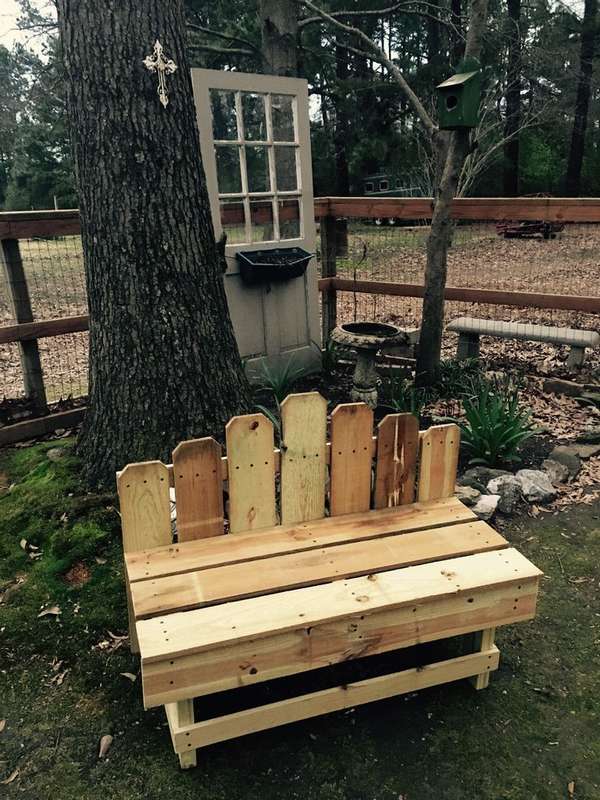
A simple bench with a back from old boards and uncleaned logs


https://i.expert-h.com/en/lavki/1067#sigFreeIdcf06a62e94
Simple garden bench
 This is a very simple project. There are no joints. Everything is held together with screws. Such simple garden bench even a child can do.
The necessary tools are shown in the photo.
 The thickness of the wood and the width of the planks in this case are dictated by the presence of boards that the author of the project had. In addition, the length of a double bench has much in common with the size of the yard where it is installed. You can easily make the construction a little longer or shorter. The depth of the finished bench made of wood is 65 cm.
 It’s very easy to cut parts, except diagonal hind legs. The gallery has a photo of how to do this, but to make it easier to understand, here is a short instruction.
- Place your foot so that the side 20 cm wide is parallel to the ground.
- Measure 42 cm from the base of the foot.
- Measure 12 cm from the opposite edge of the leg along the upper edge. Make a mark.
- Using a ruler, draw a line from the top mark to the mark at a distance of 42 cm from the base of the foot.
- Measure 42 cm from the base on the other edge, draw a transverse line. You will not use it for a cut, but you will need it later.
- Using a circular saw, cut along the diagonal line.
Do it twice.
Complete instructions how to make a garden bench with your own hands, you can read on the website of the author.


https://i.expert-h.com/en/lavki/1067#sigFreeIde10b6ca07a
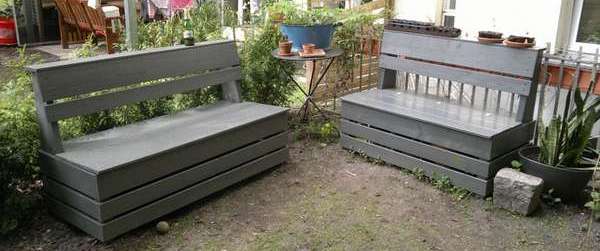
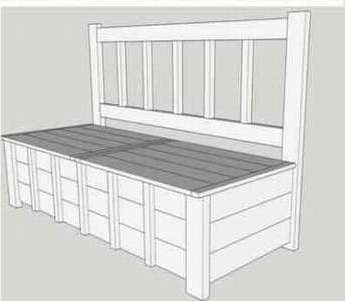
Bench with back and drawer
 This wooden garden bench large enough to accommodate three people. The design contains a box where you can put different things that clutter up the yard.
Especially such the bench will be usefulif you have children. Usually after the games the yard becomes a dump for toys. Even if there is a barn, this does not solve all the problems, because the doors are usually locked, and it is a troublesome task to constantly go for the keys.
A bench with a drawer will allow you to relax, not think about trifles and calmly watch improvised football matches, and fun games of children. When necessary, you can quickly assemble and put everything in a drawer, and when the children need something, they just open the lid and take what they need.
 Necessary materials
- 8 boards 2 x 4 2.5 m long
- 1 block 2 x 2 2.5 m long
- 6 wide boards 14 cm long 1.80 m
- 4 boards 1 x 6 2.5 m long
- 3 boards 1 x 2 2.5 m long
- 4 - stainless steel hinges
- Metal mesh fabric (60 x 150 cm)
- Wood glue
- Countertops
- Miter saw
- Nails
- Kreg jig
- Paper clips and staples
Assembly instructions are on the site, and see the step-by-step photos below.


https://i.expert-h.com/en/lavki/1067#sigFreeIdf987c2ec53
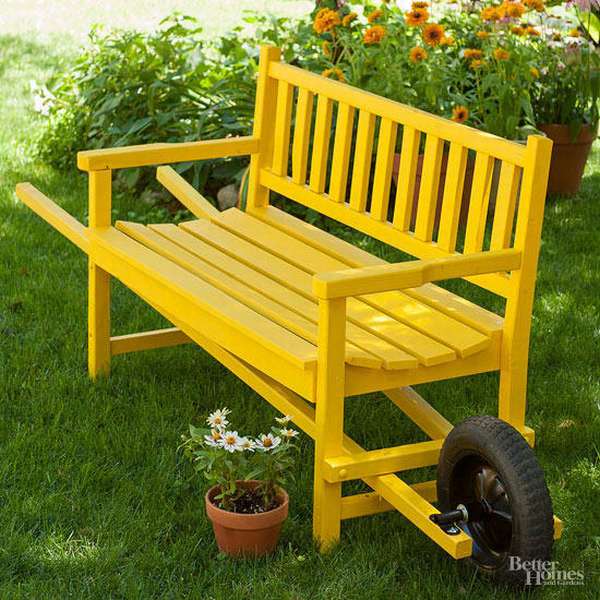 Bench car
The original idea for the garden is mobile bench. Now you can choose a place to relax, easily moving the bench. Unusual shops with a wheel at one end, you are unlikely to find somewhere, so just grab standard garden bench and add a wheel from a wheelbarrow, durable pens and a new coat of paint. The bench can be moved according to the season. You can put it on the terrace, if you don’t have enough furniture for the party, roll it to the far shady corner of the garden, if you want to be alone, and even take it to the beach, if it is, of course, not far from your house. In general, a lot of opportunities.Look at the step-by-step photos on how to make this a miracle of garden furniture, to find out detailed instructions, use the link under the gallery.


https://i.expert-h.com/en/lavki/1067#sigFreeId8a4915ef8a
Original bench
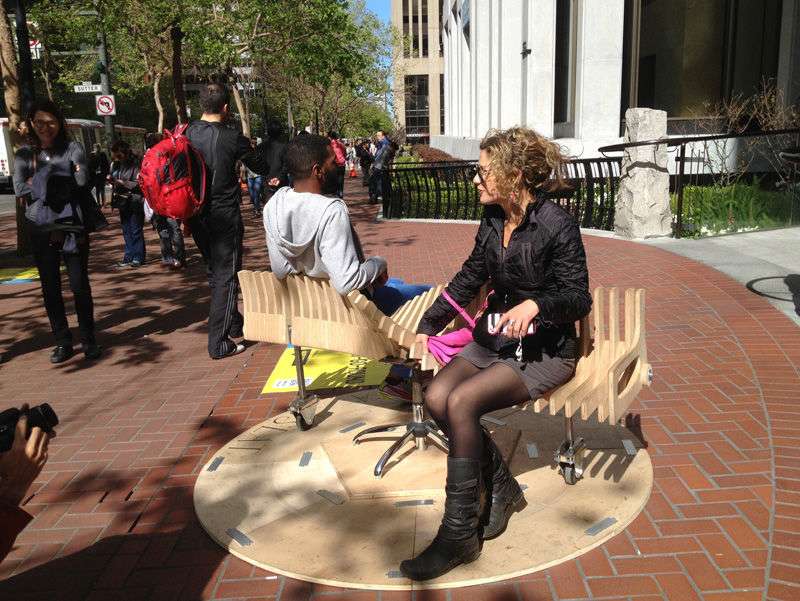 Original design spinning bench. The concept is to reevaluate a public space to create a playful connection between strangers. The bench was ordered for the Market Street Prototyping Festival in San Francisco, April 2015. Invented the original concept George Zisiadis, and the author of this photo developed and embodied in real form. Of course, hardly anyone will do such a bench for a summer residence, although we have enough originals with golden hands. But, meanwhile, if you are interested in a super shopthen there are no serious obstacles to not doing it. Of course, if you have ...
- CAD software
- CNC milling machine
- angle grinder
- MIG welding machine
- electric drill
- hand tools - wrenches, tape measure, screwdriver, marking tools, etc.
If all these tools gather dust in your home workshop, then you can go materials:
- 3 sheets of 13-ply birch plywood
- 180 cm 5 cm square mild steel pipe
- a couple of square meters of soft steel plate
- 3 cm square mild steel pipe
- bottom of a swivel office chair
- two wheels
- 15 m round mild steel pipe
- meter steel dowel
- meter threaded rod
- 5 bolts
- 2 sheets of plywood
- many small mounting plates and screws
In the drawing, it will look like this

 The bench is supported by the base of a 5 meter steel pipe that runs along the base of the bench. Steel plates are welded in the middle of this tube to fit the plate on top of the base of the chair. Then they will be bolted during assembly. The support legs are made of 3 cm steel pipe and sheets. At the upper end, a clamping structure is assembled that fits snugly to the central square tubular line.
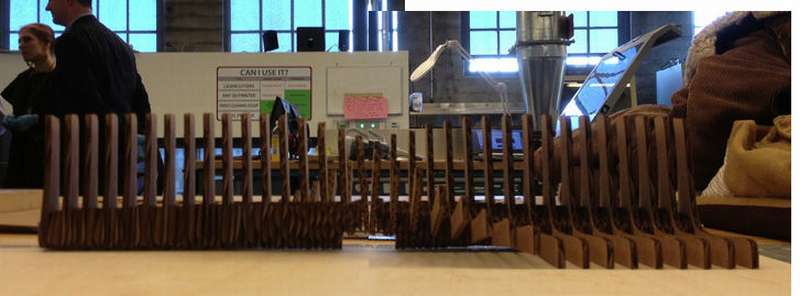 The seat is designed for the optimum combination of strength and lightness, made from separate sections with gaskets. Thus, the grandfather is not a solid tree (very heavy), but the sections are located close enough to each other, so sitting pretty comfortable. The result is a visually pleasing, airy structure that easily withstands the weight of two adults. Do not look that it looks not very reliable, the bench has already been tested, for three days it was used by thousands of people of all ages and judging by the smiles, everyone really liked it.
In general, if you are interested in this innovative invention, you can read the detailed instructions for its manufacture on the site, the link is neatly inserted under the step-by-step photographs.


https://i.expert-h.com/en/lavki/1067#sigFreeIdc9dba92543
Curved wooden bench for a summer residence
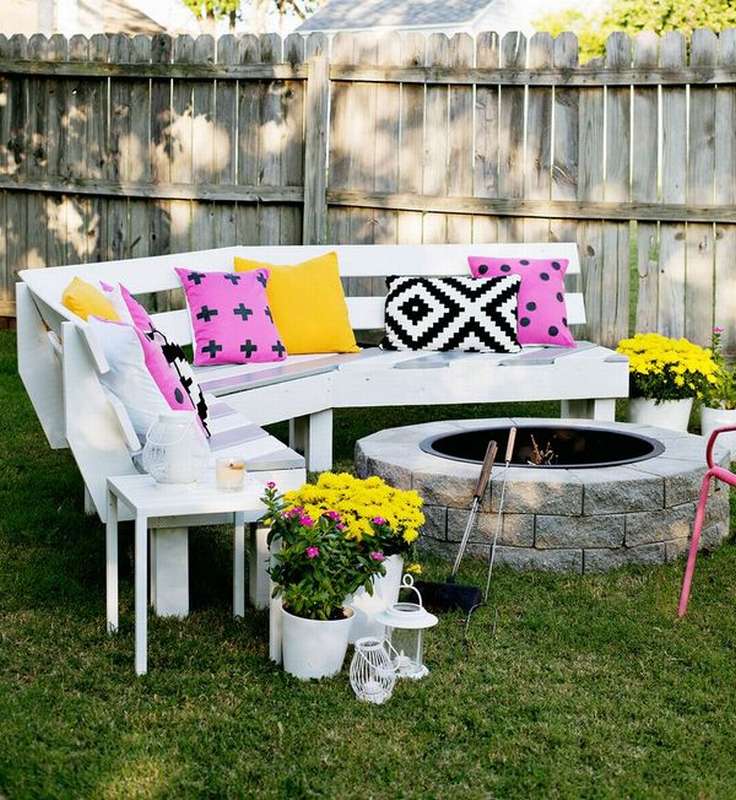 If you have a fireplace in the country, the resting place will be incomplete if you do not install a beautiful wooden bench. You can choose different designs, some prefer hexagonal shapes, also beautiful. But curved wooden bench more practical, more people fit and somehow more comfortable.
The construction of this model took about two days, despite the fact that the author had no experience in the manufacture of such structures. But you will have instructions, so it will probably take less time. There is no exact size in the description, because you probably want to make a bench that fits your space.
Tools:
- a circular saw
- drill
- Sander
- pencil and tape measure
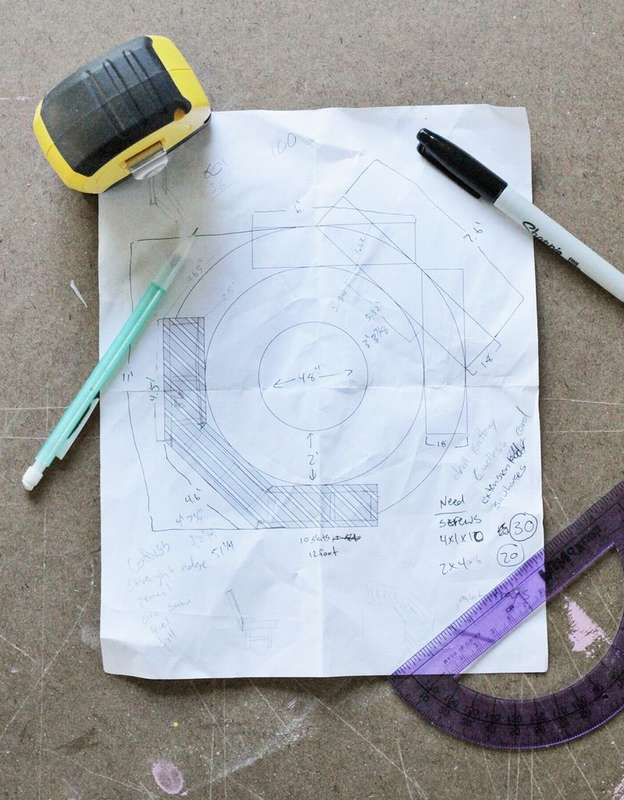 The first thing to do is find out what you are doing. That is, you need a drawing or sketch.
Still, this is not a simple bench, and although the design is not very complicated, it is necessary to calculate the length of the boards and angles in order to get smooth joints.
In the photo you can see the author’s sketches and draw a similar diagram for your project.
Some more tips
- The stand is half the hexagon, so all cuts should be at an angle of 30 °
- The planks on the top of the bench do not need to be accurately measured - just roughly cut to get closer to the size, set down, and then saw off at the same level with a circular saw.


https://i.expert-h.com/en/lavki/1067#sigFreeIdd878baf1ab
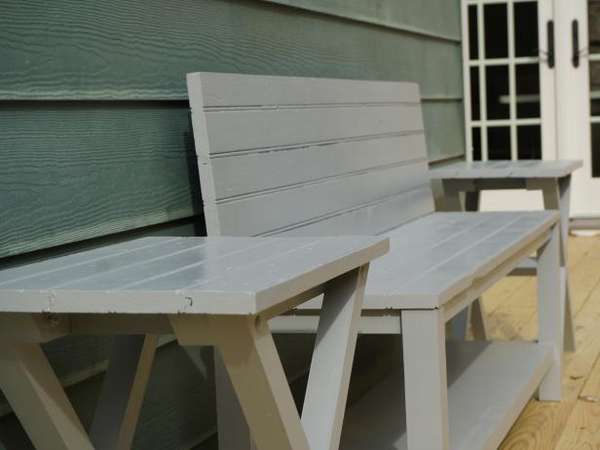
Veranda bench
 Want to design and to make a bench for the veranda? This guide will help you. This is a large bench (approximately 260 x 150 cm), but you can easily change the scale and make it to the size that suits you.
Toolsthat were used to make the bench
- Qicircular saw
- Jigsaw
- Table saw
- Kreg R3 Jig & Kreg Board Screws
- Drill
- Clamps of different sizes
- Roulette
It mainly used 4 × 4 bars and deck boards for flooring. To make the bench fit into your space, draw on paper a simple drawing with all measurementswhich you will need.
This bench is 2.6 meters long, including poles. The depth of the base between the uprights is 55 cm. If you make the depth more, it will just be uncomfortable to sit, leaning back. therefore be careful when designing. After the back, side and depth of the bench are specified, a few calculations are required to determine the length of the two front parts.
You can read the detailed instructions on the website. Just be careful, and do not rush to assembly until you are sure that all parts are well fitted.


https://i.expert-h.com/en/lavki/1067#sigFreeId138566e293
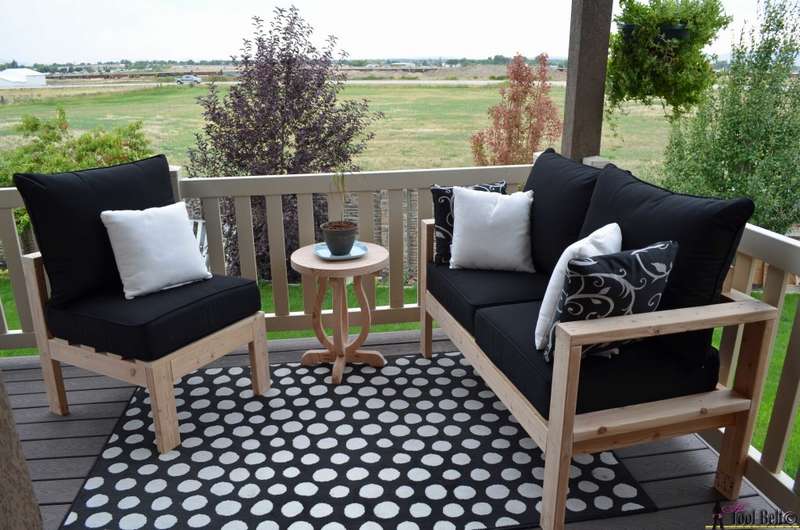
Outdoor sofa for the terrace
 Well, who will refuse such beauty. See how to make a big sofa for a large terrace or veranda. If you do not have so much space, it’s okay, in fact, the whole structure consists of separate sections, so you can make a corner bench if you wish. That is, you can fold sections in any combination.
Below are step-by-step photos, they depict drawings of section details with dimensions. On the site you can read detailed instructions, a list of materials, tools and sawing boards with dimensions.


https://i.expert-h.com/en/lavki/1067#sigFreeId19f2ba2350
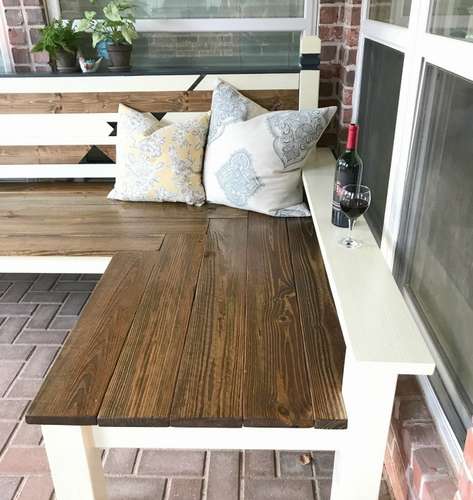
Wooden bench for the veranda
 Here is another example how to make a bench for the veranda with your own hands, this is if your site is long and narrow and standard sets of outdoor furniture do not suit you. This is a simple design with armrests and a back without trims.
you also can make a chair of the same designwhich perfectly complements the rest of the space. In step-by-step photos you can see diagrams with sizes.
Use the link under the gallery and go to the site where there is a detailed instruction.


https://i.expert-h.com/en/lavki/1067#sigFreeIdff31614c09
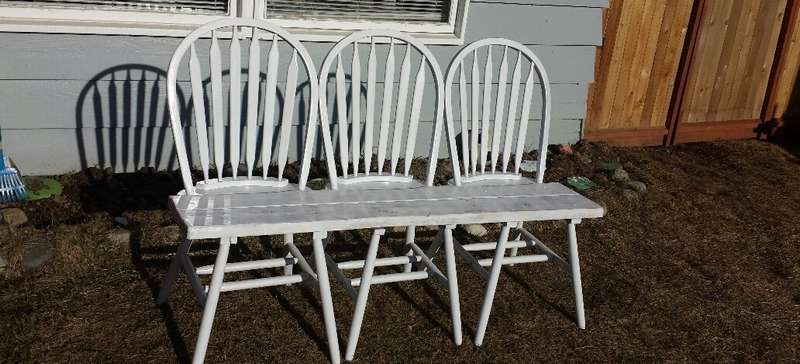
Chairs from chairs
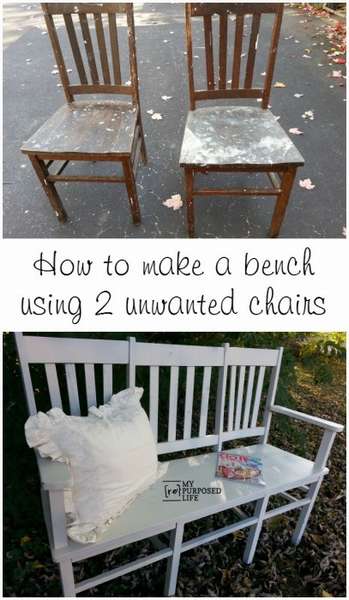
How to make a bench out of chairs
 let's make a bench with old chairs ! Do you have some old chairs? Not sure what to do with them? Why not remodel these chairs into a unique bench? In fact, everything is simple.
Need:
- remove the seat
- cut boards to size
- attach a new seat
- the bench is over
But usually everything doesn’t always happen as planned. Here some problemsyou may encounter:
- cleaned screws
- access to screws is blocked
- glued screws (difficult to remove)
Then, rarely can you find chairs with straight backs. Of course, all this can be solved. So, the first step is to dismantle the chairs. Then you will need boards for the bench seats. You can use old ones, for example, from a cabinet or other furniture.
- To make the process go faster, make a template. You can align the board to the curved back of the chairs, measure where the marks should be to create a pattern.
- Now that you have your own template, you can draw a wooden panel with a pencil. Be sure to mark where you can crop the sides.
- When finished with sawing, make sure all parts are sized. Now it's time to grind and paint everything. For best results, use fine sandpaper.
- Fastening a bench to chairs is the last moment of truth. To fix the seat, you need to apply glue between the wood panel and chairs. Then fasten with clamps so that they hold them firmly until the glue dries.
- After that, remove the clamps and turn the bench over to secure with screws.
Everything, you can flip and enjoy what you got.


https://i.expert-h.com/en/lavki/1067#sigFreeIdab3dfc5037
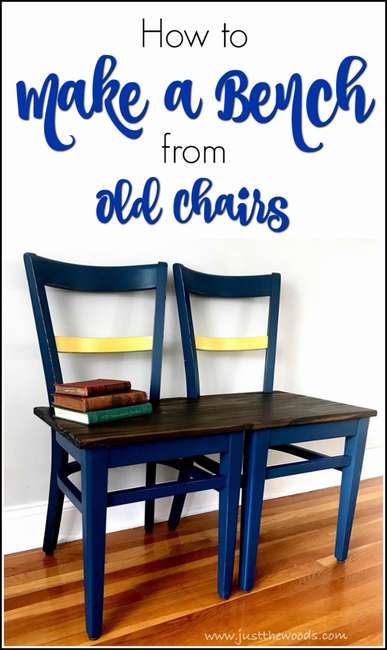
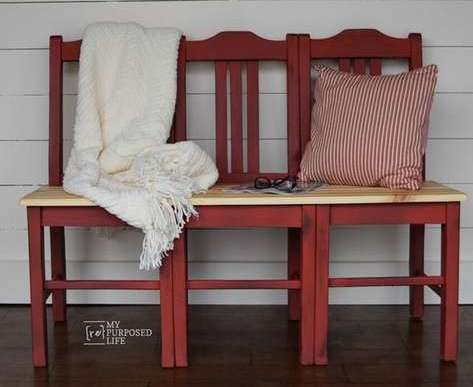
How to make a bench of two chairs
 There is nothing more satisfactory than taking what was thrown away as garbage and turning it into something unexpected and surprising.
What is necessary:
- Optional paint and primer
- Good quality brush
- Good roller
- Drill or screwdriver
- Plywood
- Jigsaw
- Sandpaper
- Trisodium phosphate (detergent)
Instructions:
- Use a drill or screwdriver to remove the screws from the chairs. This will free the seat cushions from the frame. Save the screws.
- Sand the chair frames with sandpaper.
- Clean dust and dirt with trisodium phosphate.
- Wipe again with a clean, damp cloth and water, let it dry.
- Apply a primer coat. Let dry for one hour.
- Apply 1-2 coats of paint. (One hour between layers)
- Set 2 chairs together and measure for plywood.
- Round the corners.
- Apply one coat of paint. Let dry for one hour.
- Apply 1-2 more coats of one paint depending on the desired coating. (Givethose dry one hour between layers)
- Set the seat on 2 frames.
- Take the screws that were used to attach the pillows. Screw them in using the same holes.


https://i.expert-h.com/en/lavki/1067#sigFreeIdbfd8224f54
Another example benches from chairs. The colors on the seat are a dark red primer, metallic copper paint, turquoise paint and red.


https://i.expert-h.com/en/lavki/1067#sigFreeIdb800228813
Garden bench with two chairs


https://i.expert-h.com/en/lavki/1067#sigFreeIdcff27b2191
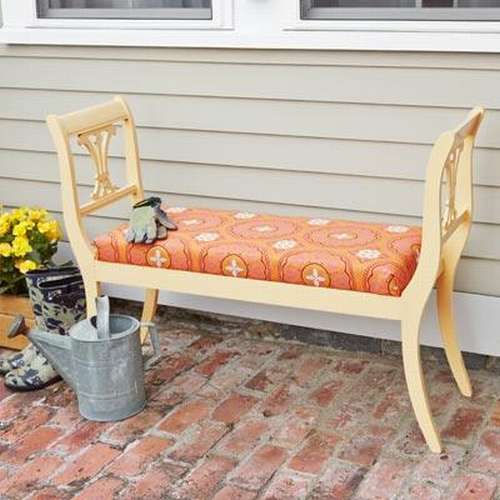
Three-chair bench
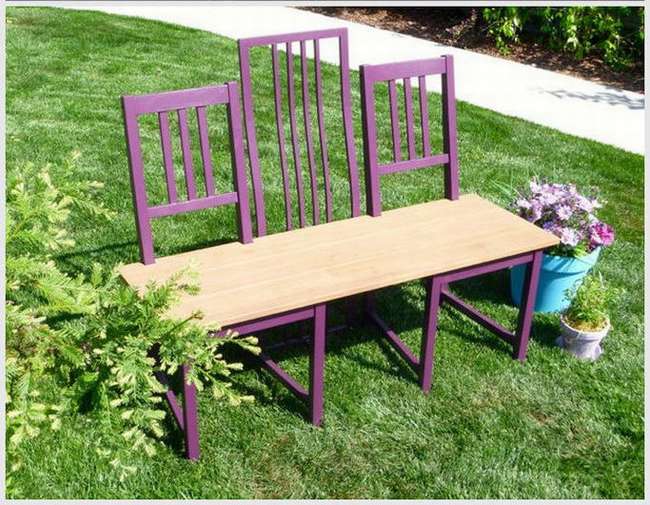 You will need ...
- 3 chairs
- Material for the bench - boards or solid wood
- Tools - drill, saw, grinder
A triple bench can be made in a variety of ways, and often the chairs that you have and the place you want to use for the bench will be determined by the design.
When creating this benches from chairs An electric jigsaw, grinder and drill were used. Essentially in this project you can do without power tools. Only a hand saw is needed to cut a bench, a notch saw, sandpaper and a screwdriver. But, this is in case you do not have them, let this problem not stop you, do not be afraid to start.
«If you want to control someone, all you have to do is make them scared. ”- Paulo Coelho. So, by the way, I had to :)
Finding chairs for the project is easy, at least take a look at your attic. If you find nothing there, ask your neighbors. Decide where to be used. bench of chairsoutdoors or indoors. If on the street flooring is the perfect choice. Deck boards are made of durable and weather-resistant material. you also can make a hardwood bench - hardwood boards, plywood, etc. Just make a cardboard templateto visualize finished size and shapes.
 Design selection and assembly
- Install the chairs, paying particular attention to the gap between them. In this case, it was necessary to simply remove the back from the section of the front legs. Depending on the design, you can cut off the front legs, remove the seat and legs from the back ... or leave everything as is.
- Then measure the total length of the bench and determine the size of the protrusions for the side and front.
- Cut the seat to fit.
- Use a jigsaw to make a notch.
- Sand and paint.
- Once the paint is completely dry, install the seat boards, making sure that they are all installed correctly.
- Screw the boards with screws. For a street bench use stainless steel.
If the bench is made for indoor use, think of pillows.


https://i.expert-h.com/en/lavki/1067#sigFreeId9b398728e1
 Here is another project bench of three chairs. In the manufacture of a typical triple bench from chairs, it is customary to remove the legs of the middle chair. In this case, all the legs are flat, so they remained in place.
Sand the surface, then connect with each other with screws. The photo shows the blue arrows where to tighten the screws.
A very simple project, captivates the beautiful color and simplicity of the lines. So if you find three old chairs, now you know what to do with them.


https://i.expert-h.com/en/lavki/1067#sigFreeIde2e5ec1e62
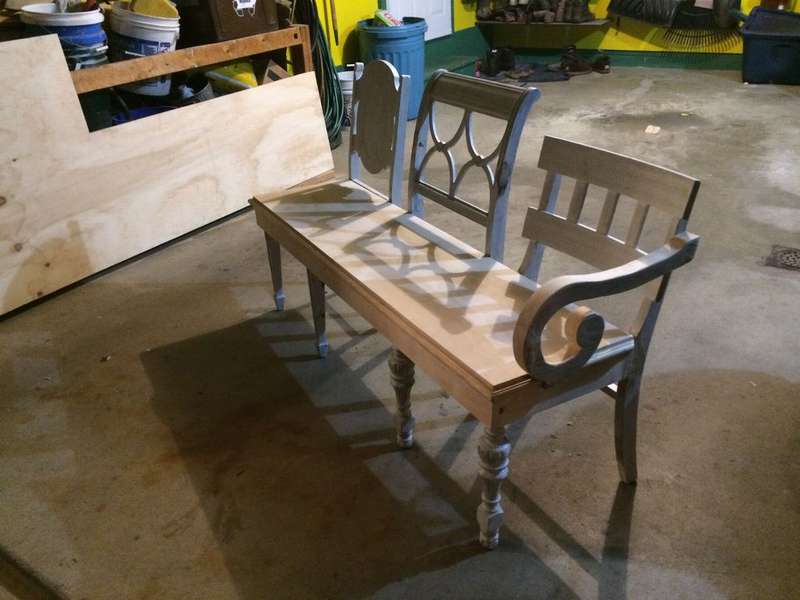 If you come across three chairs of different shapes and sizes, okay too. This project is quite simple and based on creative thinking and simple methods of building furniture. It consists of three separate unique antique chairs that are attached to the bench under the back of the chair.
Used here pine board and bench, trim to clean the edges, edging. To make the upper part of the bench look solid, armrests are made.
Stand cut out pine plywood. The corners of the bench platform are fixed with glue and screws. The top of the bench is attached to the frame at the corners with 45 degree angle brackets, as well as with screws with holes on the base frame.
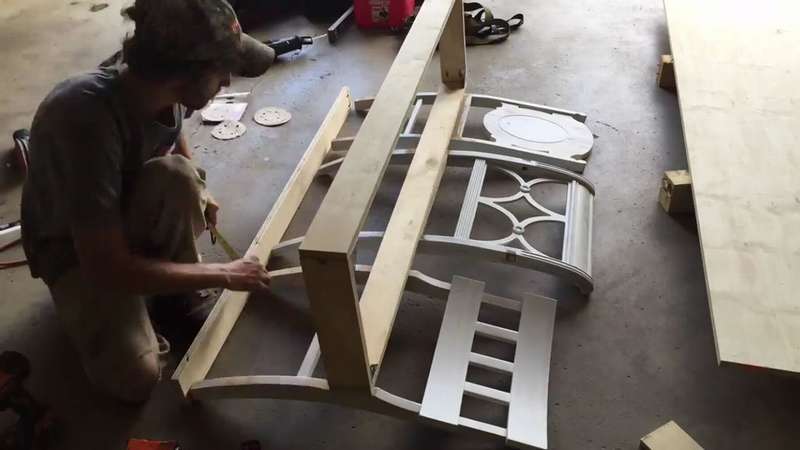 First, disassemble the chairs by cutting off the seat and leg lifts using a saw blade. After that, lay it on the ground and use a straight board to keep them level with respect to each other.
- Attach the base frame to the back of the chair with glue and screws.
- You can use a car jack to hold the front of the bench. This is a convenient way to free the other hand.
- To attach the middle legs, add a few plywood sheets in the middle of the base frame, fasten with screws.
- Sand the entire surface of the bench to hide most of the edges.
- The armrest is attached to the base frame with a small wooden tongue, screws, and then the heads must be sealed with putty.


https://i.expert-h.com/en/lavki/1067#sigFreeIdcbdf060bf4
 If you need big benchbut you only have two chairs, you can just add a couple of boards and you get what you see in the photo.
- The first step was to udpour wooden seats, and then use extra boards to connect the two chairs.
- To make the third (middle) chair, you need to add a few slats. You can use the router to make grooves for the slats.
- Use the pocket holes to attach the top and bottom of the new chair to the back.
- Kreg jig will also be needed to attach the front and back braces that connect the left and right chairs.
- To make the bench look as if it is actually made of three chairs, you need to make a backrest.
- Then make the armrests. They look a little funny, but they perform their function.
- Use the pocket holes to attach the armrest to the chair and the bracket to the seat.
- When finished, sand and paint.
Looks good.


https://i.expert-h.com/en/lavki/1067#sigFreeId225f6c1968
This is another similar design of a bench of three chairs


https://i.expert-h.com/en/lavki/1067#sigFreeId28d0406046
Shop from chairs
 Many of us have old chairs that we no longer use, but it's a pity to throw out chairs - just in case, if suddenly one day you will need an extra chair. True, over time, they become “what to do with them?” The answer to the question in this article is make a bench out of chairs with your own hands. Look at the photo, do you like such a bench? Such a shop can assemble in one day and at virtually no cost. Of course, provided that you know how to work with different types of power tools and have basic experience with wood.
If you need detailed instructions, you can find it on the author’s website, the link is under the gallery. Although if you have any skills and this is not the first project, then everything can be understood by step-by-step photos.


https://i.expert-h.com/en/lavki/1067#sigFreeIda81981cd86
 A similar example is shown here. how to make a street bench from dining chairs.
The designs are almost the same, only a mattress has been added, which can be sewn independently.
This project uses elegant contoured backs of chairs, which makes the shop so attractive. Plus, you need a few more boards - new or used and a sheet of plywood. Apply several layers of latex paint and upholstery from a waterproof, fade-resistant fabric.
The crossbar under the seat will add stability lost when removing the front legs of the chairs.
Working time approximately 4 hours.


https://i.expert-h.com/en/lavki/1067#sigFreeId2108b9ec34
Bench made of old chairs
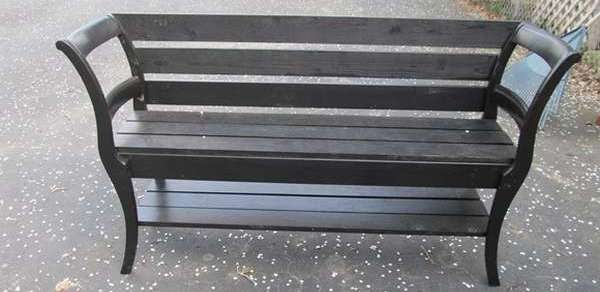 See another example, this bench made of chairs with a back looks solid.


https://i.expert-h.com/en/lavki/1067#sigFreeIddcdb59f08e
Here is how to do beautiful street bench of three chairs.
 The design is not at all complicated. After painting cover the surface with polyurethane. The end result is a nice, durable bench that is weather resistant!


https://i.expert-h.com/en/lavki/1067#sigFreeIdf37fc1ffe8
Benches from chairs 100 photos


https://i.expert-h.com/en/lavki/1067#sigFreeId112a243273
Door benches
Old door bench
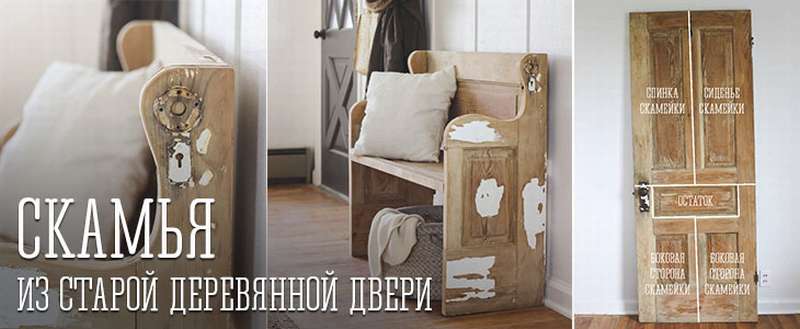 Old doors, this is almost a bench, you just need to fix them properly. You can do this in different ways, depending on the door and of course on your imagination. Here is one way, on the right you see a diagram, how to divide the old door into the details of the future bench. The author did not provide step-by-step photographs showing the process, but the idea should be clear. You just need to carefully cut the door into pieces, as shown in the photo. Using a jigsaw to cut beautiful side backs, well, how to assemble all these details into a single unit, intuition will tell you. The main thing is to start, but some kind of bench will work out anyway, I hope that it is no worse than in the photo.


https://i.expert-h.com/en/lavki/1067#sigFreeIdcb9bd04371
And this is another example, how to make a bench out of doors. Here, step-by-step photos are shown in more detail, moreover, the site has instructions.


https://i.expert-h.com/en/lavki/1067#sigFreeId51d6c863da
How to make a bench out of a door
 See how to use an old veneer door to make a bench for the garden and a small table.
Tools
- a circular saw
- table saw
- roulette
Materials
- door made of lamellas
- 2x2 wooden square beam 2.5 m long
- 15 cm metal brackets
Start with a plan
Since used materials are unique and do not meet standardspurchased at the store, each cut should be planned in advance. Since this door was only 90 cm, the bench was planned 45 cm, that is, half the door.
 Cut the door in half so that the ends are absolutely square.
- Make a frame.
- To create joints and veneers, use a 1/2-inch square bit milling table.
- Saw out the transverse parts
- Assemble the bottom frame
- Make legs
- Assemble the main frame, for which loosely assemble all the parts and adjust the dimensions if necessary. Use glue for all joints.
- Make a shelf. Cut two sheets of plywood and reinstall.
- ClosePlace the L-shaped brackets in the seat
- Turn the seat over and mark the rear cross braces to position the bracket so that you can make a groove.
- Attach the seat to the main frame
- Sand the surface before applying the primer. After the primer has dried, sand it with sandpaper, then apply two coats of semi-gloss paint.


https://i.expert-h.com/en/lavki/1067#sigFreeIdef0dddc33e
 If there is an old door that is idle in your garage or workshop, then this project can be a practical way to reuse them. This bench made of doorhard to call old, she was tall and strong. Of course, all the doors will be different, so you just need to lay out the door and imagine how and in what places it will be necessary to cut it.
Doors from solid wood are ideal building blocks to create a reliable bench. They are very durable, easy to use and require very little modification.
First mark the cut lines. In this case, the upper half will be the back, and the lower one will be the seat. After sawing off, 4 parts should remain. If glue was not used in the manufacture of the door, all parts will fly apart, so you may will have to glue some parts. And yet, if you decide to make a different shape, then you did not even need to trim the top - you can leave it as it is.
After all the boards are cut, drill holes. Then simply glue and screw in the screws.
At the end, sand everything well, apply a primer and paint.


https://i.expert-h.com/en/lavki/1067#sigFreeId85c4ce9de1
Bed benches
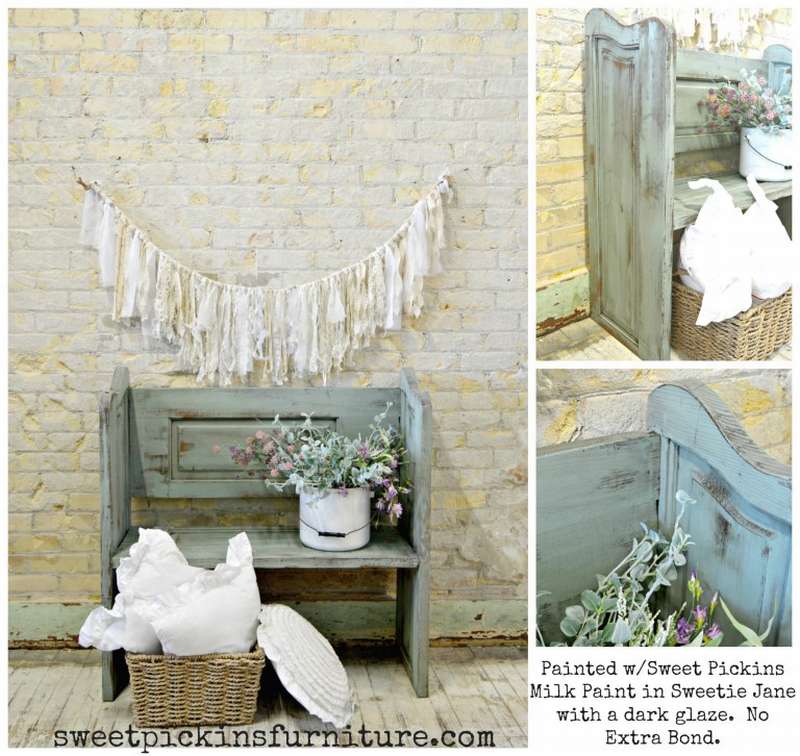
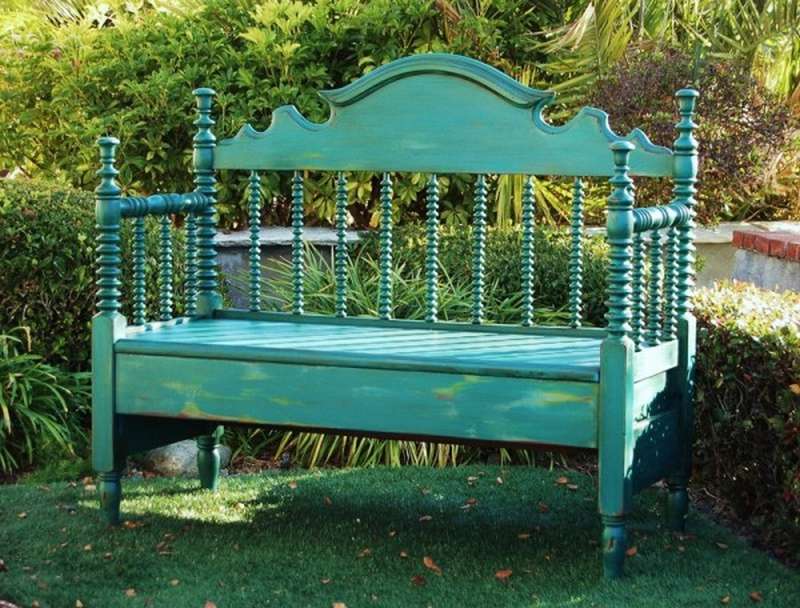
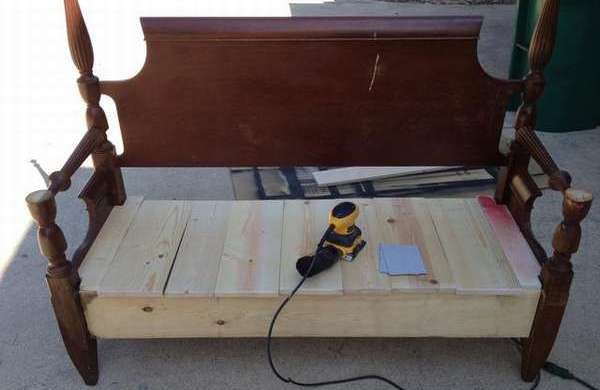
Bench from the headboard
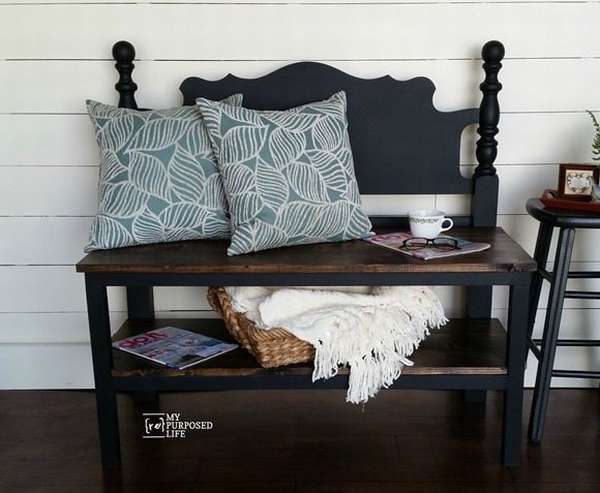 Find the headboard and make yourself a new bench. To make the frame, screw the rear bracket directly onto the legs of the bed, and then insert the side strut. Make more holes for attaching to the lower framewhich will hold the bottom shelf. It will not be visible, they will be covered with shelves from above.
Cut the boards exactly the same size to fit the lower braces correctly.
To strengthen the seat you need support, so you need to attach bracket in the middle.
After fixing and polishing the parts of the bed, apply wax oil to the surface, which allows the wood to breathe and at the same time has water-repellent properties. Also great protects the tree from cracking. Then polish.
Make do-it-yourself bench, this is a wonderful lesson. There are no two identical self-made constructions, in this the network is the beauty of creativity, creating unique things ..


https://i.expert-h.com/en/lavki/1067#sigFreeId4aa3517ec7
DIY corner bench
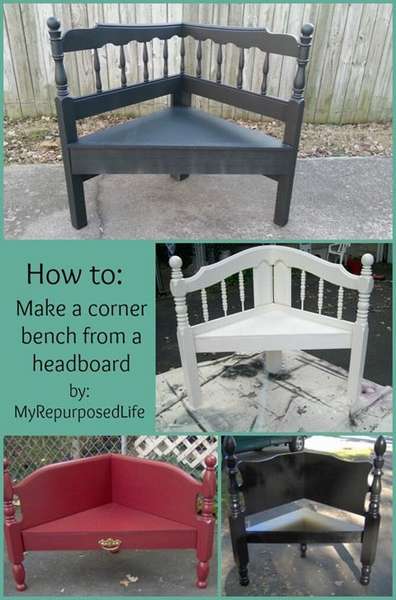 Idea first make a corner bench from the headboard It may seem a little scary, but this step-by-step guide will show how easy it is. Cut the head of the bed in half - here is the easiest option to make a corner bench. A bench of this shape is easier to move, and it takes up less space. I hope this article inspires you to make your own. headboardwhich is perfect to fill an empty corner in your home.
How to make a corner bench
- Cut the headboard. As you can see in the photo, her no need to cut exactly in half. It is difficult to explain, but if you saw it off in exactly half, one side will be shorter than the other.
- Attach the backrest at a 90 ° angle
- Attach the third leg to the back of the bench.
- The back leg will support the seat, so it is important to set the correct height using the level.
- Bench will need a front bracket
- Make room for the armrests. The problem is that the front of the seat had a small overhang over the front bracket. Add a pair of small planks to the hind leg to support the top of the head.
- Color bench


https://i.expert-h.com/en/lavki/1067#sigFreeIda9ef33e40c
Bench from an old wooden bed
 Look how to make a bench from an old wooden bed
You will need
- Old headboard
- 2 mm plywood 50 x 200 cm (seat) In this case, the width of the head was 2 m, so you need to take the dimensions corresponding to your headboard
- 2 boards 2 m long (for seat)
- 3 boards 2 m long (for the seat frame)
- 4 bars of 45 cm for legs
- Screws, drill, brush, rags.
How to do, look at the photo. First, assemble the frame, fasten the boards to it, from below screw the crossbar for strength. Then fasten the legs, and screw the whole thing to the headboard.
Color and enjoy the beautiful bench.


https://i.expert-h.com/en/lavki/1067#sigFreeId578aa4f8bf
 Isn't it beautiful!?
Find an interesting headboard. Saw the footboard and attach it all to the railing of the bed frame, or take boards if there is no railing ...
Then attach everything with glue, screws, brackets. For the seat, you can also use parts from old furniture or find suitable boards. Be creative!
Then paint or leave as is if the back and other parts are in good condition.


https://i.expert-h.com/en/lavki/1067#sigFreeIdb352375a32
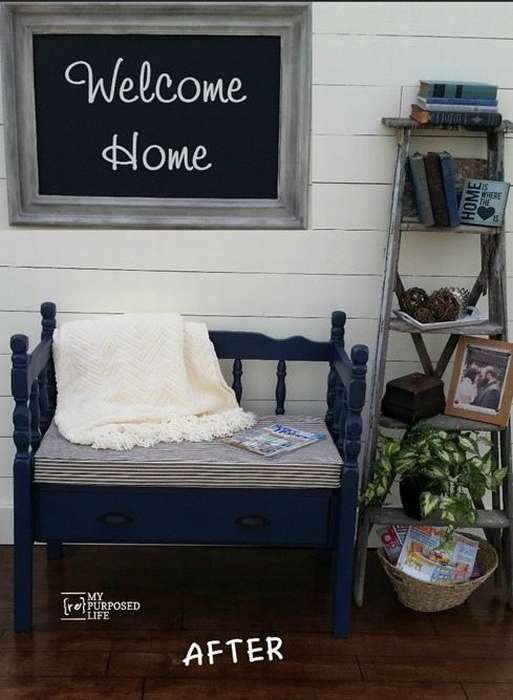 See another example how to make a comfortable bench sofa with drawer for storing various things.
Very nice and comfortable, ideal for an entrance hall or porch under a canopy. Of course, you won’t do exactly the same, but you can always findsome old furniture to do something like that.
You have already seen many examples in this article. benches from the head of the bedThey are all so different.
Of particular value old beds with a beautiful headboardso if you come across an old headboard, you now know exactly what to do with it.
Below you will find step-by-step photos of how the author of this project brought his idea to life, if it is interesting to know the details, then there is a large instruction on the site where it is written what, where and why you need to saw off and screw it on.
Read, it may come in handy.


https://i.expert-h.com/en/lavki/1067#sigFreeIdddacc40242
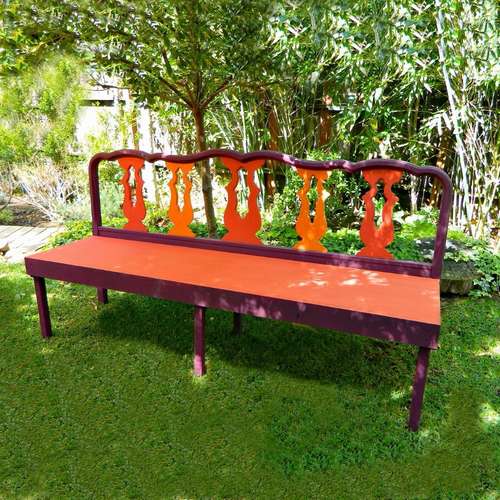
Headboard bench
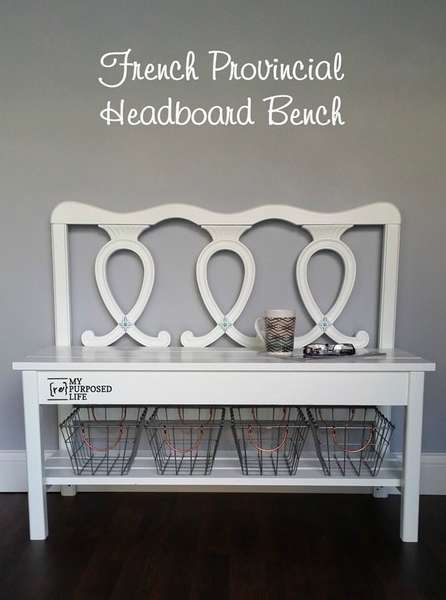
 Part of the problem with this type of project is that the headboards come in all sizes and shapes. Looking through numerous examples of benches with headboards, just use the helpful information to plan your own bench, and remember that you will most likely have to calculate your size and shape. Although the basic structure will be the same for most optionsif you certainly don’t find a whimsical back.
Here is what the author used for his project:
- Wooden headboard and footboard, full size was used here.
- 2 boards 1 x 6 "for the front and back of the bench, for the inner frame.
- 2 boards 1 x 6 "for parts of a side emphasis of an internal frame.
- 18 boards 1 x 6 45 cm long
- Wood screws
- 4 metal corner brackets
- Drill
- Jigsaw
Measure the width of the headboard and find out how deep you want to make the bench. Most chairs have 45 cm, you can choose the same size.
- First tie the inside of the frame to the bench. Then fasten the sides with screws.
- Choosing the right place to mount the frame is what you will need to find out because the backs are all different.
- Use metal L-shaped brackets at all internal corners for added strength.
- If the bench will be on the street, and you do not want the boards to deform over time, tighten two screws at each end of the board.
Most helpful tip. Before buying materials, make accurate calculations. You will save a lot of time and money.


https://i.expert-h.com/en/lavki/1067#sigFreeId773218cc6e
How to make a bench out of bed
 You just need find a beautiful headboardEverything else is not a problem. Look at the step-by-step photos, if you want more details, the author’s site has instructions and a video, a link under the gallery.


https://i.expert-h.com/en/lavki/1067#sigFreeId7c8fb25b4c
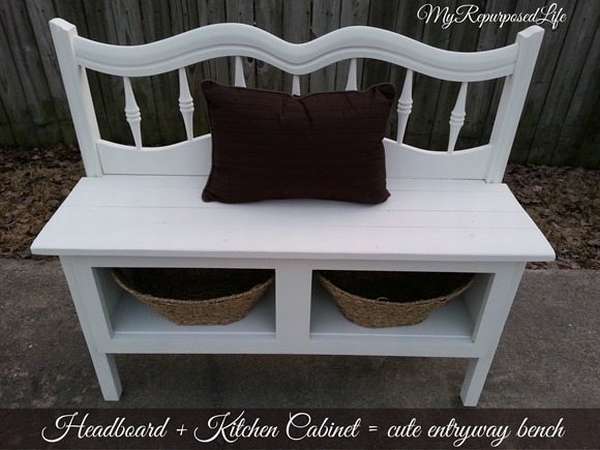 This is another little bench out of bedwhich is perfect for entry. This time, the bench is assembled from the headboard and kitchen cabinet.
Use wood glue and a nail gun to attach the seat to the top of the cabinet.
If the cupboard is narrower than the head of the bed, attach plywood on both sides to fill the empty area. Secure it with glue and a nail gun. You can see in the photo how to close the area of the planks on the head.
Now you can start painting. Do not forget to paint bottom and back for a more complete look.


https://i.expert-h.com/en/lavki/1067#sigFreeIdb9f35b4483
There are many ways make a bench out of the headboard. Here is a very good example. Comfortable with lower shelves and compact.


https://i.expert-h.com/en/lavki/1067#sigFreeId1dbbf4854e
 Design of this bench from the headboard slightly different from other options.
Use the front footboard and the front crossbar of the bench. Necessary saw off pillars just above the bottom of the footboard.
Grind the pins well after cutting.
Make the bottom shelf of the board the same size as the seat. Use a Phillips screwdriver for all screws because the fit may be too tight.
Saw out the bottom shelf to fit between the legs of the bench.
To secure the seat, use wood glue and a nail gun.
Apply a primer to the surface of the boards. Paint the bench.


https://i.expert-h.com/en/lavki/1067#sigFreeId749c64aae6
Look another beautiful example of a bench from a headboard.


https://i.expert-h.com/en/lavki/1067#sigFreeId76980b92f5
 Beautiful back. The frame is made of wood, but the little curly curls are made of plastic.
The very first step in manufacturing bench from the headboard - This is to decide which legs you will use for the front of the bench. Until you know the width, you won’t know how long to cut the sides and in front of the bench.
Cut one front support and two side supports, then connect with screws.
If you do not have a pocket clip, you can use the “L” brackets. But, if you do a lot of projects, it is recommended to buy Kreg Jig, a very convenient piece in the manufacture of furniture.
Make another rung to secure in the center of the frame for strength.
Attach the bottom shelf
Steal your new old bench


https://i.expert-h.com/en/lavki/1067#sigFreeIdd9629077ea
Or in this way


https://i.expert-h.com/en/lavki/1067#sigFreeId175048a428
 Here is another beautiful example, Gothic style headboard bench.
- Cut the boards to form a frame.
- The easiest way to make a bench is to first assemble the box and then attach it to the headboard.
- The author had to use two old boards, because that was all he had. Of course, the new 1x6 board would have looked better.
- Now put it all together. It will be necessary to add support in the center of the bench.
- To attach the veneer, use wood glue.
- Cut the seat boards and sand them lightly so that there are no rough edges.
- If there is no way to attach the armrests, you canthen do not set, as the author did. It looks beautiful anyway.
- Then sand and wax. An important rule: first apply a transparent wax, and then dark, where you need to add. You can erase excess dark wax.
 Done.
Done.
What do you need
- brackets
- 1 x 6 boards
- skin
- wood glue
- wax
- gypsum
- brushes
- rags
- wood screws


https://i.expert-h.com/en/lavki/1067#sigFreeIde996c673b0
DIY bench with backrest 200 photos


https://i.expert-h.com/en/lavki/1067#sigFreeIdef12e60b52
Hello, I am the author of this article, so I look forward to asking questions for this article in the comments below, I will answer all !!!
If you have questions on another topic, ask them on our forum, we will answer you
- Two baskets of paper in 5 minutes (Master class)
- How to make a simple and compact table for a milling cutter from plywood
- How to make a soft headboard tile (Instructions + step by step photos)
- Cinder block benches: a convenient bench in 55 minutes
- How to make a bed with a niche: saving space (Master class)