Do-it-yourself loft bed. 800 photos + drawings, instructions
 how to make an attic bed
Look for information how to make a loft bed do-it-yourself? You found her! Here are 35 concrete examples with step-by-step photos and drawings. Design and comfort should not be compromised even when living in a tiny space. An attic bed is a great way to make your bedroom or children's room as spacious as possible.
There can be many options. Find here how to make a baby bed loft do it yourself and examples loft beds for adults and teens, with tables, shelves and sofas. Regardless of which design you choose, you will appreciate the availability of vacant square meters, especially when you try to squeeze a lot of everything into a small space.
The content of the article:
- DIY loft bed
- Children's bed attic lodge
- Loft bed with table
- Attic bed drawing
- Loft bed with sofa
- Corner loft bed
- Bed loft in the kitchen
Children's loft bed made of wood
 What furniture salons offer does not always meet our needs. When you are unhappy with what is in stores, you just need to do it yourself! Here is an example how to make a baby bed loft do it yourself. The final construction of the bed is a simple, double frame made of lumber from wood, which can be easy to assemble and disassemble. What were the main criteria when developing the project: safety; the bed must be durable so that it can be used for years; the design must be collapsible so that it can be rearranged if necessary.
 All these requirements were met and that’s what happened. If you want the same loft bed for kids room, read the instructions on the author’s website, link under the gallery. In the gallery you will find step-by-step photos with drawings and diagrams. The great thing is, when you do things with your own hands, it is very easy to make any changes to the design.


https://i.expert-h.com/en/krovat/cherdak#sigFreeIdceb0ba3119
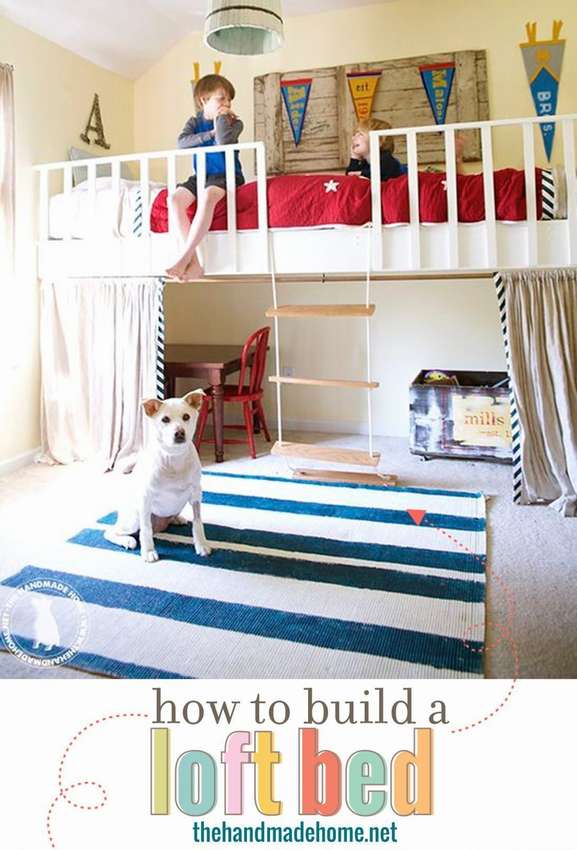
Attic bed for kids instruction
 This step by step guide will help you make modern loft bed for children with a comfortable staircase, two single beds on top and a fairly extensive play space below, where you can place a table, cabinets for toys and small chairs. On the site you can watch a video where the assembly process is well shown, but there are also detailed step by step instructions for cutting parts, assembling beds and making stairs, you can view them below in the gallery.
 True, I want to note that for security reasons for assembly it is better to use not self-tapping screws, but screedsthen the design will be much more reliable.


https://i.expert-h.com/en/krovat/cherdak#sigFreeIdebca728929
Canopy loft bed
 Here is another example how to make a loft bed do-it-yourself for a girl with a canopy. By placing the bed on a high raised surface, loft beds allow your child to use space under the bed. This area is ideal for playing or doing homework for a teenager.
- First measure the mattress and make a frame.
- Then cover the frame with plywood. It was originally planned to attach the frame to the ceiling, but this is not very reliable. Therefore, a pole was installed at the floating angle of the bed in the attic.
- After that, fix the wooden safety rails on the sides.
Please note that previously used here primed wood.


https://i.expert-h.com/en/krovat/cherdak#sigFreeId5f2e9a143d
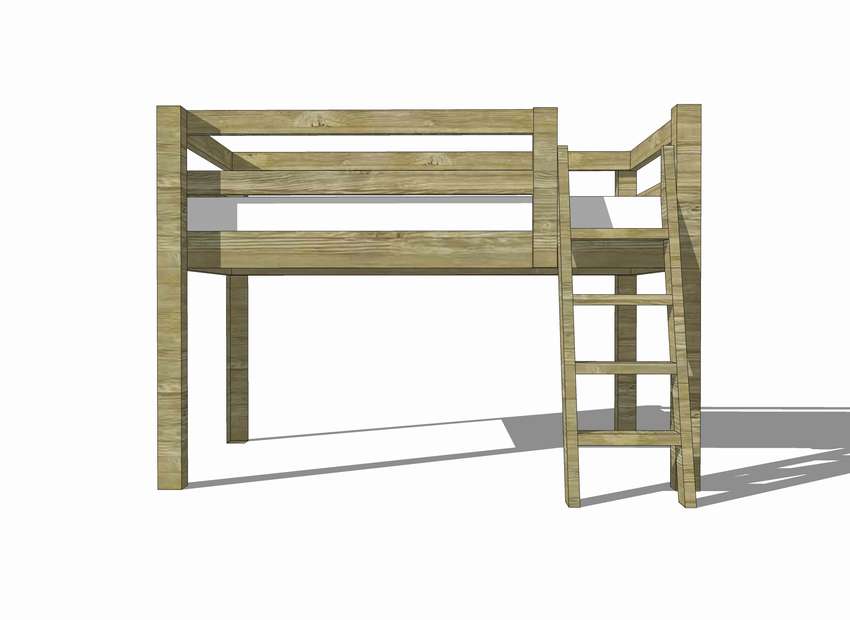
DIY loft bed
Want to do loft bed for baby do it yourself? Here is a good example with a drawing.
 The size of the bed is 1400x700x800 (the level of the mattress). Wood was used here: 28x96, 40x70, 15x70 and shelves from 20x100. The assembly process can be found in detailed video on the author’s website.


https://i.expert-h.com/en/krovat/cherdak#sigFreeIde7d03ba3ab
Loft bed with stairs for children
 Want, believe, want, no, but you can build awesome loft bed for children for only 50 dollars. This type of construction is great for tight spaces, and the unique staircase will free up more space on the wall. To make loft bed, use the drawings presented here and step-by-step instructions, then the work will take only two hours. Go to the site via the link under the gallery, there is full list of materials, tools, general instructions, diagrams and color photographs to help you make your own loft bed for children.
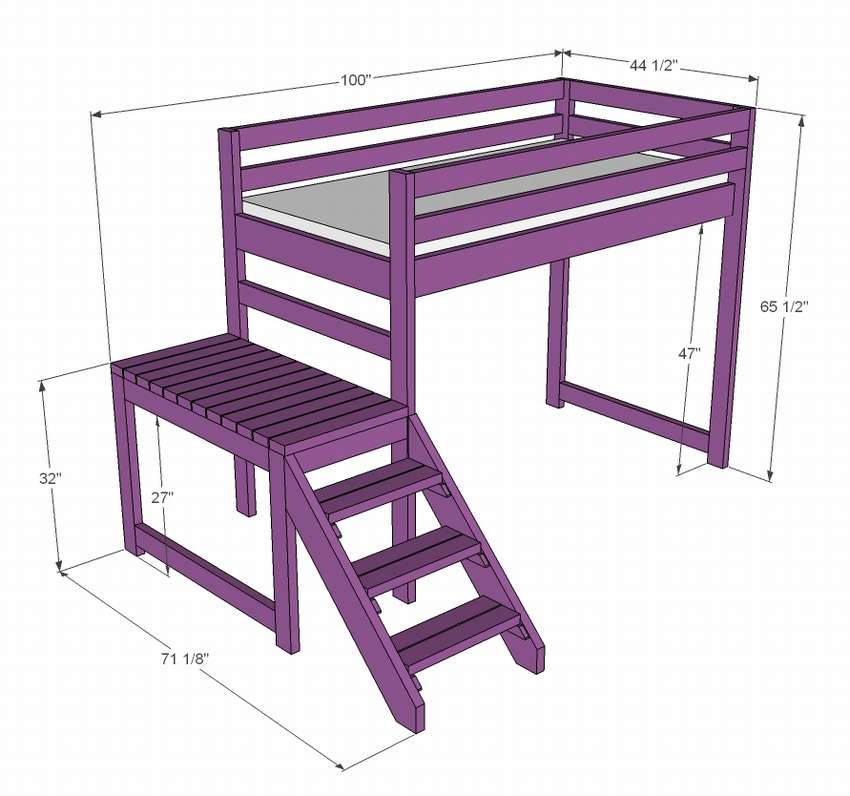 On the site, the dimensions in inches, convert to centimeters, multiplying by 2.54. Here paspilation:
- 2x4 bars - 4 pcs. 65 ½ ”(167 cm) long, 5 pcs. 37 ½ ”(95.5 cm); 4 things. 75 ”(190 cm); 2 pcs. 30 ½ ”(78 cm); 2 pcs. 37 ½ ”(95.5 cm); 1 PC. 41 ½ ”(106 cm); 2 pcs. 20 ½ ”(52 cm); 12 pcs 22 ”(56 cm); 6 pcs 20 ½ ”(52 cm)
- 2x6 board - 2 pcs. 37 ½ ”(95.5 cm) long; 2 pcs. 75 ”(190 cm); 2 pcs. 43 ”(109 cm) both ends are cut 45 degrees from the square, the ends are NOT parallel
- 2x2 bars - 2 pcs. 75 ”(190 cm)
- Planks 1x2 - 6 pcs. 7 ¾ ”(20 cm) both ends are cut at an angle of 45 degrees to the square
The assembly order is shown below in the gallery on the diagrams..


https://i.expert-h.com/en/krovat/cherdak#sigFreeIdcd665f642a
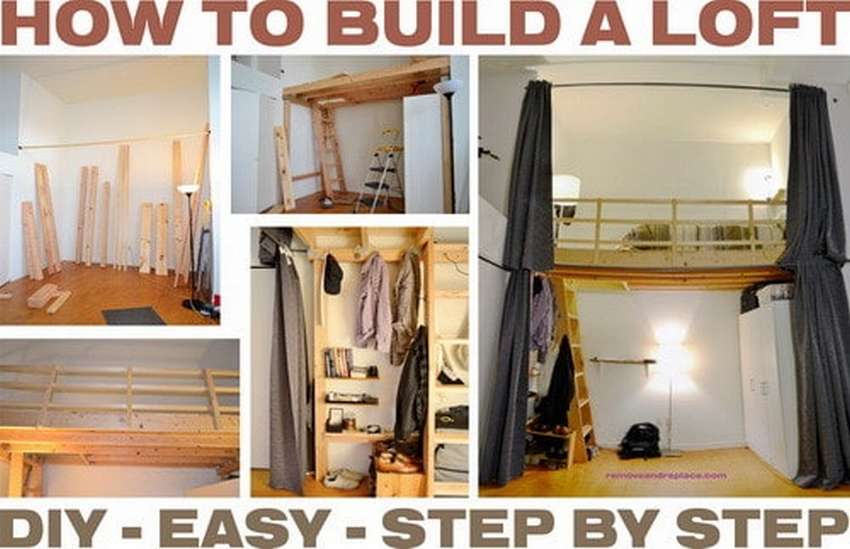
How to build an attic bed
 It's simple loft bed project for children with additional details such as a curtain and a rope ladder that you can make to your taste. The design is almost 3.5 meters long and a little over 90 cm wide. Of course, you can make an attic bed of any size you need, just be sure to adjust the proportions and sizes of the details.
Helpful advice: when buying wood, remember that you need to buy unprocessed wood, because processed under pressure is poorly stained. When you have prepared all the materials, put it all in the room in which you plan to put the bed. It’s much easier to assemble in a room.than another option, when you try to drag an already finished construction inside. You can read the instructions for assembling the loft bed with your own hands on the site, see the master class below in step-by-step photos.


https://i.expert-h.com/en/krovat/cherdak#sigFreeId931e28df49
Attic bed with integrated bookshelf and coat rack
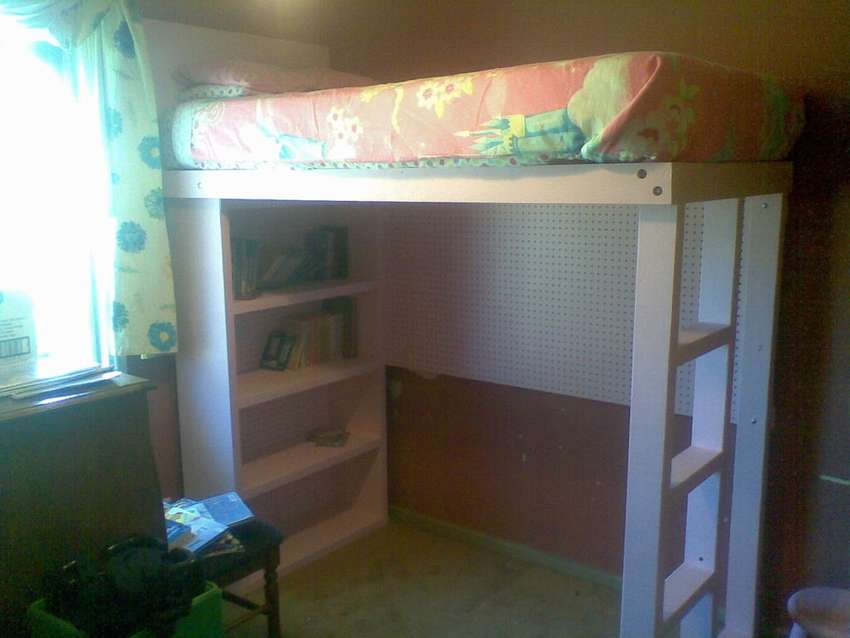 it simple loft bed for a small children's bedroom. Moving the sleeping area up makes the room's space more versatile. The design consists of side walls, without a separate staircase, this role is played by one of the walls, which is even more saves space. The second wall serves as a bookshelf. The author also added an Ikea handrail and a water bottle storage tank. On the bookshelf is a power supply with four outlets for connecting game chargers, a camera charger, a CD player, etc. If you like the idea, step by step photos are at your disposal.


https://i.expert-h.com/en/krovat/cherdak#sigFreeIdcc1f9c3049
How to make a loft bed drawing
 Do you have only one child who dreams of a bunk bed? This project is just what you need, because with the help of the drawings presented here you can build a double crib bed with a large play area.
The manual includes a list of tools and materials, as well as detailed instructions and many diagrams. Dimensions in 1 ″ inches - 2.54 cm.
 You will need:
- 2 bars 4 × 4 10 ′ (305 cm) long
- 3 boards 2 × 6 8 ′ (244 cm) long
- 5 pieces. 2 × 4 10 ′ (305 cm) long
- 2 pcs. 2 × 4 8 ′ (244 cm) long
- 1 PC. 2 × 4 long 6 ′ (183 cm)
- 6 boards 1 × 4 10 ′ (305 cm) long
The step-by-step photos below show the assembly steps..


https://i.expert-h.com/en/krovat/cherdak#sigFreeId1e9b79b96f
Children's bed attic lodge
 Children love houses, and it doesn’t matter if it is a tree house or a private bed. See a great example how to make an attic bed for a child with your own hands. A lot of space for games is freed up, and the design will win the heart of any baby. To assemble such a design is no more difficult than to make an ordinary bunk bed.
Read the detailed instructions on the website, and step by step photos in the gallery will be of great help to you in the implementation of this project.


https://i.expert-h.com/en/krovat/cherdak#sigFreeId2a387829e3
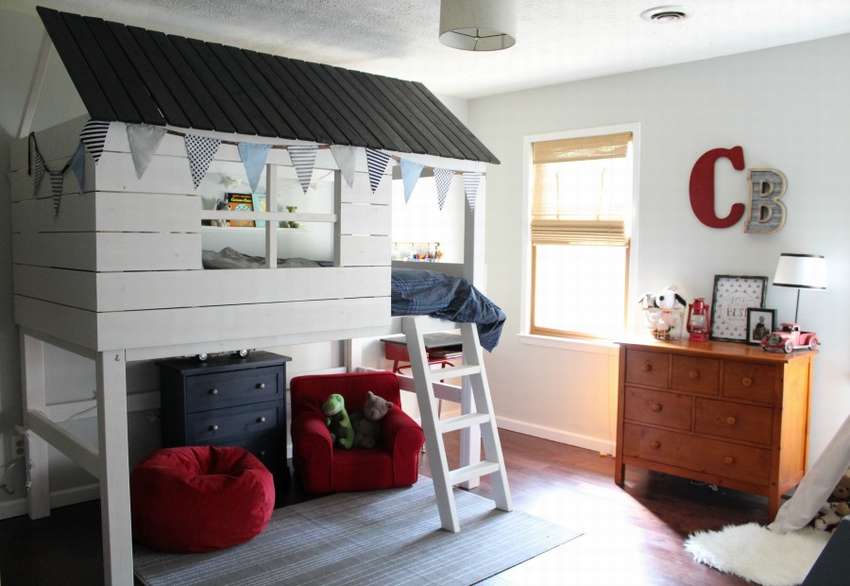
Attic bed with house upstairs
See an example how to make an attic bed with a house upstairs and a cozy sitting area on the ground floor.
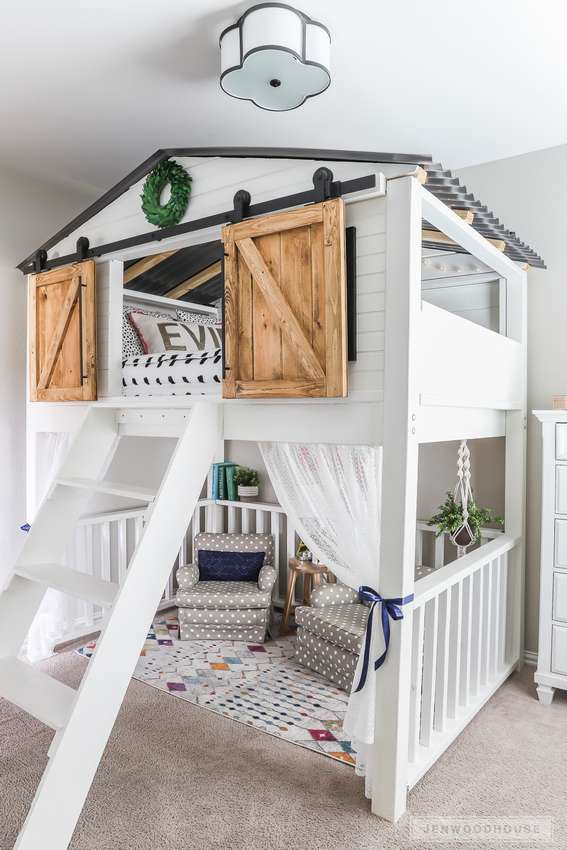
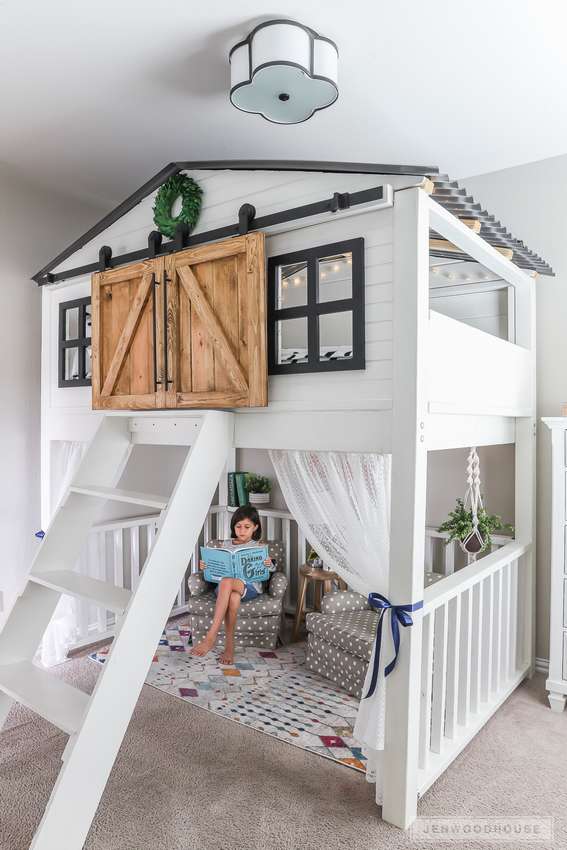 The loft bed is one of the most practical types of furniture for a child’s bedroomif you want to have much more
 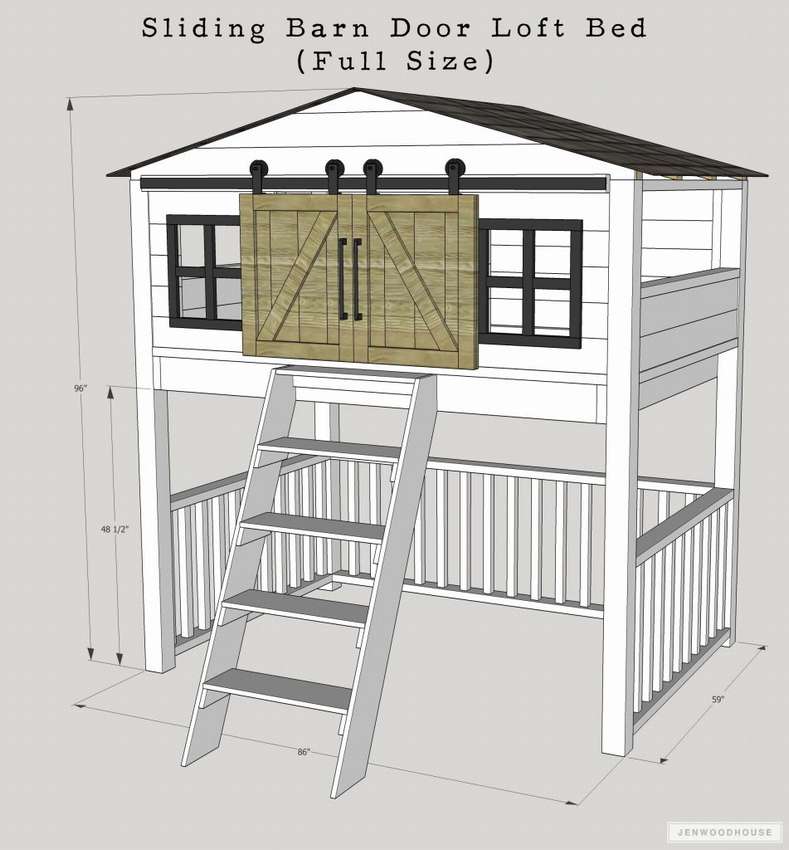 innovative sites for interior design and future planning.
Below is the real small roomYou can make a playground or a television corner for your children there. But the main feature of this project, sliding door. Of course, this is not the simplest design, there are many different nuances. For reference, this room has 275 cm ceilings.
About all this, as well as detailed instructions, how to build an attic bed with a house do-it-yourself, you can read on the website of the author of this project. And if you are interested in learning about the basics of painting and wood finishing, this information is also in the video on the site.


https://i.expert-h.com/en/krovat/cherdak#sigFreeIdd1fec3f70b
Children's bed loft house 50 photos


https://i.expert-h.com/en/krovat/cherdak#sigFreeIdf57d24f3c0
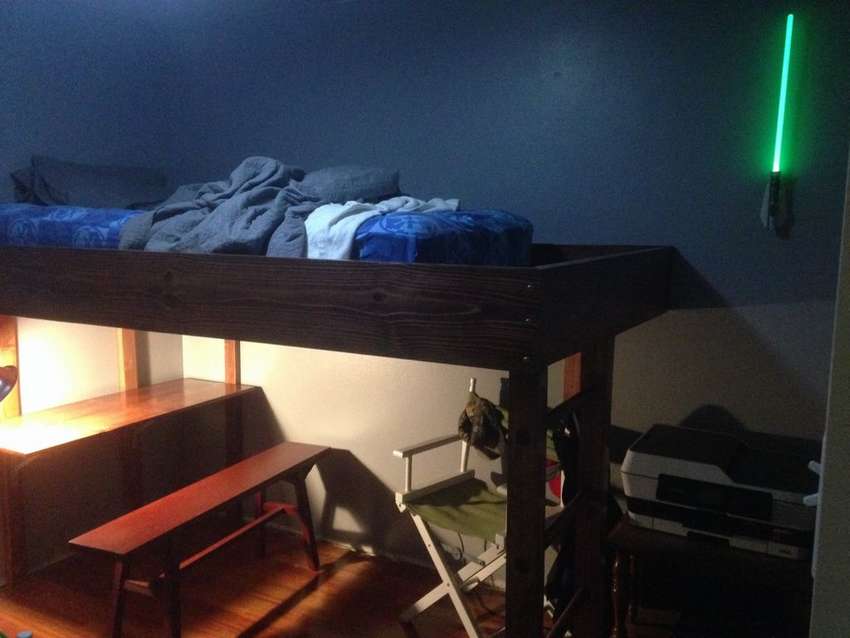
Loft bed in the form of a spaceship
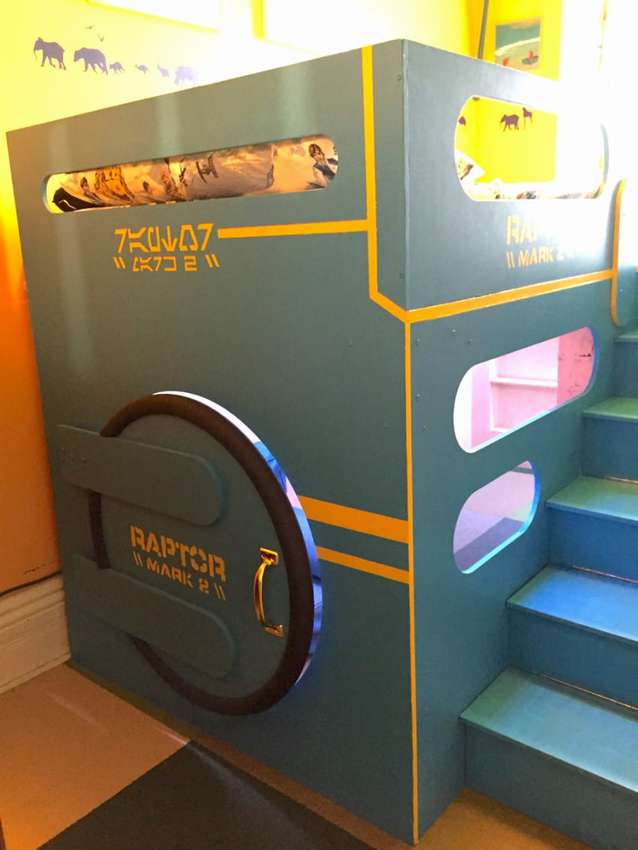 Decorating a kids room is a fantastic opportunity to unleash your imagination. When the son needed a new bed, the author of the project decided to create amazing original loft bed in the form of spacesky ship. He independently created a design model using Sketchup and Adobe Illustrator. This amazing bed has turned into an ideal place for games, storage of toys and the delight of friends. All sorts of funny buttons, switches and lights are added to the design so that the child can have fun for hours. There are also inscriptions throughout the bed, starting with stencils in both English and Star Wars language, Aurebesh. A specially designed control panel from a sci-fi movie is installed right through the round door of the bed. The author even set the iPad as a panel screen. Unfortunately, there are practically no step-by-step photos, but the idea itself deserves attention.


https://i.expert-h.com/en/krovat/cherdak#sigFreeIde1e68a3b7b
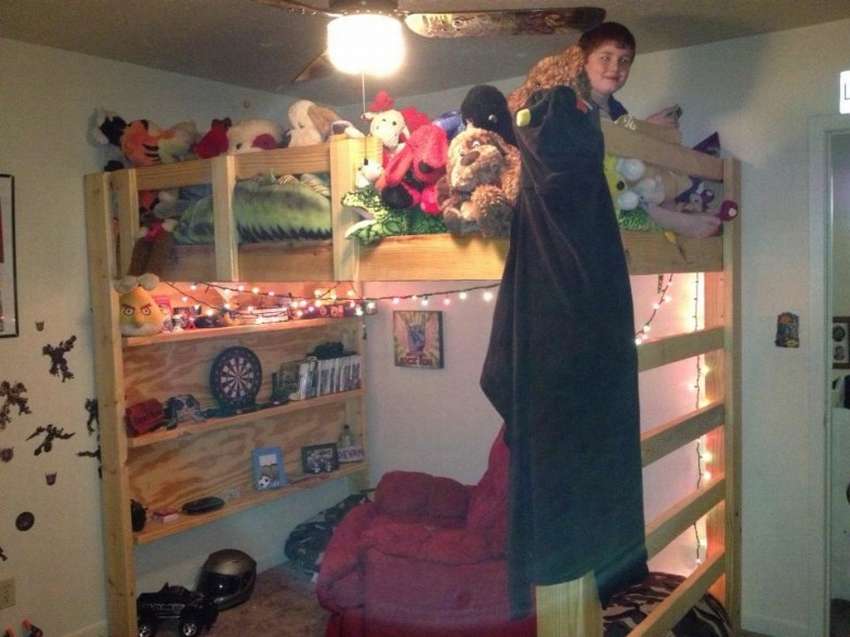
Superhero bed
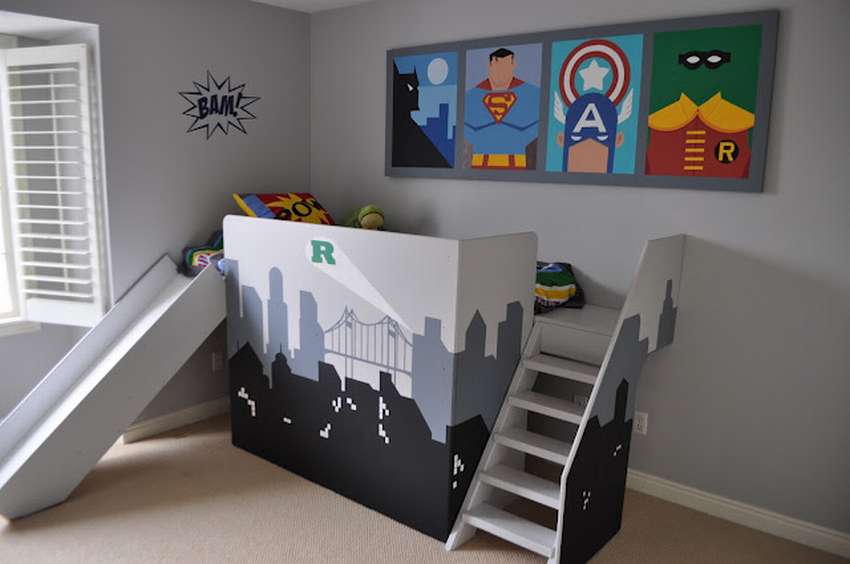 Every kid wants to be a superhero, so why not do this funny loft bed with a hidden fort below? Extremely durable to fit as many heroes as you can fit on a bed, this is a must! Making an attic bed is not difficult, the main material is MDF, for a bed you will need 2 sheets. Also a sheet of plywood, 7 blocks of 2.5 m and boards.
The assembly process is shown in the diagrams below in the gallery, the instructions can be read on the website.


https://i.expert-h.com/en/krovat/cherdak#sigFreeId4b01378c70
Children's bed loft bus
Look how to make a baby loft bed in the form of a bus for a children's room.
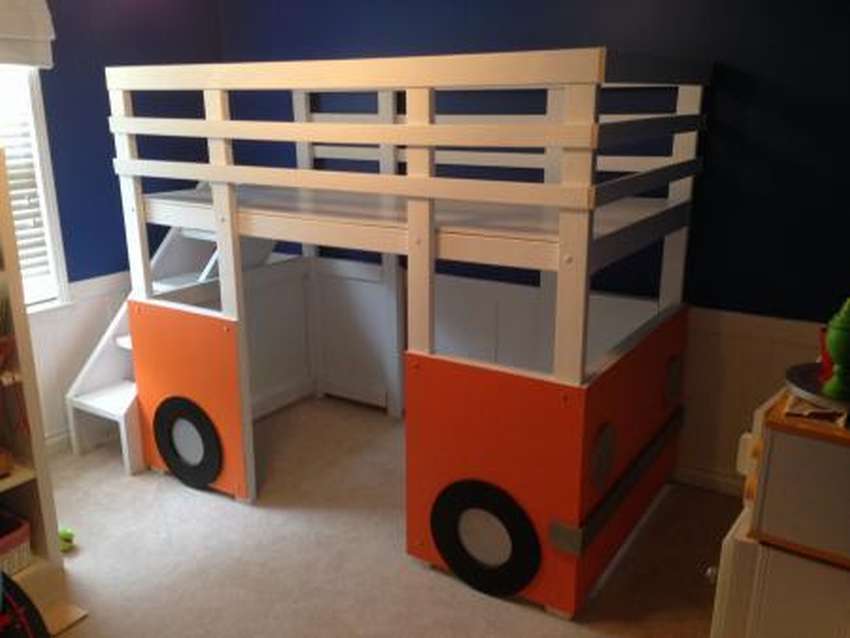
 Detailed instructions with the dimensions of parts, a list of materials and tools can be found on the website.


https://i.expert-h.com/en/krovat/cherdak#sigFreeIda006e31b33
Children's loft bed 100 photos


https://i.expert-h.com/en/krovat/cherdak#sigFreeIdd322de9539
Loft bed for adults and teens
How to assemble an attic bed
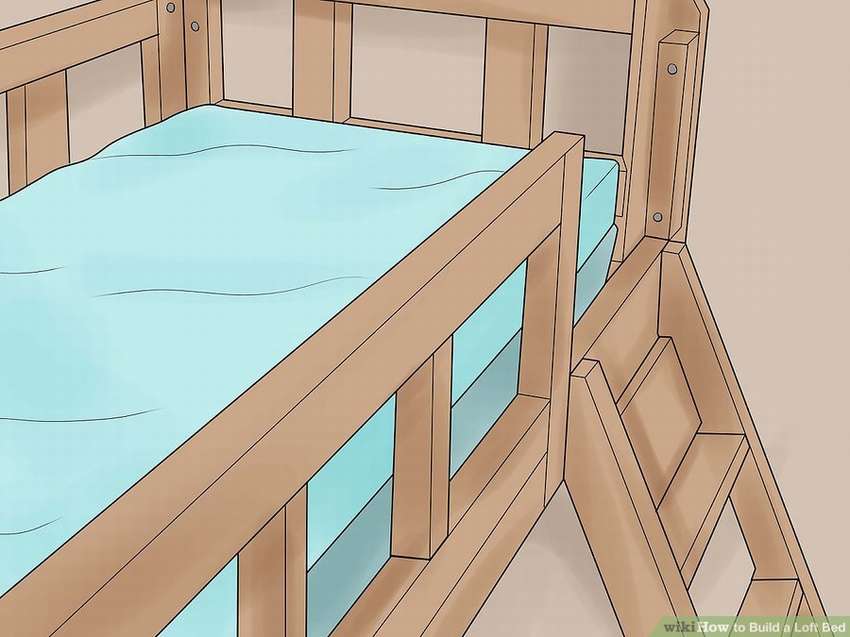 In this guide from a famous site wikihow described as build a loft bed do it yourself. In the instructions on the site you can read how to create upper and lower structures, the manufacture and fastening of strips, as well as how to make a ladder for a bed. This is one way to build an attic bed by attaching two sides to the walls. This design reduces the complexity of the project and you can make a bed that will support a lot of weight. Sizes are for making a bed that designed for one mattress.
The process is shown in beautiful pictures, see gallery below.


https://i.expert-h.com/en/krovat/cherdak#sigFreeId9f3047537a
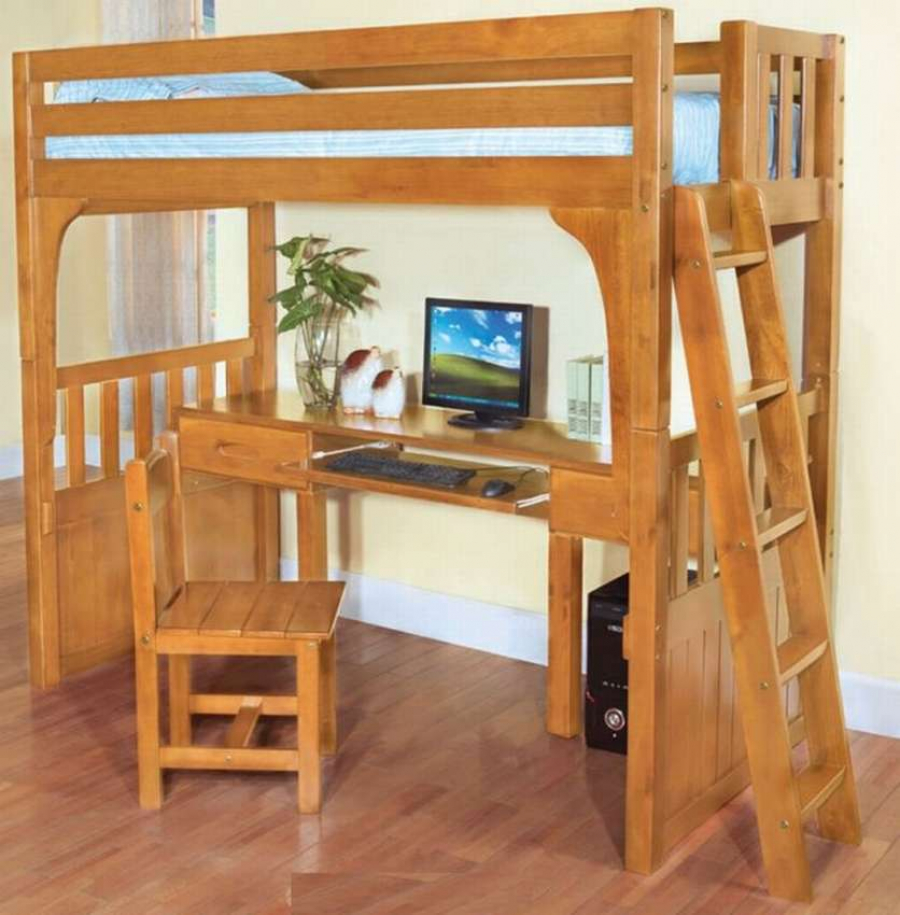
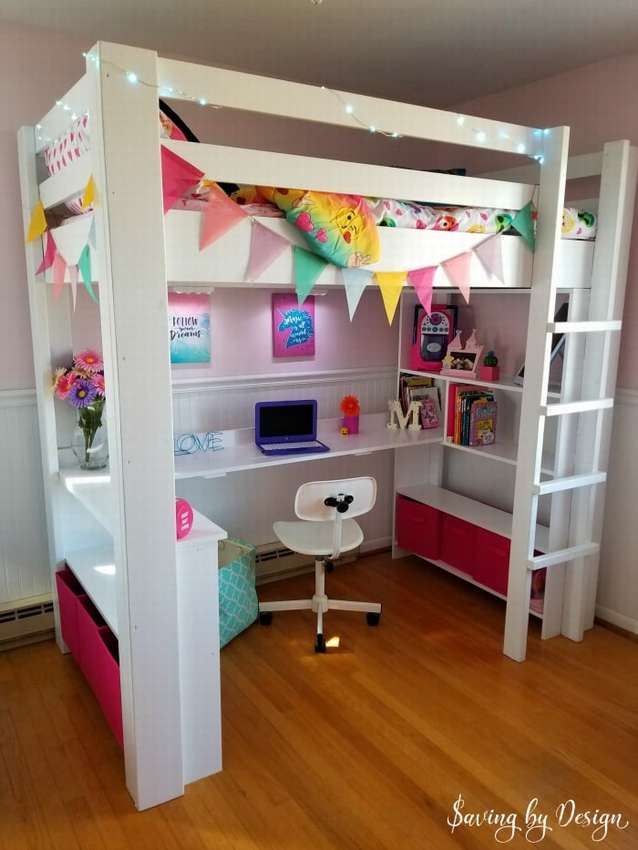
Attic bed with shelf and table
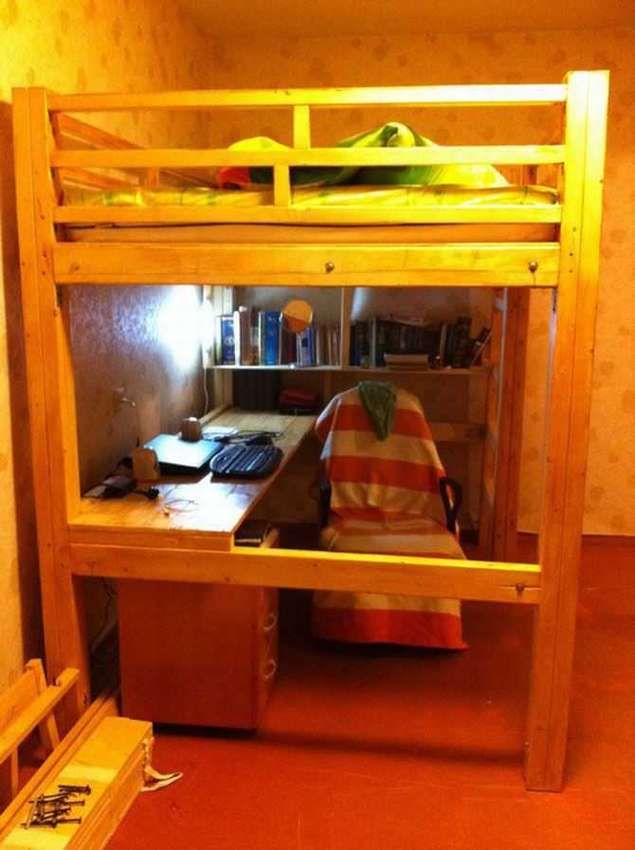 Here is a simple example of how to make a wooden attic bed with working area. The design is easily rebuilt in a bunk bed, if you fix the crossbar and install the shelf for the mattress.
Materials that will be needed to assemble the structure:
- 2 sheets of 9 mm plywood 152 x 152 cm;
- 16 boards 90x45 3 m long
- 8 bars 45x45 3 m long
- furniture panel 18 mm in dimensions 600 x 2000 mm.
How to make an attic bed described in the detailed instructions on the author’s website. See below master class on step by step photos.


https://i.expert-h.com/en/krovat/cherdak#sigFreeId42ccf8fea1
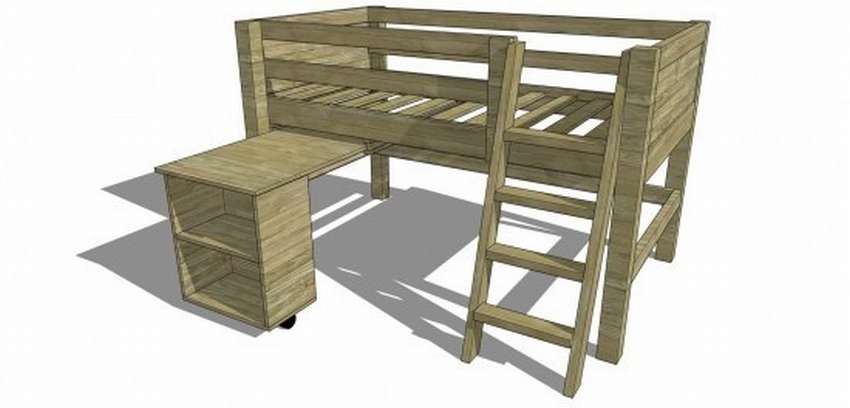
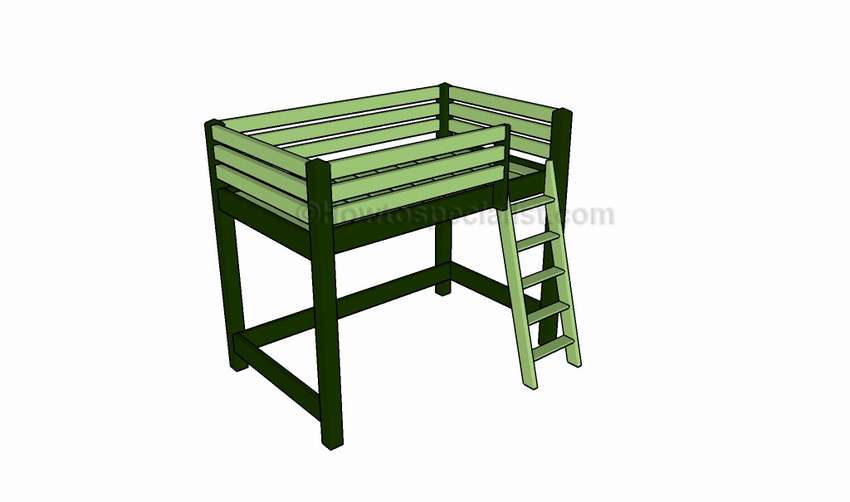
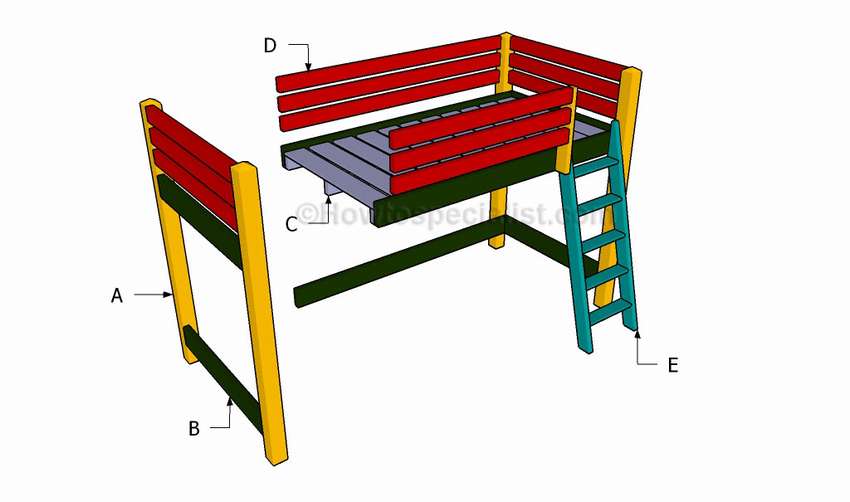
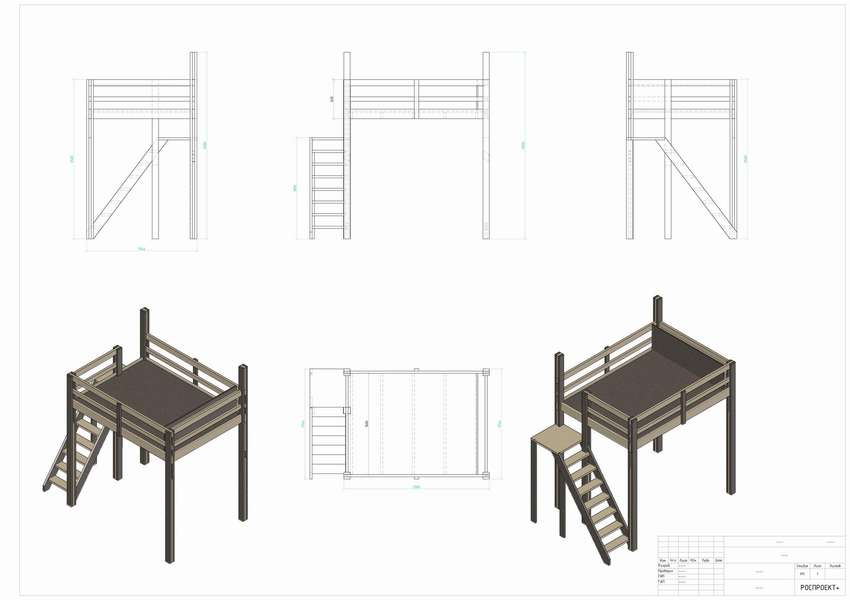
Do-it-yourself loft bed
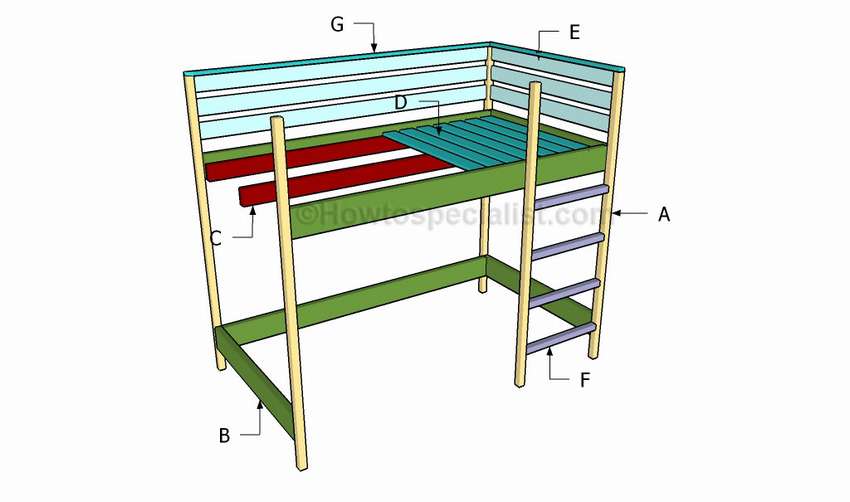
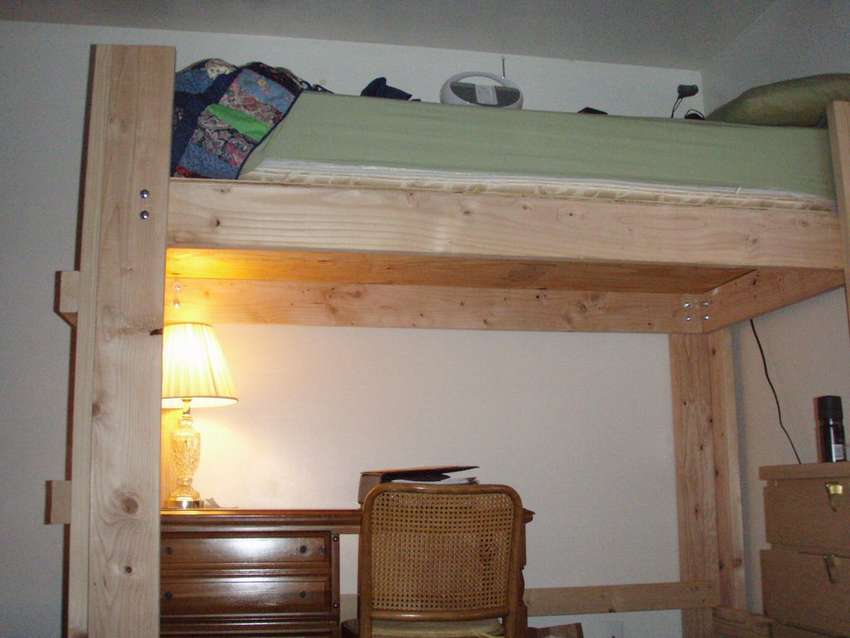
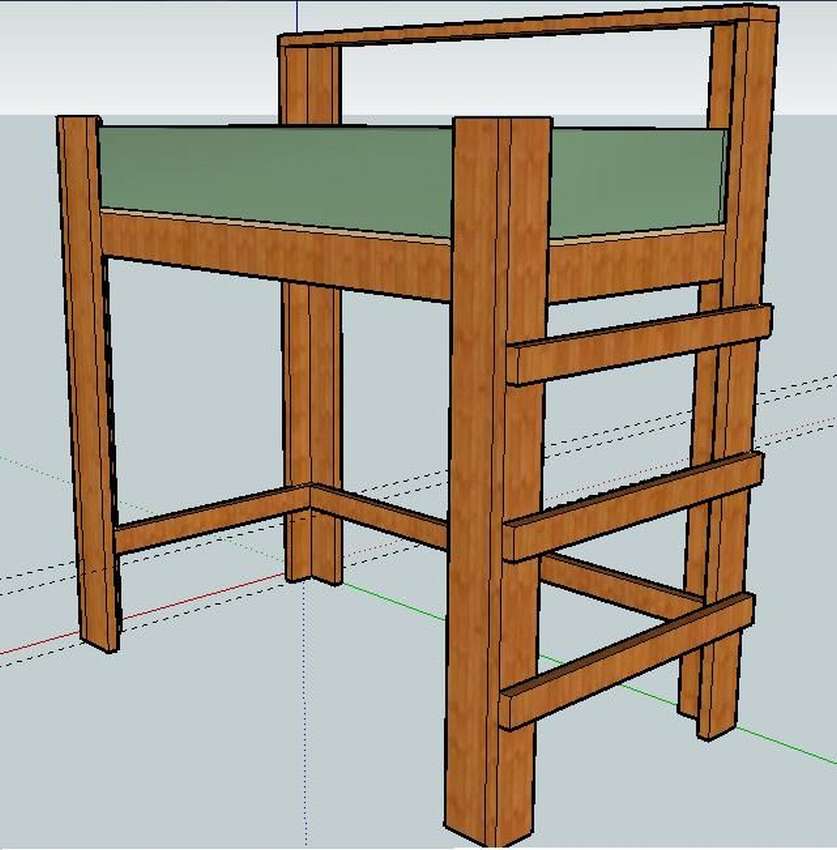
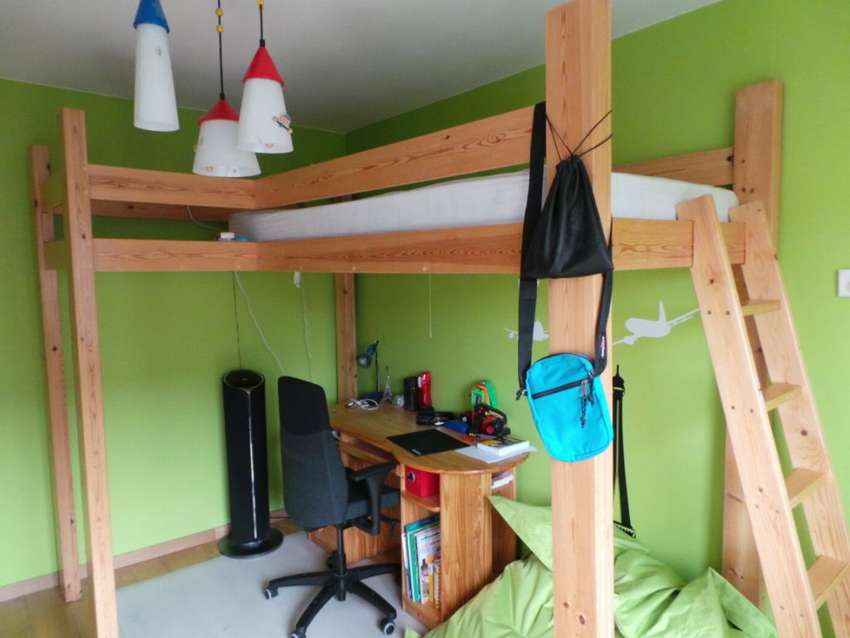 Unique loft bed An excellent solution for organizing a berth for a teenager to use the room space functionally. Under the bed there is place for a desk or some closet, and at the bed level there’s a platform on which you can place comics, books, an alarm clock, etc. This loft bed was assembled several years ago, so there are no assembly steps in detail. But the drawings and photos of the individual nodes will be enough to minimize work and facilitate assembly. All the loft bed is done from identical pine boards 22x120 mm. The dimensions on the drawing are for a standard bed with a width of 900 mm.
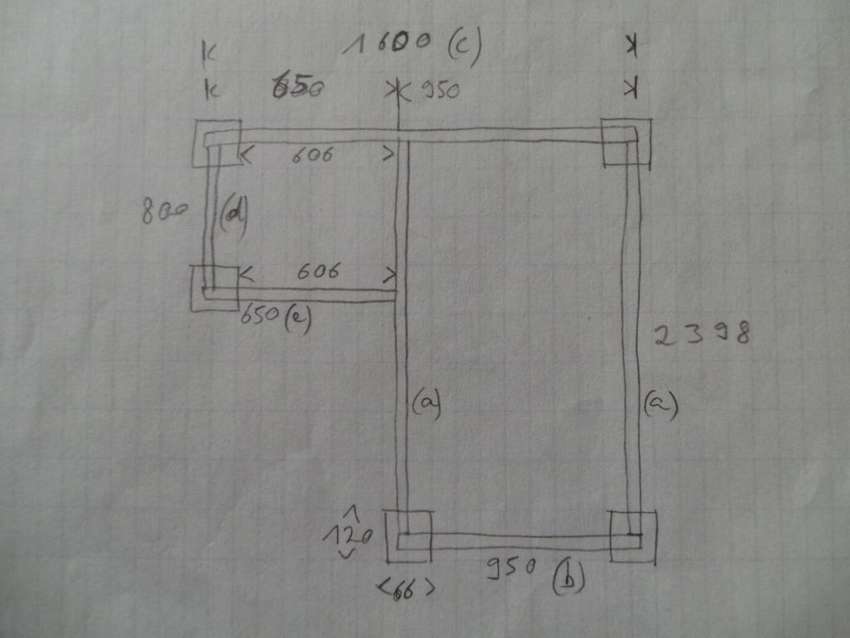 Necessary details ([quantity] - thickness x width x length in mm)
- For 5 vertical messages: [15] 22x120x2080
- Long side: [4] 22x120x2400 (marked (a) in the picture)
- Leg side: [1] 22x120x950 (marked (b) in the picture)
- Headboard: [2] 22x120x1600 (marked (c) in the picture)
- Small side: [2] 22x120x800 (marked (d) in the picture)
- Small side: [2] 22x120x650 (marked (e) in the picture)
- Spring support posts: [2] 27x27x2400. You may need to trim them a bit to fit between the racks.
- Support strips for a small platform: [2] 27x27x606
- Boards for the bottom and head of the bed [4] 22x120x906. You will have to cut some corners to fit the supports and shape of your chosen spring.
- Trims for a small platform: [5] 22x120x800. You will have to cut some corners to fit the posts.
- Then mainly screws: Maximum length 60 mm for assembling poles and sides and 40 mm for assembling support rods.
- To make a staircase, you need 2 wide inclined boards (~ 900x27 mm) for the sides and horizontal steps made of ~ 68x27 mm boards.
For young children, so that they do not fall out of bed while sleeping, you can add boardsimply mounted on a garden hinge and a simple sliding lock. Detailed instructions can be found on the website, link under the gallery.


https://i.expert-h.com/en/krovat/cherdak#sigFreeIdf939a0f741
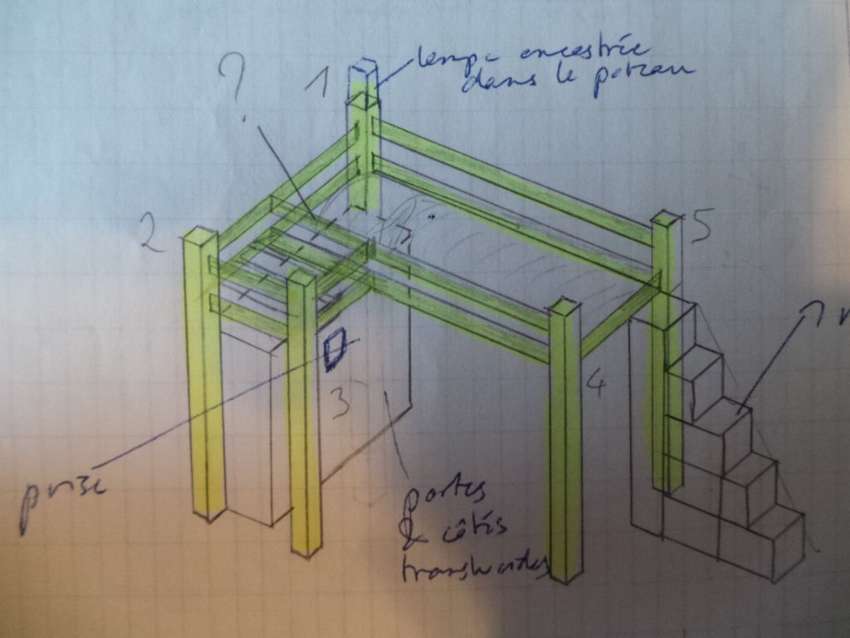
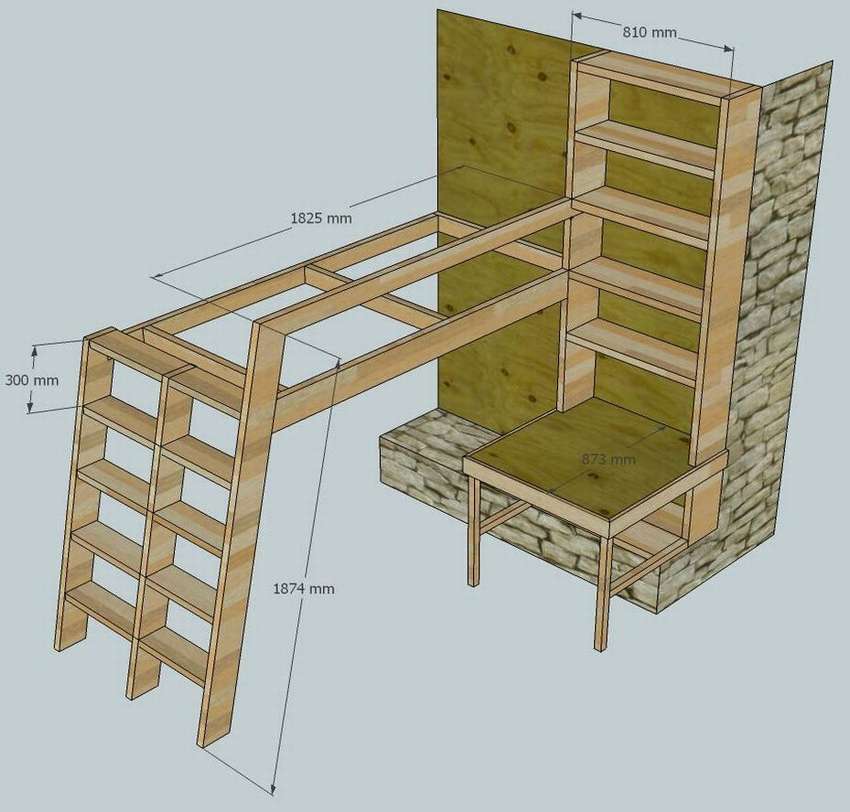
Attic bed with table and wardrobe
 Use this manual to make it relatively cheap, compact loft bed with desk and bookcase, so to speak, a small study for a teenager. The guide includes a list of tools and materials that you will need, as well as step-by-step instructions.
In short, the order of work is.
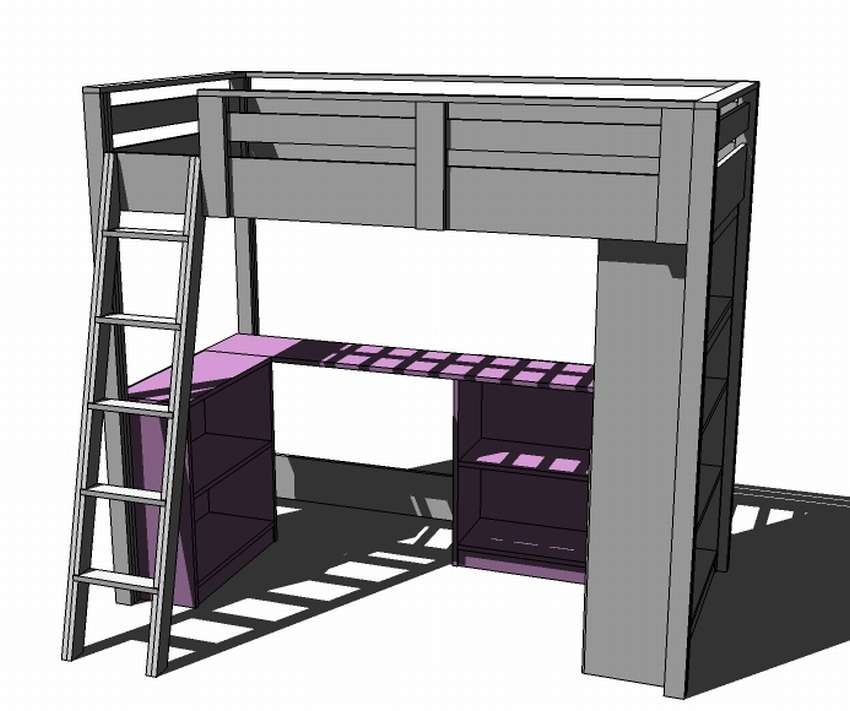 Step 1. Assemble the box using glue and screws. First, assemble one part, as shown in the photo, then the other without the upper part attached.
Step 2. Attach the bottom rung with glue and screws.
Step 3. Attach the backs to the bookcases. You may have to wait to attach the top in the next step to the second bookcase before adding backs. Make sure all shelves are firmly locked. Use glue and 3 cm nails.
Step 4. Attach a large desktop to the top of the second bookcase and legs. Use 5 cm screws and glue.
Step 5. After the bookcases are finished, use the screws to screw the legs of the desktop to the small bookcase and legs of the loft bed. It is also recommended to screw a small bookcase to the front of the attic and to a large bookcase.


https://i.expert-h.com/en/krovat/cherdak#sigFreeId036dce371e
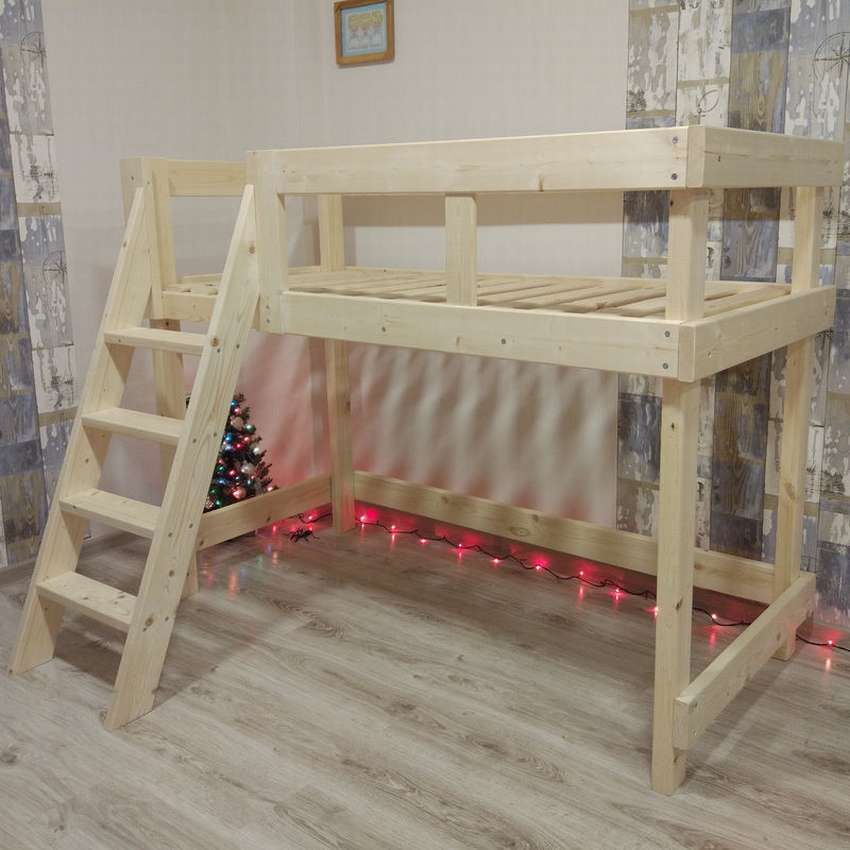
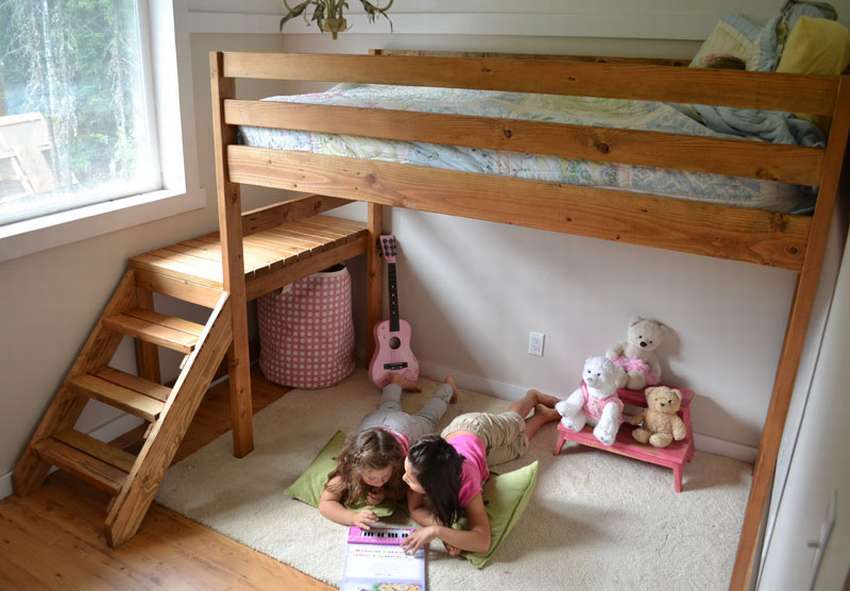
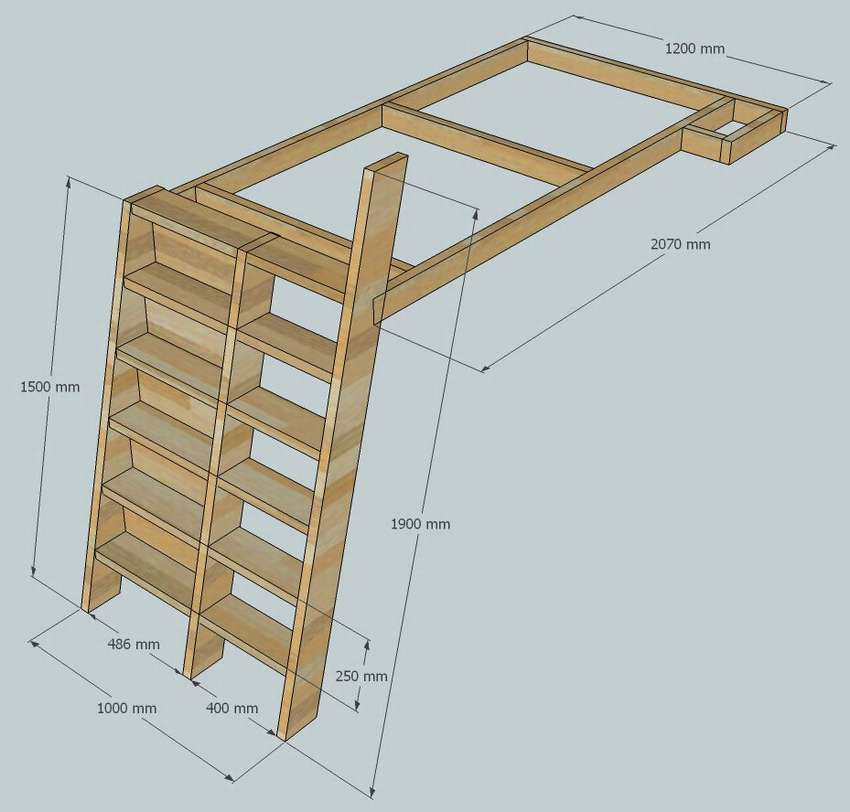
Do-it-yourself loft bed made of wood
Example, how to make a loft bed of wood.
 The design is attached to two walls, includes a simple staircase going from the floor to the bed. it universal designwhich saves as much space as possible. On the site you can read the instructions, which includes a list of parts with dimensions, a list of materials and a phased assembly plan. The master class is presented in step-by-step photos below in the gallery.


https://i.expert-h.com/en/krovat/cherdak#sigFreeIdd200328856
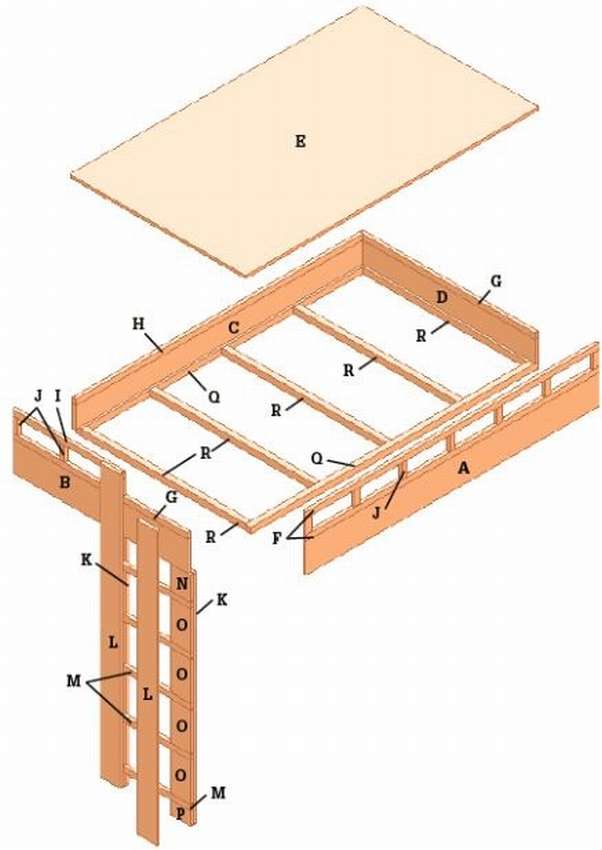
Bed loft with a shelf
 With this guide you can do DIY loft bed with two stairs - one serves for the main purpose to go up, the other acts as a bookshelf. An interesting design, a railing in the form of a floating cloud, will make every child happy, but the main thing is a practical solution, there will be much more space in the children's room.
Some are used here design principles for a one-legged bunk bednamely, the use of walls as part of the frame. And another big plus in terms of reliability, this reinforced staircase combination as a bookshelf for support is so much stronger than just a single leg.
 The loft bed is made using simple carpentry from building timber (2x4 and 2x6) and plywood. The design turned out to be incredibly durable and cost relatively cheap, about $ 150. The instructions can be read on the website, and see very below detailed step by step photos.


https://i.expert-h.com/en/krovat/cherdak#sigFreeId16ef542311
Large loft bed
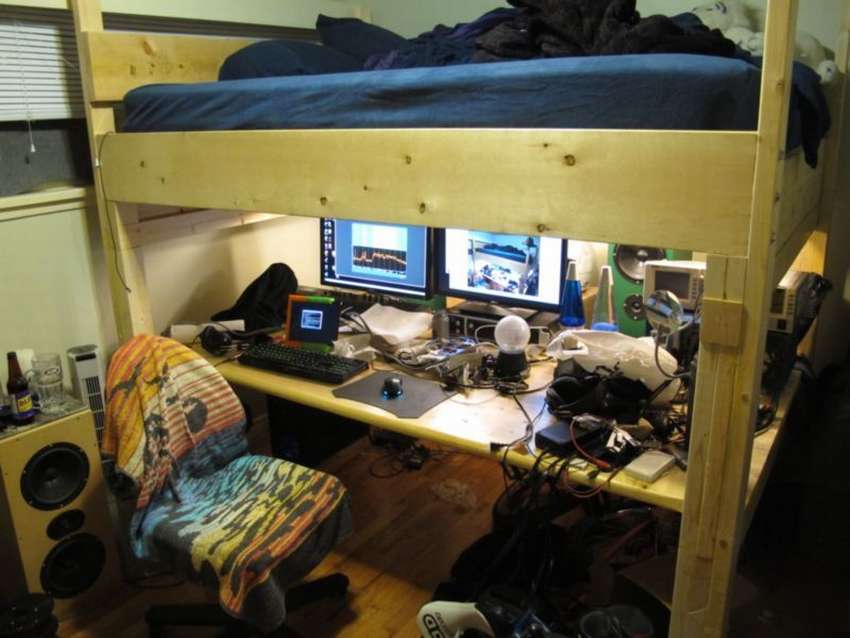 Not sure how to place a computer desk and bed in a small room? Enter the 3rd dimension! This loft combination plus table will give you what would otherwise be an incredibly huge (2.2 m long by 1 m) table, and all the rest of the space would be wasted by a normal bed. The design is large enough to use the left half for the computer, and the right for the workplace in electronics and hobbies. To save vertical space, make support for the leading edge of the bed trims, using a piece of metal corner, instead of supports from 4x4 timber.
 Here the table is glued from boardsso that it is quite thin, but very durable and tough. The countertop is made of solid wood, it is necessary to glue a bunch of boards from edge to edge, and then level it to sand. The results are good, but this is a huge amount of work. Of course, you can make it a lot easier using plywood.
If you use narrow boards for the side walls and supports, you can place them in the form diagonal brackets on the back to prevent spreading.
The picture shows one board of a strange shape on which the author had to cut a corner with a hand saw. There are probably many other ways around this problem (this is called the “end rail”), it’s not so difficult.
 The front metal support of the bar (aluminum was used here) is screwed to the side boards with a large number of screws (every 10 cm). The ends are held onto the blocks, but most of the weight is carried by screws to the board, so the more the better. You can still make a staircase. Here, the author simply steps on the edge of the table to fill up, but with a ladder it will probably be more convenient. The full instructions can be read on the site, the link is found under gallery with step by step photos.


https://i.expert-h.com/en/krovat/cherdak#sigFreeId585294ba81
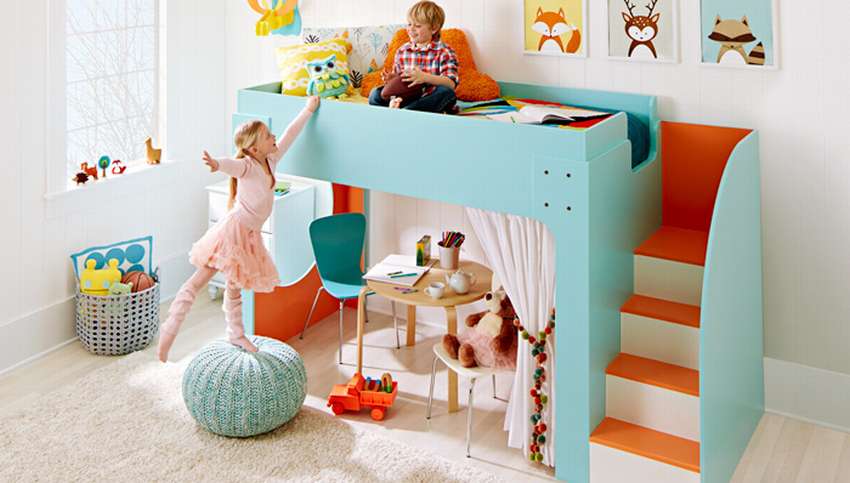
How to make a loft bed with a table
 Look at a great example of how to equip a nursery and save space as much as possible. What can make a room for a child more attractive than a fairytale loft bed with table and shelves for books ?! When it comes to children, there is no doubt ... everyone wants a bunk! Making your own DIY loft beds allows you to create exactly the design you want. This type of home-made furniture is ideal for children, teens and even adults! The storage options offered by the loft bed with desk are another advantage of this wooden furniture. Open racks can be used to store not only books, but much more, from clothes and school prinaccessories to toys and decorations. This, in turn, leaves more free space in the room, ideal for playing and safe movement. By installing an attic bed in your child’s bedroom, you can create an interesting work area that also improves the overall usability of his room. Assembly master class see below on step by step photos.


https://i.expert-h.com/en/krovat/cherdak#sigFreeIddc35634e8d
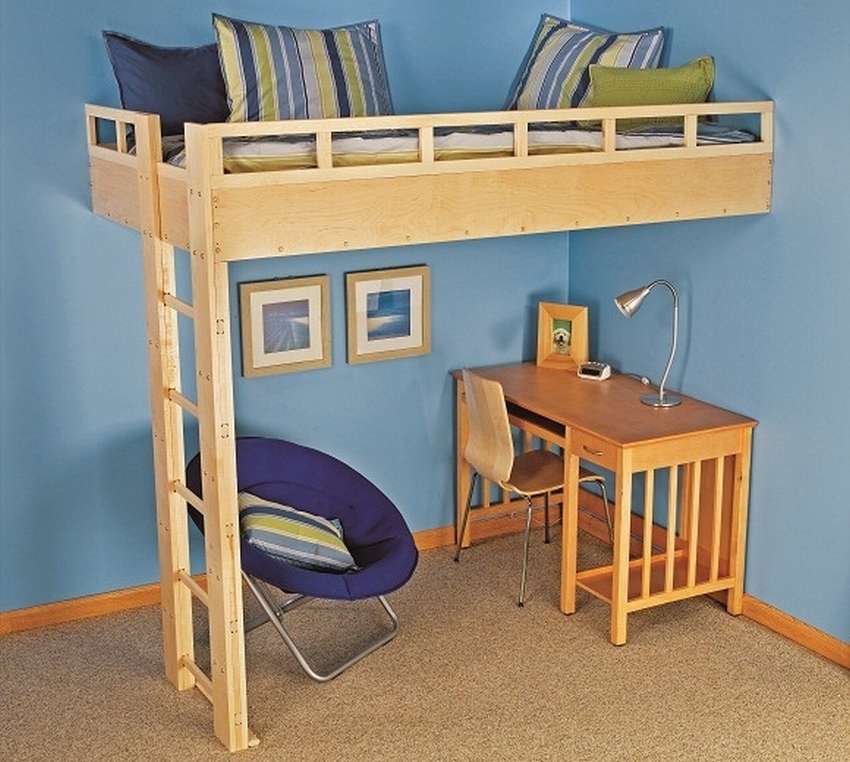
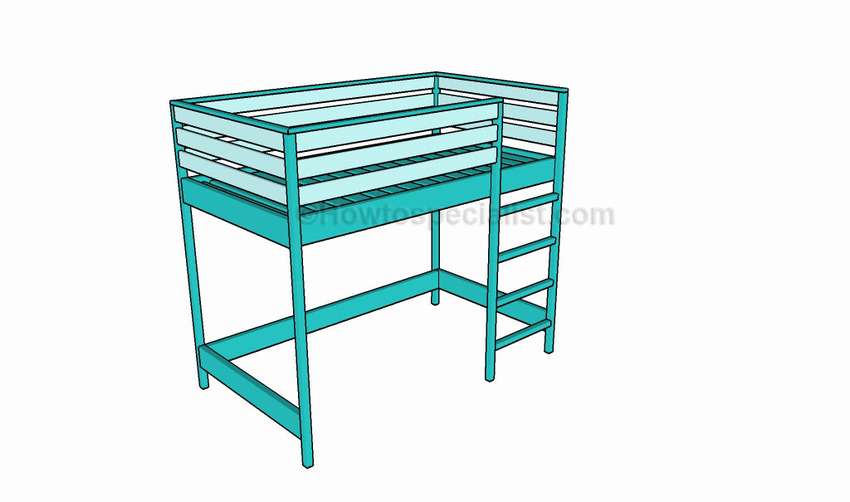
How to make an attic bed yourself
 An attic bed is a great alternative to classic beds in a small space. They have a berth only at the top (attic) and can be of different sizes. Under the bed is a room - work or play area. Some loft beds include a desk, drawers or small lockers with open or closed shelves.
This is a review article from which you can learn how to assemble an attic bed frame, make a ladder, install a railing, equip a working area at the bottom and a lot of other useful information. If you want to do the loft bed do it yourself, a link to the site is under the gallery.


https://i.expert-h.com/en/krovat/cherdak#sigFreeId9902887e1b
DIY loft bed drawings
Here are the drawings how to make do-it-yourself loft bed with folding table and bookshelf.
 In addition to step-by-step diagrams in the gallery, on the site you can read detailed instructions with a list of materials and sawing parts with dimensions. All figures in the drawings in inches, convert them to centimeters, multiplying by 2.54.


https://i.expert-h.com/en/krovat/cherdak#sigFreeIda959c9949d
How to build a loft bed drawing
 Here are drawings and diagrams with which you can build DIY loft bed. It is practical and relatively cheap solution for small roomsin which there is not enough space for standard beds. Despite the fact that you can choose from many designs, from this article you will learn what you need to know about making a classic loft bed from ordinary materials. If you used to work with lumber, the methods of carpentry should be familiar to you.
Materials
 A - 5 bars 2 × 2 69 inches (175 cm) long
B - 4 boards 2 × 6 43 inches (109 cm) long, 3 pieces 76 inches (193 cm) long
FROM - 3 bars 2 × 4 length 76 ”(193 cm)
D - 4 boards 1 × 4 40 ”(102 cm) long
E - 6 boards 1 × 4 43 inches (109 cm) long, 3 pieces 76 inches (193 cm) long, 3 pieces 53 inches (135 cm)
F - 4 bars 2 × 2 21 1/2 ”long (55 cm)
G - 1 strap 1 × 2 length 79 inches (200 cm), 2 pcs. 46 inches (117 cm) long, 1 pc. 56 inches (142 cm) long


https://i.expert-h.com/en/krovat/cherdak#sigFreeId3396dbcbd3
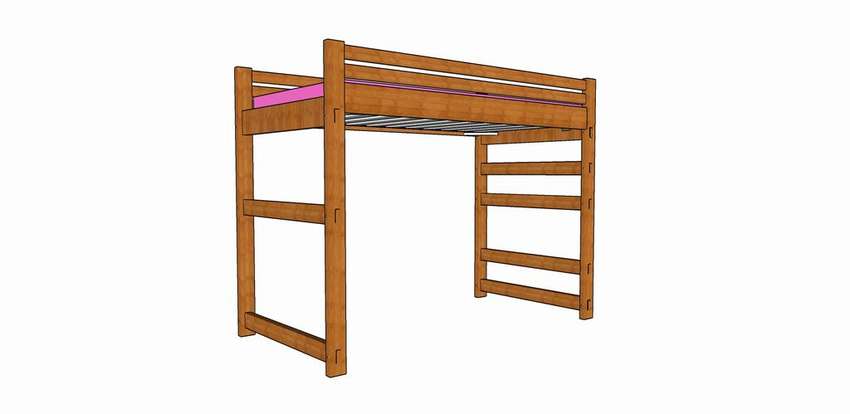
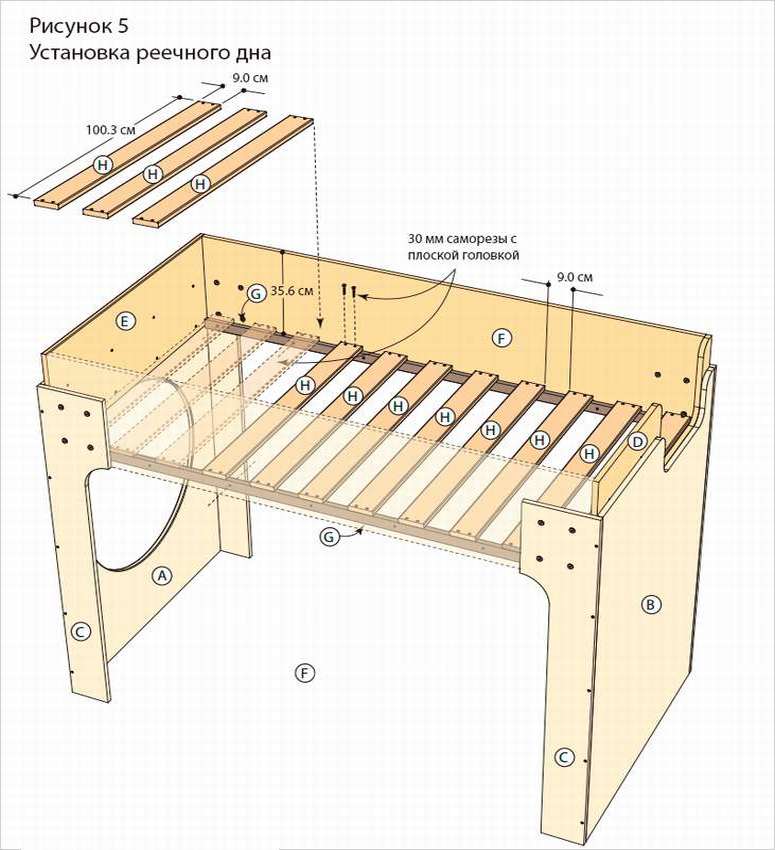
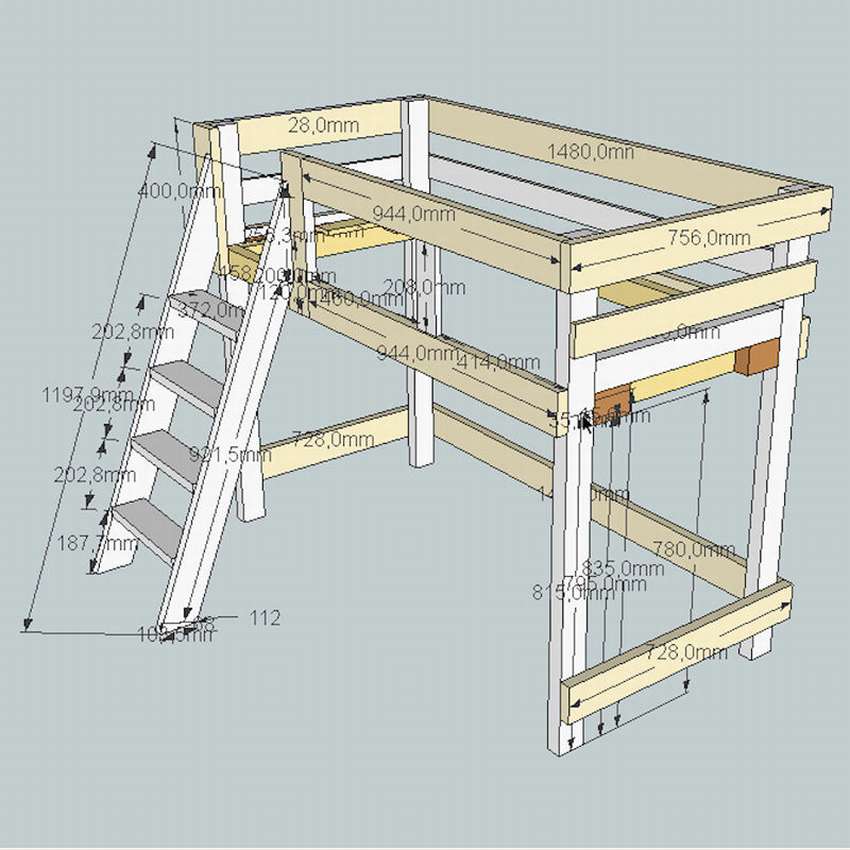
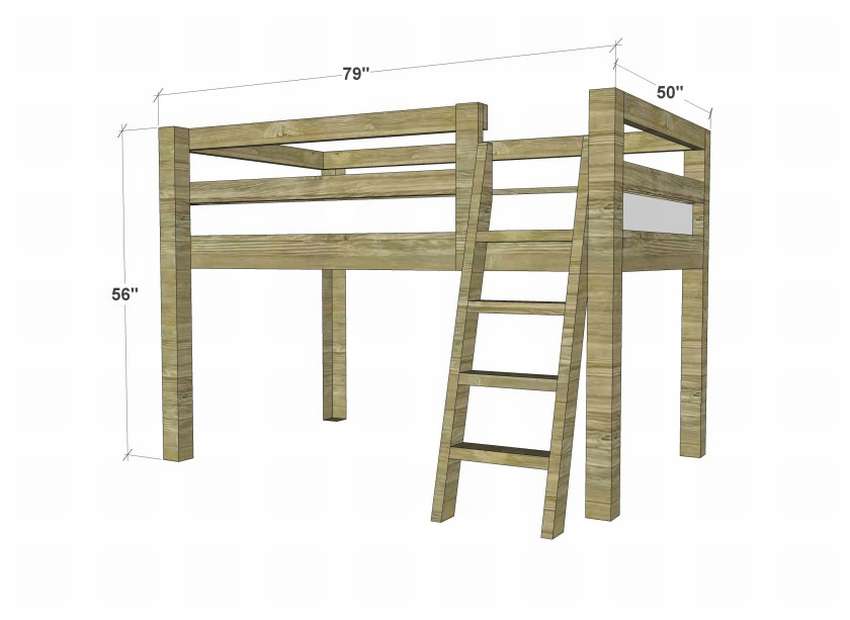
 Another project loft bed with ladder. One of the most important aspects that you should consider when you want to make an attic bed, this is the height. Height above head is the space between the ceiling and the top of the mattress. You should have enough free space so that you can climb onto the loft bed without hurt your head, the reserve should be not less than 75 cm.
Materials
 A - 4 bars 4 × 4 69 "(175 cm) long, 1 piece 2 × 4 21 3/4" (55 cm) long
B - 4 boards 2 × 6 43 inches (109 cm) long, 3 pieces 76 inches (193 cm) long
C - 3 bars 2 × 4 76 inches long (193 cm), 11 boards 1 × 6 40 inches long (102 cm)
D - 3 bars 2 × 4 72 "(183 cm) long, 3 pcs. 43" (109 cm), 3 pcs. 51 "(130 cm)
E - 2 bars 2 × 4 58 "long (147 cm), 5 boards 1 × 3 16 1/2" long (42 cm)


https://i.expert-h.com/en/krovat/cherdak#sigFreeId2615878c79
Loft bed drawings


https://i.expert-h.com/en/krovat/cherdak#sigFreeId45e23b6add
How to make a four-poster bed
 This is a detailed step-by-step instruction, how to make a loft bed do-it-yourself for a standard full-size bed. The design is very reliable and is an excellent solution for those who have free space in a small room is an urgent problem. If you liked this project, assembly instructions can be read on the website. It must be borne in mind that this design is quite heavy, so if you assemble it somewhere in the workshop, you will need to assemble the bed, disassemble and then assemble it in the right place. But it’s very durable, and easily withstands 110 kg. In addition, for the assembly you will need an extra pair of hands, maybe even two. Below, see the drawings and a few photos that show how to bond individual joints.


https://i.expert-h.com/en/krovat/cherdak#sigFreeIda4da548af9
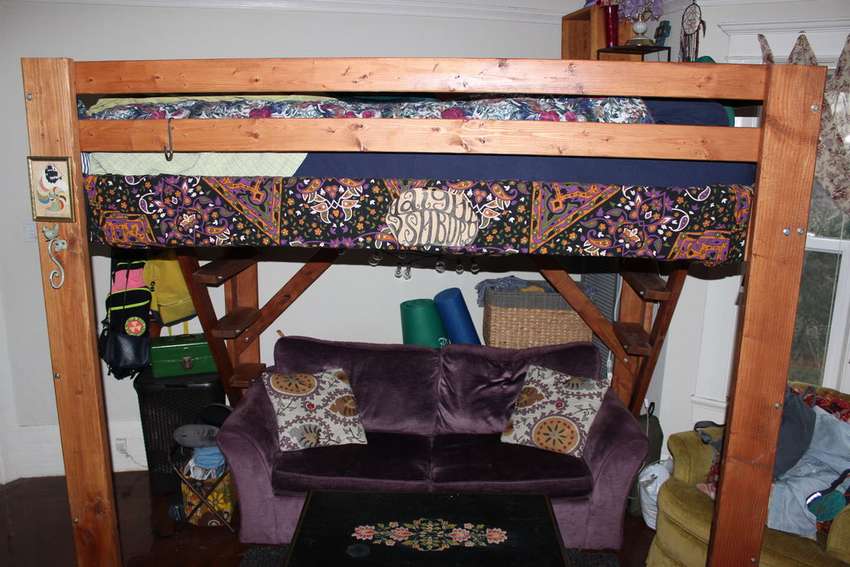
Loft bed with a sofa
 Here's another great example of design for a small room with a ceiling height of 2.5 m. How to assemble this loft bed with sofa do it yourself in a master class on step by step photos.
What you need for assembly and how much it will cost approximately can be found on the author’s website, You will find the link under the gallery.


https://i.expert-h.com/en/krovat/cherdak#sigFreeIdb900a4a999
High loft bed
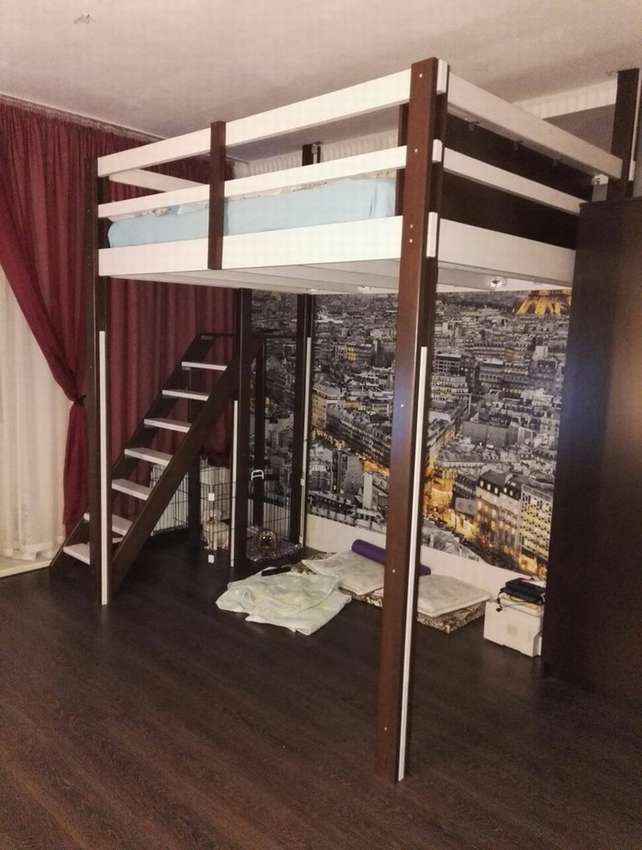 Great for a room with high ceilings. This high loft bed allows you to go to full growth under the base, which is very convenient, since it does not limit the space in the room.
 On the bed itself, you can safely sit down without touching your head on the ceiling. Below you can put a sofa, table or other furniture. How to make a loft bed do-it-yourself read on the website of the author of this project, all sizes and even the cost of materials are indicated there. Below you can see the master class on step by step photos in the gallery.


https://i.expert-h.com/en/krovat/cherdak#sigFreeIdf1694b5b1f
Bed loft with sofa 100 photos


https://i.expert-h.com/en/krovat/cherdak#sigFreeId37b7846808
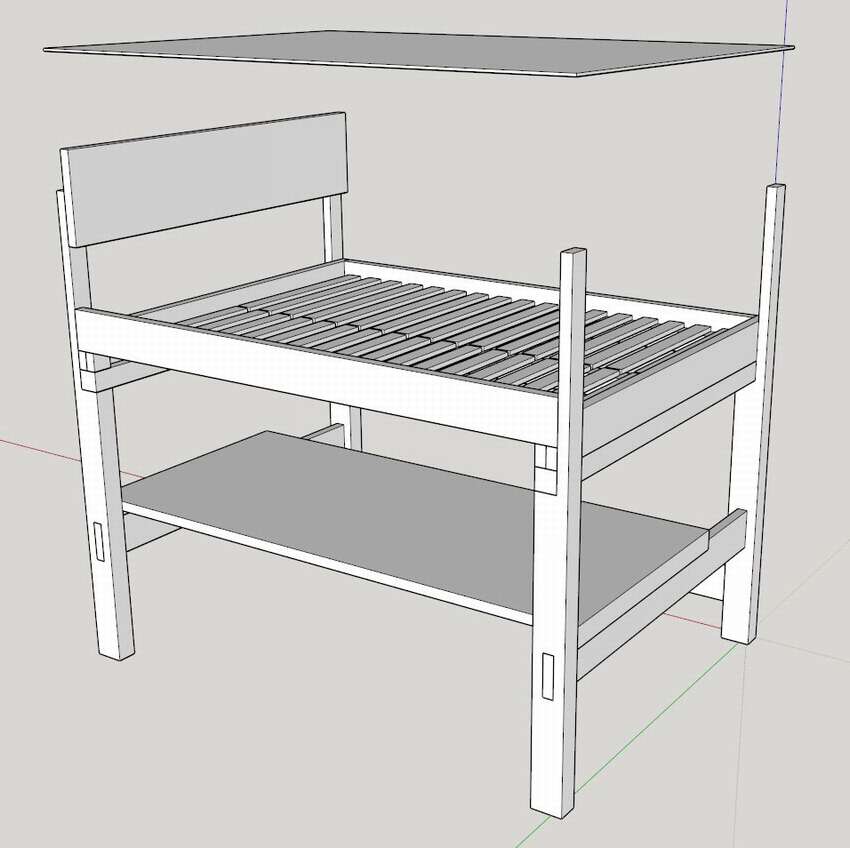
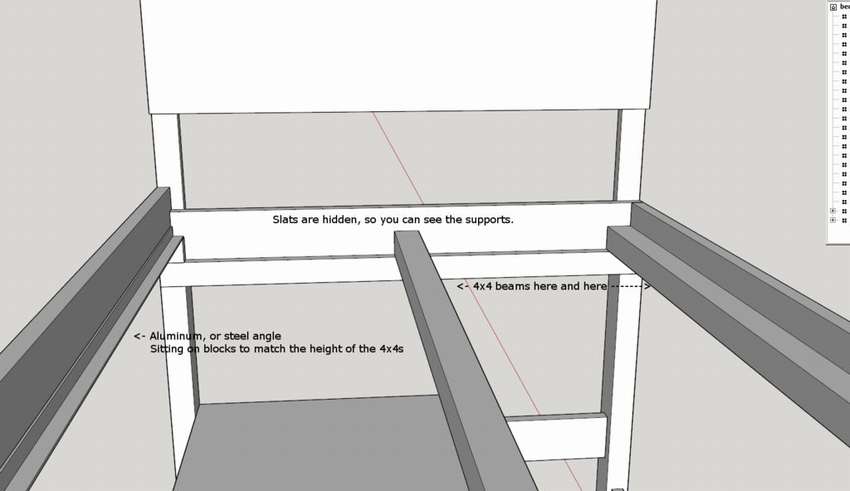
Large loft bed
 All you need to build a bed is drawing of an attic bed with dimensionswhich you can change as necessary. The footboard is a full-fledged ladder which will sustain adults without problems. All slats from 2 × 4 bars with a small dowel to fit on the auxiliary rung. This creates a solid foundation. for the base of the mattress. The side of the headboard below has 3 shelves with a plywood back to strengthen lateral support. The frame is mounted 150 cm from the floor. To find out all the details, use the link under the gallery, the site has a shopping list, all diagrams, a SketchUp file and 6 videos telling about the assembly.


https://i.expert-h.com/en/krovat/cherdak#sigFreeIdf52b31af9f
Corner loft bed with working area
 It’s shown in stages how to make a corner loft bed with a work area do it yourself. First measure the mattress, in this case it is 1 x 2 meters. To keep space for bedding, add 5 cm. Your measurements will obviously differ. depending on the size of your mattress. After the perimeter of the box is built, it is recommended to measure as necessary, just in case. Sometimes the details may not match a couple of mm, or the tree is slightly curved; these things can affect the design, so it’s always better to double-check.
You will need parts of this size..
For frame:
- 2 boards 1x6 208 cm long for the sides of the bed and 2pcs. 105 cm long for the head and legs of the bed
- bar 1x2 103 cm long support for the head and 2 pcs. 194 cm for the sides of the bed
- 103 cm long 2x4 bar to support the stairs
- 2 1x3 boards 194 cm long for slats on the sides of the bed
- 2 boards 1x3 103 cm long leg of the bed and 13 pieces 104 cm for bed slats
For crossbeams:
- 1x4 board 208 cm long for a crossbeam, 1 pc. 28 cm for side rail, 1 pc. 28 cm for side rail and 1 pc. 38 cm for lateral support
For stairs:
- 2 2x4 bars 150 cm long for the sides of the stairs
- 5 2x4 bars 101 cm long stairs


https://i.expert-h.com/en/krovat/cherdak#sigFreeId776699e4ea
How to build a loft bed step by step
 Construction of an attic bed may be the perfect solution for the bedroom when space is a problem. High ceiling makes it possible make the bed the right size and partially solve the issue of free space. The construction process consists of many accurate measurements, buying the right type and length of wood, choosing bolts and screws, and also assembling an attic bed in the right area. This design was collected in 12 hours. In this case, the space with high ceilings was fully used, and a lot of additional living space was created. Process loft bed construction You can see below for detailed step-by-step photos.


https://i.expert-h.com/en/krovat/cherdak#sigFreeIdffc764aa0d
Wooden attic bed for adults
 A great option for a small apartment, to arrange a place to sleep and work without taking up too much space, this DIY wooden loft bed. The design presented here is very simple, if you follow the instructions, you can make such furniture in the afternoon for less than $ 100. Of course, it’s hard to find plans that exactly match your situation, but you can use ideas that are plentiful on the Internet. Make your changes, remove something, add. But let's look at this specific example.
For this loft bed you will need such materials:
 double size mattress
- 3/4 "plywood sheet (if possible, cut the sheet 1 x 2 meters)
- 12 boards 2x6's
- 6 bars 2x4
- 16 3/8 "carriage bolts, nuts and washers (locknuts if you want)
- 9 cm long screws
For what size it will be necessary to saw boards and bars, read on the site, there is a long and detailed list. Cut all the wood before you start assemblyto avoid unexpected surprises - cracks and so on. In general, the link under the gallery, carefully read the entire manual before work.


https://i.expert-h.com/en/krovat/cherdak#sigFreeIddc0c56b13b
Wooden loft bed with shelves
Example how to build large wooden loft bed over the window.
 Support and proper alignment of the frame is the most important task, especially when it is 2 meters high. How to assemble the structure, see below for step by step photos.


https://i.expert-h.com/en/krovat/cherdak#sigFreeIda0be115b15
Build a loft bed in the kitchen
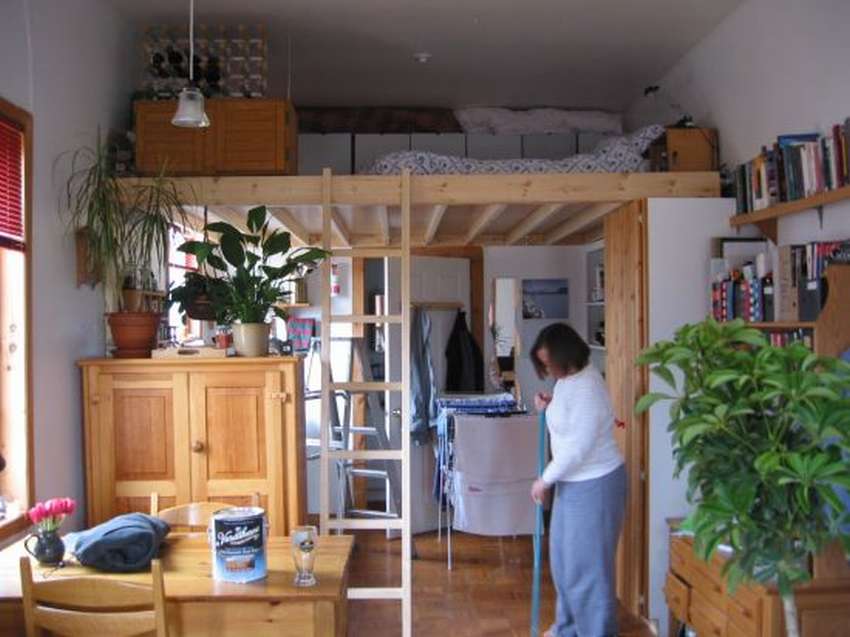 One of the main benefits of loft beds is extra floor space. But the amount of space under it will depend on the height of the bed. In this case, the ceiling was 10 feet (6.2 meters) high, so there was enough space for a normal sleeping bed. The author decided to build a platform above the kitchen end of the apartment, with the top of the platform at a height of 7 feet (2.1 meters). This gave approximately 105 cm of space to the ceiling, that is enough to rise and enough to sit. But there is also enough space below so that there is no danger of bumping into the platform with your head. Drawings and step by step photos, how to make an attic bed for the kitchen, see below in the gallery.


https://i.expert-h.com/en/krovat/cherdak#sigFreeId2dd9714a77
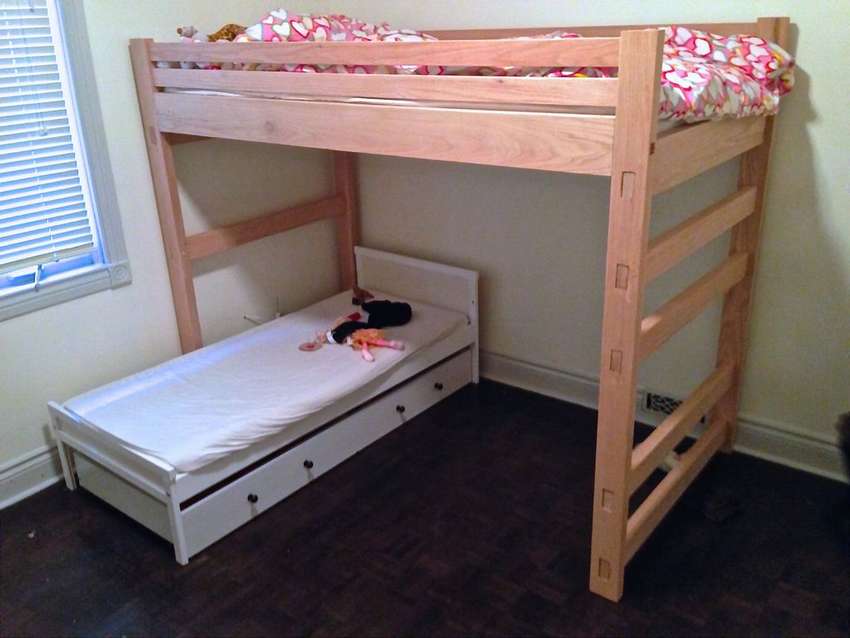
How to convert a bunk bed into an attic bed
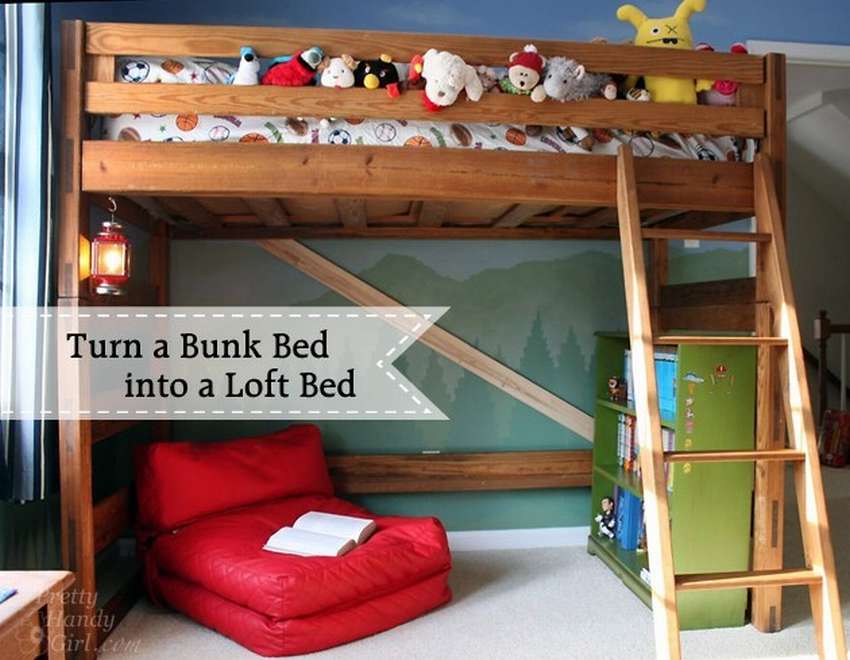 If children have grown out of a bunk bed, do not rush to throw it out. See how easy it is to turn bunk bed in loft bed in a few simple steps. You will need to remove the hinged board (or slats) and the front side rail. There will be a bed frame without a lower part. But the bed will stagger until add diagonal support. Place the board at an angle to the headboard. Mark with a pencil the corner and everything that needs to be cropped. Saw off the board, tighten the screws into the frame of the bunk bed at the bottom of one side and at the top on the other side. If you want, you can color the diagonal bracket. That's all, the loft bed is ready.


https: // i.expert-h.com/en/krovat/cherdak#sigFreeIdf1053cdd50
Homemade loft bed
 Looking for a way to enlarge a room? Build this one DIY loft bed and there will be twice as much space. Start by assembling the frame. The frame is made of sanded and painted boards. To distribute the weight of the bed across the floor and not fully rely on wall studs to support weight, install along the walls 2 x 4 125 cm long at 3 cm from the corner of the frame. The frame is assembled on the floor before installing it on the supporting walls using 10 cm bolts (3 on each corner). The staircase supports the corner of the frame and is set to 120 cm to the side so that there is access under the bed. Screw the frame to the wall mounts described above first, and then screw into the wall with the same bolts. The table is attached to the wall supports using two metal brackets. Highlights of the assembly, see the step by step photos.


https://i.expert-h.com/en/krovat/cherdak#sigFreeIda370fdd9f2
Bed loft in the interior 300 photos


https://i.expert-h.com/en/krovat/cherdak#sigFreeId2df41213b1
Hello, I am the author of this article, so I look forward to asking questions for this article in the comments below, I will answer all !!!
If you have questions on another topic, ask them on our forum, we will answer you
- Two baskets of paper in 5 minutes (Master class)
- How to make a simple and compact table for a milling cutter from plywood
- How to make a soft headboard tile (Instructions + step by step photos)
- Cinder block benches: a convenient bench in 55 minutes
- How to make a bed with a niche: saving space (Master class)