Original DIY bird feeders: 700 photos, step-by-step instructions
 original idea bird feeders photo
There are many types of bird feeders and various methods for their manufacture. They should be durable, safe, easy to maintain and certainly attractive from the point of view of our feathered friends. These are basic conditions, but who said that dining room for birds It should look like a boring eatery.
If your imagination works, you can always come up with how to make an original bird feeder with your own hands. This article presents only a few dozen examples of homemade feeding troughs, just to wake your imagination. I hope that after watching you will have your own ideas.
Bird feeder design
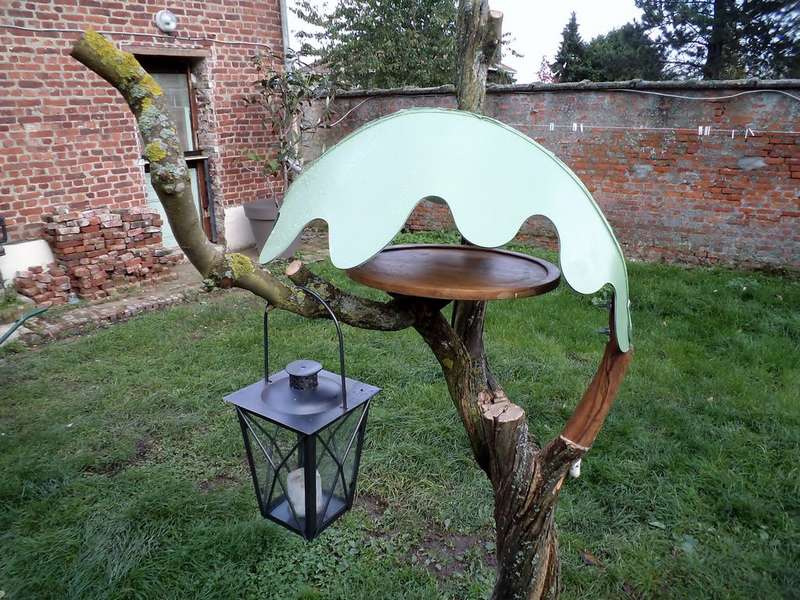 If you are looking for a suitable design for feeding trough, then you probably reviewed a lot of options on the Internet. The author of this project offers his solution, how to make an original bird feeder with your own hands - hardly you saw something similar. This canopy bird feeder is easy to manufacture and weatherproof. You need two things: wooden tray or cutting board and aluminum composite Alubond panels. This is such a facing material, consisting of two aluminum sheets with a plastic layer. The panels are easy to cut, and you can also give them any shape.
In step-by-step photos, the author as detailed as possible showed the manufacturing procedure. It is not necessary to hang a lantern. Just a tiny decorative shade for your yard.


https://i.expert-h.com/en/kormushka/originalnye-dlya-ptits#sigFreeId7ebafbe896
Original bird feeder ... from a satellite dish
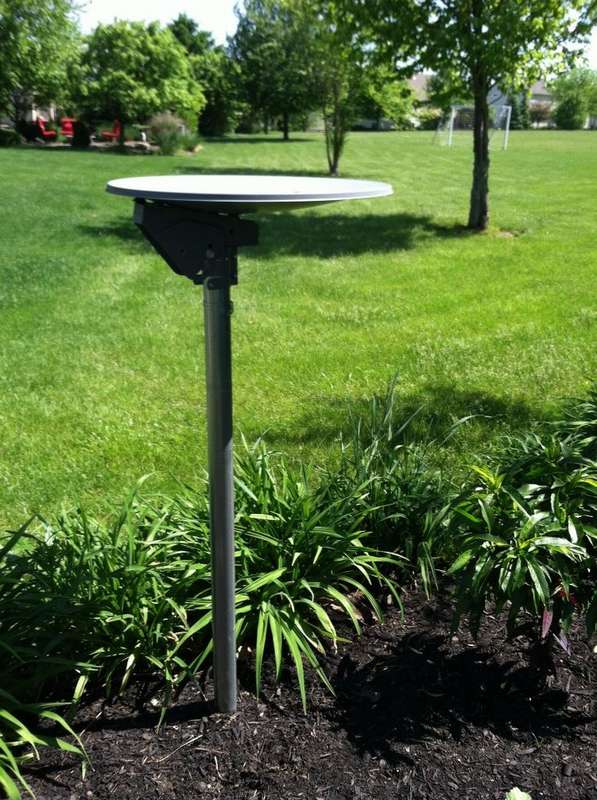 Refused from satellite television, but the dish remained? Take a closer look, it's ready original bird feeder. Remaking is very simple, anyone can do it with simple home tools.
There can be two options for installing a feeder (plates):
- Use a metal pole, as the author of the project did;
- Use the lower bar (the straight thing that sticks out in front of the plate) to hang on a tree or elsewhere.
In order to mount the antenna horizontally, remove the two upper bolts from the support assembly and use only the two lower ones (see photo).
Install the pillar. Putting a plate on a pillar is a simple task. Make sure the plate is level and tighten each bolt. Now it’s clear that it’s really ideal bird feeder: Maintenance free, easy to clean and looks great.
I hope you will enjoy!


https://i.expert-h.com/en/kormushka/originalnye-dlya-ptits#sigFreeIdac9ec37954
Lamp feeders
How to make a feeder from an old chandelier
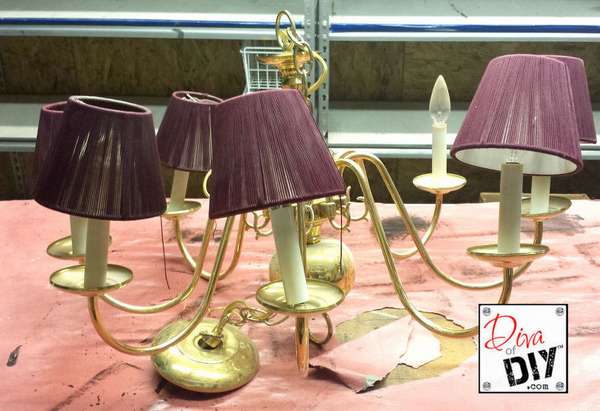
 Most people see this ugly, obsolete copper chandelier and wonder why it is still not in a landfill. But, the author of this project saw in it beautiful feeding trough and implemented this idea.
In general, old chandeliers are very attractive in quality of processing, there are several reasons for this. You can choose the source material for any idea, First of allchandeliers are produced in a wide variety of shapes and sizes and Secondly, the old chandelier can be found in any garage or barn, for some reason no one immediately throws them out.
 Feeding materials:
- Chandelier
- Cups - any, plastic, ceramic, everything that you find a suitable size.
- Liquid Nails
- Nippers
Instructions on how to make a chandelier feeder:
- Remove the lamp holders from the chandelier
- Remove the plastic wire cover
- Unscrew the lamp holder
- Cut the wires with wire cutters
- Replace metal base and lamp holder nut.
- Spray paint to your desired color. Let it dry.
- Using liquid nails, glue the cups
- Let it dry overnight
Of course, chandeliers are very different, but the author is sure that a bird feeder can be made from almost any chandelier design. One condition, make your imagination work.


https://i.expert-h.com/en/kormushka/originalnye-dlya-ptits#sigFreeIdea8802f0f8
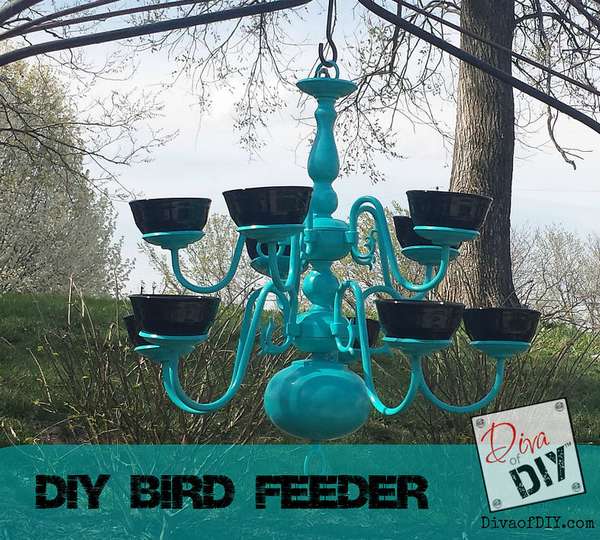
Chandelier bird feeder
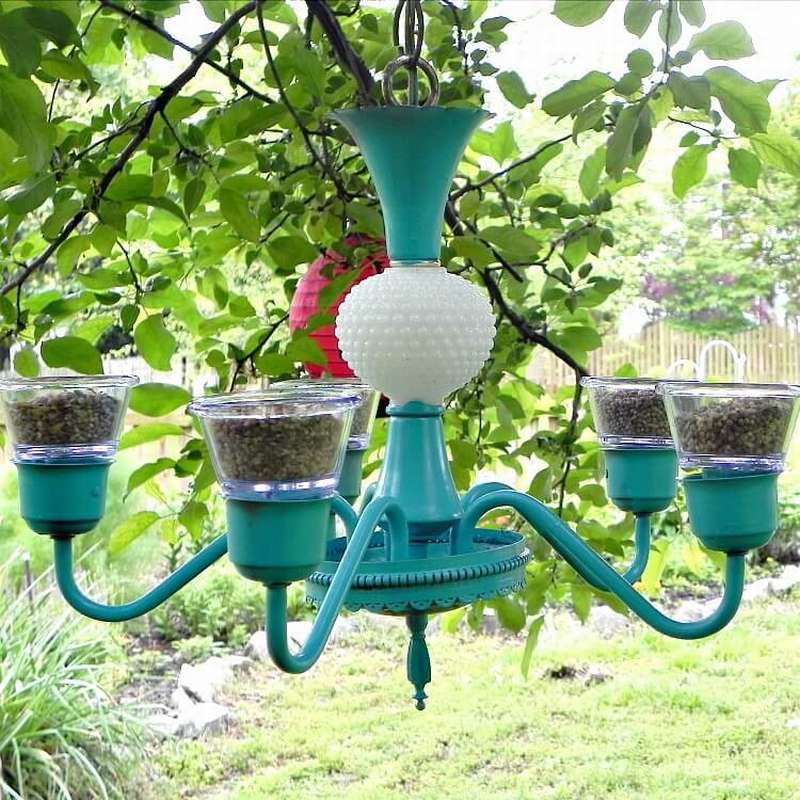 This easy homemade bird feeder assembled from an old chandelier and a few inexpensive items that are likely to be found at home.
Things you need:
- Old lamp (chandelier)
- Silicone sealant
- Spray paint
- Small bowls for food (the author used plastic cups from yogurt)
How to make a simple bird feeder:
Spray paint onto a lamp, pre-covering partsnot to be painted. Fix plastic cups to the horns in any way - glue, electrical tape, adhesive tape, wire. Hang and enjoy.


https://i.expert-h.com/en/kormushka/originalnye-dlya-ptits#sigFreeIdca731a47f6
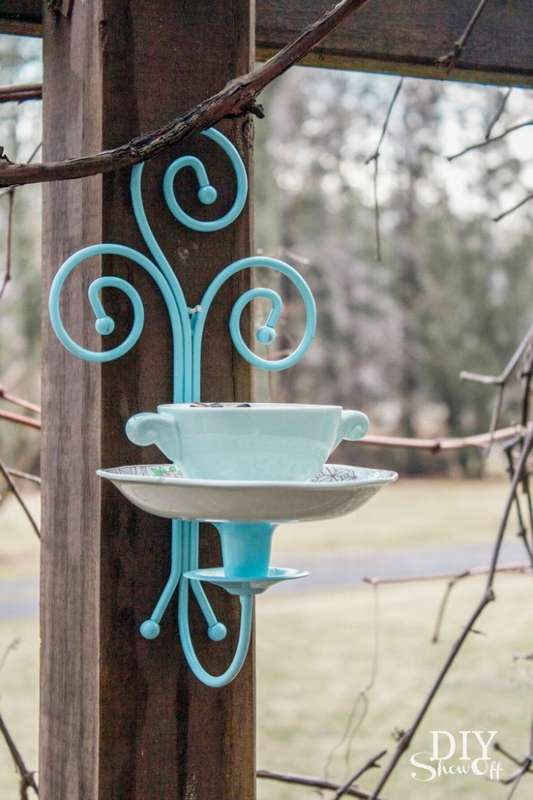 Vintage Bird Feeder
Do you like this photo? Buy at thrift store old sconce, a beautiful cup and saucerand do cute little bird feeder.
Of the tools you need
- sandpaper,
- wet rag
- glue E600
- tape clamp
What need to do:
- Sand the candelabra lightly with sandpaper.
- Paint and let dry.
- Glue the saucer to the cup. Use a clamping tape, gluing is much better.
- Let dry according to the instructions on the packaging of the adhesive.
- Hang, apply food.


https://i.expert-h.com/en/kormushka/originalnye-dlya-ptits#sigFreeIde6ce0e8c08
Dish Feeders
 Dish feeder
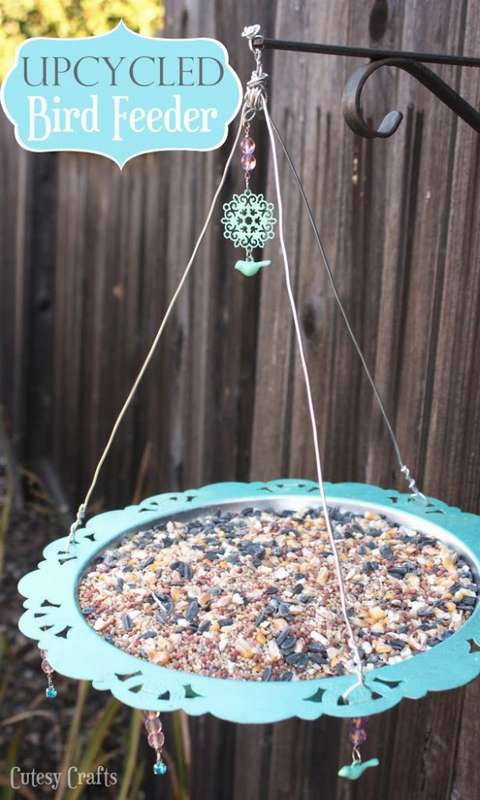
The author made this old silver dishthat I found in a thrift store. The openings on the outside of the plate make it ideal for hanging. To soften the shine, you can use glaze for decorationthis will give the feeder nice antique look. Still apply thin layer of transparent enamelto protect from moisture.
But the most interesting is the decoration. If you use a silver dish, then in any case it’s there will be no ordinary feeder.
The author used jewelry, beads, decorative figures of birds and rings.
Thread three wires and twist the ends. Make one of the wires a little longer and twist the loop for hanging. Attach a few more beads to hang from above.
Of course, if you hang it on chains, it will be prettier, the author tried different options, but for some reason the birds liked ordinary twine most of all. Confirmation you see in the last photo in the gallery.


https://i.expert-h.com/en/kormushka/originalnye-dlya-ptits#sigFreeId7a85511647
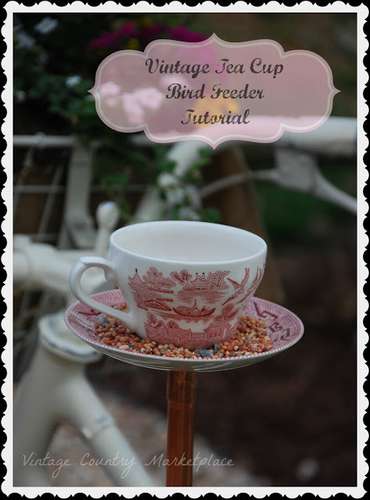 How to make a cup feeder and saucer
Necessary materials:
- cup and saucer
- glue E6000
- copper clutch
- copper tube
- Glue the cup to the saucer
- Apply a large amount of E6000 glue to the bottom and to the saucer.
- Put a few coins for weight in a cup and leave to dry for 8 hours.
- When dry, gently sand the bottom of the saucer and glue the copper sleeve.
- Using a rubber mallet, carefully, so as not to bend, hammer a copper pipe into the ground. Put the feeder on the tube.
Tea Cup Feeders, this is a very interesting and extensive topic, you can see many interesting examples on the same site, in the article “Ideas for feeders».


https://i.expert-h.com/en/kormushka/originalnye-dlya-ptits#sigFreeId7ec6b6e521
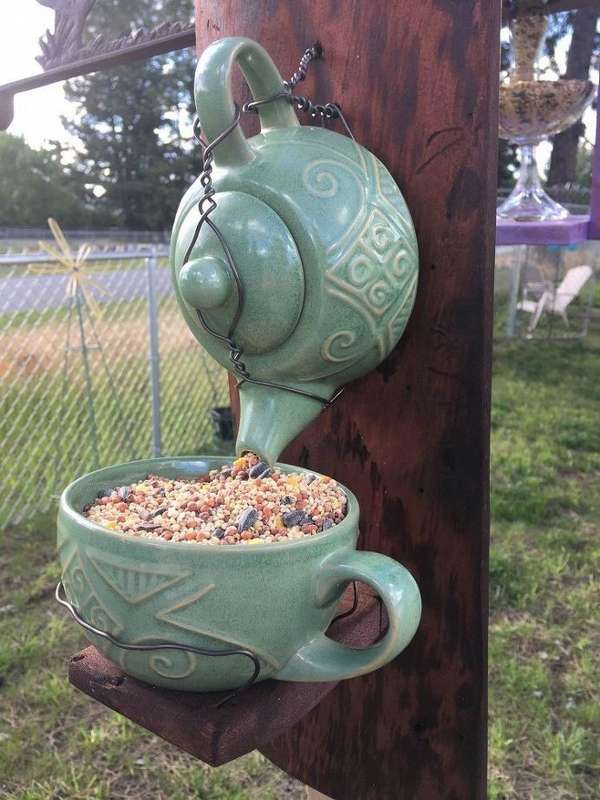 Teapot feeder
Do you like this original teapot feeder? You can easily do the same, just sort out the old dishes, there will probably be material. If you find an old teapot and cup, consider that the feeder is almost ready. It remains to find a board of a suitable size and install a mount on it, as shown in the photo. You can, of course, and not in such a difficult way, as the author suggests, because here it will be necessary to drill holes to secure the wire.
You can read how to do this on the site, well, if something is not clear with step-by-step photographs. In general, it doesn’t matter how you fix it, the main idea is that the kettle is a bunker where you will put the grains. Through the spout feed is fed into the cup. That is such an automatic original feeding trough. Just remember to expand the holes in the middle of the teapot in front of the spout so that the grains do not get stuck.


https://i.expert-h.com/en/kormushka/originalnye-dlya-ptits#sigFreeId2286e4462e
Kettle feeders 35 photos


https://i.expert-h.com/en/kormushka/originalnye-dlya-ptits#sigFreeId622b38cc19
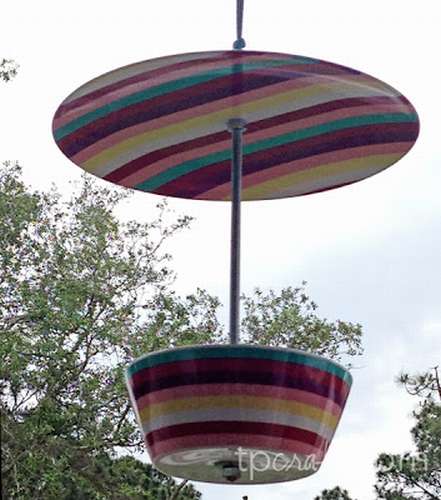
Beautiful glass tray feeder
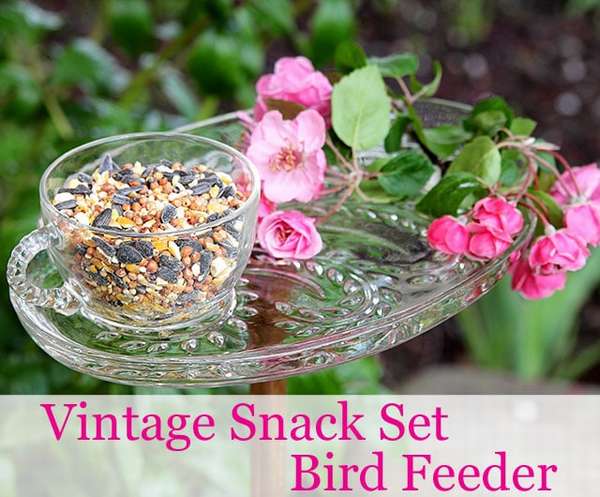 Similar glass sets can be found in any thrift store, once they were very popular. And now, in most cases, gather dust on the far corners of the shelves of kitchen cabinets. It shows how easy it is to remake a glass tray into a cute bird feeder. So it will be much more useful.
In addition to a set of dishes, you will need to find a wide copper tube, with a diameter of up to 2 cm. Although not necessarily copper, you can use anything, even a wooden column for a rack, just a copper tube looks more elegant.
The second main task, to buy a good glue, the author used Loctite Glass, a two-component epoxy adhesive with a high degree of stickiness and toughness. If you find everything, it remains to stick the dish to the tube, in principle, this is all the work. Your birds will not mind if you put flowers, they do not care, but you are pleased.


https://i.expert-h.com/en/kormushka/originalnye-dlya-ptits#sigFreeId9bedd65135
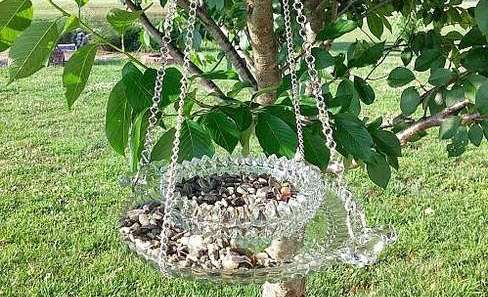 And if you think your feathered friends deserve more, do it for them. crystal manger. So what? You cannot forbid beautiful living. The author of this project decided to attract birds in this way, well, who refuses to bite from such a chic feeder. A crystal dish and a candy cane were used here, and old necklaces were used as a fastener. I don’t know how the birds reacted to such a feeding trough, but the neighbors probably appreciated it.
How to collect such beauty, you can read in the instructions on the author’s website. In addition to crystal glassware, you will need S-shaped hooks, rings, pliers, glue E 6000.


https://i.expert-h.com/en/kormushka/originalnye-dlya-ptits#sigFreeId5450a78abb
 But, if you don’t have glass trays and crystal dishes, you can do original bird feeder from ordinary plastic plates. This is a simple project, attract children, let them have fun helping you.
Cook: flat plastic plate, cup, long bolt, 4 washers, 4 nuts, twill tape or fabric, silicone glue, drill.
Drill holes in the plate and bowl. After that, you can start assembling the feeder.
- Start at the bottom in the following order: 1 nut, 1 washer, bowl, washer, nut. The first nut is about 3 cm from the end. Apply some glue between the nuts and tighten.
- At the other end, in this order: 1 nut, plate, 2 washers, 1 nut. Before tightening, add tape or twill between 2 washers.
- Cut a small hole in the middle of the tape and put on the bolt between the 2 washers. Add some glue and tighten.
- Let the glue dry for several hours and you can set the feeder.


https://i.expert-h.com/en/kormushka/originalnye-dlya-ptits#sigFreeId71f7f471db
Check out a few more examples of bird feeders from plates and cups


https://i.expert-h.com/en/kormushka/originalnye-dlya-ptits#sigFreeIdd01ff08004
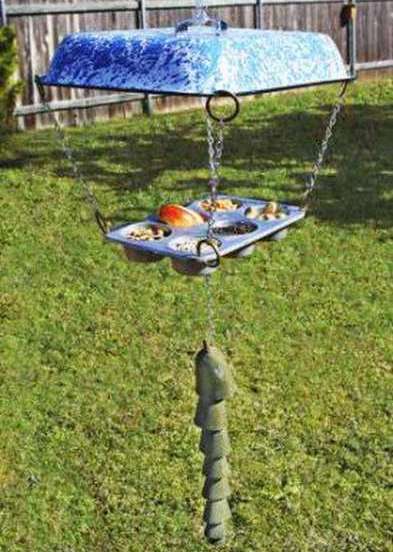 Baking trough for bird feeders
Use of household items that have expired making bird feeders A great way to save money and help our feathered friends.
Instruction manual:
Step 1 Make holes in the mold and on the roof. From what there will be a canopy, think for yourself, it can be a tray, a large lid from the pan or something else like that.
Step 2 Attach a handle to the roof.
Step 3 Counterbalance the bottom to make the bird feeder more stable. For this purpose, you can use any heavy object that is convenient to attach.
Step 4 Pass the chain rings through the holes.
Step 5 You can decorate the feeder whenever possible, for example, the author used old skeleton keys.
A good reason to rummage in the garage and clean up:)
 Materials:
- Molds for baking, in this case muffins
- Metal hole punch or drill
- Pliers
- Screwdriver
- Chains
- Metal rings
- Canopy tray
- Metal valves or any other counterweight items


https://i.expert-h.com/en/kormushka/originalnye-dlya-ptits#sigFreeId448b12e7aa
Egg Box Bird Feeder
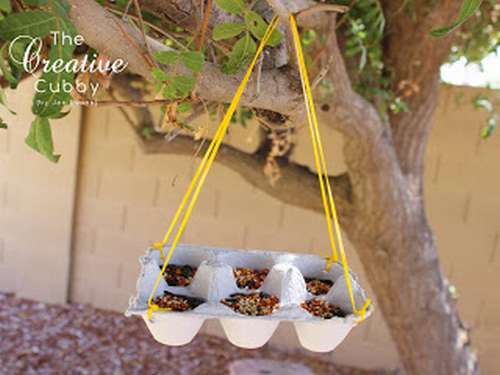 The cardboard box from the eggs turns out to be excellent material for making bird feeders. Thus, at the lowest cost you can create an environmentally friendly product. A great way to invite little guests to the yard.
Materials
- Egg box
- Thin rope
- Scissors
- Glue
- Bird food
Instruction manual
- Trim the top of the box carefully and punch a hole in the four corners.
- Cut two pieces of rope about a meter long.
- Insert the rope into the holes diagonally and tie the ends into knots above the corners.
- Feed food and enjoy the birds!


https://i.expert-h.com/en/kormushka/originalnye-dlya-ptits#sigFreeId20901a69ba
Wooden spatula feeder
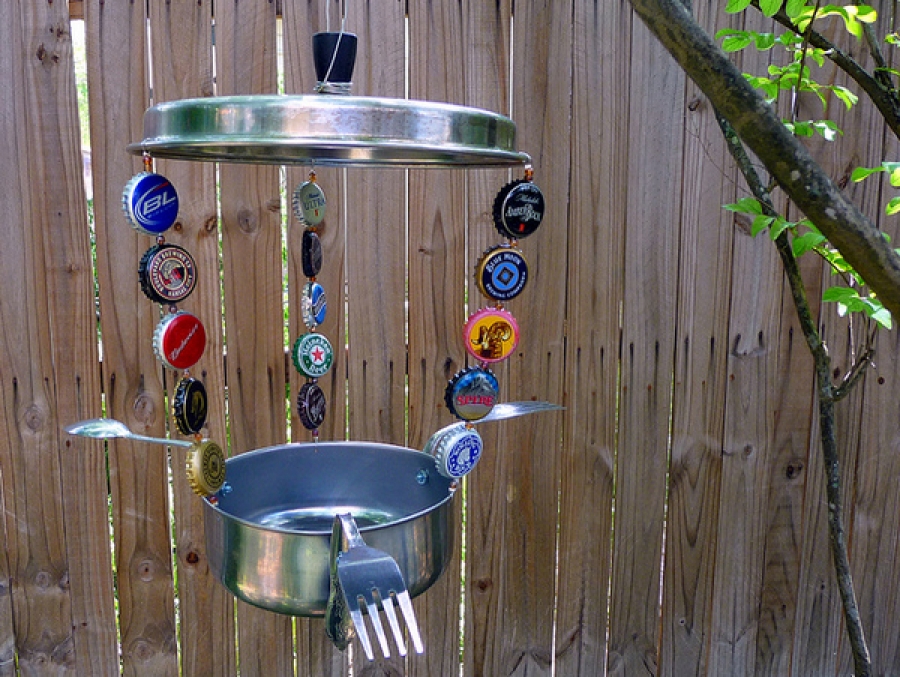
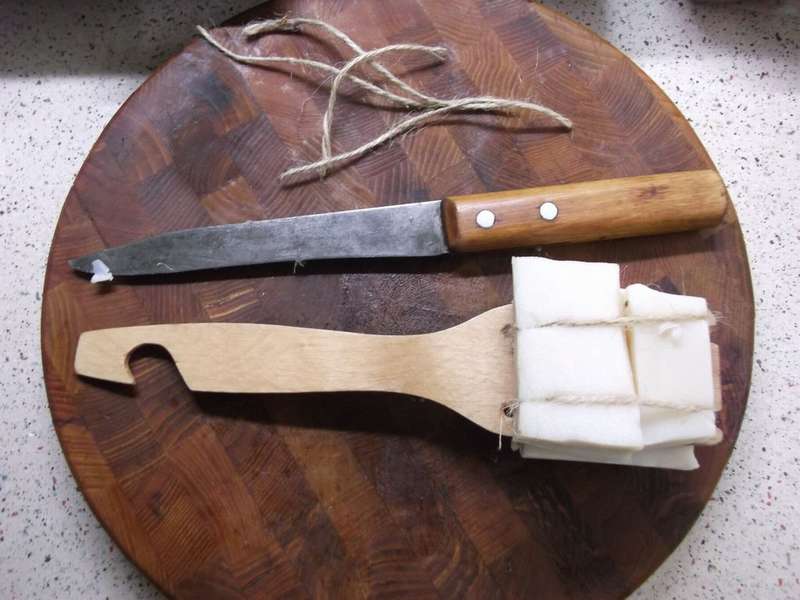 Of course, this is not the most convenient bird feeder, or rather, it is not a bird feeder at all. Just, in this way, the author decided feed bluebirds. For them, fat is an excellent source of winter fats, and they really like it. But first, the fat must be properly prepared. The main thing is to make sure that it there were no spices, well, of course, you can not use salted lard.
So, if the product is ready, simply attach the lard with twine to a wooden spatula, using the holes and cuts that must be done beforehand (see step-by-step photos).
If anything, lard can be replaced with bacon or other animal fat in any form, only so that it there was no salt or seasoning.


https://i.expert-h.com/en/kormushka/originalnye-dlya-ptits#sigFreeId05d2514b69
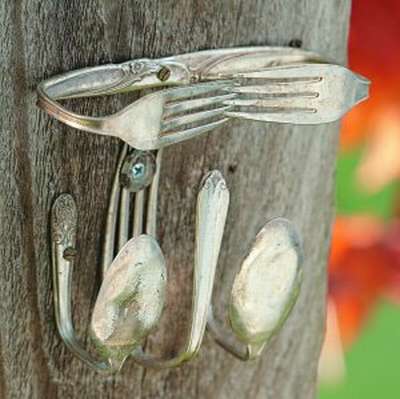
Homemade cutlery feeder
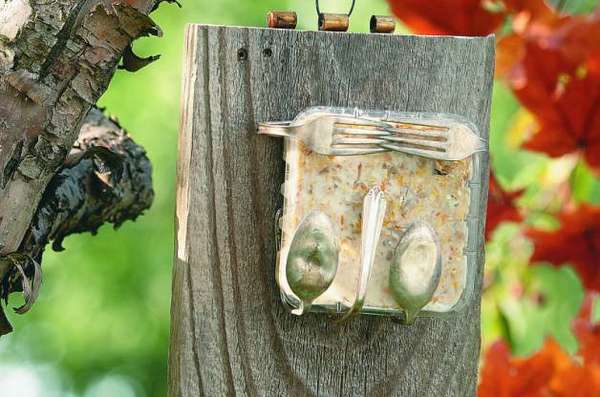 Your courtyard birds deserve exquisite food, so serve them in this elegant, functional home feeding trough. It will take a little time to assemble this home-made bait feeder for bacon, but you can be sure that no one else has the exact same cutlery product. How to assemble a mold holder from spoons and forks, I think it’s clear from the photo on the right. Just look where to drill holes. To evenly attach the cutlery to the board, first bend them in the configuration shown in the photo, then attach them to the board, holding in place, insert the mold and mark with a pencil. Then screw into place.
 Attach a loop to the back of the board. The hinge part should be just above the edge.. The wire passes through the center of the hinge and is attached using pliers to make decorative hinges for hanging. At the end, insert the box of bacon into the device.
Materials:
- Small piece of board
- Cutlery, five pieces
- A loop
- Wire
- Screws, various sizes
- Drill
- Drilling machine or hand drill
- Nail
- Rubber mallet
- Screwdriver
- Nippers
- Pliers
- Lard in plastic packaging
Plastic Tubing Bird Feeder for Tennis Balls
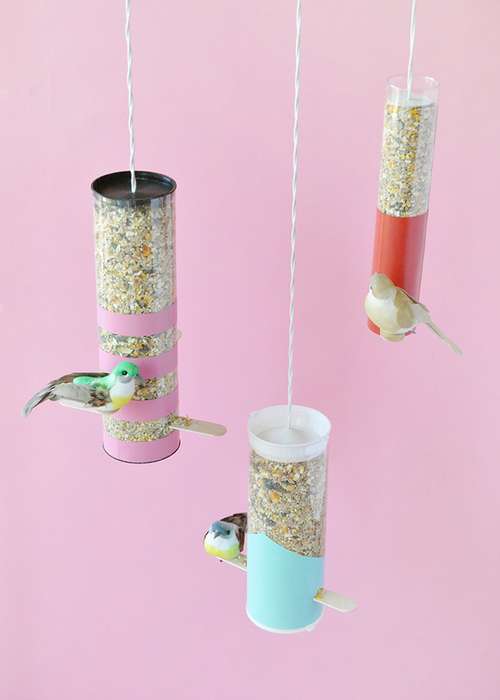 You have already seen many examples plastic bottle feedersno doubt they are very convenient, as they are very simple to manufacture. But if you have a plastic tube for tennis balls, then you can make it more beautiful and original manger - look at the photo, what attractive products the author got. Also work will not be much more than with a plastic bottle.
How to make a feeding trough, you will understand, having looked step by step photos. It is really very simple.
- Using a marker, mark a line across the width of the ice cream stick on one side of the tube.
- Cut a gap and make sure that the stick passes to the end.
- Then draw a line from the first stick so that the second sticks out exactly on the other side.
- Cut a triangle above the slot, this will be the feed hole.
- Make a hole in the cover and thread the rope.
- Fill the container with seeds, close the lid and hang the feeder!
The top cover can be sealed, so that the feeder does not fall under the weight, just make sure that the bottom cover closes tight enough and the feed does not spill out.
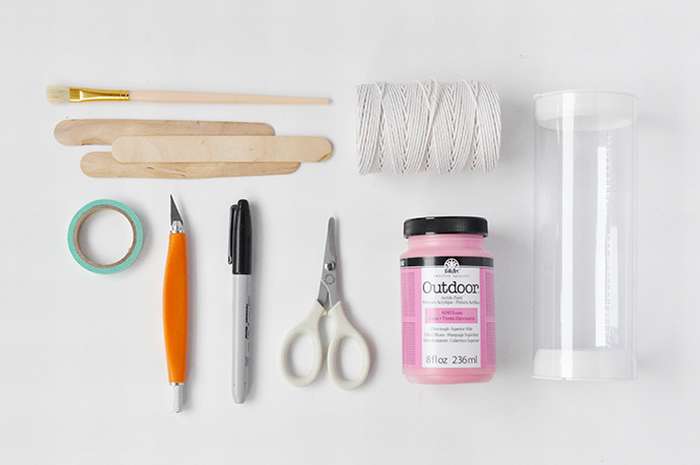 What you need:
- Acrylic paint
- Brush
- Transparent plastic tube (for tennis balls or something similar)
- Rope
- Precision shears for cutting polypropylene pipes
- Knife
- Marker
- Ice cream sticks
- Decorative adhesive tape


https://i.expert-h.com/en/kormushka/originalnye-dlya-ptits#sigFreeIda9c3aed58e
Ice bird feeder
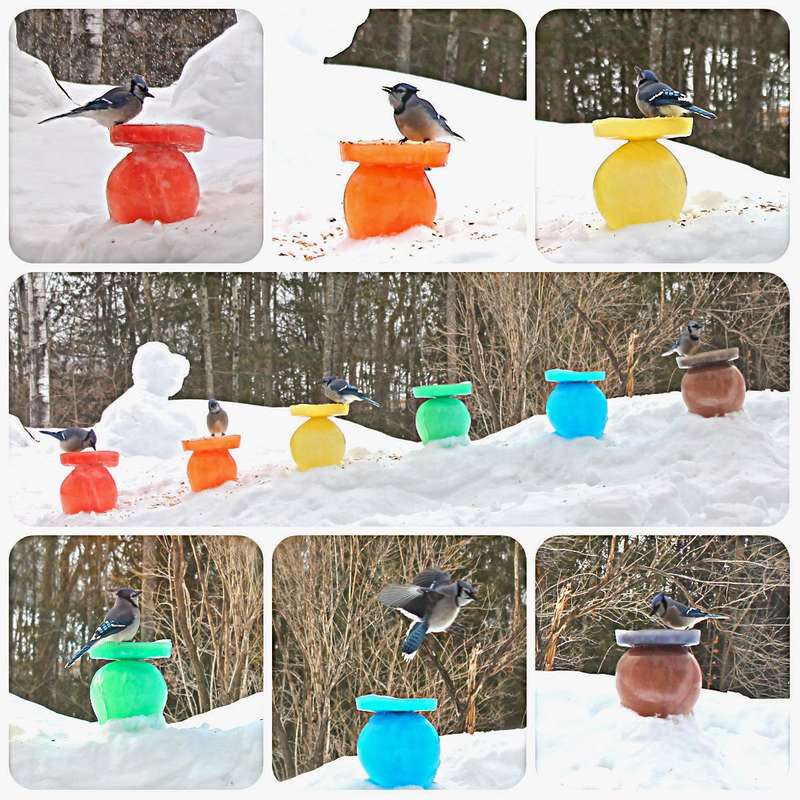 The creation of these feeders was an evolution for the author with many trial and error. If you liked the idea, you can take advantage of the experience and do something original.
What do you need
- helium balloons
- 6 round foil spoons
- food coloring
- water
- bowls
- full jars (for weight)
- time;)
Manufacturing procedure:
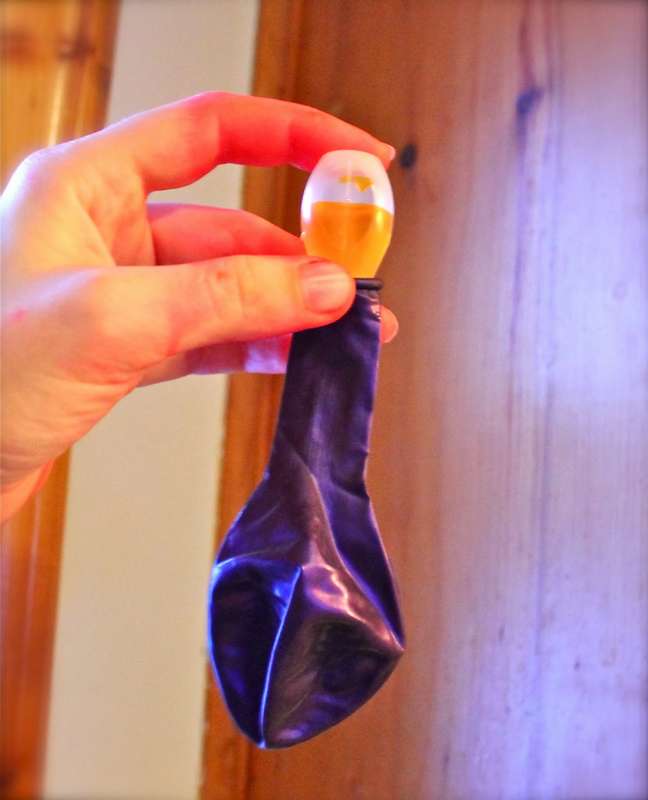 Take the dye and add a few drops to the ball.
- Then pour in a ball of water, place in a bowl (to maintain a rounded shape) and put in frost.
- Clean the frozen ball.
- Next, we make the bird feeder itself.
- Fill the molds with water and add food coloring.
- Place the bowl in the center of the can and freeze.
- Once the water has completely frozen, fill the bowls with hot water.
- Let them warm up until they slip off the ice.
- Slide the ice discs out of the cans.
- Pour cold water onto the ice sphere and gently place the disc on top. The middle of the disk will be very thin and break a little in the center, this is good. Just add some water and snow to the center and click to fasten the ball and disc together. Leave for a couple of hours in the cold.
When it freezes ... add food!


https://i.expert-h.com/en/kormushka/originalnye-dlya-ptits#sigFreeId06d6037e43
Original bird feeders with children's hands
Ice Cream Sticks Feeder
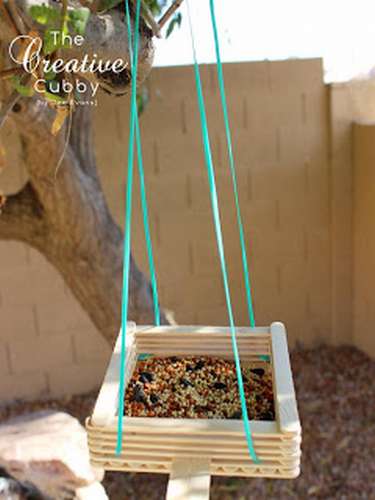 This project is lightweight, fast and perfect for little fingers! Just take some glue, sticks and seeds, and your baby will invite the birds to eat as soon as possible!
Instruction manual
1. Put the ice cream sticks as shown in the photo. This will be the base of the feeder.
2. Glue four cross sticks
4. Turn the base over and add two sticks along the edge, perpendicular to the base.
5. Glue one more stick on all sides of the base.
6. Make a perch as shown in the photo.
8. Cut two strings about 30 cm long each. Pass through the bottom of the base and up the sides. Tie all four ends in a knot.
9. Add food, hang and enjoy the guests!
Materials: sticks, glue, rope


https://i.expert-h.com/en/kormushka/originalnye-dlya-ptits#sigFreeIdb398adc788
You can decorate and upgrade the design. Check out a few more examples.


https://i.expert-h.com/en/kormushka/originalnye-dlya-ptits#sigFreeId0689dfd811
Project feeder for children
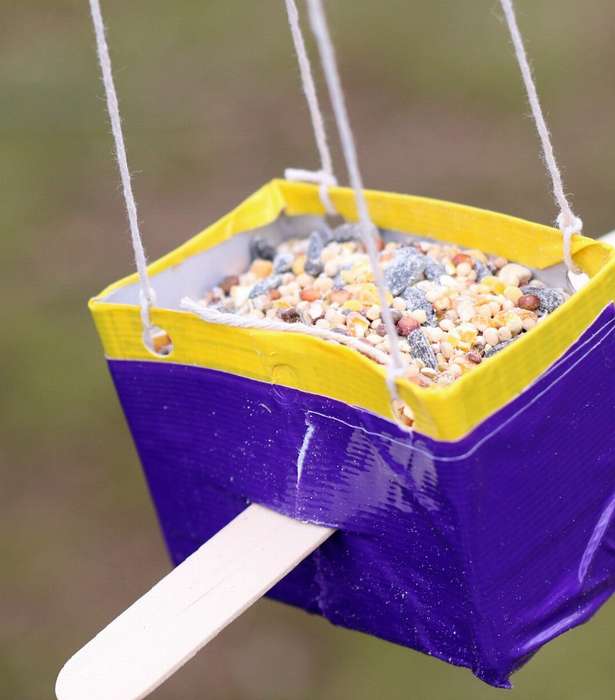 To interest children, choose a simple design so that kids can make a feeding trough with their own hands. There are a lot of safe things, choose those that are easy enough to use so that children have creative freedom and make the feeding trough exactly the way they want.
Below is a list of materials and short instructions.
Materials
- Scotch
- Wooden sticks
- Twine
- Hole puncher
- Scissors or razor blade
- Waterproof box
Instructions on how to make a bird feeder with your children
- Trim the top of the box, just not too deep.
- Tape the box.
- Punch holes at the top. Make cuts through the middle of the box on both sides, and insert the wooden sticks into the slots.
- Pass the ropes through each hole, and then tie the pieces together at the top.
- Fill the feeder with food.
- Hang and watch a bird picnic, it's interesting.


https://i.expert-h.com/en/kormushka/originalnye-dlya-ptits#sigFreeIddae04fea23
Make an easy bird feeder
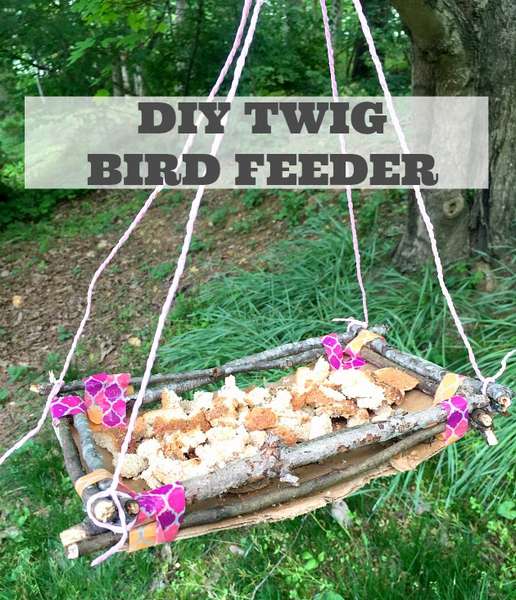 Most children love birds and animals ... at least from afar! Tell them how birds find food and what people need to help them. Suggest make a bird feeder. If there are a lot of branches and sticks in your yard, invite the children to make a bird feeder out of “past material”, at least such as shown in the photo.
Prepare the material:
- a small piece of cardboard
- twigs, sticks
- glue
- twine or rope
- Take a piece of cardboard and a few branches. Apply glue to the bottom of the twigs and press them against the cardboard.
- After they dry, add another layer of branches on top of the first layer.
- Add glue to the bottom of the branches of the second layer and gently push on top of the first layer of branches. This will be the side so that the feed does not wake up.
- Then let the children decorate the feeder at their discretion.
- When the glue is completely dry, take a rope and tie one part from the left corner to the right, and then another line from the opposite corners. Hang on a tree. Fill the feeder with seeds, slices of bread, or even cookie crumbs.
If the children like it, have them do one more on their own.


https://i.expert-h.com/en/kormushka/originalnye-dlya-ptits#sigFreeId7ea9062ecc
Homemade frame feeder
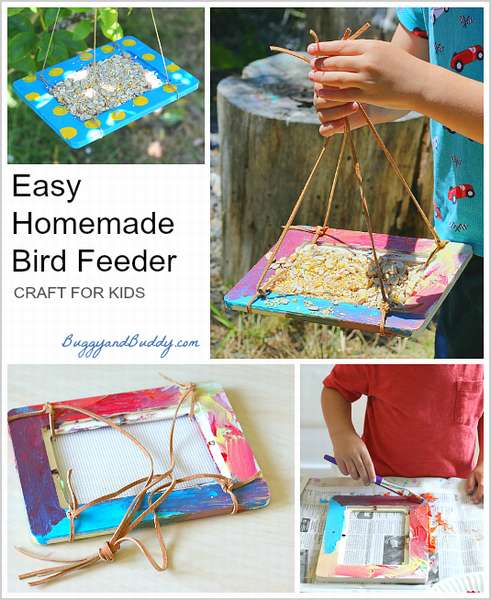 Here's how to do it homemade bird feeder with childrenusing a wooden frame. This is a simple process and allows children to be truly proud of their creations.
Materials
- Wood frame
- Acrylic paints and brushes
- Plastic canvas
- Strong glue
- Strongyarn, yarn or twine for hanging
How to do
1. Start by painting the wood frame with acrylic paints. Let it dry completely.
2. Cut the plastic canvas so that it is slightly smaller than the frame.
3. Glue the canvas to the bottom of the feeder. Optional, but for reliability, you can still secure with clerical buttons.
4. Securely fasten the cord through the hole in the frame. Leave a tail about 30 - 35 cm.
5. Do this with the other three angles.
6. Tie them in one knot.
7. Fill the feeder with seeds.
8. Hang a bird feeder on a tree and enjoy bird watching!


https://i.expert-h.com/en/kormushka/originalnye-dlya-ptits#sigFreeId9b08095376
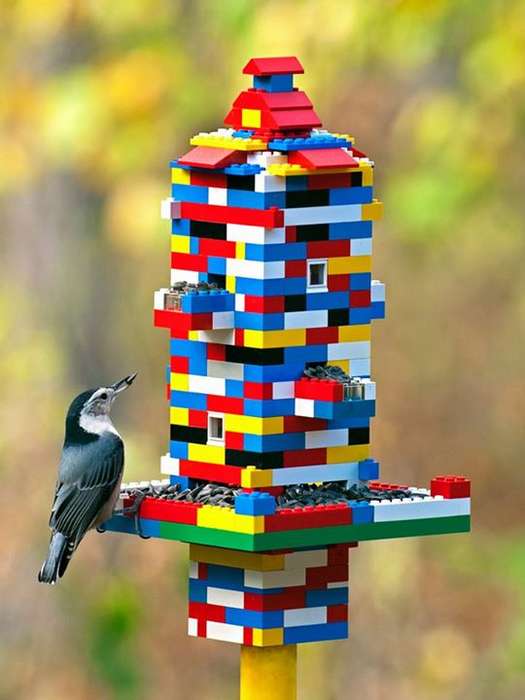 Who doesn't like Lego constructor !? It is perhaps the brightest and funny bird feederthat you can meet.
LEGO is just perfect for this type of construction - you can build anything you like and fix it with glue if necessary. Plastic does not get wet and does not deteriorate. Make the children interested in this idea, explain what the birds need and let them show their creative ideas with the material familiar to their hands.
Cardboard bird feeder
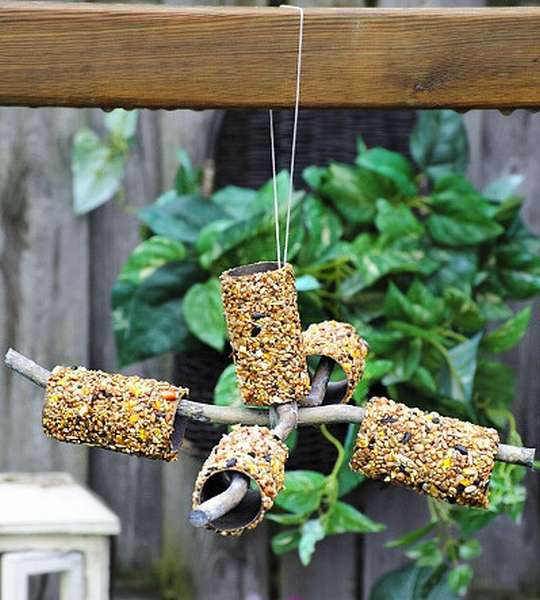
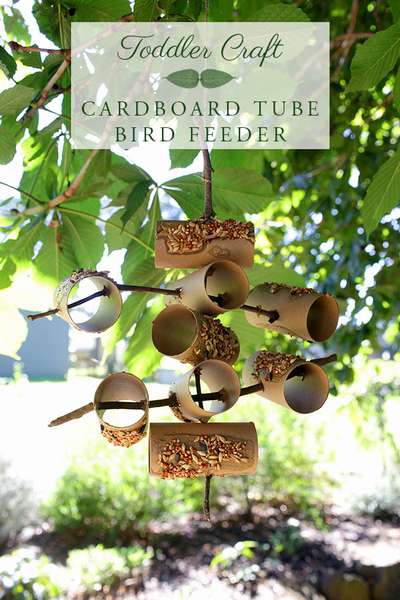 See how you can use cardboard tubes from toilet paper. Children came up with this project, help them make such a bird feeder.
You will need ...
- Cardboard tubes (as many as you like, the author used nine)
- Peanut butter
- Honey
- Assorted sticks and twigs
- Knife
- Brush
And then everything is simple...
- Choose a long straight and sturdy stick that will become the core of the feeder. Make cuts on the sides of 4-5 cardboard tubes. You can simply make slits or small crosses depending on the width of the stick.
- Insert the stick through the hole you made in the pipes, adding tubes.
- Then make cuts in cardboard tubes on a stick.
- Pass the sticks through the holes and attach the small branches as shown in the photo.
- Mix a few tablespoons of peanut butter and honey, heat them a little in the microwave to get a more viscous consistency. Then generously apply the mixture to the tubes. Add the seeds.


https://i.expert-h.com/en/kormushka/originalnye-dlya-ptits#sigFreeId4468e8c1ad
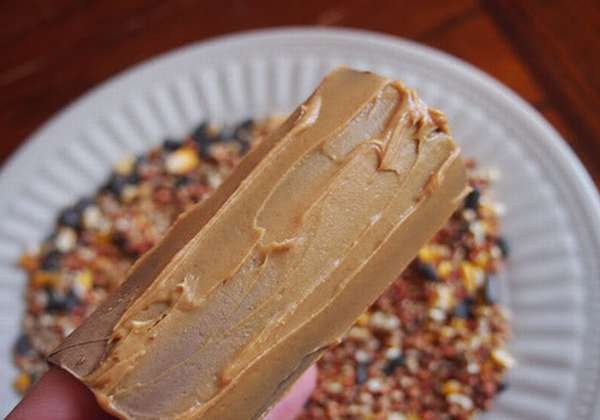
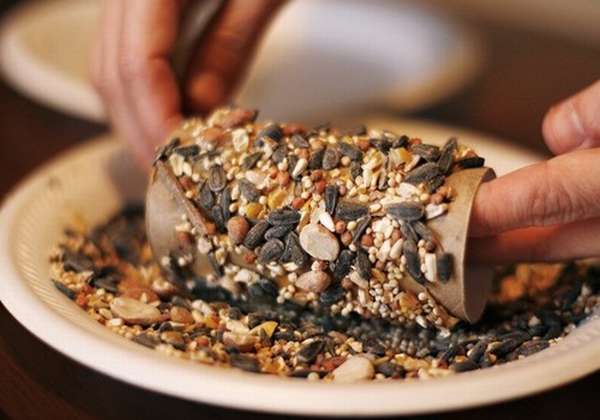
 Toilet paper feeder
See another option on how to use toilet paper sleeves for making an original bird feeder.
All you need is a few items.:
- sleeve from toilet roll
- butter
- small bowl
- plate
- plastic knife
Now you need to make holes, in general, see how it is shown in the photo.
 Oil, roll in seeds and can be used.
Edible Cardboard Feeders Photo


https://i.expert-h.com/en/kormushka/originalnye-dlya-ptits#sigFreeId9a00688824
Wicker Bird Feeder
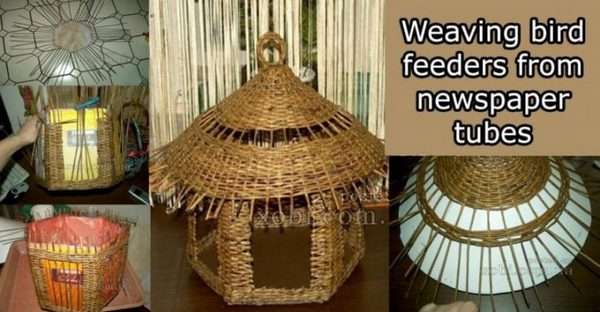 You will need: newspaper, cardboard, glue, scissors, ruler, nail.
Before you start, make a stencil - a hexagonal box. Then a hexagon is cut out from ordinary cardboard and with columns somewhere around 1.5-2 cm on the sides, with bookmarks. Next, how to weave a basket, look at the step by step photos. If you have experience, it should work out. If you do not know how to weave, then probably in the beginning it is worth trying on something simpler.


https://i.expert-h.com/en/kormushka/originalnye-dlya-ptits#sigFreeId6ccc88d687
See how you can do mesh feeder
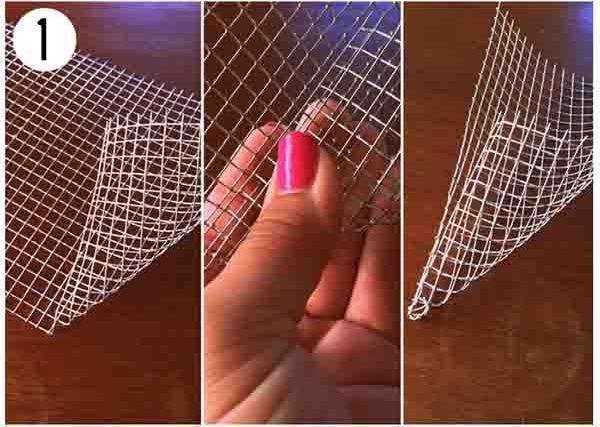 Very simple if you have a little wire mesh.
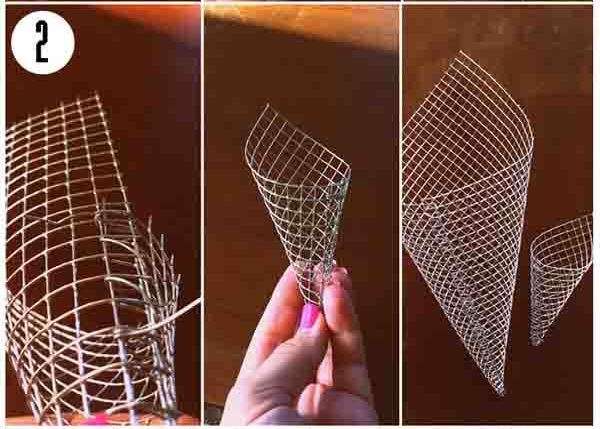 Twist the cone and fasten the ends with pliers
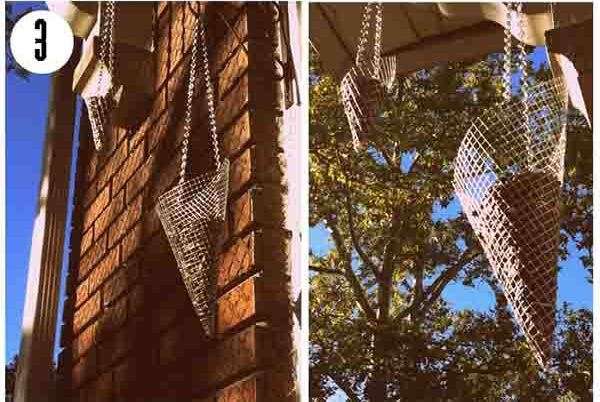 Fasten a chain or rope and suspend. Sprinkle the seeds.
Plastic can feeder
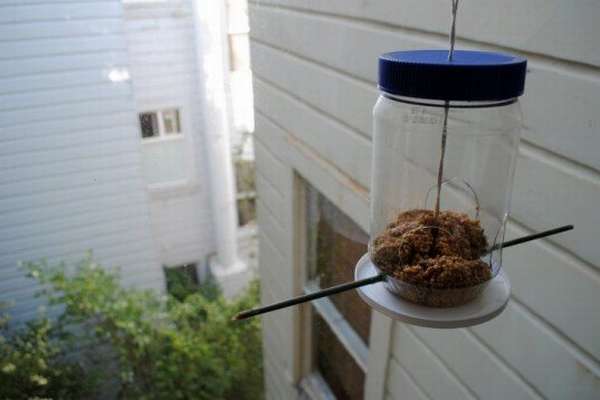 Love for birds and a desire to take care of nature has no limits, even if you live in a city apartment. Like other urban creative gardeners and nature lovers always find a way to prove that even the smallest spaces can be turned into tiny oases. These step by step photos show how to make a simple bird feeder from a plastic jarthat you can hang on the balcony, cornice or just install on the windowsill. It costs a penny, so anyone can make such a feeder in just half an hour.
In general, see the process in step-by-step photographs, if something is not clear, you can read the instructions on the site, although I think you will not need it.
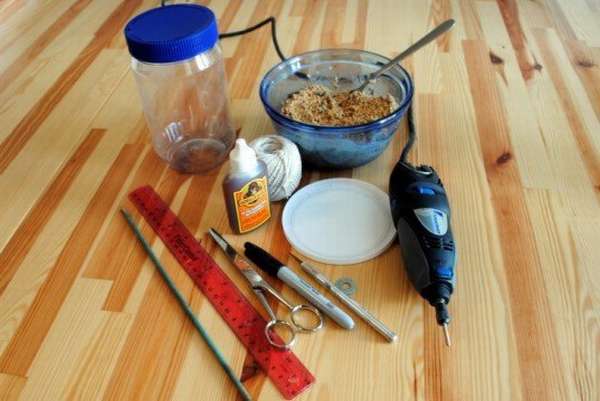 Gather materials, specifically:
- Plastic jar with screw cap (any size will do)
- Plastic cover (from yogurt, sour cream, it does not matter that only the size fits)
- Dremel (you can also use a small electric drill, in a pinch, a nail or knife)
- Washer or nut
- Strong thread or twine
- Scissors
- Strong glue
- Stick (you can use bamboo skewer or even a long pencil).


https://i.expert-h.com/en/kormushka/originalnye-dlya-ptits#sigFreeId02299e13ff
Bird bath
Although this article is about feeding troughs, but I want to say a few words about such an urgent summer topic as bird baths. If you like to watch birds, take care of them in winter, then deliver themFeel free friends make a bird bath for them. Below you can see two examples of how to do this.
How to make a bird bath
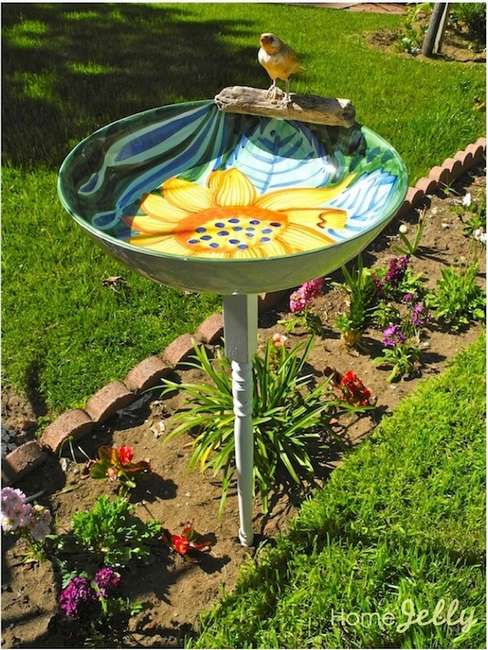 This is an economical and simple project, however, it will take a little work.
Tools and Supplies.
- hacksaw
- clamp
- sandpaper
- ruler
- big bowl
- table leg
- drill
- paints and brushes (optional)
- screw
- glue (liquid nails)
- branch (optional)
Instruction how to make a bird bath I will not rewrite, the process is shown in step-by-step photos. The idea, I think, is understandable, stick the bowl to the leg from the table, using the gasket from the board. It is very important to balance the design well. Using a ruler and a pencil, you need to find the center of the legs and planks, and then drill a hole. Using the clamp, screw the gasket to the leg, determine the center of the bowl and glue it.
Detailed instructions can be found on the website, link under the gallery. And more advice! If in hot weather algae problems, add some copper coins or a piece of copper pipe (must be really 100% copper). Water will remain clean.


https://i.expert-h.com/en/kormushka/originalnye-dlya-ptits#sigFreeId0cc667c83c
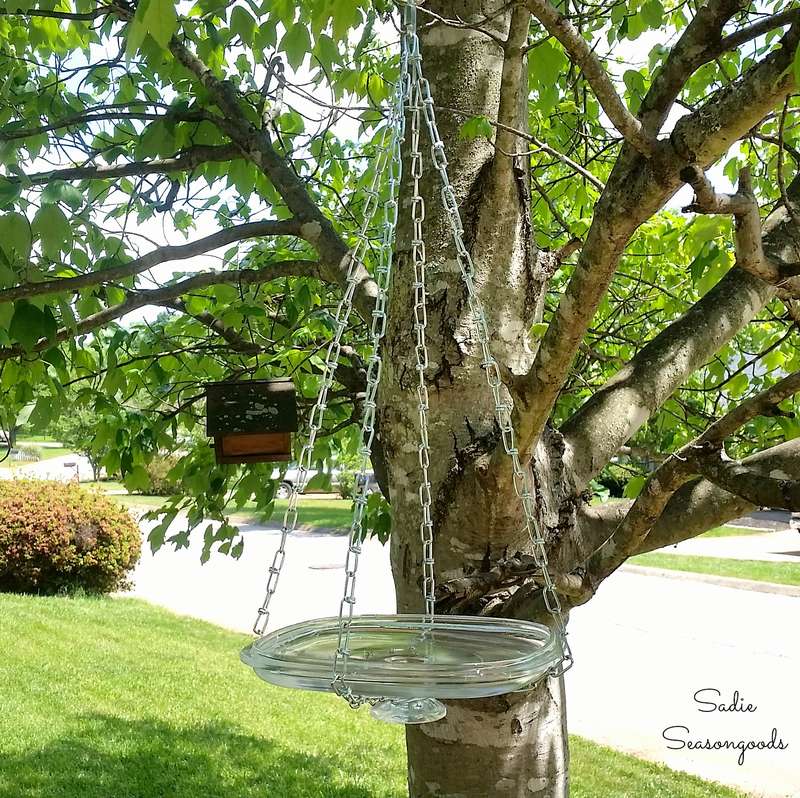 And this is another example, how to make a hanging bird bath from a glass lid. The author used chains from a hardware store. It is necessary to connect a short chain length to make a “bracelet” using “S” hooks, although it can be replaced with twisted steel wire. Thus, the circle from the chain will be a “nest” in which the glass cover will be located. Then four more chains are attached to this ring, connecting all the ends with a carabiner, the whole structure can be suspended on a branch. As you can see, everything is very simple. The main advantage is that the cover does not fasten in any way, that is, the bathhouse is very easy to clean.
It is also important to note that bird bath should be in the shade, where there is no direct sunlight. It needs to be done to avoid the effect of a magnifying glass - safety first.


https://i.expert-h.com/en/kormushka/originalnye-dlya-ptits#sigFreeId79604d40cd
Examples of a homemade bird bath


https://i.expert-h.com/en/kormushka/originalnye-dlya-ptits#sigFreeId0c6455994a
Original do-it-yourself bird feeders 200 photos


https://i.expert-h.com/en/kormushka/originalnye-dlya-ptits#sigFreeIddb12b85fb8
Hello, I am the author of this article, so I look forward to asking questions for this article in the comments below, I will answer all !!!
If you have questions on another topic, ask them on our forum, we will answer you
- Two baskets of paper in 5 minutes (Master class)
- How to make a simple and compact table for a milling cutter from plywood
- How to make a soft headboard tile (Instructions + step by step photos)
- Cinder block benches: a convenient bench in 55 minutes
- How to make a bed with a niche: saving space (Master class)