Plywood bird feeder. Do it yourself. 500 photos, drawings, instructions
 how to make a plywood feeder
In winter, when natural food for birds becomes inaccessible, it's time to feed our feathered friends. Make a bird feeder with your own hands from plywood it’s not difficult, it will be a house with a roof, an open platform or a hopper with automatic feeding, for birds the main thing is safety and the availability of feed. Therefore, your feeder will be simple or complex, not so important.
In this plan plywood bird feeders, a good choice. They may be less reliable than wood bird feedersbut plywood is a lot easier to work with. No complicated tools or some kind of woodworking equipment is needed. Of course, if you want to do something original and attractive, this is your business, such options are presented in this article.
Plywood bird feeder drawing
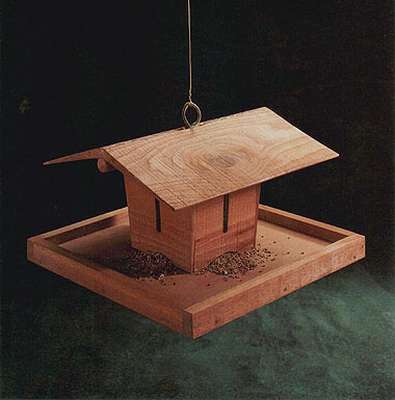 Here is an open option. plywood bird feeders on the platform. The idea is simple, make a decorative feed box and then install it on a sheet of thick plywood. Birds will not mind the remnants of building materials, so you can use what remains of the repair.
Both in terms of the amount of time spent and cost, this is a very profitable project. On the box you can even install plastic windowswill be more convenient.
To fill out this expertly designed bird feeder, rotate the threaded rod that serves as a hook so that it aligns with the groove in the roof. Then just raise the roof and sprinkle bird food.
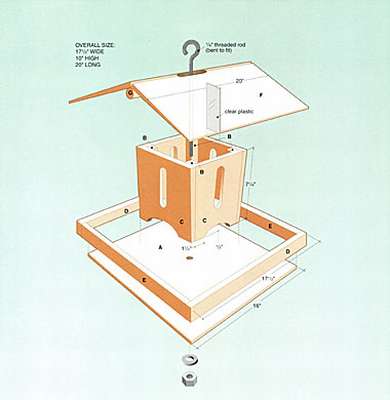 It will be necessary to cut out such parts
- A base. Plywood sheet 40 × 40 cm 2 cm thick
- In wall 4 pcs. 2x2x18 cm
- C Side 4 pcs. 0.8 × 15 × 18 cm
- D Side 2 pcs. 2 × 4 × 44 cm "
- E Side 2 pcs. 2 × 4 × 40 cm "
- F Roof panel 2 pcs. 0.8 × 18 × 50 cm
- D Spacer 2.5 × 50 cm
Tools: circular saw, drill, belt sander.
Materials: 6 mm threaded rod with suitable nut and washer, hot glue, nails.
Plywood Bird Feeder Layout
 Here is a phased manufacturing plan. plywood bird feeders on an open platform. Making a feeding trough is not difficult, but you must choose a design that suits your needs and suits the birds living in your area. Moreover, it’s important to choose the right placeprotected from cats and other predators. Hang a feeding trough on a tree (2 m above the ground) or attach to a wooden post.
Align the rails at both ends and drill through holes before inserting galvanized screws or nails to prevent wood splitting.
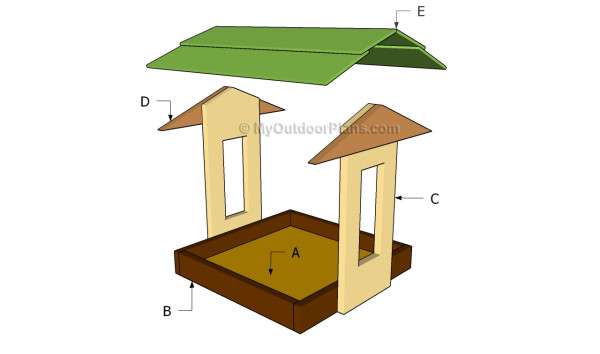 It is necessary to saw such details
- A - 2 cm thick plywood platform - 40 × 40 cm
- B - bars of 2 pieces. 40 cm and 2 pcs. 44 cm
- C - 2 side walls with a length of 47
- D - rafters of 45 cm
- E - 4 roof planks 57 cm each
The assembly sequence is shown in step-by-step photos., you can read the instructions on the site, the link under the photos with drawings.


https://i.expert-h.com/en/kormushka/iz-fanery-svoimi-rukami-foto-chertezhi-instruktsii#sigFreeIdb3f0cfb350
This is another similar option, step-by-step diagrams with dimensions, how to make a bird feeder from plywood, with only a few changes.


https://i.expert-h.com/en/kormushka/iz-fanery-svoimi-rukami-foto-chertezhi-instruktsii#sigFreeIdd66ffb8966
DIY plywood bird feeder drawings
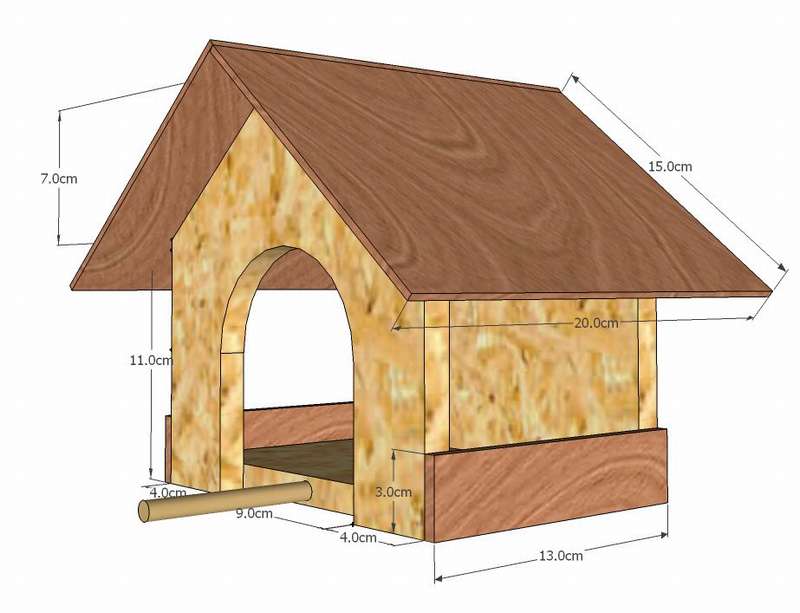
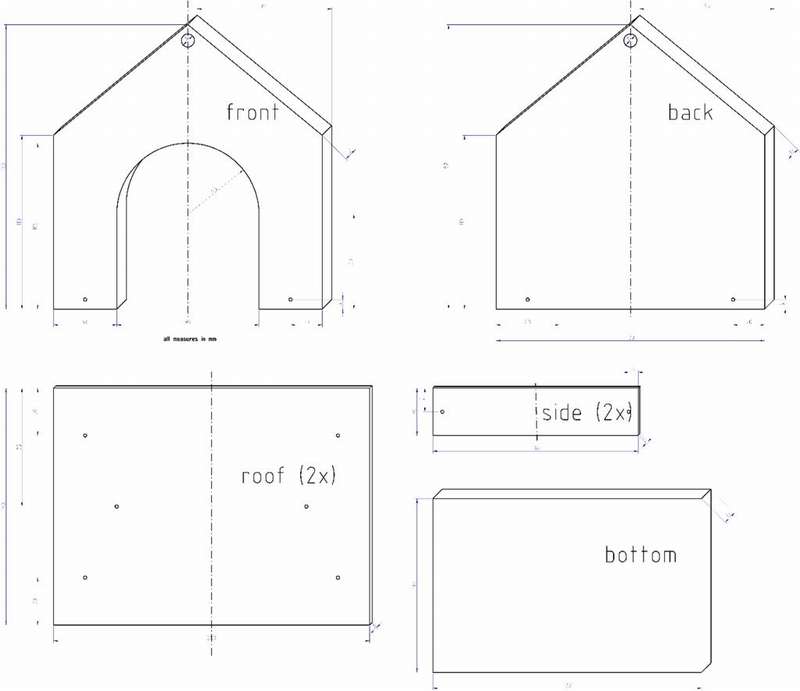
 Here, step-by-step diagrams with dimensions show how to make simple plywood bird feeder.
Materials
- plywood 4 mm;
- wooden blocks;
- glazing bead.
Tools:
- hacksaw or jigsaw;
- screwdriver;
- hammer;
- glue for wood, nails, screws.
Assembly is very simple, the sequence is beautifully shown in step-by-step photos with drawings. You can find detailed instructions on the website of the author of this project, link under the gallery.


https://i.expert-h.com/en/kormushka/iz-fanery-svoimi-rukami-foto-chertezhi-instruktsii#sigFreeIdc4c2a6f65f
Plywood bird feeder drawings sizes
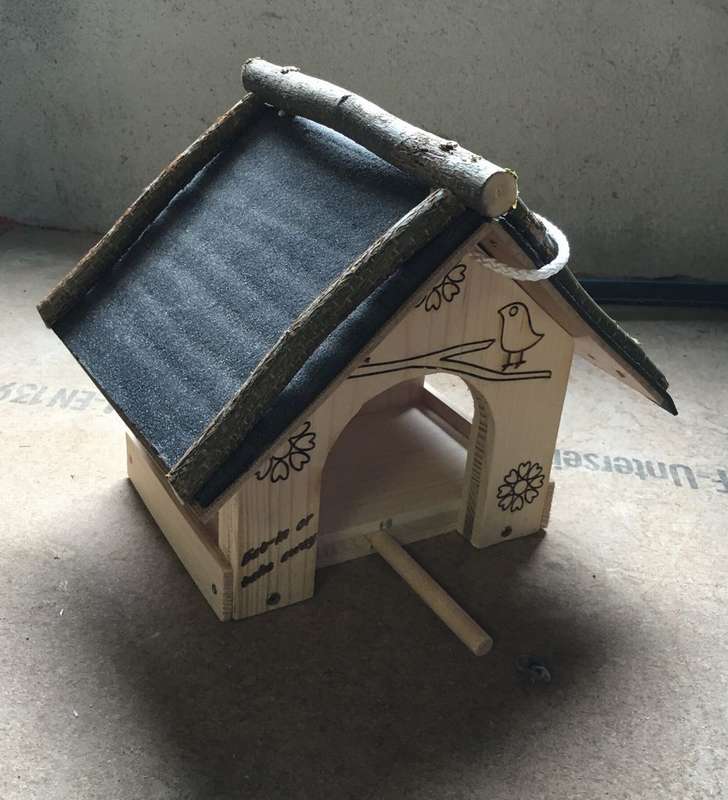 In winter, it is pleasant to support the birds with a delicious “lunch”. The author suggests make a bird feeder out of plywood using laser engraving.
Materials:
actually nit doesn’t matter what shape and size you use, the author made his feeder from OSB, MDF plates for roofing and tar paper for protection. Reed sticks and stone gave the design an even more pleasing look.
Of course you need screws (2.5 mm x 20 mm + 3.5 mm x 35 mm).
Prepare the material, cut out the parts of the required shape and size, drill holes.
Step 1: Grinding
Grinding - as usual for wooden work.
Step 2: Mounting
 Since the holes are drilled, it is very easy to assemble all the parts together. Still install a small side wall - this will prevent feed blowing. The roof must be assembled so that the planes are attached at an angle of 90 °
Step 3: Roofing
If you used MDF slab as a roof, add a little resin on top to make it more resistant to moisture, then it will last a longer time.
 The edges of the roof will be held by sticks.as shown in the photo. Finally, you can use an industrial dryer to make the floor flexible and to melt the resin.
The author used OSB fragments, which he cut off from the front, shortened a little and made a chimney. Also add some resin to the chimney: It not only protects from rain, but also looks natural.
Step 5: Installation
At the end, take the cord (~ 70 cm) and thread into the two holes in the front and back. Alternatively, they could build a stand and set on it.
Of course, you can still colorize as you like.


https://i.expert-h.com/en/kormushka/iz-fanery-svoimi-rukami-foto-chertezhi-instruktsii#sigFreeId71e2af4c31
How to make a bird feeder from plywood
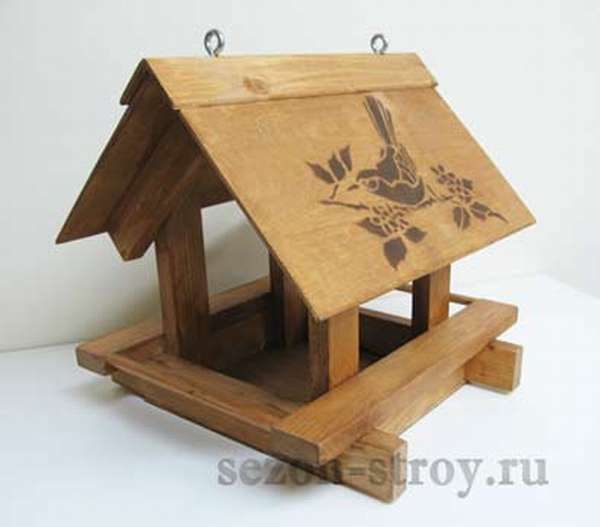
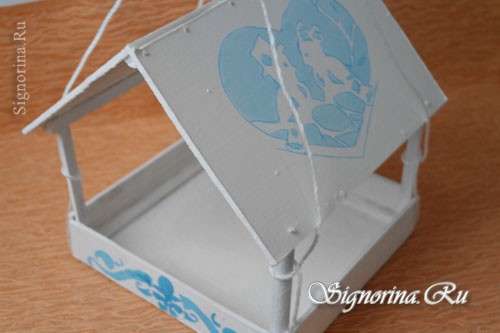 Here is a classic version plywood bird feeders. If you have basic skills in woodworking, then you can make such a feeder in perhaps an hour, or in a couple of hours without skills. Complex tools are not necessary, a hammer and a jigsaw will be enough. You will need to work sheet of waterproof plywood and a couple of meters of glazing bead. How to assemble this simple design, you can look at the step by step photos. The decorative part, as in this case - painting and stencil drawing, can be entrusted to children.


https://i.expert-h.com/en/kormushka/iz-fanery-svoimi-rukami-foto-chertezhi-instruktsii#sigFreeIdb97c5315ea
DIY bird house feeder
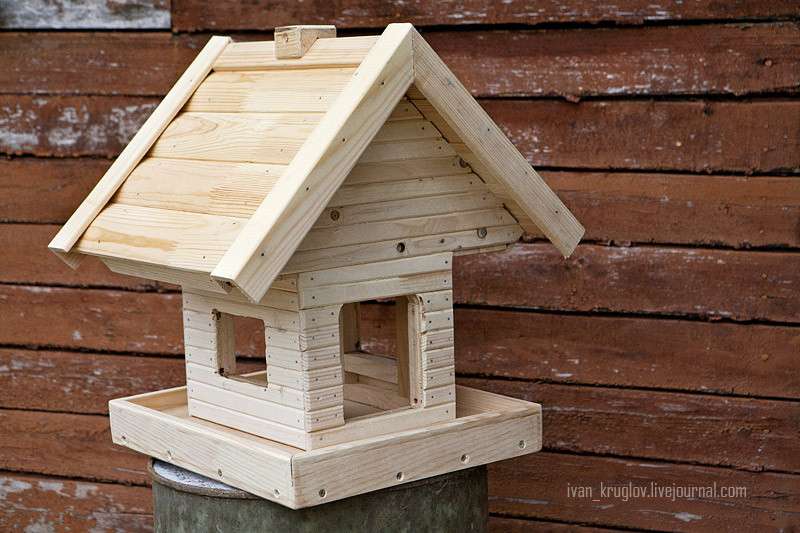
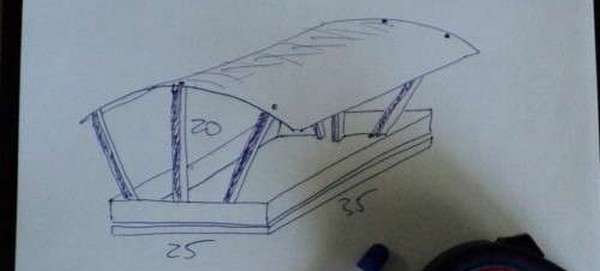
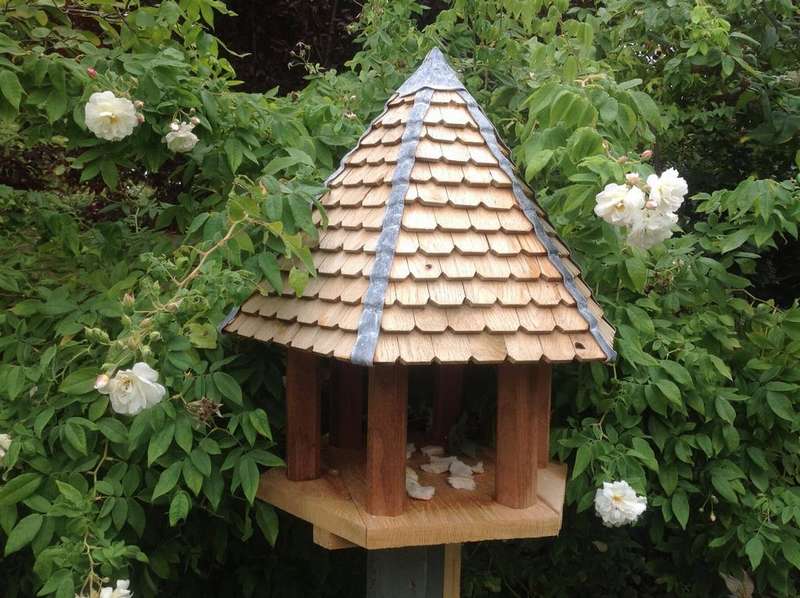
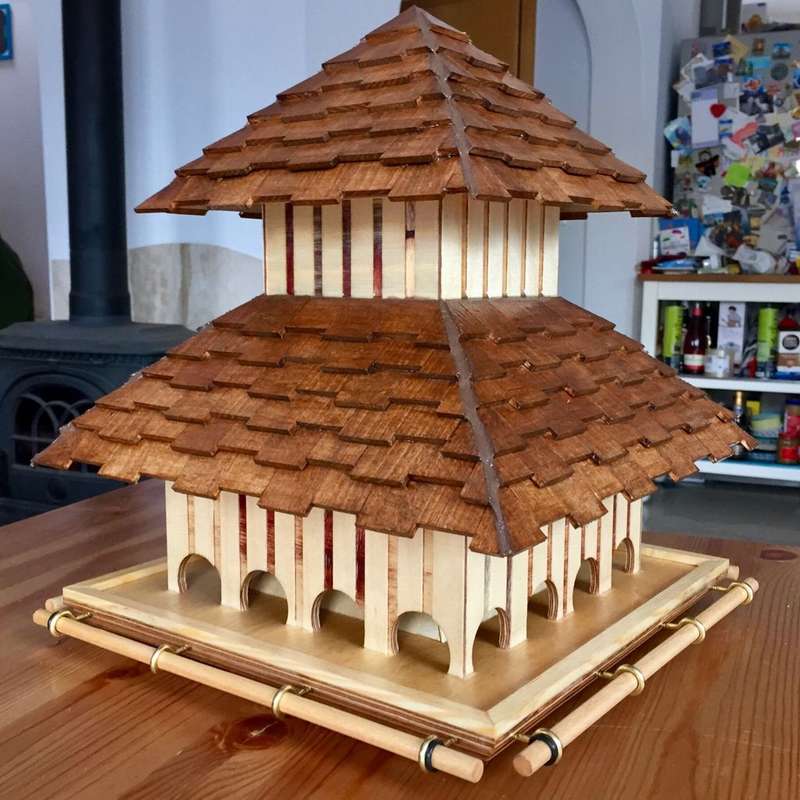 If you want to make a bird feeder with your own hands, choose something original and unusual. For example, as shown in this photo Chinese pagoda feeder. The idea is to install a platform with a house on a pole, make the feed device protected from the weather, and the seed hopper is large enough so that you do not need to replenish it often. These are the key features. You can visualize concepts and make a simple sketch. Although plywood feeder construction and it looks grandiose, but everything can be done at home with a small set of tools and materials. Here you can read brief process descriptionshown in the step-by-step photo, read the full instructions on the author’s website, the link is under the gallery.
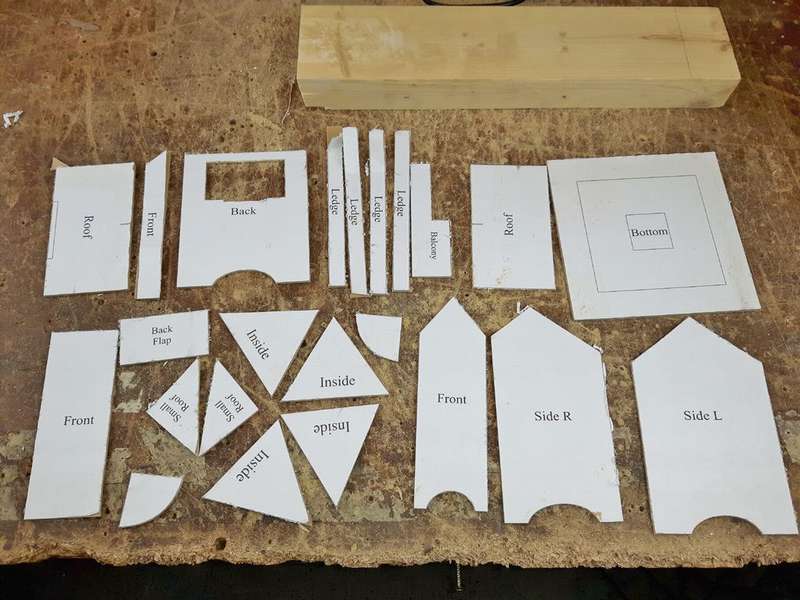
Start with sketch and create a cardboard model. Below you see the drawings of the author of this project, drawings of a bird feeder made of plywood. Having made a cardboard model, it will be easier for you to navigate with the proportions.


https://i.expert-h.com/en/kormushka/iz-fanery-svoimi-rukami-foto-chertezhi-instruktsii#sigFreeId9679efdc18
Materials and Tools
Below in the photo you can see what is needed to make a plywood house feeder.
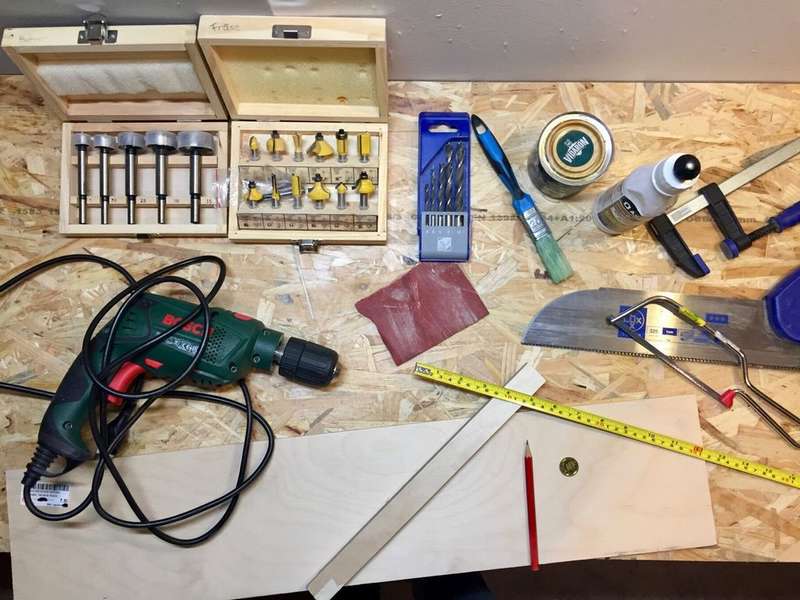
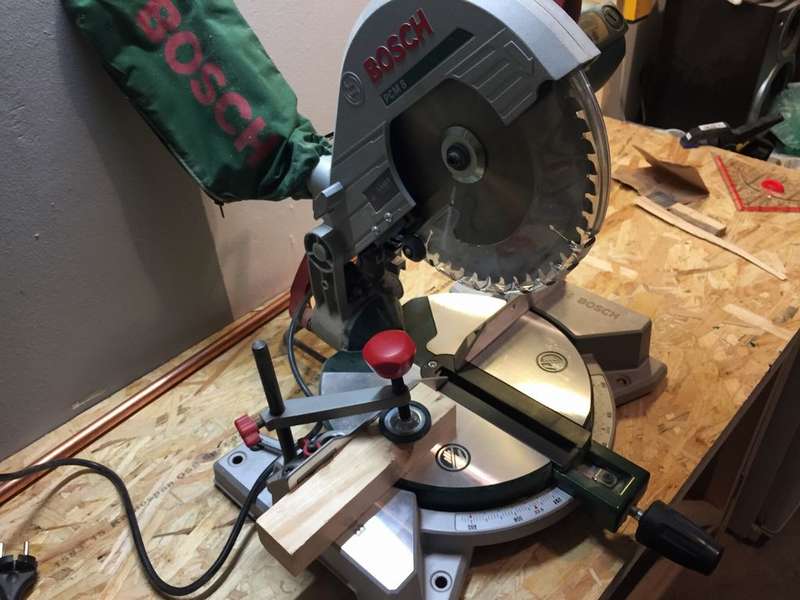
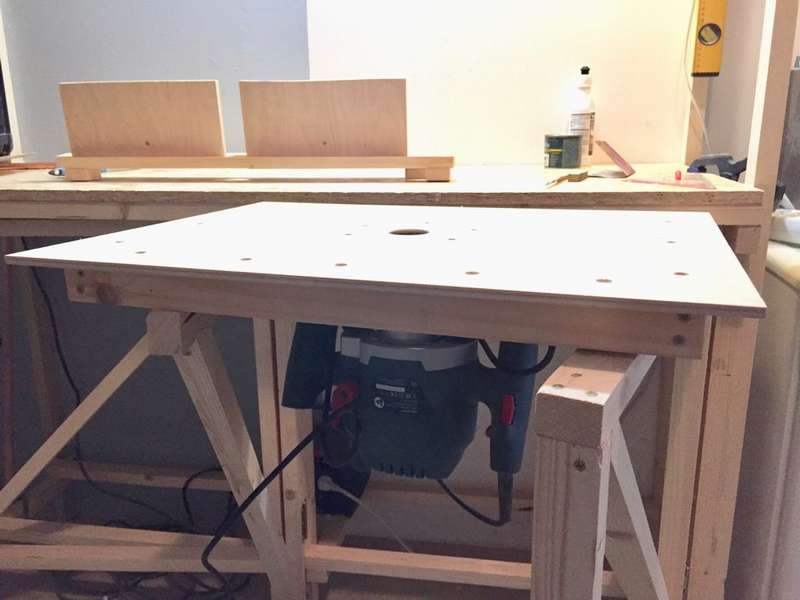
 The author used two plywood boards of different thicknesses, 15 mm and 6 mm, but you can use a different size. The final appearance may be different, but it is not so important. I will not list all the necessary tools and materials, you can read this information on the site of the author of the project. But of serious equipment you will need a milling table and a miter saw.
 Cropping all parts
Start by trimming all the main parts. Red frames designate details for the main structure, blue for the top of the roof and yellow for the bottom of the roof. Parts 1 and 2 are made of plywood 15 mm thick.Others are 6 mm thick plywood.
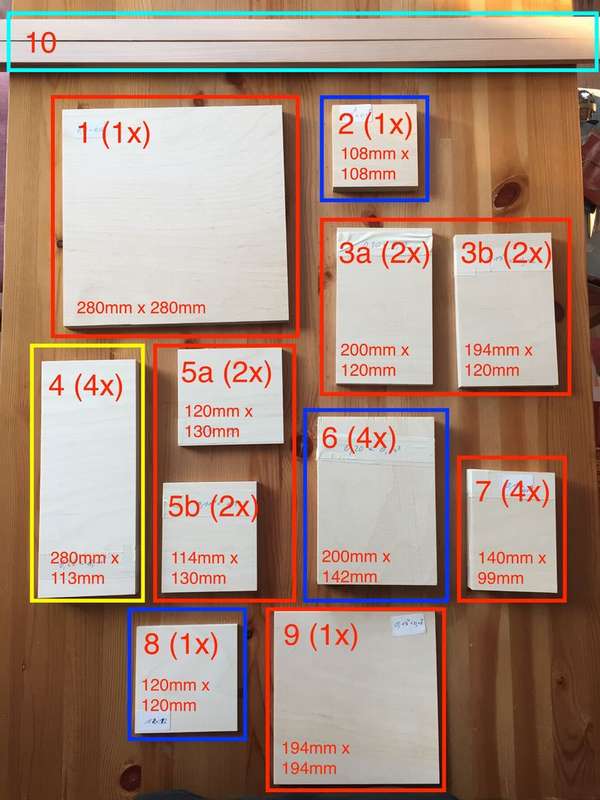 15 mm plywood parts:
Part 1: base plate
Part 2: Top Roof. Will hold the screws for magnetic mounting
6 mm plywood parts:
Parts 3a and 3b: walls on the ground floor
Part 4: Bottom Roof
Parts 5a and 5b: ground floor walls
Part 6: Top Roof
Part 7: The Inner Pyramid. For feeding seeds into holes.
Part 8: Top Roof. Roof ceiling
Part 9: Ceiling between the first and second floors
Parts from wood strips 2 mm thick:
Roof tiles
Inner pyramid, lower and upper roof of bird feeder and basement.
So, now all the main parts are ready for the next steps. Start with part 7, the inner pyramid. She used for feeding feed from the center to the holes on the first floor. The photo also shows the assembly of the upper and lower roofs.


https://i.expert-h.com/en/kormushka/iz-fanery-svoimi-rukami-foto-chertezhi-instruktsii#sigFreeId672c735cc8
Ground floor, ceiling between first and lower floors, first bird feeder test.
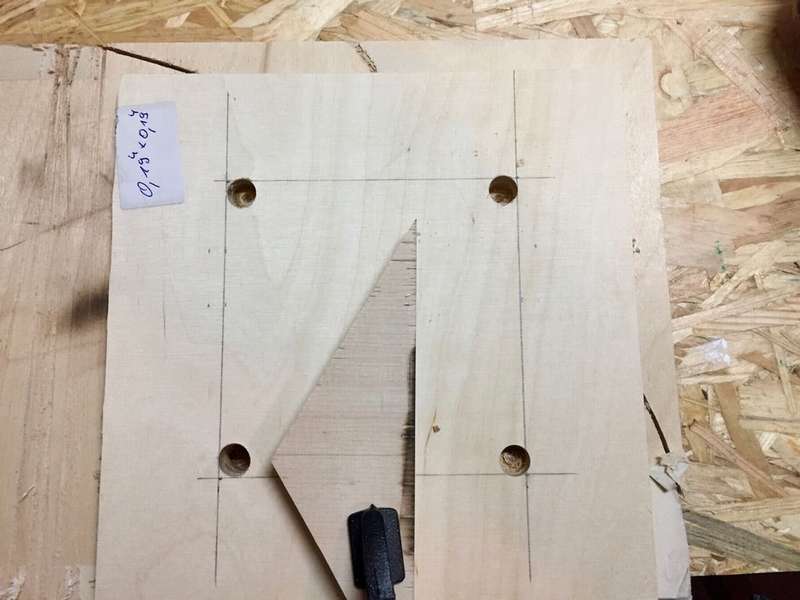 Making the ceiling between the first and lower floors is a bit complicated. First, we need a few more incisions in the walls of the first floor. This time, the cutout should be 6 mm deep (ceiling plate thickness) and 3 mm wide.
The ceiling plate should now fit perfectly. The next step is to cut out the inner square, which should have the inner size of the first floor. In this case, this is 120 mm - 2x6 mm = 108. The first walls of the floor will be glued directly to the ceiling later. Mark a square with a pencil and drill four holes in the corners. Test. Install the walls of the first floor to the ceiling and pull the lower roof.


https://i.expert-h.com/en/kormushka/iz-fanery-svoimi-rukami-foto-chertezhi-instruktsii#sigFreeId148100917d
Holes for seeds, completion of the facade and a second test.
In the next step make holes for the seeds. You can make just small holes, and do not install the full-length hatch. Then there will be more space for gluing the walls to the plate.


https://i.expert-h.com/en/kormushka/iz-fanery-svoimi-rukami-foto-chertezhi-instruktsii#sigFreeIdb8340b9113
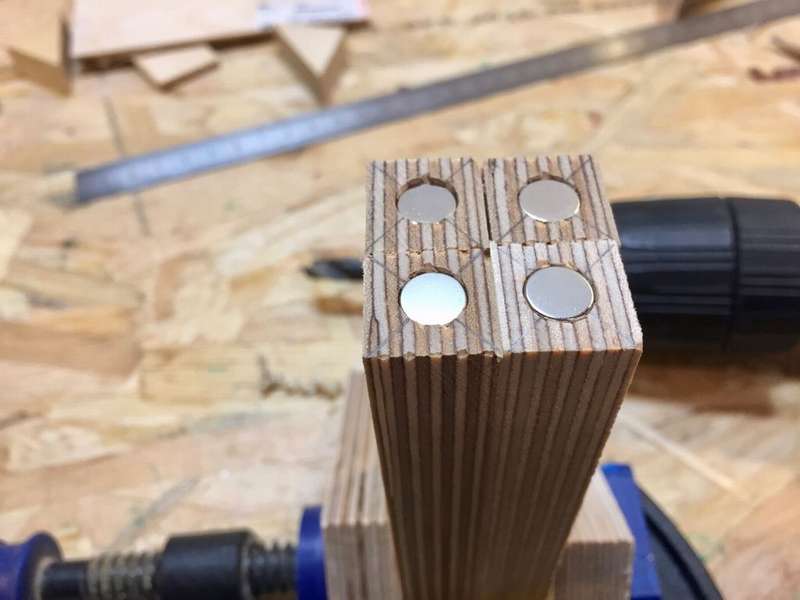 Base bird feeders made of plywood. Magnetic mount. Bonding of the top roof, ground floor and ceiling. Trimming the edges. Bonding the bottom roof and base.
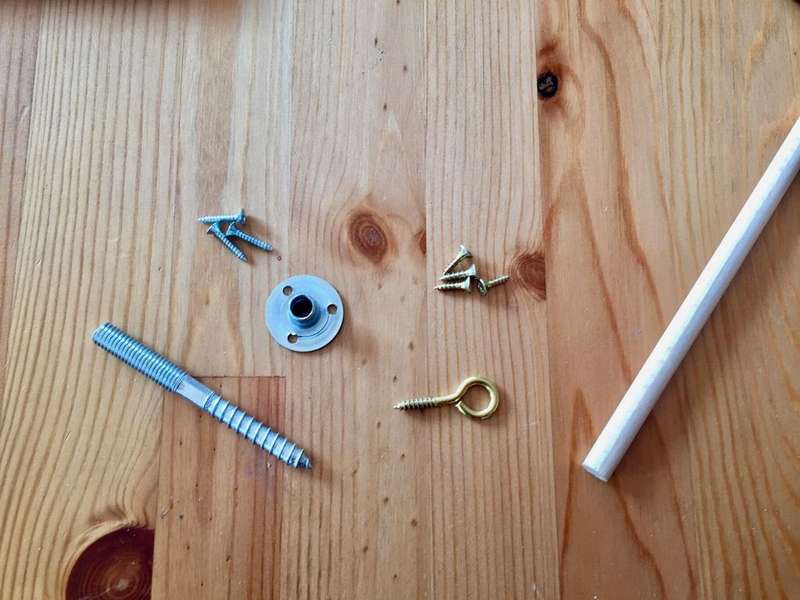
Bird Feeder House almost finished. It's time for part 1, the ground slab. The step is to use a fastening nut for mounting on a pole.
Feed will be fed through the top roof. To open the cover, the author decided to use magnetic mount. Then comes the bonding of the upper and lower roofs. A lot of glue will be needed for the bottom, but be careful that the walls do not stick to the roof.


https://i.expert-h.com/en/kormushka/iz-fanery-svoimi-rukami-foto-chertezhi-instruktsii#sigFreeIde1d0997e54
Bonding the ground floor and magnetic mount. Installation and painting of roofing tiles. Drawing selikon along the edges of the roof. Final gluing and varnishing.
Now you can glue the walls of the first floor of the feeder together and fix the rods in the corners using magnets.
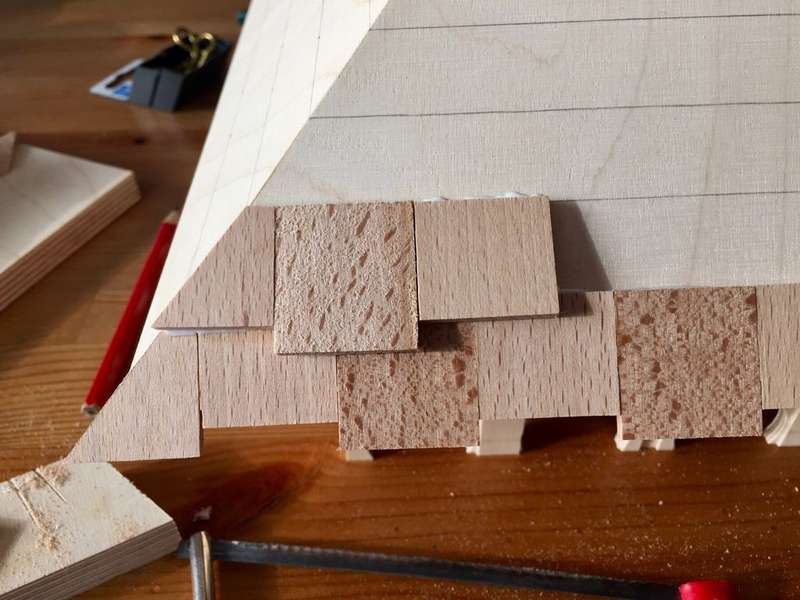 Installation of roofing tiles is entirely up to your decision. You can use roofing felt, metal sheets or just varnish. The author decided to do roof tile. Therefore, I cut out small pieces (30 mm x 100 mm x 2 mm). In this case, two sizes were used: 30 mm x 30 mm x 2 mm and 25 mm x 30 mm x 2 mm, in an alternating sequence. An annular distance of 20 mm from each other. Just make sure they are equally spaced. You can paint it, or leave it as it is.
Use siliconeto fill the gaps in the roof. At the edges there are 8 gaps and four between the lower roof and the first floor
 At the end, apply two layers of waterproof varnish on all surfacesas well as inside. When dry, glue the bird feeder house to the base. Use o-rings to secure the boom as well as pliers to squeeze the hooks slightly.
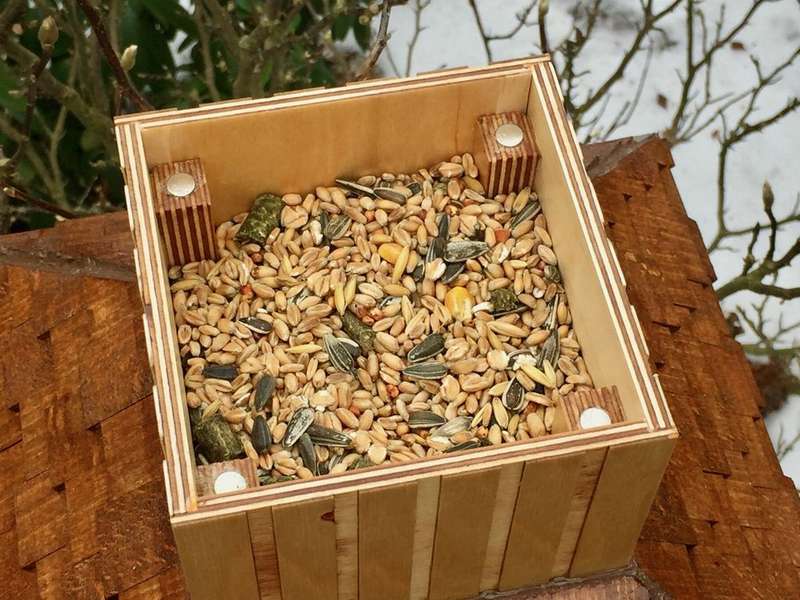
Done. It remains to attach the suspension screw to the pole and screw the house. Use a small piece of cardboard to close the holes while filling the seed hopper. In the house should fit almost 4 kg of seeds. This is enough for almost a month.
Hope you enjoyed building one for your birds.


https://i.expert-h.com/en/kormushka/iz-fanery-svoimi-rukami-foto-chertezhi-instruktsii#sigFreeId362096397a
Bird house feeder
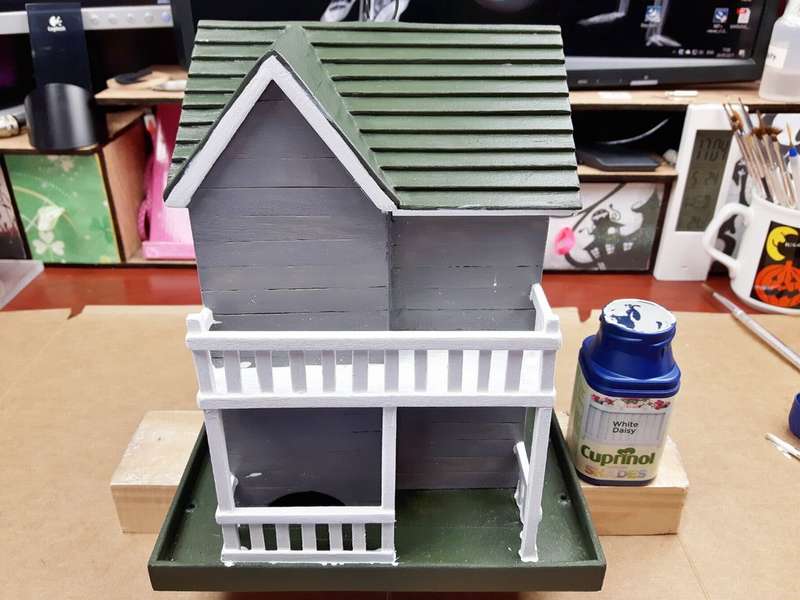
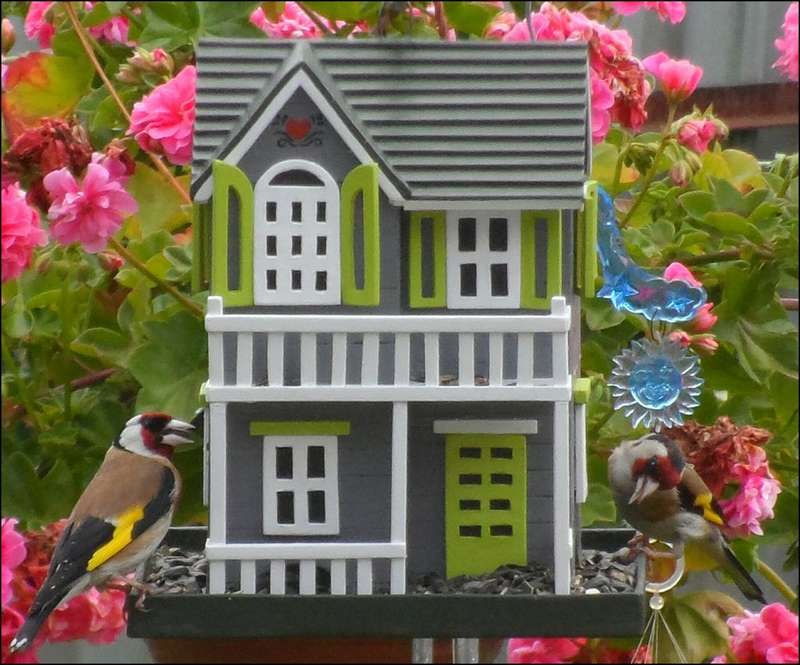 If you love your garden, then you probably want everything in it to be beautiful. Do original plywood bird feeder in the form of such a cute house. Birds do not care, but you will be pleased. This is not to say that it is very simple to assemble such a design, the whole project took about 35 hours from the author. But it’s quite realistic, and I think it’s not a pity to spend a few days off for such beauty.
Materials: 305 x 305 mm MDF sheet; glue for wood; about 300 sticks of candy; steel wire; hinge; screws; paint for wood (gray, green, white, lemon green, red, black)
Tools: jigsaw; Sander; sandpaper; mitral block + hacksaw; bit; clamps; drill; screwdriver; dremel + grinding nozzle; 3 large rubber bands; paint brushes
You can read the detailed instructions on the author’s website, only the following are listed plywood bird feeder assembly highlights.
Draw a template and stick on the MDF sheet.

 Step 1: Base. Make a clip for the inner pyramid using a piece of wood, candy sticks and a few screws. Glue the pyramid and let it dry. Drill 4 holes in the bottom and pass the steel wire. Make sure the holes and the pyramid are slightly offset from the centerso that you have enough space for a balcony. Drill another hole in the top of the pyramid, pass the steel wire and glue it to the base.
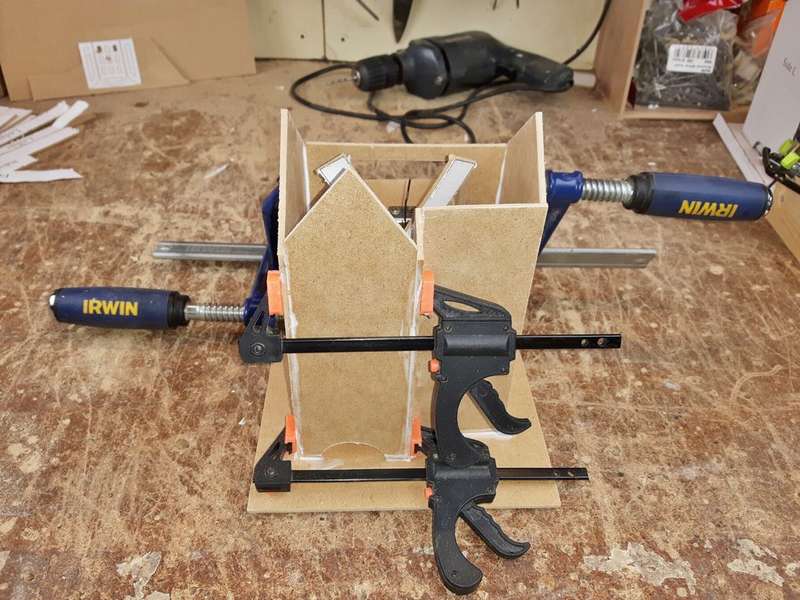 Step 2: Walls. Install the hinge between the rear and mark the positions for the screws. Shorten the screws to the required length with a hacksaw and screw in. Glue the walls to the base and fasten with clamps until the glue dries.
Step 3: Cut the sticks of candy and glue to the walls starting from the corner.
Step 4: Slot the back side with a small chisel, seal and secure with clamps.
Step 5: Grind the protruding sides of the sticks at an angle so you can glue the roof. Make a small loop with wire and secure it with several knots.


https://i.expert-h.com/en/kormushka/iz-fanery-svoimi-rukami-foto-chertezhi-instruktsii#sigFreeId203672c166
 Step 6: Roof. Glue the two parts of the roof to the top of the walls and secure with rubber bands. Continue sticking rooftop candy sticks.
Step 7: Balcony. Make a railing and attach to the edge of the balcony with wood glue and secure with rubber band. Do the same for the side and bottom guards.
Step 8: Complete wood filler any unwanted gaps and let dry.
Step 9: drill drainage holes at the base so that rainwater leaves.
Step 10: A pen. Glue together 5 sticks of candy, cut off the end. Glue and tighten the handle.
Step 11: Painting. Just paint in any color you imagine.
Step 12: Color the windows and door with the color of your choice. When dry, mark the position of the windows with a pencil and paint with black paint. Glue.


https://i.expert-h.com/en/kormushka/iz-fanery-svoimi-rukami-foto-chertezhi-instruktsii#sigFreeId5421c9ac44
Now you are a happy property owner, invite feathered tenants.
Here is another similar project, but not just anymore plywood bird feeder, and a whole mini-estate with a garage.
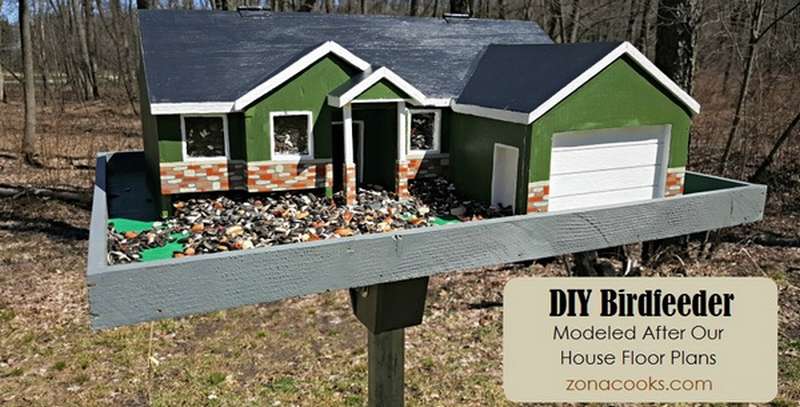 The author just decided to make an exact copy of your own home, very convenient when the sample is in front of your eyes. The house is made of 1 cm plywood. Plexiglass was used for windows to see how many seeds were in the feeder. Inside the wall separates the garage from the house. The floor is tiltedso that the seeds can slide down and get enough sleep on the "front yard". 3 cm of space is left in front of the front of the house, from where the feed comes, excluding the space of the front porch and the garage. A box is also installed under the fasteners to the pole with a bolt so that the structure does not rotate.


https://i.expert-h.com/en/kormushka/iz-fanery-svoimi-rukami-foto-chertezhi-instruktsii#sigFreeId7cea53d4f1
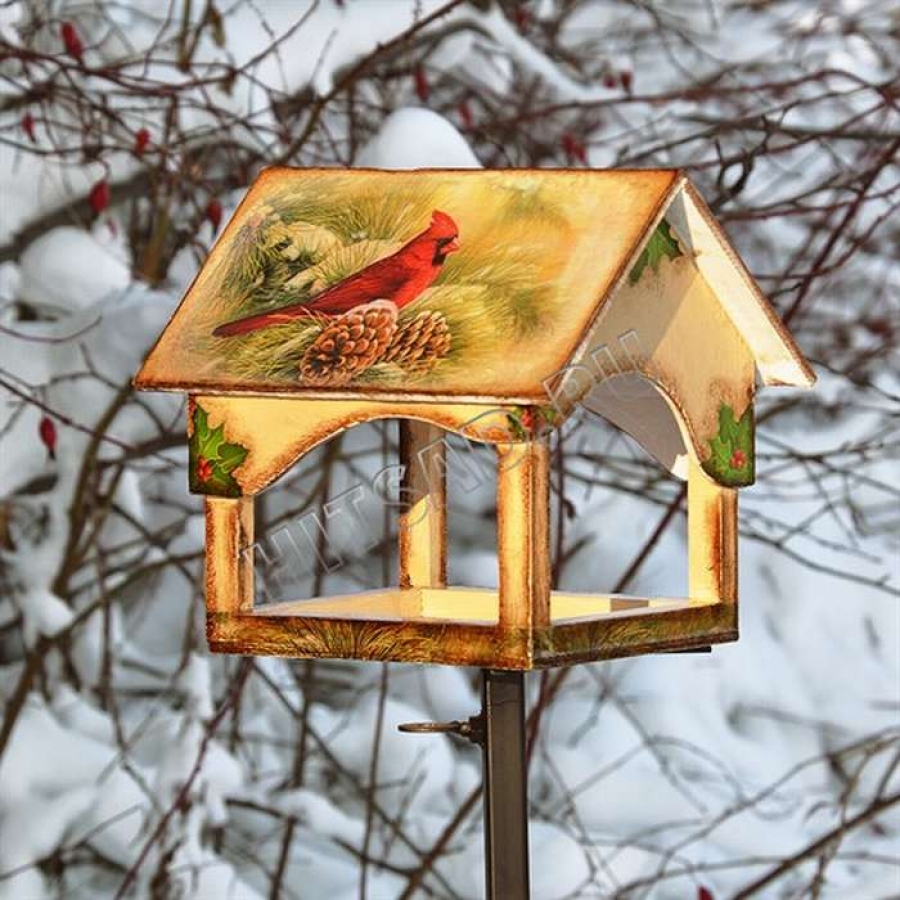
How to make a bird feeder step by step
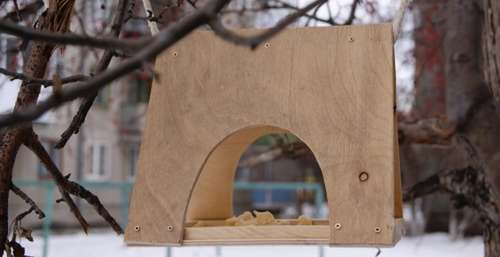
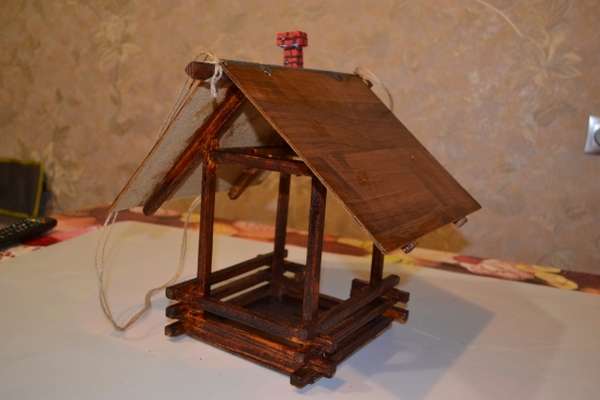
 This house, of course, is more modest, but also pretty. Below, step by step photos show how to make a bird feeder from plywood. The main feature of this design, the walls made under the beam. You will have to tinker with the sawing, but the end result is worth it. Pay attention to the roof, whose ridge is made of decorative wooden corner. There is even a chimney. If you liked this project, you can read the detailed instructions on the author’s website, the link can be found under step-by-step photos.
The skate is decorated with a decorative "pipe". It will be screwed into the roof hook for fastening feeders on a tree branch.


https://i.expert-h.com/en/kormushka/iz-fanery-svoimi-rukami-foto-chertezhi-instruktsii#sigFreeIdae7c662a8c
Chipboard Bird Feeder
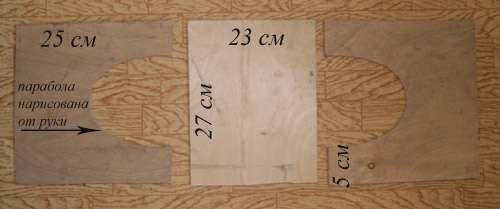
 This is perhaps the easiest option, how to make a bird feeder with your own hands. In this case, the source material was old packagingnaya box. Of course, not the best choice if you do something similar, better use waterproof plywood with a thickness of at least 2 mm. The photo below shows which parts to cut.
 I do not think that in this case we need detailed instructions on how to assemble a bird feeder, although if you want to clarify something, the description is on the author’s website, a link under the photos.


https://i.expert-h.com/en/kormushka/iz-fanery-svoimi-rukami-foto-chertezhi-instruktsii#sigFreeId4f382c72ec
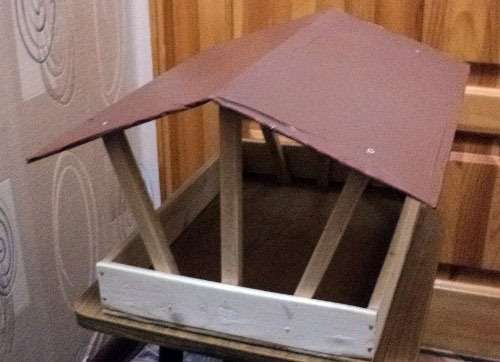 The second option is a bit more complicated, if we consider it difficult to fix the six slats on which the roof will be installed. You just need to nail it all. You can, of course, not steam, but just make four vertical supports, but certainly more beautiful. Just have to do everything "by eye".
In general, first make a reliable box of bars and plywood, then begin experiments with vertical slats. In principle, if it turns out a little unevenly, it’s not scary, the birds will not be offended. There is even an improvised drawing of a plywood feeder with dimensions, you see it in the photo below.
 In conclusion, it remains to fix the roof of cardboard covered with a self-adhesive film.


https://i.expert-h.com/en/kormushka/iz-fanery-svoimi-rukami-foto-chertezhi-instruktsii#sigFreeIdc90ef174c0
 Look more like this, more decorative version of plywood feeders and wooden slats. A little imagination turned out to be a nice "log cabin" and even with a pipe.
As you can see, this is a very simple design, be sure to attract children, they will surely enjoy such an activity.
Everything can be assembled with glue., although the author used decorative carnations for reliability, and secured the beams with self-tapping screws. The pipe was made of foam.


https://i.expert-h.com/en/kormushka/iz-fanery-svoimi-rukami-foto-chertezhi-instruktsii#sigFreeIdef6e274c5b
Here is a similar option. How to make a bird feeder with your own hands


https://i.expert-h.com/en/kormushka/iz-fanery-svoimi-rukami-foto-chertezhi-instruktsii#sigFreeId697f684a57
 Bird feeder on suction cup window
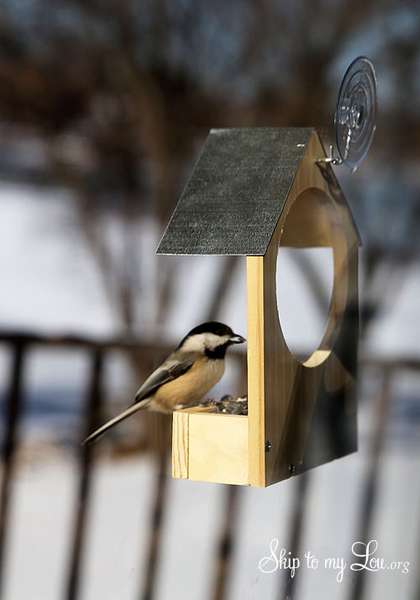
Like to watch birds? Do a simple window feeder on suction cups, and you can watch the birds poking fun right outside your window.
Can be made from plywood or wooden planks.
In addition, you will need suction cup, glue, screws.
- Screw the screw into the back of the bird feeder.
- Screw the sides.
- Screw on the bottom.
- Drill a hole in the back.
- Glue the front and roof.
- Screw the hook on the back wall and hang on the window on the suction cup.


https://i.expert-h.com/en/kormushka/iz-fanery-svoimi-rukami-foto-chertezhi-instruktsii#sigFreeId08d599f0c9
 Original plywood bird feeder
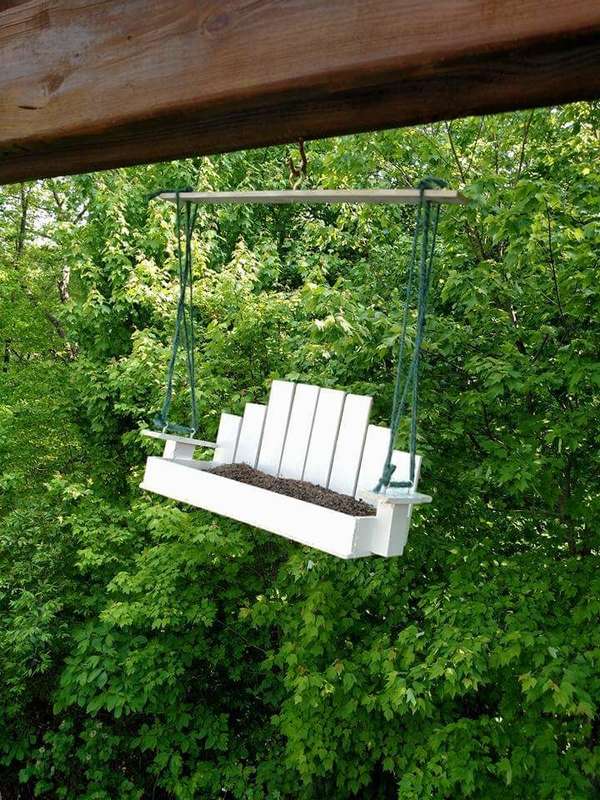
If you are lucky enough to live in a house where you can go outside, and you have a porch to sit and think about life, then you will understand what it is about. Now it would be great to have a suitable bird feeder in the yard? If you are looking for a simple project, then you have come to the right place. Look how to make an original bird feeder in the form of a swing.
The assembly order is shown in step-by-step photos. The idea, thinking is clear, make the usual frame with a side, do not forget about the drainage holes, if the feeder is not under the roof. To do this, drill holes in the bottom and cover with a mesh. Then do decorative parts - armrests and backrest. To hang the feeder, take four small screws and screw two into each armrest. Then attach a rope, any braided line or even small chains.
All that remains to be done is to fill the feeder with seed and watch your project in action!


https://i.expert-h.com/en/kormushka/iz-fanery-svoimi-rukami-foto-chertezhi-instruktsii#sigFreeId5d0a878d6c
Hexagonal Bird Feeder
 See how fast and cheap make original hexagonal bird feeder.
What is necessary:
- Plywood or other sheet materials
- Several planks and bars
- Wood screws
- Wood glue
The most remarkable part of the feeder is the roof. The internal structure is 6 sheets of waterproof plywood, cut at the edges with the correct joint angle, so that they fit well in a stable form.
Most of the wood used by the author for the roof consists of oak boards 120 mm widetherefore each set of 3 will be approximately 120 mm x 50 mm. You may not worry about any differences in width or depth, because by definition, tiles always have different sizes and widths.
You can read the assembly instructions on the site, you will find the link under the gallery with step-by-step photos.


https://i.expert-h.com/en/kormushka/iz-fanery-svoimi-rukami-foto-chertezhi-instruktsii#sigFreeId5414eef721
DIY bird feeder in kindergarten
 This simple plywood bird feeder made by caring parents for kindergarten. If you have the same task, you can take as an example, the design is light and small.
To make a feeder you will need 8mm plywood and several bars. Since the slaveyou have to give it with plywood, the simplest tools are needed, a jigsaw and a hammer are enough. Also prepare nails and sandpaper.
How to assemble a feederwell shown in step by step photos. As you can see, you do not need to be a great master for this, everything is very simple. Assign the decorative part to the child, let him choose how he imagines it beautiful bird feeder.


https://i.expert-h.com/en/kormushka/iz-fanery-svoimi-rukami-foto-chertezhi-instruktsii#sigFreeId9e3995010f
How to make a bird table
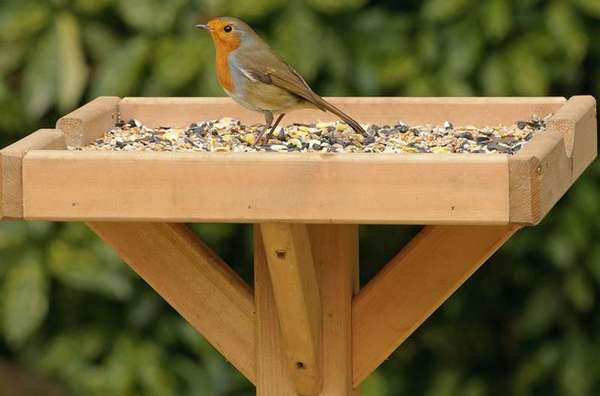 Tables for birds - a great way to feed the birds and at the same time add a decorative touch to the landscape design of your garden.
There are many ways to do bird feeder on a pillar, it all depends on how much effort you want to make in its creation.
For countertops, you can use both boards and waterproof plywood, it does not matter.
Method 1
Simple wooden table
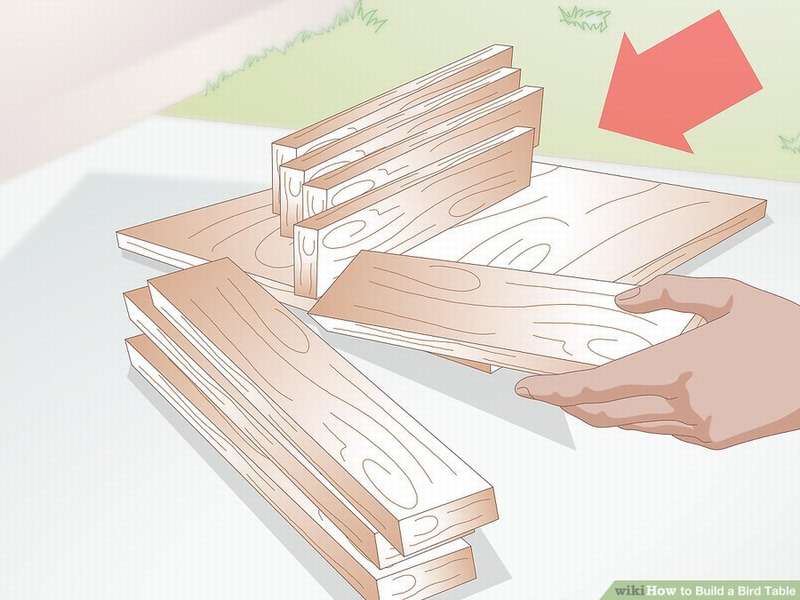 you can use used and new boards or plywood, the main thing is that it is suitable for outdoor use and there is no toxic coating. For this simple wooden bird table you will need:
- Board size approximately 30 x 50 cm, thickness 0.5 to 1 cm countertop
- Four thin bars approximately 1 cm thick for sides
- A log or a thick bar for a pillar, the height of your choice
- Four planks for the base, the same length, width and height
- Four support elements
- Four metal corner brackets for attaching the countertop to the rack
 How to do
- Sand the surface of the countertop.
- Glue the four parts of the rim to the top of the countertop.
- Attach the base details. Make these pieces long enough to support the weight of the table.
- Attach the supporting parts to the base elements.
- Use the brackets to attach the countertop to the post.
- Set up a finished bird feeder table in the garden.
Check the strength of the structure by observing the birds when they flock to try your treats.


https://i.expert-h.com/en/kormushka/iz-fanery-svoimi-rukami-foto-chertezhi-instruktsii#sigFreeId1dabf72cd1
Method 2
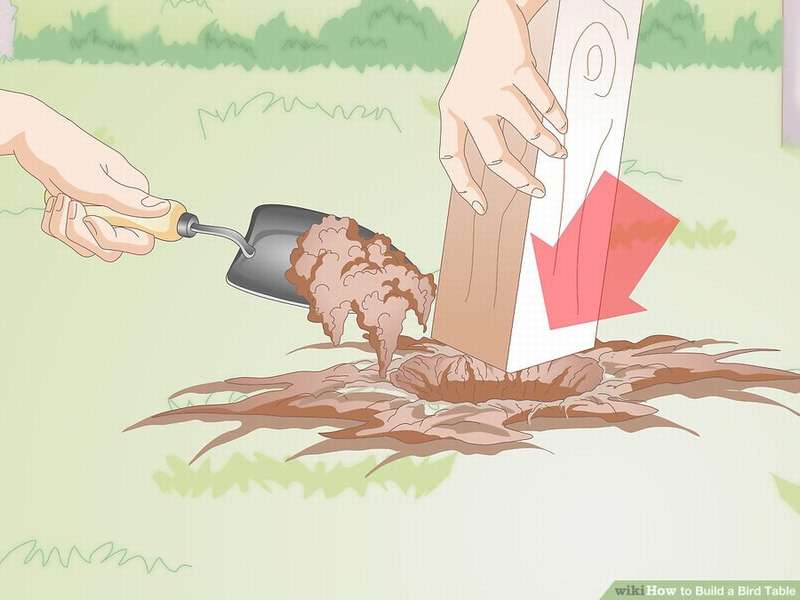 This method is used a little less, since it involves earthwork. You will need to dig a large enough hole to install a pillar.
You'll need:
- 300 mm x 300 mm x 12 mm thick plywood sheet for countertop
- Four bars 50 mm x 275 mm x 12 mm
- A beam or log not less than 1.5 m long
The assembly order of the feeder itself is, in principle, the same as in the previous version, the difference is only in the way the column is installed.
Simply don't forget to leave small gaps on each end of the countertop to make it easier to wash the surface, as well as to ensure a stack of water.
With the installation, I think everything is clear, you just need to dig a pole deeper and even cement if necessary.


https://i.expert-h.com/en/kormushka/iz-fanery-svoimi-rukami-foto-chertezhi-instruktsii#sigFreeIdb87ef3fe74
Table bird feeder
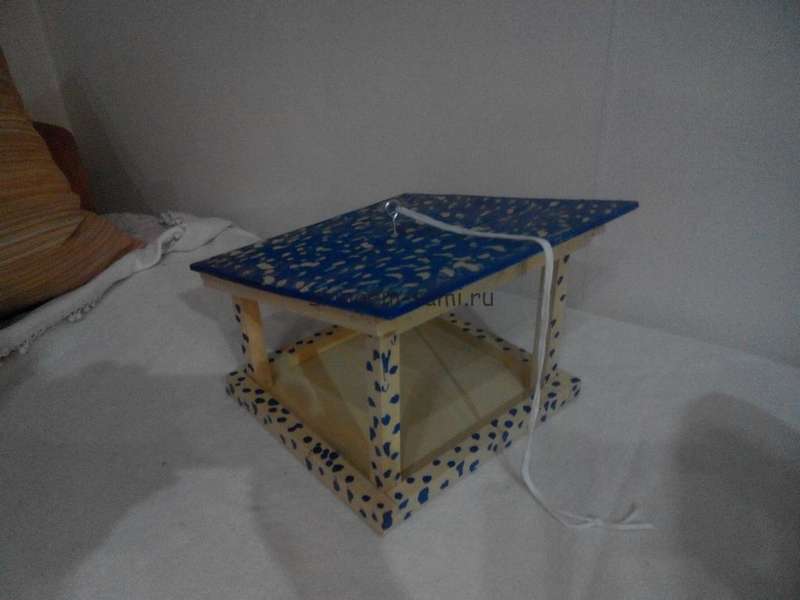
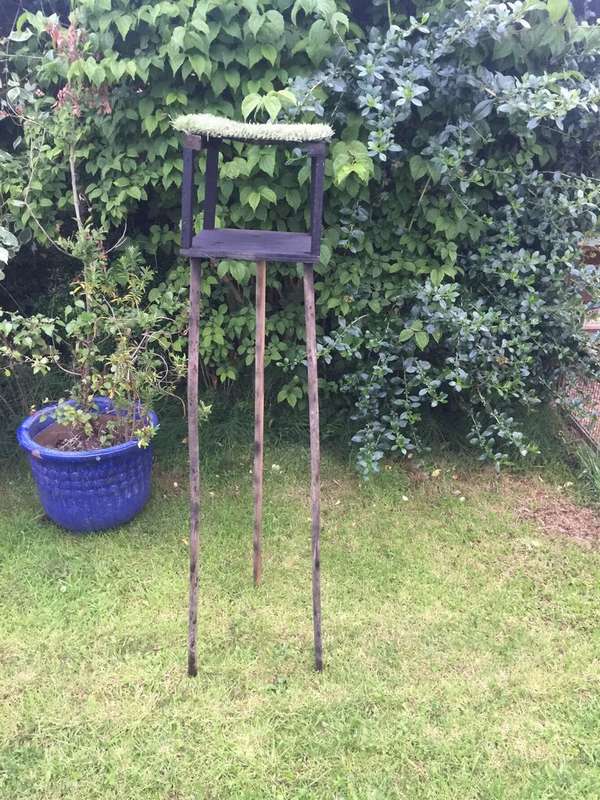 Look how to make a simple plywood bird feeder table and a few poles.
- First, collect all the details you need.
- Then cut the base 30 x 30 cm.
- Measure 3 cm holes on each side at two corners and mark.
- Drill 2 cm holes that should just fit the rods.
- Now that you have your feet, paint them with black spray paint.
- Install 4 bars to support the roof.
- Connect the two sides along the top with trims.
- Fasten a sheet of plywood on the planks, lay with any waterproof material and lay on top a layer of turf.
This is an abridged version of the instruction, if you are interested in the details, the information is on the website of the author of this project, a link under the gallery.


https://i.expert-h.com/en/kormushka/iz-fanery-svoimi-rukami-foto-chertezhi-instruktsii#sigFreeIda6329638e5
Plywood bird feeder 200 photos


https://i.expert-h.com/en/kormushka/iz-fanery-svoimi-rukami-foto-chertezhi-instruktsii#sigFreeIdb4b937463b
Hello, I am the author of this article, so I look forward to asking questions for this article in the comments below, I will answer all !!!
If you have questions on another topic, ask them on our forum, we will answer you
- Two baskets of paper in 5 minutes (Master class)
- How to make a simple and compact table for a milling cutter from plywood
- How to make a soft headboard tile (Instructions + step by step photos)
- Cinder block benches: a convenient bench in 55 minutes
- How to make a bed with a niche: saving space (Master class)