(๏ ̯͡ ๏) Bird feeder made of wood. Do it yourself (Drawings + 450 photos!)
 wooden bird feeder
Birds are beautiful creatures that bring energy to our living space, not to mention the invaluable benefits they bring by destroying pests in gardens and forests. Simple wooden bird feeder, this is the minimal help we can provide to feathered friends. Moreover, many bird species are endangered and require our help and protection.
In this article you will find dozens of examples, how to make a bird feeder with your own hands from a tree. At your disposal step-by-step photographs, drawings, instructions - everything you need to work. Some of these homemade feeders provide a fantastic opportunity for children to gain first experience, learn more about birds and nature.
 If you decide make a bird feeder with your own hands, and typed a query on the Internet, then they were probably amazed at the variety of designs, raw materials and methods of fastening. But for now, we will focus on the classic version - wooden bird feeders. The article presents the following types:
- Bird house feeder
- Bird feeder on the window
- Open platform feeder
- Hopper feeder
- Tiller
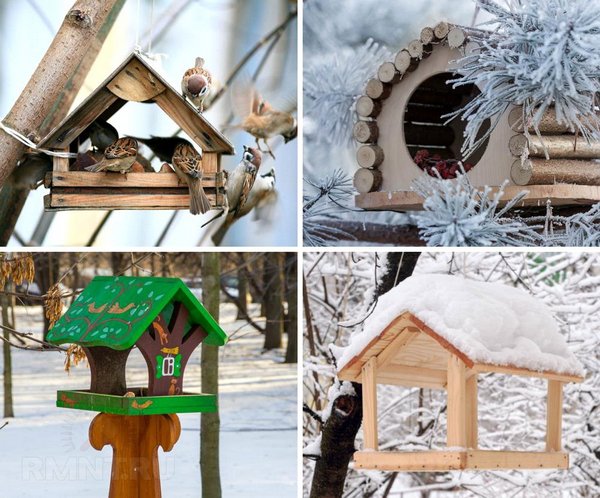
Interesting examples of bird feeders.
All these types have their advantages and disadvantages. There are so many varieties of feeders that you will surely want to make sure you choose the right one for the birds in your area. But do not worry too much, almost all the designs presented are suitable for numerous species of birds, so you can make a feeder, which is more suitable for your experience and the availability of materials.
Bird house feeder
How to make a bird feeder out of wood
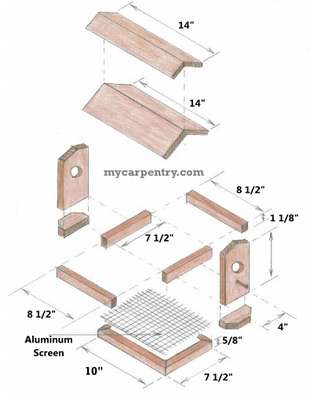
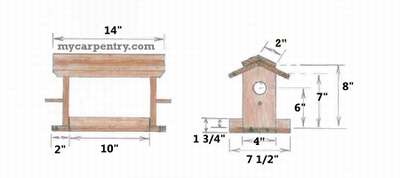
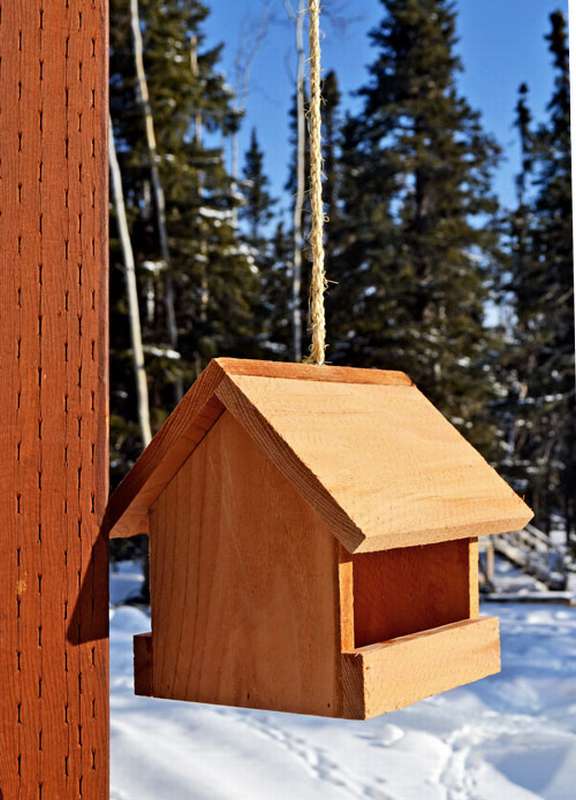
 Do it yourself bird feeder not as hard as you think. You need simple tools: a solid hammer, saw, screwdriver, drill, nails and screws. Here is a drawing, although the dimensions are in inches, but it’s easy to convert to centimeters, just multiply by 2.54, this will be the size in centimeters. Of course you can do it yourself draw a drawing of bird feeders, with all the details, as you imagine it. To make it easier to imagine what you want, first choose a place for the feeder and the way how it will be attached.
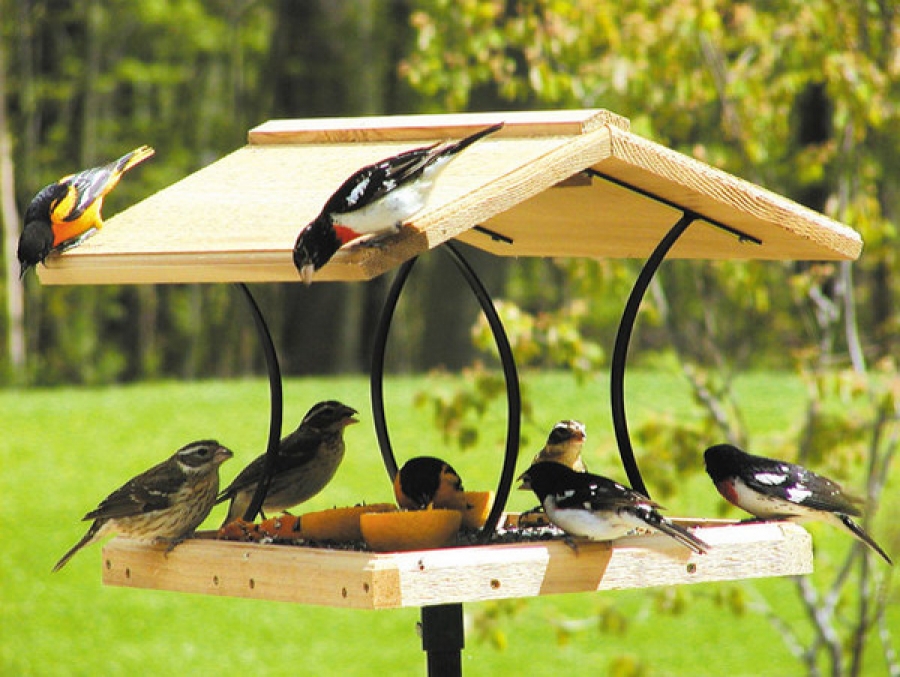
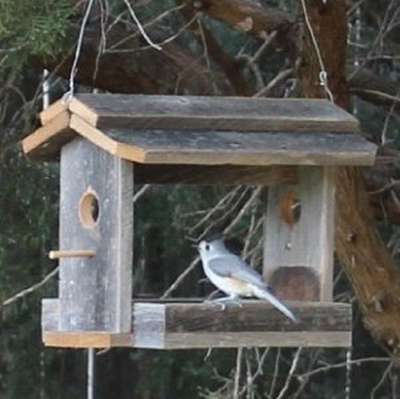
 For example, this version of the feeder has mounting wall and hook, that is, you can attach the feeder to a tree or some flat surface - a fence, a wall of a house or a barn, or you can hang it on a branch or under a roof.
In this case, it was used cedar boardif you can buy, great. You will need a board with a width of 20 cm and a length of approximately 1.80 m. Choose a thickness of at least 2 cm.
Cut out all parts of the bird feeder following the specified dimensions.
Cedar is excellent weather wood for outdoor use, but it can crack and crack if not careful. It is important to prevent this undesirable phenomenon. pre-drill holes for screws. Countersinks position screw heads slightly below the surface of a tree.
- Glue and then screw all the wooden parts together.
- Assemble and secure the roof.
- Glue and screw the rear and recessed front on the roof.
- Glue and screw the sidewalls to the base.
- Glue and fix the support posts.
- Sand with sandpaper and paint.
Do-it-yourself bird feeder drawing of a tree
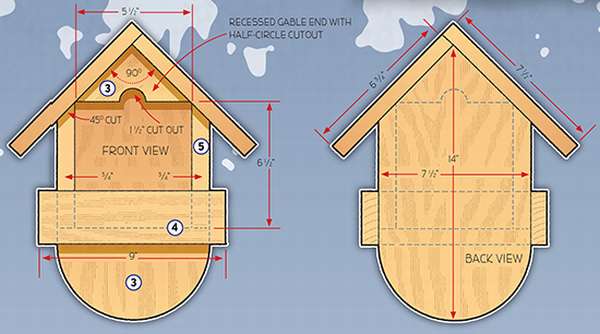
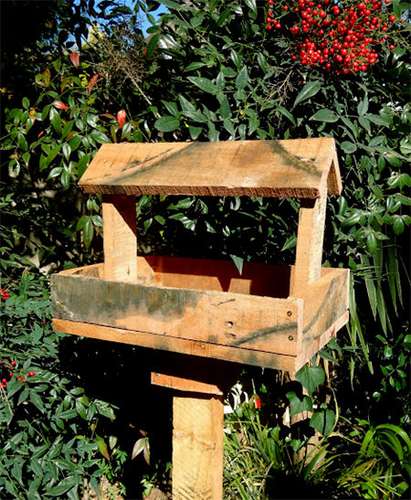
 According to this drawing, you can easily make a bird feeder with your own hands. All the dimensions shown in the pictures in inches, just multiply by 2.54 and get the value in centimeters. This homemade bird feeder made entirely of old fence boards, so it costs nothing but a few nails and a small piece of aluminum screen.
 Do not throw away old boards, our landfills are so crowded, they are always useful for a good project, like this.
For the manufacture presented here simple bird feeders made of wood the instruction is not needed, just cut the boards to the sizes indicated on the drawing. The aluminum screen can be bought at the store, they are sold in rolls, so that is enough for a few feeders. If you don’t want to spend money, you can use metal or plastic meshbut they have their own flawsone will rust, the other will stretch.
First, assemble the two parts of the base that hold the screen in place. The drawing of the feeder shows how to do this in two ways.
Cut the aluminum screen slightly smaller than the outside dimensions of the base. Thus, he will not stick out when collecting the base.
Bird feeder manufacturing scheme
 In winter, the bird feeder is very useful because it is very difficult for birds living all year round in your area to get food. In addition, you will help migratory birds build up energy reserves for their long flights. Different birds eat different types of food. This feeder is designed for seeds. Find out about the birds in your area and what they eat.
Below are plans from ana-white.com for do-it-yourself wood feeders.
Shopping list:
- 1 board with a width of 14 cm and a length of 180 cm and a thickness of about 2 cm
- Glue for wood.
- Nails or small screws.
- Hook for hanging the feeder.
List of wooden parts of the feeder:
- 2 pieces of 20 cm (sawn at an angle of 45 degrees) - gable walls
- 1 pc 18 cm - floor
- 1 pc 25 cm (cut 1.5 cm from one edge to make 13 cm wide) - short roof
- 1 pc 25 cm long roof
- 1 pc 8 "20 cm + (measure and cut so that it can vary slightly depending on the thickness of the wood - cut two strips 4 cm wide from this board)
Step 1: Attach the walls to the base.
Step 2 Attach the short roof to the walls.
Step 3 Attach the wide roof to the walls and the short roof.
Step 4 Attach the side guides to the sides of the feeder.


https://i.expert-h.com/en/kormushka/1034#sigFreeIdcd126e3804
How to make a simple bird feeder
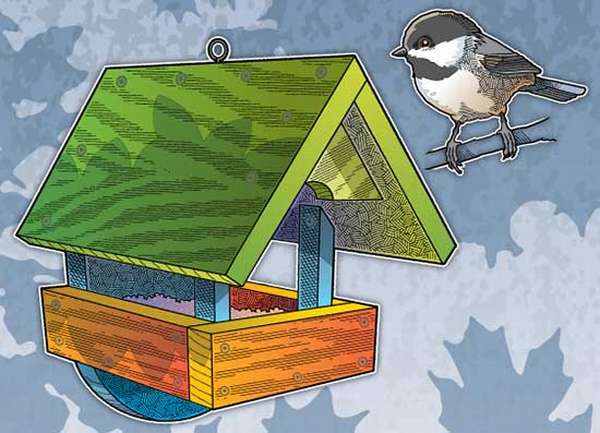
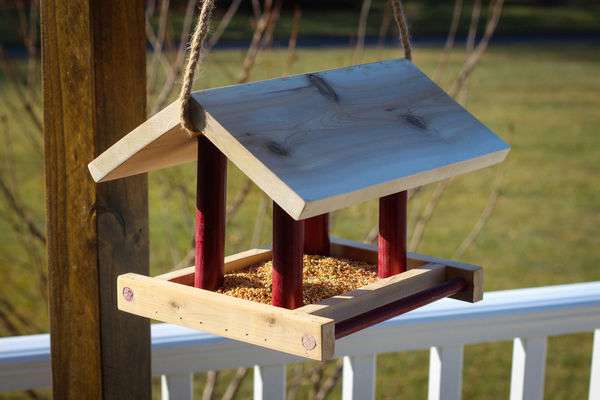 This is a simple project for a beginner joiner. On the Internet there many bird feeder designsso you can choose what is best for your conditions. Great craftsmanship in the manufacture is not required, so you can fantasize with the design, as you like, only to not frighten hungry feathered friends. Well, if without any frills, then presented here simple bird feeder Ideal for a first experience. To facilitate assembly, parts in the drawings are encoded in different colors. Please note that the size is arbitrary. You can scale this project as you wish without any problems.
 Tools:
- table saw
- drill
- Sander
- roulette
Materials:
- Board 1 x 6 85 cm long
- Board 1 x 4 45 cm long
- Round rod with a diameter of 2.5 cm and a length of 64 cm
- Round rod with a diameter of 1.2 cm and a length of 50 cm
- Waterproof wood glue
- Nails
Step 1: Cut the board 1x6 to 20 cm. Make holes as shown in the drawings.
Step 2: Cut the sides as shown. Drill holes (shown in blue).
Step 3: Cut a round rod with a diameter of 1.5 cm and a length of 24 cm.
 Step 4: Assembling the tray, start by assembling the short sides for the bottom.
Step 5: Add the remaining blue side. Use glue and nails.
Step 9: Cut a core with a diameter of 2.5 cm and a length of 15 cm. Make 4 pcs. Drill holes and add a 30-degree chamfer to the other side. Please note that this angle will correspond to the angle of the roof indicated in the drawings. You can use different angles, but then you must change the angle on the roof.
Step 10: Columns are fastened with screws and glue.
Step 11: Cut the roof and add a chamfer to one side. Attach the two parts of the roof together as shown.
Step 12: For mounting, add hooks or use a rope to make a loop under the roof.
The bird feeder is ready!


https://i.expert-h.com/en/kormushka/1034#sigFreeId2952089b61
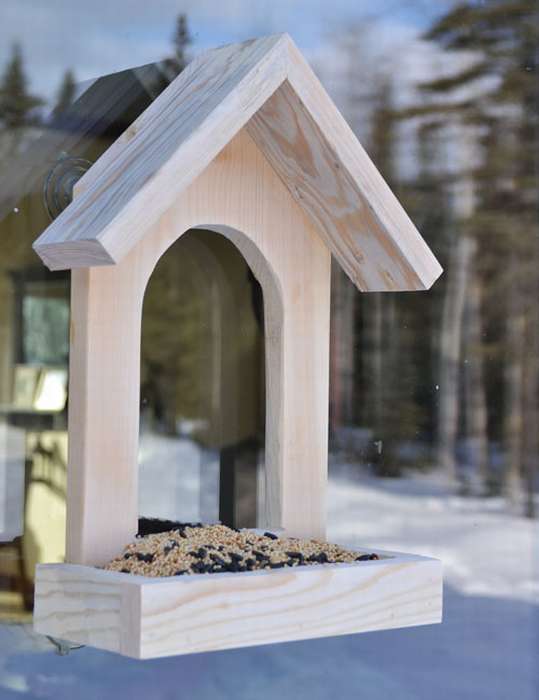
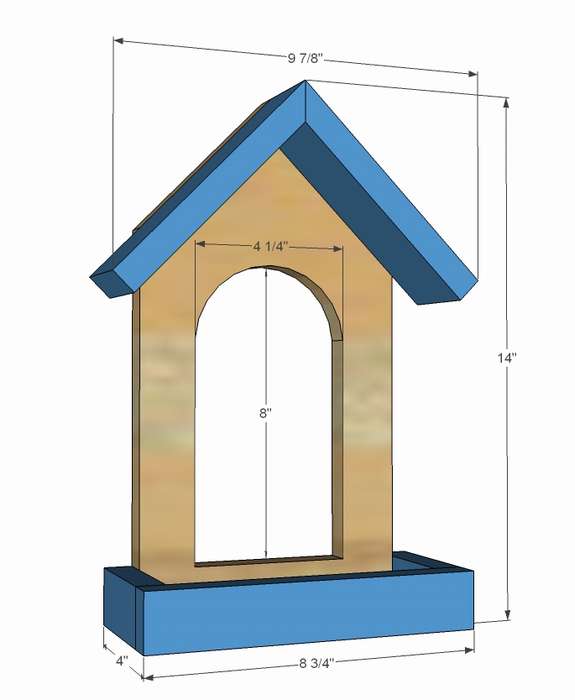
An example of another cute wooden bird feeder.
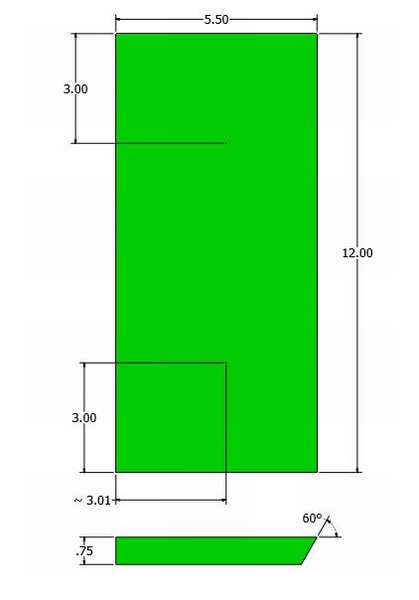
 The drawing is shown on the right, although it is hard to see, but if you liked this design, you can read the detailed assembly instructions on the site, the link is under step-by-step photographs.


https://i.expert-h.com/en/kormushka/1034#sigFreeIdde32fe05cf
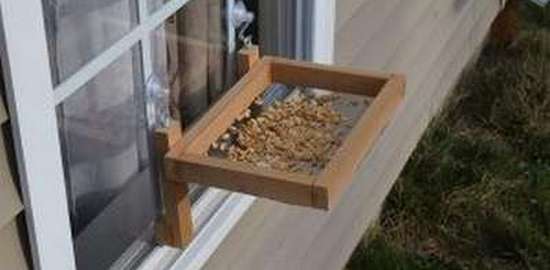
Bird feeder on the window
Bird feeder on suction cup window
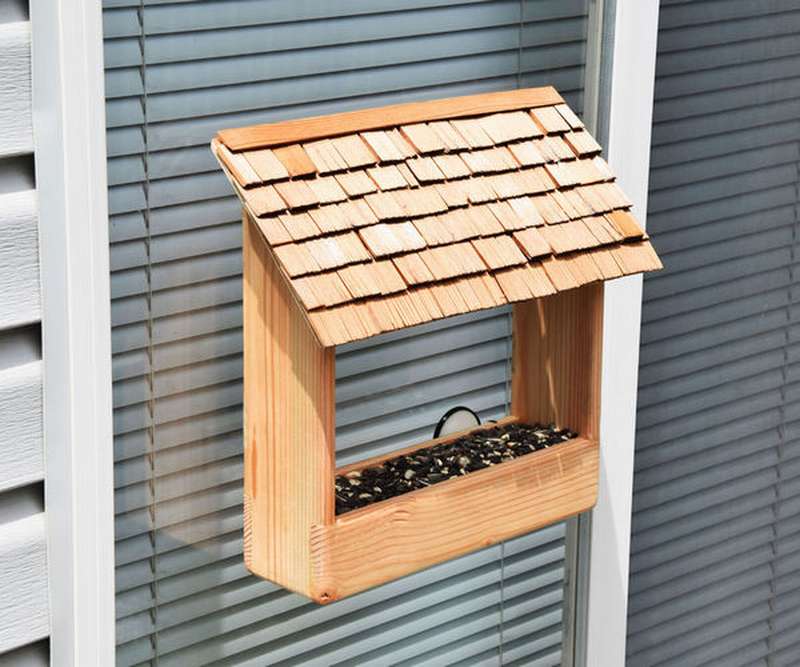 Great idea to do bird feeder on the window, and children have so much joy. But besides the pleasure of watching birds at arm's length, such feeders also have other advantages, neither cats nor squirrels will get there. Today, such models are very popular, therefore buy a bird feeder on the window not a problem, there are very interesting offers in the stores.But on the other side, do-it-yourself feeder will bring much more joyespecially if you do this with your children. The construction shown in the photo is not difficult to assemble, there is no need to make special fasteners, the suction cups will reliably hold the feeder on the window. The costs are also not large, you need to find any trim boards and buy 4 vacuum suction cups.
How to make a bird feeder on a windowwell shown in step by step photos. The only point is to make it easier and more reliable to attach the suction cups, the back can be made of thin steel or hard plastic. If you have questions, information about the necessary materials, sizes and step-by-step instructions can be found on the website of the author of the project, a link under the gallery.


https://i.expert-h.com/en/kormushka/1034#sigFreeId514aea7d2b
 Transparent feeder on the window
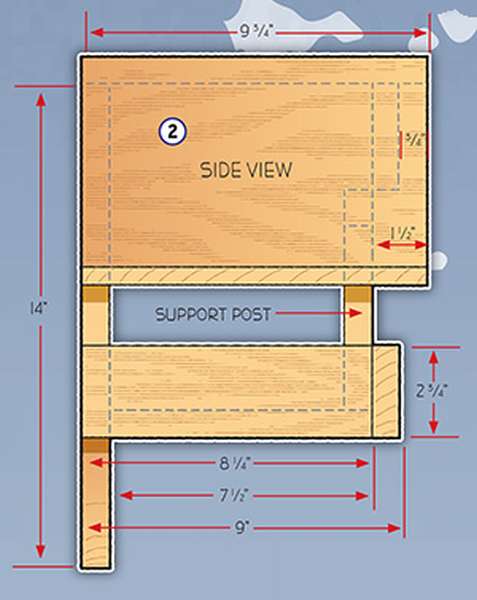
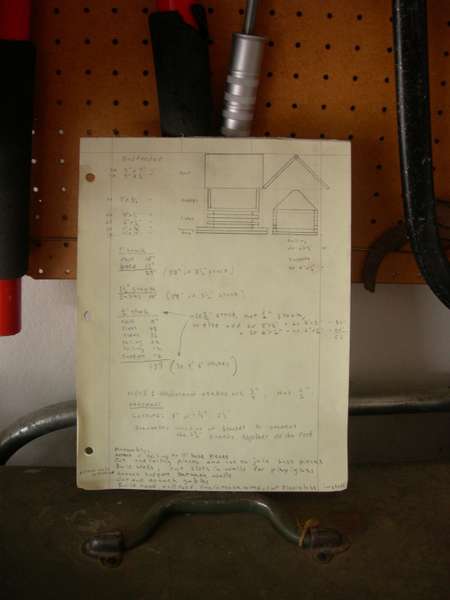
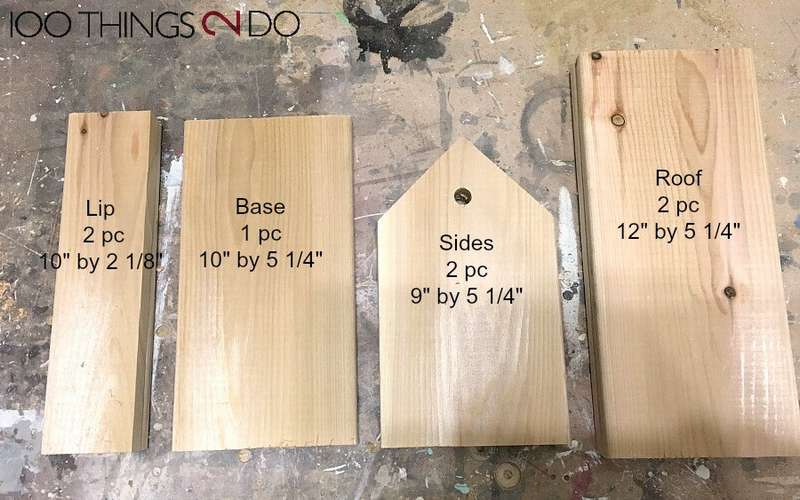
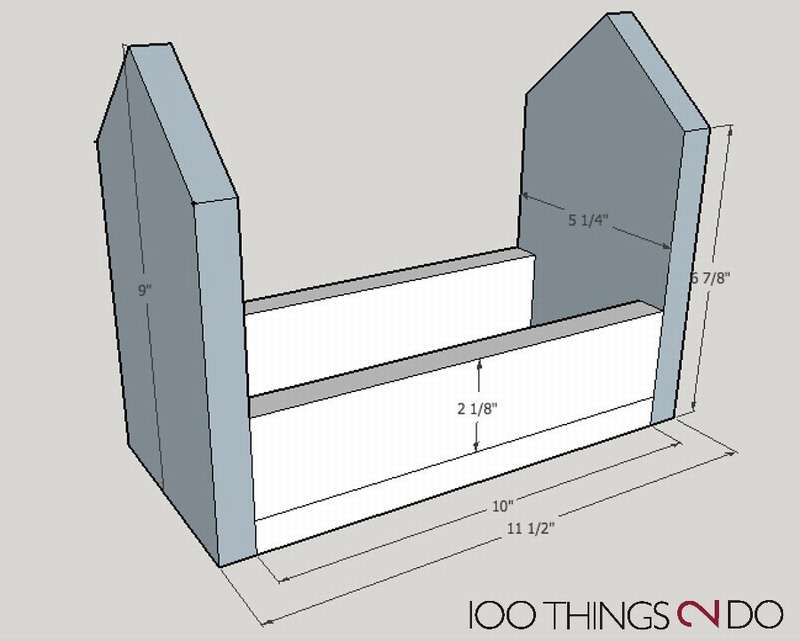
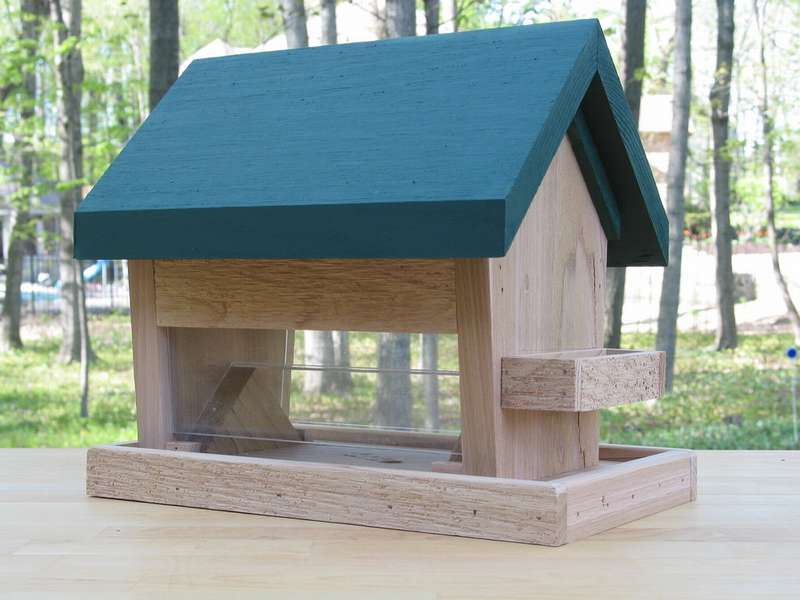
If you like to watch birds in winter, but don’t want to go outside, you can attach the feeder to the window. You need a few pieces of wood and a frame protected by glass. Just make a small bird house and then attach it to any window. Then you can sit in your warm and comfortable home and watch how the birds eat at least all day.
On the diagrams, the dimensions are in inches, therefore, in order to simplify your translation, the sizes in centimeters are also written in brackets in the list below
Shopping list:
- 1 - board 1x8 @ 18 "long (46 cm)
- 1 - board 1x3 @ length 15 "(38 cm)
- 1 - bar 1x2 @ 16 "long (41 cm)
- Glue, nails, 4 suction cups and screws
Tools:
Roulette, saw, drill.
 Sawing
- 1 - 1x8 @ 14 "main body (35.5 cm)
- 1 - 1x8 @ 2 1/2 "lower part of the tray (6.4 cm)
- 2 - 1x3 @ 7 "(18 cm) the top is cut 45 degrees from the square roof NOTE: You can cut one into 6 1/4" (16 cm) and one into 7 "(18 cm) and attach to the roof if you don't have a miter saw
- 2 - 1x2 @ 3 1/4 "(8 cm) sides of the tray
- 1 - 1x2 @ 8 3/4 "(22 cm) front of the tray
Assembly
- From the 1x8 board, cut out the back as shown in the diagram. It is recommended to immediately grind it will be much easier than after you collect the feeder.
- Add the bottom tray, securing with glue and nails.
- Make a roof and attach it to the back.
- Attach the sides of the feeder to the front panel.
- Attach the suction cups


https://i.expert-h.com/en/kormushka/1034#sigFreeIdab7257cbc8
How to make a bird feeder on a window
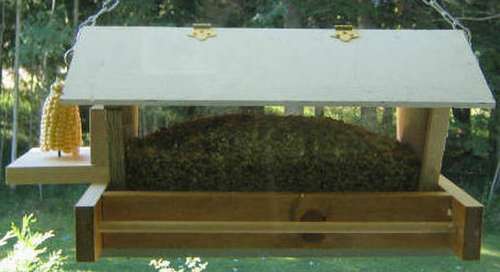
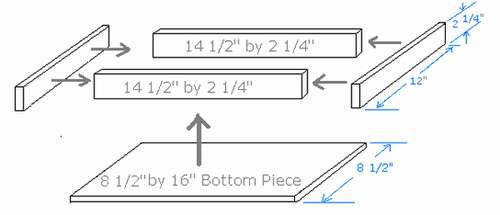
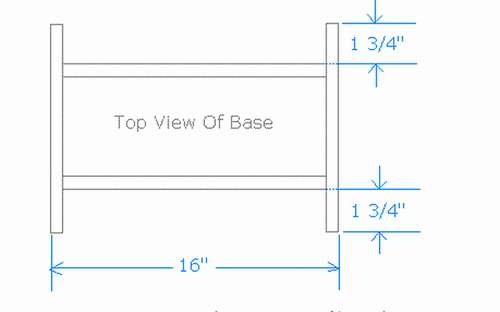
 This is another interesting and easy project, you will learn how to make a bird feeder on a window all from a board, a small aluminum screen and two screws with hooks. Using suction cups, you can easily install it on the window and watch the birds from a warm room. It’s very easy to assemble a feeder, so this is a great project for beginners. As you can see, the idea is very simple, wooden frame with a screen attached to two bars, the ends of which are screwed with hooks. The design is suspended on two suction cups.


https://i.expert-h.com/en/kormushka/1034#sigFreeId7941f21bc1
Here are some more photos on how to make a feeding trough on a window


https://i.expert-h.com/en/kormushka/1034#sigFreeId644fc0cbea
Hopper feeders
Instructions on how to make a bird feeder
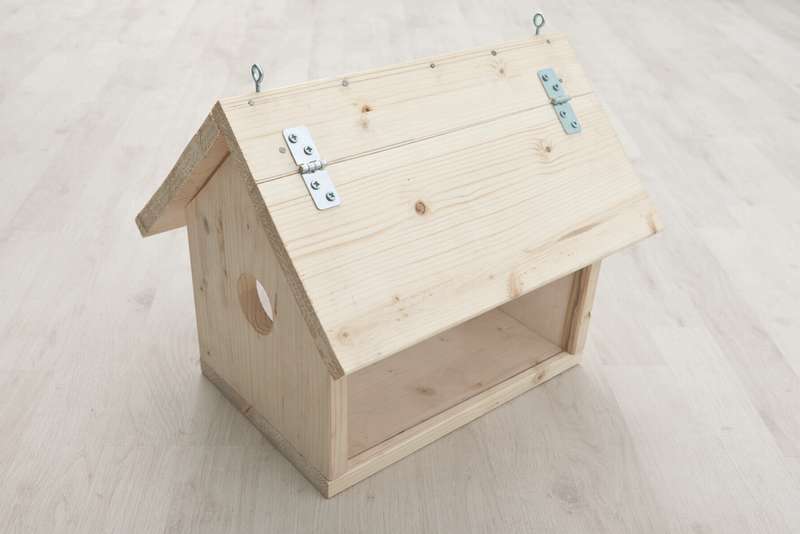 This step-by-step guide on how to make a bird feeder . If you want to refresh the look of your garden or simply draw birds to your home, making a wooden feeder is a prerequisite. There are many forms and designs, therefore, before making a decision, study all the alternatives. An ordinary wooden feeder can be made in just a few hoursThis is if you have all the materials and tools.
Materials
- A - 2 boards 1 × 8 10 "25 cm long front and rear walls
- B - 1 board 1 × 8 30 cm long for the floor
- C - 2 sheets of plexiglass 14 x 28 cm
- D - 1 board 1 × 8 35 cm long for the long part
- E - 1 part 35 x 5 cm, 1 part 35 x 15 cm short roofing parts
- 2 loops, 2 hooks, nails
Production time 2 hours
Saw the boards according to the dimensions indicated on the drawing.

- Drill a large hole, just along the cut lines, and remember to sand the edges with sandpaper to make them smooth.
- Then cut small channels (6 mm deep) on the sides of the front and back surfaces, about 1.5 cm from the edges.
- Then attach the front and back surfaces to the floors and secure with nails.
- Make plexiglass side pieces. If plexiglass panels do not fit, smooth the edges with sandpaper.
- Assemble the roof.As you can see in the photo, you first need to attach a small part to the other side of the roof. If you follow the drawings, these components should be perpendicular.
- Attach the hinges to the cover with small screws
- To hang the feeder on a tree, two screws must be installed, one in front and one on the back of the structure.


https://i.expert-h.com/en/kormushka/1034#sigFreeIdc1838a4152
Bird Feeder in 20 Minutes
Here's how to quickly make a very simple bird feeder..
 You will need
- Board 1.80 m long.
- wood glue
- Miter saw
- drill
- rope for hanging
It will be necessary to saw such details
- 2 pieces 1 × 6 30 cm long
- 2 pieces 1 × 6 23 cm long
- 1 piece 1 × 6 25 cm long
- 2 pieces 1 × 6, cut to 25 cm and then sawn in half
- On 23 cm boards, find the center point and cut a 45-degree angle from this point outwards on either side of the long side of the board.
 Drill a hole in both boards closer to the top, slightly larger than the thickness of the rope.
- Using wood glue and screws, attach the two side parts to the base of the feeder. Then, between the two side boards and flush with the edge of the base, fasten the sides. Repeat on the other side.
- Align the second roof panel so that it overlaps both the peak and the first half.
- Glue and fasten in place.
- Before filling the feeder, you need to drill a couple of small holes in the base.
- Insert the rope from the outside into the feeder and tie a knot. Repeat on the other side.
Work took about 20 minutes. You can make this a family project if you first cut the parts for the children.


https://i.expert-h.com/en/kormushka/1034#sigFreeIda8dae9e4c4
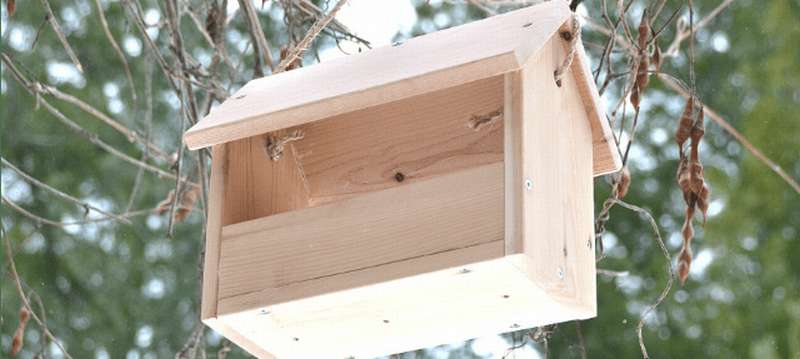
Do-it-yourself bird feeder
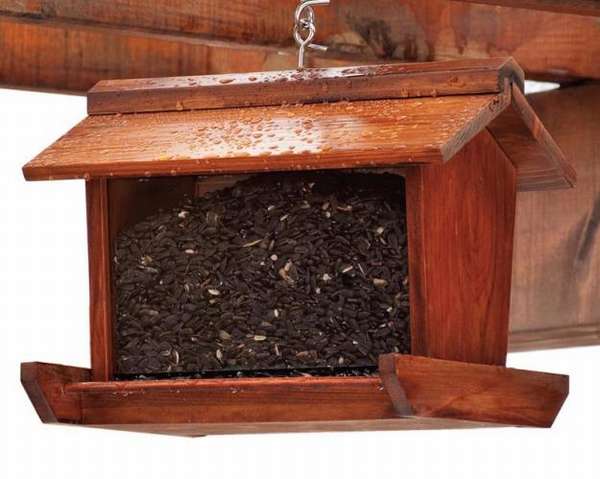
 This simple but robust bird feeder has transparent, plastic sides for viewing feed levels and holds about three kilograms of feed. The hopper provides a constant feed, and the hinged roof makes it easy to fill the tank, and at the same time the feeder has enough space for hungry birds. You can make such a bird feeder almost for free with the help of materials that are likely to be in your home workshop or garage. Below are presented drawings of feeders and step by step photos.
 The author of the project used 2 mm plywood and casingremaining after the repair of the house. I had to buy only sheets of plastic and hooks for hanging the feeders.
 You can familiarize yourself with the detailed assembly instructions for the feeder on the website of the author of this project.


https://i.expert-h.com/en/kormushka/1034#sigFreeIdbe2925e2e2
DIY bird feeder
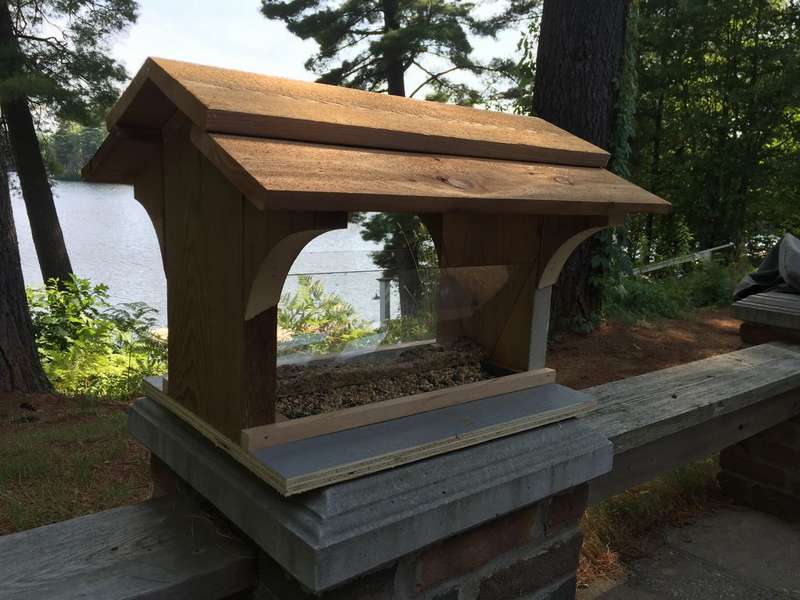
 Decorate your yard by making do-it-yourself beautiful bird feeder. An important reason for the attractiveness of this design is that it is made of red cedar. Along with weather resistance, cedar is great for open-air construction projects.such as fences, flower boxes and awnings. Dry cedar is a very soft, easy-to-process wood. All parts except the roof ridge are made of 15 cm cedar boards. If you need to use more than one piece, try choose shapes with a good color combination. Making stops for feeding is a special case, so lay out a single blank about 12 cm wide. All parts are small, so try to get around all the nodes.
 When you are cutting pieces, make sure that angles combined. You can first make a test fragment from some old boards to see what ultimately works out.
Before making slit cuts on the sides, buy transparent filmwhich you will use front and back, and measure its thickness, which should be approximately 2 - 3 mm. As a rule, the thinner the material, the easier it is to work.
And further, the roof ridge must be large enough to fit any mounting hardware. Loop hooks were used here, one in the center of the upper part of the roof ridge, and the other in the lower part of the gazebo, where this feeder is installed.
Detailed step-by-step instructions can be found on the website. Below are the sizes in inches (1 inch 2.54 cm).
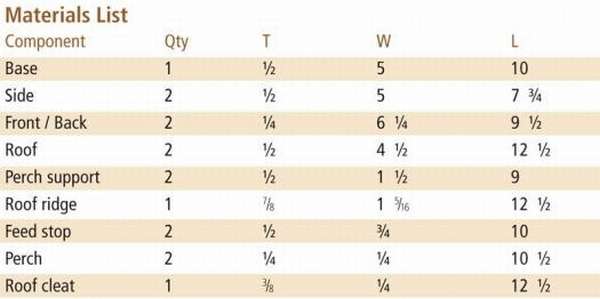 Meaning of Terms
base - base side - side, front - front end, roof - roof perch suppot - support for the perch, roof ridge - roof ridge, feed stop - feed stop; perch - perch


https://i.expert-h.com/en/kormushka/1034#sigFreeId3597055b6b
 Street bird feeder
Here is everything you need to know to make a bird feeder in your yard.
Materials
- Board 20 cm wide 2.5 meters long
- A small sheet of transparent acrylic plexiglas
- Wood glue
- Screws and nails
Tools
Saw, drill, clamps.
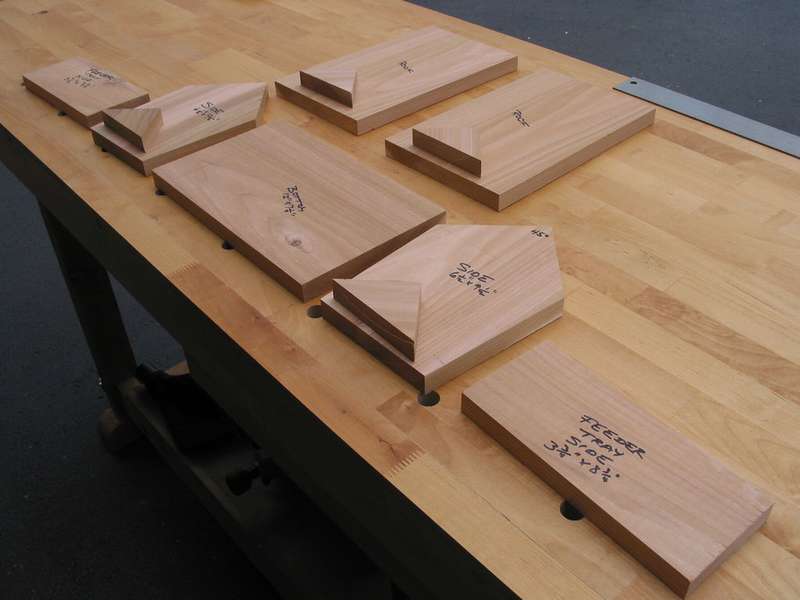 All the main parts needed to make a feeder, shown in the photo on the right. The ends of the structure determine the slope of the roof and must be sawn as follows:
- find the center at the top of the workpiece and mark
- draw a line at an angle of 45 degrees from your mark to the edges of the workpiece
- narrow the ends to the base, make a mark 1.5 cm from the lower edges of the workpiece and draw lines from these marks up and down along the lines of the roof. NOTE. If you want everything to be simple, you can skip narrowing the ends, you get a more traditional-looking feeder.
- After trimming, save the remaining triangular trimming for later use.
The assembly order of this simple but pretty feeder is shown in step-by-step photos. At the expense of the installation. Feeders can be mounted in various ways. Nevertheless, metal pole mounting is really the best wayand it’s not so difficult to do. Find the pipe, set the peak at a height of approximately 1.5 meters from the ground, attach some form of shield so that small animals do not climb to the feeder and that’s it.


https://i.expert-h.com/en/kormushka/1034#sigFreeId2abb1fedd3
Bird feeder and squirrels
 Using old boards, you make one like this bird feeder, from which squirrels and chipmunks can also eat. It can be fixed or hung on a tree or mounted on a stand.
Making a feeding trough is not difficult, cut out two sidewalls of approximately 35 cm, then the parts for the roof, as shown in the photo. Make grooves for glass on both sides of the feeder.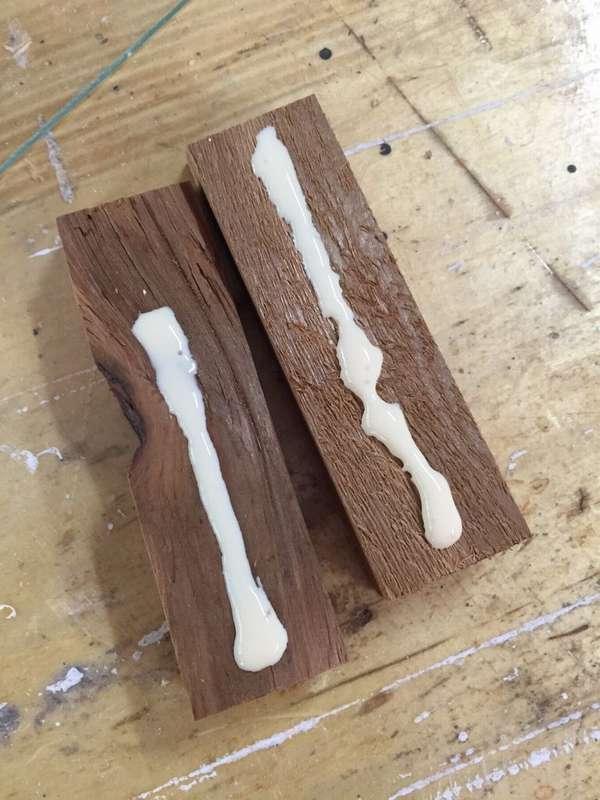
The width of the glass will determine the width of the food dispenser, in this case 40 cm.
- Glue the sides to the top of the feeder.
- Fasten with nails.
- Saw and attach four small planks to make a multi-layer roof. Glue and reinstall.
- Add a bottom panel. The size will depend on the size of the feeder. Make a 5 cm overhang on both sides.
Tip. For the top strip, give more glue to make the roof tight.
Set up a feeding trough where it is more convenient for you, lay down bird food and watch the wildlife come to visit you!


https://i.expert-h.com/en/kormushka/1034#sigFreeIde1553a4d9c
Pallet feeder
 You have pallets and don’t know how to use - make a bird feeder, there’s nothing to think about. How? Here is the assembly order.
- Make a rectangular base measuring approximately 250 x 400 mm. You do not need to be particularly accurate in measurements, this does not play a big role in this design. Attach the long sides to the short sides with two screws in each corner.
- Cut the two center posts approximately 250 mm long. The hole can be used to install wire or skewer to string fruit.
- The top of each vertical surface is cut at an angle of 45 degrees to install the roof and screwed to the inside of the frame.
- Attach the base.
- Install the roof.
- Make a box that is screwed to the bottom of the feeder, it will serve as the upper part of the support. Alternatively, you can fasten several chains on the sides of the feeder and hang on a tree.


https://i.expert-h.com/en/kormushka/1034#sigFreeId924bfcab1a
How to make a bird feeder drawing
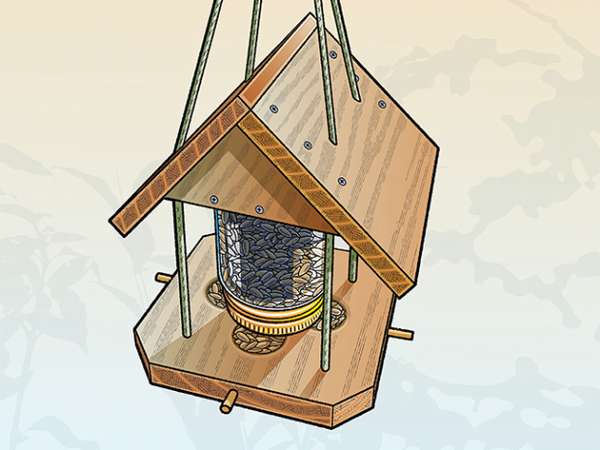 These drawings show how to make a simple hopper feeder for feeding birds. The main material is a pine board 20 x 150 cm, which will need to be cut into seven parts.
In the drawings, the dimensions are in inches, so here I will also give the dimensions in inches, so as not to be confused.
To convert to centimeters, just multiply by 2.54. For example, 6 "multiply by 2.54 = 15.24 cm
- 7-1 / 2 "x 7-1 / 2"
- 6 "x 6"
- 7-1 / 2 "x 10-1 / 2"
- 6-3 / 4 "x 10 1/2"
- 5-1 / 4 "x 5-1 / 4" (cut in half diagonally to make two pediments)
- 6-1 / 4 "x 4"
- Two meter ropes or paracord
- Liter can with a cover
- Drill
- Four small screws or nails (to attach the cover ring to the base)
- Boiled linseed oil
- Wood glue
 Assembly order
- Saw seven parts as described above and sand.
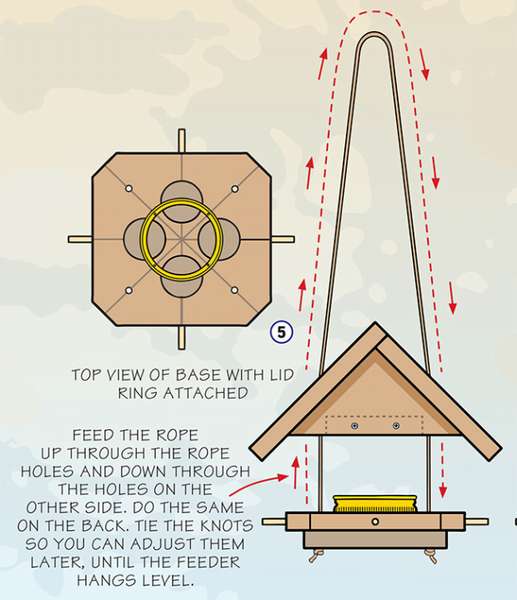
- Find the center of a large square by drawing lines from corner to corner and from side to side. Place the lid in the center of the square and circle. Locate and mark the holes for the rope. Mark the center of each hole and drill. Cut corners.
- Screw a small square to the bottom of a large area. Drill a drain hole from above through the center in the cup. Drill the holes for the rope. Drill four holes in the center of each side of the base.
- Glue and screw the roof. Set the jar. Apply linseed oil to the roof and base and allow to dry for 24 hours.
- Drill four holes through the can lid ring. Attach the ring to the base. Feed the first rope straight through the front of the base and up through the holes forNata, and then pass it down through the holes on the opposite side. Do the same with the second rope on the back of the feeder. Tie the knots at the bottom of the base. Make them loose enough to adjust. Fill the jar with seeds. Adjust the nodes to align the birdhouse.
- Wrap the wire around the top two loops as shown, and hang the feeder.


https://i.expert-h.com/en/kormushka/1034#sigFreeId5ca8dd113b
Automatic bird feeder
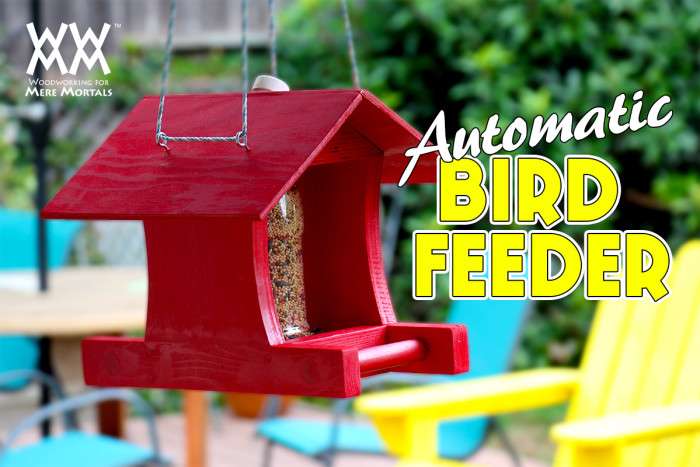 This idea is similar to automated pet cups. This is a very convenient device.since you don’t have to fill the tray with food every day.
- First glue the three boards and fasten them together, this is for the roof.
- Drill holes at each end of the two boards that will create the bottom frame. These two boards are glued to the inside of the frame. To glue the round slats, apply a little glue and pull them into the holes. Then saw off the ends of the rails flush with the frame.
- Install an aluminum mesh to circulate air so that mold does not form in the feeder.
- Now install the food hopper.
For this version automatic bird feeders a plastic bottle was used as a dispenser. You can glue it to the bottom of the large roof opening with epoxy. You can read the detailed instructions on the author’s website.


https://i.expert-h.com/en/kormushka/1034#sigFreeIda20f74584e
Cozy bird feeder
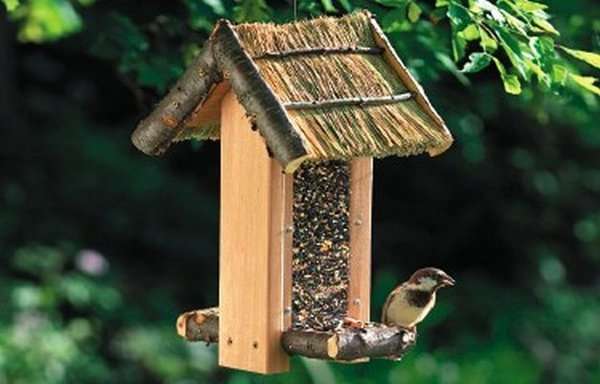 So many available today different types of bird feedersso that you can choose any style. If you're looking for something special, try this design, such a cozy thatched-roof feeder.
Although making it a little more complicated than regular projects, here are step-by-step photos, and on the author’s website you will find detailed instructions.
So collect your tools and learn how to make feeders in any style.


https://i.expert-h.com/en/kormushka/1034#sigFreeId8369dee660
Here is the way how to attach a bird feeder to the ceiling. This idea came to the author of the project when he thought about how to protect bird food from squirrels.


https://i.expert-h.com/en/kormushka/1034#sigFreeId253b0a4154
Open platform feeder
DIY bird table
 Bird table does not have to be unusual or complex - birds are only interested in good nutrition in a safe, protected place.
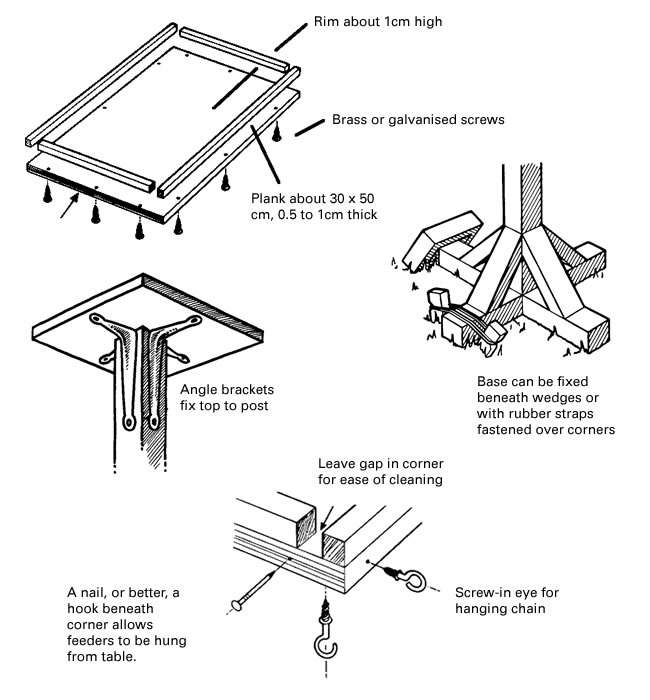 Use wood that will not split or decompose when it gets wet. Will fit waterproof plywood, 0.5 cm - 1 cm thick. Although any cheap piece of solid wood can serve as a great bird table.
There is no maximum size, but don't make the platform too smallotherwise the birds will quarrel. A rim about 1 cm high around the edge will help keep the feed from being struck or deflated. Leave gaps in the corners to allow water to drain and make cleaning easier.
Sand before assembly to prevent dirt from clogging in the gap. To extend service life, use water based preservative. A few nails or hooks at the edges of the table will be useful for bins or balls of grease. The roof keeps food dry and provides little protection for birds from rain and snow. Some birds can even sleep on a table with a roof. But we must remember that birds are guided mainly by sight; they have practically no scent. Therefore, the roof will obstruct the view.
Open Feeder Drawing
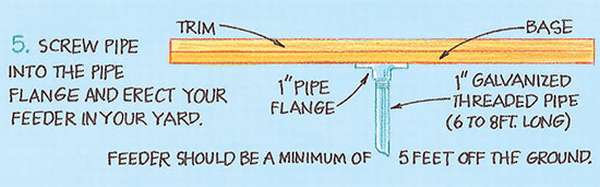
 If you plan to do simple bird feederthen an open platform, this is a good solution. You will need only one board with a width of 30 cm and a length of 80 cm or a similar size sheet of moisture-proof plywood 2 cm thick. You will also need a 2-meter galvanized pipe with a flange.
Install the platform in an accessible and easily visible place., First of allso that it is convenient to fill it with food, and so you can see when to do it. Secondlyso that the birds could also see from afar that the treat was prepared for them.
In an open area, install a bird feeder from the side of the house, which is most protected from winter winds.
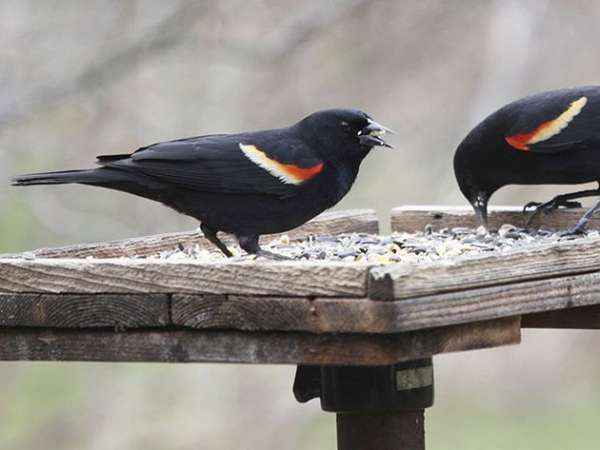
 Each bird species has its own special habits and needs.. The best high-calorie foods for poultry: sunflower seeds, which attract most birds, are an ideal food because of their high fat content, and many birds are attracted to millet, millet, and oats. In winter, it is very useful to add lard and beef fat, only not salty, salty food causes dehydration in birds, which can lead to sad consequences. And best of all, read on the Internet how you can and what you can’t feed the birds in the feeder.


https://i.expert-h.com/en/kormushka/1034#sigFreeIddcd83d04b1
Dimension drawing of a bird feeder
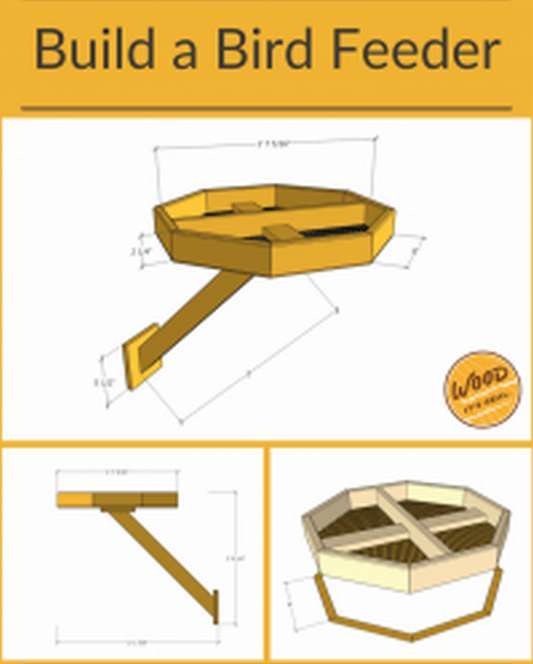 It’s realistic to do it yourself. Regardless of whether you like bird watching or just want to improve your woodworking skills, this project is designed specifically for you. This feeder can attract birds per kilometer from all around, so now in your yard will not be bored.
Hexagonal Feeder made frompine boards, so it will stand for several years, and all the time it will look great. Mount it on the wall outside the window to make it more convenient to watch the birds. The project is relatively simple, with tools and materials a feeder can be done in half a day.
Below, check out step-by-step photographs in which the entire manufacturing process is shown in diagrams, indicating the dimensions and assembly sequence.
If you are interested, on the site of the author of the project there is a video and detailed instructions describing the process.


https://i.expert-h.com/en/kormushka/1034#sigFreeId8670da9862
Cheap bird feeder
 This is very simple bird feedermade from pallets and scraps of wood. Therefore, the author of the project did not provide drawings and a list of materials, but the assembly of the structure is shown in great detail in step-by-step photos.
You can also read the description of the process on the site, the link can be found under the gallery. The main idea of the master is to make the most cheap bird feeder using only glue, no nails and screws. As you can see in the photo, we got a pretty nice house - a very comfortable “dining room” for the birds. For a complete menu, you can add a hook to the top of the roof to hang bird balls or pieces of bacon.


https://i.expert-h.com/en/kormushka/1034#sigFreeIdc37c0f0864
 Interesting bird feeder
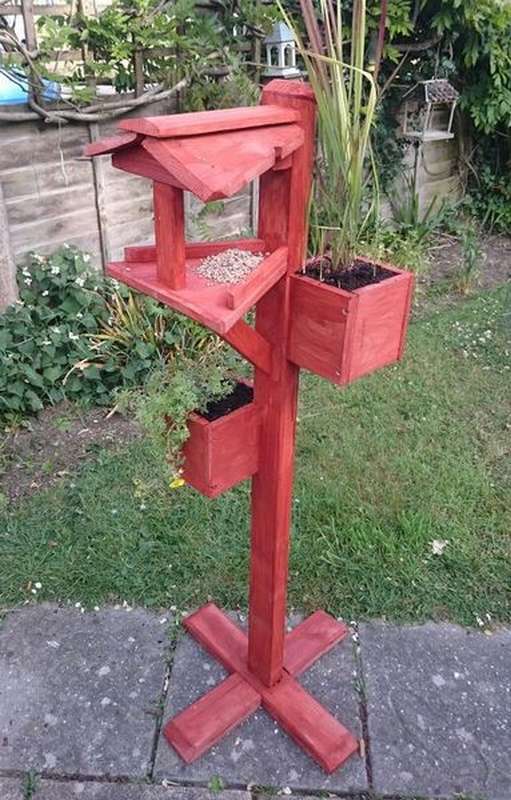
This design, the improvisation of the author, idea to make an original bird feeder with flower boxes, was born in one day and was improved in the manufacturing process.
To make the feeding trough really interesting, the author added two small flower boxes. The nice part about this project is that You can adjust the position of the roof, the shape of the table, the shape of the drawers according to your personal taste.
How long will such a design last? Probably not, but if you have a free pallet and one free day off, then this is not so important. Below are detailed step-by-step photos.
On the author’s site you can see build video and read more detailed instructions.


https://i.expert-h.com/en/kormushka/1034#sigFreeIdb30a91ac92
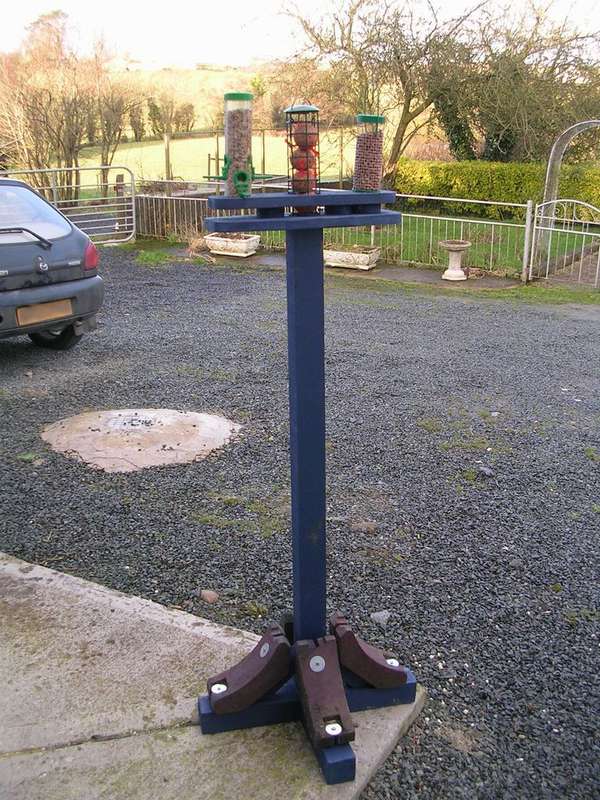 Another example similar bird feeders on a rack. A stand was made using 2 x 1.5 meter posts of 8 x 8 cm and wooden blocks.
The platform is designed to hold 3 feedersand bought in a store for seeds, fat globules and peanuts.
For stability, the rack is reinforced with additional bars, but if you want to make a stationary structure, can also be fastened to a 60 cm square concrete slabso that the drain does not swing in strong winds.
The author developed the rack design based on the materials that he had. The assembly order of the structure is shown in detail in step-by-step photos. The author does not have instructions, but the idea is clear, if you find a strong wooden pole, then it will not be difficult to do something like this.


https://i.expert-h.com/en/kormushka/1034#sigFreeId9206b6d851
Feeding rack
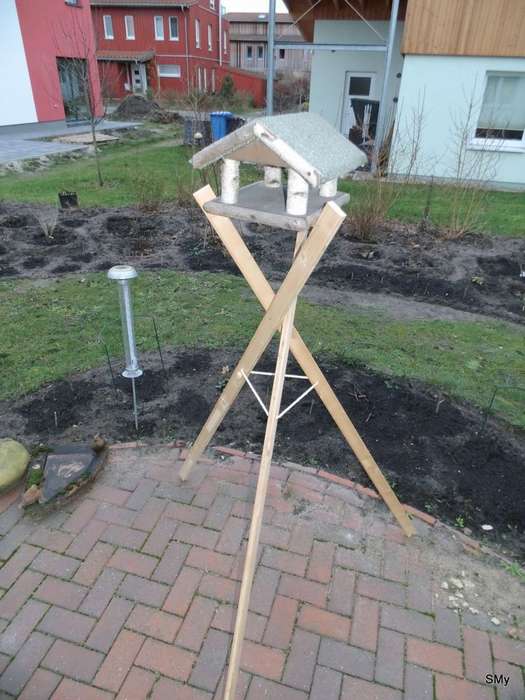 You made a feeder, but can not choose a suitable place for installation? Make a portable feeding rack, and install in any convenient place.
What do you need:
- three wooden planks (in this example: 1.60 mx 5 cm x 2 cm)
- center bar
- three screws for attaching strips to the central part
- rope
- three 6 mm pins
Collect these materials, and in two hours you will have an excellent rack for a feeding trough.
- The idea is this: fasten the three trims with the triangular central part with one screw so that you can rotate the bar slightly. Make the center part a little biggerthan a bracket to hold screws easily. (In this example: a 5 cm wide plank, the central triangle has an edge length of 5.6 cm).
- Locate the rope and drill four holes, approximately 30 cm below the center element. Make knots at the ends to make the tripod stable.
- To ensure stability, you can use a rope to place any load on top of the tripod.
- Easy storage and space saving. When you don't need a tripod: rotate the three slats in parallel, and all this can be stored even in a small pantry or shed.


https://i.expert-h.com/en/kormushka/1034#sigFreeIdbfcce32947
Look at examples of wood feeders on a pole


https://i.expert-h.com/en/kormushka/1034#sigFreeId2f78d8dcdc
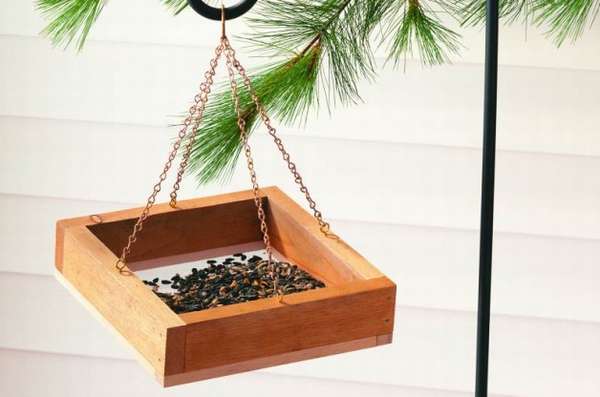 Hanging bird feeder
This simple one, inexpensive feeder Suitable for a wide variety of birds. Designs like this are one of the most popular options for attracting birds. You can buy a bird feeder, it’s not so expensive, but for no money you can’t buy the pleasure received from a useful thing made by yourself.
Materials:
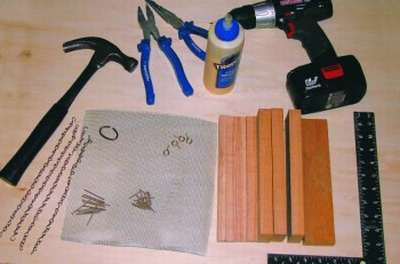 4 boards of 40 cm
- Metal strips
- Aluminum screen 25 x 25 cm
- Panel nails, hooks, chains for hanging plants
- Wood glue
- Scissors
- Ruler
- Needle pliers
- Scotch
- Hammer
- Drill
- Hand saw
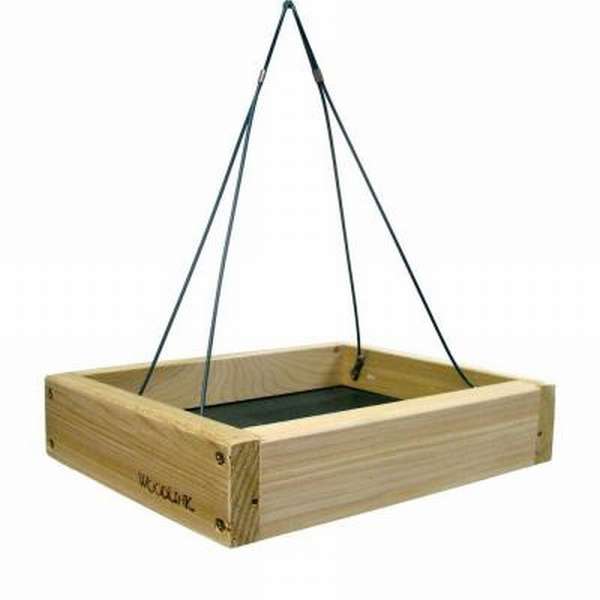
Step-by-step instruction:
 STEP 1 After sawing the parts, the assembly is quite simple. The finished feeder will be 25 cm wide, 25 cm long and 7 cm high. The first step is to glue the four boards together to make a square box. Secure with nails to reinforce.
STEP 2 Place the frame on a work surface, then center the aluminum screen and fasten to the frame.
STEP 3 Fasten the strips over the screen with nails, again formingtimid, imposing the joints of the feeder.
STEP 4 Drill holes in the corners of the box and tighten the hooks.
STEP 5 Attach chains to each hook using pliers. Then fasten the ends to to the larger link to make the hanger. Hang a bird feeder and wait for the arrival of your feathered friends!
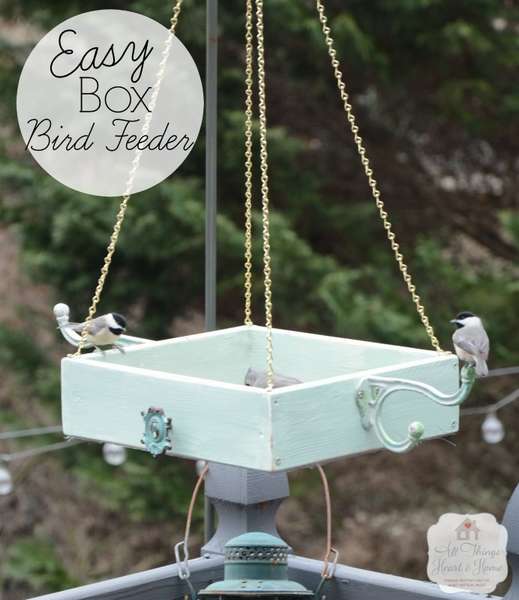 Easy bird feeder
See a good example how to make a light bird feeder with your own hands of four planks and auxiliary materials that you probably will find in your home.
Here is what you need:
- Screen (use aluminum screen)
- Wood (the author used 1x4 boards)
- Chain for hanging
- Decorative equipment
- Wood screws
- Paint
- Wood glue for wood
- Clear acrylic
 Instruction manual:
- Cut 4 boards of the required length - it depends on which box you want to make.
- Use glue and screws to assemble the box.
- Paint box
- Attach four chain lengths to each corner and using the S-shaped hook, connect the 4 chains in the center.
- Fasten the screen, it will be the bottom of the feeder
- Hang the box and fill it with seeds for your little friends!
It remains to wait for the guests!


https://i.expert-h.com/en/kormushka/1034#sigFreeId6ae2343fdc
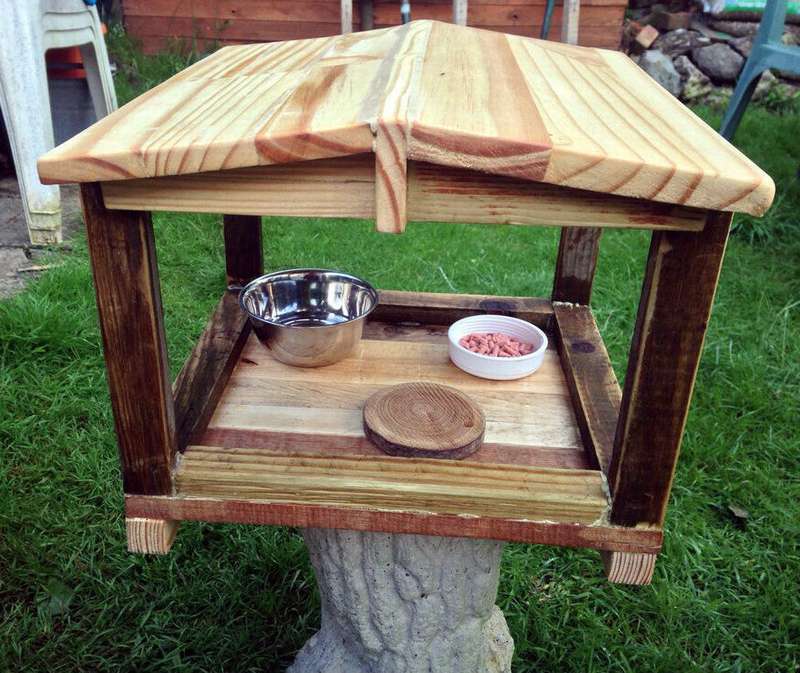
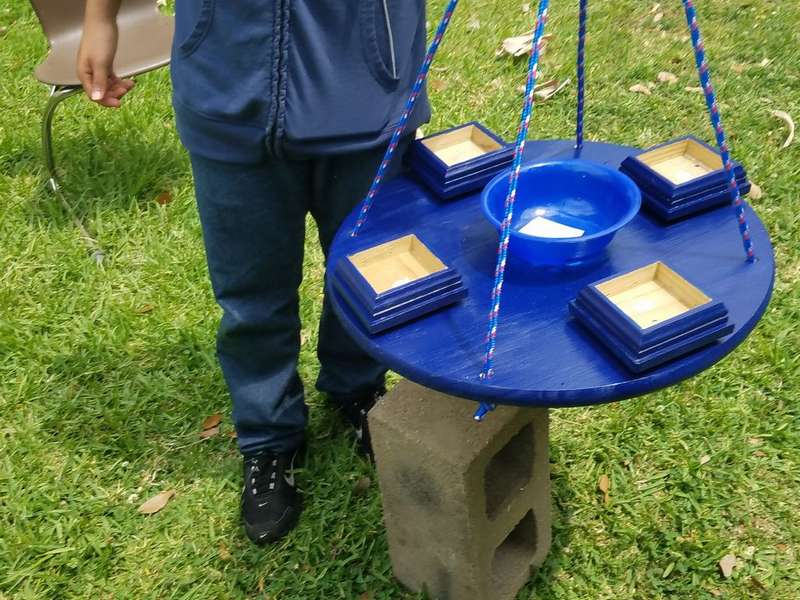 See another example hanging bird feeders, only more comfortable, with a bowl for water and separate "plates" for different types of food. For the platform, you can use a solid tabletop or make from boards, which is not so simple. But in general, the idea is quite simple, the main problem is to hang the table. It will be necessary to drill holes at an equidistant distance, as shown in the photo. Pass the rope, only singe endsso that it does not unravel. Make a knot at each end. Glue a plastic bowl in the middle of the table and square plates on the sides. Then it remains to paint, pour food and invite feathered friends to the table.


https://i.expert-h.com/en/kormushka/1034#sigFreeIdee2da2bdad
Here are some more examples of platform feeders


https://i.expert-h.com/en/kormushka/1034#sigFreeIdf7b0c645c3
Tiller
Vertical bird feeder
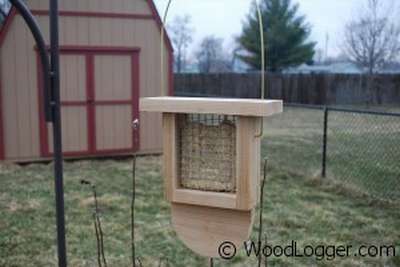 Homemade Bird Feeders just funny. They are lightweight, fast, cheap, and you get almost instant gratification when you complete a simple project like this. In this case, it is vertical feederin which the feed is held by a metal mesh.
You don’t need much to make materials: one and a half meter board 15 cm wide and stainless steel wire mesh.
- First of all, cut the board in size, in this case, the sides are 4 x 20 cm. Then make a small furrow in the lower and lateral parts. Measure and cut the wire mesh with scissors.
- To assemble the feeder, the author used glue and nails, you can tighten with screws, this is optional.
- For the top, the author cut and bent a brass rod. Then he drilled holes in the upper part, inserted the rod into the holes and attached it to the sides.


https://i.expert-h.com/en/kormushka/1034#sigFreeId5d5870f2b3
Interesting bird feeders
 Poultry bird feeder
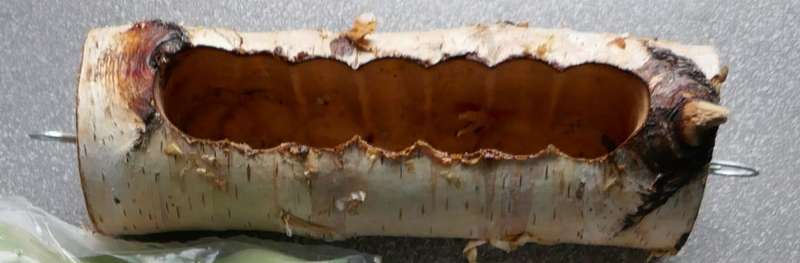
In this article you will learn how to make an original manger from logs and deliciously treat birds in their garden.
Pick a beautiful log of birch or another tree
In addition, you will need:
- electric drill
- metal ring and staple nail
- screw hook
For delicious food:
- mixed seeds and nuts (birds love peanuts)
- fat (e.g. coconut oil) that birds can digest
- pot to heat oil
- mixing bowls
Prepare a log
- Drill several holes connecting to each other to make a groove on one side.
- Attach the metal ring to the upper side with a staple nail to hang the log.
 Cook the filling
- Put coconut oil in a container of hot water, it begins to melt quickly, at a temperature of ~ 40 ° C, you do not need to boil.
- Mix peanuts with other seeds.
- Go outside where it’s cold enough to make the butter solid again.
Then:
- Put some food in the cavity of the log.
- Put a layer of oil on top.
- Let it cool and let the oil harden again.


https://i.expert-h.com/en/kormushka/1034#sigFreeId8bd60b8ffe
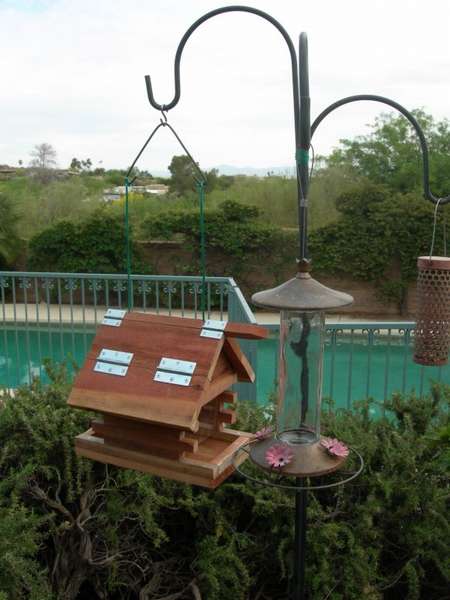
Bird feeder wall
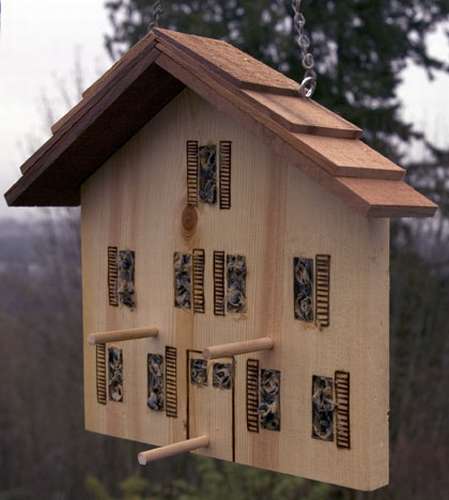 This is a simple small project that will be interesting to do with your child. The idea is that you fill the holes with a mixture of peanut butter and seeds. For the manufacture of original bird feeders You will need a 23 x 25 cm board, several poles, hooks and a chain.
Cut the board at an angle of 30 degrees to the center so that you can install the roof. The author used several planks laid in the form of tiles. Of course, it turned out beautifully, but you can make a roof in any style, even just fixing a metal strip.
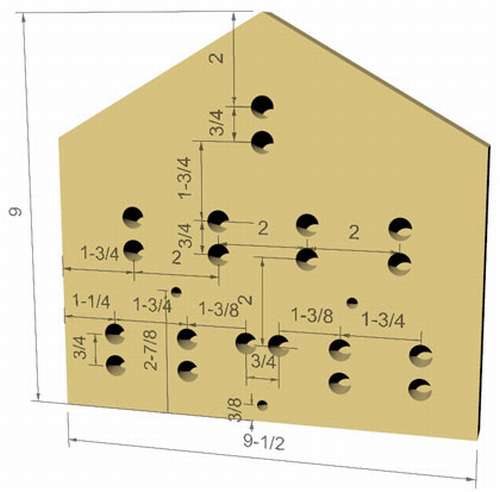 Still need to drill wide openings for feed and small for perches. This can be done in many ways, but it is better to use a stationary drilling machine, so reliable, because to make wide holes with a hand drill is problematic, the main thing is unsafe. By the wayIf there is an electric drill, then any large hole can be made with any small drill. Just put the cork from the wine, put it on the drill, so that the depth of the hole can be adjusted, and then you can cut it out figuratively with a drill.
Saw and glue the poles into the holes.
Screw a couple of hooks into the roof and attach the chain.
Mix some bird and peanut butter, fill the holes and wait for the birds to appear!
That's all. We hope you enjoyed this project.


https://i.expert-h.com/en/kormushka/1034#sigFreeIdac5d781e91
The easiest bird feeder
 Look how to make a very simple bird feeder. Not expensive and easy. You can install it anywhere.
Need:
- Derefaded boards
- Plastic bowl
- Hot glue
- Hammer and nails
Step 1. Make a template and cut out the parts of the feeder.
Step 2: Assemble the feeder, fix the parts with glue and fix with nails
Step 3: Glue the feed container and perch
Fill the container with bird food. That's all, I hope you have a better feeding trough than in the photo.


https://i.expert-h.com/en/kormushka/1034#sigFreeIdffcc8b5c09
Original bird feeder made of wood
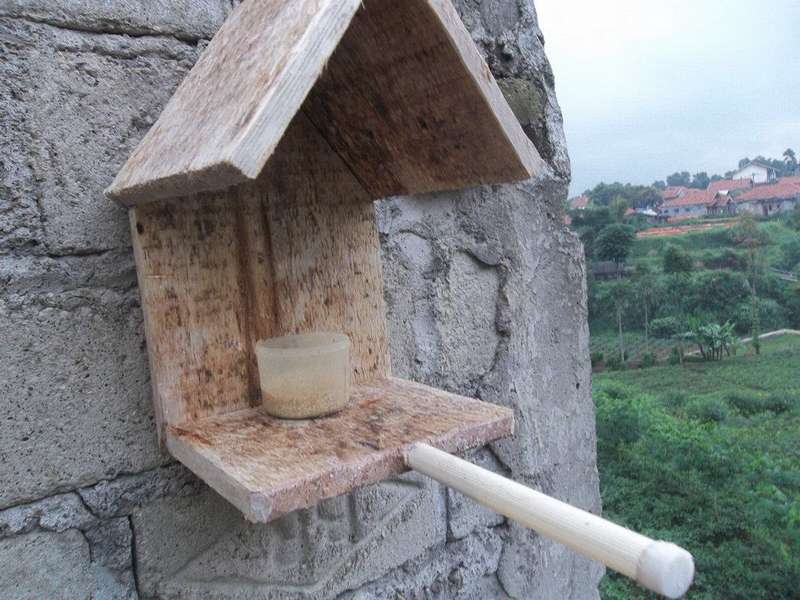
 For the manufacture of this bird feeder, old boards were used that remained after the repair of the roof of the shed and fin, that is, snags that are thrown ashore. So we can say that this Driftwood art feeding trough. Who does not know, there is such a direction in art when different things, figures of animals, etc. are made from driftwood. In general, what fantasy will tell. By the way, birdhouses, too, you can see an example of such a birdhouse in the style of driftwood art here. The author made this original manger in two days, now she proudly hangs in his garden, attracting many species of birds. The instructions can be read on the author’s website, this is a really funny and simple project that didn’t cost anything, in terms of money costs, so you can try to do something like this, maybe you will also get a craving for driftwood art.


https://i.expert-h.com/en/kormushka/1034#sigFreeId4baf93f4e3
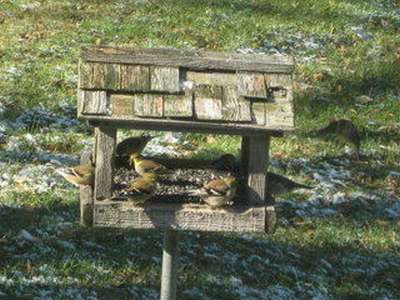 Wooden feeder with metal roof
You can use different types of bird feedersbut many people think that an open roof platform is best suited for more birds. For manufacturing, you can use old boards, it does not matter much. In this case, the feeder is mounted on the pipe, but this is one of the options. If you make a hook in the center of the roof, you can thread a light chain and hang it on a branch. You can read step-by-step instructions on the site, the link can be found under step-by-step photographs.


https://i.expert-h.com/en/kormushka/1034#sigFreeId291ac2b1ce
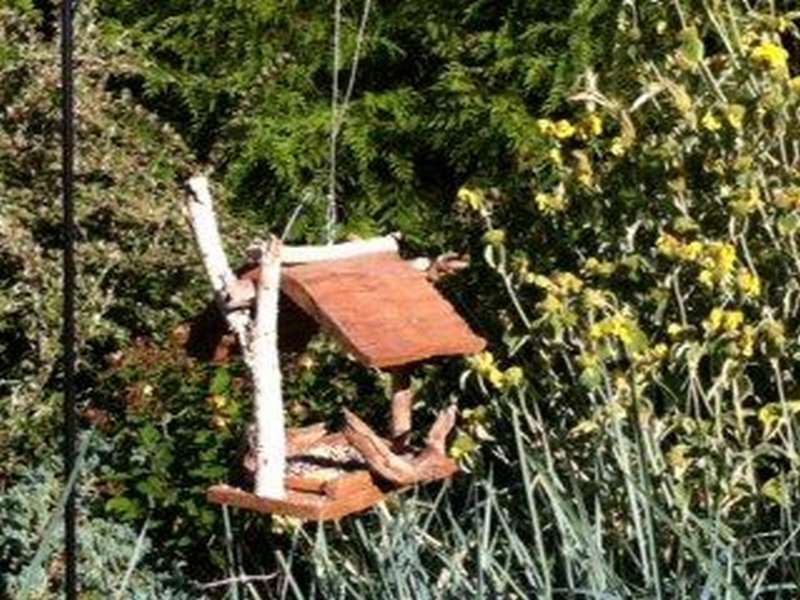
Log roof bird feeder
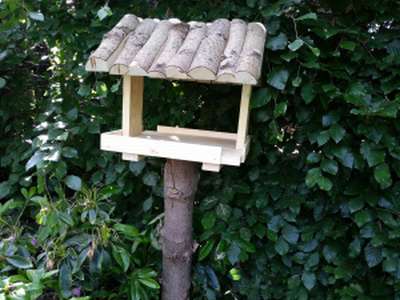 What you need:
- Thin trunk or thick coniferous branches, dried for at least a month.
- Boards 5x300 mm and 2x200 mm
- Board 2x300 mm, sawn to a length of 300 mm
- 1.2 m 100mm cable sheathing
- 25 mm pins
- 30mm nails
- 4x30 mm screws
It’s very easy to assemble a feeder
- Make the base of the roof frame
- Then take two planks 300 mm long, mark from the center to the opposite corner and cut the triangles.
- Drill holes for the supports in the base and fasten them with screws, and then drill holes for the roof triangles and fasten them.
- To make halves of logs, first cut the trunk or branch to a length of 250 mm, then cut in half.
- Now you can attach the logs to the roof. It's a bit complicated, but it's worth the time to make the feeder look neat.
- Attach the roof supports to the base and roof to the supports, and you're done!


https://i.expert-h.com/en/kormushka/1034#sigFreeId8230565035
Cool bird feeder
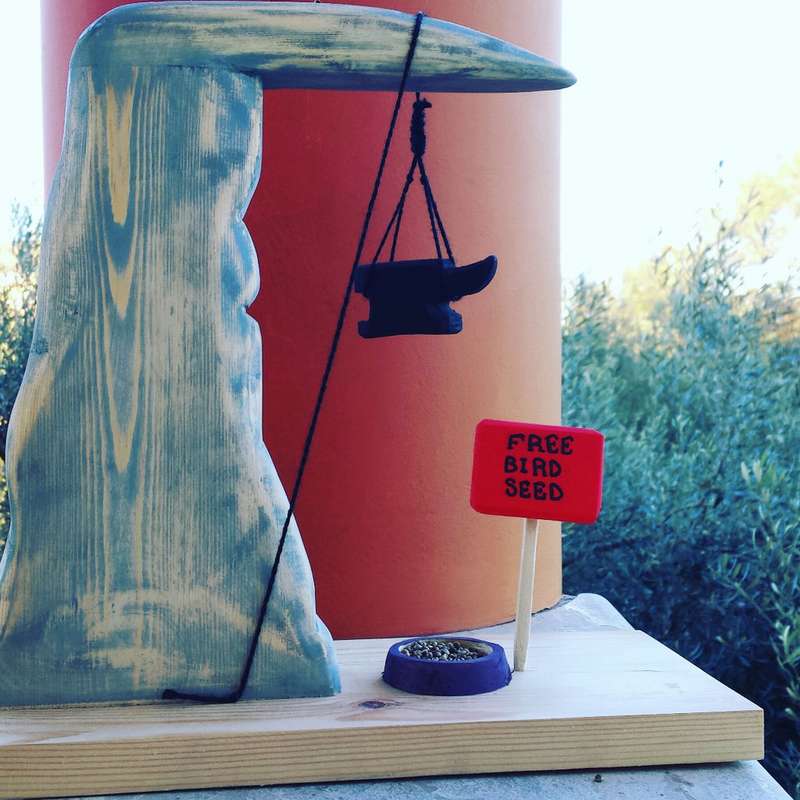 This cool bird feeder The author did, inspired by his favorite cartoon. Of course, this is not a bird trap, although it may look a bit menacing. But who said that the feeder should look like a boring box? Birds do not care, but we can and have fun.
Tools and materials:
- wood trimming, everything you can find
- saw
- hammer
- nails
- wood glue
- Super glue
- 5 cm screws
- sandpaper
- drill
- thin ropes
So have fun and always remember about safety when working with a power tool.
Step 1: Make The Rock. First of all, make some “rocks”. Shape and size do not matter much.
Step 2: Attach the “rock” to the base. For the base, the author used a piece of wood measuring 31 x 15 cm, having drilled three through holes in it, as shown in the photo. Glue the rock and fix with screws.
Step 4: Anvil. Just draw an anvil on a piece of wood and cut it out.
Step 5: Feed Cup. You can use an ordinary glass bowl or make a wooden one, as in the photo. To do this, cut out a 5 cm disk and drill a hole with a diameter of 4 cm. You will get a ring that will need to be glued to the base with superglue.
Step 6: Finish ... Color, hang the anvil on a thin black rope. Then hang the feeder by the hook on the tree. Fill the wooden ring with seeds, and that’s it.


https://i.expert-h.com/en/kormushka/1034#sigFreeIdc689ed5e6b
Drawings of wooden bird feeders


https://i.expert-h.com/en/kormushka/1034#sigFreeId8552704f7b
DIY bird feeders made of wood 200 photos


https://i.expert-h.com/en/kormushka/1034#sigFreeId7433eaba99
Hello, I am the author of this article, so I look forward to asking questions for this article in the comments below, I will answer all !!!
If you have questions on another topic, ask them on our forum, we will answer you
- Two baskets of paper in 5 minutes (Master class)
- How to make a simple and compact table for a milling cutter from plywood
- How to make a soft headboard tile (Instructions + step by step photos)
- Cinder block benches: a convenient bench in 55 minutes
- How to make a bed with a niche: saving space (Master class)