Sakura flowers made of paper. Do it yourself, step by step instructions + 215 photos
 corrugated paper sakura flowers
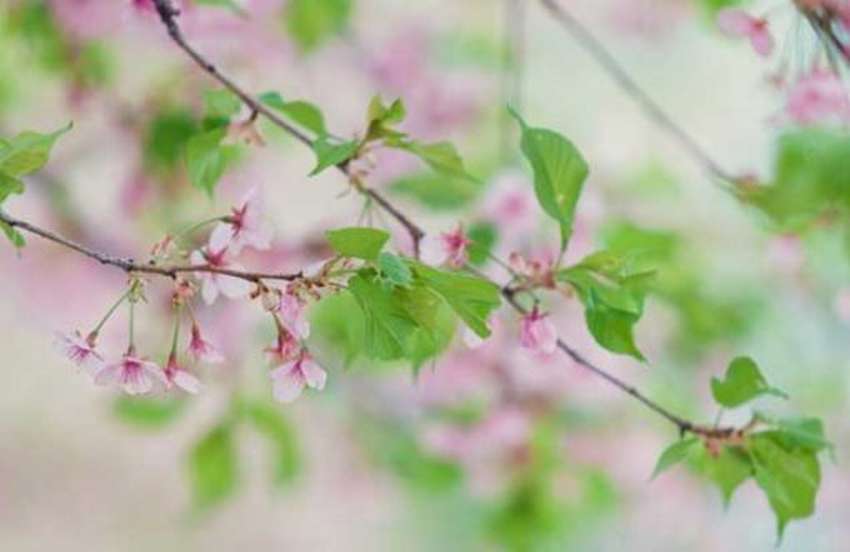
In Japan, cherries are called sakura - they are a metaphor for the ephemeral nature of life, probably because they come and go so quickly. Wonderful feature sakura flowers made of paper in that they will last much longer than fresh flowers. You can enjoy them all year round.
Sakura flowers made of paper interesting and they look amazing, like decor for your home or party. Try to capture beautiful pale pink and bright green spring colors in different versions - corrugated paper cherry, in the technique of origami, kirigami, napkins and various compositions with twigs. Just use the master classes presented here with step-by-step photos, for each example there is a link to the source. A little practice and you will be surprised how easy it is to do do-it-yourself sakura flowers from paper.
The content of the article:
- Sakura flowers made of paper pattern
- Sakura flowers from napkins
- Origami sakura flowers
- Corrugated Paper Sakura Flowers
- Kirigami Sakura Flowers
- Colored paper sakura flower
- Paper sakura branch
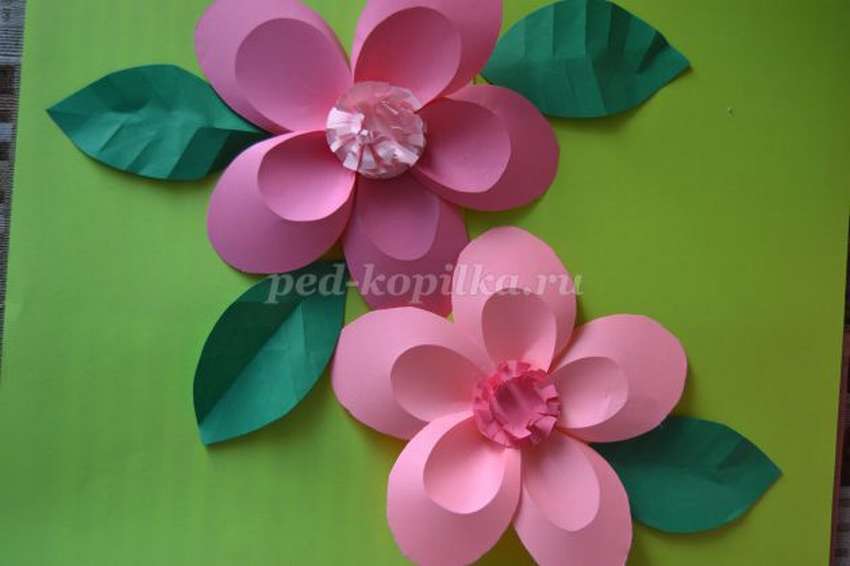
Sakura flowers made of paper pattern
 Shown here how to make sakura flowers from paper with a free template and walkthrough. First you need download templates on the site, link under the gallery. Then cut them out of cardboard, napkins, or corrugated paper. Do not be afraid to change the size of the flower according to your needs, but note that the petals come in two different sizesTherefore, you should try to keep their size the same in relation to each other. Also note that there are two different centers - one more complex, it is better suited for large sakura flowers.
 Use your fingers to gently shape the petals. Press lightly to give them greater depth. To make paper flowersas shown in this photo, glue the larger petal under the smaller petal. You can line them up or rotate them to look more beautiful. Some sakura flowers only five petalstherefore you can add if you want.
 Form the central part of the stamen (star-shaped) so that they stick a little. Now glue the sepals to the middle of the top of the petal. Then glue the stamen to the center of the petals. To finish paper sakura flowerglue the sheet under the petals.
And now the corrugated paper sakura flower is ready. On the left in the photo are real flowers - looks like? You can use these paper flowers to decorate a card or attach to a real branch and put in a vase.


https://i.expert-h.com/en/iz-bumagi/1231#sigFreeId9a214cd2e4
Sakura flowers from napkins
 Want to have a sakura branch in your room? Here is a simple step-by-step guide, how to make sakura flowers with your own hands. You will need simple household items: a facial napkin, a white straw, scissors, a lighter, pink powder, nail polish ... Cut a straw into 70 mm sections. Lighter burn one section head to make a slight bend. Cut the wire into 7-centimeter sections and glue the stamens. Cut the napkin into 5 cm squares. Fold 3 times and cut 6 petals. The diameter of the flower should be approximately 4.5 cm. Using a glue gun, attach and gently press the petals. Color the flower with ground pink pastel chalk with a small brush. Cut a small flower with a diameter of 2.5 cm, cover the ball with glue. Attach the buds to the branch and wrap them with a green floral ribbon. To get more information, read the instructions on the site.


https://i.expert-h.com/en/iz-bumagi/1231#sigFreeIdc98e9b5e83
How to make sakura flowers from paper
 Here is an example how to make sakura flowers from paper do it yourself, folding and cutting the sheet in a few simple steps. Fasten the flowers on a dried branch, you get beautiful decor for your living room. You will need white or pink 22 x 28 cm paper or any square sheet. Cut the paper into 4 equal pieces for large flowers or 16 pieces for small ones. The first step is to fold the paper in half. Mark the point "X", this is a point along the left edge of the paper that defines subsequent folds. Fold the bottom right corner up to the “X”. Then fold the bottom left corner above the right edge. Fold the top right corner above the left edge. Cut the arc starting from the right edge and rising to the left.
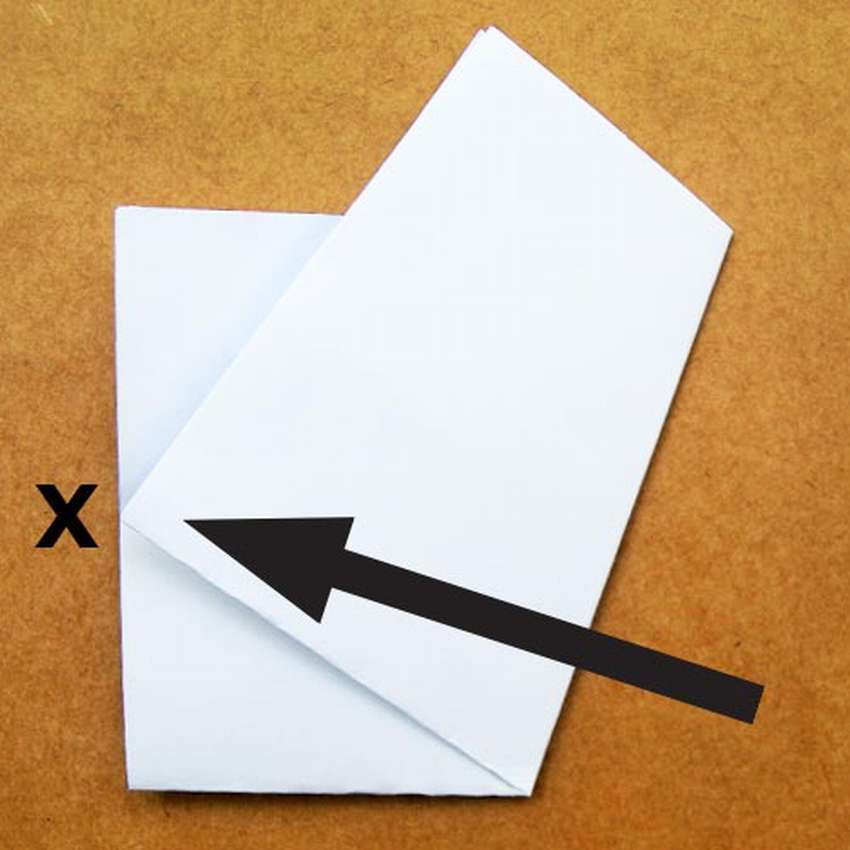 To make the task easier can draw an arc before cutting. The position of the arc determines the size of the flower. The closer to the bottom, the smaller the flower will be. Cut a diagonal section at the tip of the figure (it is shaded in the photo, just for clarity). Cut a small semicircle or semi-oval shape along the longest straight side of the paper. Try to keep the cutout close to the bottom of the figure. Gently unfold the paper to reveal the flower. Do some sakura flowers made of paper and glue it on a dry branch if you want. Flowers on this branch are only about 5 cm in diameter. Made of paper divided into 16 equal parts.


https://i.expert-h.com/en/iz-bumagi/1231#sigFreeIde4c00ee1bf
Origami sakura flowers
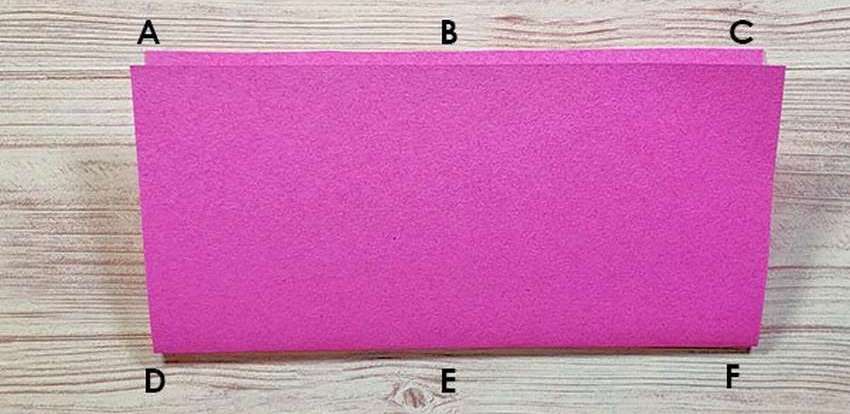
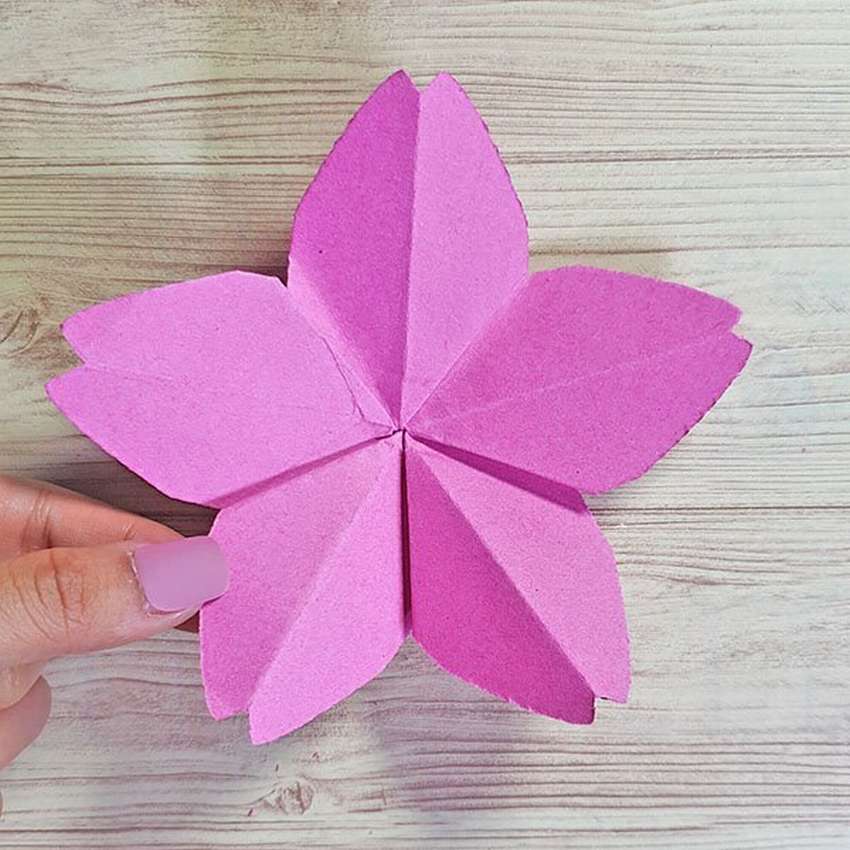 Want to learn how to do origami sakura flowers from paper? It's simple. You only need colored paper and scissors. Take a square sheet. Fold the paper horizontally to make paper.rectangular shape. Make sure the folded part is at the bottom. At this stage, we will have 6 points: A, B, C, D, E, F. Then proceed as shown on step by step photos. Fold point C to point E, then expand and fold point F to point B and expand again. As a result, there should be an “X” mark on the right side of the sheet.
 Bend point D to the center of the X sign. In the same fold, again take point D and do conical shape on the left side of the paper.
 Bend point F to the inside of the cone. Fold the entire right side of the paper back (crease with a mountain). Cut the lines as shown in the photo and remove the top. Expand the paper and make sure folds remained in the same direction. Fold the paper by connecting the “petals” in the center. On the right side of the “petal” there should be 3 folds, and on the left - 2. Fold the right side (the one with 3 folds) of the petal back. (Fold mountain) Fold the left side (the one with 2 folds) of the petal forward. (Crease valley) Gently open the paper and hold in the center. Fold the folds where they overlap. Turn the paper over and you will see beautiful sakura flower made of paper. Of course, you can make origami sakura flowers in other colors and sizes! Small flowers look especially cute.


https://i.expert-h.com/en/iz-bumagi/1231#sigFreeId9e70acaf97
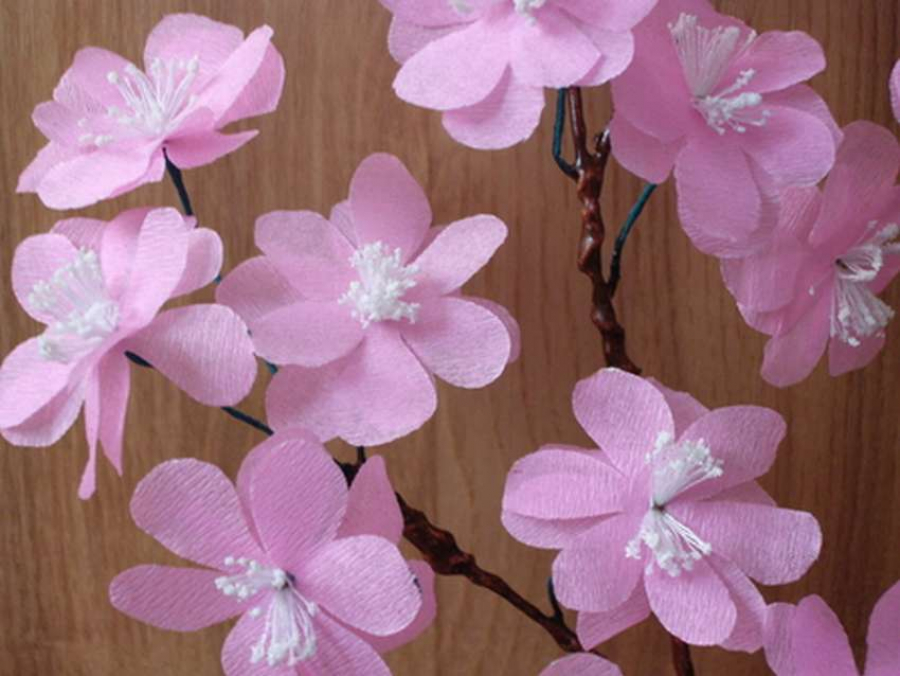
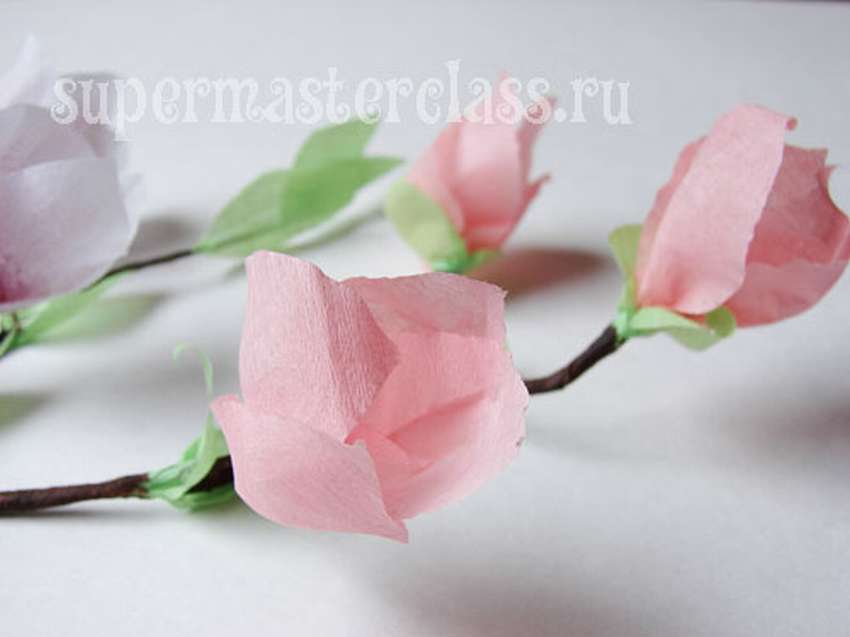
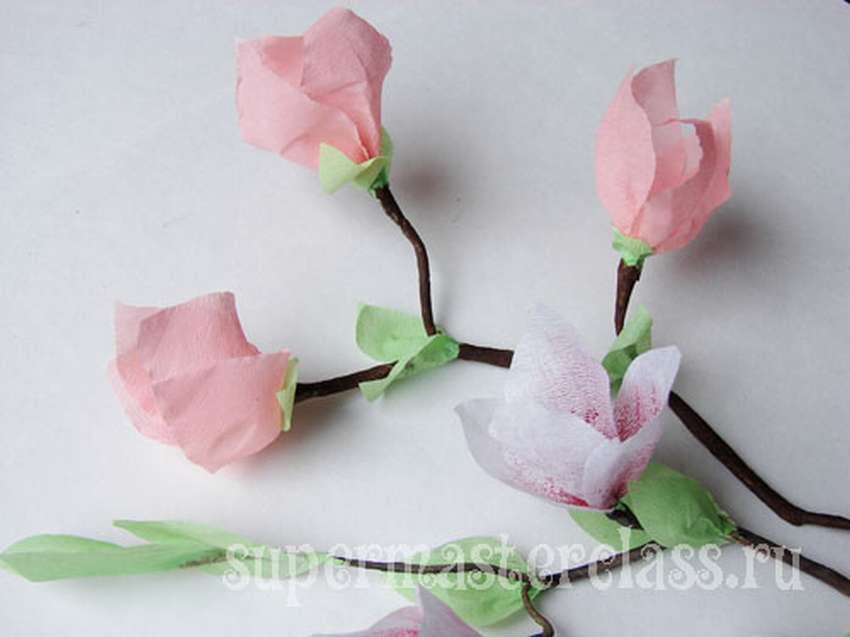
Corrugated Paper Sakura Flowers
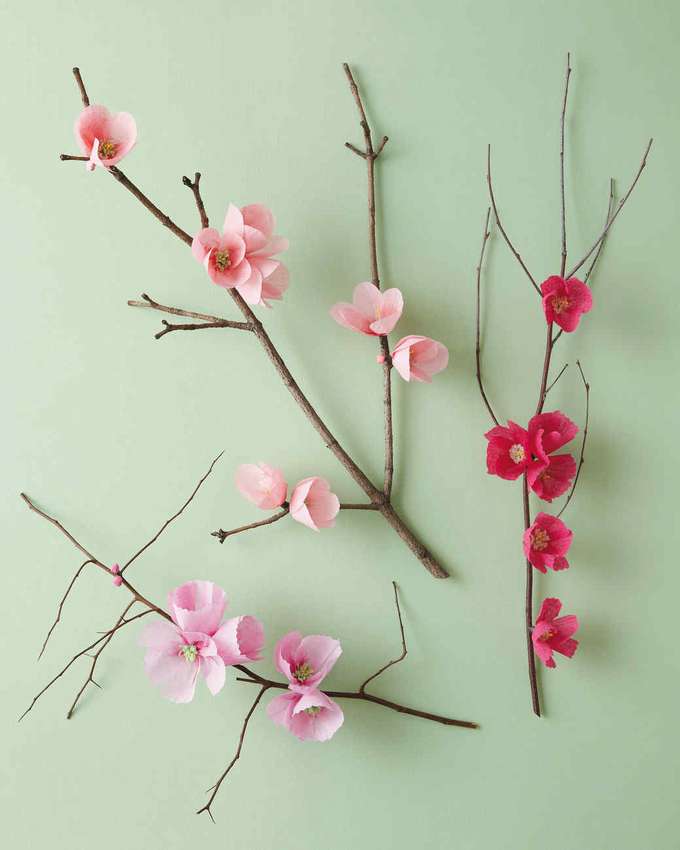
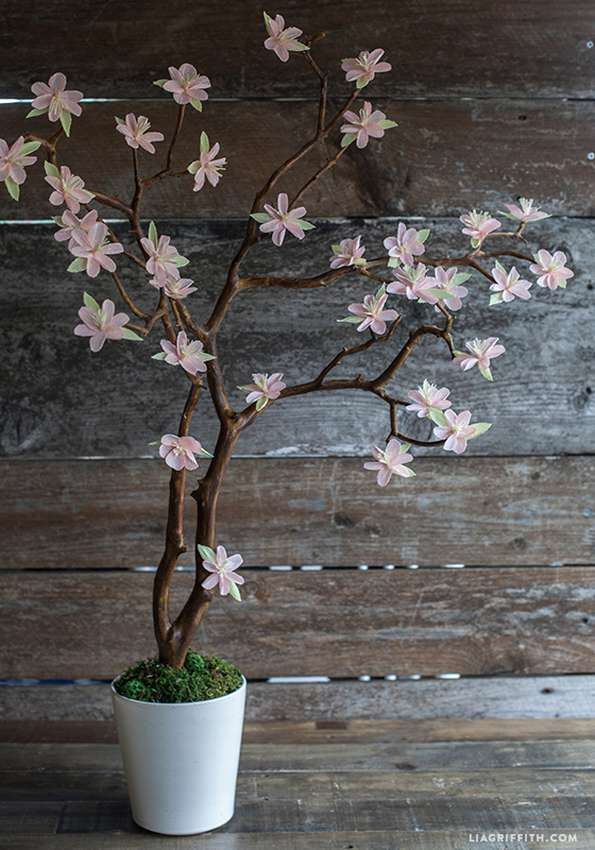 Spring is coming, and there is no better way to prepare for this joyful event than to add some flowers to your interior. Wonderful feature of these paper sakura branches that they will last longer than a few days and can be used as decorations for a spring dinner table, wedding event or children's party. In general, there are many ideas and events that can be used. These little corrugated paper sakura flowers very easy to do using just three colors of paper. All you need except corrugated paperThese are scissors and a hot glue gun. You can find any branch in a park or flower shop. Just fasten the branch in a small pot and cover green moss. Now your sakura branch is ready to bloom. To make a sakura flower out of paper, follow step by step photo below, and to download the templates, use the link under the gallery.


https://i.expert-h.com/en/iz-bumagi/1231#sigFreeIde3522c2cef
How to make cherry flowers from paper
 Walkthrough how to make cherry flowers from paperthat are attached to this branch. Measure and color the thin paper, you need a strip of 6 x 7 cm. Fold stacks of 5 napkins. Cut the tape 12 cm. Then, with a bunch of paper (5 napkins), bend the napkin onto6 mm as shown in the photo. Fold the paper in half and make small slots on both sides. Be careful not to cut the gap to the other side. Insert the tape into the slots and make a knot. Then open each layer of napkins to create a flower. Attach the flowers with a ribbon.
Now how to make buds. Cut small pieces of napkins and fold them in half. Cut two sheets of tape. Glue the bud to the leaf, and then another on top, then glue the bud to the branch. That's all, now you have paper flowersthat will bloom forever. Create a place that will showcase your masterpiece. If the branch is broken, do not worry, carefully remove the flowers and attach them to the new branch.


https://i.expert-h.com/en/iz-bumagi/1231#sigFreeIdd94cd29990
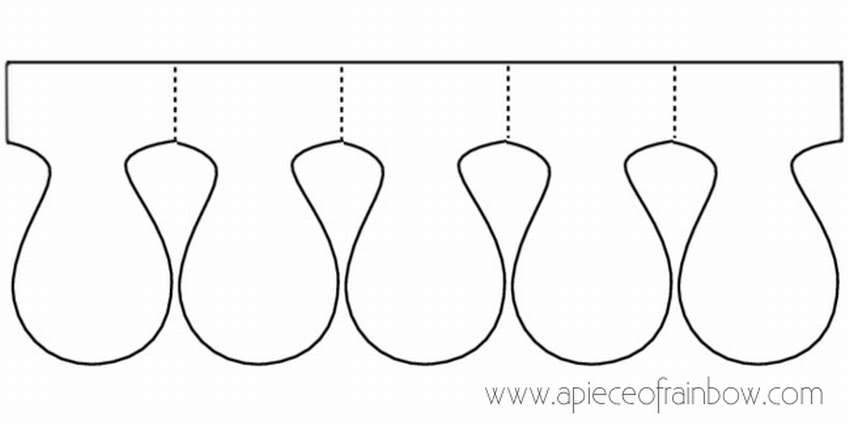
Kirigami Sakura Flowers
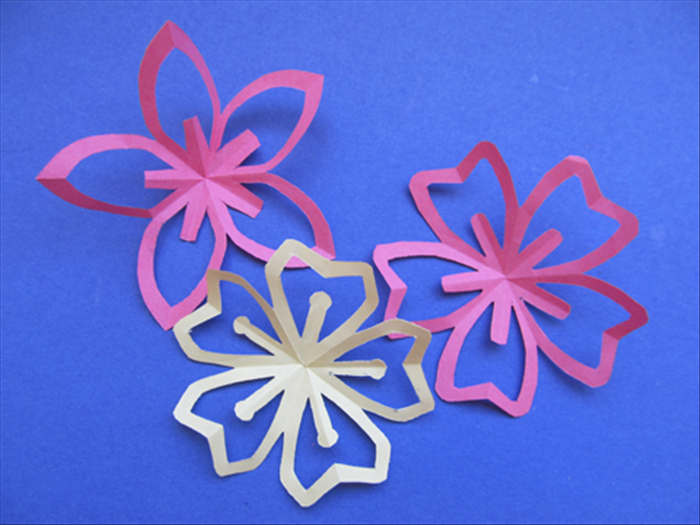 Kirigami - A paper cut method based on the ancient Japanese art of monkiri. This walkthrough will show you how to fold a square sheet of paper into 5 equal parts and cut to make Kirigami Sakura Flower. A very simple hack for beginners, you only need paper, scissors and a pencil. See the master class below for step-by-step photos.very detailed photos, places of folds shown with a dashed line. If you need instructions, a link to the site under the gallery.


https://i.expert-h.com/en/iz-bumagi/1231#sigFreeId768de4c534
 Or look another such Kirigami Sakura. This is also a fairly simple example, all you need is thin paper (ideal, color origami paper size 15 or 7.5 cm ) and sharp scissors. The first step is to study the folds needed to make a sakura flower from paper with 5 petals (of course, you can make a kirigi flower with 4, 6 or 8 petals, but the classic form of sakura is 5 petals). After completing the crease, the next step - pruning! Of course, there is no need to limit yourself to the shape of sakura.
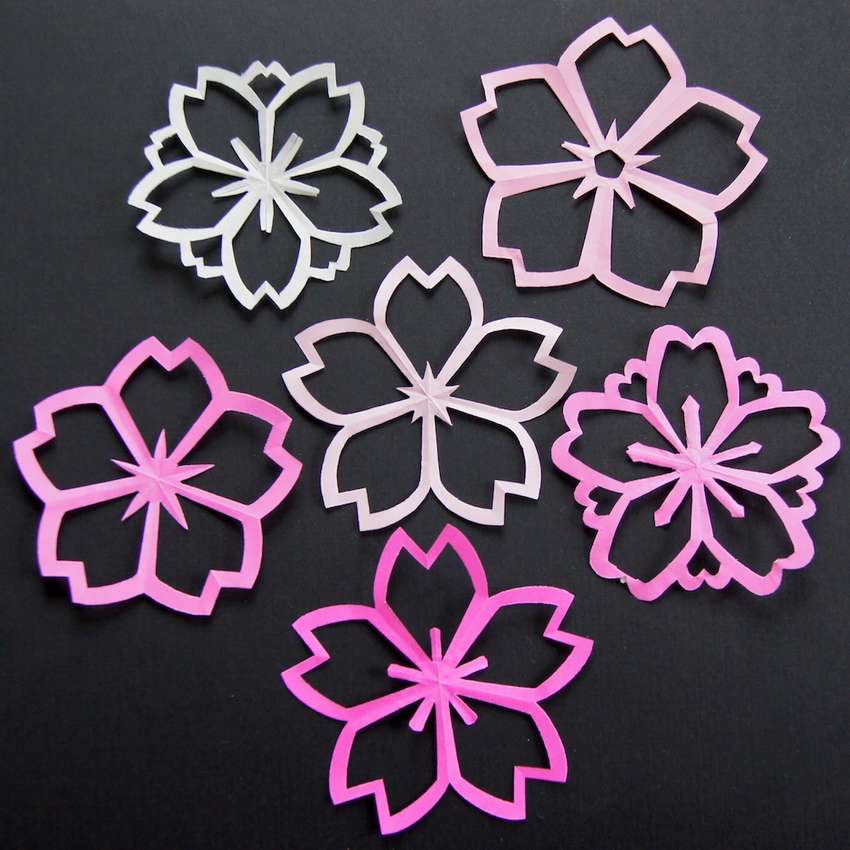 Next, you need to carefully open these flowers. A 5-point fold is a little more complicated and the paper is thin, so try not to break. When finished, the flowers will be slightly wrinkled, turn on the iron to a minimum temperature and gently press the flowers, no steam. It may take several attempts to paper sakura flowers Looked exactly the way you want, but in fact the most interesting thing is to experiment and try all the possible options!


https://i.expert-h.com/en/iz-bumagi/1231#sigFreeIdb08caf430e
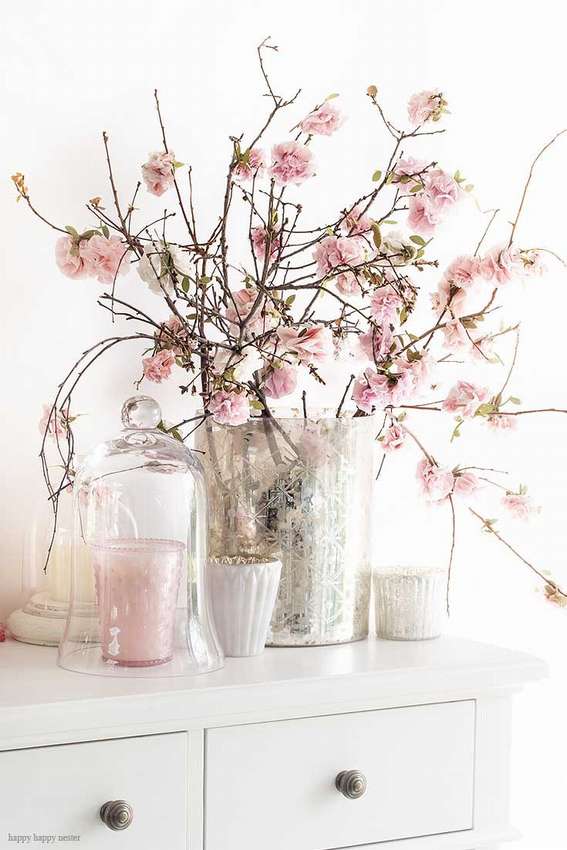
Simple flower made of sakura paper
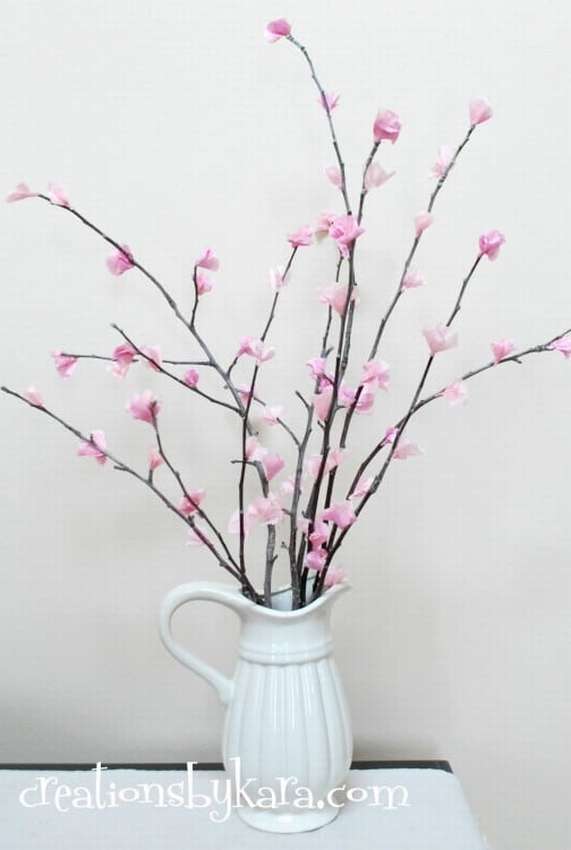 Introducing a small spring project, step-by-step instructions, how to make sakura flower from paper. Consumables: napkins (any thin paper), glue gun for hot glue, branches. Fold a few napkins on top of each other and cut out the shape of the flower. Shape doesn't have to be perfect! Here the flowers are approximately 2.5 cm across and have five petals, but this is not so important. You can also make one-color or two-color. For two-tone flowers fold the two flower shapes on top of each other, with the petals not matching. Then just squeeze the petals and twist them underneath. Now it's time to stick them to the branches. Just add a drop of hot glue and click on the flower. Continue adding flowers on all sides of the branch. When you're done, put it in the vase of your choice. White vases are so versatile that they can be used almost anywhere! We hope you have fun bringing some spring to your home!


https://i.expert-h.com/en/iz-bumagi/1231#sigFreeId920a1c73f2
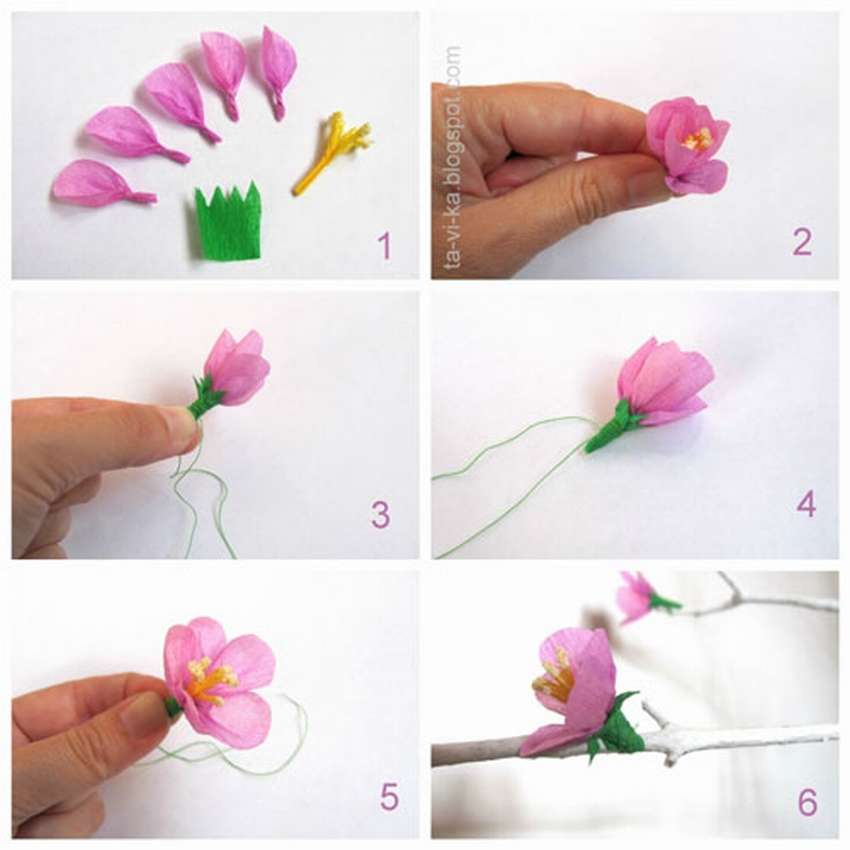
How to Make Sakura Flowers from Corrugated Paper
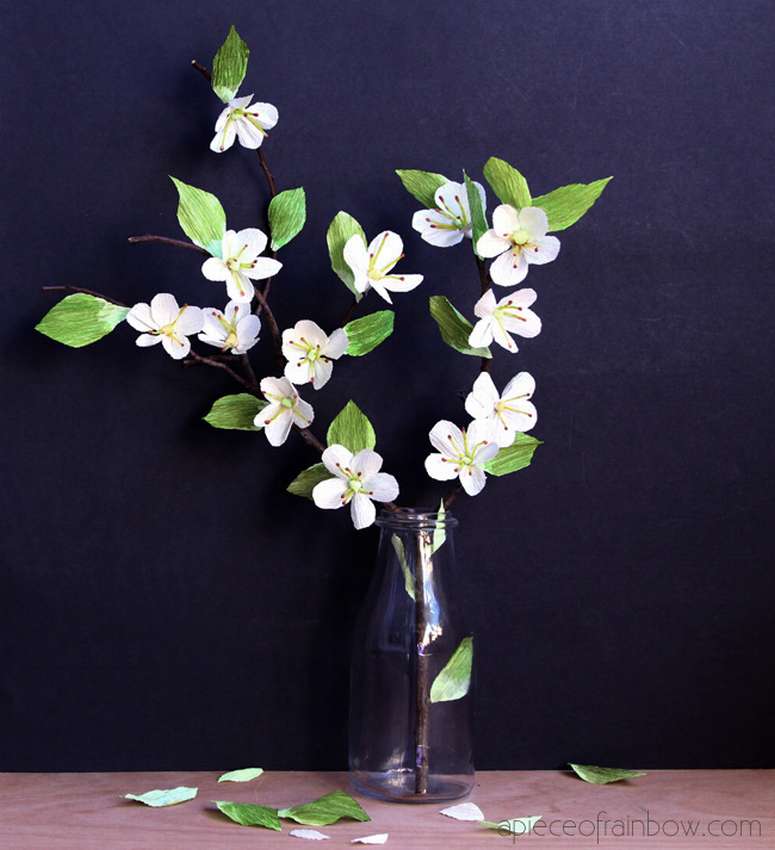 Who doesn't like sakura? She looks so cute in any interior, from vintage to modern! First, what are needed materials and tools. Branch, ivory corrugated paper or pale pink. Leaf green at will: it’s hard to find the perfect green paper in a natural color, so you can paint the paper yourself in any shade of green that you like. Still need flower ribbon white or pale green, scissors and hot glue.Stamens - You can buy on the Internet or make it yourself.
Fold a strip of corrugated paper 5 times and cut the petals, as shown in the photo below. Make sure that the grain on the corrugated paper runs vertically along the petals.
 Center by folding a strip of pale green corrugated paper four times, then fold the stamens in half.
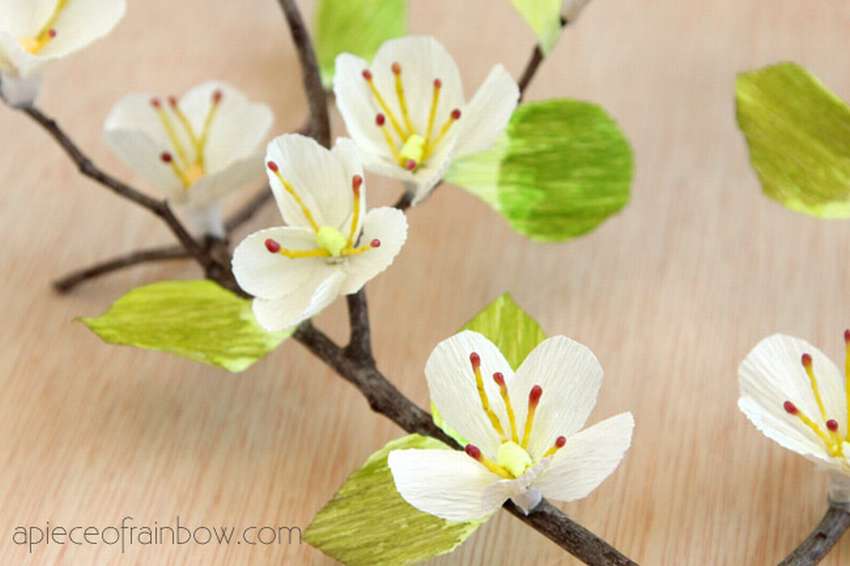 Pinch the base of each petal and attach to the flower center, and the stamens with floral tape. If you can’t find the perfect shades of green leaf paper, use diluted watercolor or acrylic paintto tint. Last step! Using hot glue, attach the flowers and leaves to the branch, that's all! If you want to hang on the wall, you can use the fishing line.


https://i.expert-h.com/en/iz-bumagi/1231#sigFreeId43137f563e
Corrugated paper sakura
See another example of how to make tender corrugated paper sakura flowers.
 Plain master class below on step by step photos, detailed instructions can be read on the site.


https://i.expert-h.com/en/iz-bumagi/1231#sigFreeId3677a41c6a
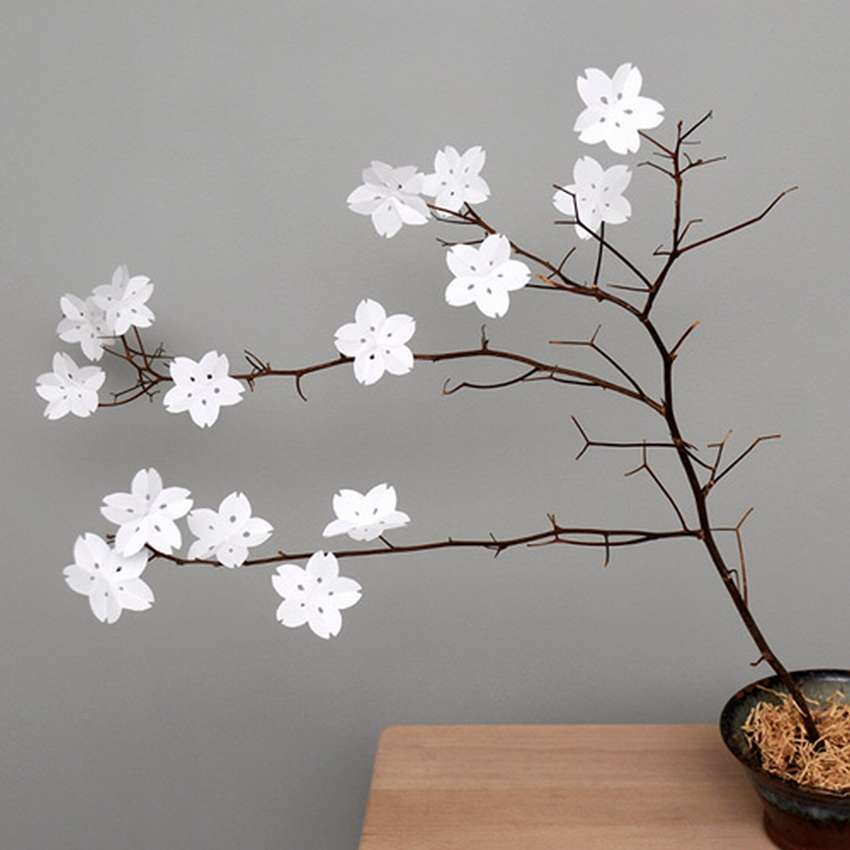
Origami sakura flower pattern
 Origami sakura flowers It’s not difficult to do. Simple enough to use instructions and step by step photos. In addition, the crafts do not need a lot of time and you will need the most ordinary materials, mainly colored paper. Any flower can be made of paper, the main thing is to make an effort. Simple crafts for children, as a rule, tulips, lilies, lotus flowers. Here's how to make amazing delicate origami sakura flowers. Link to instructions under the gallery. See below Master Classmake sure it is very simple.


https://i.expert-h.com/en/iz-bumagi/1231#sigFreeIdc41082a3c2
Colored paper sakura flower
 This is a wonderful tree native to Japan. Small sakura flowers very beautiful. They will be an excellent decoration element of any product or decoration for the interior. For the first time, we all get acquainted with the production of flowers from paper in childhood, when we make crafts to give to parents and relatives. This colored paper sakura flower just designed for preschoolers and primary school students. The master class can be viewed below in the gallery, instructions on the site.


https://i.expert-h.com/en/iz-bumagi/1231#sigFreeId58b2d67828
Paper sakura branch
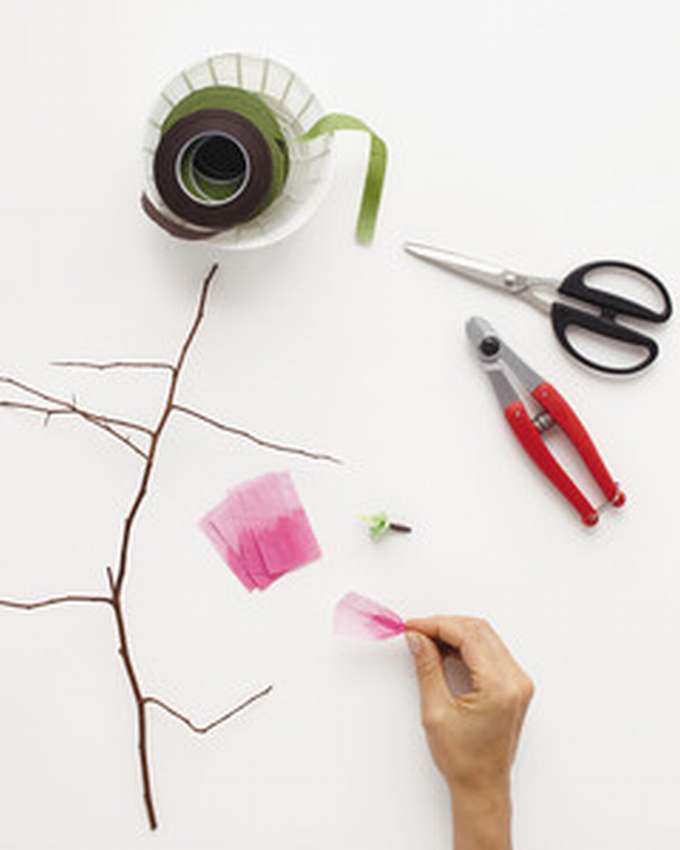
 Florist designer Livia Chetti, author of The Exquisite Book of Paper Flowers, tells how to make a charming paper sakura branch. Print and cut the petal pattern. You need 25 pieces of size 5 by 7 cm from a napkin. Divide them into 5 piles of 5. Fold template in one pile. Circle the pattern and cut it out to make five petals. Use zigzag scissors to trim the top edge of the petal. Repeat with the remaining piles. For bud balls cut two squares measuring 25 by 25 mm and two squares of the same size from a napkin. Fold one of the small pieces into a ball and wrap a large piece.
 Hold the ball in one hand and the other wrap the tape around the base. Repeat to make a second ball of bud. For centers, collapse green strip of paper cut in half lengthwise and cut a strip of 1.5 cm along the bent edge. Cut the fringe strip into five 5 cm slices. Add up yellow stamen thread in half. Wrap the green border around the stamen, positioning it so that the stamen protrudes 1.5 cm. Fasten with flower ribbon. Repeat to do 5 centers. Petal Shape: Add a dart to each petal. The three-point fold of the dart should extend from the bottom of the petal to 1.5 cm from the top.
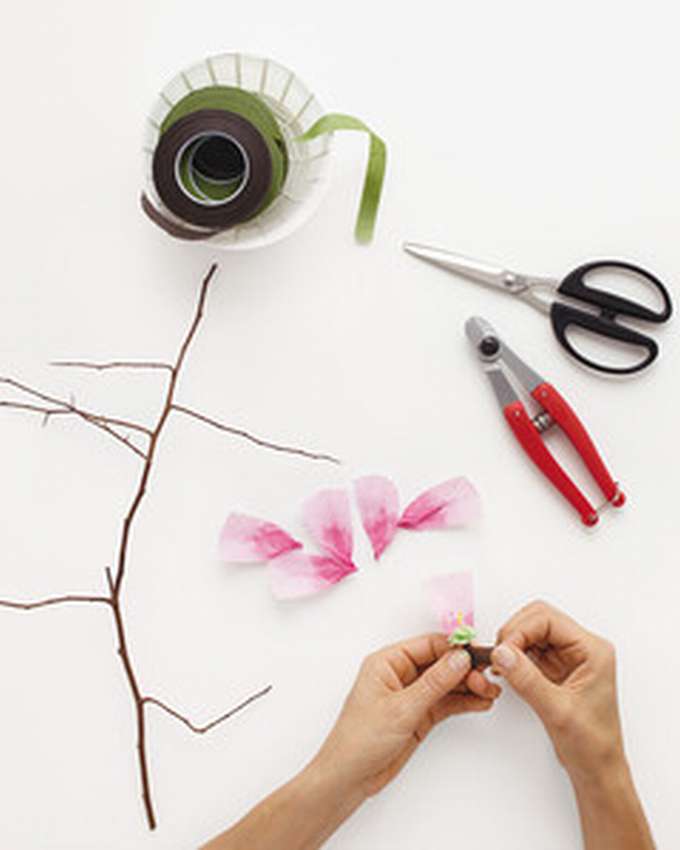 The base of the dart should be approximately 5 mm across and taper to a point. Repeat with the remaining petals. Gently squeeze the base of each petal to give it bowl shape. Collect flowers: each flower consists of 5 petals. Attach the lower end of the petal to the center with a floral ribbon, wrapping and wrapping the ribbon down and around the center, at a distance approximately 3 cm from the base. Fasten the next petal next to the first, overlapping the edges by 6 mm, and wrap the base with tape. Repeat with the last 3 petals. Fluff the flowers, adjusting the petals as needed. Repeat for 5 colors.
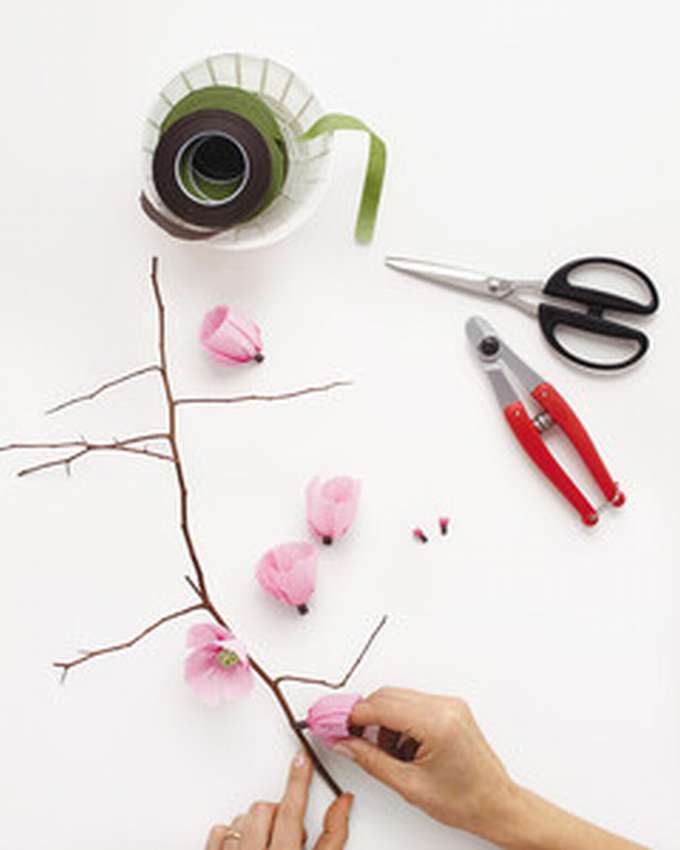 Collect a branch: Trim the bottom of each bud, leaving a 6 mm base. Prepare the branch by removing leaves or buds.Apply a small amount of hot glue to the base of the flower and hold on a branch, until the glue dries. Repeat with remaining flowers and buds.
From the materials you need:
- Petal patterns
- Napkin
- Ordinary and small zigzag scissors
- 5 x 25 cm soft green paper
- Brown flower ribbon
- Bare branch 30 cm long, any
- Hot glue gun
Sakura flower made of paper photo


https://i.expert-h.com/en/iz-bumagi/1231#sigFreeId345eb3cf37
Hello, I am the author of this article, so I look forward to asking questions for this article in the comments below, I will answer all !!!
If you have questions on another topic, ask them on our forum, we will answer you
- Two baskets of paper in 5 minutes (Master class)
- How to make a simple and compact table for a milling cutter from plywood
- How to make a soft headboard tile (Instructions + step by step photos)
- Cinder block benches: a convenient bench in 55 minutes
- How to make a bed with a niche: saving space (Master class)