DIY Pergola 700 photos step by step instructions
 do-it-yourself pergola made of wood
A practical person living in the middle lane, perhaps, may ask, why do we need a gazebo without a roof? Well, what can I say, probably then, why do I need front gardens, alpine hills or flower beds - for beauty. Yes, the pergola may seem to some to be an incomplete structure, but that’s the whole charm, besides this building is not devoid of functionality, and most importantly the light and openwork design does not create a crushing impression and can become a highlight of your garden or summer cottage.
Be that as it may, but interest in this type of garden building today is very high. Therefore, in this article you can find out how to make a pergola do it yourself, get acquainted with the various options, use step-by-step photographs, drawings, diagrams and links to sites with detailed instructions. I also want to say that in addition to external attractiveness, it is quite easy to make a pergola with your own hands even to a person without experience. Maybe not everyone will decide to build a gazebo, but with the pergola special difficulties should not arise. You will be convinced of this when you consider the examples of constructions proposed in the article.
How to make a pergola with your own hands
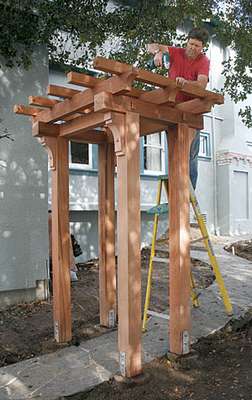
 A standard rectangular pergola is traditionally mounted on pillars or columns. It is perfect for climbing plants, therefore, especially for these purposes, trellises are stuffed between the posts. Pergolas are often placed at the entrance to the garden, to the wall of the house or as a separate building. You can buy a prefab in the form of a kit, but a pergola is fairly easy to build from scratch using inexpensive processed coniferous wood. This step-by-step photo of the instruction clearly shows one of the options DIY classic pergola, in this case, as a separate arbor. By the way, the first photo shows a metal thrust bearing for supports.


https://i.expert-h.com/en/besedki/pergola-svoimi-rukami-700-foto-poshagovye-instruktsii#sigFreeId065c1669e4
Pergola do it yourself step by step
 Wooden pergola can be a great addition to any summer cottage, as it creates a large shady area, which is ideal for eating outdoors or reading a good book. Before starting construction, you need to think carefully about the dimensions and design of the structure, because if you are going to do-it-yourself pergola drawings you will definitely need. Several types of projects with drawings and dimensions are presented in this article, choose the one that is best suited for your site. Make a pergola with your own hands easier than, say, a gazebo, but in order to get a beautiful design, it is necessary to maintain certain proportions. For example, if the distance between the pillars is much greater than their height, the view of the pergola will not be very harmonious. therefore usually the distance between the supports does not exceed three meters. Here, the diagrams show the construction of the pergola with your own hands step by step, only the dimensions are indicated in inches (1 inch - 2.54 cm). Some tips before starting construction:
- to save time, collect all the tools on the construction site before starting the final assembly;
- When choosing components, make sure that they are perfectly straight and in good visual condition;
- apply several layers of stain on wooden parts.
- The first step is the marking and installation of support pillars. When concreting pillars, it is recommended to use temporary supports, so that at the final stage, when the concrete dries, it is possible to adjust them vertically using a level.
- The next step is the installation of a lattice on the sides of the pergola, between wooden posts. As you can see in the picture, you need to use wooden slats and galvanized screws. Drill the drill holes on both ends of the components before fixing them to the posts with screws. Once again accurately measure the gaps between the parts.
- The third step is the installation of support beams. Trim the ends of the crossbars in a decorative manner, if you want to improve the appearance of the pergola.
To attach the beams to the posts, drill through holes through the beam and supports, then tighten with bolts. Ask someone, preferably with experience, to help you when attaching the beams to the uprights. - If you live in an area with strong winds, or just want to enliven the design a bit, you can reinforce the frame with brackets. Trim bothend brackets at an angle of 45 degrees and secure them with galvanized screws to the support beams.
- And at the end is the installation of cross beams. You must take care to make the shadow elements as shown in the plans. It is very important to maintain the same distance between the rafters, so do not be too lazy to make accurate measurements thoroughly. Drill holes through the rafters and fasten them to the support beams with galvanized screws.
- Making crossbars for shade is not hard work if you use the right plans and methods. As you can see in the image, it is necessary to make several cuts in the beams so that they properly correspond to the supports. Make deep cuts with a circular saw and clean the notch with a chisel and sandpaper.
Lastly, take care of the finishing touches. Fill the holes wood filler and let dry for several hours. Then sand the wooden surface with fine sand paper. If you want to protect the structure from moisture and improve the appearance of the pergola, apply several layers of paint on wooden parts.


https://i.expert-h.com/en/besedki/pergola-svoimi-rukami-700-foto-poshagovye-instruktsii#sigFreeId428e3f5fb9
Below are three more options. do-it-yourself pergolas with drawings
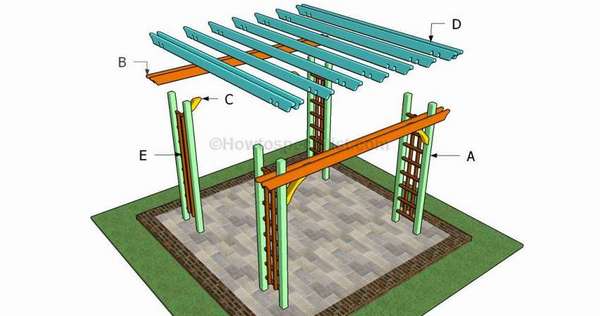
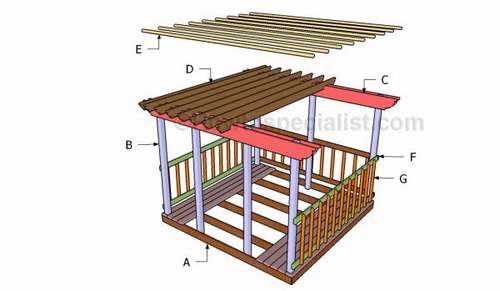
 Example, how to make a pergola do it yourself with step-by-step instructions in schemes
It is a solid construction, elegant in design and very easy to build.
Materials
- A - 4 pcs support posts
- B - 4 pcs support beams
- C - 15 pieces cross beams
- D - 11 pieces perpendicular bars
- E - 4 pcs. Additional supports for cross beams
- F - 4 pcs. Additional diagonal trim to support the support beams
Tools
- Protective gloves, glasses
- Miter saw, jigsaw
- Roulette, level, carpentry pencil
- Drill
Construction time is one week, unless you really strain.


https://i.expert-h.com/en/besedki/pergola-svoimi-rukami-700-foto-poshagovye-instruktsii#sigFreeIdd56edcc835
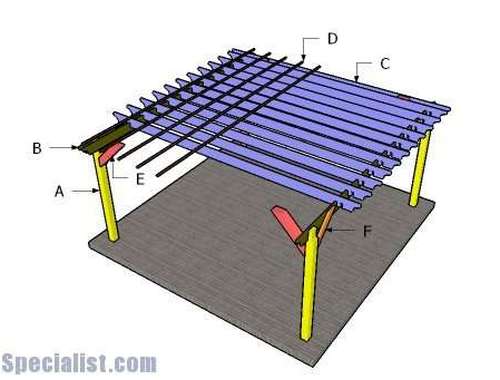
Big rectangular do-it-yourself pergola


https://i.expert-h.com/en/besedki/pergola-svoimi-rukami-700-foto-poshagovye-instruktsii#sigFreeId2ac200ca97
An example of a pergola with original supporting pillars from the famous site ana-white


https://i.expert-h.com/en/besedki/pergola-svoimi-rukami-700-foto-poshagovye-instruktsii#sigFreeId0327ad587a
Pergola do-it-yourself arbor
Often a pergola serves as a normal canopy to create a shadow. We install them in front of the entrance to the garden or to the plot, on the porch or as an extension to the house. The pergola pergola differs from the pergola of the pavilion only in that they are usually placed separately and equipped with handrails, like ordinary arbors. Here are three options. how to make a pergola do-it-yourself gazebo with drawings and dimensions.
Here is the first option.
 The initial stage of construction is to create a floor frame. As you can see in the diagram, it is necessary to cut both ends of the guides at an angle of 45 °. Carefully align the edges, drill the guide holes and insert the screws to create stiff seams. Before tightening the screws, make sure that all corners are rectangular.
- The next stage of assembly, the installation of intermediate beams in the floor frame. Place the logs at the same distance and check the angles with a square.
- Installation of vertical beams. This must be done very carefully, use a plumb line and level, then drill holes in the beams and fix with screws. As an alternative, you can use screws.
Next, you need to install the flooring on the floor of the pergola. As shown in the diagram, it is recommended to leave a small gap between the flooring boards. Fix the ends of the boards to the beams with galvanized screws. Make sure that the screw heads are flush with the surface of the board. If you want to strengthen the strength of the floor, under the shields, install the spike to the posts. - Then you need to install the support beams. To get beautiful, you can work a little with a jigsaw, figuratively cutting off the ends of the beam
- Then attach the support beams to the top of the wooden posts. Fix everything tightly, leaving no gaps.
- The next step is the installation of the roof lathing. This can be done in different ways, for example, simply lay the bars on the supporting beam and obliquely fasten with long screws. And you can make, as in this case, cut a groove from each end of the beam and simply insert it, as shown in the picture.
- Next, install the railing, there are also different ways, but it is not difficult. You can use the option shown in the step-by-step photos.
- At the end, install additional upper trims, but this is optional if you want the roof to be more durable. To do this, you just need to fill additional rails perpendicular to the transverse beams.


https://i.expert-h.com/en/besedki/pergola-svoimi-rukami-700-foto-poshagovye-instruktsii#sigFreeId1429fa0622
DIY wooden pergola Second option


https://i.expert-h.com/en/besedki/pergola-svoimi-rukami-700-foto-poshagovye-instruktsii#sigFreeId8b2bb48c8a
Third option, pergola pergola with railing and stone floor. Of course, this is a more expensive structure and also time-consuming. But if your house is made in this style, then a similar pergola will look pretty impressive and stylish.


https://i.expert-h.com/en/besedki/pergola-svoimi-rukami-700-foto-poshagovye-instruktsii#sigFreeIdaa66208101
 Do-it-yourself pergola made of wood
A design that does not provide you shelter from wind and rain, but brings coolness when it comes to midday heat. In general, the thing is not very practical, then why are pergolas so popular? This unique architectural mix, which is a common feature of Italian Renaissance gardens, often served as awnings for walkways or as grape arbors. Today, this Mediterranean design has become fashionable all over the world, even in areas that would seem a little suitable for such designs.
 In addition, a big plus is that do-it-yourself pergola made of wood to build is not at all difficult, even easier than a regular gazebo. The option presented here has a height of 2.5 meters, all dimensions of details can be seen on submitted drawingbut you can easily change them according to your requests. Below, the step-by-step photos show how to make a pergola from a tree with your own hands, and if something is not clear, detailed instructions can be read on the website, the link to which is under the gallery.


https://i.expert-h.com/en/besedki/pergola-svoimi-rukami-700-foto-poshagovye-instruktsii#sigFreeId62a6168b64
Pergola in the country with your own hands
 The pergola presented here is quite large, with support on 8 pillars. The truth in this example is the construction do-it-yourself pergolas based on the old arbor, so the installation process of the pillars is not shown. The author was lucky that all the supports were in good condition and could be reused. That is, it was necessary to make a roof for the pergola with your own hands.
In this case, the horizontal beams installed in grooves, in principle, this is the most reliable way, so you can fix it even without nails, but to be stronger, it is recommended to nail or screw it all the same. Presented in the gallery 48 step-by-step photos of the assembly processso everything should be clear if you have questions, a link to the source’s site under the photos.


https://i.expert-h.com/en/besedki/pergola-svoimi-rukami-700-foto-poshagovye-instruktsii#sigFreeIde2a270bf23
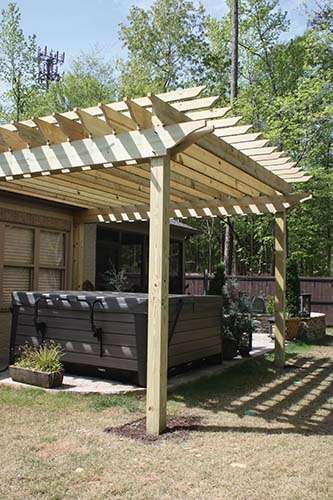
DIY do-it-yourself pergola
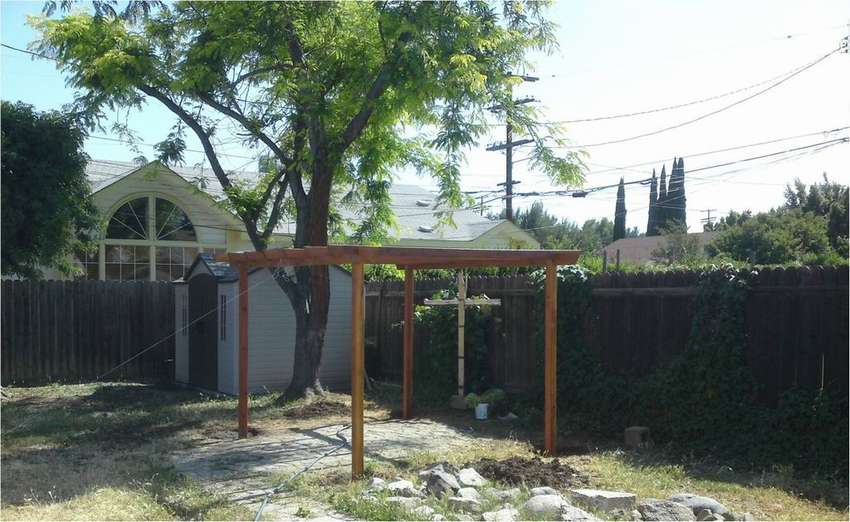
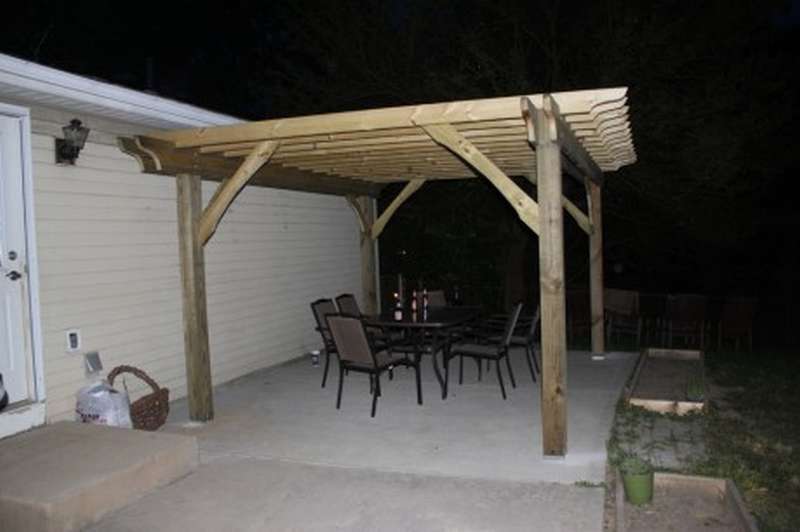 The author of this photo shares his experience, how to make a simple pergola with your own hands in two days at minimal cost. Why so fast and cheap? First of all, this is the simplest design, Secondly, the pergola was installed on a ready-made concrete site. As a rule, a freestanding pergola is built on specific supports deepened below the freezing line. Since the author’s patio was in good shape, with concrete 15 cm thick, and the construction of the pergola without a roof is not heavy, then it installed on metal thrust bearings right on the site. The horizontal load-bearing beams are reinforced with diagonal bars. It is not difficult to do this, just saw off the four bars at an angle of 45 ° and screw with one end to the support post and the other to the horizontal beam. The bars can be made curly to look more beautiful. However, all stages are well shown in step-by-step photos.


https://i.expert-h.com/en/besedki/pergola-svoimi-rukami-700-foto-poshagovye-instruktsii#sigFreeId33c7d4610b
Do-it-yourself pergola made of wood
 Pergola is a special design, so the choice of location is crucial. You can use any type of wood you prefer. It only depends on the possibilities and preferences. This do-it-yourself wooden pergola from the southern pine.
So, let's look at the list of materials that will be needed. It:
- hand saw
- safety glasses
- shovel
- hammer
- hammer drill
- a circular saw
- drill
- roulette
- level
- heels
- bolts with washers
- socket wrench
- Screws
- jigsaw
- ladder or stepladder
- Bars and boards depending on the size of your pergola
Look like that's it.Now you just have to decide on the size and place. The latter is very important in terms of deciding how the poles will be installed, in the ground or on a concrete base. Installation in the ground is preferable, although it is more work, but it is more reliable. Well, then the assembly order, see the step by step photos


https://i.expert-h.com/en/besedki/pergola-svoimi-rukami-700-foto-poshagovye-instruktsii#sigFreeId75d9832290
How to build a pergola
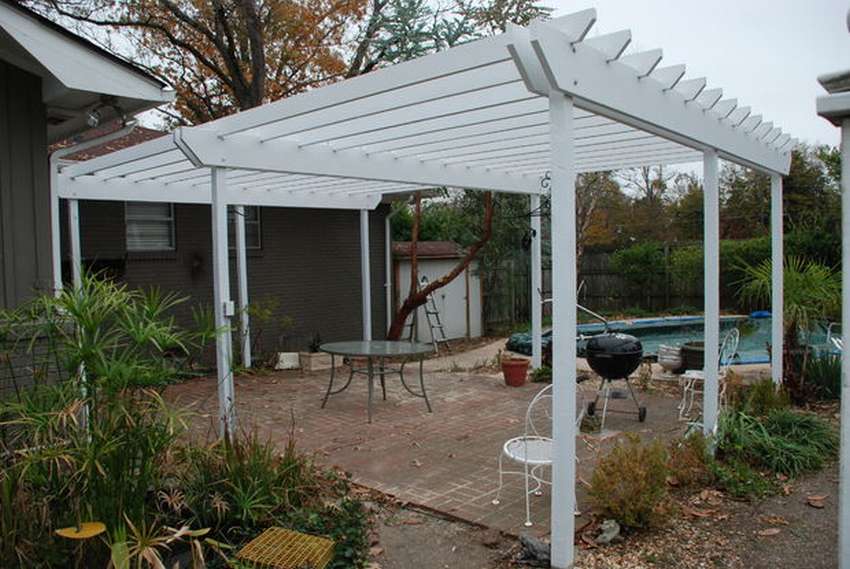
 Pergola will add grace to the style and architectural appearance of your home or garden. There is a wide variety of sizes and styles. This design is 2 m high and 2.5 m wide. If you think how to build a pergola close to home, keep in mind that standard design has protrusionswhich protrude on average 40 - 50 cm. For construction choose a flat areaIf this is not the case, remove the soil and tamp a suitable area. Remember to save the soil for use as a bulking pad. Also, think of a place for a pergola, it is advisable to install it in the shade of trees for protection from the afternoon summer sun. It is a common mistake to think that a pergola gives a good shadow; in fact, a network of beams and rafters gives very little shadow. In this project a pergola will be built at the corners of an existing retaining wall; although the assembly process is the same as without a wall.
- First, mark up and mark the installation sites of the poles with stakes. Then measure the diagonals from corner to corner on both sides and make sure the location is correct.
- For supports with a height of 2.5 m, plan to recess about half a meter in depth, in general it should be a depth of 1/4 of the height of the support, the diameter of the holes is about 30 square meters. see. As a rule, the width should not be less than 25 cm.
- After digging the holes, install the supports. When filling with cement, use a broom handle or shovel to make sure there are no air pockets. If so, you may need to add more concrete to bring the level to the surface.
- When pouring, be careful not to use too much water, this can weaken the concrete. The consistency should be like butter. When the concrete is ready, fill the hole up to 3 cm to the surface. This allows the concrete to expand and contract when weather conditions change. Leave to harden for 48 hours.
- Prepare beam and rafter support. Support beams are attached to racks. You will need two to four beams on each side. Attach the rafters over the support beams. In this project, nine rafters are used for the roof.
- After the concrete hardens, and the beams and rafters are ready, cut off the tops of the supports. Rafters on top, eventually add another 15 cm in height.
- Installation of beams. Take the time and carefully measure the overhang of each rafter to level the entire kit. Install the rafters, securing each in place with two 15-centimeter galvanized screws at each end.
- Fasten each end of the beam to the upper outer surface of each column with two 10-cm screws to temporarily hold them in place. Attach the remaining beams in the same way.
- All that remains is to install the rafters and finally fix the beams in place with the help of bolts. Lay the rafters on the tops of the beams with an interval of 30 cm.
- After alignment, you can fix the beams to the uprights with 10 cm galvanized bolts. Drill holes in the upper and lower guide rails. Using a hammer, push the bolts through the beam and post and tighten the nuts.


https://i.expert-h.com/en/besedki/pergola-svoimi-rukami-700-foto-poshagovye-instruktsii#sigFreeIdcbc23c9070
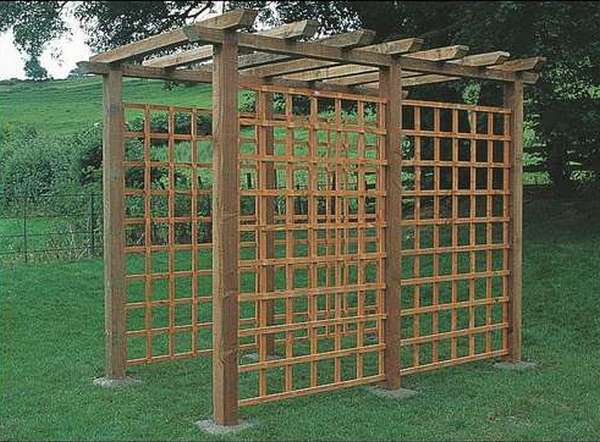
DIY Pergola for plants
 The lightweight pergola design provides an opportunity for growing vines and other plants that need support. In principle, in the Mediterranean countries this is its main purpose. Hops, wisteria, ivy or grapes will not only make the pergola more attractive, but will also give more shade and privacy. If you decide to use the design for vertical gardening, then the main task in the construction do-it-yourself pergolas for plantsit’s the right place to choose. Otherwise, the manufacturing procedure has already been described above, the construction of this pergola is fundamentally no different, and step-by-step photos in the gallery will help you.


https://i.expert-h.com/en/besedki/pergola-svoimi-rukami-700-foto-poshagovye-instruktsii#sigFreeId14b200d582
Pergola with a do-it-yourself swing
 This, of course, is not quite a pergola in the classical sense, but the author called the article “pergola with a swing", And it was simply impossible it wasn’t here
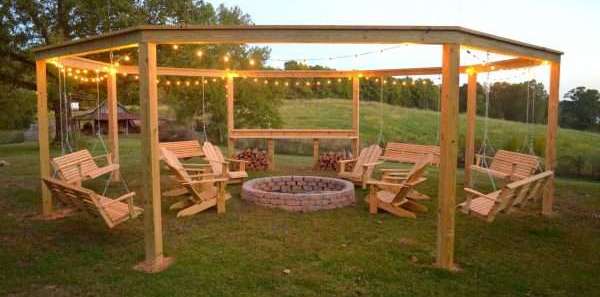
 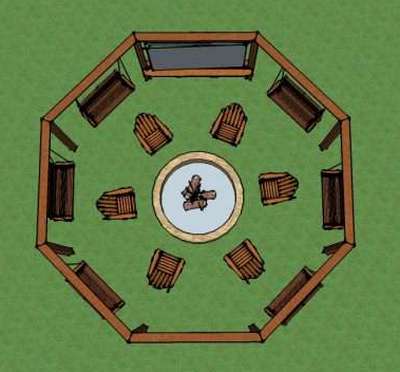 put, it’s a very attractive place to stay. Without a doubt, an open gazebo, we will call it a pergola, with a swing, a place for a campfire and a frame under the screen for a summer cinema looks like a real oasis, a place where you can gather friends and relax with the whole family. True, this project cannot be called cheap, according toIt cost the author about three thousand dollars, but it’s there, in America, it will probably be cheaper here, they even buy nails for dollars there :) The time spent on the construction depends on how much you want to work, and your skill level. If you have at least two helpers who have general carpentry knowledge and can handle ordinary power tools, you can complete this project in a couple of days off. The photographs presented by the author can hardly be called step by step, they are more likely episodic, but if you want to know how to build a large pergola with a do-it-yourself swing for your recreation area, instructions on the site, the link to which is under the gallery, more or less detailed.


https://i.expert-h.com/en/besedki/pergola-svoimi-rukami-700-foto-poshagovye-instruktsii#sigFreeIdfbfa7520b2
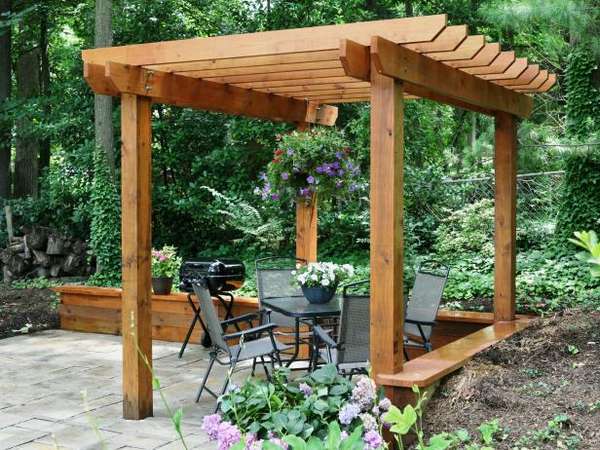
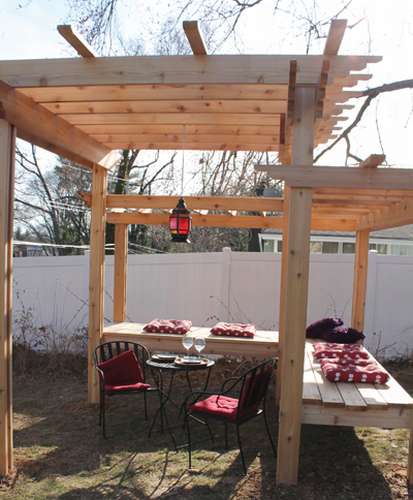
Pergola with a swing
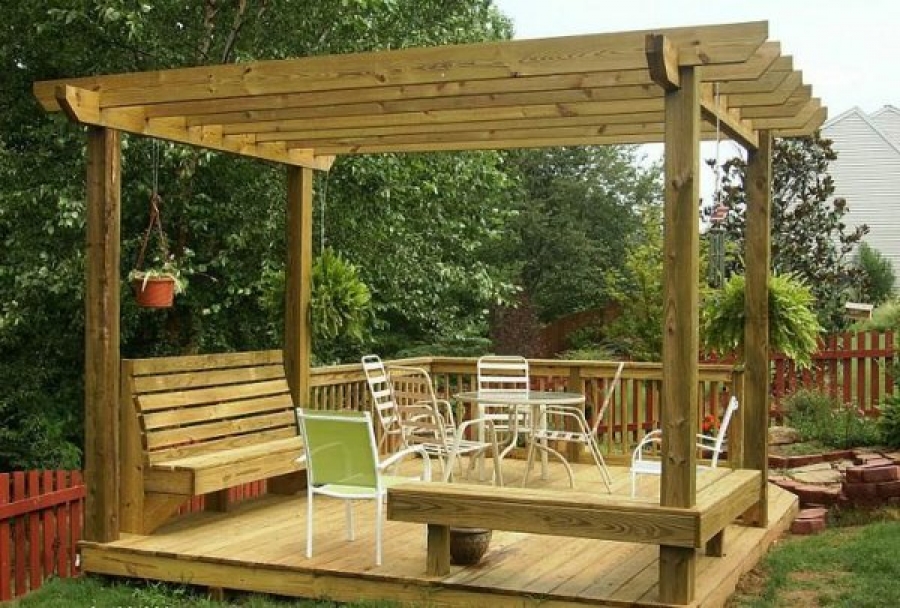
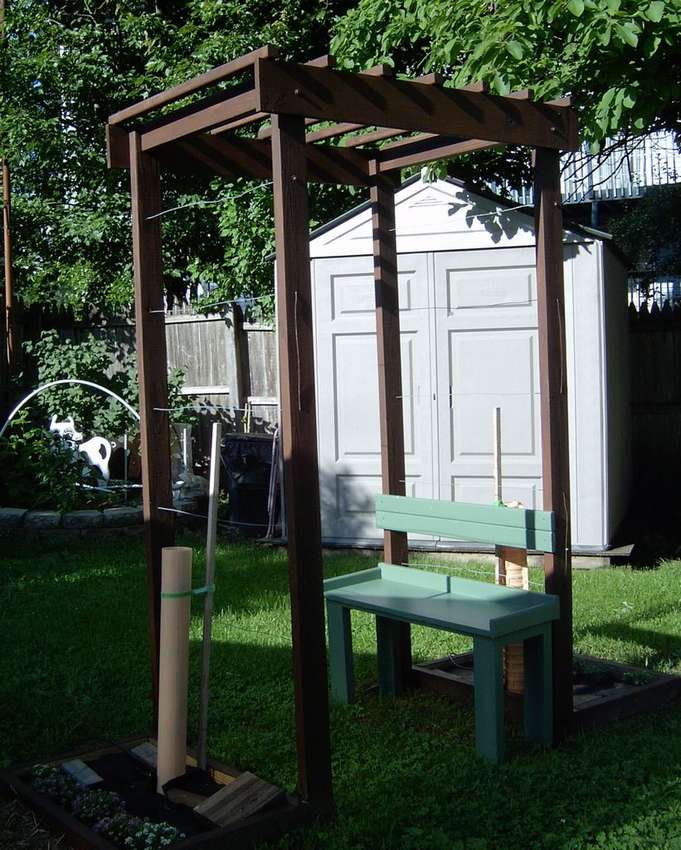
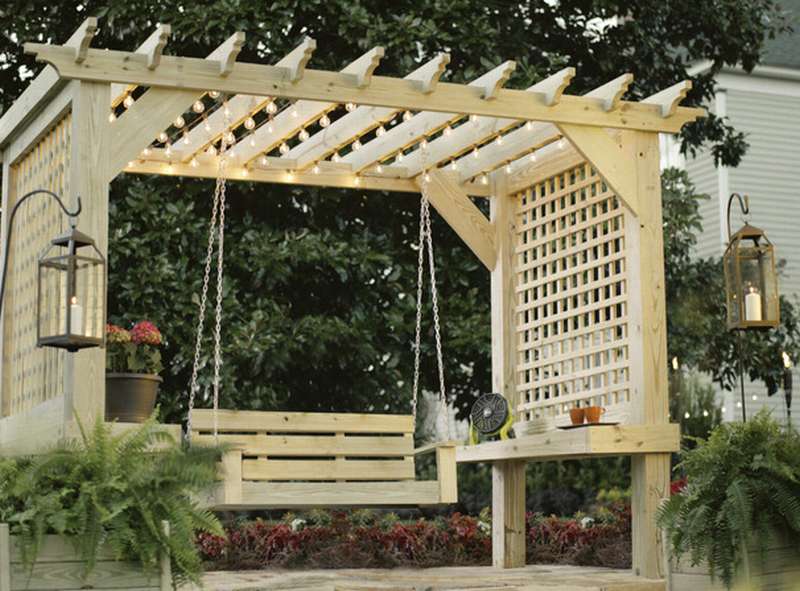 A true classic wooden pergola with everything - built-in shelves, on the sides a modern decorative lattice for shade. Lightweight and openwork design - an ideal place to relax, which is easy to build, and you can do it yourself by carving decorative patterns in the tails of the rafters. In the middle you can put a small bench, or do as in this case, pergola with a swing, at your discretion.
Below are pictures where the diagrams show the assembly order of the pergola. Note, if you cut decorative tails on the rafters, do this in advance, before installing on a pergola.


https://i.expert-h.com/en/besedki/pergola-svoimi-rukami-700-foto-poshagovye-instruktsii#sigFreeIdd1f68af70f
 Making pergolas from wood with your own hands
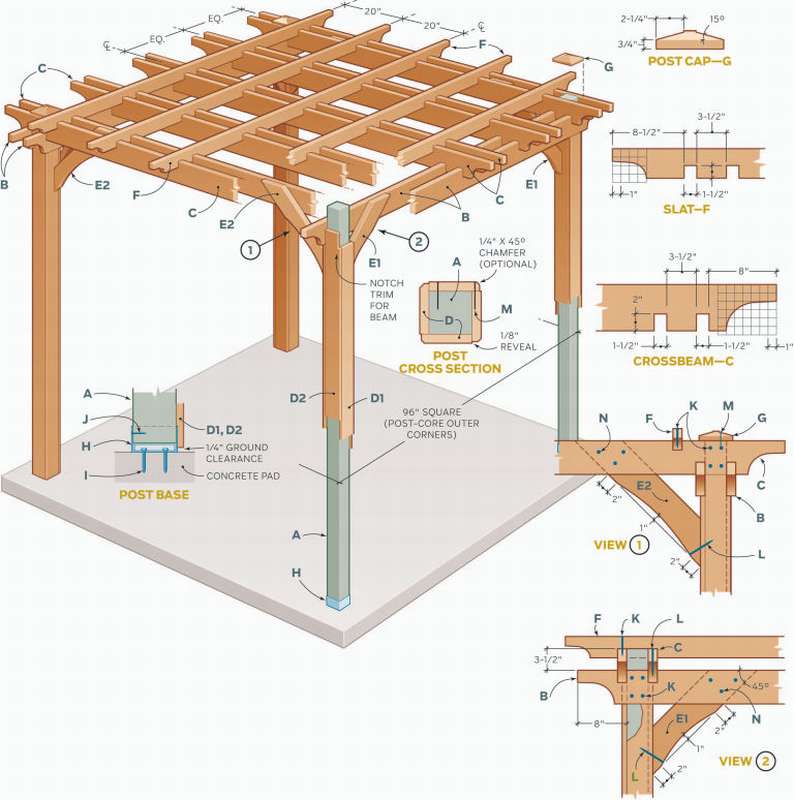
Making do-it-yourself pergola from a nerve is like making beautiful furniture. The finished product demonstrates the craftsmanship and beauty of wood. But, unlike an openwork home table, the pergola is exposed to the sun, rain, wind and snow. Therefore, it is important to build such a structure that can withstand all atmospheric adversities and live a long life. Presented here wooden pergola consists of four pillars supporting canopies of girders and beams. The author has developed parts to ensure stability and durability of the pergola, but so that the design does not turn out to be too complicated or expensive. The canopy consists of three layers, starting from the crossbar node, which are fixed on the tops of the posts.
Circular joints in girders and beams create interconnected frames that not only strengthen the structure, but also make it more attractive. Since the beams and racks are installed at the same level with each other, process the notches and the tops of the posts with sandpaper. This procedure will ennoble compounds and hide minor inconsistencies. Two transverse guides add pergole structural integrity, and through studs give a more decorative look. All the details of making a pergola with your own hands are shown in step-by-step photos and diagrams.


https://i.expert-h.com/en/besedki/pergola-svoimi-rukami-700-foto-poshagovye-instruktsii#sigFreeId0ea443a85a
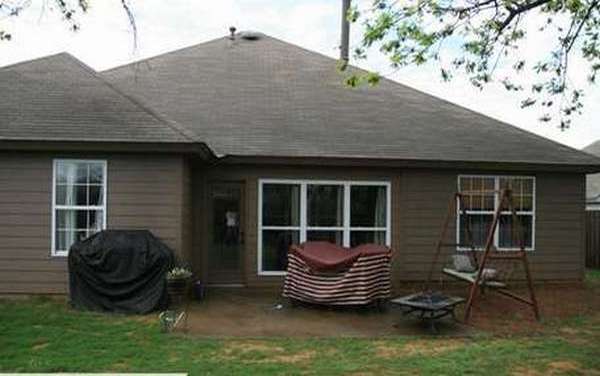
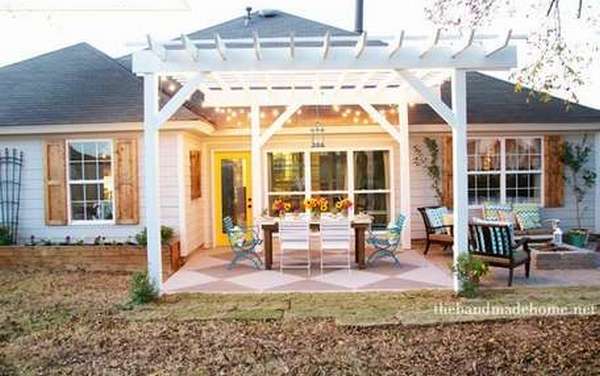
Pergola do it yourself step-by-step photo instruction
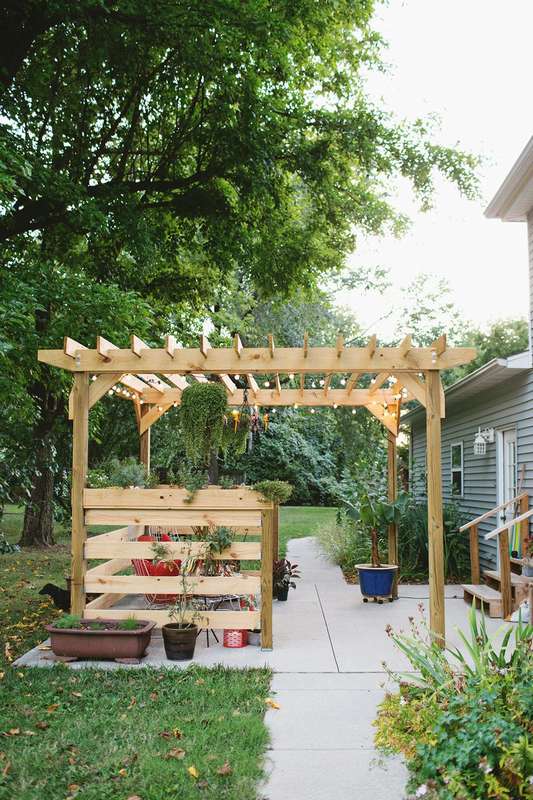 If there is free space in the yard that you would like to decorate somehow, make a pergola do it yourself - perfect solution. If you have a garden and you want a cozy place to relax, then again, the best solution is pergola. Do you agree? So the author of this project came to this conclusion. Perhaps this project may seem complicated, but you can just take it as a basis if you are planning a similar construction in your country house or in the yard. The author needed to implement his idea just two daysTrue, not without the help of friends. In any case, you will need helpers for installation, and the presence of an additional pair of eyes will never hurt, at least to minimize possible stupid errors.
The detailed step-by-step instruction is quite voluminous, so I won’t post it here, under the gallery there is a link to the site where you can read the description of each step. As you can see, the author decided to make his pergola more comfortable and provided outdoor lights around the perimeter, as well as flower boxes. True used them for herbs - planting tarragon, thyme, mint and basil. If you liked this idea, step-by-step photos also show how to make wooden boxes for plants. In general, you can read all the nuances on the site, there is a whole work of art.


https://i.expert-h.com/en/besedki/pergola-svoimi-rukami-700-foto-poshagovye-instruktsii#sigFreeId962c503ee1
 DIY Pergola for grapes
This small DIY grape pergola the author built near his house, it turned out such a cozy place for relaxation. The design is small, there should not be any special problems with the manufacture. Tool list:
- hammer,
- cordless drill
- level clamps
- tassels
- shovel.
Material List:
- galvanized screws with washers of different sizes
- stainless washers for fastening wires
- galvanized wire
- 2 bags of gravel
- 2 bags of cement
- lumber of the sizes you need (4 beams, 2 boards, rails on the crossbars)
- primer
- paint
How to make do-it-yourself pergola for grapes and even a small bench, shown in step-by-step photos. Detailed step-by-step instructions are on the site, but this is not such a complex project, so it can be used simply as an idea.


https://i.expert-h.com/en/besedki/pergola-svoimi-rukami-700-foto-poshagovye-instruktsii#sigFreeId67007f9655
 Pergola do-it-yourself arch
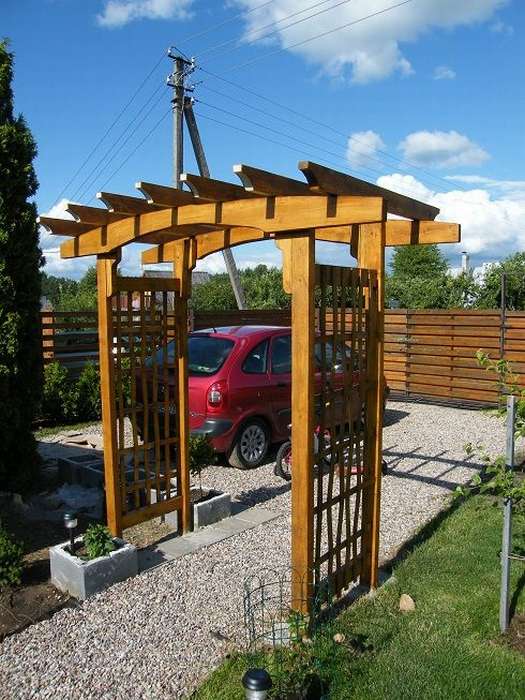
The arch above the track is a classic and it’s shown here how to make a pergola arch do it yourself. To build such a construction is quite easy, however, the author did not provide detailed instructions. You may have questions: what sizes of beams are needed, how to install poles, etc. This is not a problem; do not let these small details stop you. The construction of the arch is not much weaned from the manufacture of an ordinary pergola with your own handsdrawings and step-by-step photos of which are presented above. Just take your time, make a plan, a good design may be spoiled by improper installation, so carefully check the measurements before starting work. When installing the supports, mark the place of the first two supports with wooden pegs, check with a square and tape measure. Then mark the position of the other two pillars. After all four points are set, check all basic measurements, including the diagonals, to make sure everything is set correctly. Although there is no instruction, the step-by-step photo shows the manufacturing process very well, you definitely will not need an engineering degree to figure it out. A a design example is just an example in which you can easily change elements to suit your own unique preferences and situation. Simple or complex, large or small, build as you like!


https://i.expert-h.com/en/besedki/pergola-svoimi-rukami-700-foto-poshagovye-instruktsii#sigFreeId3ca3e0956b
How to build a do-it-yourself pergola
 Pergolas are a popular addition to a country house or a summer cottage, as they add the style and character of the outdoor area. They can vary in size and design, depending on the landscape, and serve as a good shelter from the hot sun in places where people like to relax and have fun. One of the types of summer designs - pergola, is a good solution for decorating the patio and softening the heat of the scorching sun. Pergolas are usually built with four supporting posts connected from above by rafters and decorative cross-beams. As a rule, these are rather simple constructions in design, but you should take into account some basic methods in time to get a strong and reliable design.
Message support
- In order to adequately invest in the overhead costs of lumber, as well as to provide sufficient strength, it is best to use support columns 6 × 6. For a very small structure with a distance between racks of 1.5 m, supports 4 × 4 are suitable. Nevertheless, for a normal large pergola a 6 × 6 margin will not be superfluous, and such a design looks much more solid. To integrate the pergola into the existing landscape, they are usually built in the shape of a square and close to the house or the nearest structure.
- First, align the holes to the depth specified by local building codes to go deep under the freezing ground in your area. Compact the soil at the bottom of the holes, add gravel for drainage, then fix the bottom with concrete, while the racks should be perfectly aligned. Check your measurements two or three times.
- The supporting posts must be 6 × 6 treated wood, designed for contact with the ground. Installing them is work for two. It is necessary to install together, because it is necessary to level and fasten the lower part at the same time with side boards that hold the pin when the concrete dries. The boards are nailed to two adjacent sides of the rack and corner down to the ground to strengthen the posts. After leveling, drive the stakes to the bottom of the bracket. Repeat this process for all four posts.
The pergola shown in this article was built for a specific patio, and one of the pillars served as a support for the patio and was attached to the wall of the house.
The key to pergola design is its visual proportion. Beams and cross-elements should be large, otherwise the upper part of the structure will look small and unfinished. The allowable range based on the size of the pergola must also be considered. For example, a 3-meter span is too long for a 2 × 6 board. Not only will it seem fragile visually, but it will sag over time. Most builders use at least 2 × 8 for the upper parts of the frame, and this is for a small arbor.
For this pergola, 2 × 12 beams, 2 × 10 and 2 × 4 rafters were used for a layer of decorative girders mounted on rafters.
Typical for the construction of a pergola is the presence of tails on all horizontal boards sawn with a decorative pattern. The tails give the pergola an elegant design and can be cut into a curved curved profile or an angular geometric design - or something in between. The longest edge of the boards is always on top, but it is entirely up to you. Experiment with the design on a paper template, it is easier to imagine the future design.
After making a decision, cut out the first line and use it as a template to mark the rest.
- Cut the pattern using a combination of a hand saw and a circular saw. As the first beam is ready, usethose her as a template to make tails on all beams. Do the same for rafters and runs. Beams, rafters and girders may have different tail designs, but each type of board should correspond.
- The next step is installing the beams. Double beams are attached to the top of the pergola and connect the side posts.
- It is necessary to install together, two ladders will also be required. After aligning the beam at the desired height on the support posts, make sure that it is completely level. Fasten it temporarily with nails until you make a proper connection to the latch. Attach the appropriate beam to the opposite side of the two posts. Repeat for the opposite side of the pergola.
Then fix it completely by drilling two through holes through the uprights and double beams. - When setting the height of the beams, given that they will be the lowest horizontal structural elements, so do not forget to leave a sufficient margin below. Rafters and girders will be fixed at the top, and the entire structure should be designed in such a way that it fits any neighboring structure, in this case, the roof. Secure each corner assembly with two 1/2 "¾ bolts, washers, and nuts.
- When all the beams are secured, drill two 1/2-inch through holes through the beams and uprights in each joint and secure each corner assembly with two bolts. Two pairs of beams will support the weight of the rafters and pergola runs.
- Usually the rafters are slightly smaller than the beams, and are installed vertically, crossing the beams at an angle of 90 degrees and hanging on each side with the decorative tails of the rafters.
- The distance between the rafters vary depending on the size of the pergola. The most important rule in intervals is the equal distance between all rafters. First, install the front and rear rafters, attaching them to the support posts above the beam.
- Install all the other rafters, placing them evenly between the front and rear, and then attach them to the beams, scoring two nails in each joint.
The last layer of lumber in this design runs 2 × 4, which are installed vertically above the rafters at an angle of 90 degrees, essentially forming a grid. Please note that the girder layer is an additional decorative part that is best suited for large pergolas.
Painting and wood processing is a good way to add a color cast, as well as protect the tree from moisture and insects. Cedar and mahogany contain natural preservative oils that help protect against insects and rot, but processed wood is much cheaper.
Treatment with water-soluble preservatives leaves moisture in the tree. For best results, let the wood dry for 2-4 weeks before processing. Despite the simple design, building a pergola requires minimal experience, reliable tools and competent decisions at the planning stage. Take the time to carefully plan each aspect of the project, especially taking specific notes on how to attach a pergola to an existing structure, if that is what is required in your project.


https://i.expert-h.com/en/besedki/pergola-svoimi-rukami-700-foto-poshagovye-instruktsii#sigFreeId259a3c6f7f
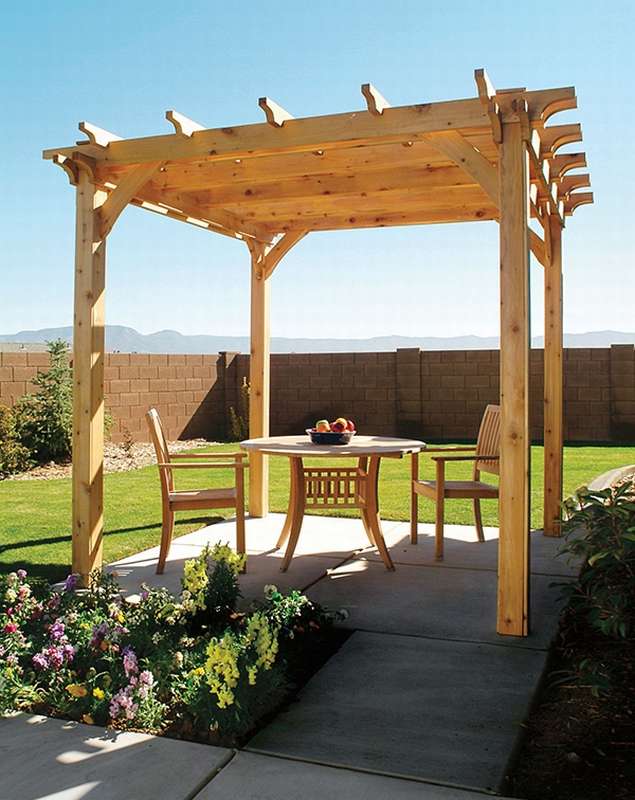
Pergola Design and Construction
 Do you like pergolas? To the authors of this project, Marcus and Teresa Clement too. The proposed version of the original design may be of interest to you. It all starts with design. The essence of this simple structure of poles, beams, rafters and girders is that the appearance of the design possibilities is almost unlimited. But you still need to do it “right”, otherwise it will turn out something not quite right, an arbor that no one uses, or a colossus that obscures the door to the backyard.
Start with questions. How will pergola be used most of the time? How many people are supposed to fit there? Do you plan to cook something there, or will it just be a place for communication? Or both? You can make a cozy place, say, near a stream. Or, as in this case, the pergola will serve as part of the design of the patio, located near the house.
The height will depend on the width and depth of the pergola. Location in the yard affects the size of the materials. If you are dealing with rough terrain, this is a different story. In general, you need a middle ground, a balance of the height, width and depth of the pergola with each other and the materials that you choose for construction.
Typically, the bottom of the beam is a reference point for height composing. Anything below two meters (the height of a typical doorway) will make people feel that they need to tilt their heads to enter. It sounds strange, but it's true. The best height to the bottom of the beam is approximately 2.80 m, which makes the space comfortable and cozy, but at the same time grand and soaring. You can also add a second, lower level, so that there is a place for sitting, which can also serve as a table for plates, dishes, cups and food.
Which is better to choose a tree for pergola? In this case, the authors used red cedar. It is great for this design, easy to maintain and has a unique texture and patterns. Of course, there is no strict rule when choosing material for building a pergola, so it's up to you to decide what to use. Dimensions are also a matter of taste, for example 3.5 meters - a too long gap - both for boards and for the eyes.
Poles and crossbeams
- Before moving the template to dig holes under the posts, make marks on the ground. For the template, the authors used a frame, which is not just simpler, it is much simpler. Just make a box with the external dimensions of the placements. In other words, poles are placed inside the box. All pergola sizes are where the rafters end, but you build the box where the posts go.
- Deep meter holes create a lot of dirt to protect the grass, you can useUse a tarp.
- Install a jumper (diagonals + crossbar look like A). The crosspiece makes it easier for you to move the box. Adjust the position of the template as accurately as possible, making sure that it is parallel to any object within 3 meters or so, such as a fence or porch. Mark the locations for each rack carefully.
- Digging is perhaps the least fun activity in any project. Depth should be about 70 cm. Even in warm climates, it is not recommended to install less than 60 cm so that the ground holds the supports in place.
- Next we install the posts. You can saw them in place, you can measure the template to the desired height, and then saw to the required length on the ground. To adjust the height, add gravel to the pit to raise the pole. Each message requires two diagonal braces. Something around 1.5 m.
- Fill the pillars with concrete.
Beams, rafters
- Use a template to outline the appearance of the rafter's tail, and then transfer it to the rest. The decorative details of the rafters will give your pergola a special look.
- Saw off one beam and screw it to the layout, in the future you can use it as a template.
- The bar clamps are well suited for securing the beam in place. The same with the rafters.
- There you have to cut a lot. Then mark the sides of all parts, so as not to figure out where the top is where the bottom is during installation for a long time.
- Lastly, runs are installed, fixed perpendicular to the rafters, they fix everything in its place, adding shadow lines and depth to the structure.
Grass is ideal for the floor of the gazebo. It is cool and comfortable. You can just as easily build the platform or add later. In any case, both approaches are combined.
In the last photo, the finished pergola with all its parts from scratch. The combination of pillars, beams, rafters and girders can be changed for almost limitless design options.


https://i.expert-h.com/en/besedki/pergola-svoimi-rukami-700-foto-poshagovye-instruktsii#sigFreeIdb9a46a0f14
Authors Mark and Teresa Clement
Pergola from branches and poles
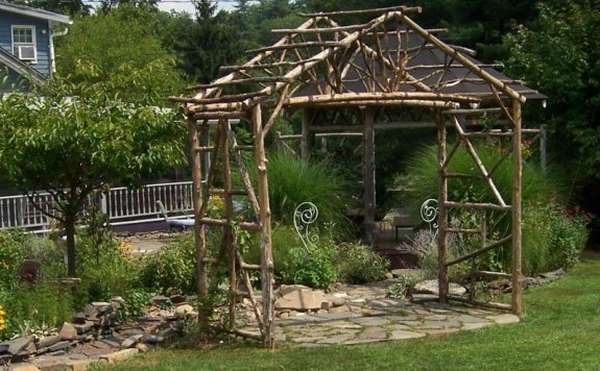 Pole designs have always been popular. The main thing, do-it-yourself wooden pergola from the poles is quite easy to build. There are no specific rules that must be observed during construction; it all depends on your imagination. The idea of a wooden pergola for landscaping in combination with a wicker fence made of twigs can create a unique style for your site. All you need to build original wooden pergola do it yourself, this:
- thick solid wood poles (about 70 cm long)
- short straight poles and decorative branches.
From tools: hammer, delimbers, pruners, nails and wire.
- Step 1: Prepare the poles. You can use both dried poles and fresh wood. If the tree is dry, pre-drill holes for nails. The author used willow branches, you can choose other types of solid wood that grow in your area.
- Step 2: We make two rectangular side panels. X-shape will make the design more reliable and safe.
- Step 3: Add some decor. Use decorative branches to create an attractive pattern on the sidebar. In the photo, the author made a series of Gothic arches, fixed them with nails and cut off the excess with secateurs.
- Step 4: To create a triangular pediment for the top of the pergola, stitch together thick branches. Make two such triangular pediments.
- Step 5: Make the pediments decorative too, add some beautiful twigs around
- Step 6: Assemble the pergola, fasten the side panels with nails and install the pediments
- Step 7: Add slats to the middle of the top of the structure.
- Step 8: Install the angle bracket in the front and back
Tip: to extend the life of the pergola, make a mixture of 2 parts linseed oil and one part turpentine. Using a spray gun, treat the structure with this mixture. Remember to clean the spray tip when done.


https://i.expert-h.com/en/besedki/pergola-svoimi-rukami-700-foto-poshagovye-instruktsii#sigFreeId8c64462f17
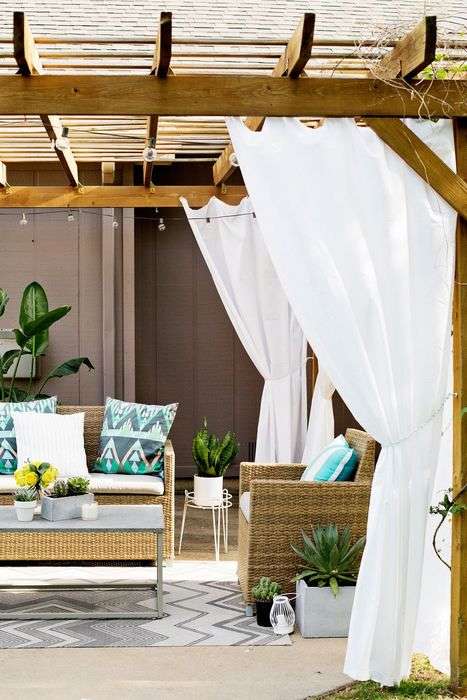 Pergola curtains
How to build a do-it-yourself pergola we have sorted it out, but we would still have to bring a little comfort, to create a special atmosphere for relaxation. Design, high-quality materials and reliable construction are all well and good, but without the pergola decorative elements, these are just poles and crossbars to create a comfortable environment, the easiest option to sew pergola curtains. Can I sew them with my own hands? Sure you may. For this you will need:
- white fabric (author used 18 m)
- eyelets set 40 pcs
- scissors
- hooks 8 pcs
- chain
- wire
Which fabrics you want to use is up to you. Some can be very expensive, so the author preferred the usual waterproof impregnated cotton fabric. In principle, you can take a regular sheet, it depends on what sizes you need and what weather conditions in the area where you live. It may not be necessary to use a good cloth if the wind and rain are your usual weather.
The length of the curtains, of course, depends on the height of the pergola. It is possible that the sides have different heights, this is not visible visually, and when you hang the curtains, it will not look beautiful. Therefore, careful measurements must be made to ensure that everything is consistent. The width must be determined depending on the fabric and the size of the openings between the beams. After measuring out, you can cut eight pieces of hinged panels. Further on the step-by-step photo shows how to make holes and insert metal bushings for curtainsfasten the hooks and hang the chain. Well, perhaps everyone will cope with the task of hanging curtains.


https://i.expert-h.com/en/besedki/pergola-svoimi-rukami-700-foto-poshagovye-instruktsii#sigFreeId672e3cb7f7
DIY metal pergola
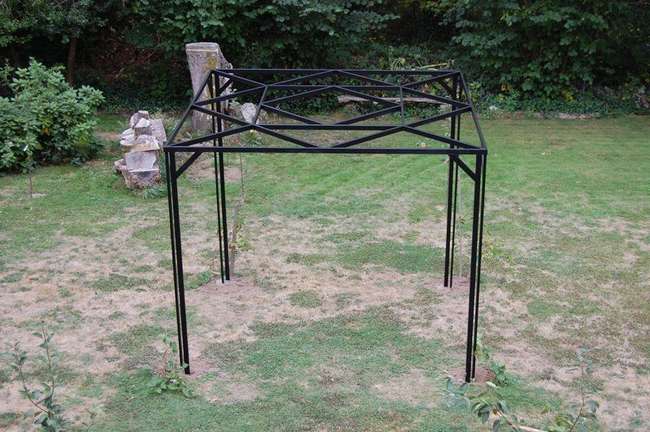 Pergola is a flat design that can simultaneously perform role of arbor and trellis for climbing plants. Of course, she has few practical functions, but it fits perfectly as a decoration of a garden or a plot. Mostly they make wooden pergolas, you have already seen two dozen examples above, but this is not the only material for the manufacture.
Very beautiful, lighter and more airy look pergolas made of metal. In these photos just one of such designs is presented. Author likethin lines run and he has welding, so here he presents his own version of a metal pergola with his own hands. The assembly procedure (or welding), see the step by step photos.


https://i.expert-h.com/en/besedki/pergola-svoimi-rukami-700-foto-poshagovye-instruktsii#sigFreeId27afc8454a
Pergola do-it-yourself drawings


https://i.expert-h.com/en/besedki/pergola-svoimi-rukami-700-foto-poshagovye-instruktsii#sigFreeId41877675ea
DIY Pergola 300 photos


https://i.expert-h.com/en/besedki/pergola-svoimi-rukami-700-foto-poshagovye-instruktsii#sigFreeIdf83eee5d43
DIY wooden pavilions 300 photos, drawings, diagrams
Here you can find a small gallery of DIY wooden arbors. Of course, you can collect more photos, because there are millions of options. Each gazebo, made not according to the template, but by one’s own hands, even according to standard drawings, is still a work of art. Relatively simple constructions are collected here, which can be done by every master who does not have much experience. There are, of course, examples of industrial products, it may come in handy.
Square Arbor Drawings


https://i.expert-h.com/en/besedki/pergola-svoimi-rukami-700-foto-poshagovye-instruktsii#sigFreeId5ada0681b4
Square arbors 150 photos


https://i.expert-h.com/en/besedki/pergola-svoimi-rukami-700-foto-poshagovye-instruktsii#sigFreeId457faad387
Drawings of hexagonal arbors


https://i.expert-h.com/en/besedki/pergola-svoimi-rukami-700-foto-poshagovye-instruktsii#sigFreeId94337e37c5
Do-it-yourself hexagonal gazebo 50 photos


https://i.expert-h.com/en/besedki/pergola-svoimi-rukami-700-foto-poshagovye-instruktsii#sigFreeIdd44ba8b697
Drawings of octagonal arbors


https://i.expert-h.com/en/besedki/pergola-svoimi-rukami-700-foto-poshagovye-instruktsii#sigFreeIdcc2e795133
DIY octagonal gazebo 100 photos


https://i.expert-h.com/en/besedki/pergola-svoimi-rukami-700-foto-poshagovye-instruktsii#sigFreeId5bbbaa169f
Hello, I am the author of this article, so I look forward to asking questions for this article in the comments below, I will answer all !!!
If you have questions on another topic, ask them on our forum, we will answer you
- Two baskets of paper in 5 minutes (Master class)
- How to make a simple and compact table for a milling cutter from plywood
- How to make a soft headboard tile (Instructions + step by step photos)
- Cinder block benches: a convenient bench in 55 minutes
- How to make a bed with a niche: saving space (Master class)