Making a shed of pallets
 Shed of pallets.
What they don’t do from pallets: fences, furniture, houses, tables,
Have you seen the shed from pallets ???? At least someone ???
I think such a building will be just the way to the owner, who thinks it is easier and cheaper to build a woodcutter. Firewood in it will be sheltered from the rain, they will not be filled with snow and at the same time they will be well ventilated. The following are a few simple and functional options. sheds from pallets.
DIY barn from pallets
Wooden pallets are used to deliver goods that range from building materials to groceries. Some of them are recycled, collected and returned for use again, but many are simply thrown away. Pallets can be good source material for projects such as sheds.
 You can build completely pallets shed, or disassembling them, letting the material onto the walls. They will also make an excellent foundation to support a shed with frame walls or walls from the same pallets.
Pallets can be used for a variety of projects, in this case, it is shown how to make a shed from pallets for giving with your own hands. If you have financial difficulties, not everyone has the opportunity to buy a ready-made prefabricated shed, then this idea will certainly help to save a lot. So if there are old pallets, do not rush to burn them or throw them away, this is such material that is easy to repurpose and use for a variety of projects. You just need to be creative. If you were interested in this topic, you probably saw on the Internet how many useful things for a summer residence can be made from wooden pallets. But back to our barn.
The first thing to do is make a plan based on the size of the building you want to build. Based on this, you can calculate the number of pallets that will be needed for building a shed of pallets.
Materials
- Pallets
- Nails, screws, other fasteners
- Hammer drill
- A circular saw,
- Shovel
- Concrete blocks
- Level
- Plywood
- stairs
- roulette
- hinges, handle and door lock
- Generator and Extension Cords
- Well, a few friends, some of the stages of construction alone can not be mastered.
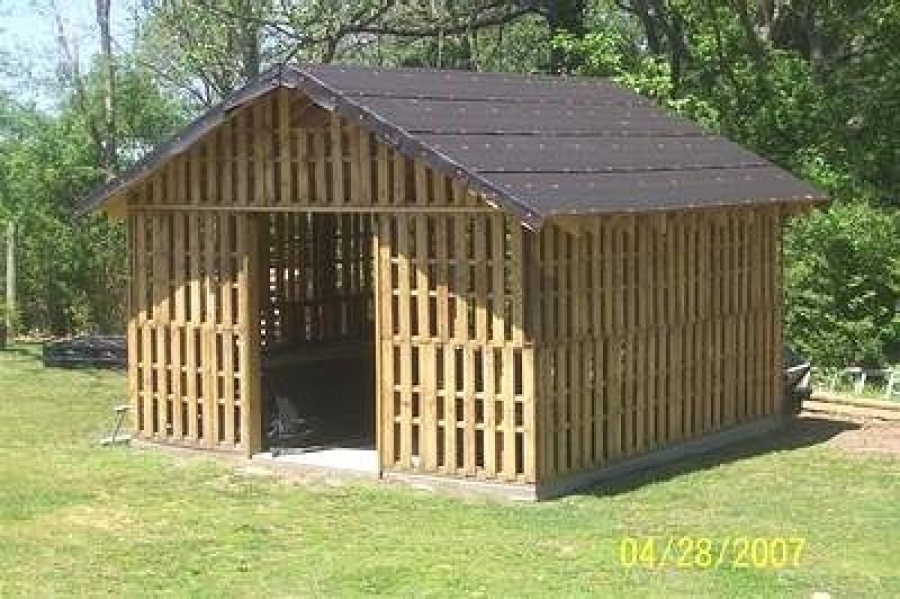
How to build a shed from pallets
- Floor preparation. This is the first step, prepare the site for the barn. It’s hard to find a perfectly flat area, so use concrete blocks for leveling. A floor frame will be installed on them, and the small space between the ground and the floor will help to some extent to prevent damage to the tree from moisture. First set up the outer blocks to make a rectangle. Using a level, make sure that all the vertices of the blocks are at the same height. Then set the rest in the middle and check with a meter level their location in relation to the external units.
- Floor installation.
After leveling the site, begin to install the floor. For the author, it consists of 12 pallets of different sizes, laid on bricks, and then fastened together. After fixing the pallets with plywood, the upper part is attached. - Wall construction
Walls are perhaps the most difficult part of the construction of a shed of pallets. The walls should not have a single weak point, otherwise the whole structure will be unreliable. With a circular saw, cut several pallets in half. Fasten pallets to the floor with screws and nails. When raising walls, make sure they are vertical and even. Dimensions, of course, at your discretion, the author's walls are assembled from 2 pallets, 2.50 m high. - Production and installation of farms.
Raising the walls, make trusses for the roof. The author used 2x6 and 2x8 boards and plywood trimmings. Unfortunately, the dimensions of the roof are not indicated, since it was built "by eye". Just make sure that there is at least 15 cm of protrusion on each side, this will protect the walls from rain. To properly position the farms, find yourself an assistant, yes, and before that it is advisable to fix the door. - Roof and siding
There are different options, the author just used the osb panel, then covered with resin, and then with tiles. It is only advisable not to carry out such work on a hot day. When you finish with the roof sheathe the walls, you can use the same osb. - Completion of external work
Now that the walls and roof are installed, all that remains to be done outside is to build a door, a ramp and paint withshadows. The door is made of a single sheet of osb panel with a frame. Ramp made of plywood and boards. The walls are painted in two layers to protect against weather conditions. On the front and rear of the shed, two ventilation openings were made from pallets so that there were no problems with circulation. The door was eventually painted, as well as the upper triangles of the front and rear of the barn. At this stage, the building is almost finished. - Workbench Installation
Now that the outside is finished, a small work area can be equipped inside. The author built this workbench using pallets and plywood. The heavy part is what is lined with plywood covers for pallets. The rear legs are attached directly to the walls. As you can see, pallets give a lot of space for hanging tools, as well as the ability to attach small shelves. The construction of a shed from pallets is not difficult, but time-consuming, but the final product is worth the time and effort.
A few words from the author of this project.
- I'm not a professional carpenter, maybe I can’t even be considered an amateur
- This was my first barn that I built.
- I know that mistakes were made
- Since the barn is built primarily of pallets, many sizes are not accurate.
- I hope this idea helps people with real skills, and they can build something more solid.


https://i.expert-h.com/en/stroitelstvo/delaem-saraj-iz-poddonov#sigFreeId0f201fccab
Do-it-yourself shed of pallets step by step
 Buying a prefabricated shed is expensive, but there are also cheap options. Good alternative build a barn from pallets with your own hands. The advantage of this option is that it can be easily built over the weekend, and is very cheap compared to prefabricated sheds. You can even get pallets for free. In addition, they are durable, versatile and will last a very long time. In the end, pallets are used to store all kinds of materials and contents, therefore they are very reliable. And in case of damage, they are easy to repair.
In general, the benefits are clear. If you do not know from what end to start building a shed from pallets for a summer residence, this brief instruction will help you. The methods that the author of the project used to build the barn are quite simple. So.
Tools required:
- cordless drill
- a circular saw
- level (the more the better)
- ladder
- 2 pairs of pliers
- roulette
- an oscillating instrument (there is no generally accepted name in the Russian language. One can hear “multitool” in a conversation, and if more officially - a universal vibration machine, which absolutely accurately reflects the essence of the device based on high-frequency oscillations with a small amplitude)
Materials:
- pallets, quantity according to size
- screws, washers of different sizes
- door hardware what do you like
- roof covering
- 1 sheet of chipboard 4x8
- Level the square pad and install the cement blocks. Install the first pallets that will serve as the base and fasten them with screws. Check that the angles are even.
- Then attach the remaining pallets, as in the photo.
- Fasten the rear left corner wall with screws to the bottom using several planks.
- To complete the side walls, add smaller pallets.
- Use 2x4 boards to make a doorway.
- Then install three planks from the front to support the temporary plastic roof and door frame.
- Install the doors and roof.
- Then replace the temporary plastic roof with corrugated sheets. The shed is about 2.5 m high in front and about 1.80 m high in back, so the rainwater stack is normal.
- Install windows.
As you can see build a shed of pallets quite simply, just do not rush, carefully measure everything before fastening the pallets.


https://i.expert-h.com/en/stroitelstvo/delaem-saraj-iz-poddonov#sigFreeId380d3e8a7f
How to build a garden shed
 When building this garden shed of pallets, the author followed two simple rules: First of all, use only used materials, so it’s logical that the first thought was about pallets. The barn door is the door to the old refrigerator. Even nails and connecting brackets were assembled from scrap metal. Secondly, the design must be mobile, that is, so that it can be easily disassembled and assembled.
The main technological idea was that the pallets are knocked down two in each panel, and all other connections are easily detached. Thus, the entire frame can be easily folded and transported in a truck. Basically, of course, the author wanted to build simple shed of available materials. This is just an example, adapt it according to your needs, there are so many possibilities.
A little bit about pallets. They must be uniform in size. You will need at least sixteen pieces. If the pallets are old, you should take care of spare parts, so a couple of stocks come in handy. In addition, if you want to use pallets for floor or roof, you need to carry out additional calculations.
Step 1: Make sections
The basis of the future design is sections of 2 pallets interconnected by nails or screws. This is very convenient, since the sections are small enough to be loaded into the car body, and light enough so that two people can easily carry them, but at the same time this is already a small part of the design.
Pallets are not square, but rectangular. Lay them on the ground so that the open side faces up and rotate so that they stand the same. Fasten with nails or screws. The connection should be rigid, but the entire section is not yet stable. Later, when the whole structure is assembled, it will take on a more solid form.
Step 2: Dimensions and Design
- Having made the section, take the dimensions. When you know the size of a section, you can determine its location. In this case, some sections are laid on their side, and others on top. So that the wall can be taller, but with a smaller size.
- With the assistant, substitute the section up and then on the side to have an idea of what the wall will be in height and height.
- Now you know the size. Two sections form a wall, four walls the entire structure of the barn. Of course, you can add more sections, it depends on what size shed you want to build.
- By setting the dimensions of the sections and walls, you know how many panels you need to make. Make them exactly the same.
Step 3: Assemble a barn wall
- In this case, the wall is formed by two sections.
- This step must be done locally. The wall is heavy and bulky, so it will take several people to install it in place.
- Lay the two sections on the floor next to each other. Again, lay with the open side facing up.
- Now you need to make a solid wall, so the spacers should be through.
- Then connect the gaskets to create long support bars.
- Dismantle a few extra pallets to make gaskets.
- Slide the gaskets up the section and install next to the outer and center gaskets, which are the base. Knock down two sections with nails. One frame is ready.
- In the same way, make three more frames.
Step 4: Four walls
- The two sections joined together are quite heavy, so ask someone to help hold them while you fasten them to the other sections.
- Install the first wall. Ask assistants to lift the upper ridge from the ground while the lower ridge remains in place. One person must hold it, and everyone else raises the second wall.
- Install the second wall. When you form the box, the walls should be at right angles. Use tape to temporarily hold two walls together.
- Repeat for the third and fourth walls. Remember that you must be outside the box when you fasten the last wall, otherwise you will have to wait until you cut out the door :)
- It should already be a stable design. Pay attention to weaknesses that can be slightly strengthened, as well as to the fact that the walls are at right angles.
Step 5: Tie the corners to the good
Step 6: Doors and windows
Size depends on available materials. For example, in this case, the door of the barn is made of the door of the refrigerator. Narrow, but reliable and many shelves. Windows, as it turns out, just remove a couple of pieces from the pallet and the opening is ready.
Step 7: Floors and roof
You can use simply connected sections if the shed of pallets will be in a dry place, but it is better, of course, to make a frame and install it on cinder blocks. The roof can also be made of sections. If you want the roof of the barn to be inclined, just make the back wall a little higher. For the roof it is certainly better to buy roofing material, but if you basically do not want to spend money, you can come up with anything, it just takes more time to search and experiment.
Step 8: Sheathing
You can use a plate or plywood.
So, you can build a shed from pallets with your own hands at no cost - both for the economy it is convenient and for the environment.


https://i.expert-h.com/en/stroitelstvo/delaem-saraj-iz-poddonov#sigFreeId10bbf9de84
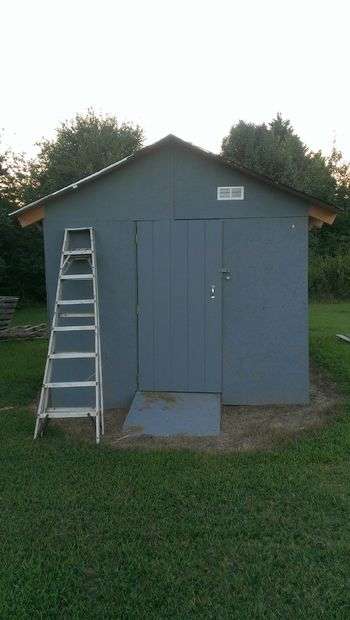
Wooden shed made of pallets
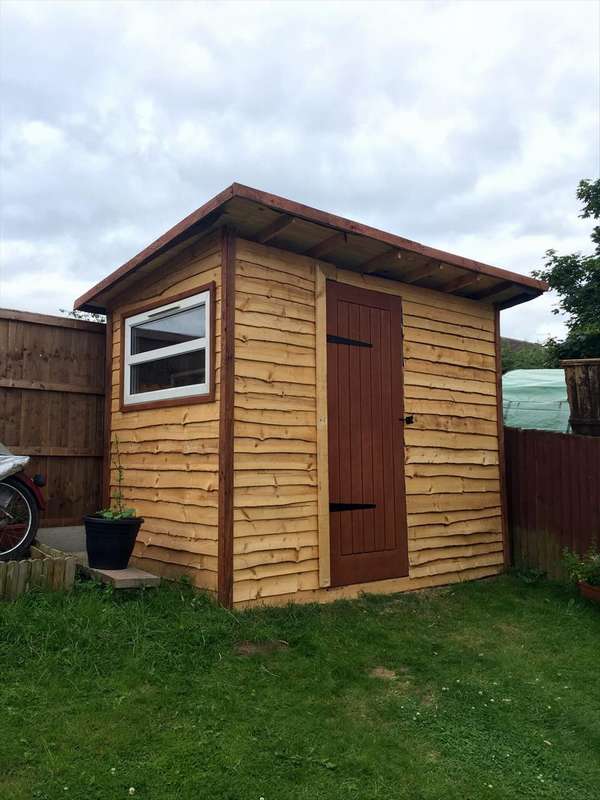
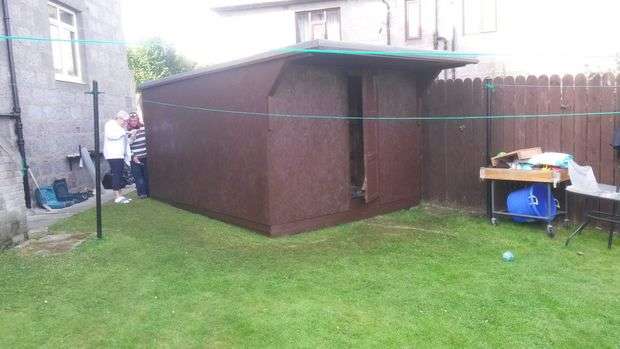
 This small barn 2.5 x 1.8 m made not entirely from pallets, rather using pallets, but it looks beautiful and is great for any summer cottage, very functional and durable. Pallets were used in this case. to create the foundationthat is, a concrete platform is poured and shot down sections of pallets are installed on it. In principle, it is possible not to fill with concrete, but simply install several cinder blocks. Then, on this basis, a timber frame is built and sheathed with boards. Detailed descriptions of typical sheds are herewhere many different options are presented.


https://i.expert-h.com/en/stroitelstvo/delaem-saraj-iz-poddonov#sigFreeId4c74638f23
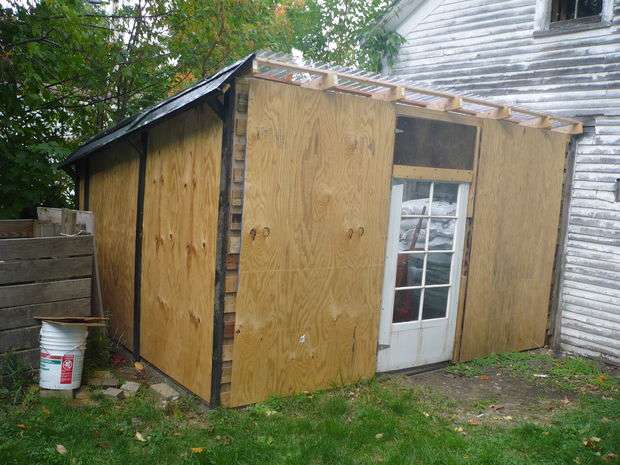
How to build a shed from pallets
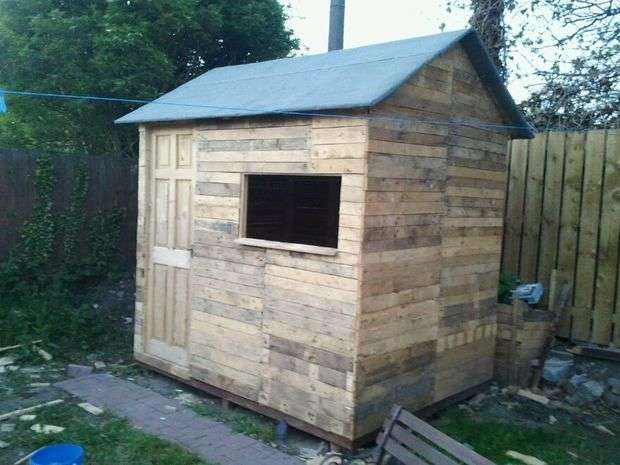
 A beautiful shed, isn't it? It is hard to immediately guess that it is built from ordinary pallets. The author needed a new barn to replace the old one, but of the same size 3 by 4.5 m, height 3.5 m. Buying something like that would cost a decent amount, which is why the idea of using old pallets was born. If you also don’t want to spend extra money, read how to build a shed from pallets, someone else’s experience never hurts. Just keep in mind that there are many ways, this is just one option. Pallets, a universal thing, so there is enough room for creativity.
- First you must collect enough pallets.
- First, make a frame that will be installed on concrete blocks, which will also serve as the basis for the floor.
- Then build the first wall by bolting the pallets. The author made the walls 3 m long, but this is determined by the size of the pallets that you use. Note. If you use pallets with a constant size, then get rid of excess headache. The larger the square, the better.
- Then attach the wall of the pallet to the frame. Repeat this process for other walls. This is not easy, because the walls are heavy and need to be lifted over the first wall.
- Put the top layer on the bottom using the carriage bolts and the board.
- Make the roof frame using boards rotated on the sides and secured by roof brackets. Then set the wide bar over the top to form a mesh. The roof has a pitch of 60 cm in front so that water can drain from the back. You can do higher, but then it will be harder to fix metal sheets.
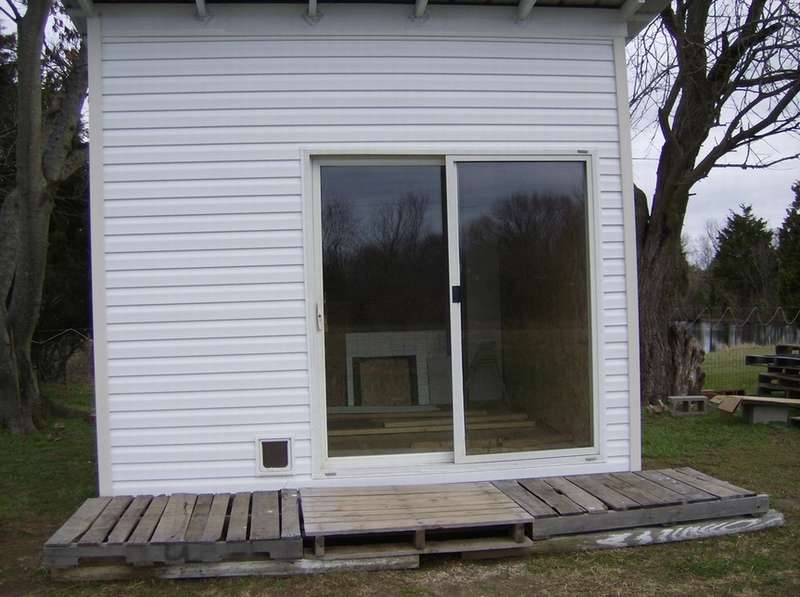
- At the expense of the door. The author decided to install a glass, insulated, double sliding door. Conveniently, the window does not need to be inserted, but this, of course, is possible. Although it looks, of course, cool.
- Fasten the sheet metal roof using screws and special washers with gasket.
- Install floor pallets. Of course, this detail is not necessary, but if you want to lay the boards on the floor so that it is dry inside, it is better to do it as an author.
- The next step has many options. Exterior walls can be anything from wooden siding to sheet metal. The author wanted the barn to fit the house, so he bought vinyl siding (the cheapest option).But for siding, sheathing is needed, so the author used thin sheets of OSB.
- Then attach the siding to osb.
- Install the thermal insulation of the walls and insulate the floor, if desired, of course. You can also sheathe the walls from the inside and lay linoleum. And also make a small terrace of pallets, as shown in the photo.


https://i.expert-h.com/en/stroitelstvo/delaem-saraj-iz-poddonov#sigFreeIdf689d3a781
Shed in the country of pallets
 A garden shed is an urgent need for every gardener, because it is not an option to store tools and equipment in the open air or to constantly carry them out of the house. You can hire builders, and build a gorgeous vault or do it yourself, as presented here pallets shed. This is a great material for such designs, it is easy to modify - it will be much easier for you to add useful objects such as windows and shelving, and since they are easier to adapt, they are also suitable for wider use. In this design, almost everything is made of disassembled pallets - wooden poles, planks, floor and roof frames.
How to make a garden shed from pallets
- Level the ground first to make it level and solid. Concrete tiles will be the foundation, so they must be adjusted so that a smooth surface is obtained.
- Install a wooden floor on the most balanced base to provide a solid foundation. This is the first and most important step in the construction of the barn and must be performed exactly!
- Lift the wall around the base of the floor so that you can fix the beams to which the walls will be attached.
- Install lattice wooden frames for walls, additionally reinforcing them with cross-shaped supports and brackets for greater stability!
- Make openings for windows.
- Do not forget to provide a tilt angle for the roof.
- Finally, sheathe wall frames with boards from disassembled pallets.
- First cover the roof frame with felt, and then cover with roofing felt.
- Install the finished structure on the frame.


https://i.expert-h.com/en/stroitelstvo/delaem-saraj-iz-poddonov#sigFreeId8fe0469a1c
How to build a do-it-yourself pallets shed
 Building a typical wooden shed is not an easy task, it requires at least basic knowledge and certain skills. But the task is greatly simplified if you want build a shed of pallets, although you still need to be able to use a hammer and a hand saw. So, instead of throwing away wooden pallets, you can remake them into something useful, and a barn is just one option. In addition, you will still benefit the environment - less trash, less felled trees. Not to mention the fact that by building a fairly simple structure, you will improve your skills as a novice master.
You can read step-by-step instructions on how to make this beautiful barn from pallets on the site, and visually see on these step-by-step photos.


https://i.expert-h.com/en/stroitelstvo/delaem-saraj-iz-poddonov#sigFreeIdbefecac6f7
Here is another option, though not completely completed.


https://i.expert-h.com/en/stroitelstvo/delaem-saraj-iz-poddonov#sigFreeId2fed0d917d
Is it possible summer barn, from disassembled pallets.


https://i.expert-h.com/en/stroitelstvo/delaem-saraj-iz-poddonov#sigFreeIdc2240bebba
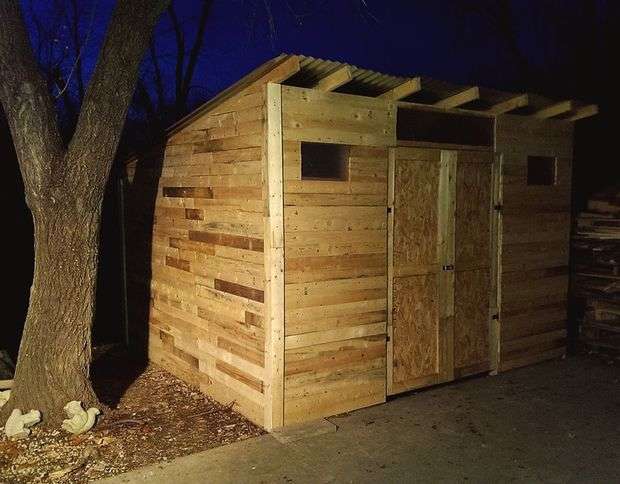
Simple shed of pallets
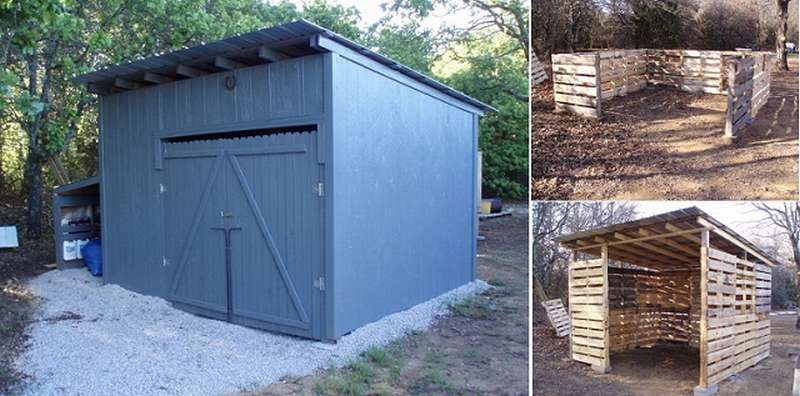
 Indeed, nowhere is easier. To build simple shed of pallets, the author needed only 29 pieces of this universal building material, plus a few sheets of cheap OSB. The walls are stacked in three pallets and trimmed to form a sloping roof. The pallets are held together with flat plates and floor-shaped, the doors are also separated front and rear. The roof is assembled separately from wooden beams and then mounted on the structure. A small canopy was made in front. The whole structure is sheathed with OSB sheets and painted with waterproof paint. The roof is covered with sheets glued to the frame. The author used the old doors left after the repair of the house.


https://i.expert-h.com/en/stroitelstvo/delaem-saraj-iz-poddonov#sigFreeIdda92163469
Summer shed of pallets
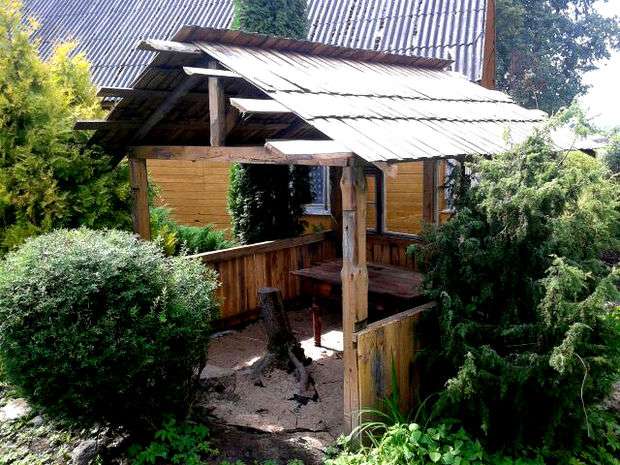 Idea to build summer barn, which you see in the photo came to the author spontaneously, in the original version it should have been just a table and benches in the courtyard of the house. But then the idea came to combine the useful with the pleasant - there were a lot of construction waste left on the site after reconstruction of the old barn. Plus, there were several dozen pallets, metal corners and other unnecessary, but useful things. All this came in handy for the construction of a summer barn, in which you can relax and store things you need on the farm.
The author immediately warns that he is not a professional, he did everything alone.
Step 1: Prepare the site.
Step 2: Support pillars. Usually, beams are installed for this design, but if you have metal corners, you can follow the author’s example, he just poured cement mortar into a bucket, inserted a corner and let it dry. The result was such supports, as in the photo.
Step 3: Structure. If you work with old boards, it will take a lot of time to sort. Pick the right material and cut to size.
Step 4: Install the support posts. Dig holes, add some sand and install concrete blocks. Then carefully attach the vertical beams to the supports and connect with the corners. So tie all the corners until the structure is stable.
Step 5: Roof
Unfortunately, there are no step-by-step photos of installing the roof, but in short in words, the author did this:
- First, sawed off two short rails and mounted them vertically in the middle of two opposite upper horizontal beams.
- Then on each side added 4 diagonal supports.
- After that, he placed 4 long boards horizontally on the diagonal supports and began to install the roof.
- Thin boards were used for the roof itself.
Step 6: Walls. It's simple, cut the required number of boards in size and sheathe the frame from horizontal bars.
Step 7: Make a bench.
Step 8: Floor. As you can see, the author did not begin to make a wooden floor, he simply covered the ground with a geo-cloth from the growth of weeds, and first he covered sand, then gravel. The easiest and cheapest solution!


https://i.expert-h.com/en/stroitelstvo/delaem-saraj-iz-poddonov#sigFreeIdc34381de22
Firewood from pallets
 To make this small firewood shed The author was prompted by a photo on Pinterest, you can see it below in the photo. If you also liked this firewood from pallets, you can only find the source material. The author had three long pallets 200 × 100 cm and 16 smaller than 75 × 75 cm.
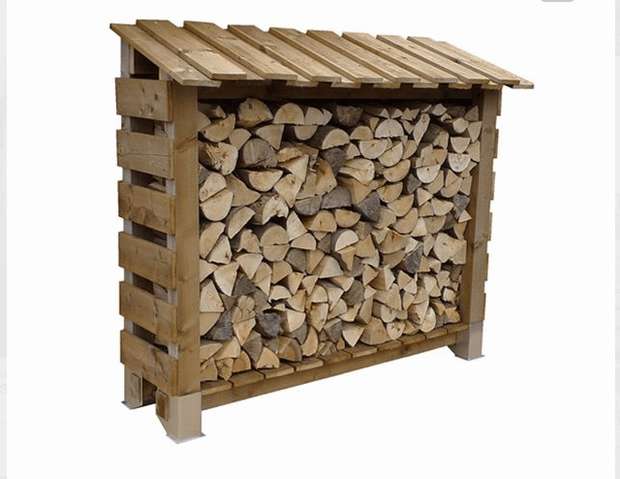
- First you need to disassemble them. You can do it yourself, but with an assistant it will be easier.
- The next step is to measure the length that will be needed for the floor cladding. In this case, it is 185 cm.
- Then, from the dismantled pallets, build a rectangular box. Why cut the boards 65 cm.
- Connect them together and fasten to the lower frame.
- Using boards from pallets, make and install a roofing structure.
- Establish the top support.
- After the flooring is firmly fixed, take care of the roof. Attach the roof with a pneumatic stapler and cut pieces of 90 cm so that you have an overlap. Also make sure that the roof is at an angle for a stack of water.
- Cut and attach the side parts. Keep in mind that the whole structure is even, you need to carefully align the first plate.
As you can see, the barn was not perfect. Wooden pallets come in different shapes and sizes, so you have to work with what is.


https://i.expert-h.com/en/stroitelstvo/delaem-saraj-iz-poddonov#sigFreeId39eca892a8
Pallet firewood shed
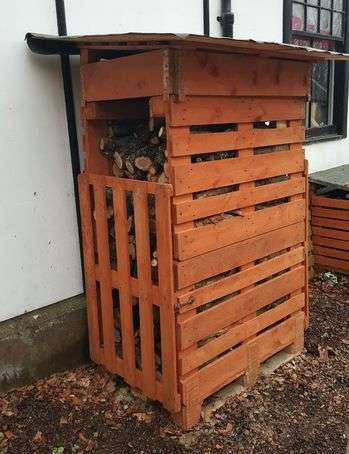 The usual masonry for firewood is not very convenient to use, so the author decided to make a more comfortable design of pallets, such mini wood shed. It is much more convenient to sort logs and provide better access for loading with fresh wood. When you watch step-by-step photos, keep in mind that the amateur built the barn. If you are a professional carpenter, you can probably find simpler ways to build such a woodcutter. Although there is nothing complicated here, the main idea of the author is to make a two-level design so that you can sort the firewood stored in the barn.
To create a double stack, you will need 10 pallets, wooden boards, 14 metal openings, galvanized nails, a saw, 6 hinges, 2 hooks, a felt roll, work gloves, time and good weather.
See assembly steps for step-by-step photos. Perhaps the steps are not displayed in great detail, if something is not clear, the description of the process can be read on the site, the link can be found under the photo gallery.


https://i.expert-h.com/en/stroitelstvo/delaem-saraj-iz-poddonov#sigFreeIdfc9a718f6c
Small pellet shed
 Wood pellets, or pellets, are biofuels made from wood waste, peat, and agricultural waste. Today they are very popular in Europe, because they are convenient to store, practically do not leave ash, and most importantly, they have an increased calorific value. If you also use this progressive type of fuel, then you can build this pallets shedspecially designed for storing pellets.
In addition to pallets, you will need boards, 5 sheets of cardboard 1.20 x 2.50 m, glue, nails, boards for lining and plywood.
For the foundation, the author used three pallets 1.2 x 1.2 m. The floor is made of plywood on the frame.Then the back wall was built. After the wall was finished, it was sheathed using building glue. Then the side and front walls were assembled and installed.
The next day, the rafters, roof and roofing materials were installed.
In conclusion, several large hooks were installed on which a tarp could be put on.


https://i.expert-h.com/en/stroitelstvo/delaem-saraj-iz-poddonov#sigFreeIde91beeea90
DIY barn from pallets 200 photos


https://i.expert-h.com/en/stroitelstvo/delaem-saraj-iz-poddonov#sigFreeId40acc39e56
- Brick grill: 44 drawings, 18 projects + photos
- Collapsible barbecue: 50 drawings, 20 master classes +300 DIY photos
- ✿ Flowerbeds:> 34 turn-based master classes + photos (248 ideas) - do-it-yourself
- DIY sauna in the apartment: bathroom, balcony, storage room. Projects and photos
- Shelves in the bath with your own hands: +200 photo. Drawings of bench benches in the steam room