DIY barn step by step 1000 photos
 DIY wooden shed
Wooden shed in the countryIt is primarily intended for storing garden tools, firewood and outdoor furniture, can be used as a workshop or a place for hobbies and much more. Regardless of the application, turn it around, you will spend as much time in the barn as you are in the house, so it makes sense to create a functional, effective and pleasant working space.
Do-it-yourself barn can be built from almost any building material. The most popular, of course, are metal and wooden structures. Here on the last option and stop, and consider how to build a wooden barn with your own hands. Here are selected more than thirty designs, with step-by-step photographs, drawings, instructions, as well as links to sites from where the material is taken.
DIY do-it-yourself barn
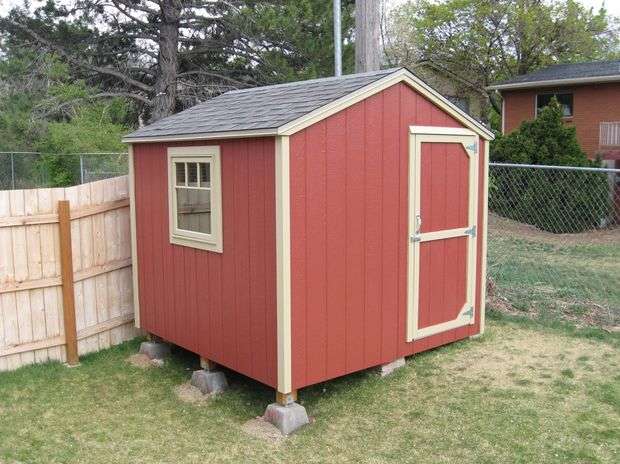 This design is essentially a 2.5m cube, which is an ideal place to store heaps of bicycles, lawn mowers, wheelbarrows and garden tools. The design is quite simple, and the author managed relatively inexpensively. If you want to build a similar do-it-yourself simple barn, the step-by-step photographs presented here literally from scratch show the entire construction process in detail. In addition, if you, like the author of the project, have a plot on a slope, this instruction will help to resolve this issue.
The author’s goal was to build durable simple do-it-yourself barn, with a design that would completely minimize all costs. (As a side benefit, this design has very little waste.)
Materials and Tools
This is an overview of the materials necessary for the construction of a simple barn. Of course, not everything is listed here, complete information is contained in separate steps, but the list will give you a general idea of what was used:
- Fourteen boards 2x6 (50.8 x 152.4 mm) 250 cm long
- About 50 boards 2x4s (in our opinion 50 x 100 mm) 245 cm long
- Two sheets of OSB 58/82 cm
- Four sheets of OSB 16/40
- One 4x6 pressure treated board (for tilted lawn)
- Eight SmartSide Siding Panels
- Landscaped Garden Blocks
- Three packs of tiles
- Roofing roll
- Cement for roofing
- Paint: 4 liters of the main color, 4 liters of the finishing color, 4 liters for the floor
- Hinges and door hardware
- Various fasteners (screws, nails, bolts, etc.)
The main tools necessary for building a barn with your own hands:
- Circular saw (make sure it has a tiltable base plate).
- Wire drill
- Cordless drill
- Square frame
- Great level
- Hammer
- Painting materials
- Roulette
- Rubber mallet
- Hoe and spade
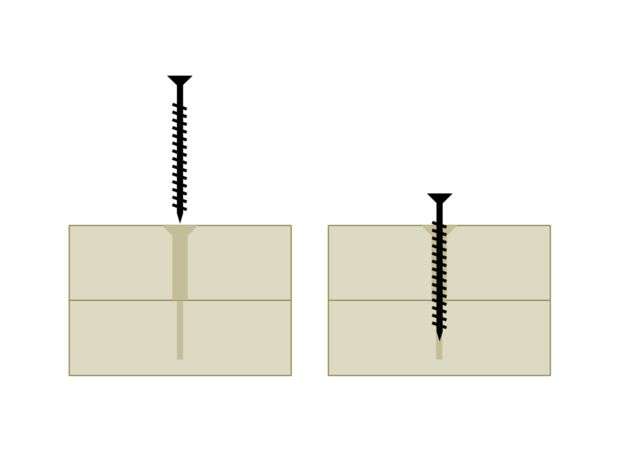 To connect the details of the barn, the author used mainly the screws. That's why
mandatory tools should include a wire drill for drilling holes and a decent cordless drill for screws. These two tools are almost universally necessary for any type of project, and they are more than enough to create such small barn. Using screws may take longer when attaching compared to a hammer and nails or a nail gun, but you will appreciate the difference as soon as you make a mistake by nailing the part with the nails not where you need it.
Foundation
- A small barn, like this one, can simply be put on the ground, for example, processed wooden beams, but it is more reasonable to create even contact points from concrete blocks first.
- For a base of 2.54x2.45 m, the author recommends distributing solid contact points in the corners and at the midpoint along each wall.
- The author has a slope of about 30 cm, so he placed the upper half directly on the blocks, which were slightly dug into the ground, and the other half on raised risers attached to concrete blocks, similar to how the lower floor frame will be installed.
- The trick is to make sure that they are all precisely positioned as needed, ideally mounted on top of each other and firmly attached to the sealed material. Of course, if you have a flat area, then all these nuances are not needed.
Floor frame and interior boards
The floor frame and internal beams are made of 2x6 pressure-treated boards (50.8 x 152.4 mm), trimmed as needed. So that the floor of the shed does not sag, the author doubled the outer boards to increase strength and stiffness. Where the slabs are attached directly to the risers, 8 cm galvanized bolts with a diameter of 8 mm, attached to pre-drilled holes, were used.
If the upper part of the frame lies directly on the blocks, glue can be used for fixing, just as for fixing two blocks on each side that support the frame in the middle along the slope. At this point, it is very important that the frame is square. Be sure to measure the angle and adjust the frame as necessary, until both measurements are the same.
Floor frame and exterior boards
External boards were added to double the floor frame, i.e. actually fix this second layer inside so that the boards are tied directly to the risers. This took a little preliminary planning to ensure that the finished frame would be exactly 2.45 by 2.45 meters.
Floor slabs
Galvanized supports for the transverse boards are attached to the frame with galvanized nails every 40 cm. The beams for fastening are installed in place and fixed with 8 cm of external screws through the brackets. 2x6 blocks are added to the middle of the section between the beams to provide support for the edges of the floor boards to be joined. These sections are secured between the beams by screws with curved toes.
Floor boards
For the floor boards, two OSB sheets of 58/82 cm were used, which were attached to the floor frame and beam with external screws located every 20 cm or so. The “tongue” of the board, which protruded above the edge of the frame, was carefully cut with a circular saw.
However, if you have a very steep slope, it is better to cement 4x6 messages deep into the ground, and create frames at an angle of support attached from the risers to the floor frame.


https://i.expert-h.com/en/stroitelstvo/1004#sigFreeId31bed3038a
Farms and magic corner
When it comes to creating trusses for a simple structure, an angle of 22.5 is really a magic number. If you cut something at 22.5 ° and want to cut the pairing piece, then with this angle it is very easy. The structure of the trusses for the roof, as well as the walls, is done directly on the platform. It is basically a large, ideal-sized desktop that acts as a calibration guide when assembling components. 5 farms were used here, laid out at a distance of 60 cm from each other. See the drawing.


https://i.expert-h.com/en/stroitelstvo/1004#sigFreeIdbd292ca733
End wall framing
The author framed the walls with studs located at a distance of 60 cm.
- Before installing each wall section up, attach the outer panels to the wall frames. This requires accurate calculations, but when the time comes to raise the walls, you will understand that it was not in vain that they spent time on calculations.
- Start by building two peaked walls. They are made across the entire width of the floor, that is exactly 2.45 m wide.
- It is necessary to use every centimeter of the external siding panels, which was wasted money, so the height of the end walls plus the height of the platform floor should be exactly 2.45 m.
- External panels are attached to the wall frames, and the lower edge passes past the bottom of the walls, so the panels will cover the sides of the floor.
Side wall framing
The side walls are framed by 9 cm, subtracted from the width at both ends, so that they fit well into the interiors of the pointed end walls. But anyway, the external panels will be 2.45 m wide, so they will cover the end wall frames only after all the walls have been installed.
Framing windows and doors
There are many options when it comes to windows and doors on a simple barn. You can adjust to the old frames, if you have them. Or do it yourself and set the dimensions that suit you.
Installation of side wall panels
Installing wall panels requires accuracy and the right sequence. Since the factory panels are perfectly square, we can use this for our own purposes. The panels are equipped with external galvanized nails in accordance with the order and directions in the diagrams diagrams that are presented here. To make the design beautiful, the walls must be absolutely square. Take your time and do everything in sequence.
Install wall end panels
In principle, end wall panels are installed in the same way as side walls, except that there is no side overhang for the side canopy. Mark and trim the top corners of the panels as shown.


https://i.expert-h.com/en/stroitelstvo/1004#sigFreeIde72a068d58
Side wall window
The side wall on which the window is installed requires a lot of measurements and marking. You need to know exactly where to hammer the external nails in order to fix the panels on the frame. Remove the material where the opening will be and set the window.
Note. Do not remove the panel in which the frame is still installed. At this point, the wall will be too weak.
Ventilation
You will need a pair of ventilation holes located somewhere along the walls to maintain air circulation in the barn.
Install walls
The most interesting moment. Here you will find out exactly how correct your calculations were.
- Start by installing the back wall.
- Use 10 cm external screws to secure the wall through the floorboards to the carcass slabs.
- Then lift the side walls so that they fit snugly on the frame and screw the floor boards to the frame.
- The corners where the frames are connected are screwed to each other from the inside of the side wall frames to the end wall frame.
- Tighten the short screws along all the outer lower edges of the panels so that they cover the floor frame.
Last wall
To raise the last wall, need a few people. Then trim the trim covering the doorframe with a saw. This panel will be used to assemble the door, so it must be carefully trimmed so as not to damage it.
Build a roof
- The three remaining trusses are screwed to the tops of the wall frames directly mounted into the studs.
- Two sheets of OSB 18/40 are attached to the trusses with screws every 60 cm, making sure that the trusses are installed vertically.
- 18 cm OSB strips are fastened along the lower edges to complete the roof.
Paint the walls
Trim the roof for a more aesthetic look.
To cover the author used architectural tiles corresponding to the roof of the house.


https://i.expert-h.com/en/stroitelstvo/1004#sigFreeId56584a6d05
Door
There are many details related to the manufacture and installation of a barn door. Here, as they say without comment, see step by step photos.


https://i.expert-h.com/en/stroitelstvo/1004#sigFreeId6522dcfc1a
Shelves
Paint the floor and make racks
In conclusion, you can build a ramp if you need it. I hope you build such a simple barn.


https://i.expert-h.com/en/stroitelstvo/1004#sigFreeId20a6434900
Beautiful barn for a summer residence
 Need beautiful barn for a cottage with an attic roofbut can't buy an expensive kit or hire qualified builders? This is not a reason to abandon your idea. You can save a lot and build a do-it-yourself barn. The barn has a traditional rustic style and is also ideal for storing tools and other items that you rarely use. In this article, you will learn how to build a beautiful attic shed using common tools, materials, and technology.
If you want to build a stationary building, you need concrete foundation. On the other hand, if you need a lightweight construction, and you plan to move it in the foreseeable future, it is recommended establish several supports and make a slide. In addition, if you do not plan to keep heavy objects in the barn, using a slide is a good way to reduce construction costs.
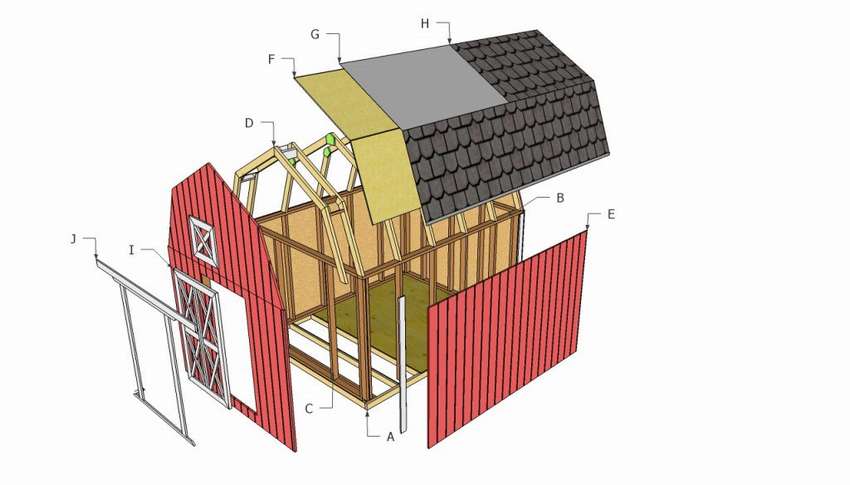 To build a do-it-yourself barn, you will need the following materials, dimensions are in inches (1 inch 2.54 cm):
A - 9 boards 2 × 4 93 "long, 2 pcs. 120" long
B - 8 sq.m. plywood sheets
C - 2 × 4 boards for walls
D - 2 × 4 boards
E - 23 sq. m. corrugated plywood
F - 12 sq. m. roofing sheets
G - 12 sq.m. roofing
H - 12 sq. m. asphalt tiles
I - 5/8 "plywood, 1 × 4 boards and 4 loops
J - 1 × 4 boards
screws, carnations, putty
Building a Shed - An Interesting OccupationIt’s also a great opportunity to learn new technologies and build a beautiful building. Plan everything from the start if you don't want to run into unexpected problems.
There are many types of foundations that you could use when DIY barn constructionFrom a solid concrete slab to a skid. Although the first solution is ideal for permanent structures, the second option is recommended if you want to move the barn. Therefore, it is necessary to install the slide on the supports, as shown in the picture. For added rigidity, you can dig deep holes, fill them with concrete and install the appropriate anchors.
Floor installation.
- It is necessary to build a full frame of the barn using 2 × 4 or 2 × 6 boards (if you will store heavy objects in the barn). Place the beams every 60 cm in the center.
- Correctly install the beams with both hands, after checking the angles. Screw the 10 cm screws through the rim into the beams, just pre-drill holes.
- Attach plywood sheets and fasten them every 20 cm with pads or nails.
- The corners of the sheets should overlap completely above the floor frame.
- Alternatively, you can make flooring from boards. Place a nail between the boards to get even gaps.
The next step - assembly of the walls of the barn on the ground and installation.
- It is necessary to build side walls from 2 × 4 boards, making sure to install wooden studs every 60 cm.
- Then also install the opposite wall.
- Measure the size between the two side walls and build a frame for the back wall. Ask someone to help you support the wall while you hammer nails into the lower bar.
- As you can see in the image, several things must be taken into account when creating the frame, for example, leaving enough space for the door to open freely.
- Do not forget that you can adjust the width of the doorway according to your needs.
Roof assembly.
- The key to this complex step is cutting the rafters at right angles and joining them.
- Farms have only two components, so as soon as you carefully cut them, you need to install the rest of the rafters in the same way.
- Make sure that all trusses are exactly the same, otherwise you will not be able to install roofing sheets.
- After you cut all the rafters, you need to fix them using plywood gussets.
- The bushings should not be too large, otherwise they may affect the design of the barn. In addition, install another truss to get a 25 cm protrusion on the front of the barn.
Installation of external siding.
- Now you need to install a corrugated external siding along the pins of the wall, upper and lower crossbars.
Clever advice. As you can see in the image, the siding should hang on the bottom plate to get a beautiful appearance and proper insulation of the barn. - Roofing sheets. Install plywood and nail. Align the sheets at both ends and fasten with galvanized nails along the rafters.
- Installation of asphalt shingles. Roofing should be covered by 5-10 cm to protect the roof from water. Install roof tiles starting from the bottom of the roof.
- Setting the bars. After you put 3 tabs in place, you need to install the finish.
- There are many design patterns that you can apply, but you must choose the ones that suit your needs and tastes.
Installation of double doors. To get a smooth transition between the barn and the double doors, use corrugated plywood. After you make double doors, install them on 4 hinges. For beauty, attach several x-shaped slats.
Fill the gaps with waterproof filler and smooth the surface with a grinder. Apply several coats of varnish or protective paint to preserve wood.


https://i.expert-h.com/en/stroitelstvo/1004#sigFreeId17b833cd18
DIY shed without foundation
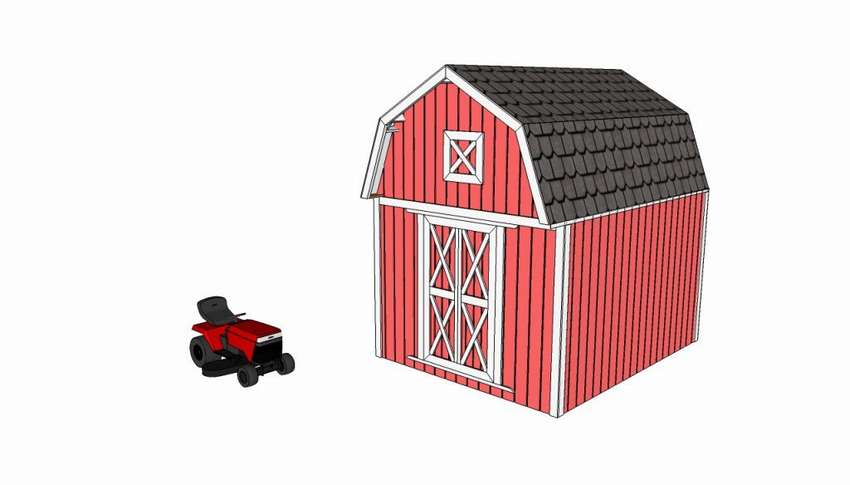
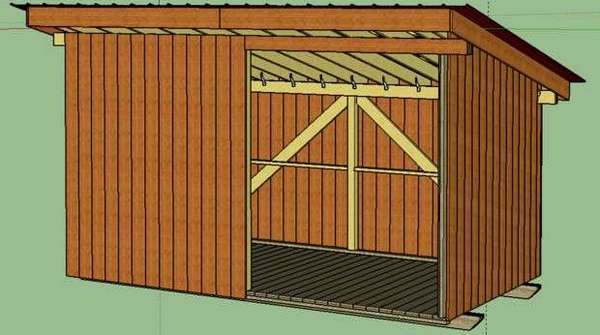
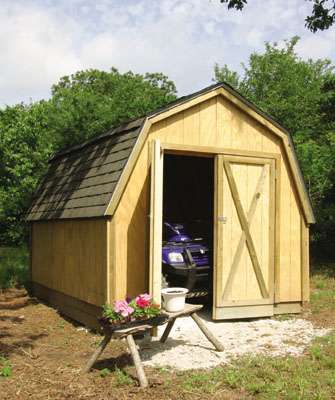 The pillar construction provides an economical way of storing and stability, even if the shed is built on an inclined section. The author originally designed this barn with doors at each end, which allows easy access to garden tools. Or, if you want to put a garden tractor with a trailer behind it, then you can simply unhook the trailer and drive out to another door. But the author had another problem. The only place for the barn was on the slope. Usually in such cases a concrete foundation is poured, but it is expensive, and the author wanted to save as much as possible, so a decision was made build a shed without foundation on support pillars. This is one of the most economical ways to build buildings, and it is also relatively easy.
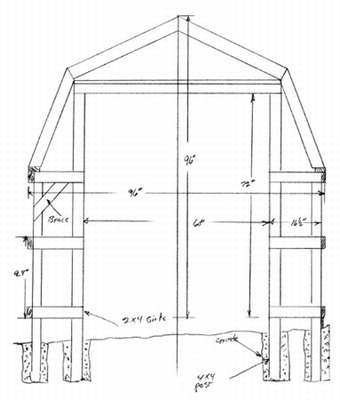 The basic structure of the barn consists of support pillars installed in the ground and concreted. Such sheds without foundation often made of round beams, but square racks can also be used, as shown in the drawing.
Wood must be processed so that it can be used for installation in the ground. After the pillars are installed, a crate is made to which the siding is attached. The view of the roof of the shed may be different, in this case the shed is covered attic roof, which gives the building a finished and noble look.
- The first step is to lay out the building. Measure the diagonals between the corner pegs to mark the platform for the barn.
- Dig holes to the depth necessary for your region, usually 60 cm. Prepare the poles and set in place. Nail the boards by connecting the posts, this not only helps maintain the proper distance between the posts, but also aligns the sides.
- Take the door and side racks and fasten them.
- Once all the parts are correctly positioned and assembled, mix the concrete and fill the pillars.
- Give concrete a few days, and then remove the staples and temporary planks.
- Make a crate and install siding.
- Saw out the doorways. Finally, install the bottom side.
- After the lower rails are fixed, install the “skirting” boards. Leave the end of the plank until the siding is installed and the doors are cut out.
Then the assembly order is almost the same as in the construction of a standard barn, this article already has some detailed descriptions. Details can be found on the website of the source, a link under the gallery. The roof structure is different, this type is called the attic.


https://i.expert-h.com/en/stroitelstvo/1004#sigFreeId6996fa4c16
How to build a barn
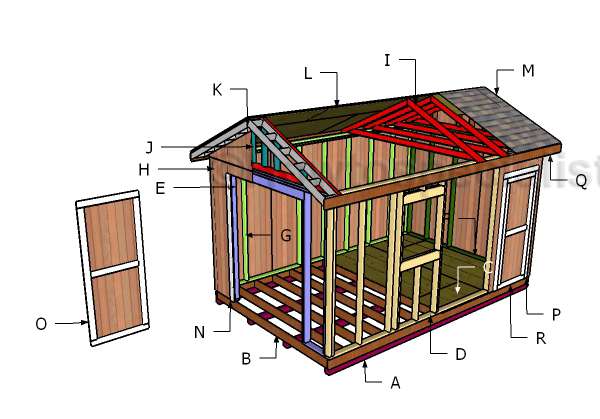
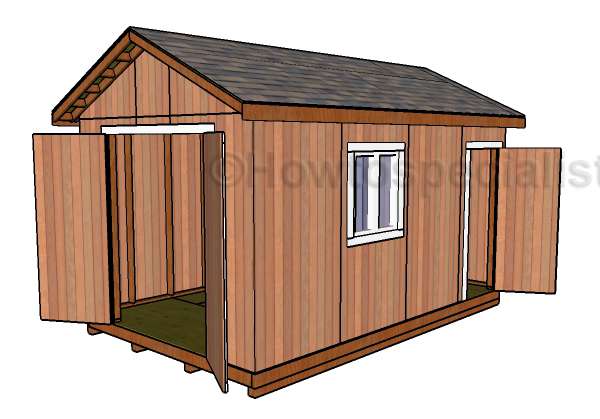 Drawing of a barn in the country for storage of inventory designed not only to have more space for folding garden tools, but also to improve the appearance of the plot. This barn is designed with large double doors on the front and a small door with a window on the other. To build a barn properly, buy the best materials you can afford. Always take accurate measurements. Drill holes before tightening screws to prevent wood from splitting.
Below is presented chart and list of materials. The sizes are presented in inches, I did not translate them into centimeters, so that it would be more convenient for you to use the schemes in the gallery. Just multiply all these sizes by 2.54, this will be the size in centimeters.
 A - 4 bars 4 × 4 long - 192 "
B - 2 boards 2 × 6 long - 192 ", 13 pieces - 117"
C - 4 sheets of plywood, size 48 "x96", 4 pcs. - 24 "x48"
D - 1 board 2 × 4 185 "long, 1 pc. - 192" long, 1 pc. - length 152 ", 1 pc. - 8", 13 pcs. - 91 1/2 ", 3 pcs. - 37", 5 pcs. - 7 1/2 ", 2 pcs. - 78 1/2", 2 pcs. - 36 ", 4 pieces - 39", 2 pieces - 35 "- this is a side wall with a window
E - 2 boards 2 × 4 120 "long, 2 pieces - 113", 2 pieces - 20 1/2 ", 2 pieces - 86", 4 pieces - 91 1/2 ", 2 pieces of 2 × 6 boards 75" long front wall
F - 2 boards 2 × 4 113 "long, 1 piece 120" long, 6 pieces - 91 1/2 "for a back wall
G - 2 boards 2 × 4 192 "long, 1 piece - 185", 11 pieces - 91 1/2 "for the side wall
H - 8 sheets of siding T1-11 - 48 "x96", 4 pcs. - 48 "x94 1/2", 1 pc. - 24 "x94 1/2", 1 pc. - 7 "x24"
In addition, boards are needed.:
- 4 things. 4 × 4 dyne 8 '
- 13 pieces 2 × 6 10 'long
- 2 pcs. 2 × 6 16 'long
- 6 pcs 2 × 4 16 'long
- 6 pcs 2 × 4 10 'long
- 42 pcs. 2 × 4 8 'long
- 5 pieces. 2 × 6 8 'long
Additionally:
- 13 pieces T1-11 5/8 'siding - 4'x8'
- 5 pieces 3/4 "plywood - 48" x96 "
- 2 1/2 "screws, 3 1/2" screws, 1 5/8 "screws
- wood filler, glue, paint
The instructions on how to build a 3 × 5 m barn can be omitted; it is not much different from the instructions in previous posts. If you are interested in any nuances, a link to the site under the gallery.


https://i.expert-h.com/en/stroitelstvo/1004#sigFreeId3042e4c570
How to build a shed roof
But the structure of the roof is different from the previous project. This shed is set classic gable roof, so let's dwell in more detail.
 Materials also in inches
H - 4 parts 5/8 "T1-11 siding - 48" x28 ", 2 pieces - 24" x33 3/4 "
I - 9 boards 2 × 4 120 "long, 18 pieces - 75"
J - 4 boards 2 × 4 length 8 3/4 ", 4 pcs. - 20", 2 pcs. - 24 3/4 "
K - 4 boards 2 × 4 75 "long, 12 pieces - 7"
L - 4 sheets 3/4 "plywood - 11" x73 1/4 ", 4 sheets - 48" x 96 ", 2 pcs. - 25 1/4" x96 ", 4 pcs. - 25 1/4" x48
M - 28 square meters; 28 square meters asphalt shingles
- 9 boards 2 × 4 10 'long
- 25 boards 2 × 4 8 'long
- 7 sheets of plywood - 48 "x96"
- 2 parts T1-11 5/8 "siding - 4'x10 '
- 28 square meters, 28 square meters asphalt shingles
- Screws: 2 1/2 ", 3 1/2", 1 5/8 "
- nails
- slings
How to build a gable roof for a barn measuring 2 × 5 m
- Installation of rafters. The first stage of the project is to make rafters. Mark the cut points on the 2 × 4 crossbars and saw off.
- Lower rafter. From the boards 2 × 4, make the lower rafters.
- Installation of wedges. Use 1/2 "plywood for gussets. Mark the cut lines on the sheet, then saw off. Put the brackets on the joints and align the edges. Drill holes and tighten the screws.
- Farm Installation. Mount the trusses on top of the barn, every 60 cm in the center and lock between the trusses, for this you can use siding or 2x4 boards.
- Installation of end supports. Take 2 × 4 boards for the front and rear end supports. Drill holes at both ends and secure with screws.
- Installation of end panels. Cut the panels of the desired size and shape, and then attach to the front and back of the barn.
- Protrusion. Assemble the tabs from 2 × 4 boards. Drill through holes through the rafters and tighten the screws.
- Installation of protrusions. Install canopies in front and behind the barn. Align the edges flush, drill control holes and insert screws to tighten. Cut 3/4 "plywood sheets and attach to the top of the roof.
- Roof installation. The simplest solution is to lay asphalt shingles to protect the barn. Therefore, install the roofing material over the sheets, making sure that the strips overlap at least 5 cm. Fasten the roofing to the plywood sheet. Lay the tiles.


https://i.expert-h.com/en/stroitelstvo/1004#sigFreeId5c372c8df2
Installing a door in a barn
 Further shown how to make double doors main entrance and a small door for the side wall.
materials
N - 1 board 1 × 4 79 "long, 2 pcs. - 87 1/2"
O - 2 parts of siding T1-11 - 36 "x87 1/2", 2 boards 1 × 4 36 "long, 2 pcs. - 80 1/2", 1 pc. - 29 "
P - 2 boards 1 × 4 long 39 "long, 1 pc. - 80"
R - 1 part of siding T1-11 - 32 "x80", 2 boards 1 × 4 32 "long, 2 pcs. - 73", 1 pc. - 25 inch wide door
Q - 2 boards 1 × 6 213 1/4 "long, 2 pcs. - 36", 2 pcs. - 43 "
- 18 planks 1 × 4 8 'long
- 2 parts siding T1-11 - 4'x8 '
- 4 planks 1 × 6 10 'long
- Screws: 2 1/2 ", 3 1/2", 1 5/8 "
- nails
- hinges and latches
How to make a barn door
- Side roofs. Install 1 × 6 trim on the sides of the roof. Align the edges flush and nail.
- Assembly of double doors. Cut the panels from the siding T1-11, and then attach the trim 1 × 4.
- Flush the edges and tighten with screws.
- Attach the door jambs 1 × 4 around the large doorway. Use 2-inch nails and glue for fastening.
- Install the double doors in the front opening and secure them in place with hinges.
- Install the latch and handles so that you can easily close and open the doors.
- Assemble the side door in the same way.
- Attach the jambs around the small doorway.
- Installation of the side door. Insert the barn doors into the opening and secure with the hinges.
- Install the latch and handles.
- Insert the window into the opening. Carefully align the tabs and secure with nails.


https://i.expert-h.com/en/stroitelstvo/1004#sigFreeIda6e4bbafd1
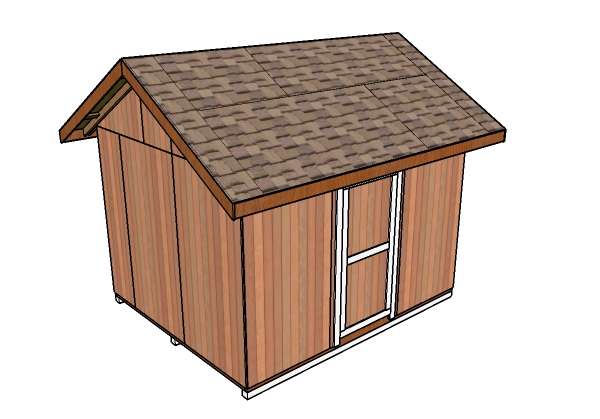 One more example wooden barn with a gable roof. A very simple and robust design measuring 3.5 × 3.65 m. Although the dimensions are easy to change to suit your needs. You can look at the list of materials and detailed instructions on the website, there are links under each gallery. In principle, the construction procedure is the same as in other projects presented in this article, except that there may be some differences in the design features.


https://i.expert-h.com/en/stroitelstvo/1004#sigFreeIdf473612f8d
Gable roof assembly diagram for a barn 3.5 × 3.65 m


https://i.expert-h.com/en/stroitelstvo/1004#sigFreeId04358ad2ca
How to make a barn door 3.5 × 3.65 m


https://i.expert-h.com/en/stroitelstvo/1004#sigFreeId922f5db52b
How to build a do-it-yourself barn in stages
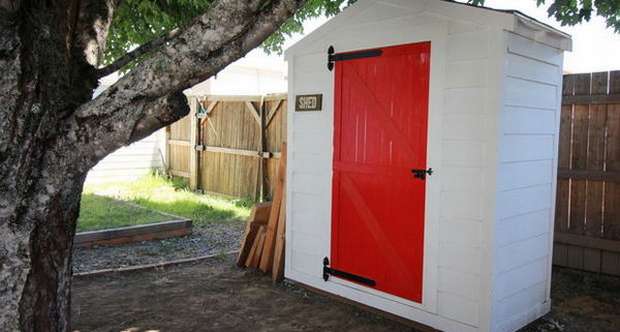 A barn is a great addition to any summer house or garden. This small garden shed a little less than 1 x 2 meters, so it has a lot of advantages. Firstly, it is very easy to build, secondly, it is an ideal option for a small plot and, thirdly, with its modest size, the barn is quite spacious, the main thing is to organize useful space correctly.
Building a barn is easier than you think. It all starts from the bottom. By the way, some barn construction stageswhich are presented here, you can change according to your needs.
- First of all, do the markup, clear the site, so that everything is smooth and beautiful, without weeds, roots and other things. Then fill the area with gravel for drainage.
- Make the base frame from the boards and lay it on the ground.
- Drill a few holes in the boards and install the armature in the ground.
- In addition, it is good to lay a special filter cloth to prevent weed growth.
- Install the grille on the frame and cover it with cheap plywood. If it’s not a pity, you can paint the tree, last longer.
- Then the walls, just make sure everyone marked correctly.
- Fasten everything with screws first, and then with nails for additional support.
- Once the walls are assembled, attach them to the floor, one after the other, screwing through the plywood into the floor frame, and also connecting the frames together at the corners.
- Once the floor and walls are finished, start the roof. If you do as an author, 4 to 12, then the angle will be about 18 °.
- The roof for such a small barn is easier to assemble on the ground and then just raise it. It is much more convenient if there is such an opportunity.
- Once the base structure is assembled, it’s good to make a test landing and make sure that the roof matches the structure,
- Cover the roof with any material intended for this purpose, at your discretion.
- For siding the shed, in principle, any siding is suitable, just fasten it with screws to the studs under the osb sheathing.
- Paint the barn.


https://i.expert-h.com/en/stroitelstvo/1004#sigFreeId1f0ef7f560
Now, how to make and install a barn door. Of course, you can buy a finished one, and fit the wall to size. But the author decided to do everything with his own hands from scratch. How to do this, see below for step-by-step photos. I will not describe the details of the process, anyone who knows how to work with wood will understand everything from photographs, but whoever has no experience, I advise you to read the instructions on the site, the author described each step in great detail. The link is under the gallery.


https://i.expert-h.com/en/stroitelstvo/1004#sigFreeId43a3267266
How to build a shed from boards
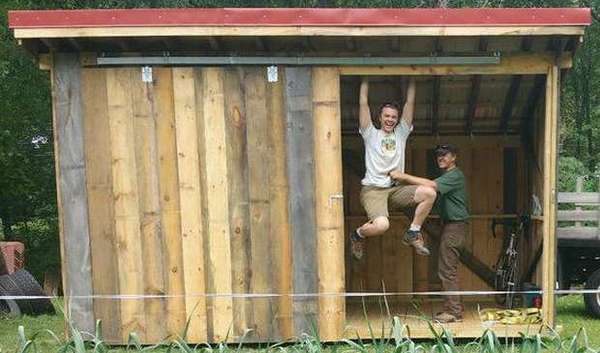 Nowhere to put old things? Familiar situation. This guide will show you how to build a mobile shed from boards 2.5 x 5 m in size from mostly untreated lumber in about two weeks. The barn is mounted on skids, so that a conventional onboard trailer can safely pull it along the highway.
Benefits:
- relatively inexpensive;
- portable, so it can be transported on a trailer, at the same time quite large, approximately 2.5 x 5 m,
- durable - designed for 40 years of operation.
- safe - the door is easily locked; there is no easy way for unwanted access.
- convenient - a sliding door opens in half of the front of the barn, which allows you to store large items such as motorcycles and lawn mowers.
- aesthetically attractive - the exterior and the red metal roof blend perfectly with any area.
Design creation
 Before you build, you need to think everything through. Start with simple sketches and determine how you want to use your barn. Make sure it is convenient for all items that you intend to store. Now that you are sure that you want a design similar to that presented by the author, read on.
Materials and Tools
Collecting materials can take quite a while.
Comment: Untreated lumber requires careful sorting ... if you select boards, be sure to choose straight, without cracks and chips. You should also buy 5-10% more than you need to take into account the short boards that may appear in the process. Be especially careful when choosing material for rafters.
The most important tools to build a barn from planks:
- Remedies - at leaste goggles and gloves.
- hammer
- screwdriver
- drill
- roulette
- a circular saw
- stairs
- good rhythmic music and a friend who understands something in the woodwork, although not necessary, can be just a friend, for insurance :)
Playground and slide
The slide is the "foundation" of the barn. The barn is installed on top of two 40 cm sleds, which, in turn, sit on 6 concrete blocks. The sled makes it possible to move the shed to different places on the summer cottage or even to more solid distances.
The first thing to do is to clear the area on which you will build the barn. Then install the blocks. Now you can build a slide. The step-by-step photos below show how to make the skid and install the flooring. Be sure to make sure sliders are flush with each other. If necessary, add gaskets between blocks and runners


https://i.expert-h.com/en/stroitelstvo/1004#sigFreeId8f87c843a3
The frame holds the roof and provides fasteners for cladding. It is very important that your frame is flat, and the supports make an angle of 90 ° with the base frame, otherwise the barn will be skewed like the Leaning Tower of Pisa! How to do this, look at the photo. If something is not clear, the site has a very detailed instruction.


https://i.expert-h.com/en/stroitelstvo/1004#sigFreeId236c564b6b
Trim and install the rafters. As soon as you make sure the roof is square, cut one rafter (this will be the template), and a handle. To draw the necessary cuts, it is necessary to determine the angle, known as the pitch of the roof. For the designed barn, this should be 18.4 °. If there is a protractor, you can dial 90 ° + 18.4 ° = 108.4 ° and use it to draw a “vertical” section. To install the rafters, first mark all the intervals.


https://i.expert-h.com/en/stroitelstvo/1004#sigFreeIdfe5af7cf2b
The following shows the installation process of the lips, or horizontal boards, located at a distance of a meter from the floor and diagonal bars. These braces are needed to hold the barn in any dimension. Therefore, you must strengthen all the planes of the barn ... front and rear, sides and roof. There are two types of diagonal braces: wooden and metal trim. Wooden brackets can only resist compressive forces, and metal trim can only withstand tensile forces. In this case, wooden brackets were used for all sides of the barn, and a metal trim for the roof, because it is thinner and, therefore, can easily fit between the girders and rafters.
Then install cladding and girders to support metal roofing There is nothing special to say, just do as shown in step-by-step photos.


https://i.expert-h.com/en/stroitelstvo/1004#sigFreeIda37d1e6642
Metal roof for a wooden shed can be installed in many ways. In this case, they decided to install in two parts, so that the rear overhanging part could be removed. Installation is a bit complicated, the roof is made so that when it rains, the drops are not on the wooden finish. A decorative frame is installed in front of the frame in order to provide a beautiful red strip along the front of the barn. To make the roof roof waterproof, use a sealing tape and a closure to make the connection between the roof and the main roof not leaking.


https://i.expert-h.com/en/stroitelstvo/1004#sigFreeId563f7d1da3
Production and installation of the door for the barn
The first step in making a door is to find a completely flat floor. Fortunately, sliding doors are one of the most stable types of configuration themselves, so physics is on your side. The design is quite simple, with one adjacent cross section and a half cut. The size of the door is such that it covers the side by about 15 cm, and the top and bottom by 5 - 6 cm.
When installing the track, you must accurately calculate how far the door should slide.
The roller bearing that holds the door at the base is simply angular brackets with slots to accommodate doors of different thicknesses. Installs quite simply. Cut the sheathing and connect it directly to the sturdy frame.
Put the locks.


https://i.expert-h.com/en/stroitelstvo/1004#sigFreeId2b318bc000
I hope you enjoyed the idea of a mobile barn!
DIY barn house
 This big the barn is like a house Suitable for year-round use. The wall studs are 2x6 and the gaps between them are completely filled with fiberglass insulation. Ceiling insulation meets specifications. The shed is mounted on the foundation. Additional foundation support is achieved by blocking between floor ceilings and a concrete walkway that runs under a canopy. Other funSections include window sill fittings, chamfered flooring, rigid foam insulation between the flooring and the plywood interior floor, roof lining, ventilation, closed double glazing and insulated doors.
Stages of building a barn shown in the photo. The steps more or less clearly reflect the construction process from the foundation to the roof. If you are interested in more detailed instructions, visit the author’s website, link below.
A cozy barn in the winter! This is about the last photo in the gallery.


https://i.expert-h.com/en/stroitelstvo/1004#sigFreeId4e66cedfc9
DIY garden shed
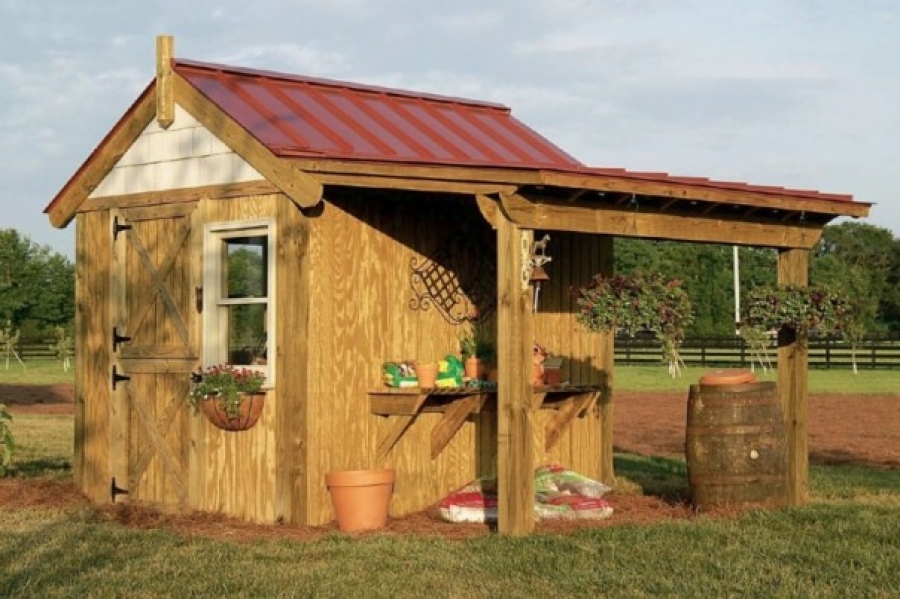
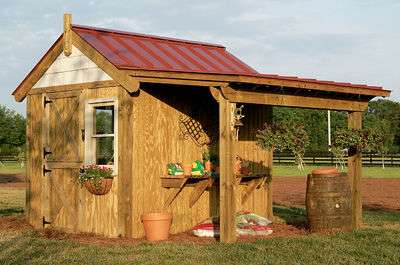 A cozy barn will be an attractive addition to a summer house or garden. With this house you can fully realize your dreams of gardening. Two meter canopy expands the working area from the outside. Three windows provide natural light. The real decoration of the shed, dutch door. Three wide tables - two inside and one under a canopy create a comfortable atmosphere. The step-by-step photos presented here give an idea of how to build a do-it-yourself garden shed, and if you need more detailed instructions, you can follow the link to the website of the source.
- Step 1: Basic and corner joints
Install four boards around the perimeter of the barn. Then make marks under the corner posts. The base is crushed limestone. Before you start building, pour a layer of 10 cm. - Step 2: Compounds
The box is mounted on poles. Walls of a barn 2.5 m high. Add a length equal to the depth of the holes. Remember to deepen the supports below the freezing line. The holes should be twice as wide as the posts. - Step 3: Walls
The walls are made of treated boards 2 x 4 (50.8 x 101.6 mm), attached to the uprights and pass through the base. The space under the base of the wall is filled with crushed limestone. Siding is used to cover the barn. - Step 4: Window
The barn has three windows made of aluminum profile, which give enough light, and when open, provide good cross ventilation. - Step 5: Rafters
To support the roof slings, a beam of 50 x 150 mm is used. 2 rafters are installed at 40 cm in the center. Decorative cuts can be used to finish the ends and add an attractive touch. Support for these rafter circuits consists of 2 x 20 cm boards that are attached to the support posts of the canopy - Step 7: Roofing
Since the box is covered with a metal roof, the boards are installed perpendicular to the roof rafters. If you use ordinary tile, you need to attach sheets of plywood and lay roofing. Double-sided 20 cm front panels are attached to the edges of the roof. - Step 8: Doors
These beautiful Dutch doors are quite simple to make. First, make a frame corresponding to the size of the door. Then attach a piece of siding to the semicircular frame. Use an X-shaped decorative part to install heavy loops. Make arrow-shaped cutouts at the ends of the boards so that they fit snugly into the corners of the door. The X-piece creates additional space for mounting the hinges. A simple lock connects the door halves.


https://i.expert-h.com/en/stroitelstvo/1004#sigFreeIdd418b215b3
Workshop barn
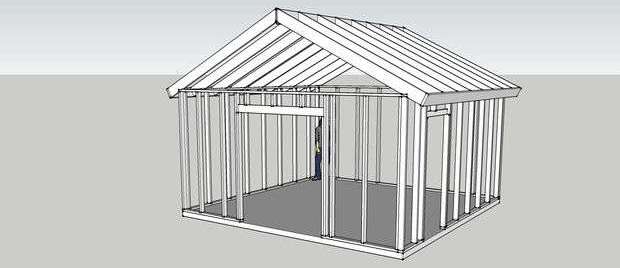
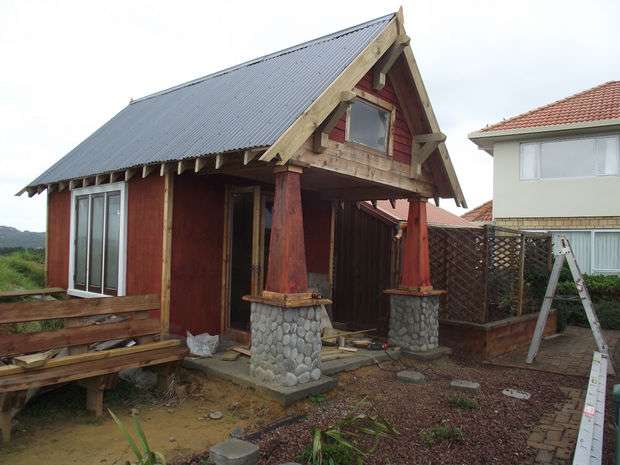 Many want their own workshop, a convenient place to work, where no one will interfere with doing what they love. A separate room in the house is not the best option, a barn for storing equipment is also not very suitable for this purpose, not to mention the garage, where there is still not enough space for old spare parts that for some reason the hand does not rise to throw out. The author of this project found a way out by building workshop barnthat you see in the photo is pretty pretty, isn't it? And if you want, a place on a summer cottage can always be found.
What were the requirements for this building:
- The barn should be relatively close to home.
- Have a roomy room.
- To make the building large enough
- The house should be beautiful.
Construction instructions for this amazing workshop shed can be read on the author’s website, everything is painted by the day and time with very colorful details, I won’t succeed. Although, if you have experience, then by step-by-step photos everything will be clear. A link to the author’s site is under the gallery.


https://i.expert-h.com/en/stroitelstvo/1004#sigFreeId02500ed7cc
Shed workshop for a summer residence
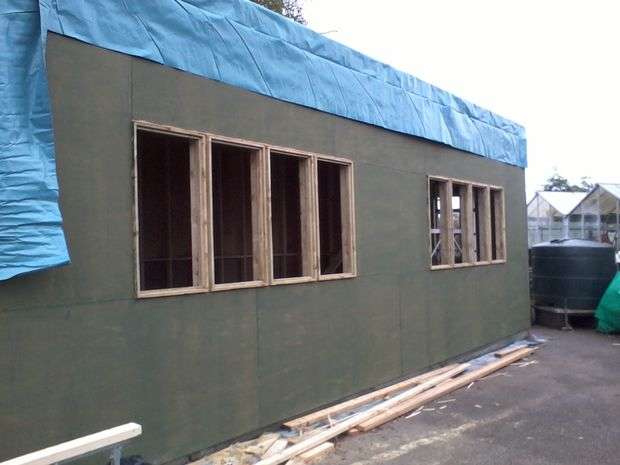 Big barn workshop DIY built on the site for multipurpose use. Of course, this room can be called a pavilion rather, and not everyone can afford such a scale. But if there is such an opportunity, then how to build a barn Look at the step-by-step photos that will give an idea of the assembly.
- First, set the dimensions of the base on the asphalt, and then make the concrete formwork and lay the reinforcing mesh on the blocks at a depth of about 10 cm. It will take 8 cubic meters of ready mixed concrete. Fill the base.
- To fix the frame, the stands are screwed to the frame, then the rest of the walls are assembled.
- The roof is made of hexagonal bars.
- Insulation made of foil 100 mm thick and mineral wool walls also 100 mm thickand then lined with a 10 mm board.
- A door is installed at the end of the barn. It is a sliding structure 2.5 meters high and a little over 2 meters wide with a built-in gate.
The inside is painted with two layers of white paint and a long working table is installed.


https://i.expert-h.com/en/stroitelstvo/1004#sigFreeIda403922609
How to build a hexagonal garden shed
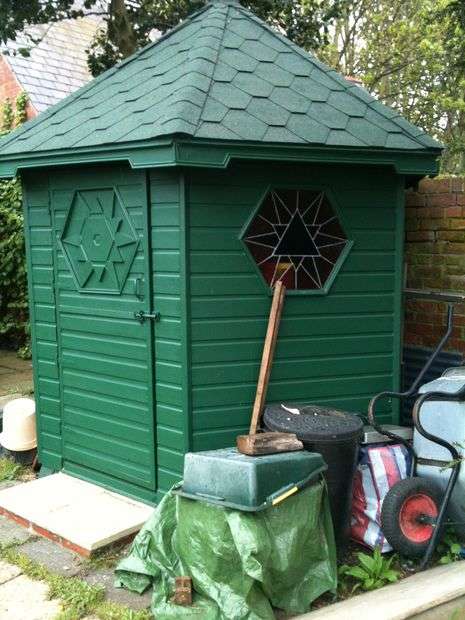 Garden shed should be not only practical, but also beautiful. Here is an idea hexagonal construction. The author used Visio and Sketchup to figure out how best to cut sheets with minimal loss. The three sides of the barn were made in the workshop and then installed at the base. When the author attached the three finished sides to the base, he had to make two empty sides and a door. He added the roofing membrane to the side frames before nailing the cladding plate. The angle of the roof is best determined when the base is in place.
For such a design it is better to strengthen the roof with a thick central pillar. The author also recommends that you make a roof frame on the ground and then install it in its finished form.
Position the crosses to match the plywood. The rest of the roof is made of standard materials - plywood coated with rubiroid, and then bituminous tiles.
The front panel is pretty simple. The door is installed in the frame, as shown in the photo. Decorative window, this is at your discretion.
The inside is insulated, paneled with plywood, and then finished with boards.


https://i.expert-h.com/en/stroitelstvo/1004#sigFreeId8db0757231
Shed Restoration
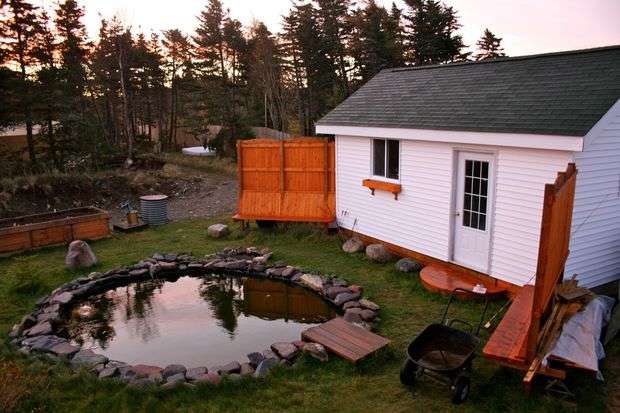
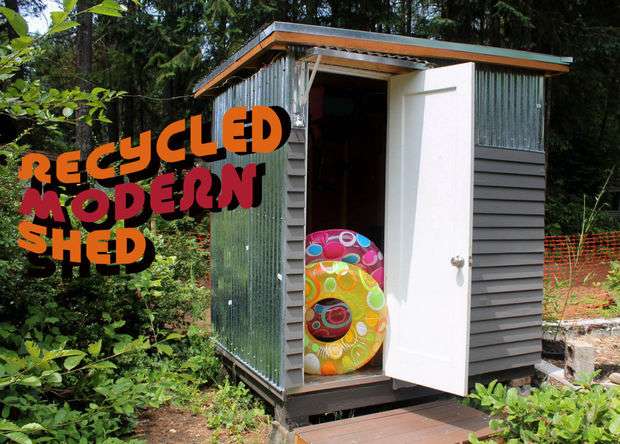 The canopies are very convenient for storing everything: from power tools to canoes, but nothing lasts forever, any building deteriorates and needs repair. The author had an old metal shed that was desperate for repairs. Here you can see how barn restorationMore precisely, a new one was built on the site of the old one, only from old materials. Most of what is shown in the photo is unique to this situation, but you can take into account the general principles when building your own extension. Obviously, everything will depend on your resources and what you can use from the old barn.
Design and materials
This is the most important step in this process, which will ultimately determine what the barn will look like. The most important thing to remember when using used materials is security. Old boards are sometimes painted with lead-based paint and can be toxic. Reused metal can have sharp edges, and boards sticking out nails, so you should always be very careful. The second important point is be creative. With the materials found, you will have to work with random sizes, and you need to do everything possible to correctly dispose of them. For example, in this case, the materials found literally dictated the size and shape of the new barn. The author used most of the floor beams and metal siding in the new design. Plywood, corrugated metal, boards and other materials went into business.
What you need from the tools:
- Circular Saw
- drill
- hammer
- screwdrivers
- level
- pencil
- roulette
- Scissors for metal
Reconstruction Stages:
- Step 1: Base
Base, this is important, but don't forget, it's just a barn. Many people dig holes below the freezing line and fill it with concrete. You can do it easier by installing the structure on concrete blocks. The advantage is that they are easy to fix (simply by installing a car jack at a sagging angle and adding gaskets), and the barn can be easily rearranged if necessary. - Step 2: Framing
Since the barn is shorter than the standard 2.5 meter boards, additional pieces of boards were cut here, cut at an angle of 45 degrees to strengthen the corners. Usually this is not necessary, as the outer plywood holds the sides well. But since in this case they used recycled plywood with random sizes, such a step is justified.
Sheds are rarely made high, in this case, the edging is 215 cm at the highest point. This will help keep the design more affordable in size and save on materials.
The author chose the design in modern style, where there are clear forms and the absence of decorations. This not only gives good clear lines, but also simplifies the work. The motto of modernism - “Form follows function”, means that the result of design should come directly from its purpose. - Step 3: Sheathing
Plywood often remains after construction or repair. Since the shed will be covered with siding, the appearance of plywood does not matter much, the main thing is that it is not rotten. - Step 4: Roofing
On the manufacture of the roof is better spent. Buy whole corrugated metal sheets and new boards. They built a frame around the roof, which will help save the rest of the structure from rain. The screws must have rubber washers to seal the holes. - Step 5: Siding
Siding is an important part of design. If you do not find many remains of one kind, you can do as an author, collecting in the form of an artistic mosaic. Use simplicity and clarity in forms and remove unnecessary details. The result of the design should flow directly from its target, which will be reflected in 90 ° angles and a visual emphasis on horizontal and vertical lines. - Step 6: Painting
You might want to make an external picture as an author. It’s good if you have old paint left. You don’t need much, you can even mix the remaining paint together to create your own color. - Shag 7: input
You may need a ramp or staircase to conveniently enter the barn. Small pieces of flooring and wood that are suitable for contact with the ground are often left after flooring. You can see the ads in the newspaper or on the Internet, who is going to change the floors in your area and agree. - Step 8: Note for windows
It is important that there is at least one window for lighting. You can find an old window or make it as an author and insert a sheet of transparent siding from polycorban. This is a cost effective solution. Commonly used in greenhouses, this durable and translucent material provides some privacy and plenty of light. - Step 9: Conclusion. I hope this post inspires you to repair your own barn. A good example of how, with virtually no cost, to make candy from an old barn.


https://i.expert-h.com/en/stroitelstvo/1004#sigFreeId37de0e76cc
 Another story of demolition and reconstruction. The author’s goal was to save as much wood as possible for the construction of a new barn. At first, the wooden siding was removed, and the author was able to tie the rope to the roof and, without help, of course, remove the entire structure. On the ground, all of it was disassembled into boards. If you plan to reuse wood, you should plan to purchase two or three backup saw blades for the grinder and table saw. Given the cost of the drive and comparing it with the cost of new boards, it's worth it. But first make a plan, an important step that will help calculate the amount of materials. All you have to do is count the boards in the picture to find out the score. Will you have electricity, running water or natural gas? Plan! The author planned to build a 5 x 5 m shed of buildings using 2x8s for roof beams.
 The author decided to build a shed next to the existing concrete site, of course, you will look according to your situation. The author did not provide all the step-by-step photographs on the assembly of walls and roofs, only the preparation and construction of the foundation. Although such information is in other posts, the process itself is not fundamentally different. There are several examples in the same article, how to build walls and roof shed. And if you need instructions, they are on the author’s website, a link under the gallery with step-by-step photos.
This barn was built in 15 days off.


https://i.expert-h.com/en/stroitelstvo/1004#sigFreeId558d879fb1
DIY workshop in the barn
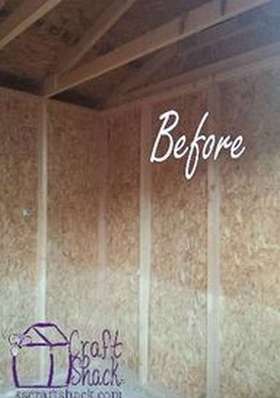
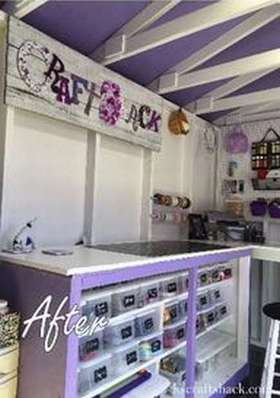 Here's how to remake ordinary garden shed 2.5 x 3.5 m to the functional workshop. Surely, this problem is relevant for many home masters, in a house or even a garage there is always a chronic lack of space even for a small workbench. Not to mention the process itself, which is inevitably associated with noise and dust. To equip such a workshop in the barn, the author took less than $ 250 and a few weeks!
Unfortunately, the author did not provide detailed instructions on how to install it, but you can see the idea in the photos in the gallery. Separate comments and explanations on the project can be read on the website, below there is a link with the inscription photo source.
One frequently asked question is how to control the climate. In winter, the barn is heated by a small heater with a temperature regulator. In summer, a small air conditioning is available. The microclimate in the barn is often better than in the house, because the room is small and the temperature is easy to regulate.


https://i.expert-h.com/en/stroitelstvo/1004#sigFreeId329c9d4ae1
27 Here is another photo tutorial how to equip racks in a barn. You can find out more on the author’s website, the link under the gallery.


https://i.expert-h.com/en/stroitelstvo/1004#sigFreeId00ff18ceb3
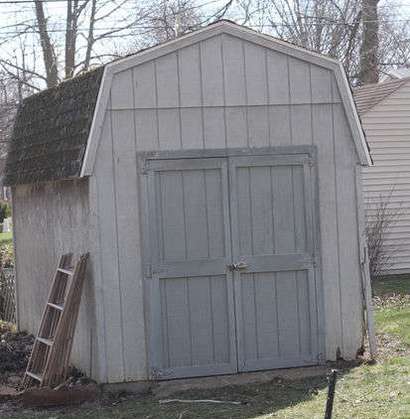
How to make steps in a barn
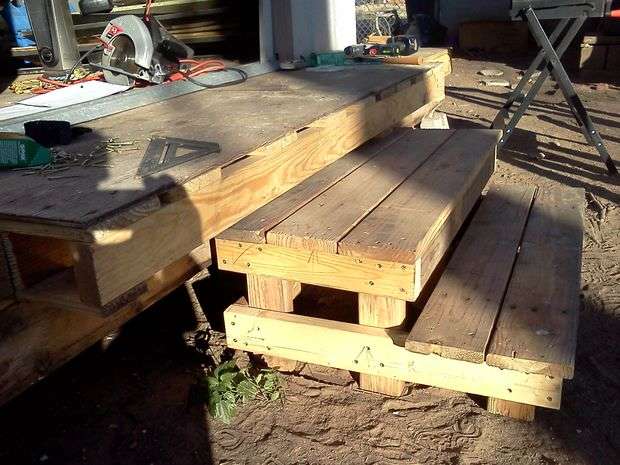 Here is an example, how to make steps in the barn. If you bought a finished structure, in this case a metal shed, you will either have to very carefully clear and concrete the site, which is not always advisable, or install it on concrete piles. In the latter case, you will have to do steps or a ramp, depending on what you are going to store in the barn. If you decide to do the steps, you can use this step-by-step instruction. To implement this project, the author did not need cash costs, he used pallets and waste remaining from the construction of the platform of the shed.
The height of the canopy platform is on average 50 cm. The author developed a plan for two wide steps of 35 cm and a height of 18 cm, as a separate structure.
- To compensate for the overhang, make the top step longer.
- The upper steps will be supported on a simple rectangular frame.
- The lower steps will be attached to the front of a larger rectangle constructed in the same way. This will be screwed to the legs of the upper frame so that the entire assembly is one piece.
- Using the drawings, saw off the short sides of the rectangle, the top - 40 cm, the bottom - 65 cm.
- Set the short side to the width of the other and draw a line inside. Measurement between marks will give a length of 86 cm.
- Measure the space between the marks and saw two sections of the subframe. Assemble the frames by twisting 10 cm screws.
- Attach the legs to the frames. First assemble the top rung. Then attach the bottom frame to its six legs.
- Fasten the steps with 5 cm screws, two for each connection, a total of six on the board. Only 30 screws.
According to the author, the steps are quite strong, so you can take advantage of experience.


https://i.expert-h.com/en/stroitelstvo/1004#sigFreeId1a8c8f3bec
How to insert a window into a barn
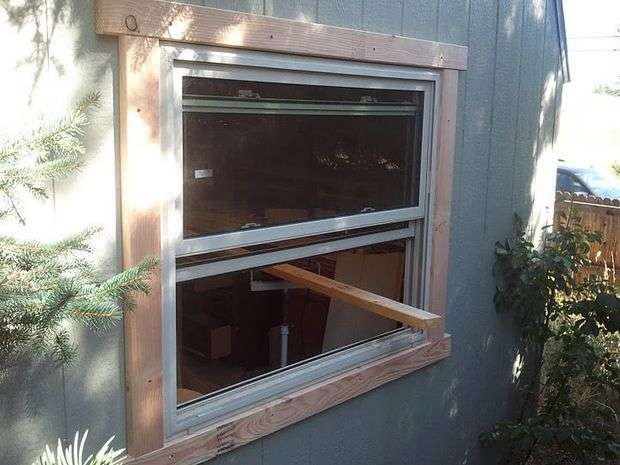 Necessity insert a window into the barn arises if you decide to restore the old barn or remake, say, in a workshop. In summer, the window will provide a slight breeze, and in winter there will be more natural light inside. In general, the work is simple, but if you do not know where to start, then this instruction, how to insert a window into the barn come in handy. But you should not follow these instructions for any structure, for example, at home.
Energy effectThe integrity of this installation is not very good and it is important to consider the strength of the wall.
Remember, this manual is designed specifically for this barn.
Benefits of a window in a barn:
- Light: south or east window, will bring many benefits in winter in terms of saving electricity.
- A window on the opposite side of the door will create a light draft that will cool the barn in summer.
The idea was to find a small inexpensive window and try to install it in an existing barn structure.
What the author used:
From the materials it is clear window, studs, screws for drywall, gaskets
From tools:
- Hammer
- A circular saw
- Hand saw
- Drill
- Marker
- Clamps
Order window replacement in the barn shown in step-by-step photos, instructions are on the site. According to the author, it was quite simple. The work was completed over the weekend. So if you are going to remake your barn in the workshop how to put a window, now you know. Do it, and you can enjoy the daylight and fresh air.


https://i.expert-h.com/en/stroitelstvo/1004#sigFreeId6937ab83cf
DIY barn drawings


https://i.expert-h.com/en/stroitelstvo/1004#sigFreeId87f5864bc5
DIY barn 250 photos


https://i.expert-h.com/en/stroitelstvo/1004#sigFreeIdbce60d65a4
Hello, I am the author of this article, so I look forward to asking questions for this article in the comments below, I will answer all !!!
If you have questions on another topic, ask them on our forum, we will answer you
- Two baskets of paper in 5 minutes (Master class)
- How to make a simple and compact table for a milling cutter from plywood
- How to make a soft headboard tile (Instructions + step by step photos)
- Cinder block benches: a convenient bench in 55 minutes
- How to make a bed with a niche: saving space (Master class)