Wine cabinet. Do it yourself. 700 photos, master classes
 wine cabinet for home
In this article you will find useful information, how to make a wine cabinet with your own hands. 20 examples of functional and stylish designs with step-by-step photographs, drawings and a link to the source with detailed instructions, a list of materials and dimensions of parts. It will allow you to make magnificent wine cabinet much cheaper than a store purchase would cost.
Several examples are also provided, how to make do-it-yourself wine shelves in different styles and sizes. To the kitchen and living room, vertical and horizontal, wall-mounted and in the form of racks - just choose what suits your style and interior. Making a wine shelf is a simple project, which in most cases can be completed in a day or two, depending on the complexity of the design.
How to make a wine rack
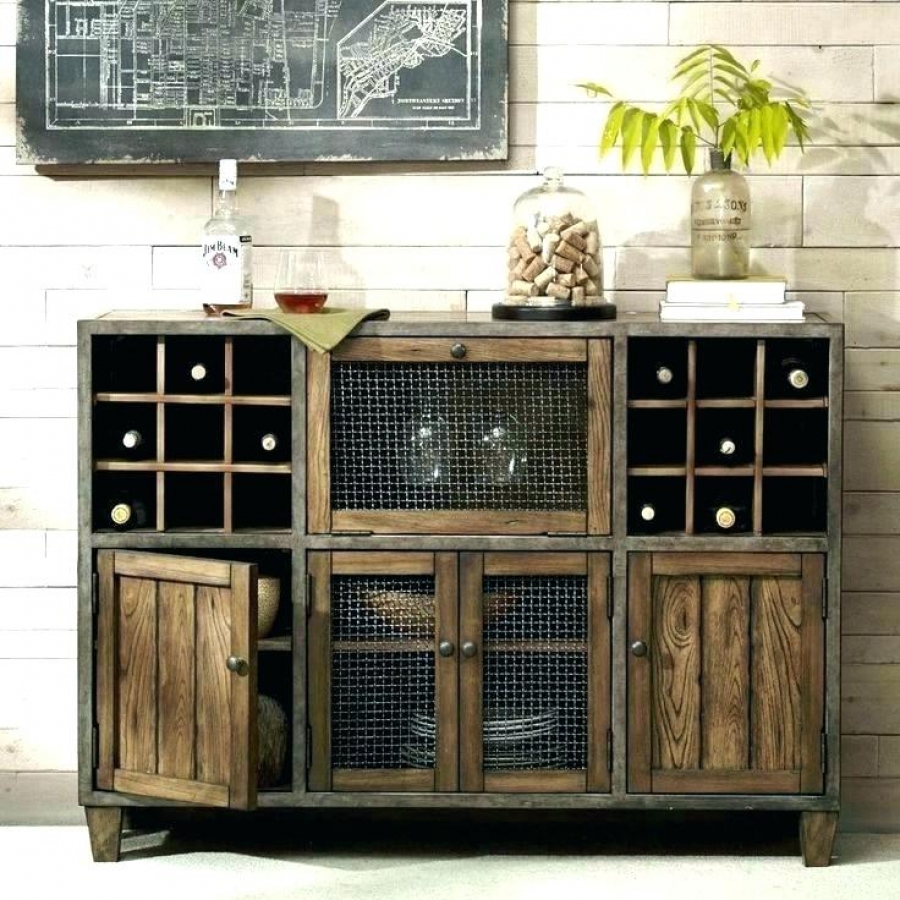
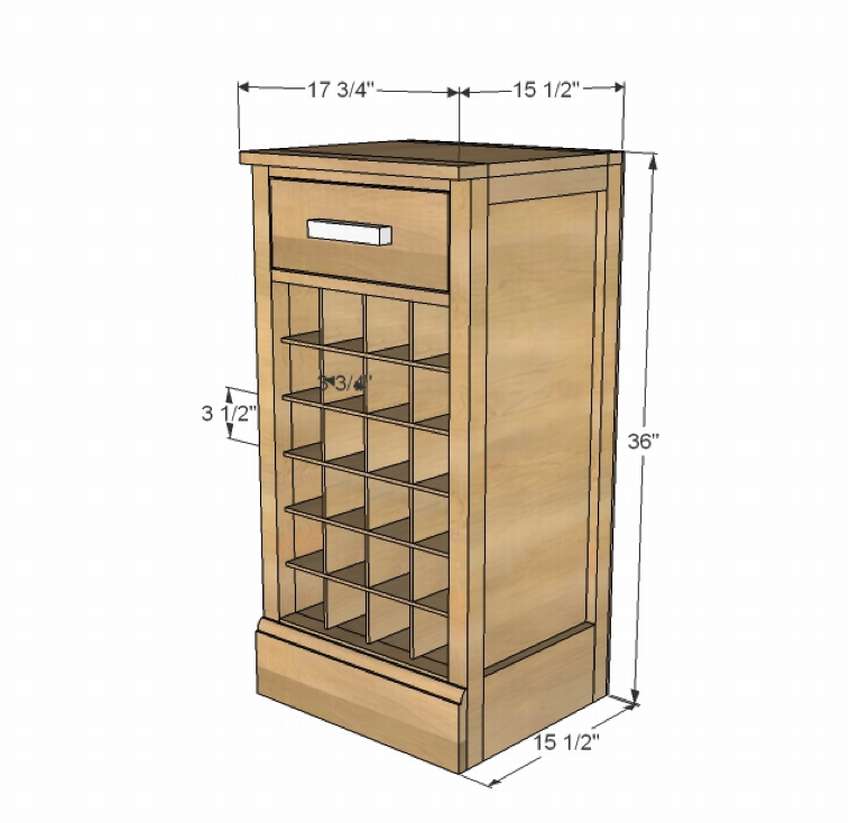
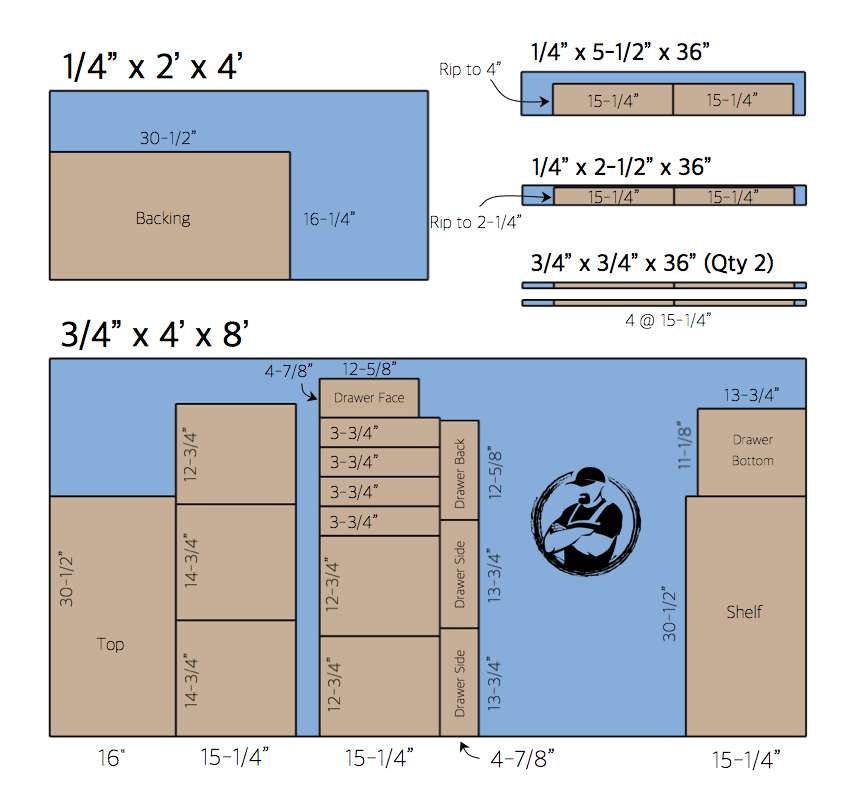
 The small space of a room requires creative solutions. See an example how to make a wooden buffet with a wine rack do it yourself for a small room. You can read the detailed instructions on the website, the link can be found under the gallery. Although the essence of the assembly process is easy to understand by step-by-step photos, which depict dimensional drawingsby which it is clear in what sequence it is necessary to assemble this cute wine cabinet. Just translate the indicators inches to centimetersby simply multiplying them by 2.54. For example, shown in the drawing 12 ", it is 12 * 2.54 = 30.48 cm.
 The hardest part is to do X - shaped bottle shelves. To do this, you need a solid sheet of plywood 30 x 58 cm. You do not need to tilt the ends, as they will be hidden during installation. With doors, too, difficulties may arise. It is important to make accurate measurements. If you will use ready-made ones, trim them and carefully sand them. When installing the loops, try to leave 3 mm clearance on each side. You can read all these nuances on the author’s website.


https://i.expert-h.com/en/shkaf/vinnyi#sigFreeId18988696da
Wine rack drawing
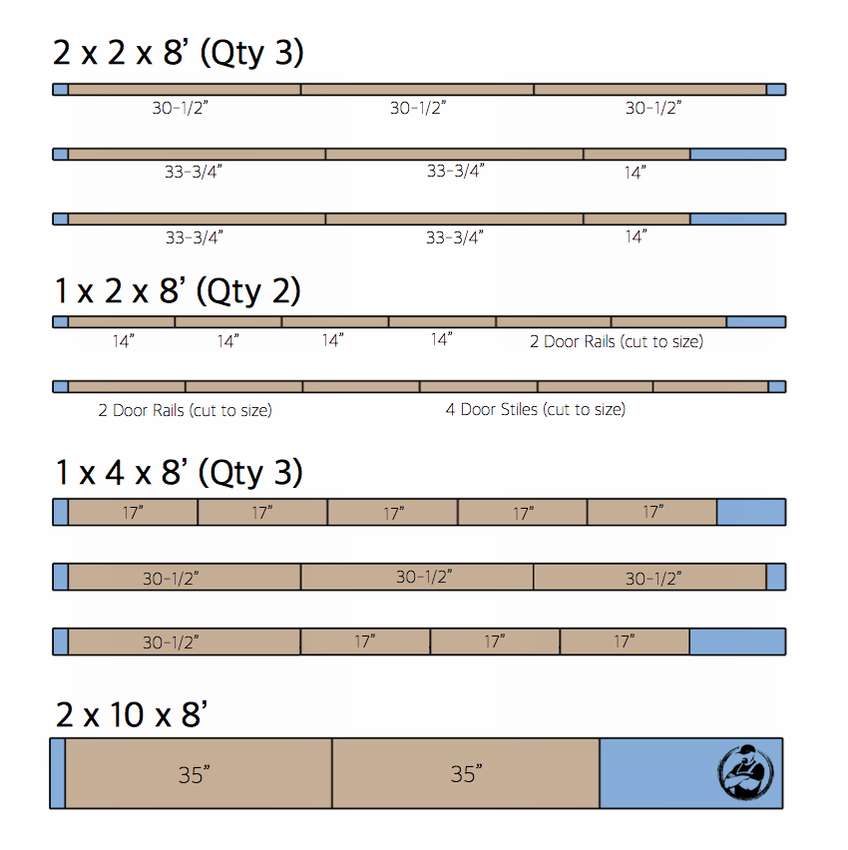
 The drawings and diagrams presented here will help you make your own. do-it-yourself wine cabinet. For this you will need:
- 3 meters of boards 1 × 12
- 1 sheet фан "plywood
- 2 boards 1x2 245 cm long
- 1 board 1x6 122 cm long
- 4 meters of bars 2x2
- 60 cm boards 1x3
- 180 cm boards 1x4
 30 cm sides of the drawer can be made of 1x12 boards. The photo below shows a drawing with the dimensions of the parts for the manufacture of the box and cells.
Detailed instructions how to assemble a wine rack, can be read on the website, link under the gallery.


https://i.expert-h.com/en/shkaf/vinnyi#sigFreeId5d8c1c6d3b
Wine cabinet for living room
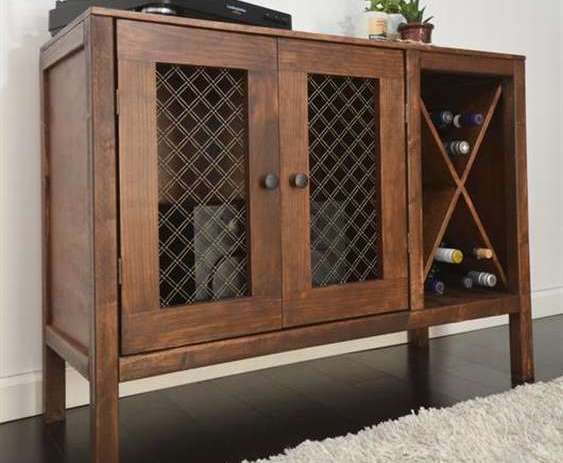
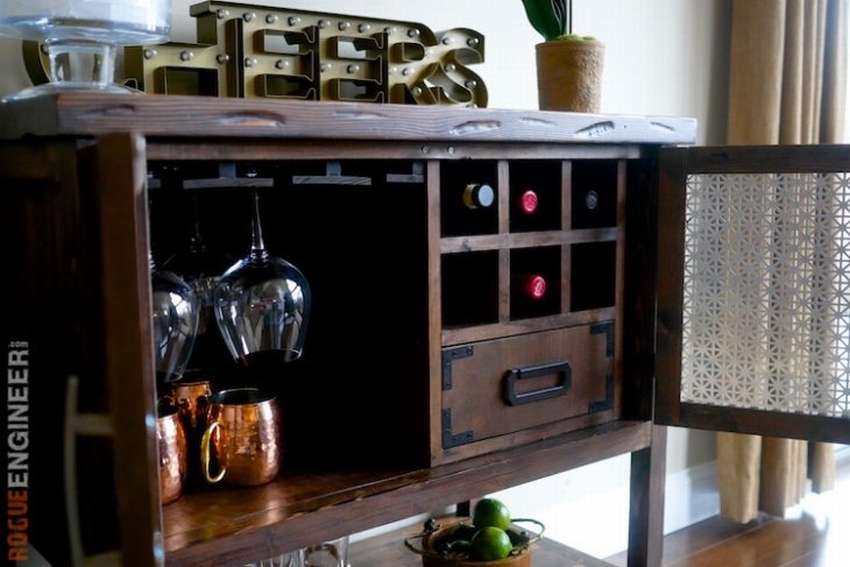 This wine cabinet for living room is a great addition to any interior.
Decorative sheet metal inserts in the door add contrast to the wooden case. Inside the cabinet you can place wine glasses, cups, 6 wine bottles and a box for storing openers and other accessories. A lot of things can be stored on the lower open shelf, and the best part is that all this pleasure, though not free, is definitely cheaper than the store, at least twice.
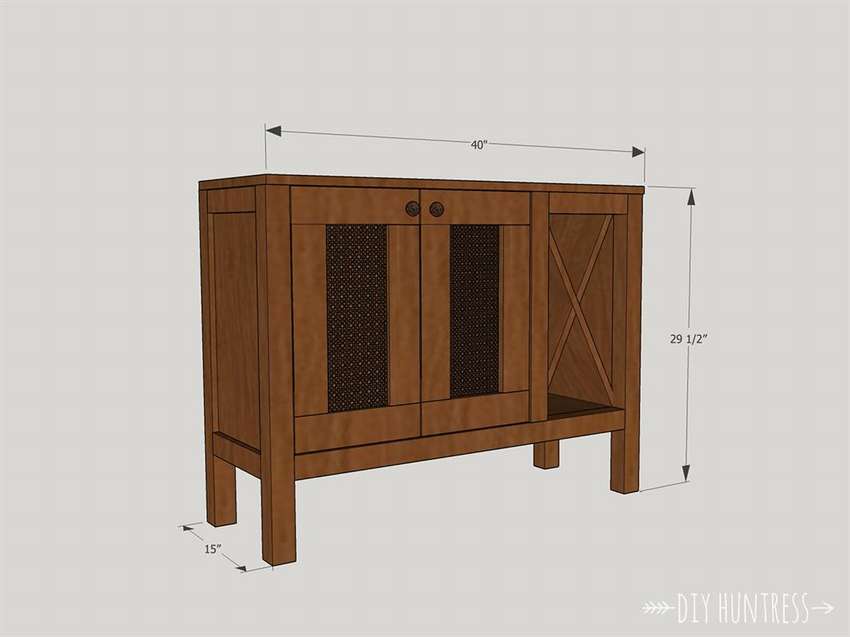
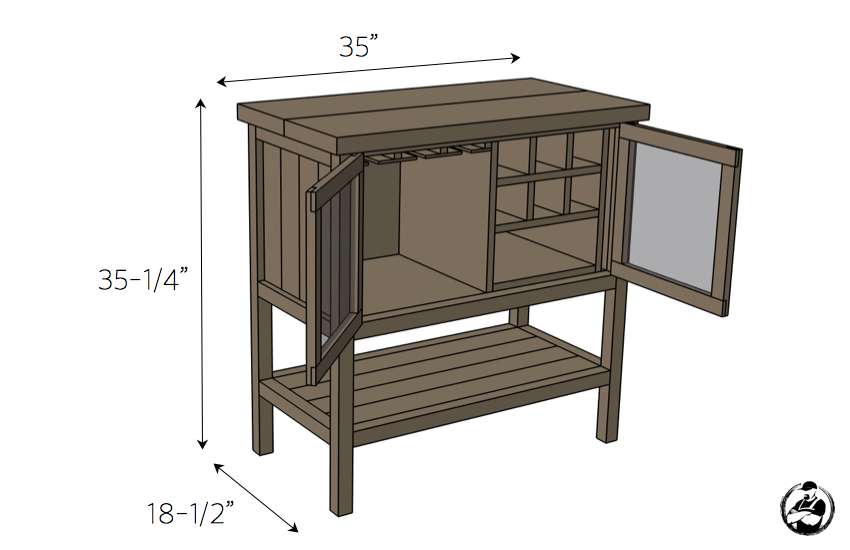 To make do-it-yourself bar cabinet, many tools will not be needed. The main thing is a table and mitral saw, drill, clip for pocket holes.
Bar cabinet drawing, as well as the dimensions of the details you can see in the photo. Convert inches to centimeters by multiplying the figures on the diagrams by 2.54. For manufacturing, mainly used 2 mm plywood. You can find out all these details on the website, the link is under the gallery.
 The step-by-step photos schematically show how to make a bar cabinet do it yourself.


https://i.expert-h.com/en/shkaf/vinnyi#sigFreeId1860b085df
Small wine rack
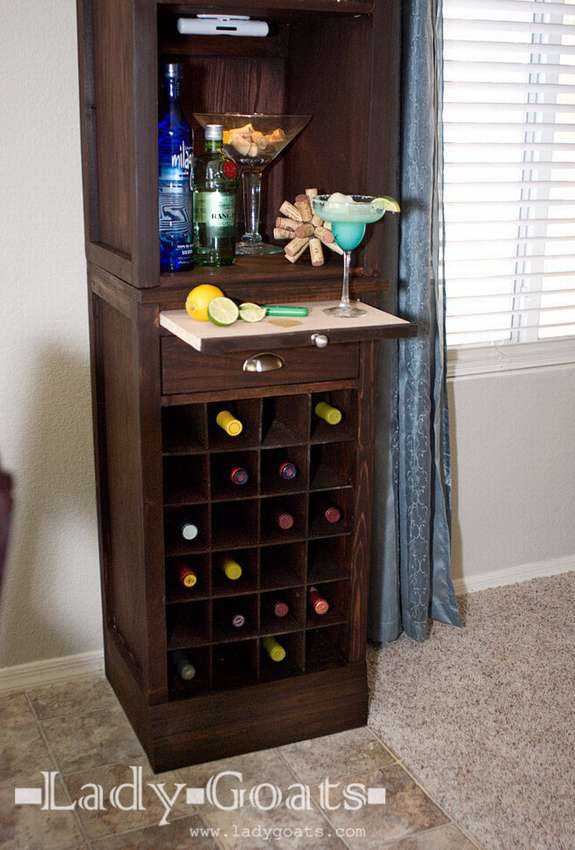
 Long wanted to make your own wine cabinetbut no opportunities for a full-sized project? Start small, for example, how do you like this option? The idea is to secure vertical walls that separate the three areas (wine rack, place for bottles and shelves) Well, with legs made of pegs, this is the original idea of the author, if you think that this option is not suitable for your interior, you can make or buy ordinary legs for the bedside table. Cabinet made of plywood, you will need sheets of such sizes:
- 2 sheets (11x48) for top and bottom
- 1
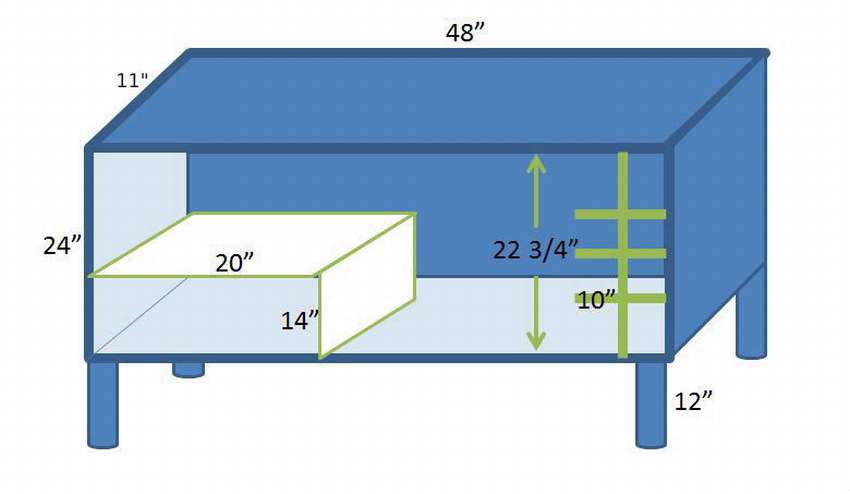 sheet (24x48) for the back
 - 3 sheets (11x22 3/4) for side walls and a rack for wine.
- 3and sheet (11x10) for shelving
- 3 sheets (11x1 1/2) for the edges of the shelves
- 1 sheet (11x20) for the top shelf
- 1 sheet (11x14) for the sides of the shelf
This is in inches, just multiply the numbers by 2.54, you get the size in centimeters. for example: (11x48) this (28x122 cm)
How to do this do-it-yourself wine cabinetsee below for step by step photos.


https://i.expert-h.com/en/shkaf/vinnyi#sigFreeId9831766481
DIY wine cabinet
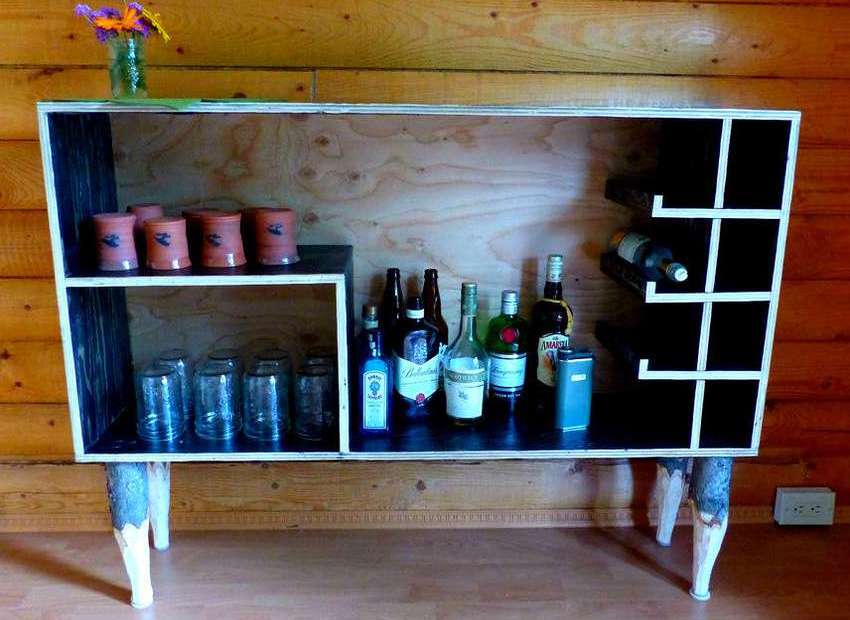
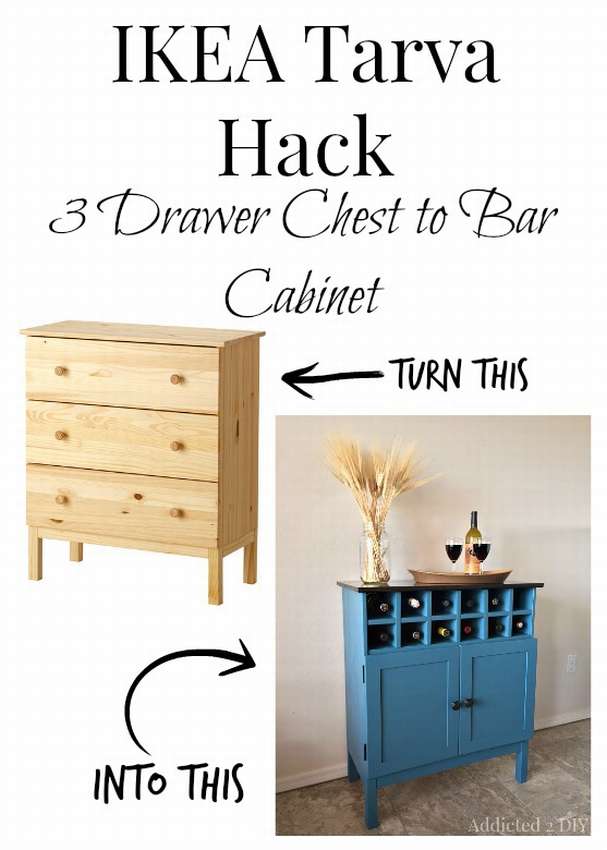 This wine cabinet for home not made from scratch, but remade from a small chest of drawers for the kitchen. True, the reconstruction will have to be done seriously. The idea isto attach wine racks for bottles with a grill at the top of the cabinet and leave free space for dishes at the bottom. Well, another difficult task, make cabinet doors.
To make incisions, use a mitral saw. Using a chisel, simply push out the wood. When the cuts are ready, peel and assemble together. Take a few bottles of wine to see how it will look.
In this case, cabinet doors were used two drawers. Cut them in half, and then use Kreg Jig to drill pocket holes. For fastening, use wood glue and pocket screws to form the cabinet doors. The photo shows that it turned out a lot of holes, so in order to fill them all, you need a bunch putties for wood. Then from plywood make holders for glasses.
This is briefly about the main points, on the site you can read more detailed instructions, and see step-by-step photos below.


https://i.expert-h.com/en/shkaf/vinnyi#sigFreeId489d6f9235
Built-in wine racks under the countertop
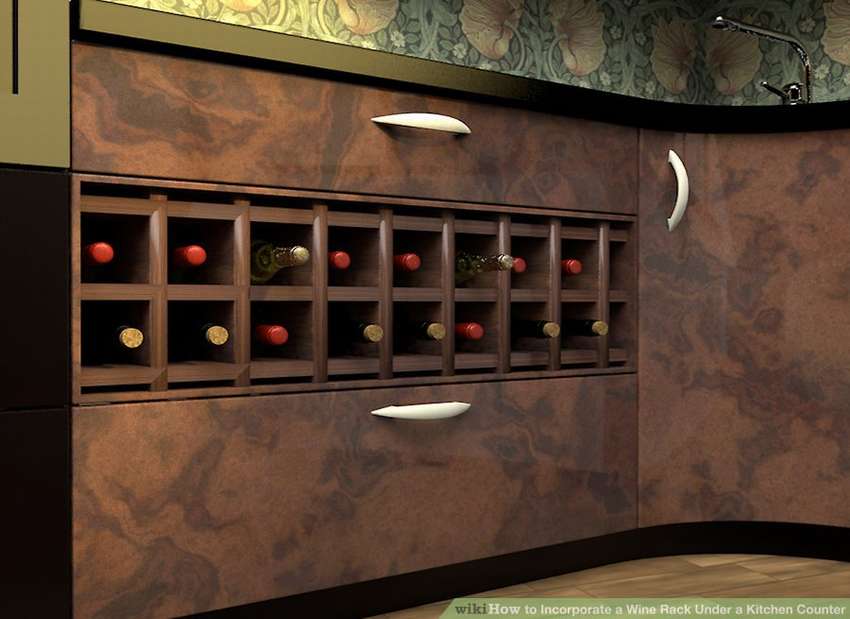 Changing the kitchen improves efficiency and comfort. Kitchen cabinets can be turned into wine cabinets, such a reconstruction adds to the attractiveness of the interior and it will just be more convenient. There are several ways to do this, so choose the best option for your kitchen and budget. Look how to make built-in wine racks under the countertop kitchen cabinet. If you do not have kitchen cabinets that meet these requirements, consider installing island backgrounds. Half of the table can be used for cooking, and the other half is reserved for the built-in wine cabinet under the countertop. Below, step-by-step photos show one of the options for arranging a kitchen with wine shelves.


https://i.expert-h.com/en/shkaf/vinnyi#sigFreeIdd91478e64c
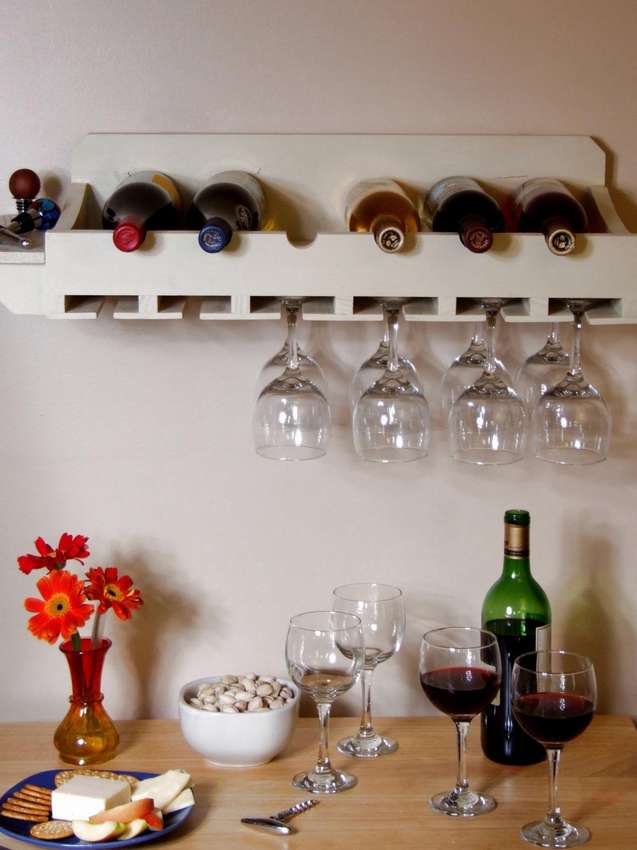
How to make a holder for glasses
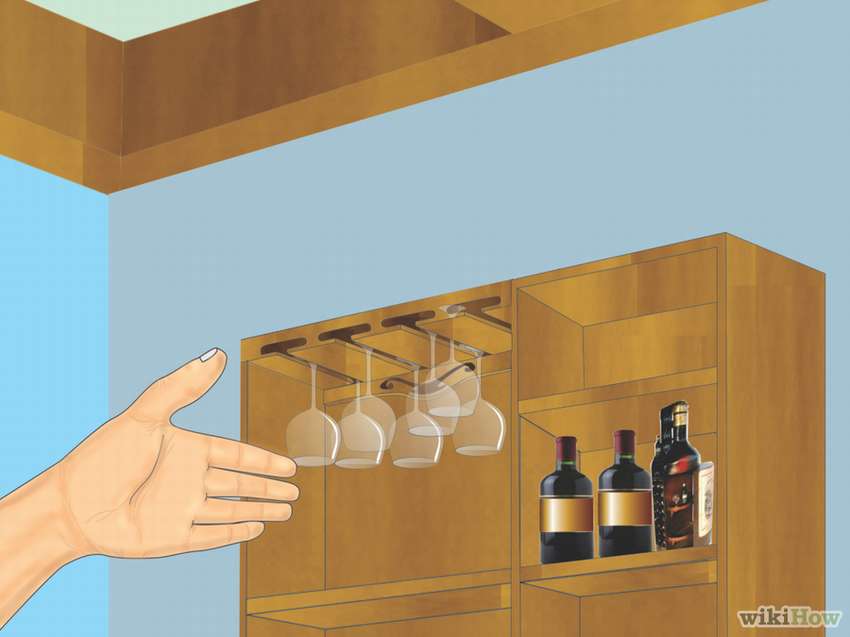 Do you want to show the wonderful glasses you have? Wooden rack under the cabinet It looks beautiful and it's not as hard to do as you think. Choose a space within easy reach, but high enough not to accidentally touch. Measure the width and length of the area you want to use. Draw a drawing, add a centimeter for each separator and 3 cm for support. Measure the rods and cut to the desired length. Glue the strips to the shaft, making sure that all but two are centered. Tighten 2 to 3 screws to each set, then fasten together and allow to dry for at least two hours. Take the last two strips and fasten using wood glue and screws. When the glue dries, paint and let it dry. Screw on the supports at predetermined intervals, starting from the end parts. Add a decorative shape to the back of the rack. Gently hang the glasses.


https://i.expert-h.com/en/shkaf/vinnyi#sigFreeIdb0b900b900
Wine Rack Drawing


https://i.expert-h.com/en/shkaf/vinnyi#sigFreeId74899f822a
Wine rack 100 photos


https://i.expert-h.com/en/shkaf/vinnyi#sigFreeId1047cd77a8
Do-it-yourself wine bottle rack
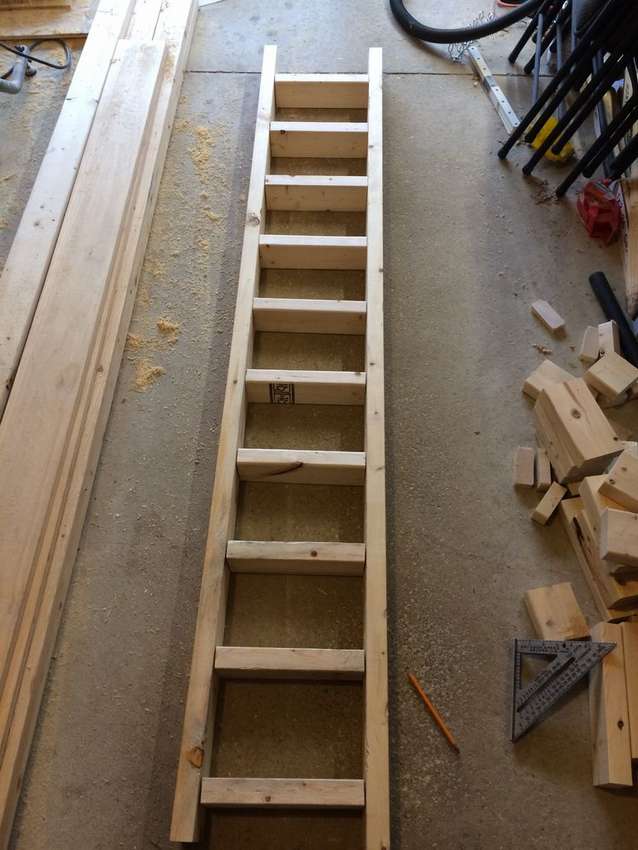
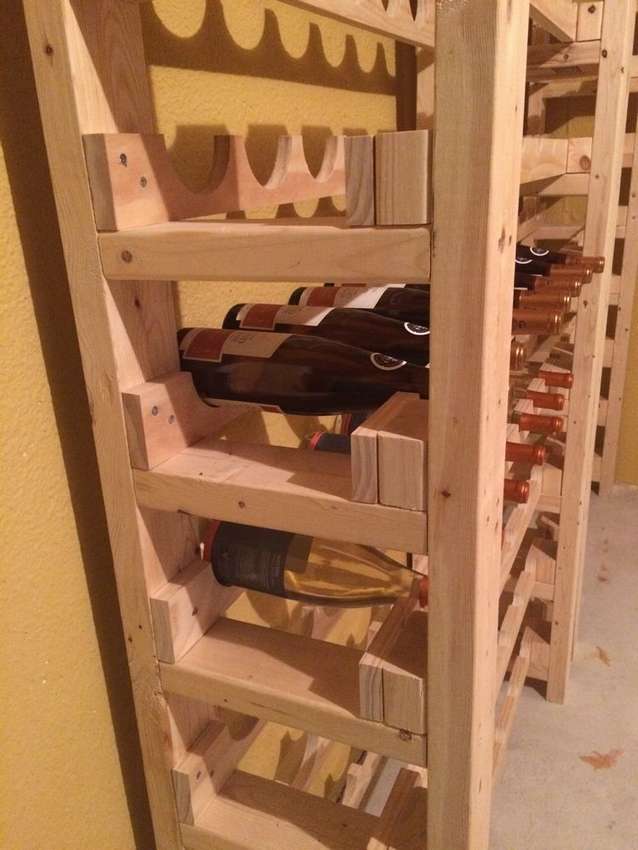 A specific example is shown here, how to make a big wine rack for storage in a basement or other room of the appropriate size. Dimensions were chosen to match the height of the basement. The width was determined by two factors: no additional support in the center is needed, and the need for remodeling part of the basement around a pair of these wine racks (between the racks you need artificial brick, lined on the wall).
This is a relatively complex project, so the author, through step by step photos I tried to share my experience as accessible as possible.
If you will change the size of the holes, the author of the project suggests making a layout and check the distance between the shelves using various bottles. You may need to change the distance between the shelves. This will also have to be done if you have boards of different different thicknesses.
Adjust the dimensions for the estimated height. In this case, the height is 205 cm, the width is 100 cm and the depth is 25 cm. 7 bottles are placed on the shelf. (70 bottles per rack).
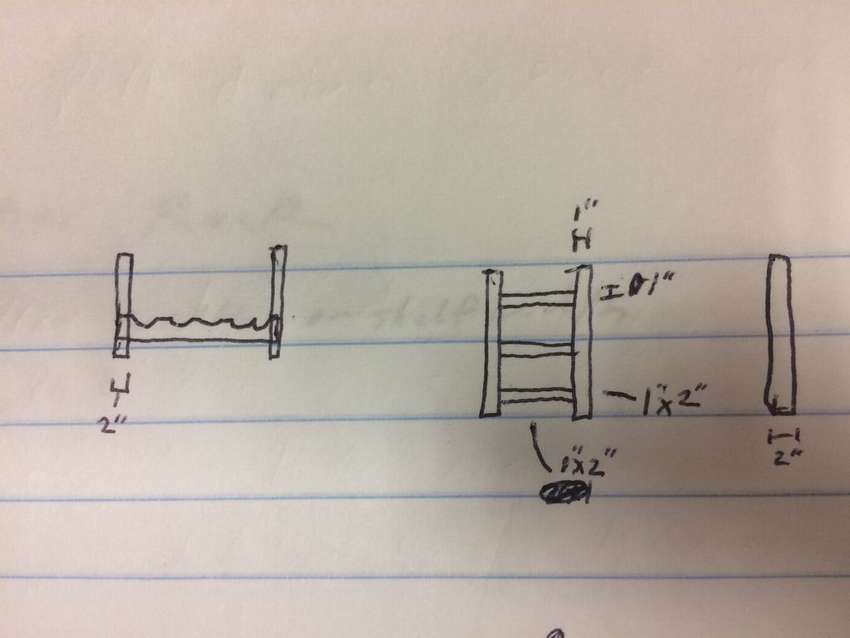 You can piclook at the sketch, if you take it apart, do not judge strictly, it’s just an amateur drawing.
Tools
- Table saw
- Miter Saw
- Electric drill
- Right angle adapter
- Roulette
- Drill bits
- Screwdriver for screws
- Clamps
See below for step-by-step photo sawing details.


https://i.expert-h.com/en/shkaf/vinnyi#sigFreeIddcfac3d85c
 And here is shown how to assemble a wine rack. Make a template on cardboard first to speed up the process of marking points for holes. Here the stands for the shelf are located at a distance of 17 cm. With the first shelf 25 mm from the floor. Using the template and starting from the bottom, mark all the places for the holes. Check all the joints square to make sure they are square. Screw the screws into the shelf support. Start from the bottom and so go to the top. The thickness of the boards of the shelves and the size of the holes should correspond to the template. Use spacersto push the front shelf closer to the rear shelf. This ensures that the bottles are in a stable position.
First attach the lower shelves (one or two), and then one of the upper shelves to make sure that the distance between the racks is consistent throughout. Then go back and install the remaining shelves.
Depending on the floor level, you need to install a pad or board under the legs to balance shelf. This will prevent rocking on uneven surfaces.


https://i.expert-h.com/en/shkaf/vinnyi#sigFreeId22a61d995c
Wine rack made of pallets
 For many craftsmen, wooden pallets are one of the favorite sources of building materials. At low cost, you can get great wood for a project that you just throw away. More pallets give a unique opportunity to adapt to the material during operation. Emphasis motivates to be individual in every project. In general, see how to make beautiful wine shelf of pallets in the original style.
As for wood, most are taken from the pallet, but also used plywood trim for holders of glasses and sections. How to make this amazing wine rack do it yourself see below for step by step photos.


https://i.expert-h.com/en/shkaf/vinnyi#sigFreeIdf285fa8f3d
Another example how to make a wine shelf with your own hands from pallets
 This design is much simpler, to better know how it was done, take a look video on the site the author of this project, a link under the gallery.


https://i.expert-h.com/en/shkaf/vinnyi#sigFreeIdd2f53c5c75
Wine shelf drawing
 The most simple wine while, with slots for glasses, which you can do with your own hands.
Drill holes in the rear panel for attachment to the rack. Alternatively, use nails and wood glue. But it’s better, of course, to use screws so much more reliableYou don’t want your bottles to crash onto the floor.
The instructions can be read on the site, it is very short and understandable.
Below in the gallery the assembly sequence is shown in the diagrams.


https://i.expert-h.com/en/shkaf/vinnyi#sigFreeId9f47545714
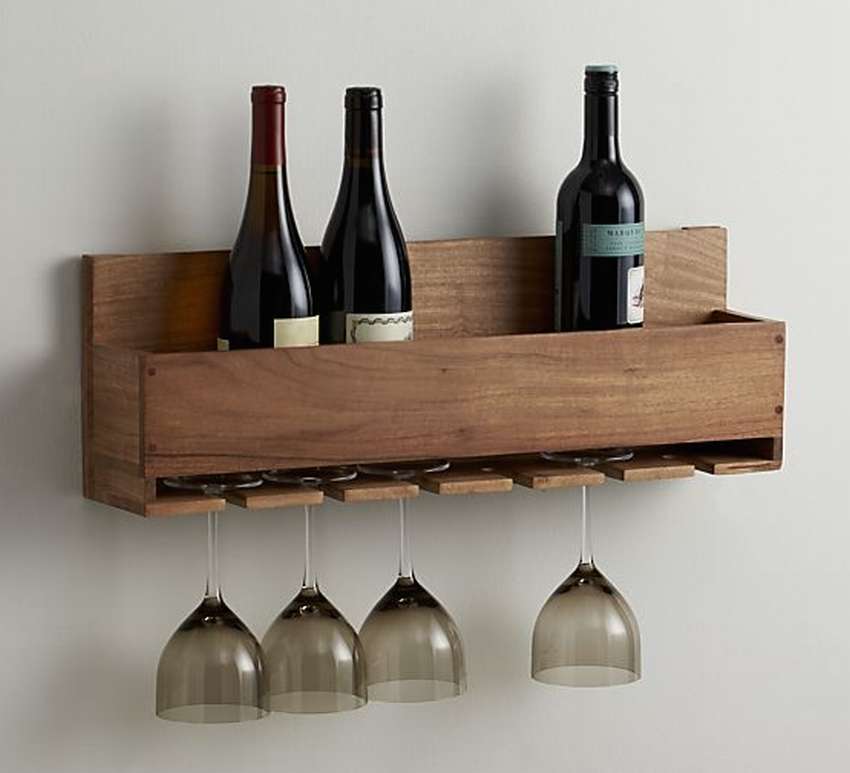
Shelf for bottles and glasses
 Want to add an interesting touch to your kitchen design, but you have little space? Do shelf for bottles and glassesto maximize the space and add a fun decorative detail for the interior! The photographs, drawings and instructions presented here will help you assemble, mount and finish this beautiful wine rack.
You can attach the wine shelf directly to the studs in the wall or use cabinet mounts. When attaching to wall studs, be sure to rear drill countersunk holesso that they match the distance between the studs. Use screws with a minimum length of 8 cm.
You can read the detailed instructions on the website. There is a chart in the gallery with the dimensions of each part, but you can change them if these sizes do not suit you.


https://i.expert-h.com/en/shkaf/vinnyi#sigFreeIdf44e4616f8
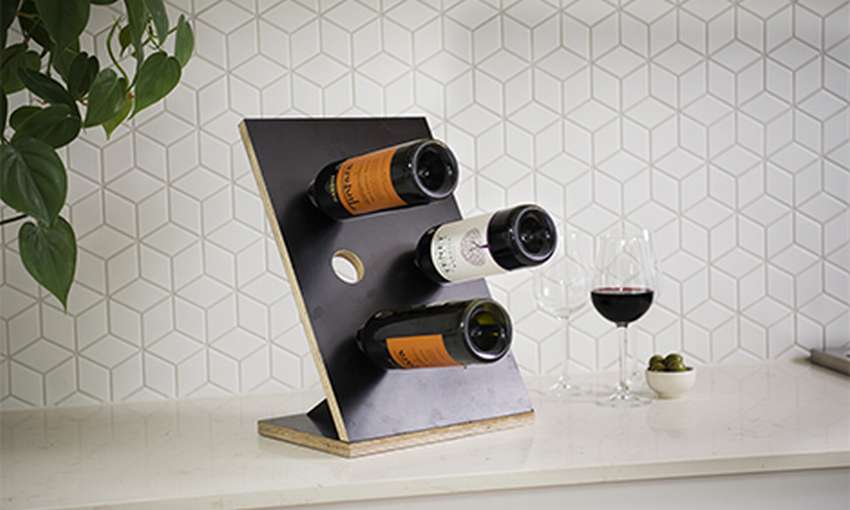
Vertical wine shelf
Here is an example how to make a wine shelf with your own hands for less than 10 dollars.

 The master class is shown in step by step photos, instructions, which include a list of materials, photos, diagrams and directions of decoration, can be read on the site.


https://i.expert-h.com/en/shkaf/vinnyi#sigFreeId4560b509ce
DIY wood wine rack
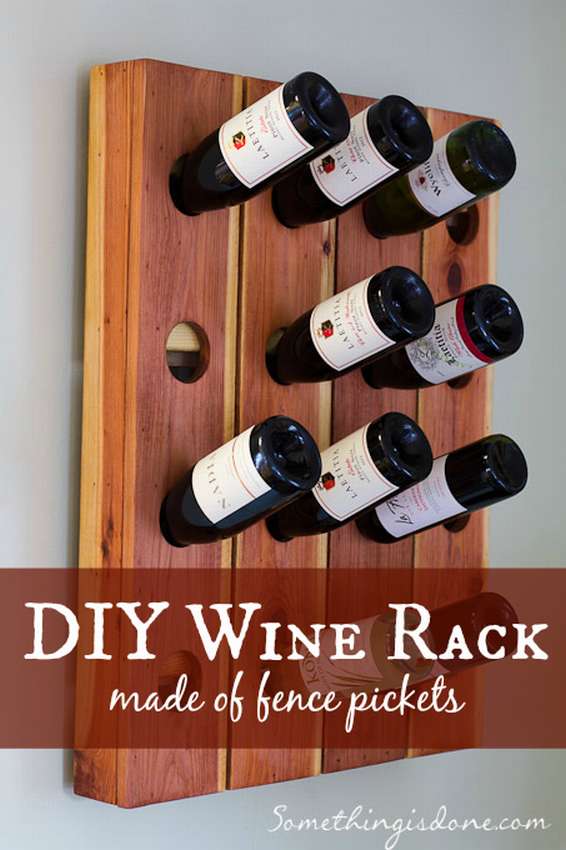 See an example how to make a simple wine rack from wood do it yourself. First decide what size your rack should be. In this case, 78 x 58 and 9 cm.
- Drill holes approximately 6 cm in diameter.
- Assemble the frame of the wine shelf. It is just a box.
- Attach 2 × 4 rails behind the holes.
- Of course, different bottles have necks of different thicknesses, so you can combine with rails.
- Then add an additional 1 × 2 strip to the bottom 2 × 4, as shown in the diagram. This makes the angle of the bottles steeper, so they will hold better when the rack is installedhen upright on the wall.
- Then assemble the front of the rack.
- Sand the wood with a belt sander or grinder and apply a protective finish. In this case, a homemade oil mixture was used (1 part boiled linseed oil, 1 part poly based oil and 1 part mineral spirits).
Of course, you can resize according to your space, but the main thing is that you have an idea.
Enjoy a bottle of wine as soon as you finish to congratulate yourself for all the hard work!


https://i.expert-h.com/en/shkaf/vinnyi#sigFreeIdb9e9c266a6
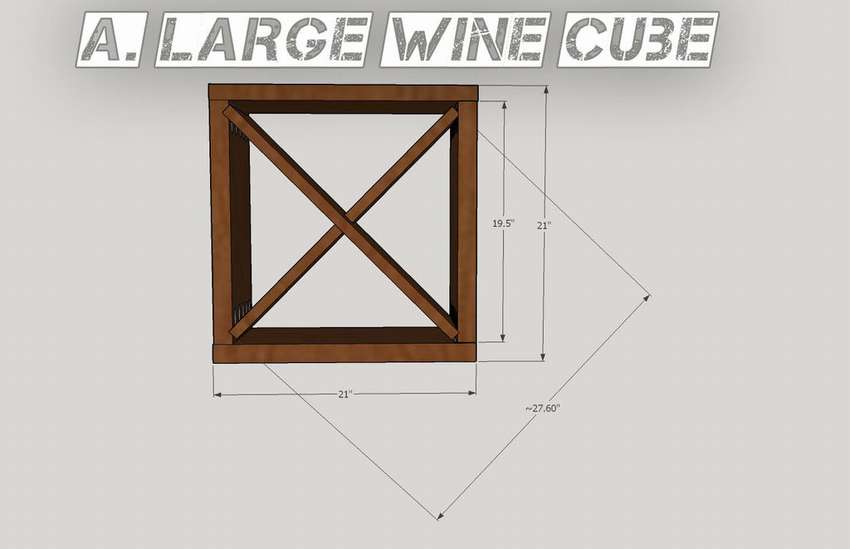
Wine bottle shelves
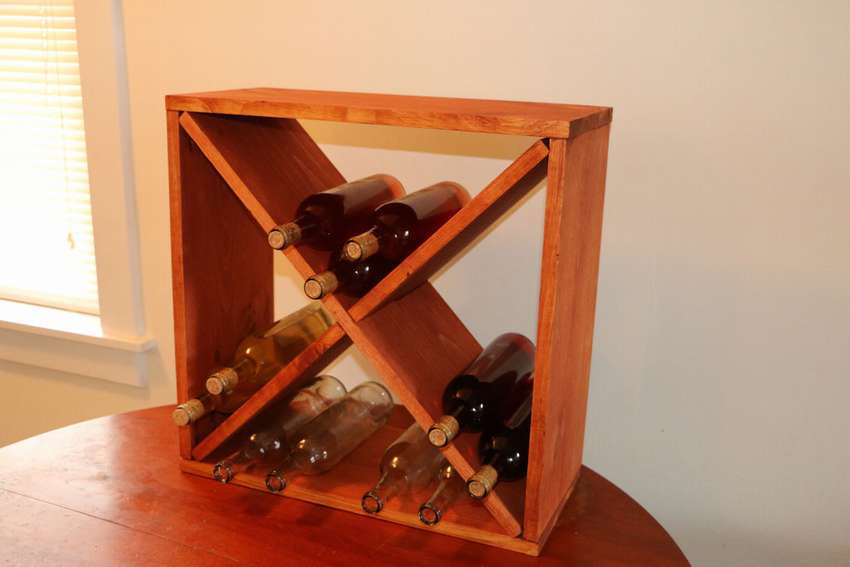 This simple wooden wine shelf holds about 24 bottles of wine. You can connect several of these cubes and make large wine rack, or create a smaller top version of this project that contains 12 bottles. This versatile design is ideal for a kitchen, living room or basement. The drawings below show two versions of this project: all the same except for the final size of the wine rack. Large rack for 24 bottles of 53 cm and a depth of 23.5 cm. A small rack for 12 bottles of 40 cm and a depth of 23.5 cm.
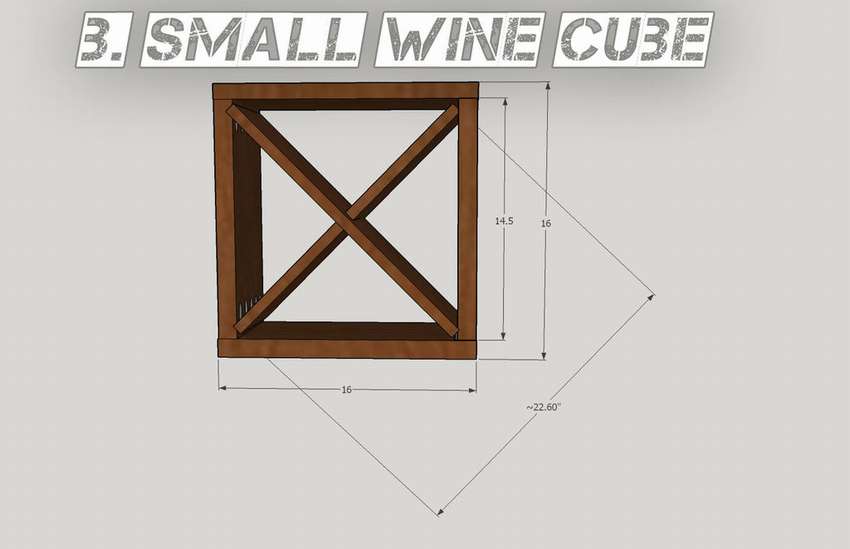 How to make a wine shelf with your own hands is shown in detail in the below step by step photos.


https://i.expert-h.com/en/shkaf/vinnyi#sigFreeId2f0e3496d2
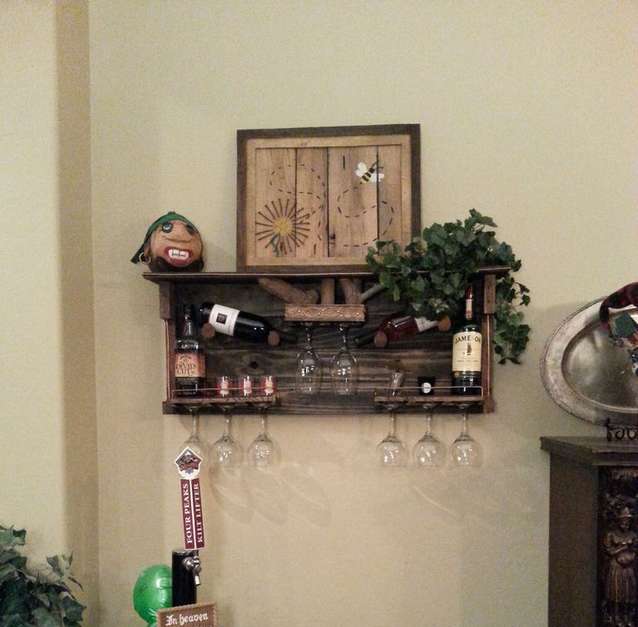
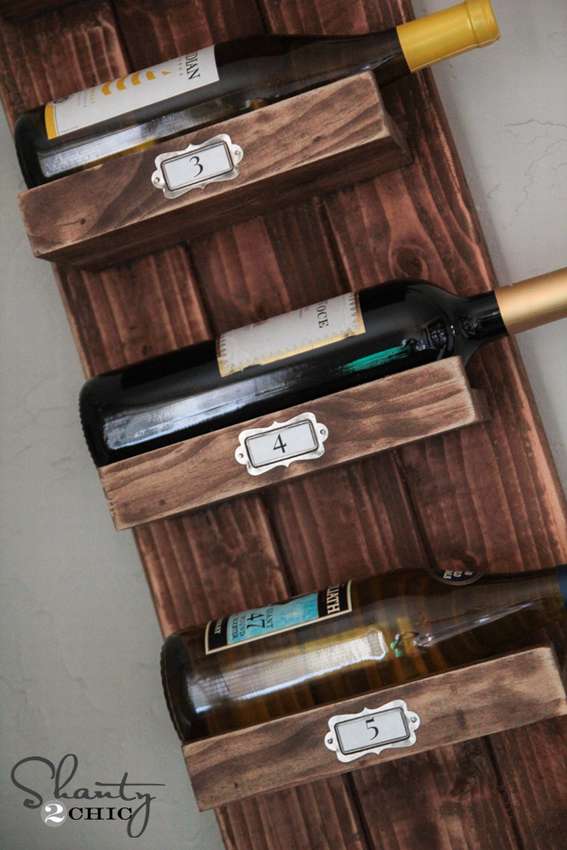
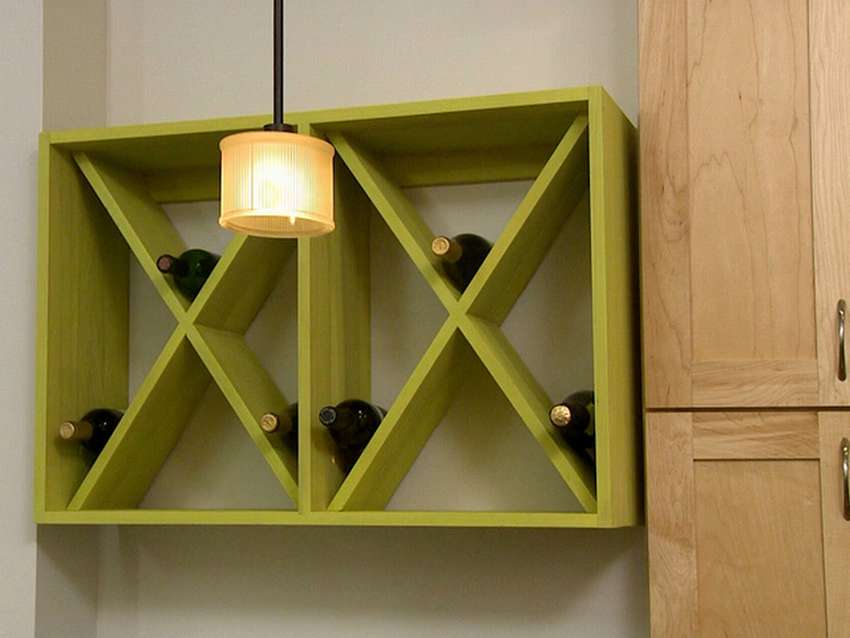 Here is another similar example, only here the wine cabinet consists of two sections. Mounted on the wall, this bottle cabinet help create a special style for your interior and add storage space to the kitchen. How to make a wine rack, described in detail in the instructions on the site, the link is under the gallery with photos. An important point. Fasten the wall beams to secure the structure through the rear mounting strip. Eight separate triangular compartments make it easy to get bottles. Below in the gallery see a detailed master class on step by step photos.


https://i.expert-h.com/en/shkaf/vinnyi#sigFreeIdfd5c7d31c1
Wine table
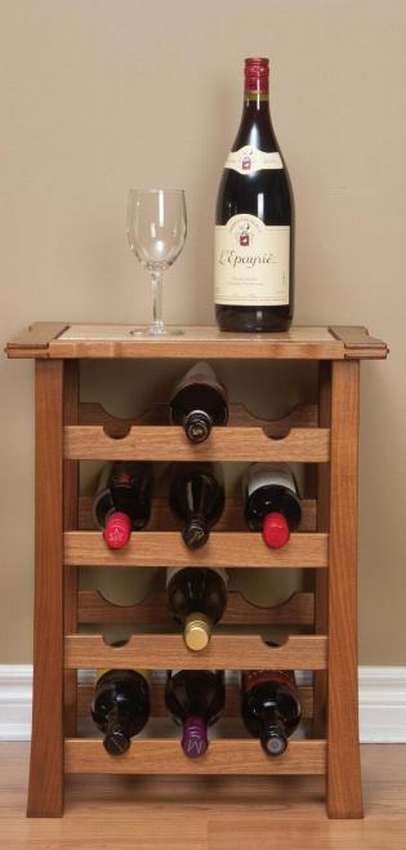 What makes this project interesting is that you choose the style you prefer. If you don’t like the Asian style, as in the photo, just replace the legs, make them straight and narrowed. The same applies to the frame around the countertop. Full-size templates or layouts to help you imagine how it will look wine table in final form. And if you don’t like the design you are trying to do, you can refuse plywood or pine, replace it with another material. When you have your own design, take your time to choose a tree. It is tempting to use an impressive sample for a countertop, neglecting other components. This is a serious mistake. All parts must match, and in this case, the structure of the wood of the legs should complement the shape of the table when viewed from the front or side. Try the template. To make it work, make a groove template. This ensures that all the grooves are in the right place.
Try to cut all the details from one solid boardto get the same color and pattern.
Feet are structural elements that support the table frame and the upper part, so start with them. Start by marking the location of the six grooves in each part using the template you made. (You made a template, right?) Pay attention to direction and pattern fibers. With open grooves, legs are formed.
However, you should read the instructions on the website, the link is under the gallery. Everything is described there in more detail.


https://i.expert-h.com/en/shkaf/vinnyi#sigFreeId41a15b581f
Photos of Bill Perry
James Provost illustration
Wooden wine rack
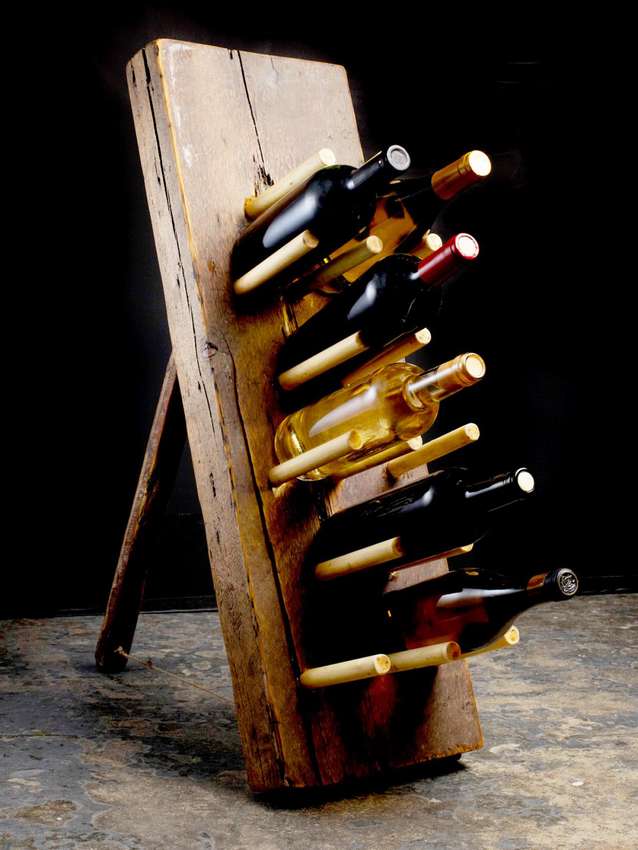 This unique but simple wine rack made of old boards and wooden dowels. This is really a very simple design, the work will take only a few hours.
- Find an old board and cut a length of 80 cm for the base of the wine rack.
- Then measure and cut the wooden dowels 23 cm long.
- From the top of the base of the wine rack, measure and mark 15 cm. Go down, making marks after 10 cm.
- Draw a light horizontal line at the marks. Mark the center on all lines. For this project, the center is at 12.5 cm.
- Starting at the top horizontal line, mark 8 cm to the left and right of the center mark.
- Repeat these marks, skipping each horizontal line.
- Drill holes in the marked areas. Tip. Try to make the holes as straight as possible.
- Sand the ends of the dowels.
- Paint the rack using polyurethane, paint or impregnation. Let dry for four to six hours. Tip. Drill holes in the board to insert the drying pins.
- Apply wood glue evenly to the ends of the dowels and insert them into the holes.
- Wipe off excess glue with a warm, damp cloth. Let the glue dry for two to three hours.
You can set wine rack on the wall or make a simple stand using a hinge, twine or rope and a piece of wood.


https://i.expert-h.com/en/shkaf/vinnyi#sigFreeIdc61b2aaa43
Original wine rack
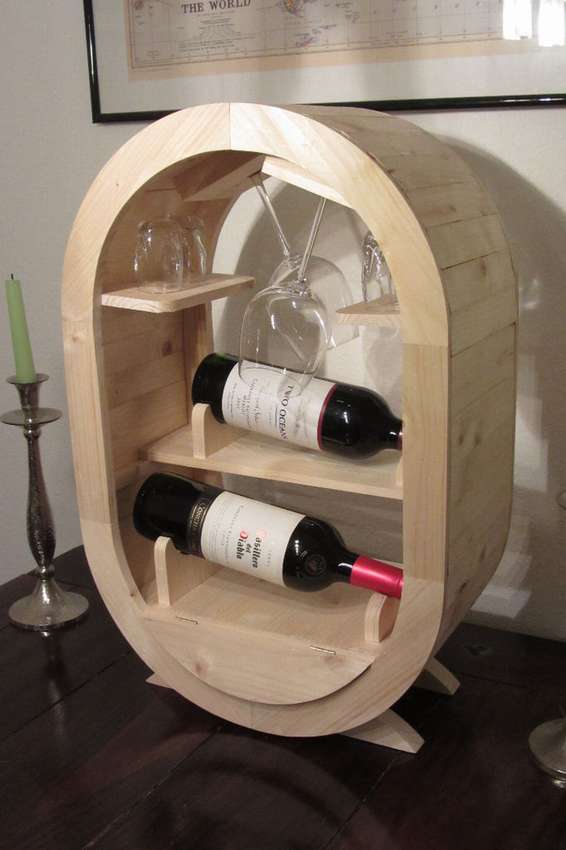 How do you like that wine cabinet option? The base of the rack are two oval hoops. The back and front. Each of them consists of six parts and is connected to simple joints.
Both hoops connected by 48 stripsfor which it is necessary to cut a rib in the front and back. Paper clips are installed on the strips at both ends. For the curved part on the long sides I havet angle of 5 degrees. But you have to work, you need to make about 200 cuts. It will take time to stick all the strips. Make it better in several steps. Align the corners on the tape and glue them into a quarter circle. For a firm grip, the author used tension belts.
Now how to put it all together. First of all, the legs. This wine rack should have a compartment to open the bottle or rollers. Wine bottle holders are located in two layers. One is on the top of the compartment, the other is on the shelf.
The design idea was to glasses hung at an angle of about 15 degrees. To do this, simply attach two small plates with slots, and the wine cabinet is finished.
Finally, cover the tree with mineral oil and bee felt.


https://i.expert-h.com/en/shkaf/vinnyi#sigFreeId52c2bf6fe9
Plywood wine rack
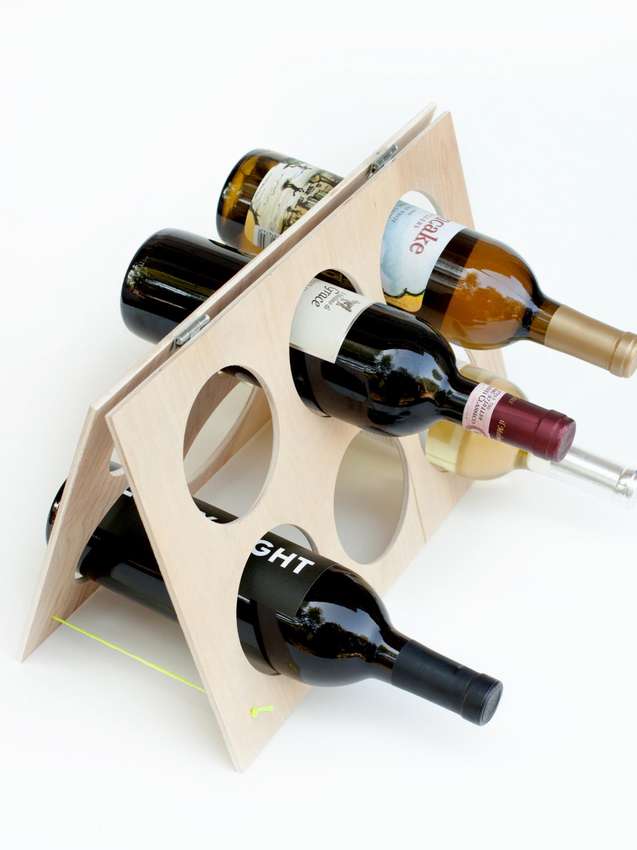 See an example of how to do simple wine rack from birch plywood and a neon rope. This standard wine rack for six bottles easy to manufacture and takes very little time. Do one for yourself, then one for a friend. The compact size of the rack makes it ideal for small spaces, for example, you can put it on the refrigerator.
- Measure and mark where the center for each bottle will be located.
- Drill six holes in each part of the plywood, resulting in 12 holes.
- Sand the stand.
- Determine where the hinges will be installed.
- Install one side of the hinge, then align the second sheet of plywood and secure the other side of the hinge.
- Repeat for the other side.
- Using a 1/16 "drill bit, make a hole in each of the four corners of the bottom of the wine rack.
- Thread neon strings through one of the holes and tie a double knot.
- Take the other end of the cord and pass through the opposite hole.
- Tie in a double knot and cut off the excess rope. Repeat on the other side.


https://i.expert-h.com/en/shkaf/vinnyi#sigFreeId9fdddccacd
How to make a rack for wine bottles
If you don’t need a large wine cabinet, but want to make it compact bottle rackHere is a great idea.
 Knock out the bottom of the drawer and remove all the nails. Cut two pieces of plywood to the inside size of the box. Cut off 3 cm from the top of the rear support so that it can be inserted into place, as shown in the photo. On the front support, mark the center of the first bottle hole by drawing lines from corner to corner so that form X. Make sure the marks form a square, with enough space to make five bottle openings. Well, then look at step by step photos, everything is clear here.


https://i.expert-h.com/en/shkaf/vinnyi#sigFreeId2e5d601174
 Or else great way to store bottles. Such wine rack very easy to do with your own hands. You will need two triangular supports between the base and the front of the wine rack. In this case dimensions of two supports 150 mm x 85 mm x 150 mm. You can make as many bottle openings as you want, there are six of them. It is necessary to measure 120 mm, and then 100 mm up. These are the center points for the holes. Use a 38 mm drill. Glue the front part to the base, install the triangle supports in place and secure with screws.


https://i.expert-h.com/en/shkaf/vinnyi#sigFreeIdbf0c4eb7fb
Wine shelves 100 photos


https://i.expert-h.com/en/shkaf/vinnyi#sigFreeIdbea6b6d371
Hello, I am the author of this article, so I look forward to asking questions for this article in the comments below, I will answer all !!!
If you have questions on another topic, ask them on our forum, we will answer you
- Two baskets of paper in 5 minutes (Master class)
- How to make a simple and compact table for a milling cutter from plywood
- How to make a soft headboard tile (Instructions + step by step photos)
- Cinder block benches: a convenient bench in 55 minutes
- How to make a bed with a niche: saving space (Master class)