Do-it-yourself greenhouse made of wood. Drawings + 700 photos. Step by step instructions
 do-it-yourself wooden greenhouse
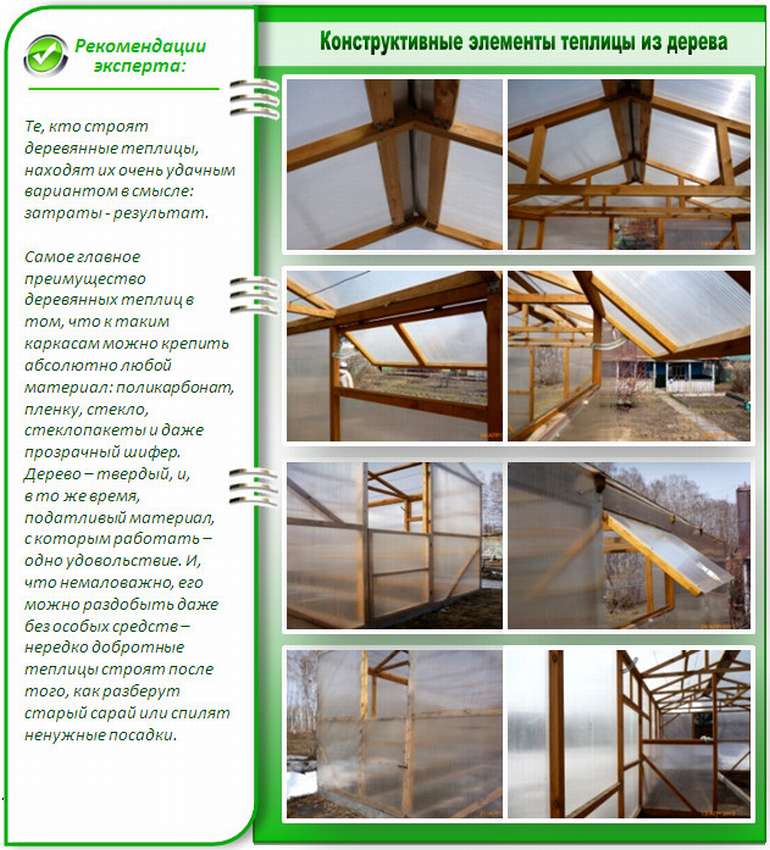
If you plan to build do-it-yourself greenhouse made of wood, it is advisable to know the features of this material. Wooden frame of the greenhouse Provides natural insulation for your greenhouse, allowing you to spend less energy by maintaining the greenhouse during the colder months. Wood is a natural insulator, it will absorb heat during the day, and at night give it to the greenhouse.
Also wooden greenhouse - One of the most pleasant aesthetic decisions, which creates a natural, traditional appearance to the landscape design of your site. Therefore, although other materials prevail in the construction of greenhouses today, wooden frames are still very widely used in personal plots. The article presents 30 examples, how to make a greenhouse from a tree with drawings, step by step photos and links to instructions, as well as two examples of assembly glass greenhouses.
The content of the article:
- Wooden film greenhouses
- Arched wooden greenhouse
- Polycarbonate wooden greenhouse
- Greenhouse made of wood
- Folding greenhouse made of wood
- Greenhouse from pallets
- Drawings of a greenhouse made of wood
- The greenhouse is wall single-pitched
- Mitlider greenhouse made of wood
- DIY glass greenhouse
- DIY greenhouse table
- Greenhouse from cans
Do-it-yourself greenhouse with a wooden frame
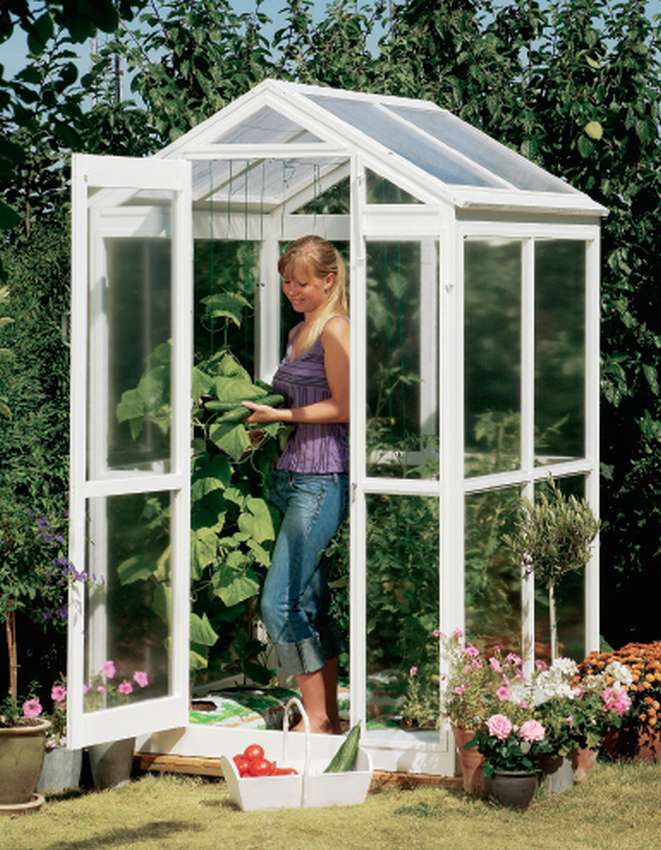
 It's great small greenhouse made of wood, suitable for almost all types of plants, has a solid wooden frame and is covered with polyethylene. A greenhouse can be a decorative and functional structure, which will add style to your site. The design is very simple, you can make both a permanent structure and a temporary one to fold and remove at the end of the season. Lasting greenhouse wood frame guaranteed to last for several seasons. Also, the coating is designed from one to four seasons, depending on the materials you choose. In any case, it is easy to replace if it begins to collapse.
How to assemble a wooden frame greenhouse see below for step by step photos.


https://i.expert-h.com/en/parniki-teplitsy/1120#sigFreeId17dcb2ec60
How to make a greenhouse from a tree
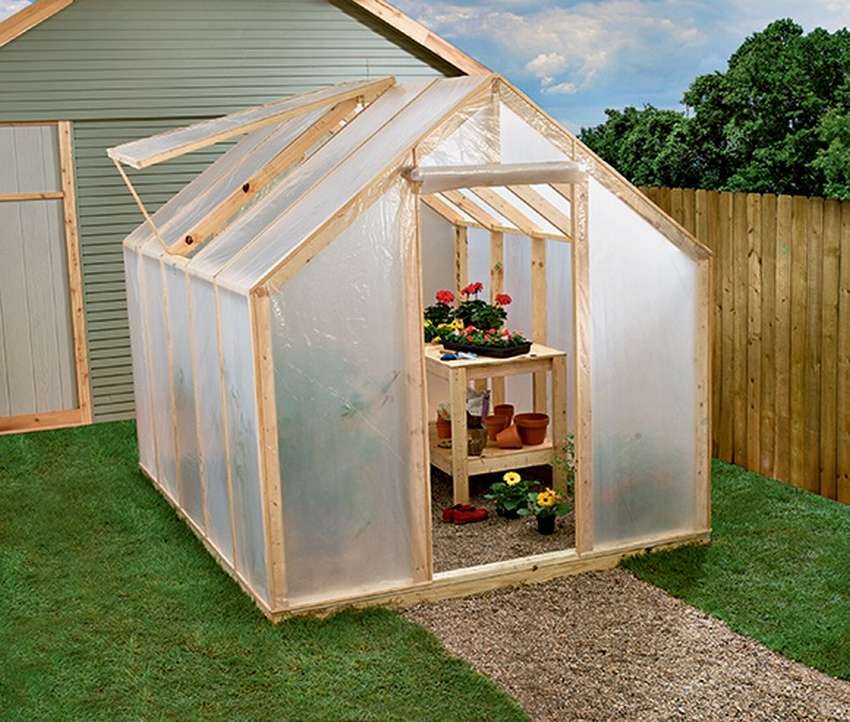
 This wooden greenhouse - A great project for beginners. The design is strong wood structurewhich is easy to build, and will last for many years. The plastic side walls allow a sufficient amount of sunlight to pass through while retaining heat in cold weather. If you have a limited budget, this project is for you.
For the foundation 6 pcs required timber 10 x 10 cm 2.5 m high, as well as plywood sheets for sheathing 2 pcs. 120 x 240 cm. For walls 22 boards 5 x 10 cm 2.5 m long and 80 mm screws. Each wall is built separately, screwed and nailed to the base. It takes 5 boards on the wall, except for the front, which went 7, this is taking into account the door. You will have to cut the vertical boards to a height of 180 cm, because 60 cm include the roof. Thus, each wall consists of 2 vertical boards of 1.8 m and 3 boards of 2.5 m, evenly spaced along the vertical boards.
Detailed instructions how to build a greenhouse with your own handscan be read on the site.


https://i.expert-h.com/en/parniki-teplitsy/1120#sigFreeIdf4269e8cb3
Farmer Tulei
Do-it-yourself greenhouse from stretch film
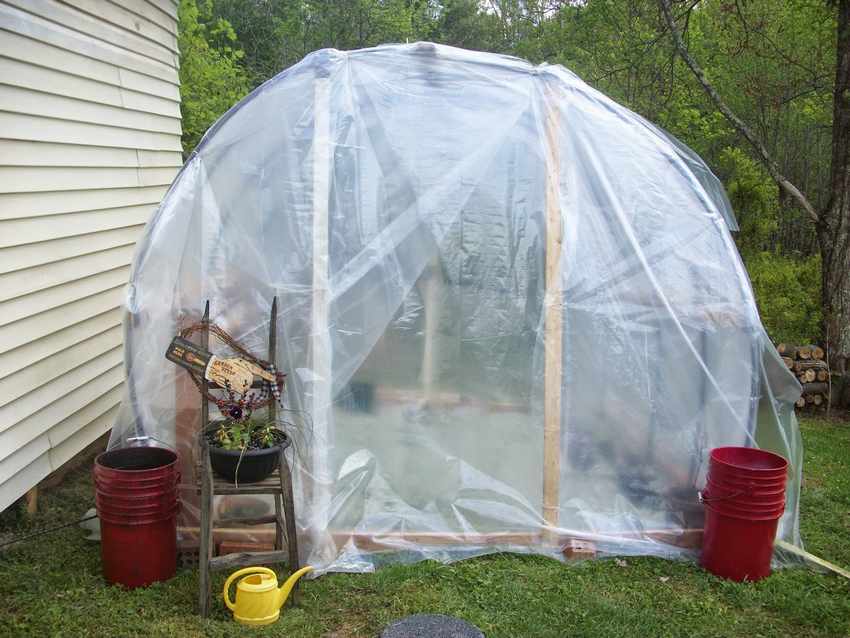
 Many people use stretch films for various things, it is also an excellent coating material. See an example of how build a wooden greenhouse out of stretch film do it yourself. This is a 3 x 3 m construction about 2.5 m high. Double-layer film with an air gap of 5 cm. It looks like an ordinary greenhouse, but here the author shares his own special way, how to pull a film on a frame. Using this method, it will be very easy to cover any construction or frame material with stretch film. Perhaps the step-by-step photos shown are not very clear, so use the link and read the instructions on the site. There are also several photos in the gallery on how to cover stretch film and other structures.


https://i.expert-h.com/en/parniki-teplitsy/1120#sigFreeId8524709018
Greenhouse made of wood under the film
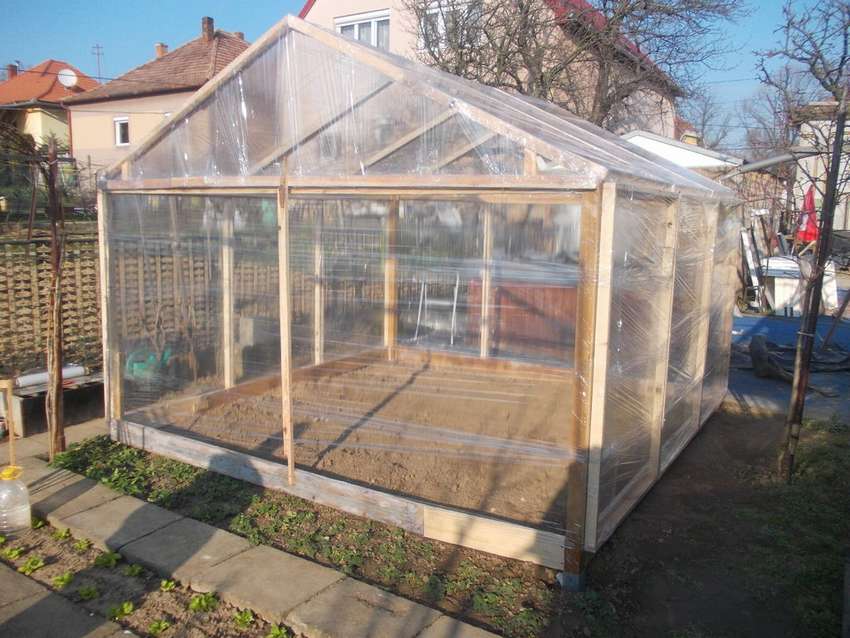
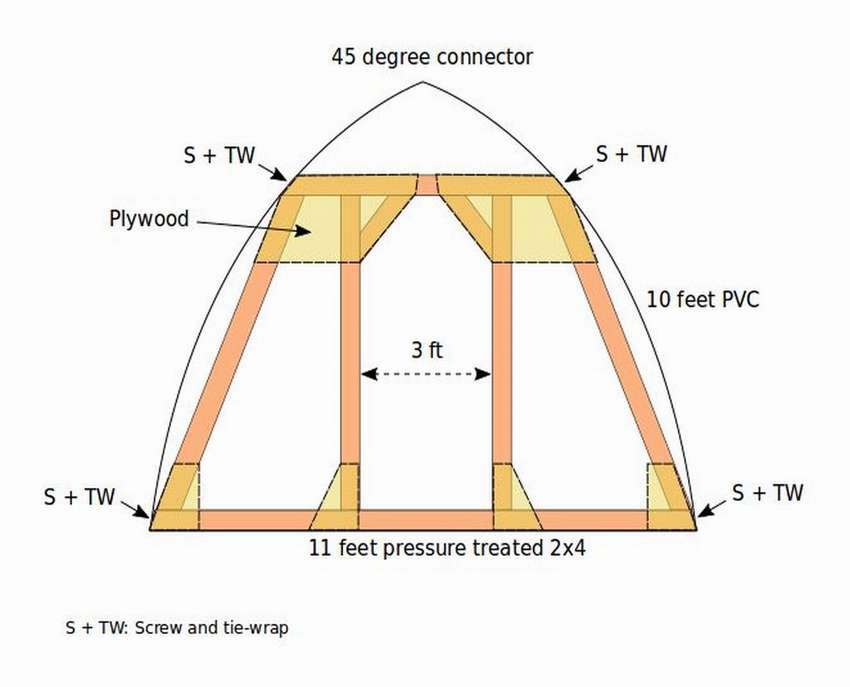
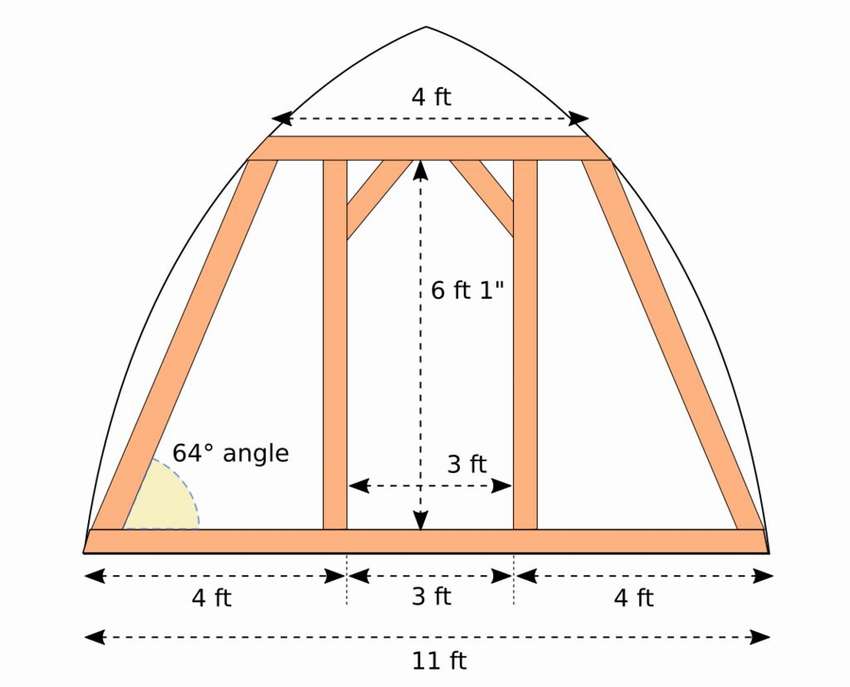
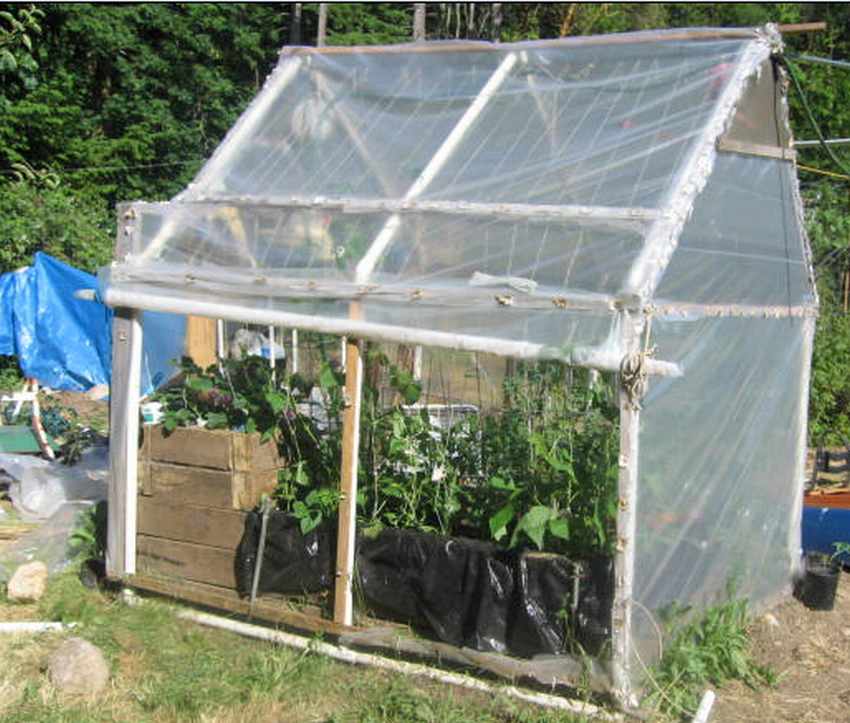
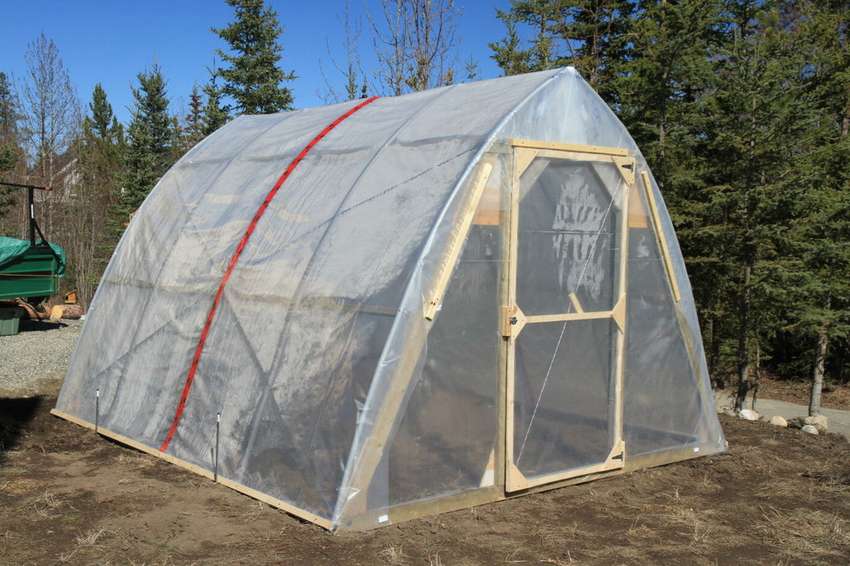 See an example how to build a cheap greenhouse from wood and PVC pipes do it yourself. This is a sturdy construction that can easily withstand heavy snowfalls. The design is designed so that prevent snow accumulation upstairs. The smooth shape gives strength to the top of the greenhouse, making the roof pitchuch.
You will need about 12 bars 2 x 4 3.5 m long, eight pieces of fittings for half a meter of PVC pipe with fittings. Optional: 6 round pins if you want to easily disassemble the greenhouse.
 how build a greenhouse with your own hands, see below for step by step photos. You can also read on the website how to install automatic ventilation in a greenhouse.


https://i.expert-h.com/en/parniki-teplitsy/1120#sigFreeIdaf395014ff
How to build a greenhouse from a tree with your own hands
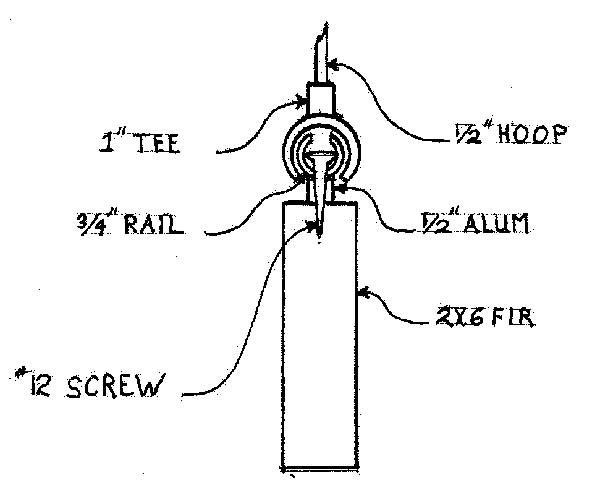
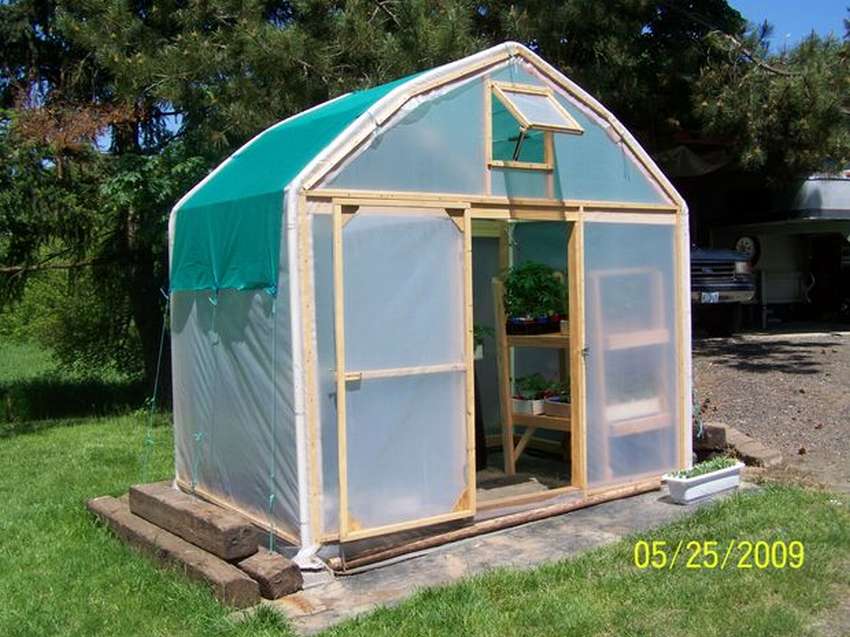 2x6 boards were used here front and back because it 3 meter span, so it will support the window frame. But you can use smaller boards. On the side with the door, the author installed 4x4 bars. Window frame made of 2x2 bars. First cut all the details, so that they fit the frame, and fasten to the metal using clamps held on flat metal plates screwed into the wood; there is no need to drill holes in the pipe. Tip: Before fastening to the pipe, fasten the clamps to the tree with metal plates. The shadow fabric is attached with latches on top, it can be easily removed when it is not needed. Read the full instructions on the website.


https://i.expert-h.com/en/parniki-teplitsy/1120#sigFreeId58abcb1c1b
How to build an inexpensive wooden greenhouse
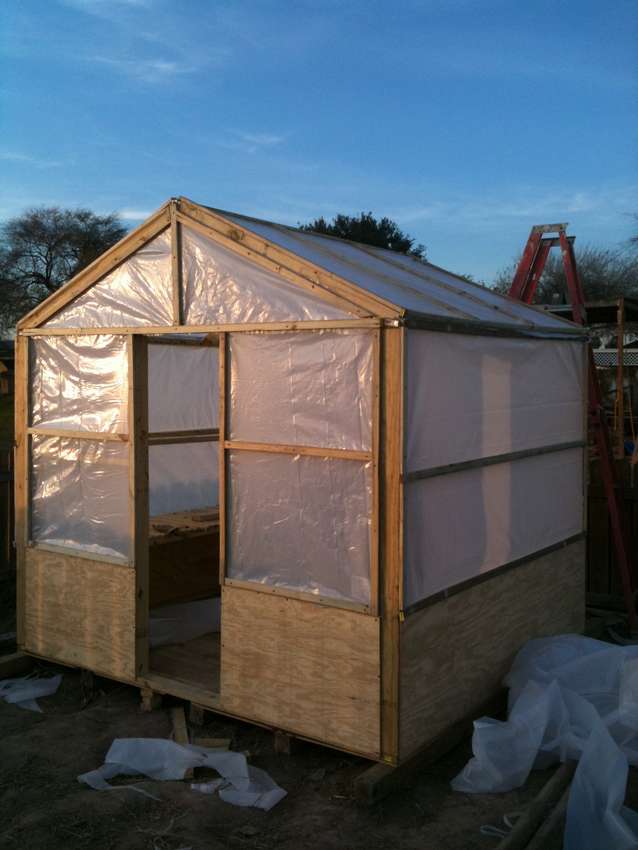
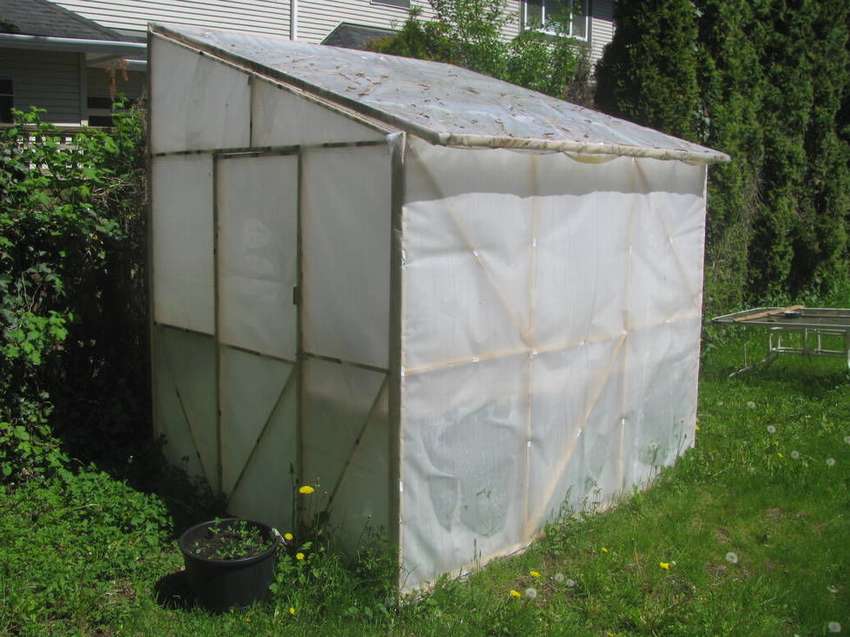 Thanks to this example, you can build a greenhouse out of wood, which will be an inexpensive, maintenance-free house for all your plants. The construction is covered plastic wrap on the frame, the size of the beam is 25 by 50 mm, the length is 245 cm. The base is made of pressure-treated 1x4 spruce boards wrapped in polyethylene and laid directly on the ground. The plot should be enough flatat least four corners must be in the same plane. The base consists of two boards 245 cm for the front and rear walls, plus two boards of 180 cm for the side walls and two more, also 180 cm, which form the supports for the shelves. See the assembly sequence for step-by-step photos..


https://i.expert-h.com/en/parniki-teplitsy/1120#sigFreeId8702f42b31

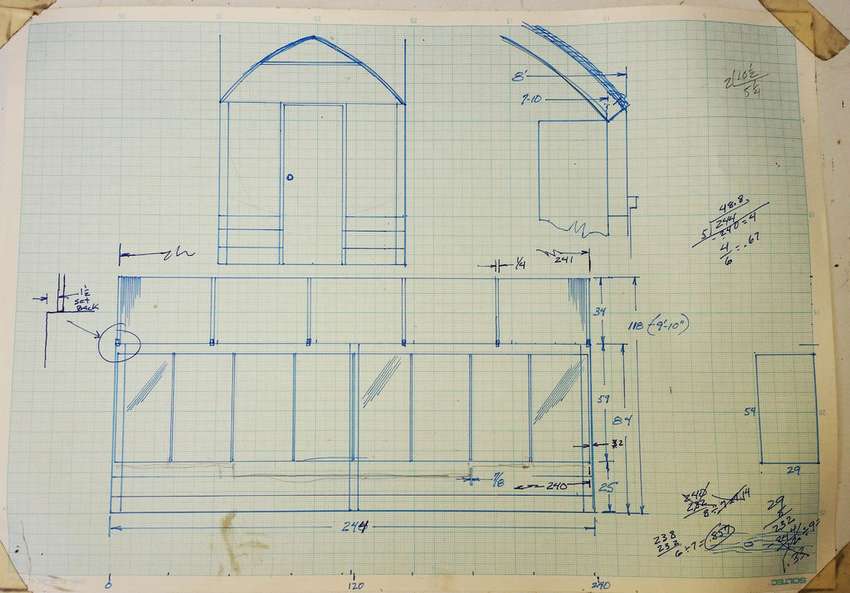
Arched wooden greenhouse
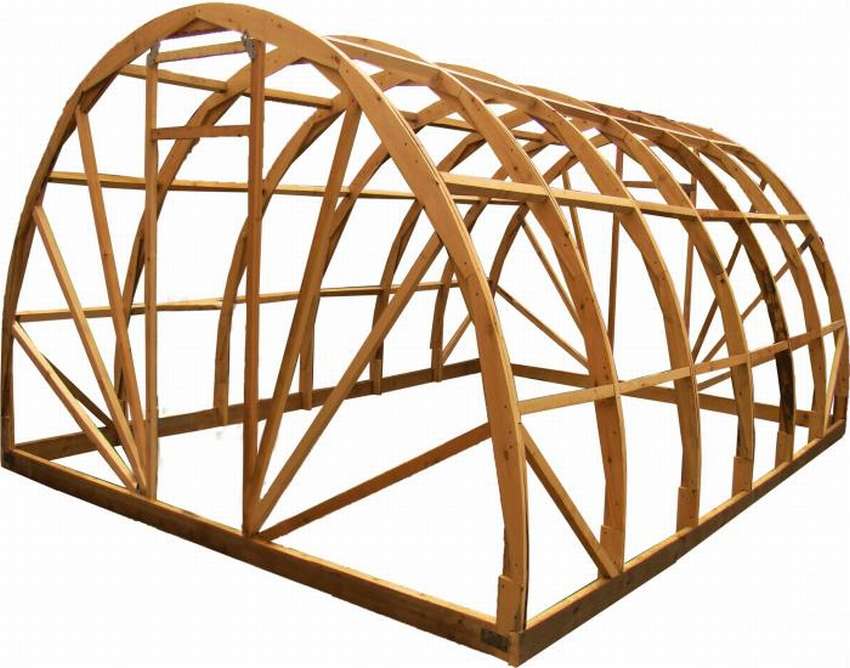 Arched structures are quite durable and will last a very long time. True, arches are mainly made of pipes - profile, PVC or HDPE, it is much easier. But if you prefer wood, this is also a good option. The hardest part of this design, make wooden arcs, these are not pipes or fittings that can be easily bent, here you have to, a little tinkering. How to do do-it-yourself arched wooden greenhousecan be read in the article on the site, a link to which you will find under the gallery. It indicates not only the assembly sequence, but also the necessary materials and tools.


https://i.expert-h.com/en/parniki-teplitsy/1120#sigFreeIdad6083bfc9
The correct location of the greenhouse
 If you grow vegetables in your own greenhouse, this is your hobby, then read about the experiments of the author of this project, who shares his experience in proper positioning of the greenhouse and observation results from plant growth. You may be able to extract lessons from the success of the author, as well as the errors and tools that he found on the Internet, trying to explain what happened right. This explains what he did, why he did, and how it works well. The construction of the greenhouse itself will not cost much. The only thing bought for this greenhouse was siliconeto install glass in frames and screws. Everything else is made from old materials.
 Read all the details on the site, there are many interesting things.


https://i.expert-h.com/en/parniki-teplitsy/1120#sigFreeId3fd4bf82c3
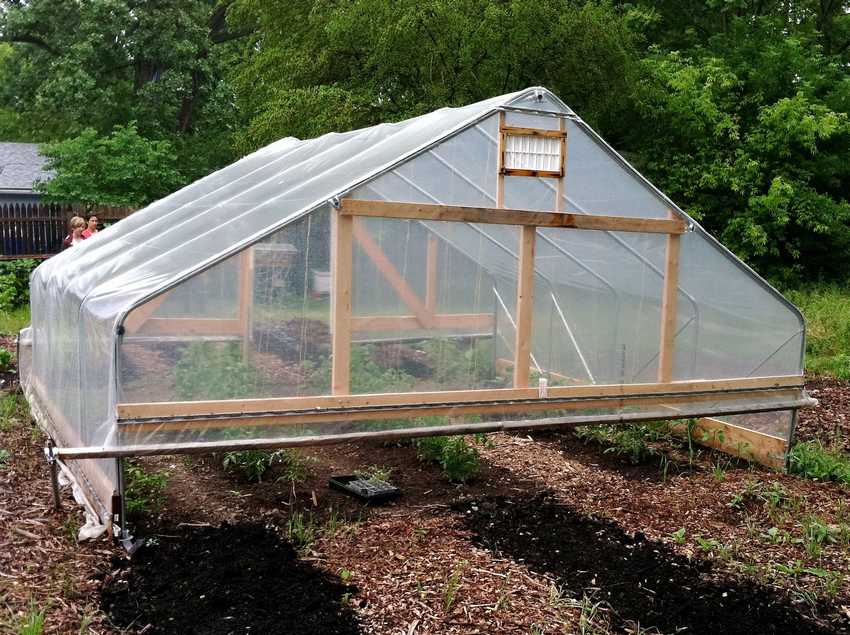
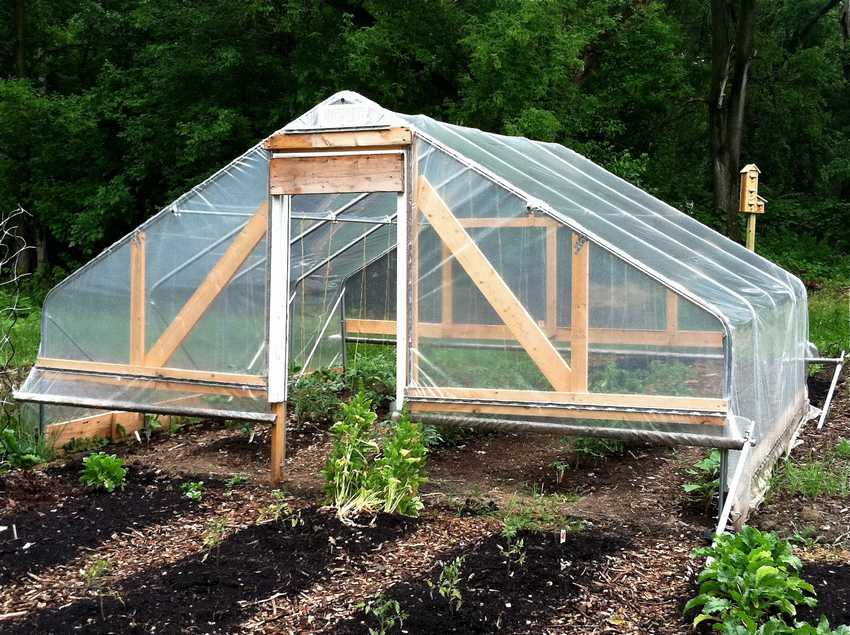
How to build a greenhouse from a tree
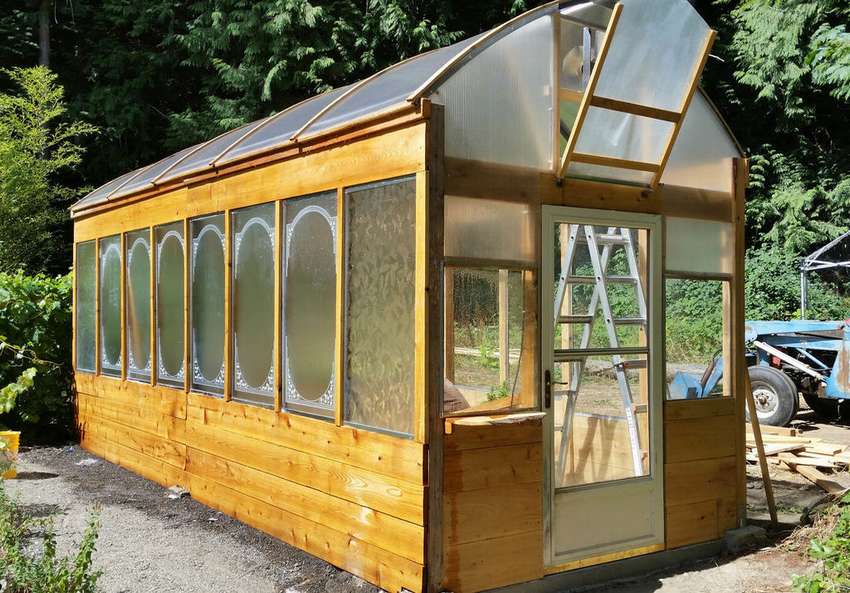
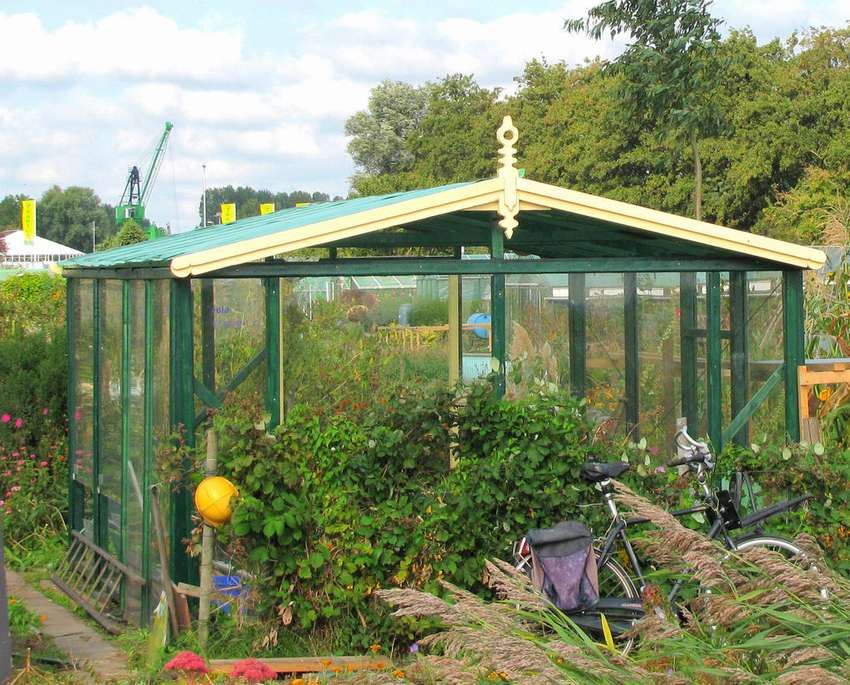 Building a greenhouse is a logical step if there is a garden. This simple wooden greenhouse was built using hand tools and electric hand saws, planers, milling machines, belt grinders and drills (batteries). Construction time: more than 2 months, almost full time, but completely made greenhouse do it yourself. Construction time can be shortened using standard window sizes, etc.
Actual dimensions are actually 5.20 x 3.85 m, with a roof reaching 2.75 m (no trim).
Materials used for the construction of a wooden greenhouse.
 Tree: many large boards (beams), approximately 16x6 cm. Mostly 2 m, and some more than 5 m! They had to be cut (in length) into 2 parts! Smaller boards were selected as needed.
«Glass": This part, of course, is very specific for this situation: large, discarded acrylic sheetsbut with gluedth them dirty plastic foil. There was a lot of work to clean the sheets of sticky glue.
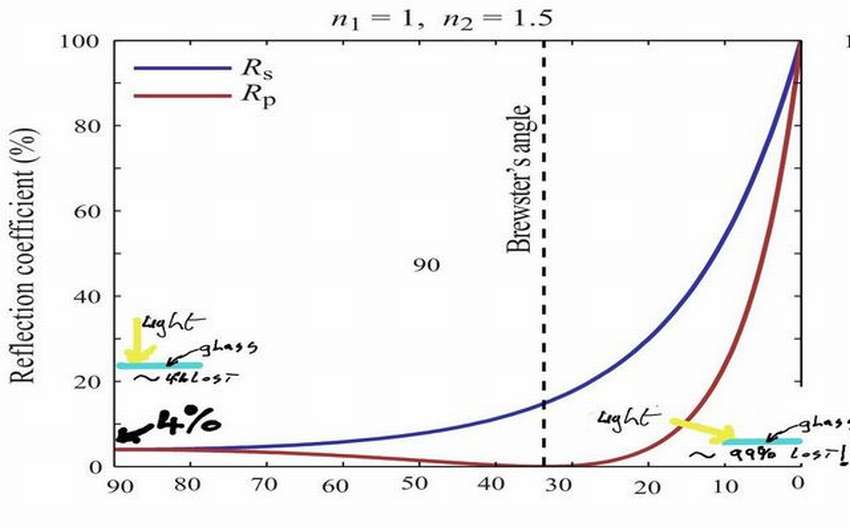
The greenhouse needs a clear coating. Traditionally: glass. There are three ways..
- Use affordable, standard sizes. old windows. If the window is broken, it will not be difficult to replace.
- Order ready glazed frames.
- Buy reinforced UV resistant polycarbonate. In this case, it was used for the roof.
How to build a wooden greenhouse with your own hands, read the instructions on the site, see step by step photos below. At the end of the gallery some more examples of greenhouses by the author are shown.


https://i.expert-h.com/en/parniki-teplitsy/1120#sigFreeIdb86f3d7492
Greenhouse made of wood
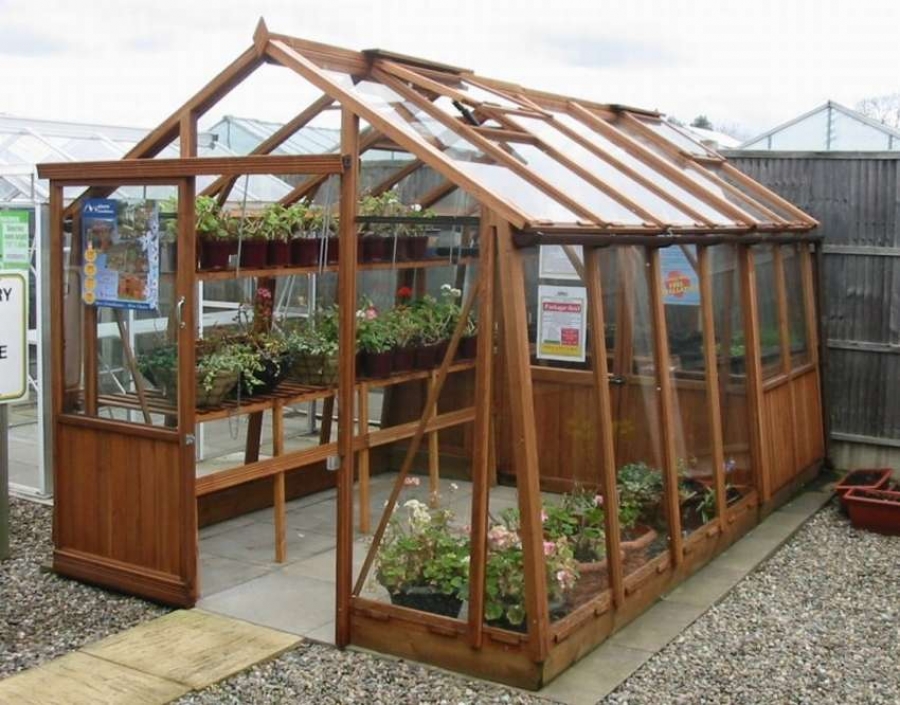
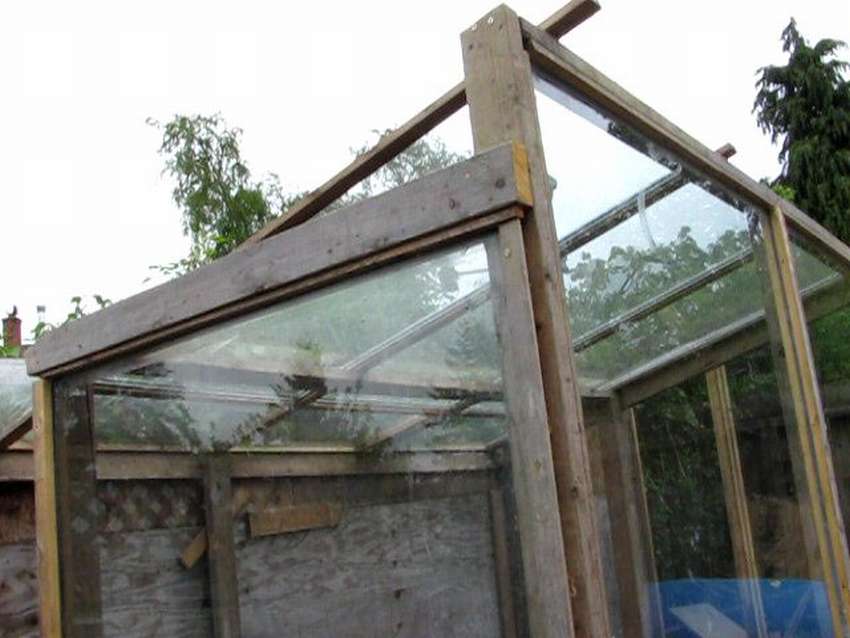
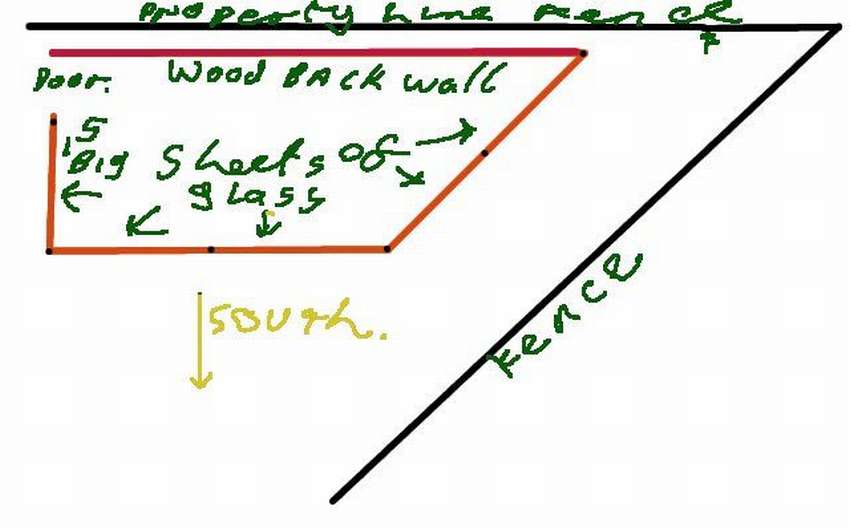
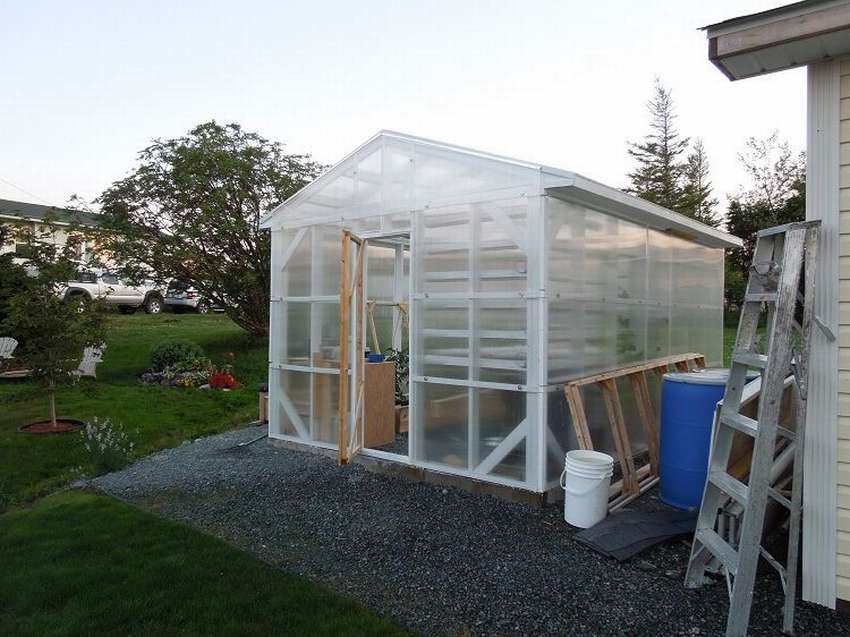
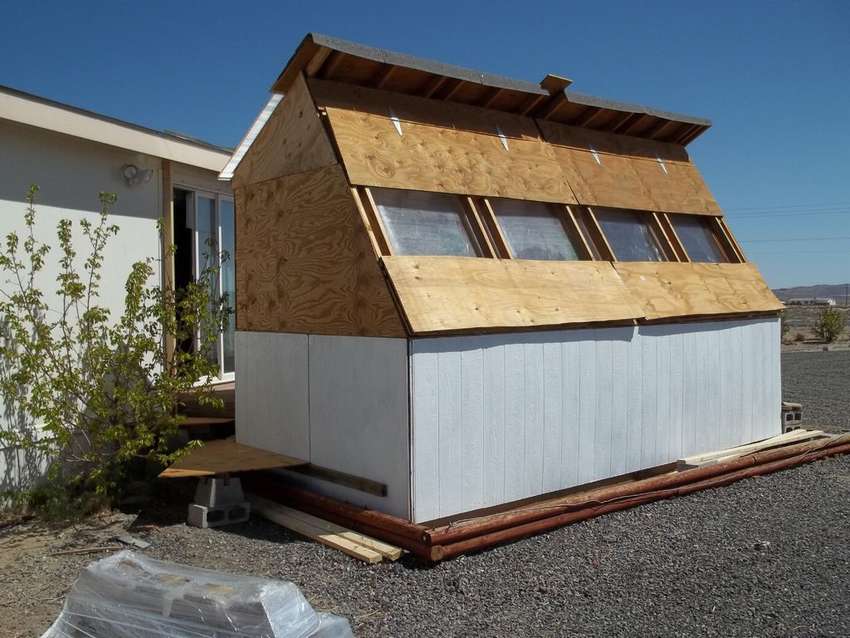
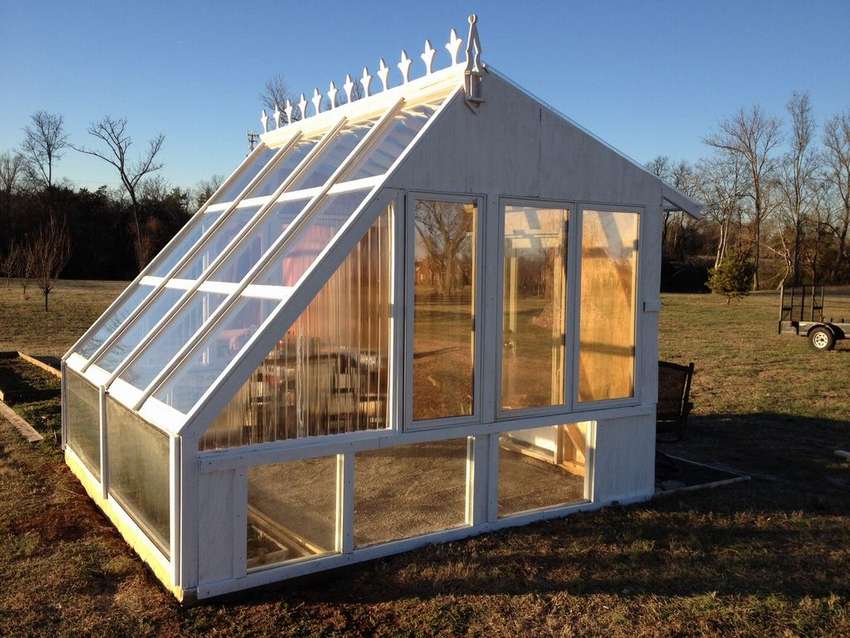 The greenhouse at your site will be a good addition to landscape design. This is a great place to store and grow plants before the growing season. Presented here wooden greenhouse more than 3.5 m high at the highest point. Start with a plan. The drawing is crucial, as this was the most difficult part of the construction process. Fortunately, old windows with 2x4 frame, which were used here, were almost 3.5 meters, so they became a determining factor in the size of the greenhouse. Another important stage in planning is the angle at which the wall of the main window should be.
 In greenhouse construction, there is a basic rule of thumb according to which proper south corner The walls should be 10 degrees larger than the latitude of your location. This provides an optimum slope for the summer and winter months.
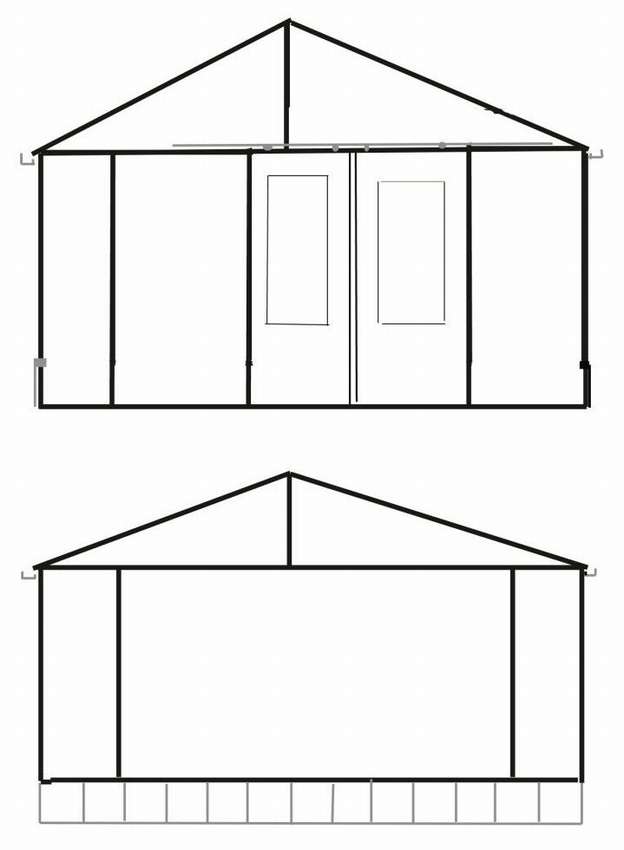
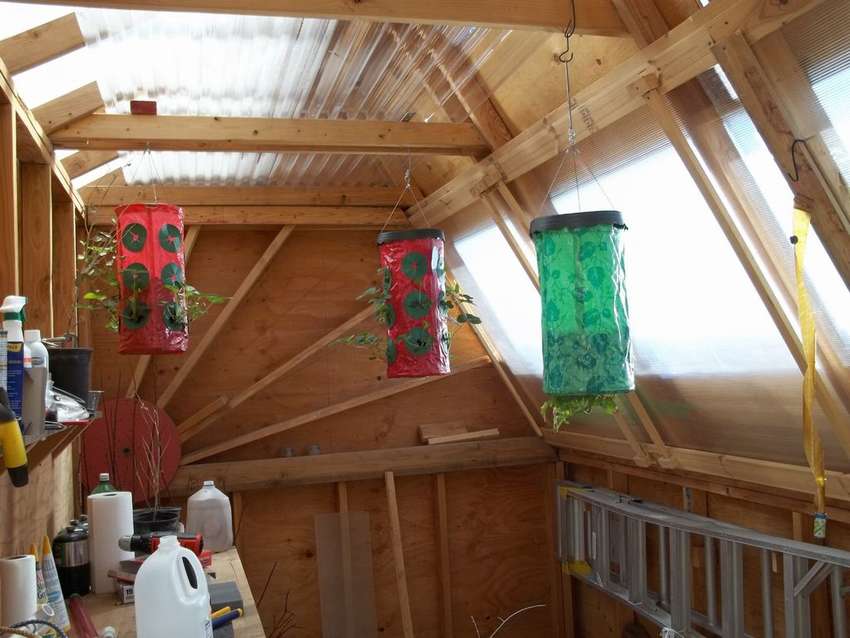
The final assembly is a ridge and a roof. Roof back coated with polycarbonate and is designed in such a way that the corrugated material is fixed flush with the bar, that is, it will close any drafts.
The east and west windows of the greenhouse are three combined panels.
 The main front windows are installed in the frame using screws and 15 tubes of silicone sealant. Side and rear end - plywood.
A fan is installed at the top of the roof slope with air vent on the floor line for transverse ventilation. In addition, in the colder months you can install an electric heater. The greenhouse is also equipped automatic irrigation system. More detailed instructions on how to build do-it-yourself greenhouse made of wood, read on the site, you will find the link under the gallery. Below see step by step photos.


https://i.expert-h.com/en/parniki-teplitsy/1120#sigFreeId4b18e1cc5a
Wooden frame greenhouse
Timber frame construction greenhousesis not the most difficult process, in fact it is a simple wooden frame, covered with a film or covered with sheets of polycarbonate. They also use glass, but in our age, plastic is a rare occurrence.
 Of course, there are many nuances and design features. This is a review article where you can get maximum information about wooden greenhouses: design features, types of foundation, roof, doors and everything you need to know about building greenhouses. In the article you will find drawings of greenhouses with sizes, photos, diagrams and a lot of useful information.


https://i.expert-h.com/en/parniki-teplitsy/1120#sigFreeIda9ff64201e
Wooden greenhouse on the foundation

Wooden polycarbonate greenhouse with climate control
 This guide is how to build a wooden polycarbonate greenhouse do it yourselfand which covers pouring the concrete foundation, assembling the frame and covering the greenhouse with polycarbonate.
Upon completion of construction, the greenhouse should be equipped with a large centralized hydroponic systemcapable of supporting up to 40 large plants (tomatoes, bell peppers, etc.). Up to 72 small plants (lettuce, spinach, strawberries, etc.) for a total of up to 112 plants.
The greenhouse is equipped with a climate control system that is able to control the environment in the room using various 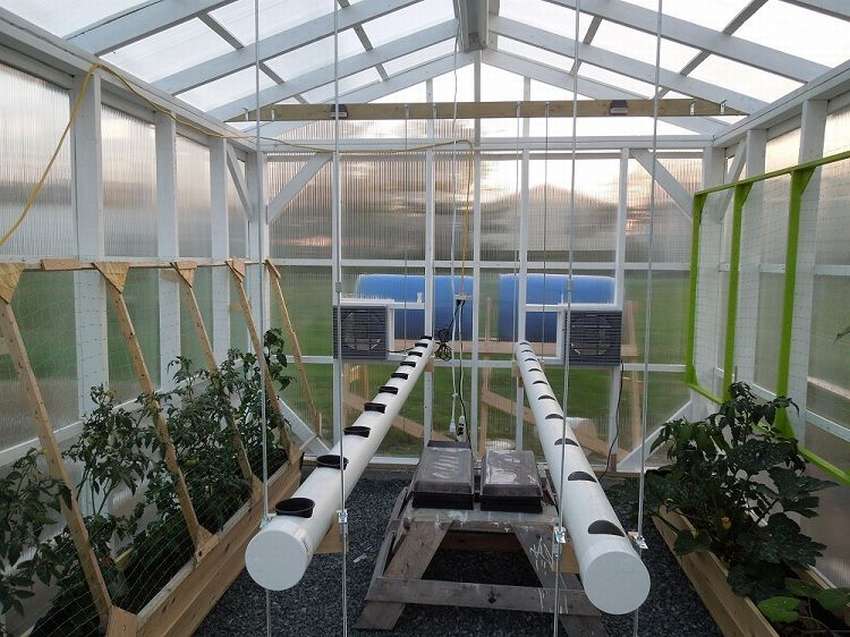 sensors (temperature, light intensity, humidity, CO2 concentration, etc.). As well as automatically adjust each variable by controlling various devices (exhaust fans, shutter doors, heaters, lighting lamps, solenoid valves, pumps, etc.). Readings from all sensors, as well as the on / off status of devices, can be sent via the Internet and viewed remotely and in real time from any computer or mobile phone. See below for step-by-step photos., instructions on the site.


https://i.expert-h.com/en/parniki-teplitsy/1120#sigFreeId9448820422
DIY greenhouse
If you need a capital greenhouse with an adjustable ventilation system, here is a good project.
 True, you will need a solar panel to charge the battery and other technological devices, but to do all this and install it is not as difficult as it might seem. Everything in the step by step photos is not shown, therefore, how to make a wooden greenhousereadinstructions on the site, everything is described there in great detail, from pouring the foundation to installing the fan.


https://i.expert-h.com/en/parniki-teplitsy/1120#sigFreeIdc71b7cc7b3
Folding greenhouse
 This folding greenhouse it requires a little more know-how in terms of construction, because several additional tools will be needed. If you like something new and unusual, it's worth a try, instructions and a complete list of necessary materials can be found on the website, the link is under the gallery.
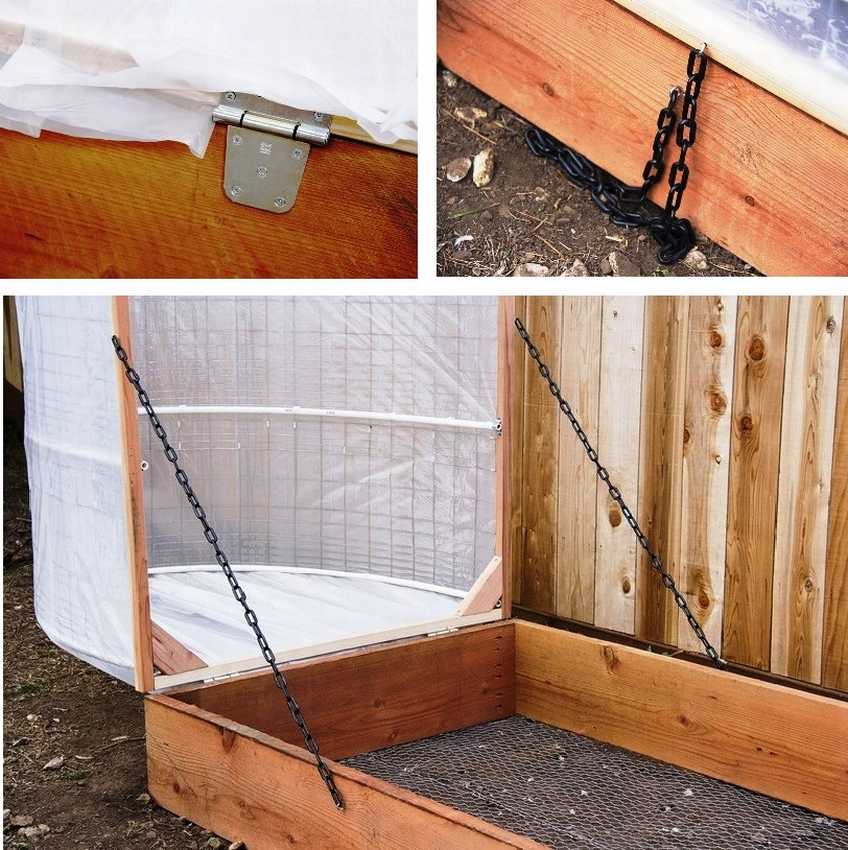
In general, if you do not want a greenhouse that is constantly in one place, or you do not need it all year round, why not build a structure that can simply be folded and rearranged? The greenhouse has glass walls that are folded with hinges. Therefore, at any time when you do not need it, you can simply fold it and remove it. A disassembled greenhouse takes up very little space, dimensions 120 x 120 cm, can be disassembled in minutes and can be built over the weekend. Despite the fact that the design is small, it can be used to grow many plants. How to make a folding greenhouse with your own hands, see below for step-by-step photos.


https://i.expert-h.com/en/parniki-teplitsy/1120#sigFreeId04593d389c
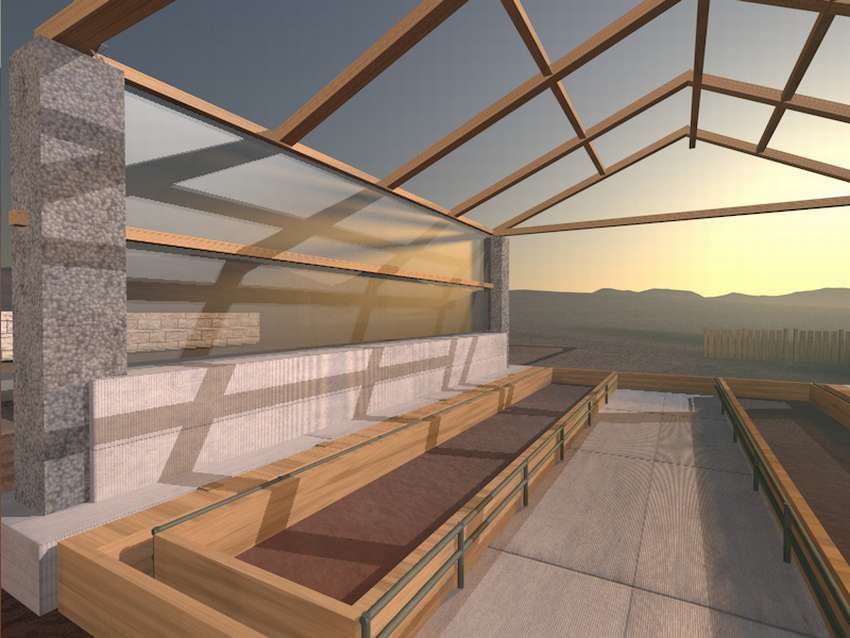
Wooden greenhouse project
Very comfortable wooden greenhouse with adjustable window shading.
 Ideal for hot climates.


https://i.expert-h.com/en/parniki-teplitsy/1120#sigFreeIdbf6b2839eb
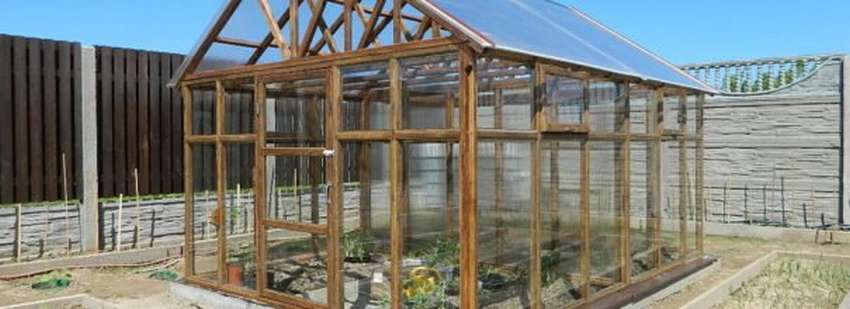
Greenhouse from pallets
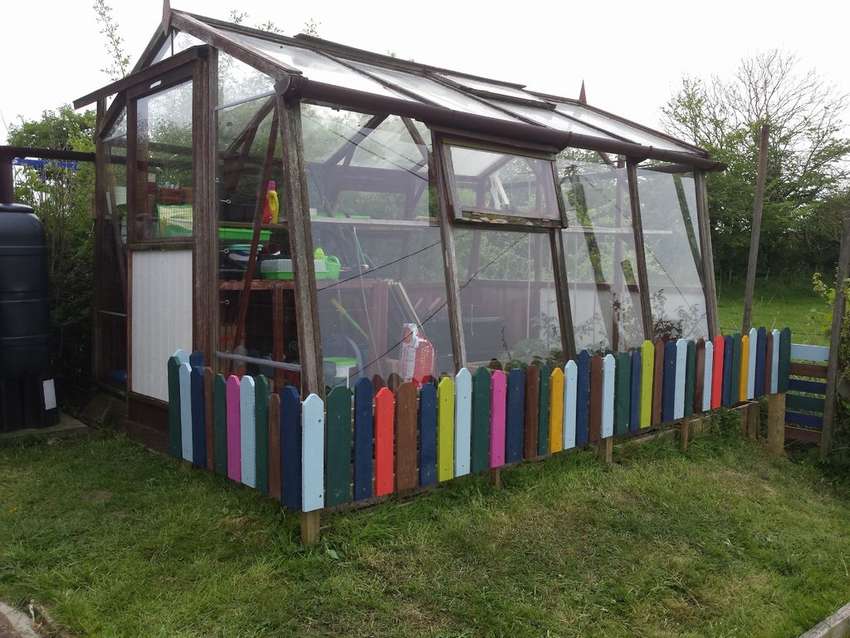 it wooden greenhousearound which the author decided to make a fence of disassembled pallets in order to protect the glass walls from damage. A wise decision, especially if children can play nearby, broken glass can cause them a lot of trouble - cuts or worse. Therefore, take advantage of experience, it is not at all difficult to put up a fence, but the extra ones security measures never hurt.
Read about some of the nuances of building such a fence on the site. See the individual assembly points below for step-by-step photos.


https://i.expert-h.com/en/parniki-teplitsy/1120#sigFreeId130c727be1
DIY greenhouse made from wood
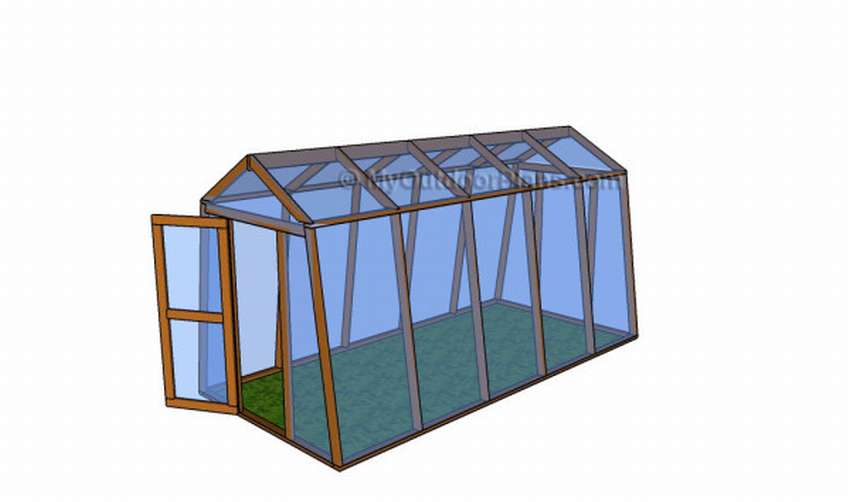
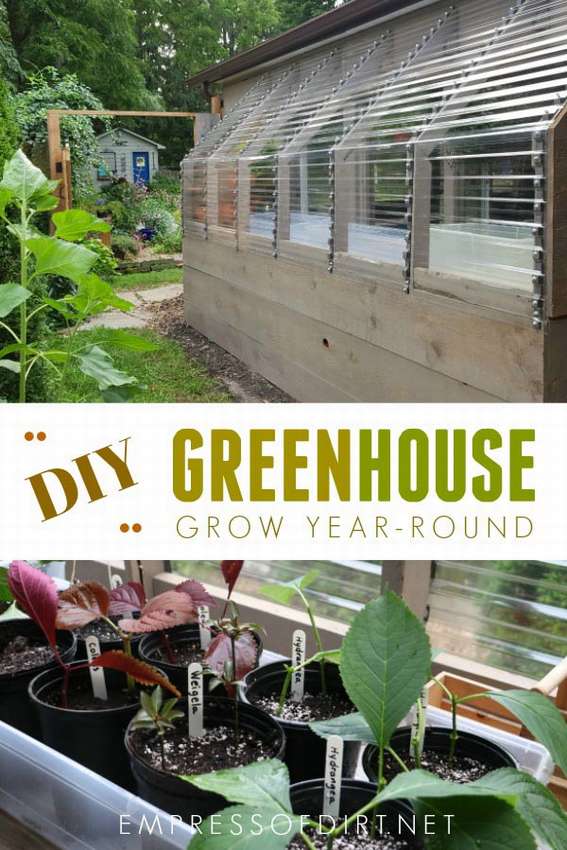
 Instructions with drawings on how to build a small do-it-yourself greenhouse made of wood. First of all, you need to choose the right place for the greenhouse. It takes at least 6 hours of full sunshine every day, so make sure the greenhouse is facing south. If the soil is not good enough for the plants, you can build a small raised garden bed.
Dimensional Parts
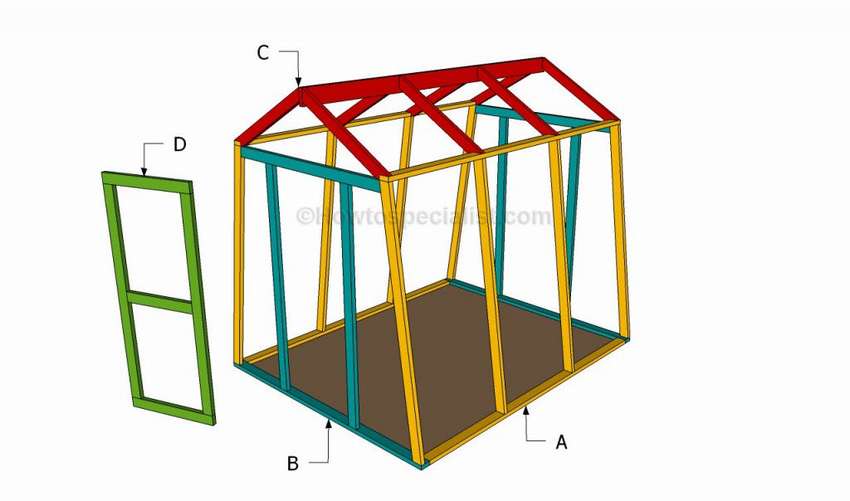 A - 2 bars 2 × 4 with a length of 120 ″ (305 cm), 2 parts - 113 ″ (287 cm), 8 pieces - 85 ″ (216 cm)
B - 2 bars 2 × 4 length 80 ″ (203 cm), 1 pc. - 96 ″ (244 cm), 1 pc. - 65 ″ (165 cm)
C - 1 board 2 × 6 length 120 ″ (305 cm), 8 parts 2 × 4 length 40 3/4 ″ (103.5 cm)
D - 2 pieces 2 × 4 32 ″ (81 cm) long, 2 pieces 73 ″ (185 cm), 1 piece 25 ″ (63.5 cm)
4 bars 2 × 4 length 10 ′ (348 cm)
23 bars 2 × 4 8 ′ (244 cm) long
1 board 2 × 6 length 10 ′ (348 cm)
500 pieces of screws 65 mm long


https://i.expert-h.com/en/parniki-teplitsy/1120#sigFreeIdbfa61e5d48
Greenhouse from timber drawing
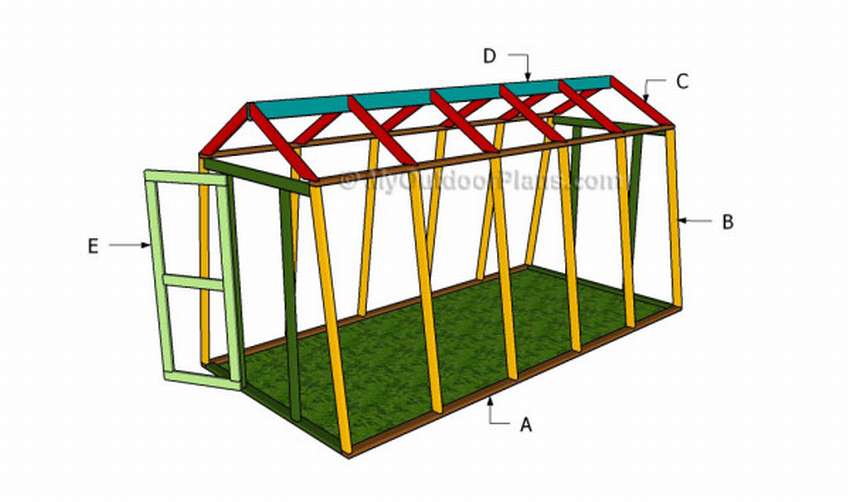
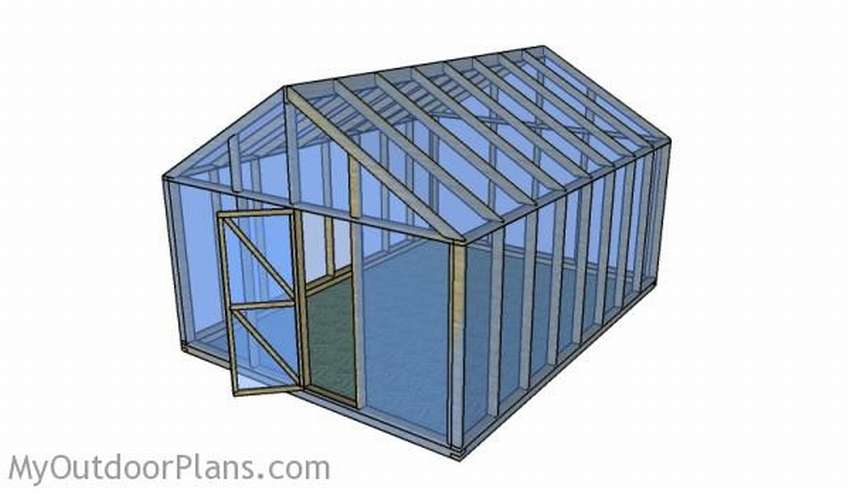 The project with drawings and step-by-step instructions for the construction of a separate bar greenhouses. This is a medium-sized construction but wide enough so that you have enough space to grow a wide variety of vegetables. Below you can see diagrams and phased drawings of the greenhouse with dimensions. Step-by-step instructions are on the site.
Here is the sawing pattern, details are marked with letters, on the left are the dimensions in inches and centimeters.
 A - 2 bars 4 × 4 144 inches (365.5 cm) long, 2 pcs - 192 inches (488 cm) long
B - 2 bars 2 × 4 192 ″ long (488 cm), 9 pieces 72 ″ long (183 cm)
C - 2 bars 2 × 4 137 ″ long (348 cm), 5 pieces 72 ″ long (183 cm)
D - 2 bars 2 × 4 35 3/4 ″ long (91 cm), 1 board 2 × 6 192 ″ long (488 cm)
E - 18 bars 2 × 4 with a length of 82 1/4 ″ (210 cm) rafters
F - 2 bars 2 × 2 69 "(175 cm) long, 2 pcs. - 26 1/2" (68 cm), 1 pcs. - 23 1/4 "(59 cm), 2 pcs. - 41" (104 cm) doors.


https://i.expert-h.com/en/parniki-teplitsy/1120#sigFreeIda7f5938076
How to build a greenhouse drawing
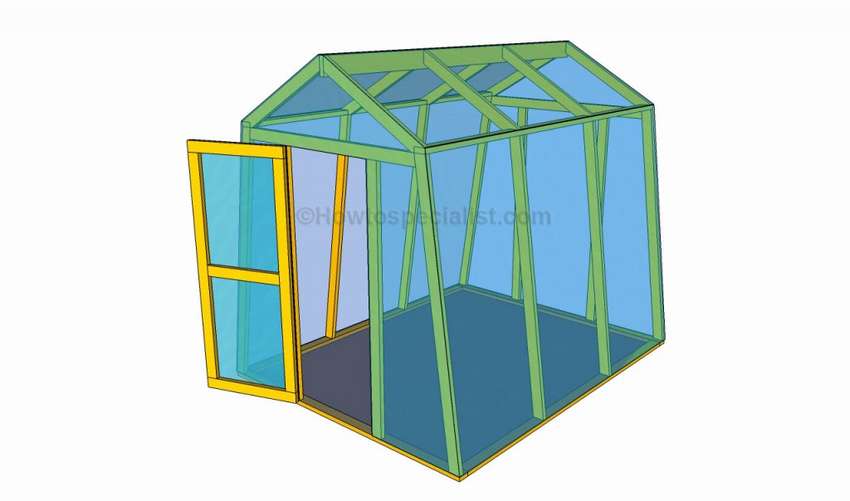
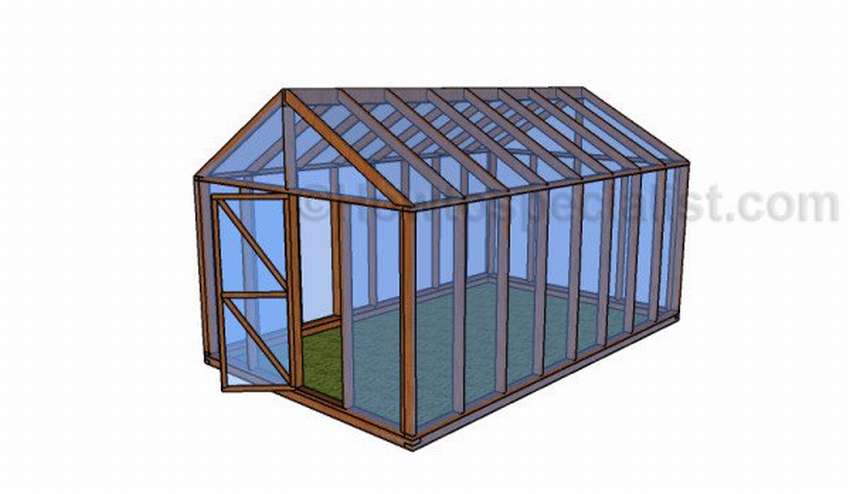
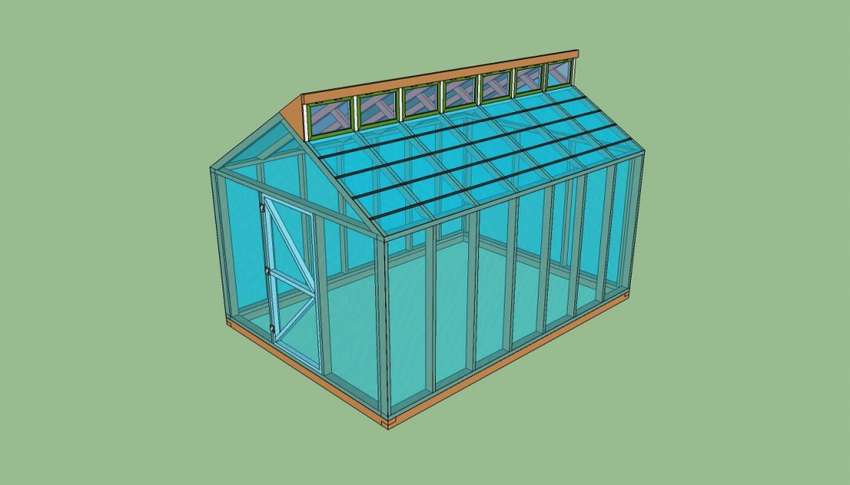
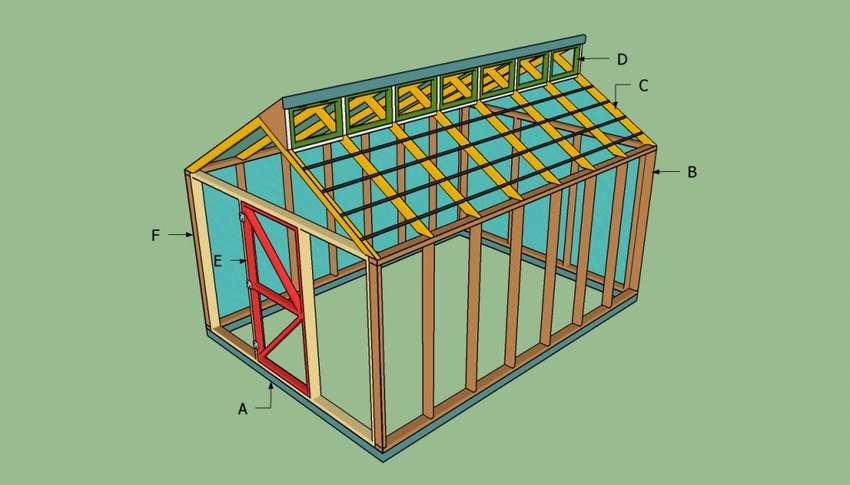
 Here is another one gable roof greenhouse project and inclined walls. Tip: if you want to improve the appearance and protect the tree, paint the components of the wooden greenhouse or apply impregnation. Set the greenhouse in the right place and move if necessary. Use clear plastic wrap or polycarbonate sheets for coating.
See below for part sizes.
 A - 4 bars 2 × 4 199 "long (505 cm)
B - 12 pcs. 2 × 4 bars length 84 1/4 ″ (214 cm)
C - 12 bars 2 × 4 40 ″ (102 cm) long
D - 1 board 2 × 6 199 ″ long (505 cm)
E - 2 bars 2 × 4 73 ″ long (185 cm), 2 pieces 32 ″ long (81 cm), 1 piece 25 ″ long (63.5 cm)
F - 1 bar 2 × 4 length 66 ″ (168 cm), 2 pcs. 80 ″ (203 cm) long, 1 pc. 89 ″ (226 cm) long


https://i.expert-h.com/en/parniki-teplitsy/1120#sigFreeId8553d254c0
Do-it-yourself canopy for the greenhouse
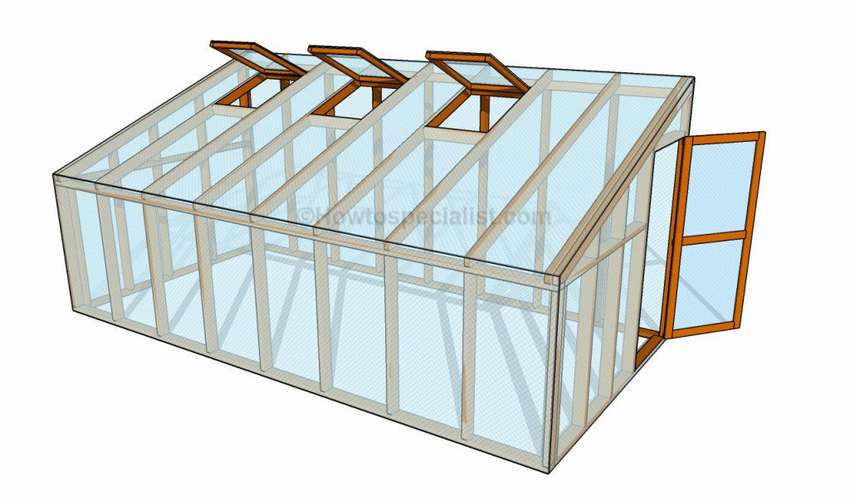 This is a walkthrough with drawings showing how to build a canopy for the greenhouse with your own hands near the wall of the house. This design will help you grow vegetables and flowers right next to the house. Installing a greenhouse under the wall of a house is a good option, but you must make sure that moisture does not damage the structure of your house. This is an ideal project if you want to grow vegetables and flowers yourself, but you do not have enough space on the site or in the yard. Here is the sawing necessary parts with dimensions.
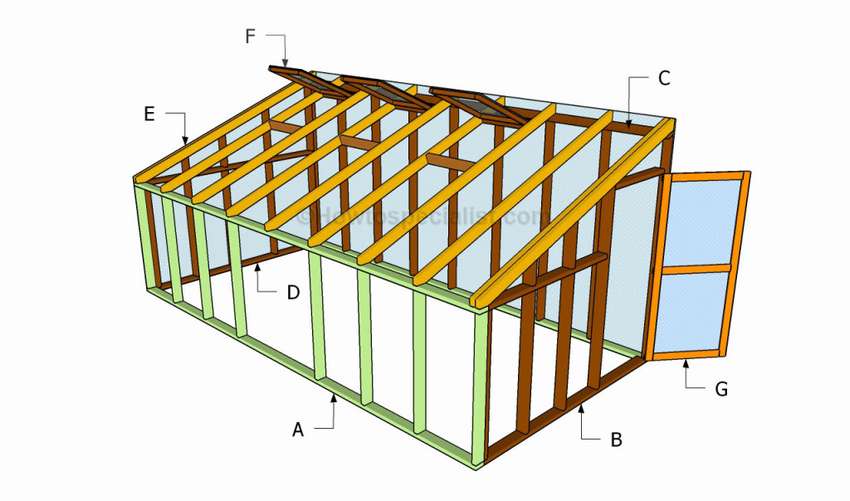 A - 2 pcs. bars 2 × 4 length 192 ”(488 cm), 9 pcs. 2 × 4 length 46 1/2 ″ (118 cm)
B - 3 pcs. 2 × 4 - 46 1/2 ″ (118 cm), 1 pc. - 57 1/2 ″ (146 cm), 1 pc. - 70 ″ (178 cm), 1 pc. - 30 ″ (76 cm), 1 pc. - 89 ″ (226 cm), 1 pc. - 14 3/4 ″ (37.5 cm), 1 pc. - 7 3/4 ″ (20 cm) walls
C - 2 pcs. 2 × 4–192 ”(488 cm), 9 pcs. 2 × 4 - 81 ″ (206 cm)
D - 2 pcs. 2 × 4 - 89 ″ (226 cm), 5 pcs. - 46 1/2 ″ (118 cm), 1 pc. - 33 ″ (84 cm), 1 pc. - 23 3/4 ″ (60 cm), 1 × 14 3/4 ″ (37.5 cm), 1 pc. - 7 3/4 ″ (20 cm) walls
E - 11 pieces 2 × 4 - 102 1/2 ″ (261 cm) rafters
F - 6 pieces 2 × 4 - 22 1/2 ”(57 cm), 6 pieces 2 × 2 - 30 ″ (76 cm), 6 pieces - 19 1/2 ″ (50 cm)
G - 2 boards 1 × 3 length 68 1/2 ”(174 cm), 3 boards 1 × 3 length 25 ″ (63.5 cm) door


https://i.expert-h.com/en/parniki-teplitsy/1120#sigFreeId474e2c3183
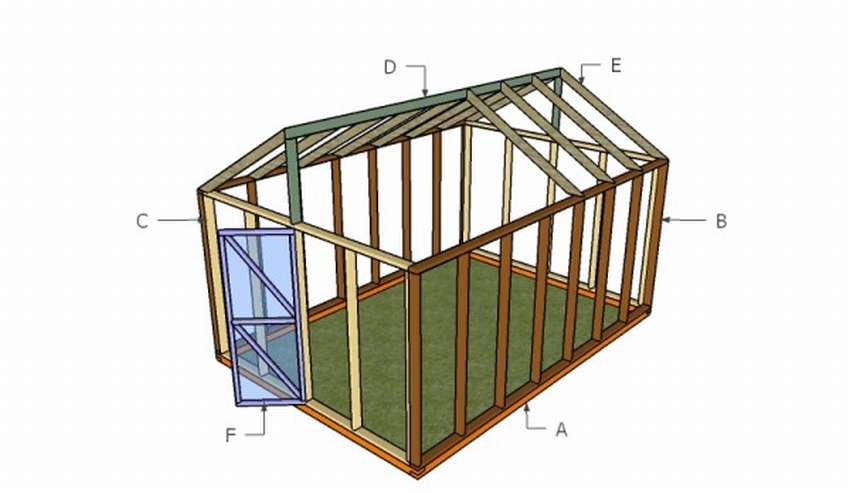
Drawing of a wooden greenhouse
 If you have a small budget but need fast build a wooden greenhouse, use the drawings presented here using 4 × 4 columns and 2 × 4 bars. On the other hand, if you don’t have time for a serious project or prefer a lighter construction, you should consider use PVC pipes. However, in this article you will learn how to build a small wooden greenhouse that will help grow your own vegetables and maintain plants in the appropriate climate during the winter.


https://i.expert-h.com/en/parniki-teplitsy/1120#sigFreeId81ea2b158e
Drawings of a greenhouse made of wood


https://i.expert-h.com/en/parniki-teplitsy/1120#sigFreeId6b82a53856
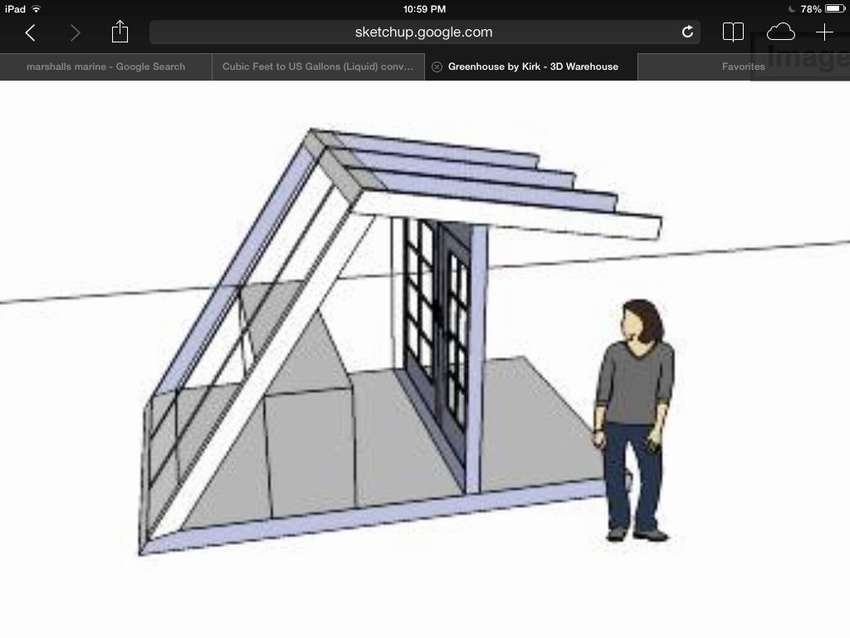
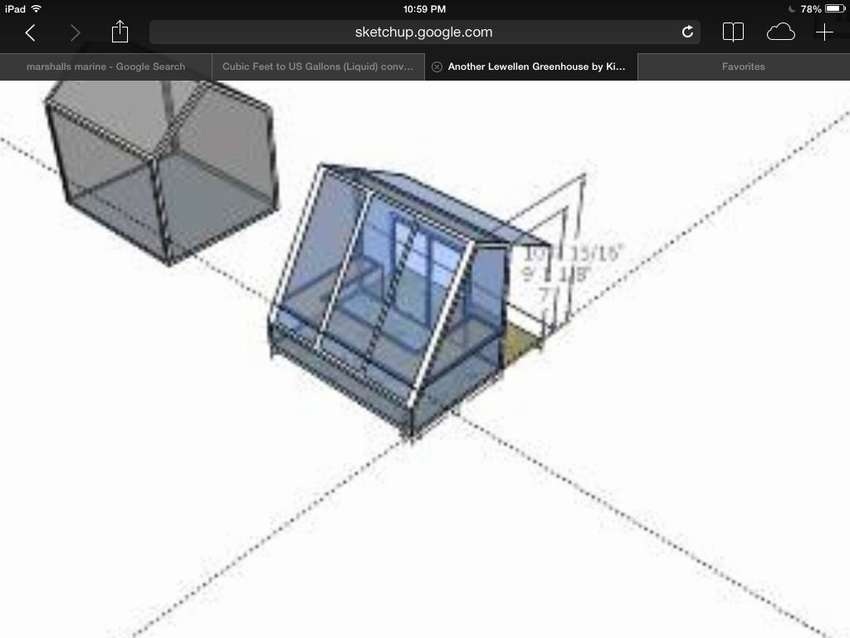
Wall-mounted greenhouse with a pitched roof
 Greenhouses under the wall is an inexpensive solution if you have suitable wall in a sunny place. True, the situation here is a bit unusual, because instead of accessing the greenhouse from one end, it goes inside a covered terrace. And instead of building the greenhouse to its full height, the author decided to set it at the height of the table for easy access to the plants. It used transparent polycarbonate panels for exterior decoration and three old wooden windows for interior doors.
The main goal of this greenhouse is to grow winter vegetables such as lettuce, spinach, broccoli and cabbage in the cold months, as well as cuttings in spring and autumn. It was easier make a greenhouse out of wood 120 cm deep, not 90, but the author wanted everything to be easily accessible from the patio, and 90 cm was a convenient distance. In addition, a depth of 120 cm would take up too much space on a narrow path outside the structure.
Although it is very unlikely that you will want to build a structure exactly like this, you better look at the whole process in case you need ideas for your own unique situation.


https://i.expert-h.com/en/parniki-teplitsy/1120#sigFreeId0247183aa7
Greenhouse Mitlider drawing
 See the drawings you can build from do-it-yourself wooden greenhouse original design Mitlider. Carefully inspect the wooden structure before covering it with transparent plastic wrap or foil. Make sure that no sharp edges or protrusionsthat can damage the foil. You can adjust the size of the wooden greenhouse according to your needs, tastes and budget. However, you can still use assembly methodsdescribed in this article by simply resizing them proportionally.
 A - 2 bars 4 × 4 with a length of 120 ”(305 cm), 2 bars 4 × 4 with a length of 168” (427 cm)
B - 4 boards 2 × 4 - 113 ”(287 cm) long, 4 boards 2 × 4 - 168 inches long (427 cm)
B - 24 boards 2 × 4 72 ”long (183 cm)
FROM - 8 boards 2 × 4, length 87 1/2 ”(222.5 cm), 8 parts 2 × 4, length 6” (15 cm)
D - 14 bars 2 × 2 14 ”(35.5 cm) long and 14 22” (56 cm) long
E - 2 boards 2 × 3 36 ”(91 cm) long, 2 boards 2 × 4 69” (175 cm) long, 1 pc. 33 ”(84 cm) long
F - 45 500 sq. M. feet (46 sq.m.) of transparent plastic film.
500 screws 65 mm


https://i.expert-h.com/en/parniki-teplitsy/1120#sigFreeId2f85393228
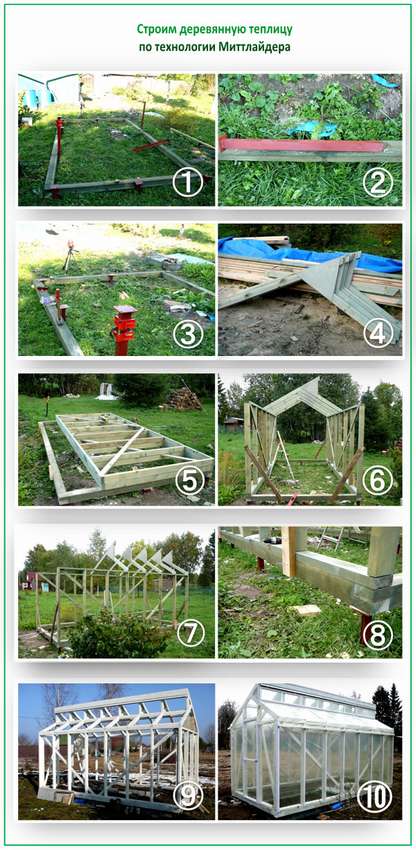
DIY greenhouse Mitlider
Here are two collages how to build a wooden greenhouse using Mitlider technology do it yourself.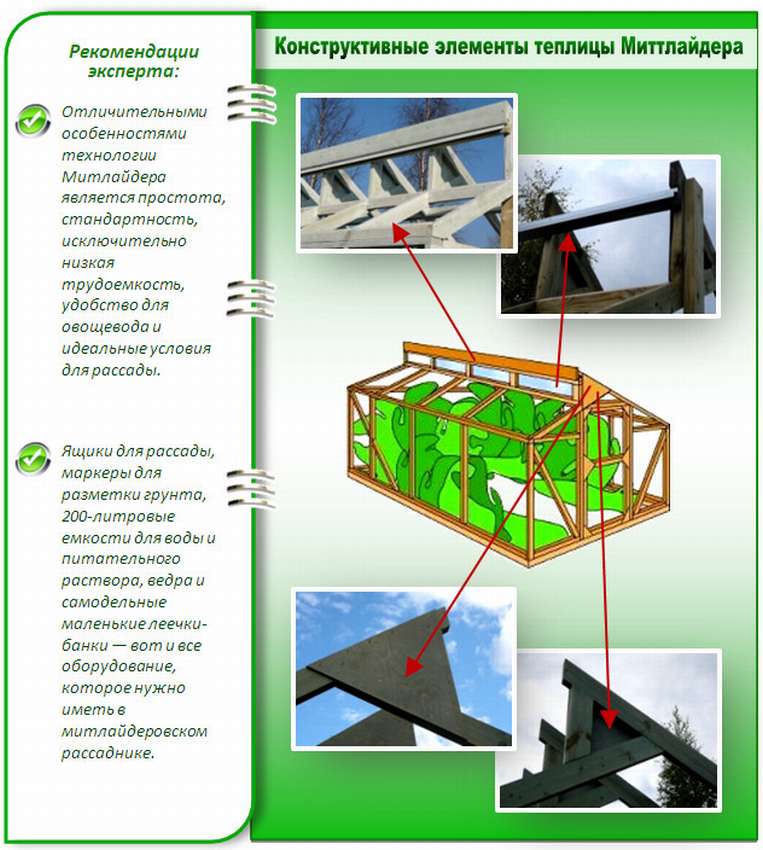 Ten photos of how to build a greenhouse
How to build a greenhouse with your own hands
 A greenhouse is a structure that creates a microclimate ideal for plant growth. It can be used to breed plants or contain them in conditions favorable for growth. Greenhouse construction - This is a serious project, not so much in terms of assembly of the structure, as knowledge of the characteristics of various types of plants to create appropriate climatic conditions. From this article from the famous wikihow site You can find out how:
- select the location of the greenhouse;
- choice of structure and coating materials;
- building a greenhouse frame;
- temperature regulation.
As well as additional planning and DIY greenhouses.


https://i.expert-h.com/en/parniki-teplitsy/1120#sigFreeId3e94f3feed
Glass and aluminum greenhouse
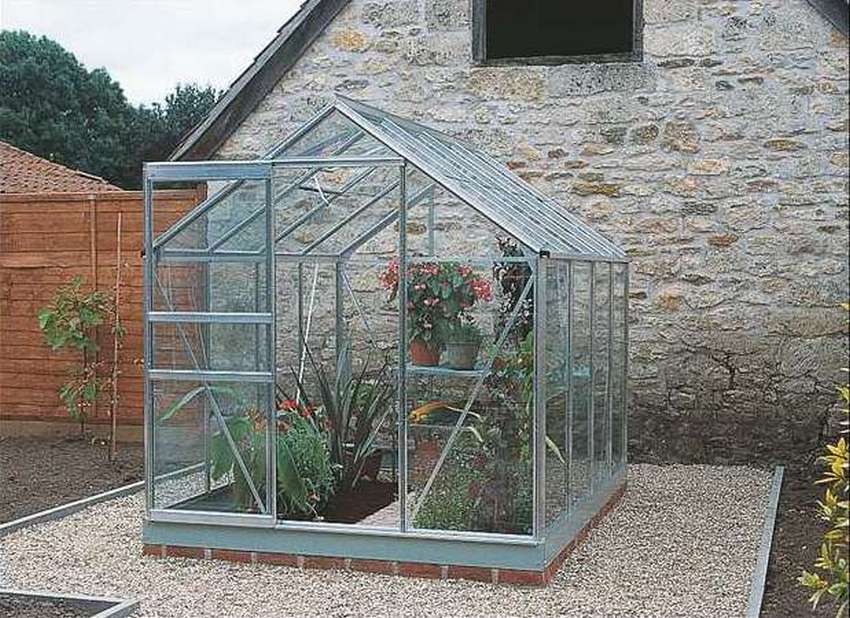 Greenhouses come in different shapes and sizes, with frames made of wood or (more often) aluminum, which has the advantage of low maintenance. Try to choose the largest greenhouse you can afford, as you can quickly make sure that the plants fill the space very quickly.
Here is an example of how to assemble with your own hands glass greenhouse with aluminum frame.
See the master class below for step-by-step photos..


https://i.expert-h.com/en/parniki-teplitsy/1120#sigFreeIdc03735224a
How to assemble a glass greenhouse from a kit
This is an example, how to assemble a glass greenhouse with your own hands.
 The design is assembled on wooden platformmade by yourself. The size of the greenhouse is 3 x 3.5 meters, assembled from a ready-made kit and slightly modernized. Added side vents, an electrical outlet, a switch for future lighting, curtains and a sprinkler system. Detailed instructions can be found on the website, link under the gallery, see below detailed step-by-step photo of the greenhouse assembly.


https://i.expert-h.com/en/parniki-teplitsy/1120#sigFreeIde9d06627df
Glass greenhouse drawing


https://i.expert-h.com/en/parniki-teplitsy/1120#sigFreeId55fd6980b8
Glass greenhouses 100 photos


https://i.expert-h.com/en/parniki-teplitsy/1120#sigFreeId2093f3c0d0
Rack for seedlings in the greenhouse
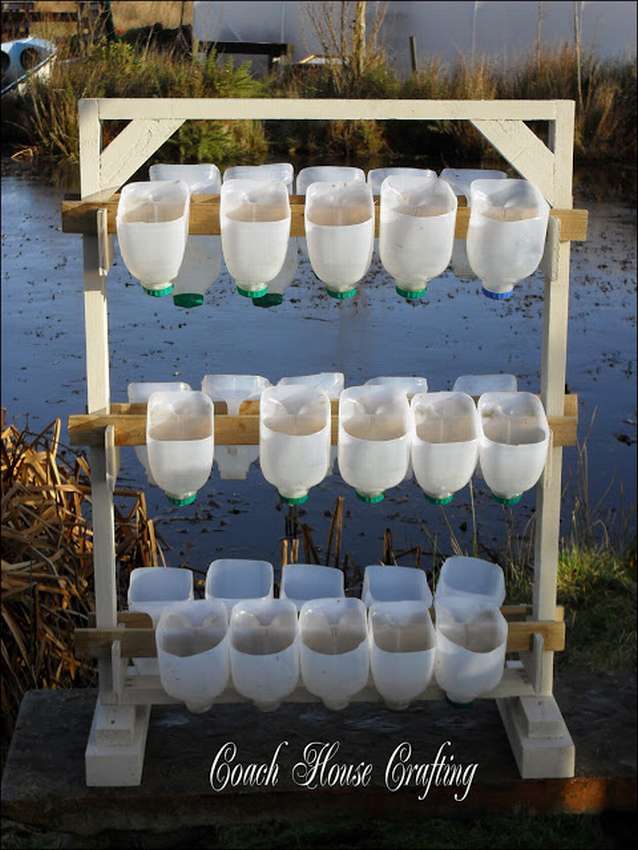 To save space, make a seedling rack in the greenhouse. It is a good option to use the height of the greenhouse and make room. It should have been light enough to carry and carry as needed. it easy to do even with limited skills and tools. For the rack you can use old boards, you still need plastic boxes of milk, so that the whole structure will cost you almost free. The author took about a day to build. But it can take even less time if you prepare the tools and materials in advance. Save space in the greenhouse Ideal for seedlings. You just lift the rack and take it out in the morning, and at night return it back to the greenhouse. It is also fabulous for rooted flower cuttings that need similar processing. If you use containers for herbs, they can be placed on a warm wall right next to the house. How to make a rack for a greenhouse, look at the step by step photosif necessary, instructions can be read on the website.


https://i.expert-h.com/en/parniki-teplitsy/1120#sigFreeIdb1fa9ddc33
Greenhouse table
If you have a greenhouse, then definitely need a tableTo make it more convenient to plant seedlings, take care of plants in pots and other cares, there is always enough work in the greenhouse.
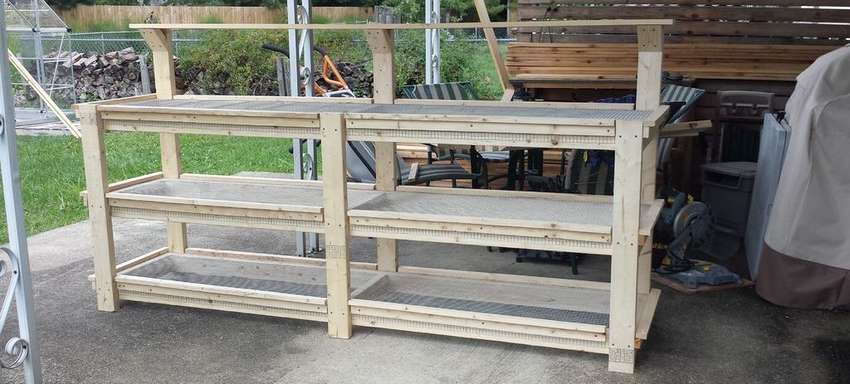 Here is an example how to make a table for a greenhouse with three tiers of landing surface. Nothing complicated, the process is shown below in step-by-step photos.


https://i.expert-h.com/en/parniki-teplitsy/1120#sigFreeIdf82802dfee
How to make a table for seedlings
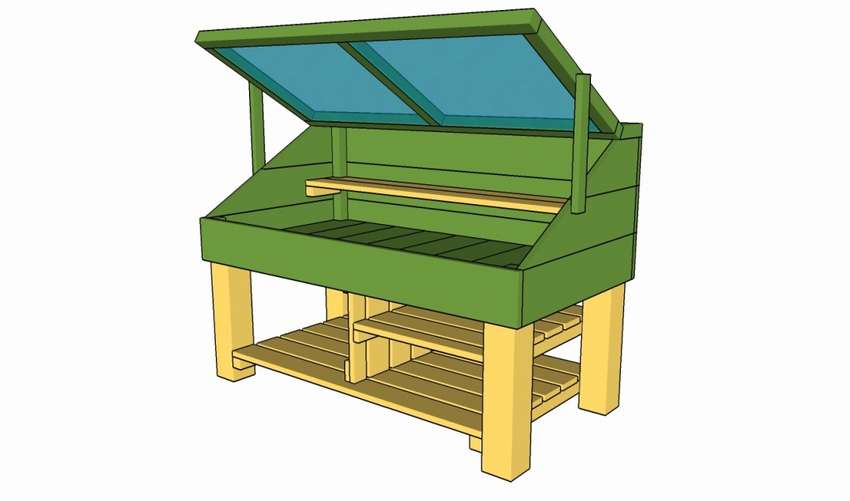 Seedling table necessary if you want to grow flowers and vegetables in comfortable conditions. This project is a simple design where you can place a large number of pots and trays for storing small plants and flower soil. Follow the step-by-step instructions and no manufacturing problems do-it-yourself seedling tables you will not arise.
Materials
 A - 1 board 1 × 8 long - 48 x 48 "(122 cm)
B - 2 sheets of plywood 1/4 (6 mm) - 16 ¼ (41 cm) x 73 "(185 cm)
C - 6 boards 1 × 6 48 inches (122 cm) long, 6 pieces - 24 inches (61 cm) back and front
D - 2 bars 2 × 2 4 ″ (10 cm) long, 2 pcs. 2 × 3 - 15 ″ (38 cm) corner supports
E - 2 pcs. 2 × 2 length 39 1/2 ″ (83 cm), 9 pieces 1 × 6 - 24 ″ (61 cm) bottom
F - 2 pcs. 2 × 2 - 5 1/2 ″ (14 cm), 2 boards 1 × 4 - 46 1/2 ″ (118 cm) shelf
G - 2 pcs. 2 × 2 - 24 inches (61 cm), 6 pcs. 1 × 4 - 39 1/2 (83 cm) below
H - 2 pcs. 2 × 2 - 48 ″ (122 cm), 3 pieces - 19 ″ (48 cm)
I - 4 things. 1 × 2 - 22 1/2 ″ (57.5 cm), 5 pcs. 1 × 4 19 ″ long (48.26 cm), 5 pcs. - 13 1/4 ″ (33.5 cm)


https://i.expert-h.com/en/parniki-teplitsy/1120#sigFreeIdcd8a7f19a8
Glass jar greenhouse
Here is an example of how to build an original wooden glass jar greenhouse.
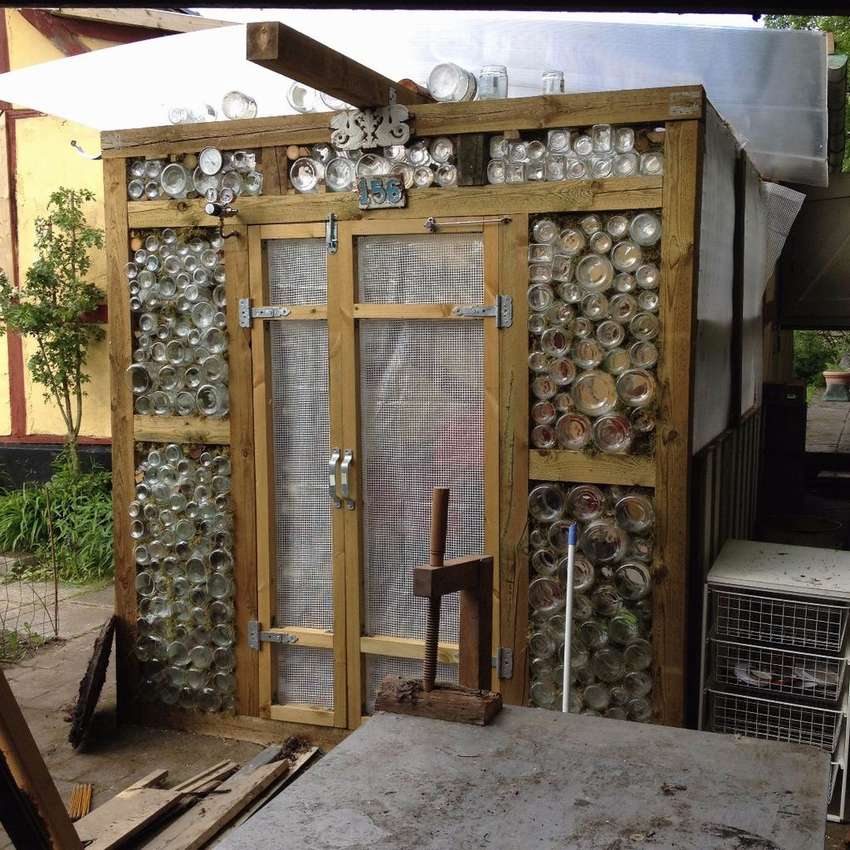 Assemble a wooden frame, 10x10cm bars were used here.
- Make a lot of glass jars.
- Install cans with an open part inside a wooden frame.
- Fill the gaps between the cans with moss - depending on where you live, you can spray the moss with water.
- Lay the floor with lids from your cans. (not necessary)
- Large cans are ideal for seedlings (mini-greenhouses)
- Make a device to collect rainwater in a jar and water the plants with it. (See photo)
- For the roof, you can use polycarbonate or thermoplastic film.
Read the instructions on the website, see the master class in step-by-step photos below.


https://i.expert-h.com/en/parniki-teplitsy/1120#sigFreeIdb36303acd4
Do-it-yourself greenhouses made of wood 200 photos


https://i.expert-h.com/en/parniki-teplitsy/1120#sigFreeIdc1d413991d
50+ greenhouse pics
Below you can view the gallery of greenhouses with an opening lid, which you can do yourself. We collected photos from all over the Internet, below we indicated the sources from which we could determine the authorship.
-

-
-
-
-
-
-
-
-
-
-
-
-
-
-
-
-
-
-
-
-
-
-
-
-
-
-
-
-
-
-
-
-
-
-
-
-
-
-
-
-
-
-
-
-
-
-
-
-
-
-
-
-
-
View the embedded image gallery online at:
https://i.expert-h.com/en/parniki-teplitsy/1120#sigFreeIdc5beefab98
https://i.expert-h.com/en/parniki-teplitsy/1120#sigFreeIdc5beefab98
Mounting Methods
How to fix the opening greenhouse cover
|
Here is one reliable way.
|
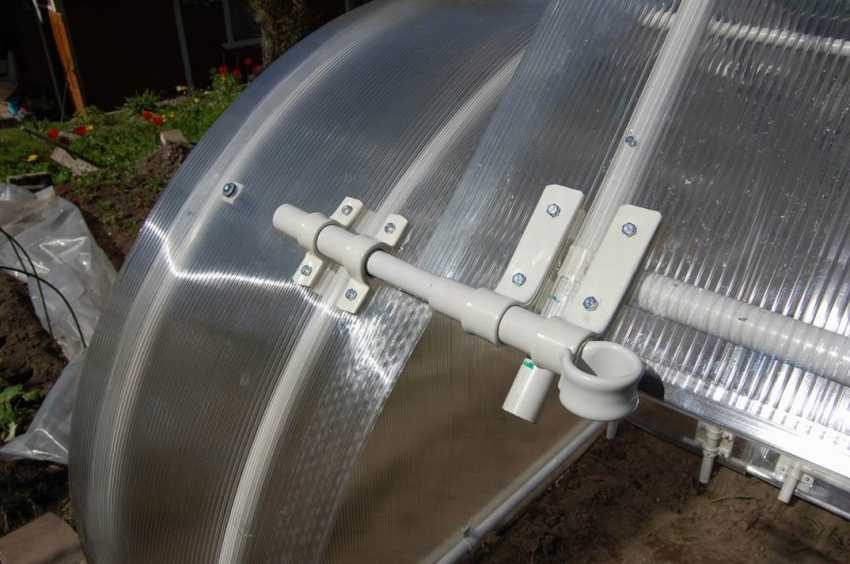
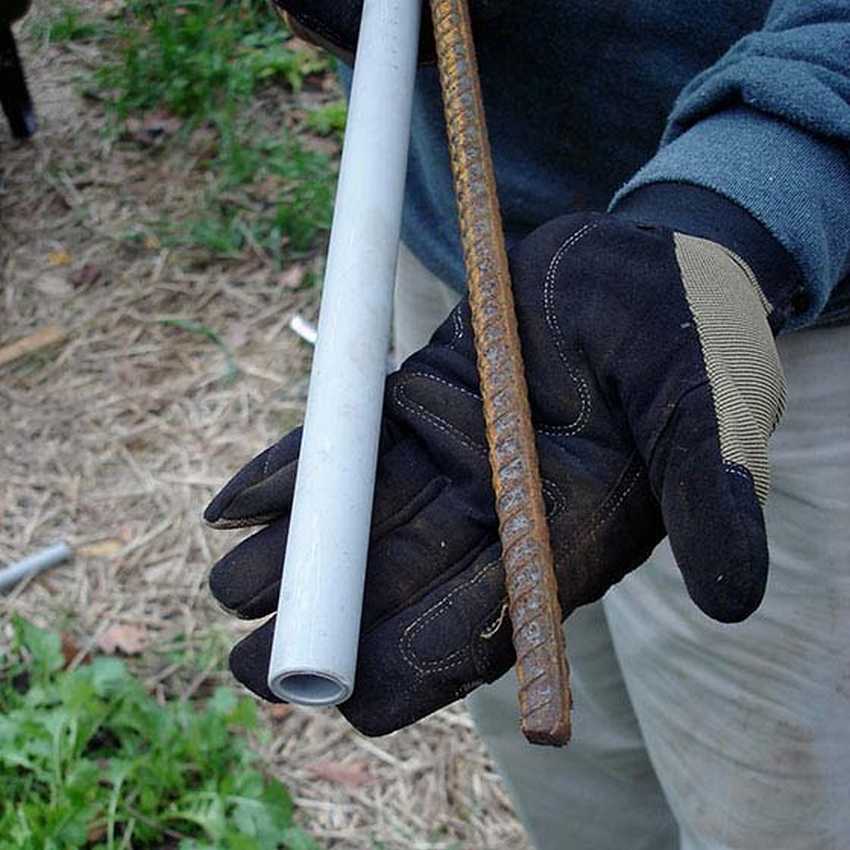
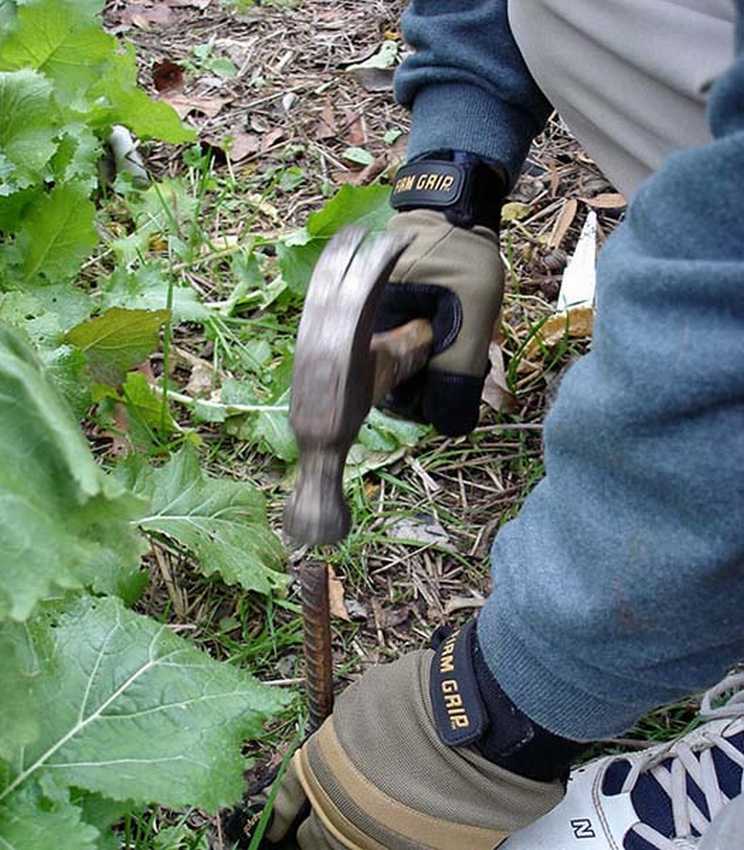
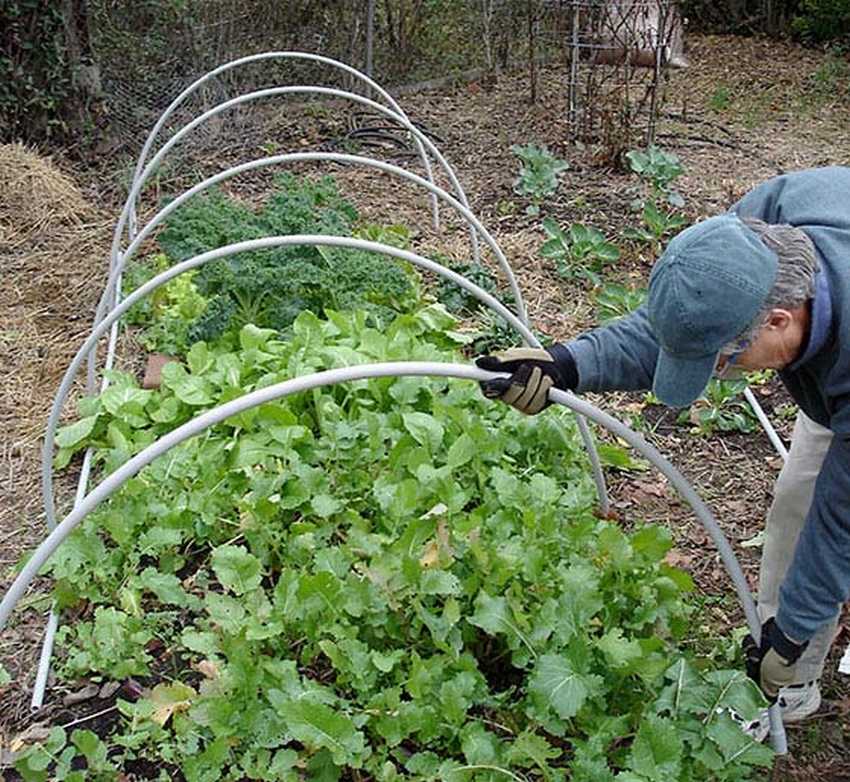
How to fix arches or PVC pipes of a greenhouse under a film
|
Clamps |
Insert into the ground The method consists in the fact that we are installing PVC pipes on fittings driven into the ground. Instead of reinforcement, wooden rods can come off (enough for a season) Click on the photo to enlarge
|
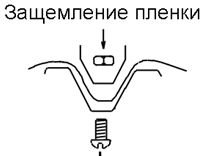
How to fix a film in a greenhouse
|
Hose lengths
|
 |

The easiest PVC pipe greenhouse

Very simple greenhouse design. Easy to assemble, and just as easy to disassemble. It can be moved, increased, reduced.
It is cheap and easy to manufacture..
ADVISE this greenhouse
Step by step photos. Click on them

https://i.expert-h.com/en/parniki-teplitsy/1120#sigFreeIdfca49e1727
How to make a greenhouse from willow or cedar branches.
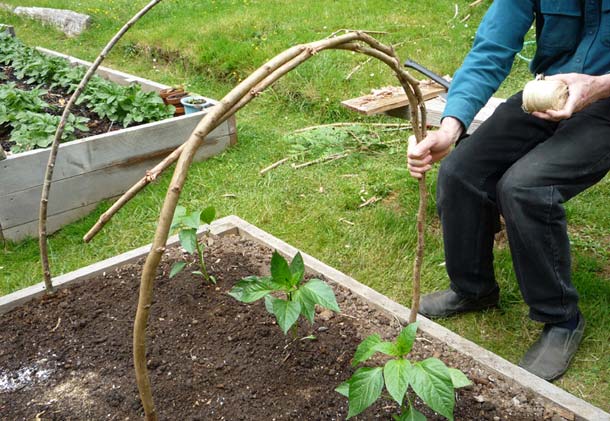
Such a greenhouse is suitable for those who did not expect sudden frosts.
This mini greenhouse can be done in 45 minutesaccording to the author of the photo. 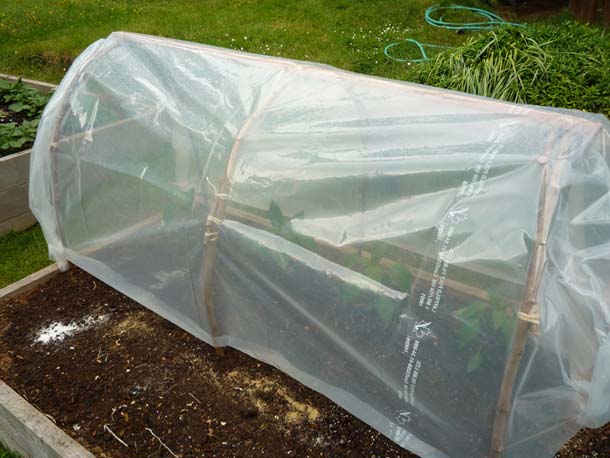
For the manufacture of arcs, not PVC pipes were used, but cedar branches, but I think that willow branches will come down in our conditions. The branches are interconnected by a nylon thread (not fundamentally what) to give an arcuate shape. When arcs from branches are stuck in the ground, a bar is attached over them, to give one damage, which is also attached to each arc.
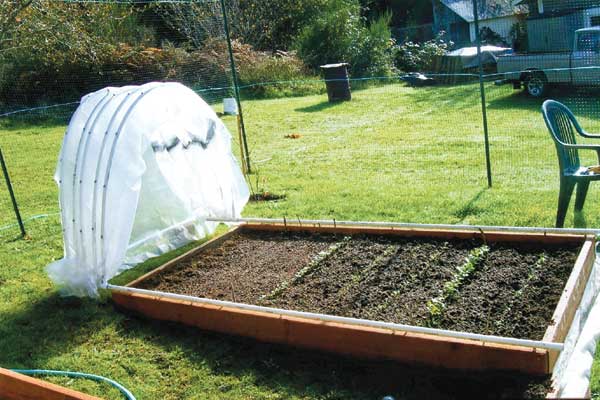
In order to transfer such a greenhouse to another place, the author advises putting two long bars along the base of the arcs, then link each arc to these bars. As a result, we get something like a stretcher. Taking such stretchers from both ends, it is quite easy to pull our greenhouse out of the ground and move it to another place.
Below you can see step-by-step photos, to enlarge, just click on them.
-
-
-
-
-
-
-
-
View the embedded image gallery online at:
https://i.expert-h.com/en/parniki-teplitsy/1120#sigFreeIdfec62abad9


https://i.expert-h.com/en/parniki-teplitsy/1120#sigFreeIdfec62abad9
Telescopic greenhouse or greenhouse
And here is a very interesting variation of a telescopic greenhouse or greenhouse. I moved the arcs and nothing interferes, below you can see the mounting mechanism, click on it to enlarge.
DIY Convertible Hotbed
See step-by-step photos of making such a greenhouse. First we make a pallet for soil, then we make a frame on which we will fix the arcs, and which will recline. Then we fasten this frame to the pallet on the hinges and cover with a film.
Step-by-step photo of the manufacture.
Click on the gallery to enlarge
-
-
-
-
-
-
-
View the embedded image gallery online at:
https://i.expert-h.com/en/parniki-teplitsy/1120#sigFreeId967c9b6600


https://i.expert-h.com/en/parniki-teplitsy/1120#sigFreeId967c9b6600
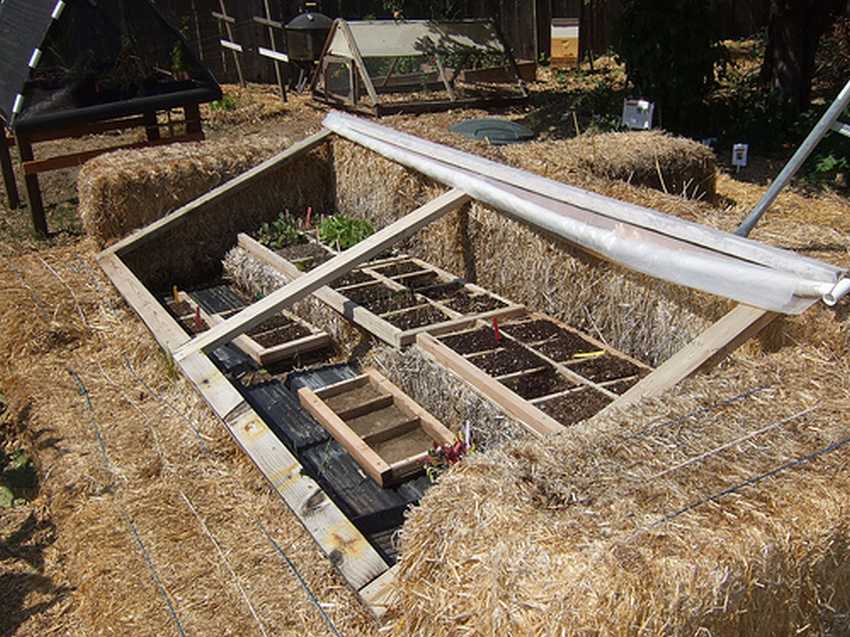
A greenhouse made of straw or hay.
As we see in the photo there is a greenhouse whose walls are made of briquettes (or bales) of straw (hay). A frame with an opening top is simply piled on the walls of straw. The film rolls onto a bar. These greenhouses are usually directed south. Such a design helps well when the slope of the soil in your area is directed to the north side, in such cases the sun weakly heats the earth. Such a greenhouse will help you out in this situation..
Greenhouse to collect water
(Roots Up Dew Collector Greenhouse System)
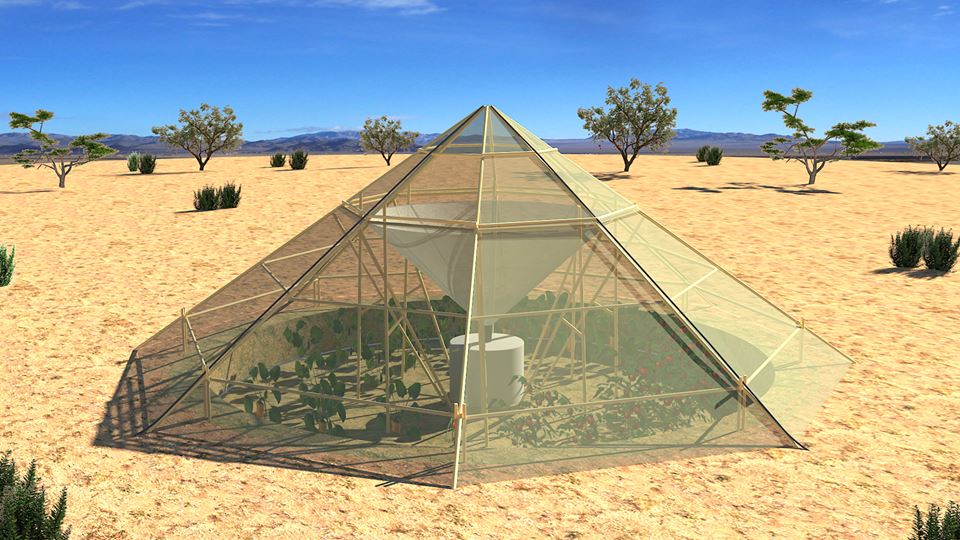 In a day, the greenhouse condenses to 80 liters of water !!!
Thanks to such greenhouses, Ethiopia will soon flood the world with food. The greenhouse was created for arid countries to solve the problem of drought.
In the afternoon, steam accumulates in the upper part of the greenhouse. When night falls, special valves are opened for intake of cold air, thanks to which water vapor is cooled and condensed, after which the liquid enters a special storage tank.
Excess water left after watering can be used for drinking.
-
-
-
-
-
-
-
View the embedded image gallery online at:
https://i.expert-h.com/en/parniki-teplitsy/1120#sigFreeId5e342fb7f8


https://i.expert-h.com/en/parniki-teplitsy/1120#sigFreeId5e342fb7f8
Portable greenhouse (greenhouse) from a barrel
Easy and simple to make (45 minutes)
This portable greenhouse is suitable for growing seedlings, or plants such as parsley, cilantro, etc.
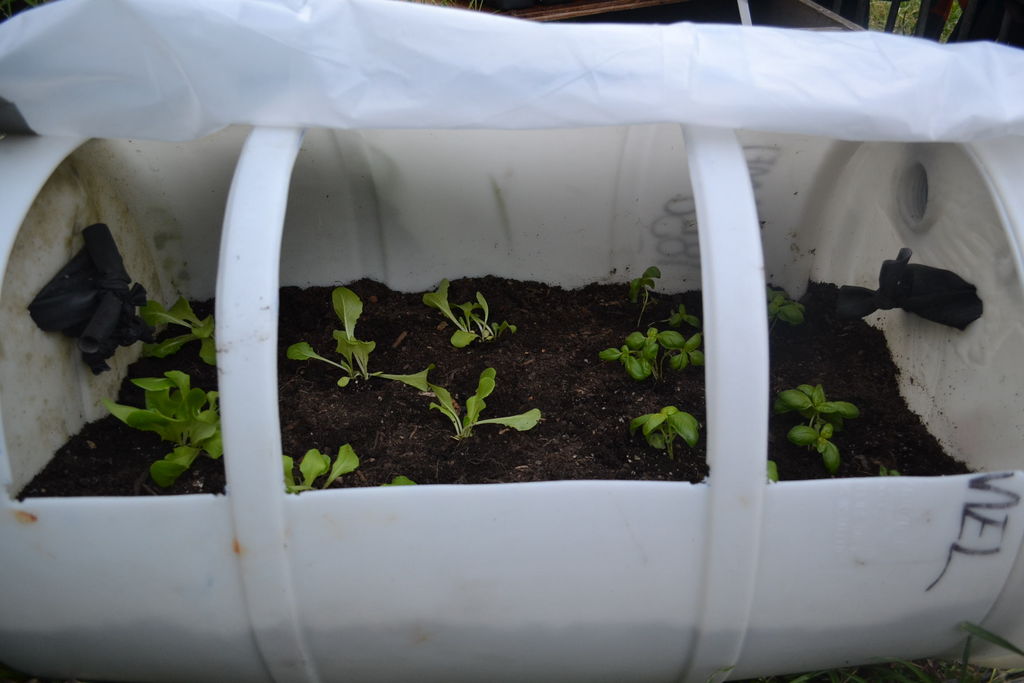
- 2 photos - cut square holes with a jigsaw in 1 quarter of the circumference of the barrel.
- 3 photos - a hole with a drill so that a jigsaw could be inserted.
- 4 photos - holes in the bottom to drain water from the drainage.
- 5-6 photos - attach the handles on the sides for transfer.
- 7-12 photos fasten the film.
- 14 photos - drainage.
The greenhouse can be painted green to blend in with the landscape of the cottage
-
-
-
-
-
-
-
-
-
-
-
-
-
-
-
-
View the embedded image gallery online at:
https://i.expert-h.com/en/parniki-teplitsy/1120#sigFreeId588bd29eff


https://i.expert-h.com/en/parniki-teplitsy/1120#sigFreeId588bd29eff
Portable film greenhouse
As you can see from the photo, the greenhouse has a lightweight version. It does not have a massive base; it is attached to the ground by reinforcement fixed on the base. It is transported as on a stretcher with the help of two long boards pinned to the base. A gardener will come in handy when it becomes necessary to close some weak plants at the time of cooling.
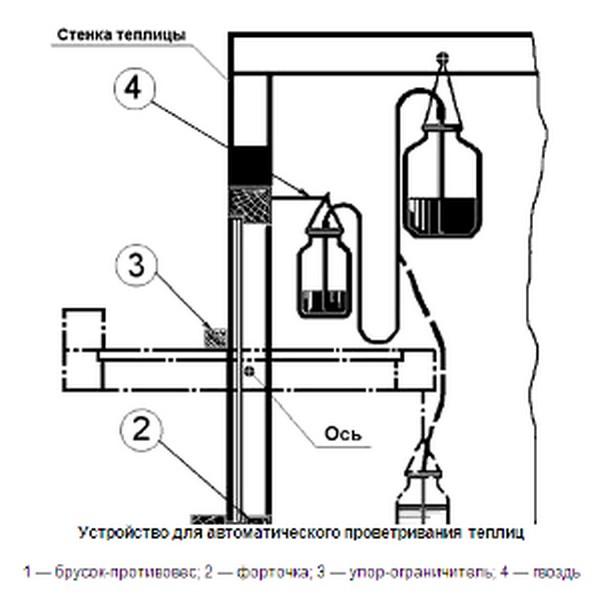
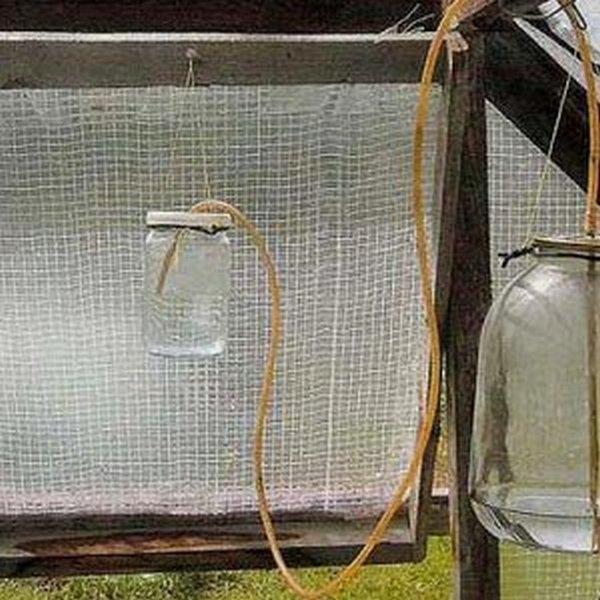
Greenhouse butterfly
How to do automatic opening window leaves in a greenhouse?
Very interesting and simple design to automatically open the window, depending on weather conditions. The principle is as follows. A tube in the form of a communicating vessel passes between the large (3l) and small (0.5l) cans. A large jar is suspended from the base of the greenhouse, and a small one from the window. Moreover, the small should be balanced with the fortpoint in such a way that with a minimum amount of water in it, the window must be closed. In a hermetically sealed large jar with increasing temperature in the greenhouse. water due to atmospheric pressure moves into a small can, opening the window
A simple version of the greenhouse side opening.
As you can see, a very simple design of the film greenhouse. Such a greenhouse can be easily moved and put into a new place.
Dome greenhouse from scraps of pipes
it's ugly but it works
 The authors of the blog booth555.com moved to a new home, and they had to independently sew themselves. As a result, they left a lot of pipe scraps, and they were used by an enterprising young family to create this greenhouse. The advantages of these pipes are that they are easy to bend and at the same time they are stable and easy to pin.
See step-by-step photos of creating a greenhouse.
-
-
-
-
-
-
-
-
-
View the embedded image gallery online at:
https://i.expert-h.com/en/parniki-teplitsy/1120#sigFreeId2d1e4b1eb3


https://i.expert-h.com/en/parniki-teplitsy/1120#sigFreeId2d1e4b1eb3
As I understood from the translation of the article from English, the pipes are attached to the wooden cross-pieces using tape. I didn’t really understand about the film, somehow the film scraps were fastened together, the cord was most likely threaded through the holes, and there is also a hint for 6 photos.
The film below is pressed to the ground by bricks, this makes it possible to pull the film up on hot days.
I could not translate the purpose of the star (in 4 photos), but suggested that it was attached to the dome to make the structure more stable.
Write your star assignment options in the comments.
Greenhouse from a double-glazed window or frames
The author of the doorgarden.com blog made here such a recumbent greenhouse from a glass door (double-glazed window), into which a stone from a lawn mower accidentally fell.
According to the author, such a hotbed allows him to collect greens for salads in January, well, America, I can’t say exactly what kind of staff it is.
See the drawing of this greenhouse. Everything is very simple. As we see from the photo, the double-glazed window is not attached to any hinges, it just lies, resting against the side board from slipping.
The double-glazed window can be replaced with any large glass or window frame.
-
-
-
-
-
-
View the embedded image gallery online at:
https://i.expert-h.com/en/parniki-teplitsy/1120#sigFreeIdd949a42e36


https://i.expert-h.com/en/parniki-teplitsy/1120#sigFreeIdd949a42e36
In summer, in hot weather, when there is no need for such a greenhouse, you can throw it on strawberries to protect the berries from birds.
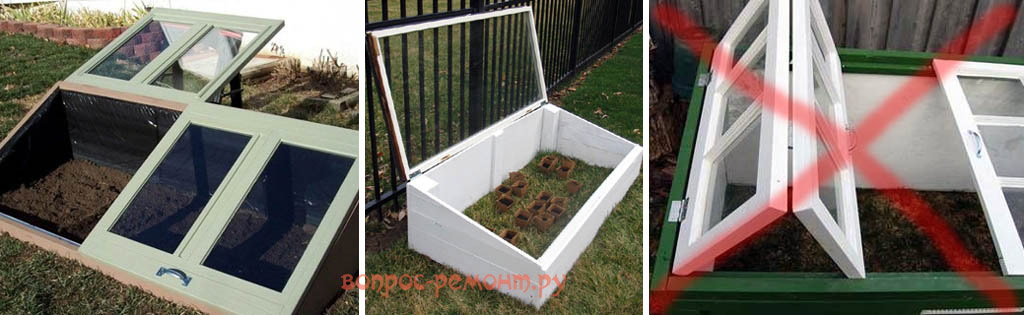
Attention!!! An important point about greenhouses from window frames
Whatever frames you have at your disposal, you need to make the transparent roof folding (lifting up), and not hinged or folding, as on the right in Fig. Through any vertical gap, all the warm air will instantly disappear and the plants will strike cold, and the horizontal one can be adjusted with supports according to the weather and local conditions.
What should be the inclination of the greenhouse cover ???
Note: the optimal slope of the roof slope of a single-pitch greenhouse from the vertical (90 degrees) –φ, where φ is the geographical latitude of the place; and (90 degrees) –φ is the angular height of the Sun at noon of the spring / autumn equinox. See below for a greenhouse with a heat accumulator.
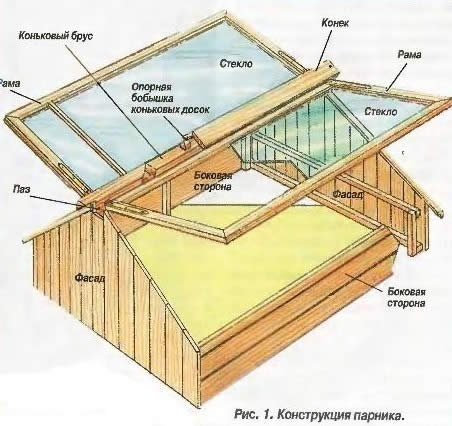
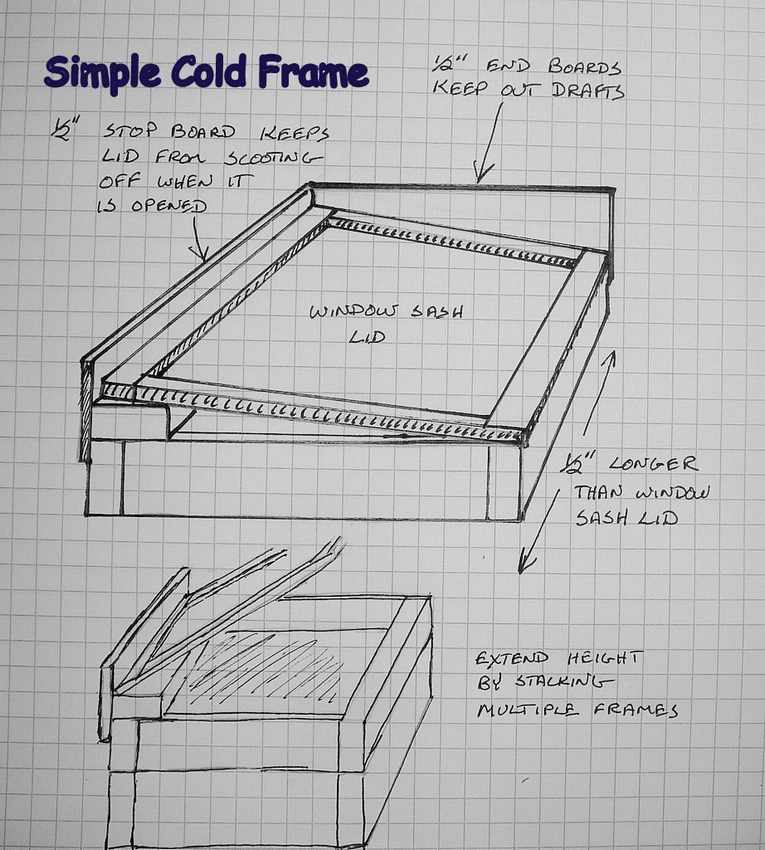
Cold greenhouse. (drawing diagram)
Do it yourself
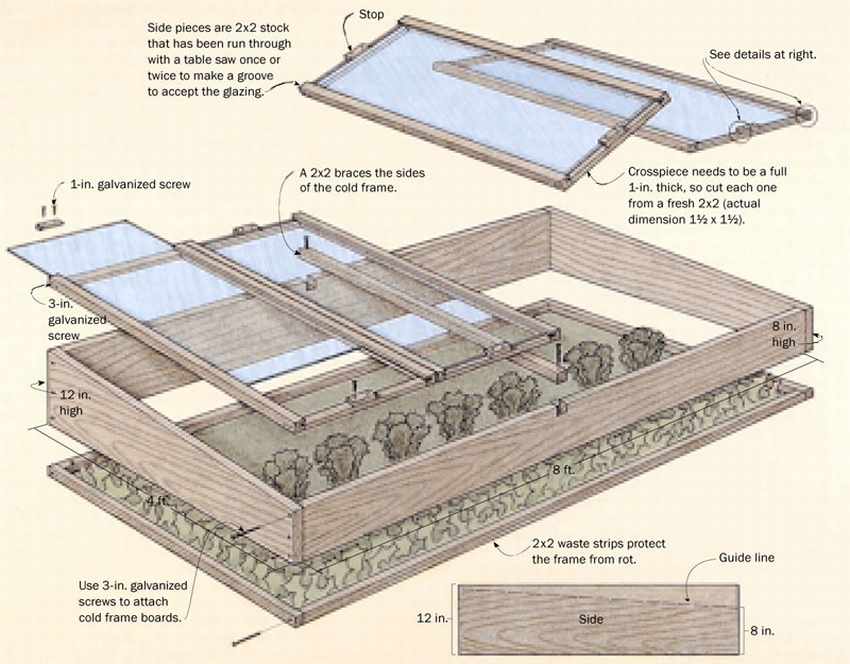
The greenhouse consists of a wooden frame and a glass lid. The glass of the lid should always be inclined to catch as many rays of the weak winter sun as possible.
The author claims that even in winter during sunny weather, this greenhouse can heat up to very high temperatures, so the lid must be able to open upward. In order to regulate the temperature, a thermometer must be placed in the greenhouse (see photo 5), and a mechanism for fixing the open cover at different angles was made (see photo 4).
Vegetables that can be grown in the early winter in a cold greenhouse
BUT, nevertheless, the main secret of such a greenhouse is not in its arrangement, but in the plants grown in it. These should be plants that easily tolerate cold. According to the author's research, five crops: spinach, green onions, mache, claytonia, and carrots can be successfully grown in the northern states of the USA. As well as arugula, Escarole, Mizuna, parsley, sorrel, European salad, mustard, spinach and turnips.
The author sows vegetables usually from mid-August to mid-September.
-
-
-
-
-
-
View the embedded image gallery online at:
https://i.expert-h.com/en/parniki-teplitsy/1120#sigFreeIdc6a1d9f617


https://i.expert-h.com/en/parniki-teplitsy/1120#sigFreeIdc6a1d9f617
My advice: make a cardboard sheet glued on one side with foil. At night, you can cover the greenhouse with this foil, which will reflect the heat coming from the earth back into the greenhouse.
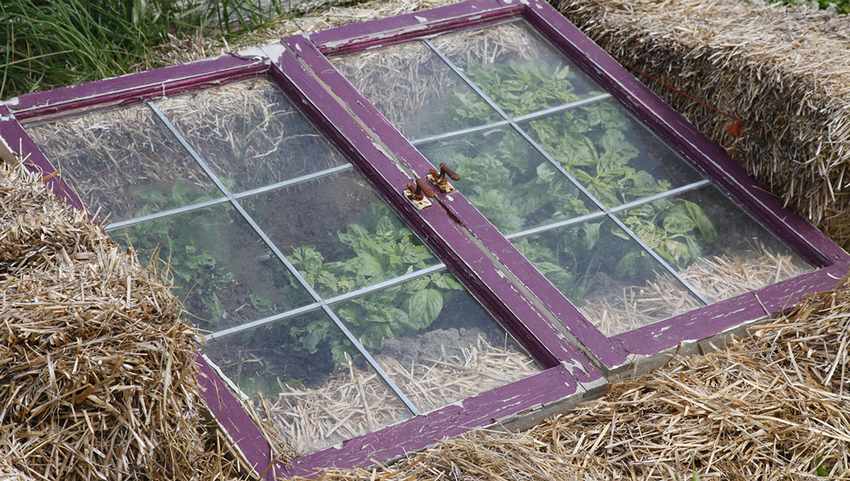
Window frame and hay greenhouse
Greenhouse (greenhouse) IN plastic bottle
or "How to grow seedlings if the apartment is cold"
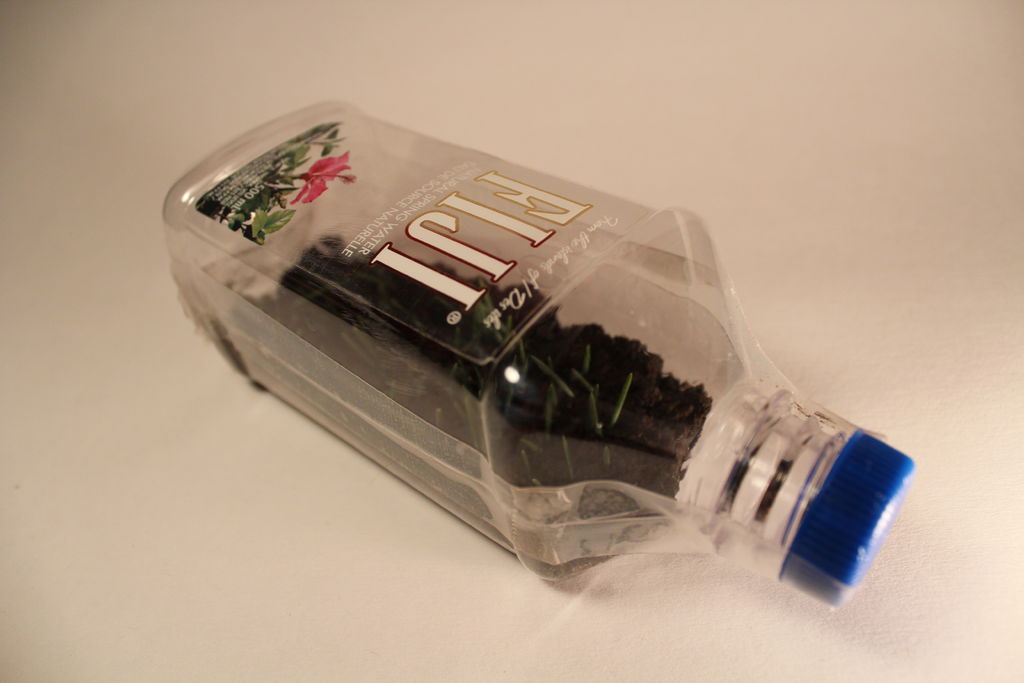 It often happens in our domestic apartments that for growing seedlings the room is not warm enough. Such a greenhouse in a plastic bottle can serve as a way out of this situation.
When sunlight enters such a greenhouse, the air in the greenhouse begins to heat up and remains warm for a very long time, even after sunset.
An important plus will be high humidity inside the bottleand, which will be created by heating pre-moistened soil. Such humidity significantly accelerates the process of seedling maturation.
The manufacturing process is simple.: Cut the bottle, rinse, place the soil with the seeds inside and seal it tightly with tape.
-
-
-
-
-
-
-
-
-
-
-
-
View the embedded image gallery online at:
https://i.expert-h.com/en/parniki-teplitsy/1120#sigFreeId2ec7d391ec


https://i.expert-h.com/en/parniki-teplitsy/1120#sigFreeId2ec7d391ec
How to do quick DIY greenhouse
Greenhouse made of wooden trellises
Advantages of such a greenhouse:
- - quickly build
- - is steady
- - easy to manufacture
Minuses:
- not suitable for tall plants, you can use for growing early greens and seedlings.
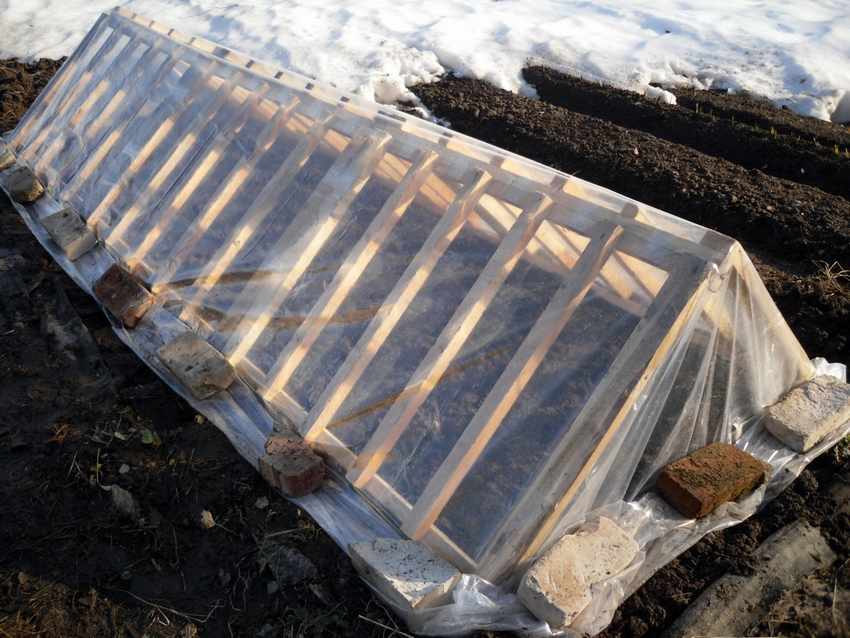
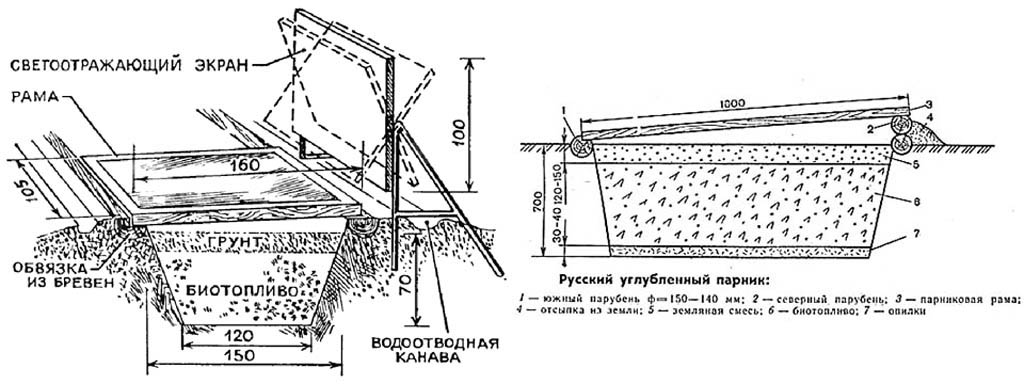
Russian in-depth greenhouse on biofuel
About Russian pits
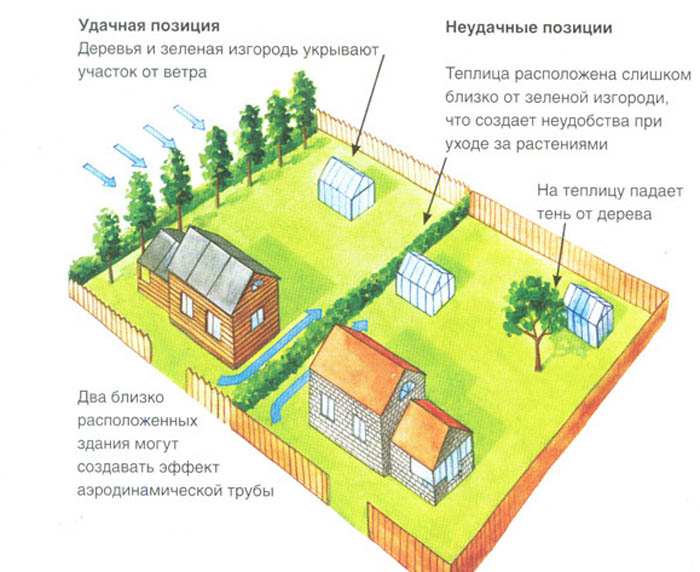
The simplest greenhouse is a single-pitch greenhouse, recessed into the ground, with biological heating. For its construction choose a dry, well-lit and sheltered from the winds place. It is desirable that this was a low slope with a direction to the south. To protect the greenhouse from the wind, green spaces, fences or special reflective screens that are arranged on the north side can serve. Particularly convenient are swivel flat screens painted with white paint, which allow maximum use of solar energy. Reflected backlight increases temperaturesin the beds by 2-3 °, which is equivalent to the transfer of your site, for example, from the suburbs to the black soil regions of the country: Lipetsk or Voronezh.
Note: you can use any flat panels glued with aluminum foil for baking.
Construction begins with a strapping device around the perimeter of the greenhouse of four sanded logs with a diameter of 10-14 cm. The north side of the strapping should be slightly higher than the south. On the south side in the harness, a groove (quarter) is selected to support the frames.
At one time, the Russian greenhouse was a revelation to European farmers. It was from the “Russian pits” that the nobility of the time received in the winter a green onion, lettuce, dill, parsley, radish, and strawberry.
The foundation pit is dug to a depth of 70 cm. In cross section, it has the shape of a trapezoid. In dense soils, the walls can not be fastened, and in loose and floating soils, fastening with horizontal boards is used. To ensure that the greenhouse is not washed away by rain, a drainage groove is arranged around it, which can be closed with wooden shields that facilitate approaches.
Frames for the greenhouse are most convenient in the size of 160x105 cm. They are made of 6x6cm bars, joined for strength with wooden studs, and then properly stained with weather-resistant varnish PF-166 ("6 = s"). Glass reinforced with putty or glazing bead. To drain rainwater in the lower bindings, grooves are cut.
Biofuel in greenhouses is horse or cow dung.. Horse is considered the best, it gives more heat. Harvest it in the fall. Manure is collected in piles and carefully insulated on all sides with straw, sawdust, peat and covered so that the manure does not freeze. In the spring, before stuffing the greenhouse, it is transferred to another, more loose pile and warmed up. To do this, make several holes in it and pour a bucket of hot water into each, after which the stack is covered with burlap or matting. In two to four days, when the manure warms up to a temperature of 50-60 °, they fill a greenhouse. It is laid colder at the bottom, and hot from above and from the sides. After precipitation, after two to three days, a new portion is added. The manure must lie loose, and only at the walls it is necessary to slightly compact it so that voids do not form.
Greenhouses - pits were usually made 3-4, which ensured year-round use: while 1 pit was heated after refueling, the rest gave production. An indispensable condition for the successful operation of the Russian greenhouse is the stroke of the entire complex with a clay castle with a drainage ditch, otherwise the biofuel will become acidic.
Click on it to enlarge it.
After stuffing, the greenhouse is covered with frames and mats made of matting, straw or burlap. From above, on heated manure, soil is poured - garden or sod soil, compost or fertilized peat. An average of 0.2 cc per frame. m of land. Exceeding this amount is not recommended, since under the weight of the earth manure is compacted, air flow is hindered to it, and it ceases to burn. For the same reason, do not over-moisten the soil.
A greenhouse of even such a simple design will make it possible to grow vegetables much earlier than expected.
Greenhouse layout
where it is better to put a greenhouse on the site
Hello, I am the author of this article, so I look forward to asking questions for this article in the comments below, I will answer all !!!
If you have questions on another topic, ask them on our forum, we will answer you
- Two baskets of paper in 5 minutes (Master class)
- How to make a simple and compact table for a milling cutter from plywood
- How to make a soft headboard tile (Instructions + step by step photos)
- Cinder block benches: a convenient bench in 55 minutes
- How to make a bed with a niche: saving space (Master class)