Do-it-yourself dome greenhouse. Drawings, photos, step-by-step instructions
 greenhouse dome
There are many types of greenhouses to choose from, but geodesic domed structures provide a ton of advantages over other styles. At first glance do do-it-yourself dome greenhouse difficult and expensive, but it is not. Using PVC pipes and plastic film, you can build geodesic dome cheaper than buying some prefabricated greenhouses.
Geodesic domes are created by joining triangles in the shape of a dome using accurate angles and measurements. In fact, the dome is an arch rotated 180 degrees around its central axis. And if done correctly calculation of the greenhouse, it will have the same, if not greater, structural strength as arched roofs of a similar size. The article presents several examples of how to make a domed greenhouse with your own hands at minimal cost.
Round greenhouse dome
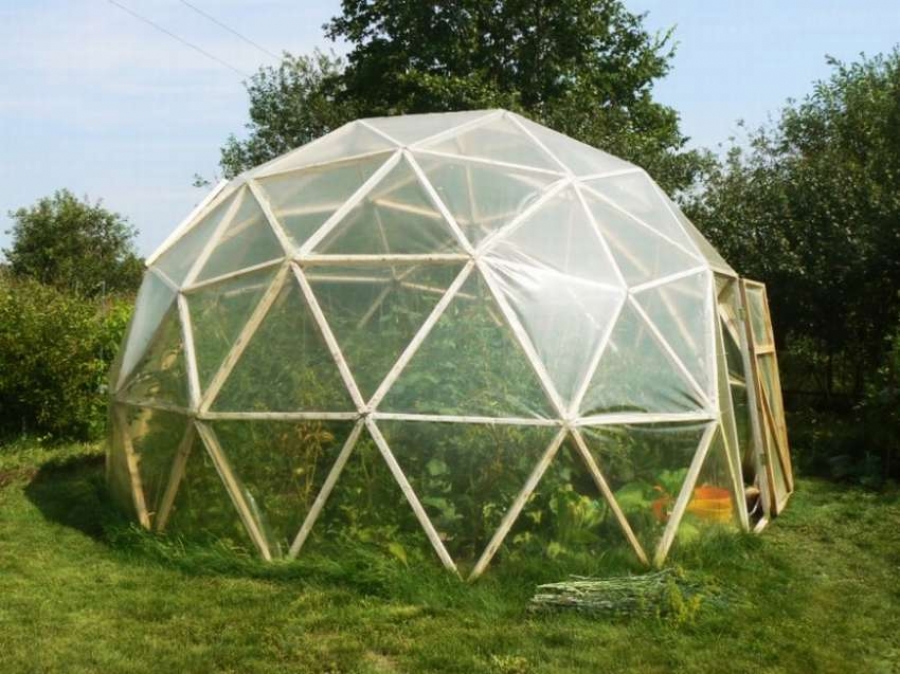
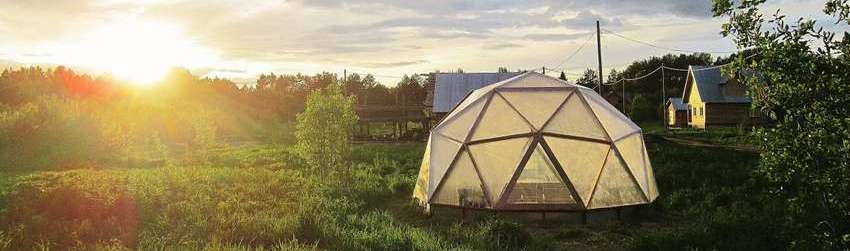
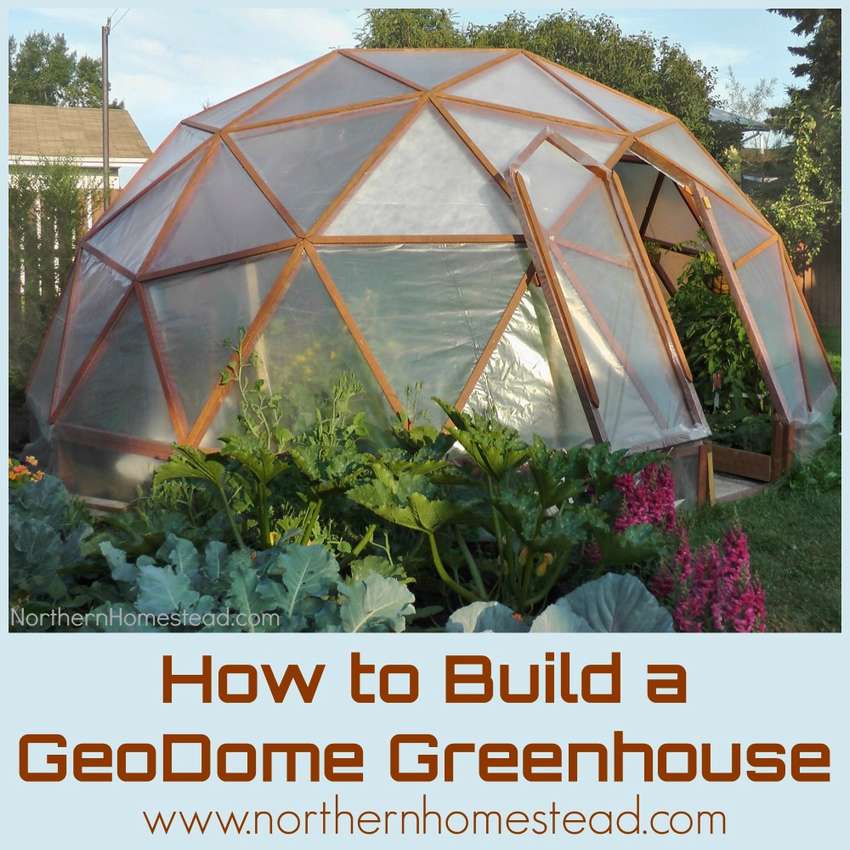
 The main idea of the project is to make the design cheap and easy. Geodesic Domes gaining momentum among summer residents and gardeners. But why? It would seem easier to just build a rectangular structure with beautiful vertical walls and angles of 90 degrees. In fact domed constructions are very energy efficient. In some cases, they will only use fourth of what will use a standard rectangular structure of the same size. Due to the absence of angles, the domes contribute to a uniform temperature of the entire structure and more efficient air circulation. Here is an example how to build a greenhouse dome do it yourself round shape. You can also embed multiple leds white light so that at night the dome glows, beautifully and conveniently. Below, see step-by-step photos on how to assemble this design.


https://i.expert-h.com/en/parniki-teplitsy/1119#sigFreeId91a3ef5f48
Greenhouse with a geodesic dome
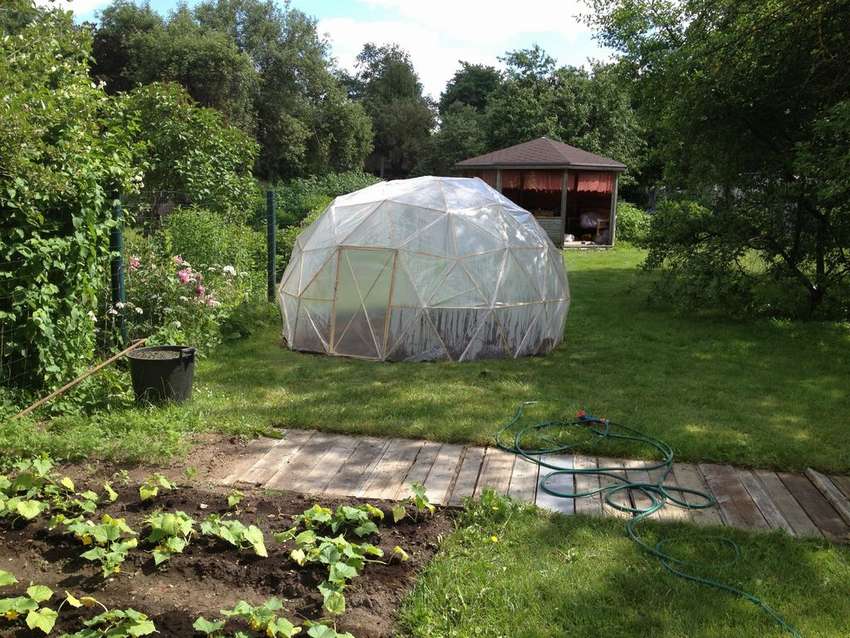
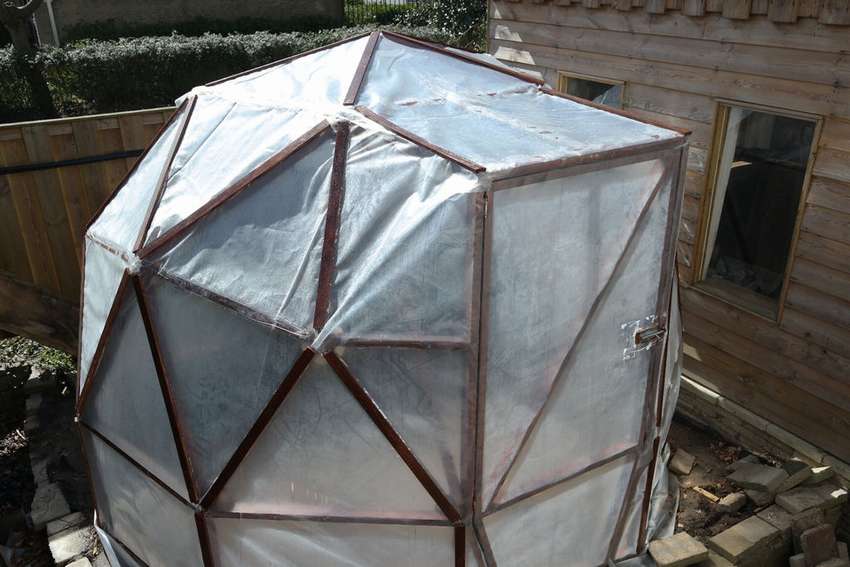
 If you want to grow vegetables all year round, greenhouse construction - one of the best ways to achieve a goal. In particular, greenhouses with domes have many advantages that are not in rectangular designs. In addition, they make a unique and attractive addition to your garden. Presented here dome greenhouse, of course, not original, but the author’s idea was simple: not to spend money on this and use recycled materials.
Need to prepare: wooden slats and strips with a length of at least 120 cm, you will need 35 pieces 120 cm long and 30 pieces 108 cm long, another 7 pcs. for doors of 1.5 meters and 30 pcs. 45 cm for bets.
How to make a greenhouse with your own hands, the author described in detail in the instructions, you can use the link and read. See the master class below in the gallery for step-by-step photos..


https://i.expert-h.com/en/parniki-teplitsy/1119#sigFreeId6c74fa3a07
Dome greenhouse drawing
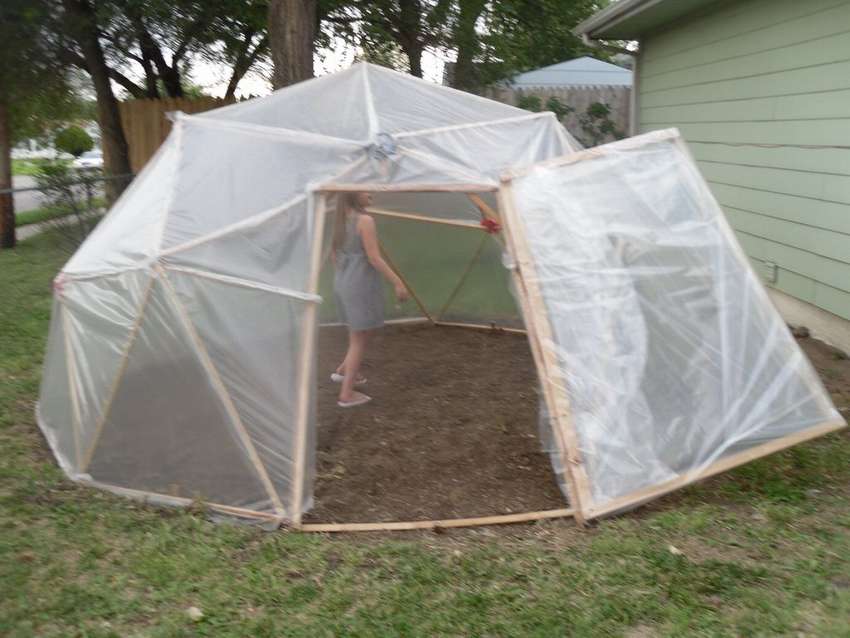
 The number one advantage of a dome greenhouse structure is dome strength. They are much stronger than rectangular buildings and, as you know, can survive hurricanes and earthquakes. Internal supports are not needed because the triangles distribute the weight evenly throughout the structure. Triangles are the strongest formas it is. This can be seen by nailing four boards together to form a rectangle, and then nailing three boards together to form a triangle. You will find that you can easily bend and rotate the rectangle, but you cannot force the triangle to budge.
 Imagine these forms during an earthquake. Rectangular houses will bend and twist as the earth moves, while the triangles that make up the dome will remain stable. Geodesic Domes also immune to high winds.
Since there are no large surface areas against which the wind can press, air simply flows around and above the dome. It can be expected that such a strong building will be heavy and bulky, but the domes are surprisingly light and they can even be carried. You can move them in the garden if you do not install them on a permanent foundation.
If you live in an area where there is a lot of snow in winter, dome greenhouse make your life easier. Snow accumulates on the roof of rectangular greenhouses, but simply slides off the edges.
According to the methodology proposed here, it is realistic to design and make a domed greenhouse any sizes and shapes.


https://i.expert-h.com/en/parniki-teplitsy/1119#sigFreeIdb29b59e9f8
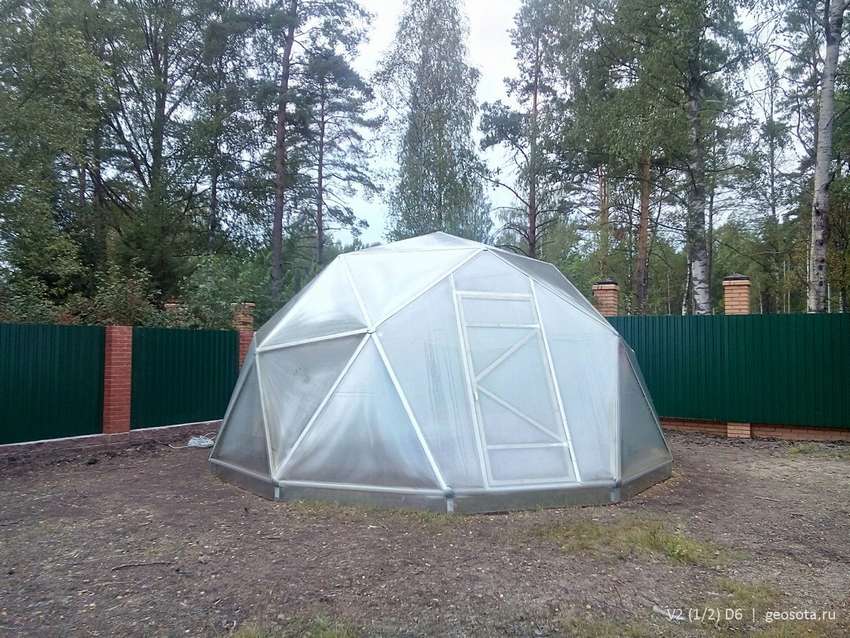
Greenhouse dome
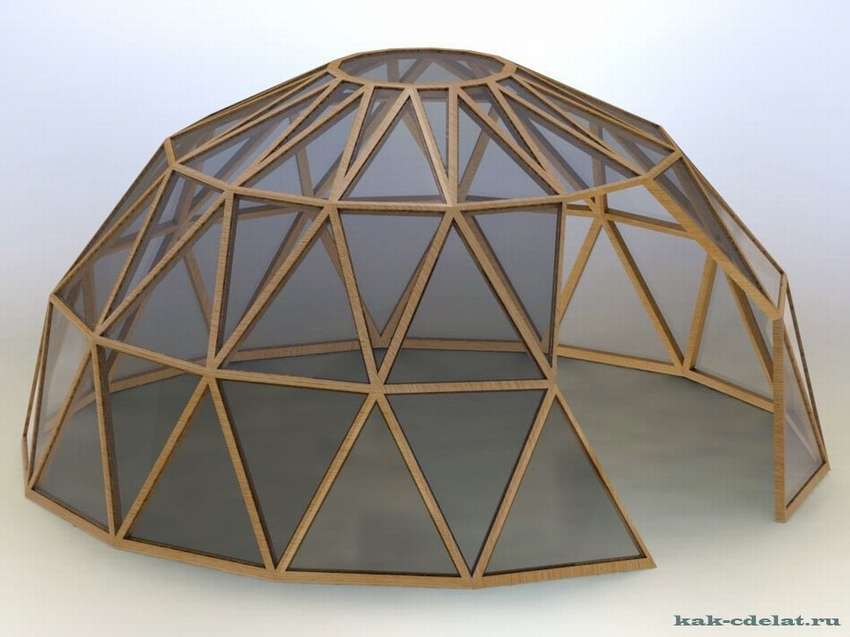
 Today, many are building dome greenhouses. The reasons are different, for example, there is a small part of the semicircular shape. Or do you just love geodesic domes. And perhaps they simply appreciated the advantages of this type of design. In addition, the structure of the geodesic dome looks very complex, but in fact it is easier to build because it is evenly distributed. You only need to cut the spacers in length and remember schemeto collect it. No roulette is needed during construction.
First a little theory. It is not difficult to make a geodetic dome with your own hands, but before manufacturing it, you need to understand several things. Let's start with the foundation. The dome must be properly attached to the ground. This part is easy to save, since it is not visible, but a solid foundation is what you need to think about in the first place, it depends on how long your greenhouse stands.
Frame - this is the visible part, therefore, in addition to durability, there must be aesthetics. But keep in mind that the material should be simple, in terms of processing and cheap. In this case, pine blocks of 28 mm by 44 mm were used for the construction.
Greenhouse cover. Here you can choose 3 directions: glass, polycarbonate and foil. In descending order, they persist for centuries, decades, and years. Glass is beautiful but expensive. Polycarbonate choose if you want make a greenhouse with good insulationbut the cheapest today is foil. It is easy to work with and is relatively cheap. Just choose foil for the greenhouse to withstand UV radiation.
Now about the practical side. How to assemble a domed greenhouse with your own handsshown below in step-by-step photos, and in great detail. The instruction is also very detailed, if interested, a link to the site under the gallery.


https://i.expert-h.com/en/parniki-teplitsy/1119#sigFreeId67000804b1
How to make a domed greenhouse
 One of the main advantage of domed greenhouses is their energy efficiency. Heat loss in a building is directly proportional to the surface area of the building. The shape of the dome has 30-40% less surface area for the fenced area than the rectangular shape. Therefore, in the domed greenhouse air circulates more efficientlythan in a rectangular design.
Plants in this type of greenhouse will receive more direct sunlight during the day, which means a more constant supply of heat. A rectangular greenhouse has less sun in the morning and evening and more at noon. The dome gets constant sun and warm during the daybecause the sun follows the shape of the dome. Your plants will appreciate it, and extra light and warmth will be useful in the dark winter months.
 Of course, the dome cannot be called a standard design, but it’s out of habit. If you are interested in this dome greenhouseYou can read the detailed assembly instructions on the website.
See below in the gallery master class on step by step photos and you will understand that all this can be done with your own hands.


https://i.expert-h.com/en/parniki-teplitsy/1119#sigFreeIdaaa7ef77c0
Dome Greenhouse Project
 Some gardeners in greenhouses prefer form rather than function, and choose beautiful options, even if this creates more work for them in the long run. Fortunately when it comes to domed greenhouseswhich function surprisingly well and are in some ways works of art. Competently built, the domed greenhouse becomes part of a surprisingly harmonious landscape design in a modern style. If you are looking modern design large volume and low price, a domed greenhouse may be right for you. Here is an example in step by step photos, how to assemble a beautiful polycarbonate domed greenhouse with your own hands.


https://i.expert-h.com/en/parniki-teplitsy/1119#sigFreeId9c98651472
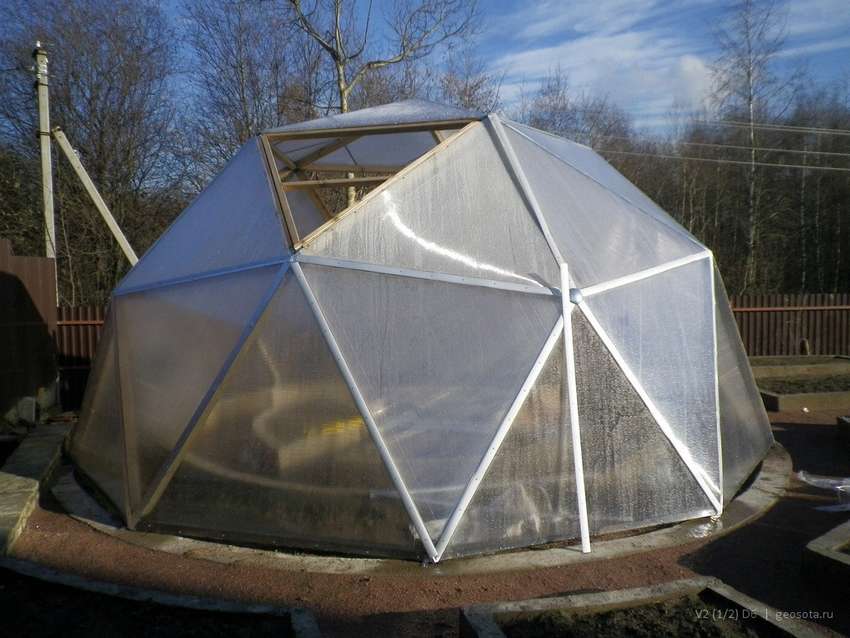
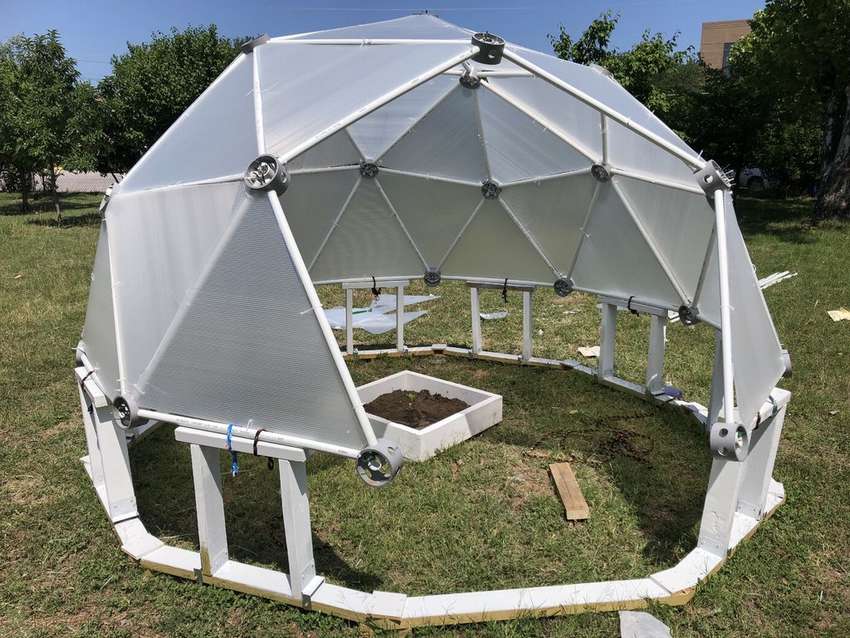
Polycarbonate Dome Greenhouse
 Most people don’t think about domed greenhouse designwhen they begin to explore various options, but these structures are more than just a greenhouse. They are made of various materials, this example, how to make a polycarbonate dome greenhouse. When properly assembled, the geodesic domes are neat designs that are very well suited for growing plants. A big disadvantage of traditional greenhouses is how important their placement is to maximize heat and light transmission. This is not a problem for domed greenhouses, as they have a lot of corners all oversurfaces - there are always panels at the perfect angle to the sunto keep heat and light in the correct position. How to assemble a greenhouse, see below for step by step photos.


https://i.expert-h.com/en/parniki-teplitsy/1119#sigFreeId0eed66074e
Here is another example how to assemble a do-it-yourself polycarbonate dome greenhouse with a wooden frame.
 See below the master class on step by step photos..


https://i.expert-h.com/en/parniki-teplitsy/1119#sigFreeId169a1beb63
Geodetic greenhouse
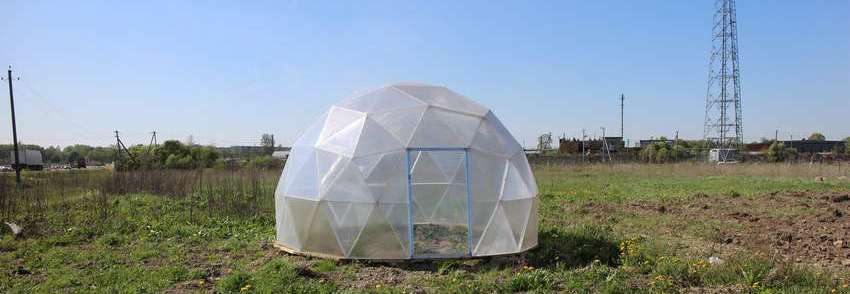
 Building a domed greenhouse does not have to be expensive, because you can build it using the remaining materials, such as waste wood, screed and plastic sheet, which will work well if make an inexpensive mini greenhouse to preserve the crop throughout the year. In this guide, you will learn how to build a six-meter dome for about $ 250, with most of this cost being polyethylene film. The design itself costs less than $ 100!
The process of manufacturing a domed greenhouse see below for step by step photos and you will realize that it’s really very easy to do it yourself.


https://i.expert-h.com/en/parniki-teplitsy/1119#sigFreeIdd338ffd5a9
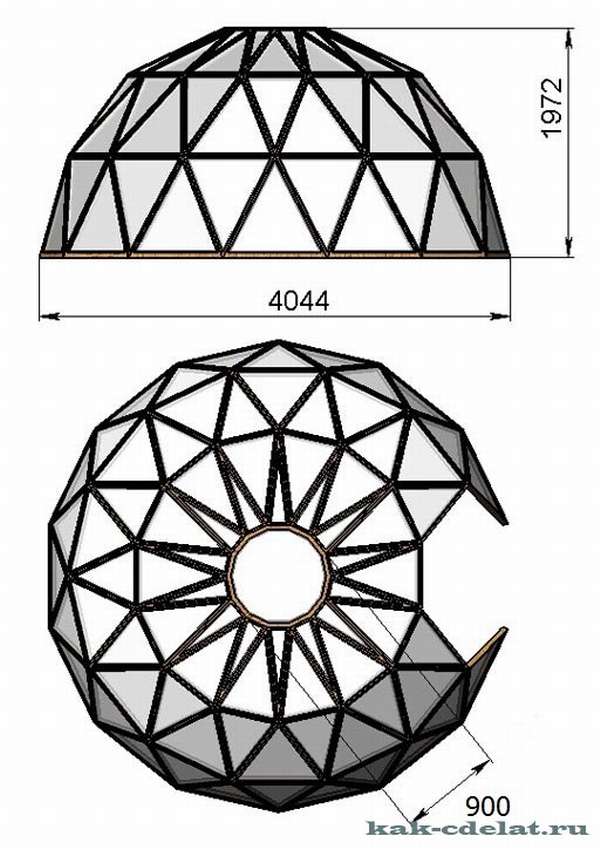
Geodesic Greenhouse
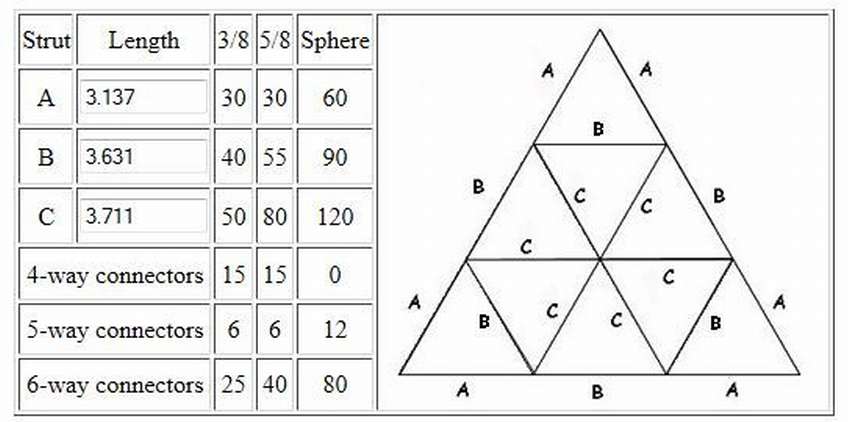
 Example, how to make a greenhouse dome small using wood from old pallets. This design is 274 cm wide, which will stand on a subframe 90 cm high. One of the problems that may arise is that for large domes it is easy to drill the ends of the spacers and insert a bolt. But for small designs, this may not work. Therefore, the author has developed quick assembly method using a plastic water pipe and rubber bands. A small hole was drilled through each rack, and the nail allowed the gum to be fixed. Ribbons were cut from an old bicycle pipe.
 Necessary sizes for 3 racks different in length.
A = 3.13 feet (945 cm)
B = 3.63 ft (111 cm)
C = 3.7 feet (113 cm)
The racks are cut from the boards from the pallets using a band saw measuring approximately 19 mm. This is tiring, if you do not want to do it manually, just buy boards of the right size. The dome is covered sticky film, you will need several rolls, because you need to make a coating of at least three layers. This is a good coating, one season will last excellently, but it must be changed every year, although this is not a significant drawback, since it takes only about half an hour.
 Details on the assembly method do-it-yourself dome greenhouse read on the site, link under the gallery.


https://i.expert-h.com/en/parniki-teplitsy/1119#sigFreeId076f63f136
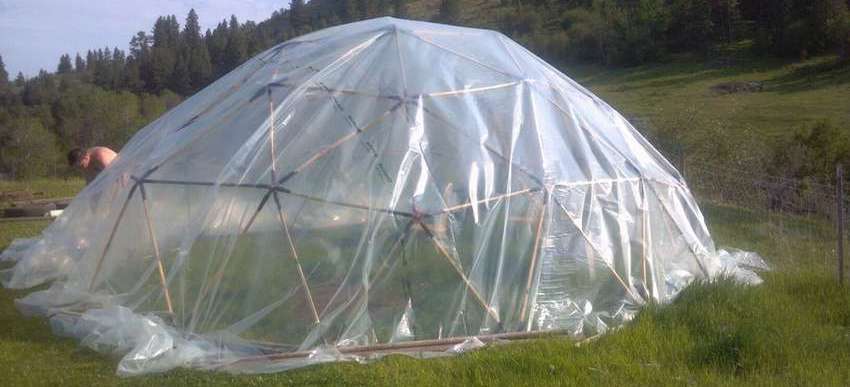
Greenhouse dome made of wood
 Through greenhouses with a geodesic dome You can extend the growing season of your plants and protect them from the harsh weather outside. Dome no internal supports, which allows you to create a very large open space in which the assembly is used on 25% less materials. Geodesic domes are the strongest, lightest and one of the most effective means of fencing space. From an agricultural point of view, domes have many distinct advantages. Here is an example of how to do simple wooden domed greenhouse do it yourself. This dome is designed and built by American students as part of the youth program, as you can see, domed greenhouses are popular all over the world.


https://i.expert-h.com/en/parniki-teplitsy/1119#sigFreeId5861bfe6e0
How to make a domed greenhouse with your own hands
Greenhouses with a dome relatively inexpensive to build depending on the construction used. 30-40% less surface area means 30-40% less materials used in construction.
 Here is another example with step by step photos.


https://i.expert-h.com/en/parniki-teplitsy/1119#sigFreeId068e03cfb0
Greenhouse Dome
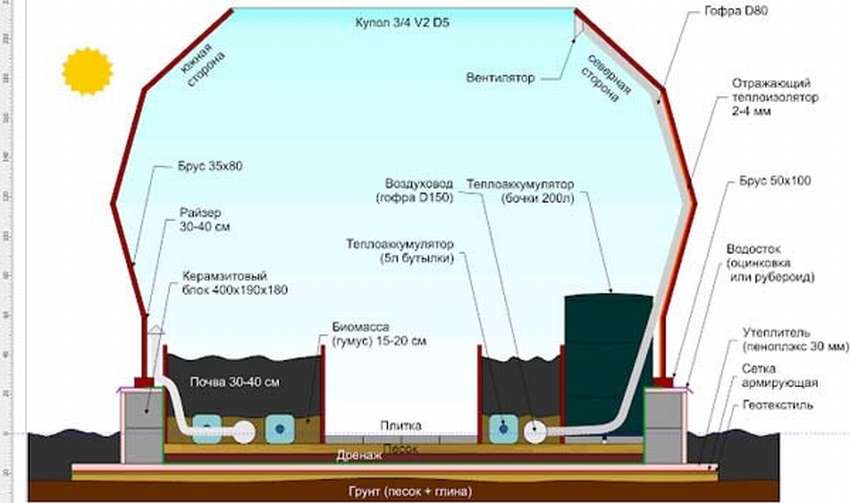
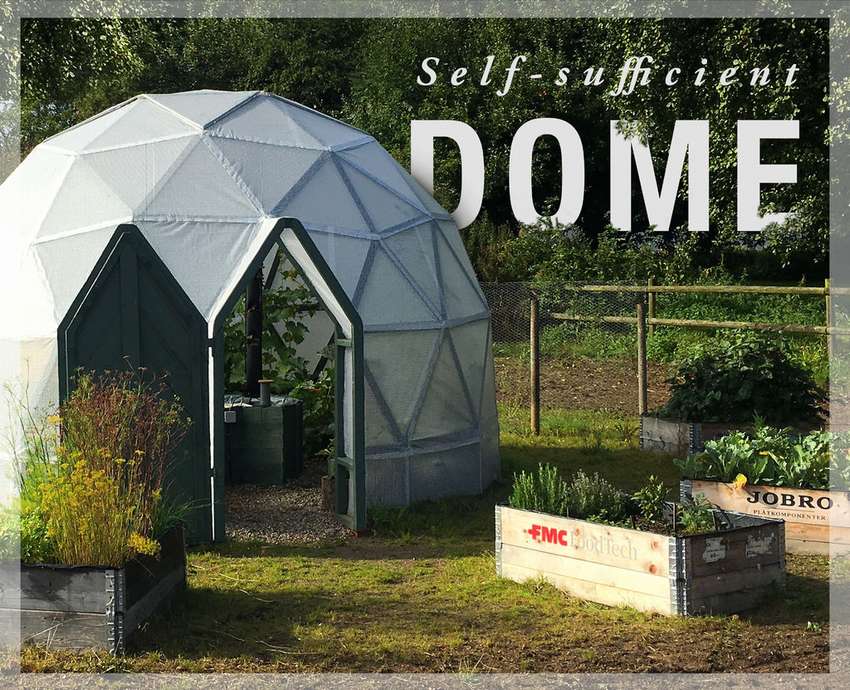 This tutorial describes the construction process. greenhouse domesto inspire and encourage others to create their own. Despite the fact that the process of creating projects of this size is very dynamic and variable, try to plan as much as possible or think carefully through everything before starting a project. This will give you a more consistent end result. In principle, presented here dome greenhouse, this is a whole complex, with a chicken coop, a greenhouse, beds, a watering system and temperature control. For coating used transparent tarp with integrated rip-stop, this is such a fabric of high strength, which includes reinforced yarn. If you want to know more about the construction and equipment of this domed greenhouse, you can visit the site using the link under the gallery.


https://i.expert-h.com/en/parniki-teplitsy/1119#sigFreeIdb17b5f5805
How to build a geodesic dome for a greenhouse
Geodesic dome is one of the strongest and lightest structures you can build.
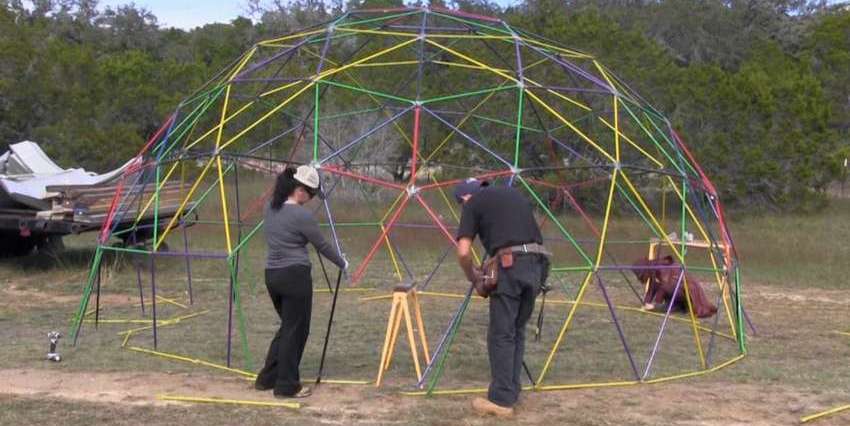 Thanks to their unique design, they are resistant to wind, hurricanes and other elements. Surveying domes can be used as additional storage, greenhouse and even as living space. It takes about 3 hours to assemble one such dome, as shown in the photo, and to disassemble, 15 minutes is enough. All parts can be bought at household appliances stores. These instructions will allow you to build a dome 5.5 meters wide and 3 meters high.


https://i.expert-h.com/en/parniki-teplitsy/1119#sigFreeId31e66a9f80
How to build a domed greenhouse
 When it comes to gardening in cold climates, greenhouse needed. This extends the growing season and gives plants much more heat. A greenhouse can also be a great place to relax on cool spring days and summer nights.
Dome Greenhousewhich the author proposes to build has:
- Unique, lightweight structure
- The design stably keeps in the wind and under the snow
- Optimum light absorption
- Since there is no foundation, this structure can be portable or temporary, no permissions are required for installation.
how do-it-yourself greenhouse, as well as a list of materials you can read in the instructions on the site, a link under the gallery.


https://i.expert-h.com/en/parniki-teplitsy/1119#sigFreeId801e5f18b6
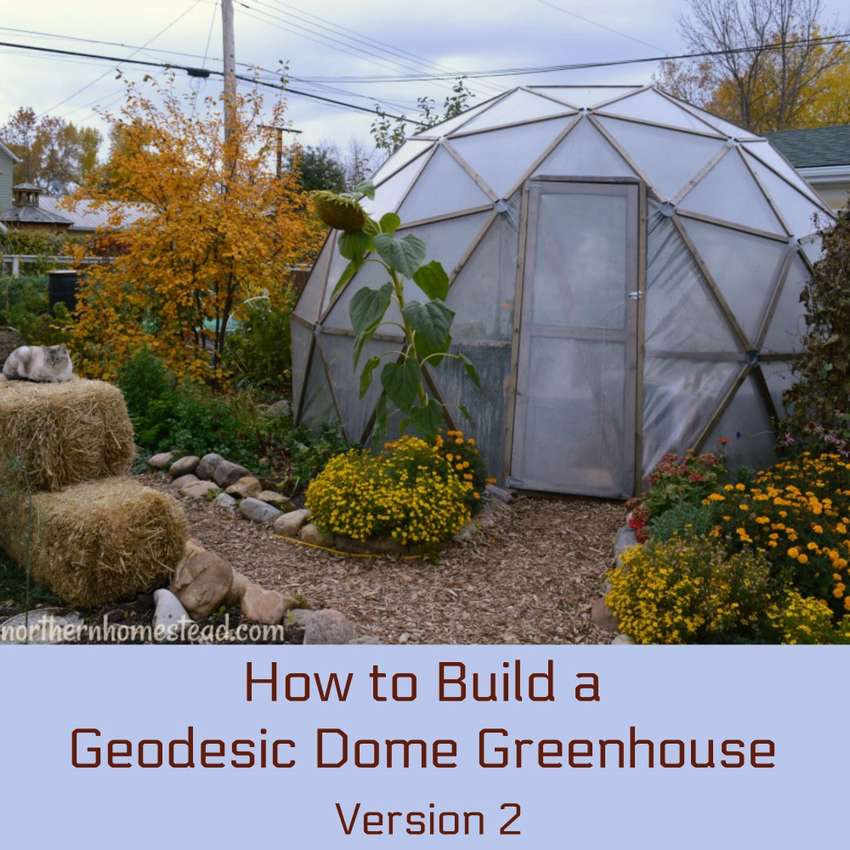 Here is the second version dome greenhouse. How it differs from the first and why they decided to redo it. First of all, the cone connection used in the first dome was not suitable for heavy snow load, and for some users the geodesic domes were destroyed under snow load. SecondlyThis version does not require complex cuts for joints. In addition, the author wanted to find more an easy way to build a dome greenhouse.
Improved version significantly stronger, which is a critical part of the whole structure.
You can read about the features of this greenhouse on the website, a link under the gallery.


https://i.expert-h.com/en/parniki-teplitsy/1119#sigFreeId82f32af3ac
Growing plants in a domed greenhouse
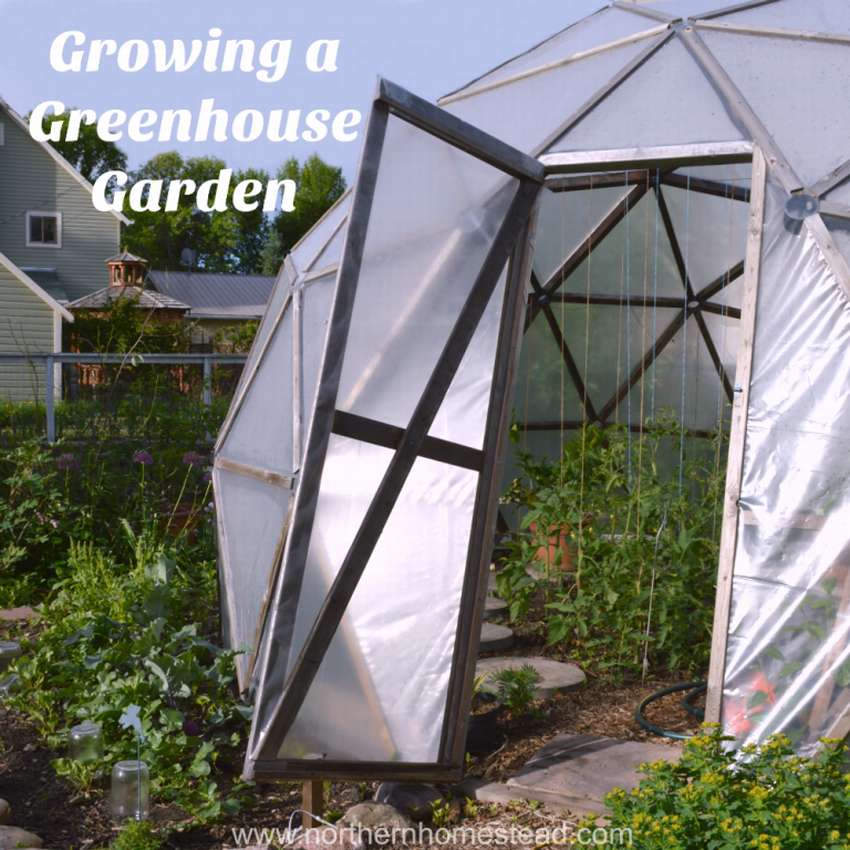 Growing a greenhouse garden in cold climates is like moving part of your garden south. Good soil, location, temperature control, water and the right plants make this place interesting for growing. Like an open garden soil is the heart of the greenhouse garden. If you can, build your greenhouse on good ground. Good soil covered with a greenhouse will warm up quickly in the spring and become great place to grow plants. To preserve this good soil in your greenhouse for many years, you need to make some efforts. Since the greenhouse is a closed environment, the soil will not recover as quickly as in an open garden. There is no wind to blow off bugs, and there is no good rain to wash away the accumulated excess of minerals. You will have to do it yourself. Read more about growing, temperature and water supply in the dome greenhouse on the website.


https://i.expert-h.com/en/parniki-teplitsy/1119#sigFreeId385185ea73
Garden Dome
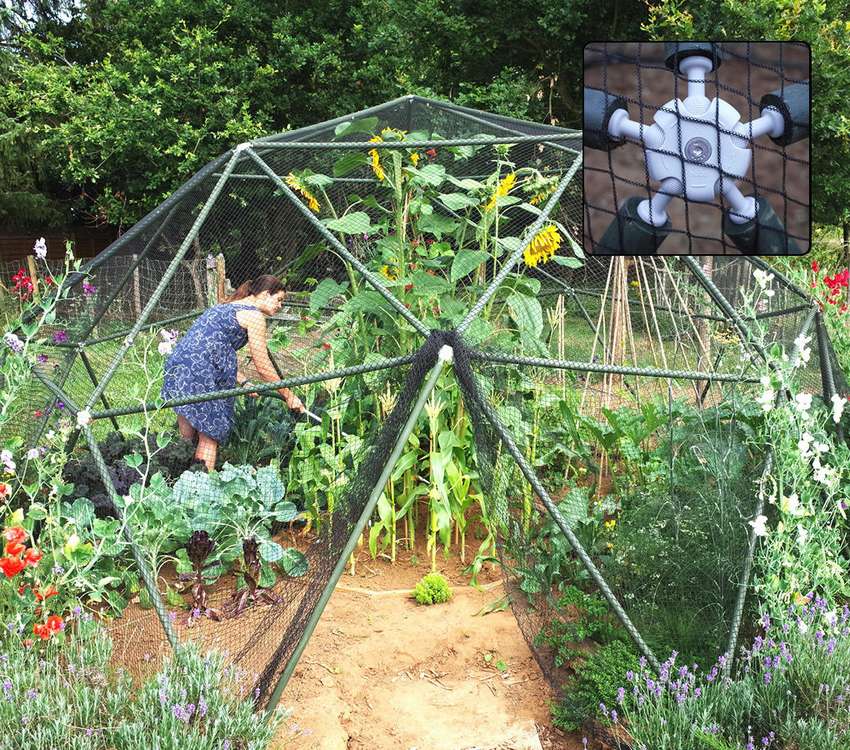 You can build a geodesic domeusing old fences, eyelets, ropes, copious amounts of glue and large twine. It is a lot of fun, but difficult and time consuming.
Today you can buy everything shown here how to assemble a dome for a bed from a ready-made kit. Of course, there are different prices and configurations, but the main nuances of how to assemble the dome will still be similar. For example, 1.5 meter pens with a diameter of 27 mm were used here.
It was necessary to cut off:
- 30 x short sticks measuring 1005 mm
- 35 long sticks measuring 1148 mm
 If you want to use other wood, look for wooden poles with a diameter of 20 to 32 mm or slats with a maximum width of 32 mm (you can make it wider, but this is a standard rule). And if you want make a greenhouse dome different size, just use the calculator to find the 2 required lengths.
More about dome assembly can be read on the site, if you still buy a ready-made kit, perhaps these tips come in handy.


https://i.expert-h.com/en/parniki-teplitsy/1119#sigFreeIda6f48f0f08
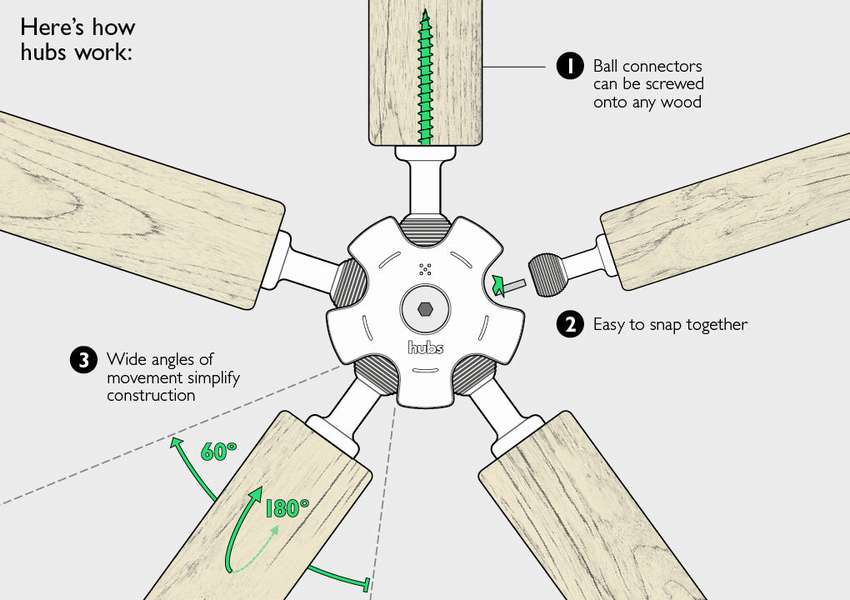
Greenhouse with a pipe dome
This guide will help you step by step. build a greenhouse with a geodesic dome from PVC pipes do it yourself.
 You can buy ready-made kits and assemble them yourself, which are much more expensive, or you can do it yourself. there is online calculatorsto help you calculate the size you need to create the perfect sized dome for your plants. And to find out how to make a greenhouse with a dome made of PVC pipes, link to the site under the gallery.


https://i.expert-h.com/en/parniki-teplitsy / 1119 # sigFreeId53ab5d2336
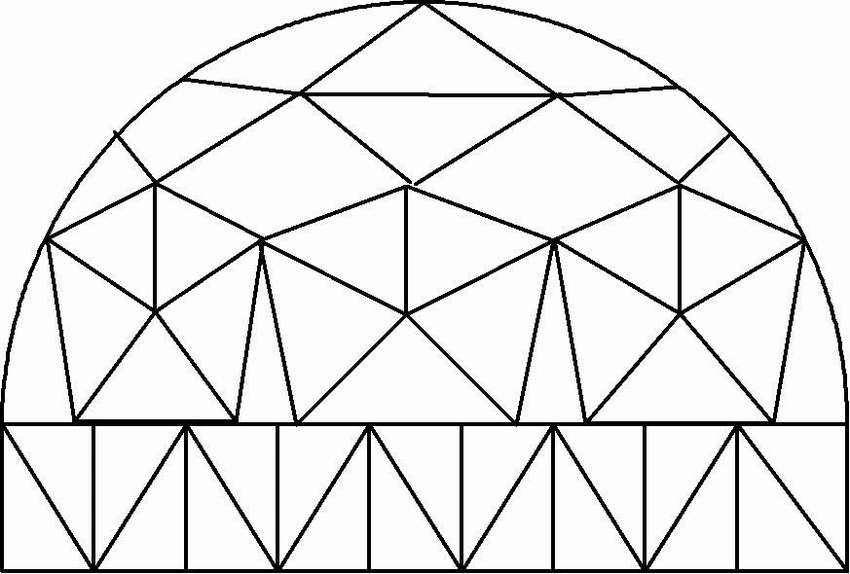
Drawings of Dome Greenhouses


https://i.expert-h.com/en/parniki-teplitsy/1119#sigFreeIdc304b6105b
Greenhouses with a geodesic dome 200 photos


https://i.expert-h.com/en/parniki-teplitsy/1119#sigFreeId3971aebcf3
50+ greenhouse pics
Below you can view the gallery of greenhouses with an opening lid, which you can do yourself. We collected photos from all over the Internet, below we indicated the sources from which we could determine the authorship.
-

-
-
-
-
-
-
-
-
-
-
-
-
-
-
-
-
-
-
-
-
-
-
-
-
-
-
-
-
-
-
-
-
-
-
-
-
-
-
-
-
-
-
-
-
-
-
-
-
-
-
-
-
-
View the embedded image gallery online at:
https://i.expert-h.com/en/parniki-teplitsy/1119#sigFreeIdc5beefab98
https://i.expert-h.com/en/parniki-teplitsy/1119#sigFreeIdc5beefab98
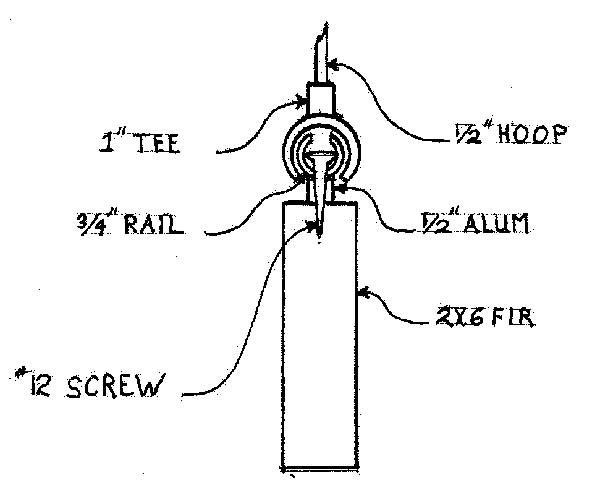
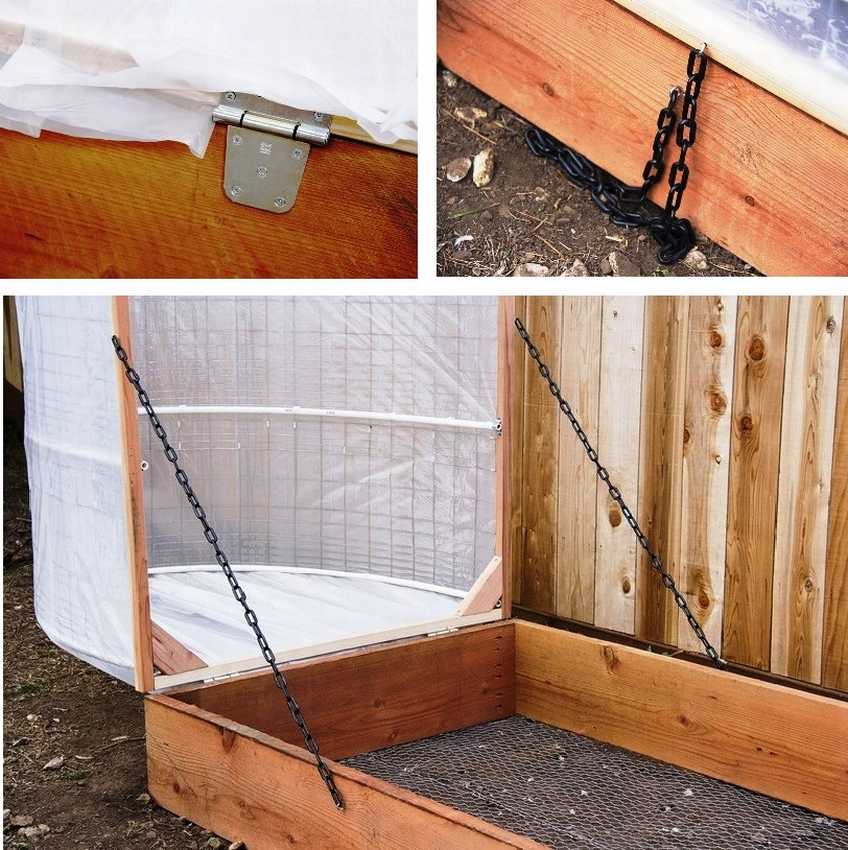
Mounting Methods
How to fix the opening greenhouse cover
|
Here is one reliable way.
|
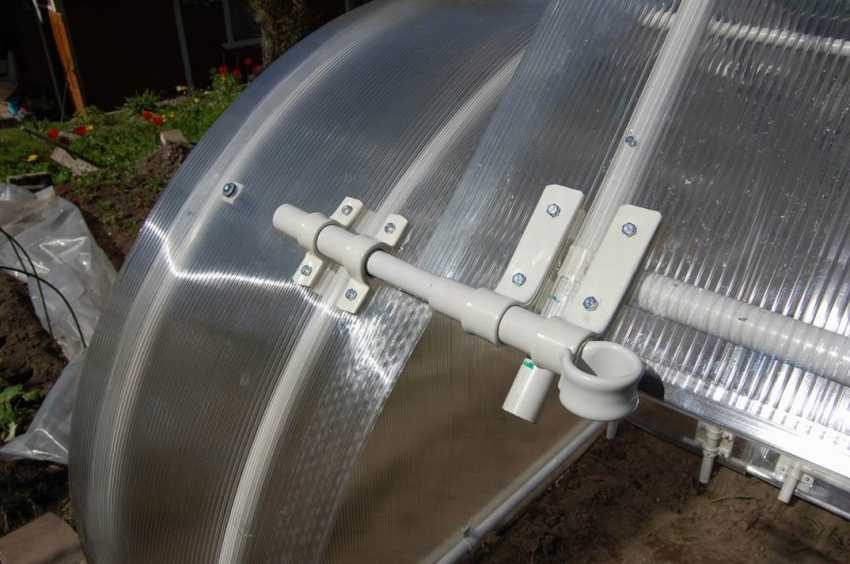
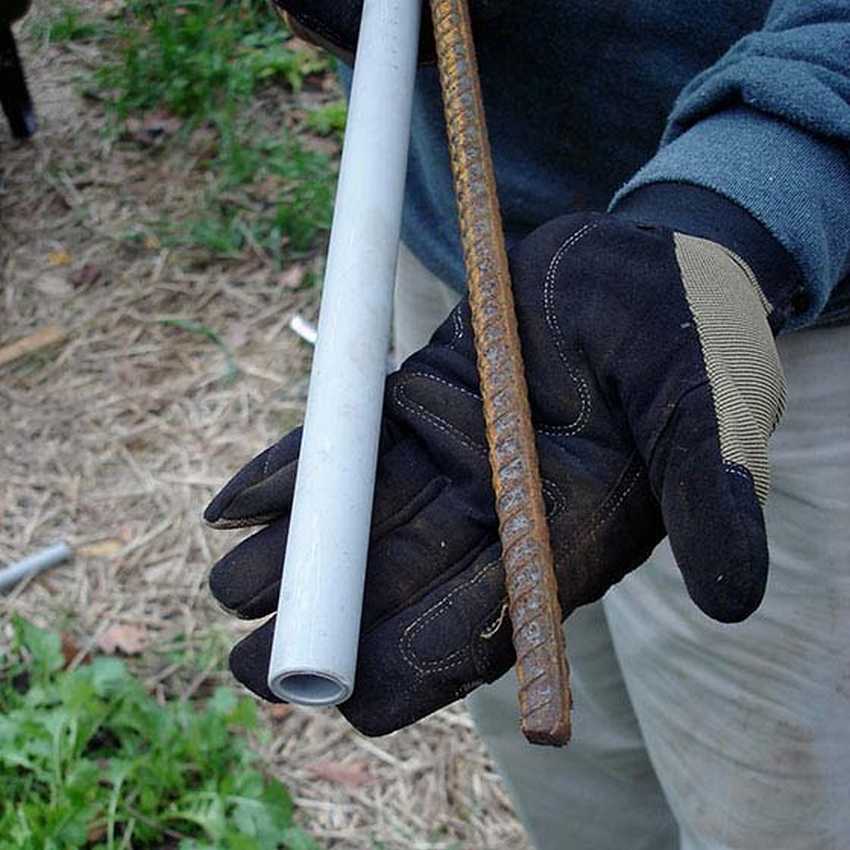
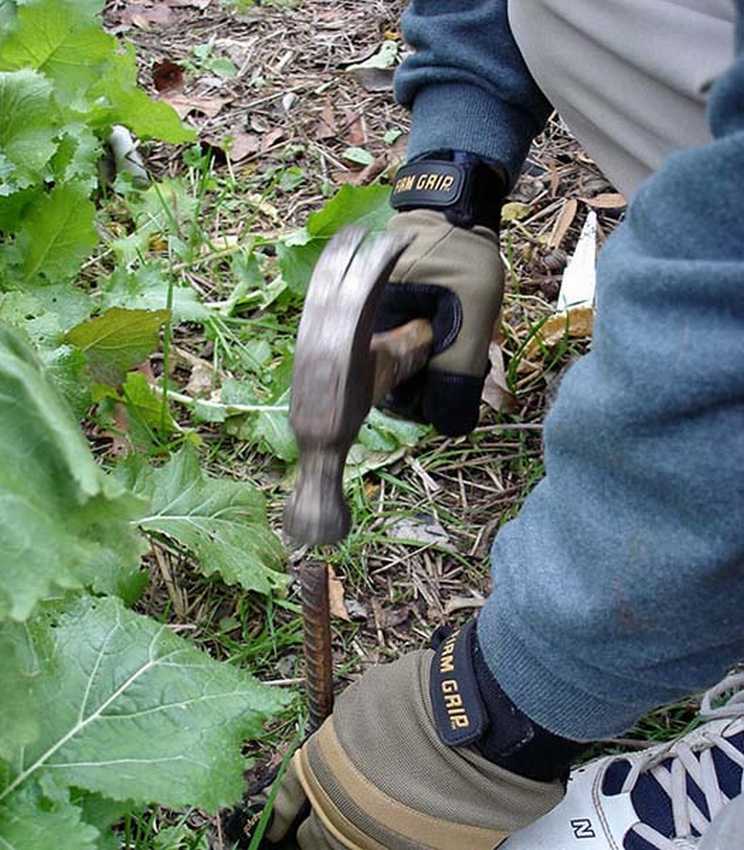
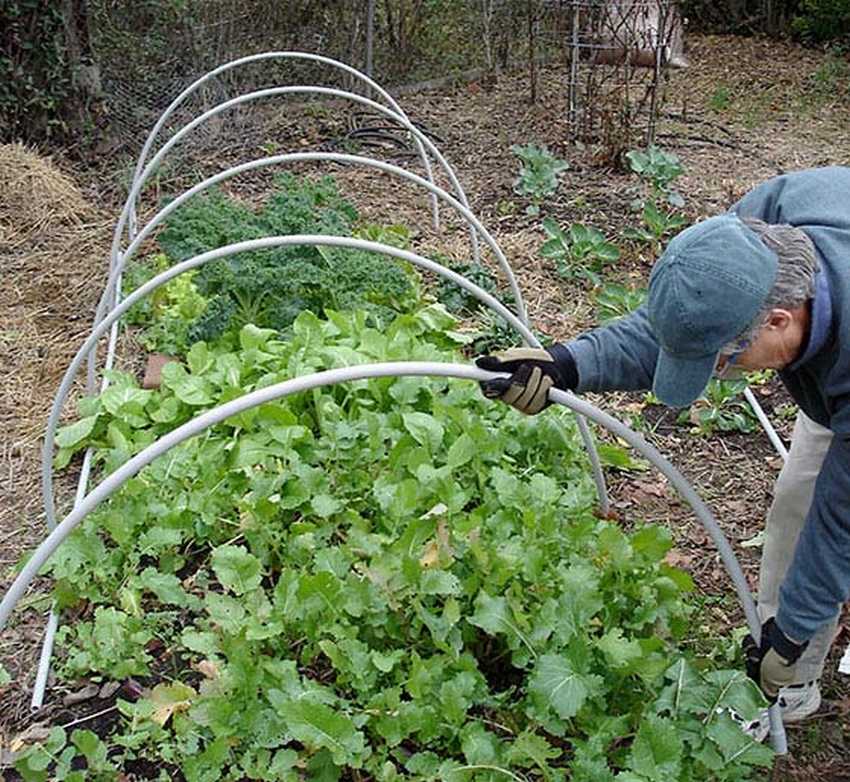
How to fix arches or PVC pipes of a greenhouse under a film
|
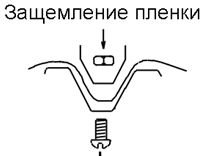
Clamps |
Insert into the ground The method consists in the fact that we are installing PVC pipes on fittings driven into the ground. Instead of reinforcement, wooden rods can come off (enough for a season) Click on the photo to enlarge
|
How to fix a film in a greenhouse
|
Hose lengths
|
 |

The easiest PVC pipe greenhouse

Very simple greenhouse design. Easy to assemble, and just as easy to disassemble. It can be moved, increased, reduced.
It is cheap and easy to manufacture..
ADVISE this greenhouse
Step by step photos. Click on them

https://i.expert-h.com/en/parniki-teplitsy/1119#sigFreeIdfca49e1727
How to make a greenhouse from willow or cedar branches.
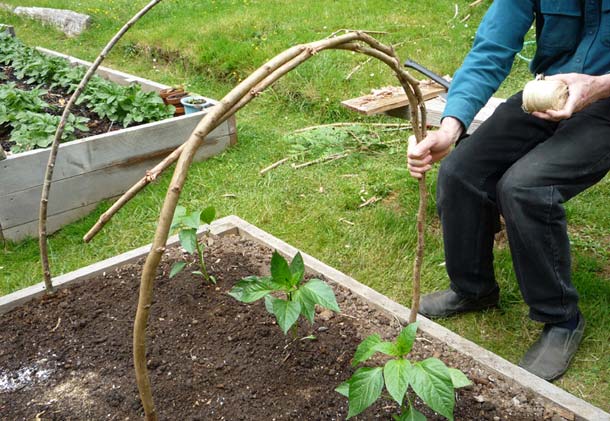
Such a greenhouse is suitable for those who did not expect sudden frosts.
This mini greenhouse can be done in 45 minutesaccording to the author of the photo. 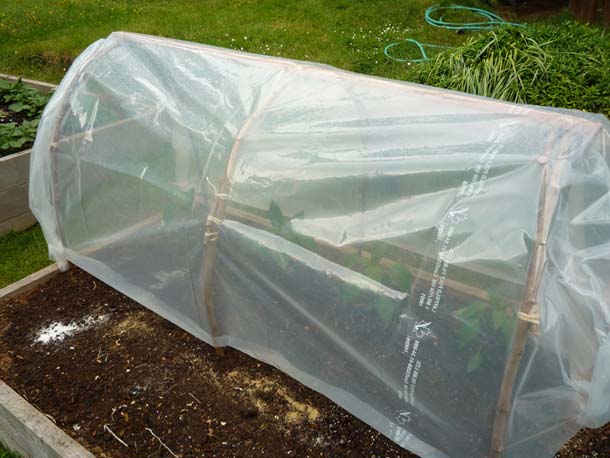
For the manufacture of arcs, not PVC pipes were used, but cedar branches, but I think that willow branches will come down in our conditions. The branches are interconnected by a nylon thread (not fundamentally what) to give an arcuate shape. When arcs from branches are stuck in the ground, a bar is attached over them, to give one damage, which is also attached to each arc.
In order to transfer such a greenhouse to another place, the author advises putting two long bars along the base of the arcs, then link each arc to these bars. As a result, we get something like a stretcher. Taking such stretchers from both ends, it is quite easy to pull our greenhouse out of the ground and move it to another place.
Below you can see step-by-step photos, to enlarge, just click on them.
-
-
-
-
-
-
-
-
View the embedded image gallery online at:
https://i.expert-h.com/en/parniki-teplitsy/1119#sigFreeIdfec62abad9


https://i.expert-h.com/en/parniki-teplitsy/1119#sigFreeIdfec62abad9
Telescopic greenhouse or greenhouse
And here is a very interesting variation of a telescopic greenhouse or greenhouse. I moved the arcs and nothing interferes, below you can see the mounting mechanism, click on it to enlarge.
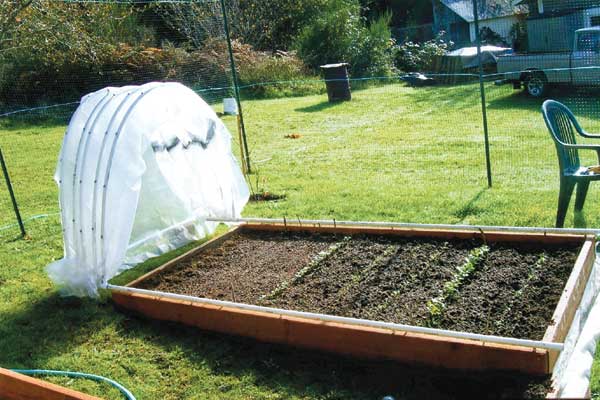
DIY Convertible Hotbed
See step-by-step photos of making such a greenhouse. First we make a pallet for soil, then we make a frame on which we will fix the arcs, and which will recline. Then we fasten this frame to the pallet on the hinges and cover with a film.
Step-by-step photo of manufacture.
Click on the gallery to enlarge
-
-
-
-
-
-
-
View the embedded image gallery online at:
https://i.expert-h.com/en/parniki-teplitsy/1119#sigFreeId967c9b6600


https://i.expert-h.com/en/parniki-teplitsy/1119#sigFreeId967c9b6600
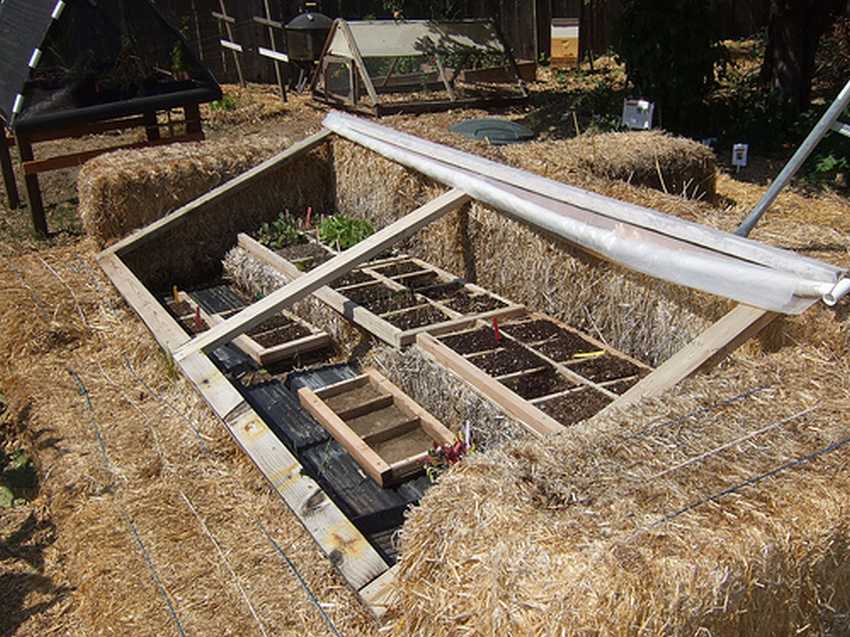
A greenhouse made of straw or hay.
As we see in the photo there is a greenhouse whose walls are made of briquettes (or bales) of straw (hay). A frame with an opening top is simply piled on the walls of straw. The film rolls onto a bar. These greenhouses are usually directed south. Such a design helps well when the slope of the soil in your area is directed to the north side, in such cases the sun weakly heats the earth. Such a greenhouse will help you out in this situation..
Greenhouse to collect water
(Roots Up Dew Collector Greenhouse System)
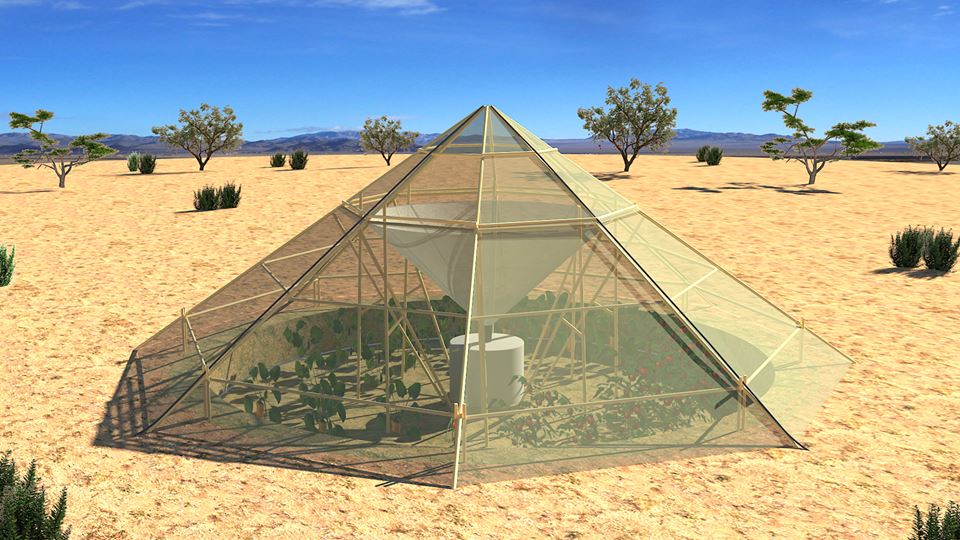 In a day, the greenhouse condenses to 80 liters of water !!!
Thanks to such greenhouses, Ethiopia will soon flood the world with food. The greenhouse was created for arid countries to solve the problem of drought.
In the afternoon, steam accumulates in the upper part of the greenhouse. When night falls, special valves are opened for intake of cold air, thanks to which water vapor is cooled and condensed, after which the liquid enters a special storage tank.
Excess water left after watering can be used for drinking.
-
-
-
-
-
-
-
View the embedded image gallery online at:
https://i.expert-h.com/en/parniki-teplitsy/1119#sigFreeId5e342fb7f8


https://i.expert-h.com/en/parniki-teplitsy/1119#sigFreeId5e342fb7f8
Portable greenhouse (greenhouse) from a barrel
Easy and simple to make (45 minutes)
This portable greenhouse is suitable for growing seedlings, or plants such as parsley, cilantro, etc.
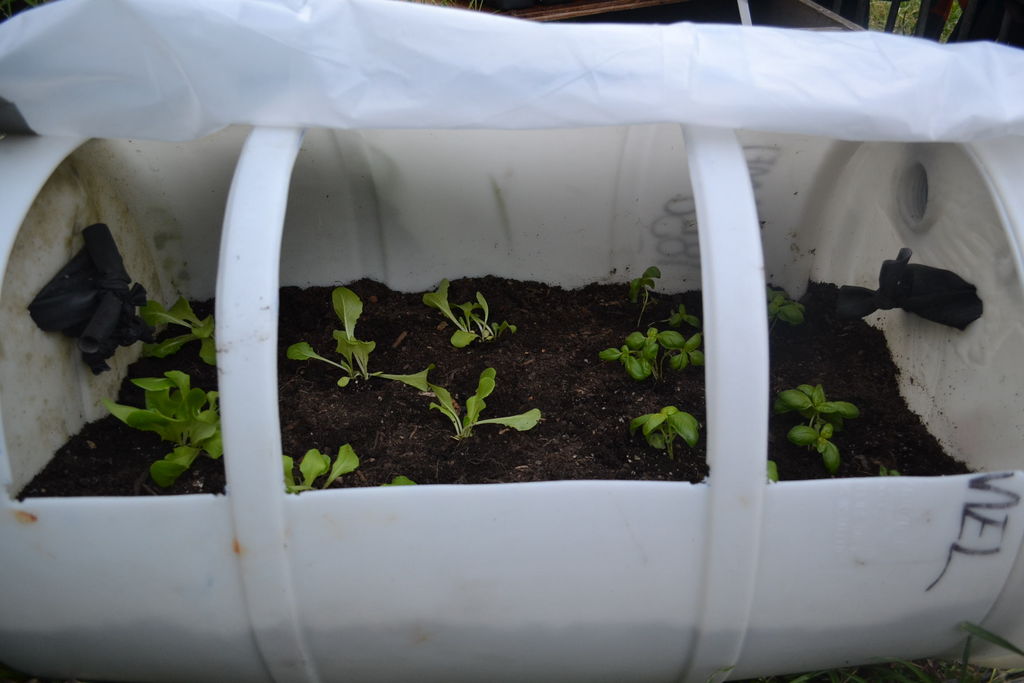
- 2 photos - cut square holes with a jigsaw in 1 quarter of the circumference of the barrel.
- 3 photos - a hole with a drill so that a jigsaw could be inserted.
- 4 photos - holes in the bottom to drain water from the drainage.
- 5-6 photos - attach the handles on the sides for transfer.
- 7-12 photos fasten the film.
- 14 photos - drainage.
The greenhouse can be painted green to blend in with the landscape of the cottage
-
-
-
-
-
-
-
-
-
-
-
-
-
-
-
-
View the embedded image gallery online at:
https://i.expert-h.com/en/parniki-teplitsy/1119#sigFreeId588bd29eff


https://i.expert-h.com/en/parniki-teplitsy/1119#sigFreeId588bd29eff
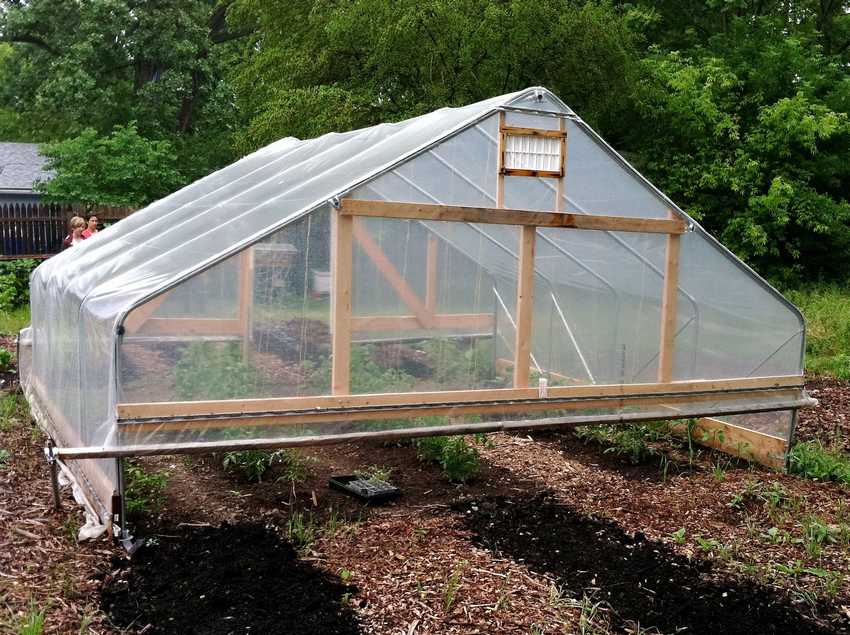
Portable film greenhouse
As you can see from the photo, the greenhouse has a lightweight version. It does not have a massive base; it is attached to the ground by reinforcement fixed on the base. It is transported as on a stretcher with the help of two long boards pinned to the base. A gardener will come in handy when it becomes necessary to close some weak plants at the time of cooling.
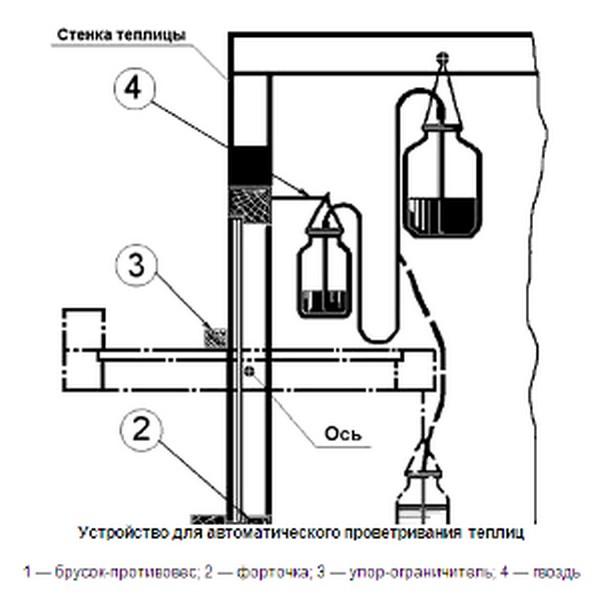
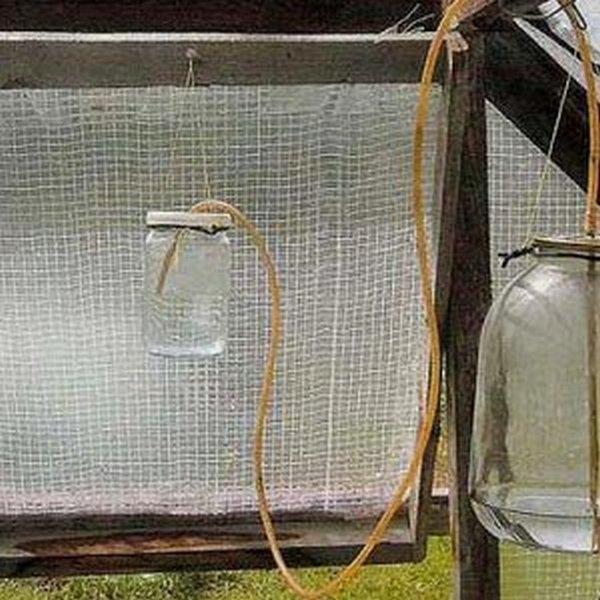
Greenhouse butterfly
How to do automatic offtearing the windows in the greenhouse?
Very interesting and simple design to automatically open the window, depending on weather conditions. The principle is as follows. A tube in the form of a communicating vessel passes between the large (3l) and small (0.5l) cans. A large jar is suspended from the base of the greenhouse, and a small one from the window. Moreover, the small one must be balanced with the window in such a way that, with a minimum amount of water in it, the window must be closed. In a hermetically sealed large jar with increasing temperature in the greenhouse. water due to atmospheric pressure moves into a small can, opening the window
A simple version of the greenhouse side opening.
As you can see, a very simple design of the film greenhouse. Such a greenhouse can be easily moved and put into a new place.
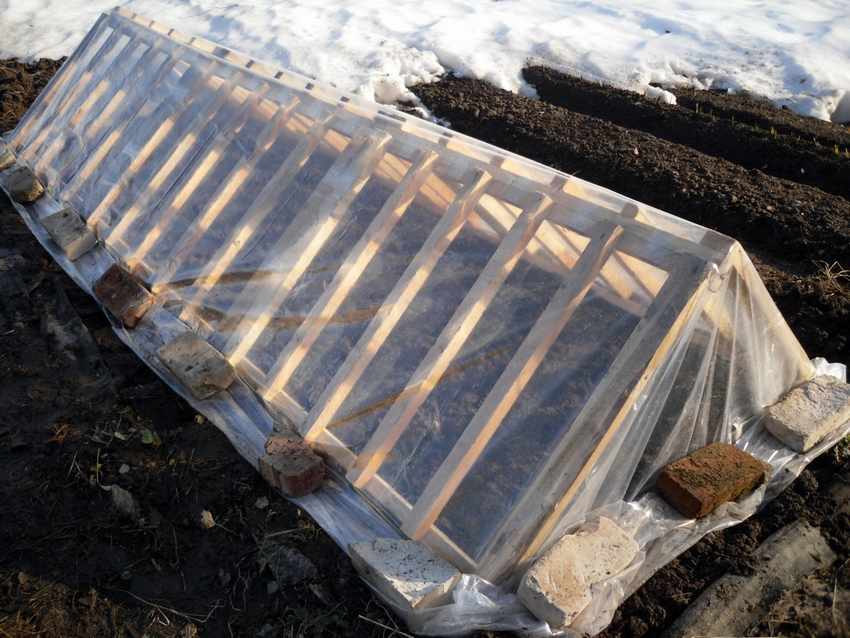
Dome greenhouse from scraps of pipes
it's ugly but it works
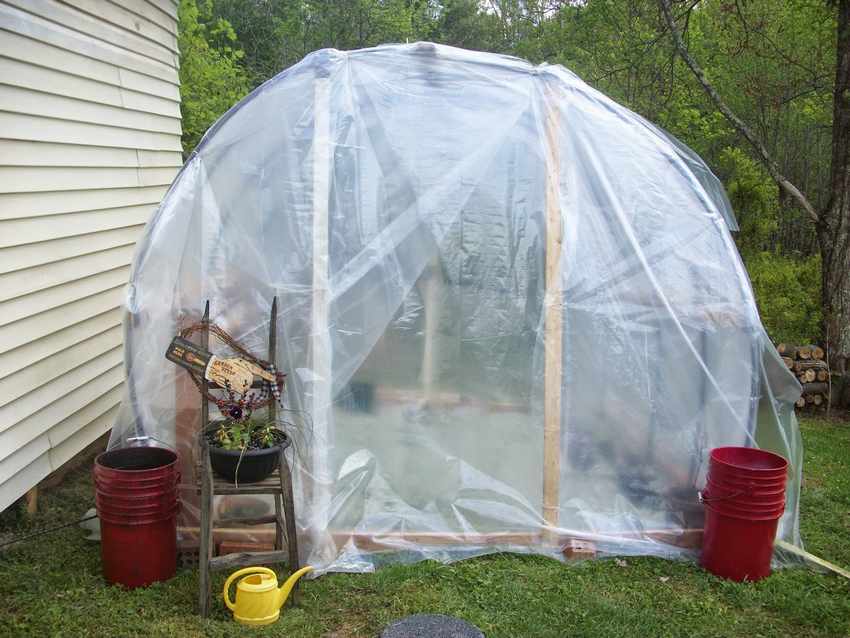 The authors of the blog booth555.com moved to a new home, and they had to independently sew themselves. As a result, they left a lot of pipe scraps, and they were used by an enterprising young family to create this greenhouse. The advantages of these pipes are that they are easy to bend and at the same time they are stable and easy to pin.
See step-by-step photos of creating a greenhouse.
-
-
-
-
-
-
-
-
-
View the embedded image gallery online at:
https://i.expert-h.com/en/parniki-teplitsy/1119#sigFreeId2d1e4b1eb3


https://i.expert-h.com/en/parniki-teplitsy/1119#sigFreeId2d1e4b1eb3
As I understood from the translation of the article from English, the pipes are attached to the wooden cross-pieces using tape. I didn’t really understand about the film, somehow the film scraps were fastened together, the cord was most likely threaded through the holes, and there is also a hint for 6 photos.
The film below is pressed to the ground by bricks, this makes it possible to pull the film up on hot days.
I could not translate the purpose of the star (in 4 photos), but suggested that it was attached to the dome to make the structure more stable.
Write your star assignment options in the comments.
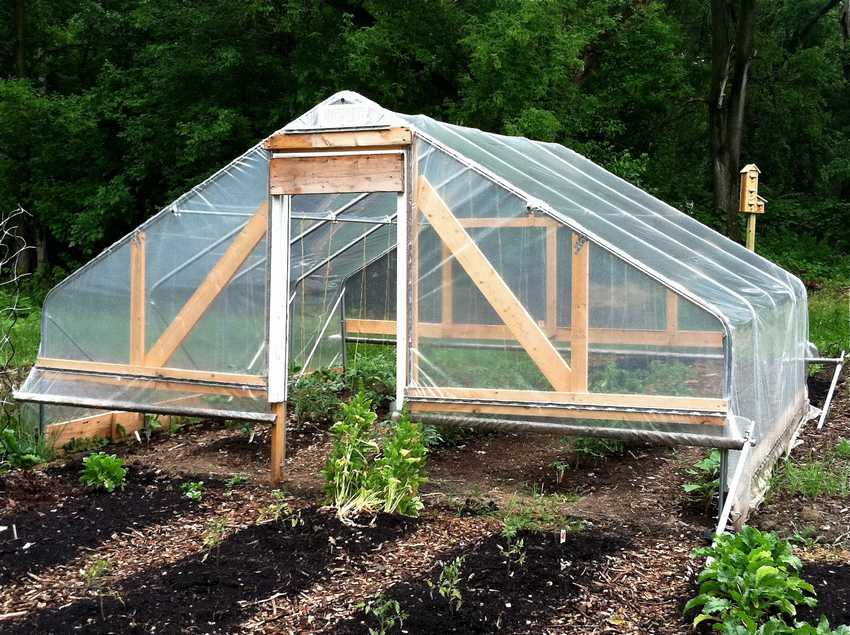
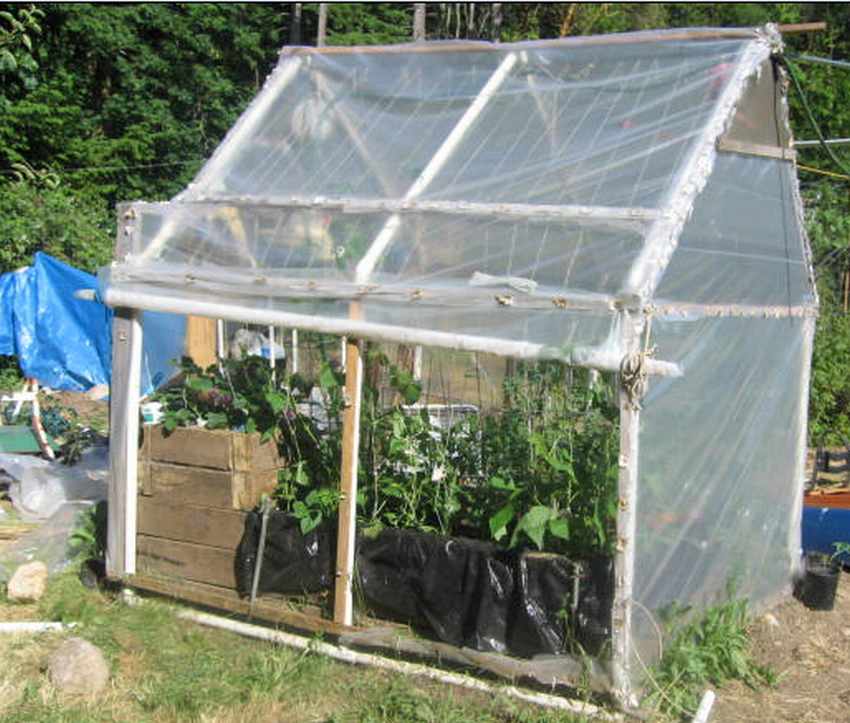
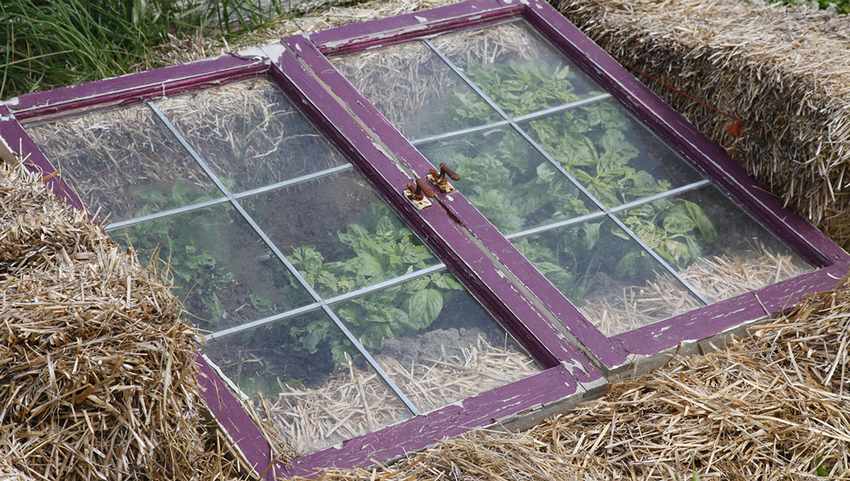
Greenhouse from a double-glazed window or frames
The author of the doorgarden.com blog made here such a recumbent greenhouse from a glass door (double-glazed window), into which a stone from a lawn mower accidentally fell.
According to the author, such a hotbed allows him to collect greens for salads in January, well, America, I can’t say exactly what kind of staff it is.
See the drawing of this greenhouse. Everything is very simple. As we see from the photo, the double-glazed window is not attached to any hinges, it just lies, resting against the side board from slipping.
The double-glazed window can be replaced with any large glass or window frame.
-
-
-
-
-
-
View the embedded image gallery online at:
https://i.expert-h.com/en/parniki-teplitsy/1119#sigFreeIdd949a42e36


https://i.expert-h.com/en/parniki-teplitsy/1119#sigFreeIdd949a42e36
In summer, in hot weather, when there is no need for such a greenhouse, you can throw it on strawberries to protect the berries from birds.
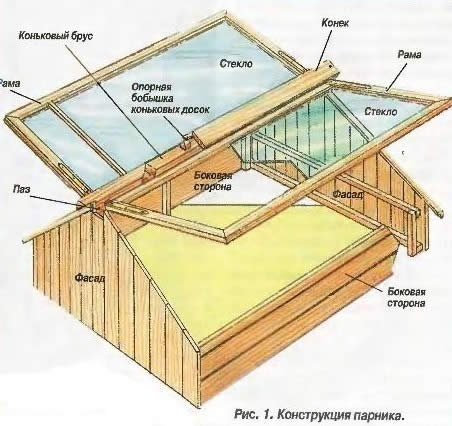
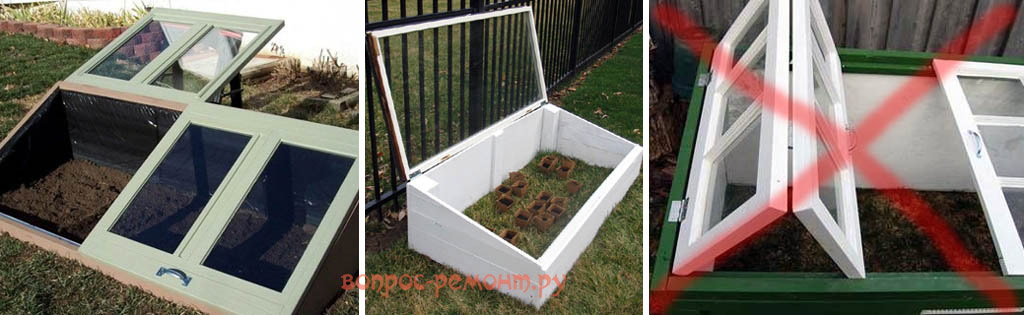
Attention!!! An important point about greenhouses from window frames
Whatever frames you have at your disposal, you need to make the transparent roof folding (lifting up), and not hinged or folding, as on the right in Fig. Through any vertical gap, all the warm air will instantly disappear and the plants will strike cold, and the horizontal one can be adjusted with props according to the weather and local conditions.
What should be the inclination of the greenhouse cover ???
Note: the optimal slope of the roof slope of a single-pitch greenhouse from the vertical (90 degrees) –φ, where φ is the geographical latitude of the place; and (90 degrees) –φ is the angular height of the Sun at noon of the spring / autumn equinox. See below for a greenhouse with a heat accumulator.
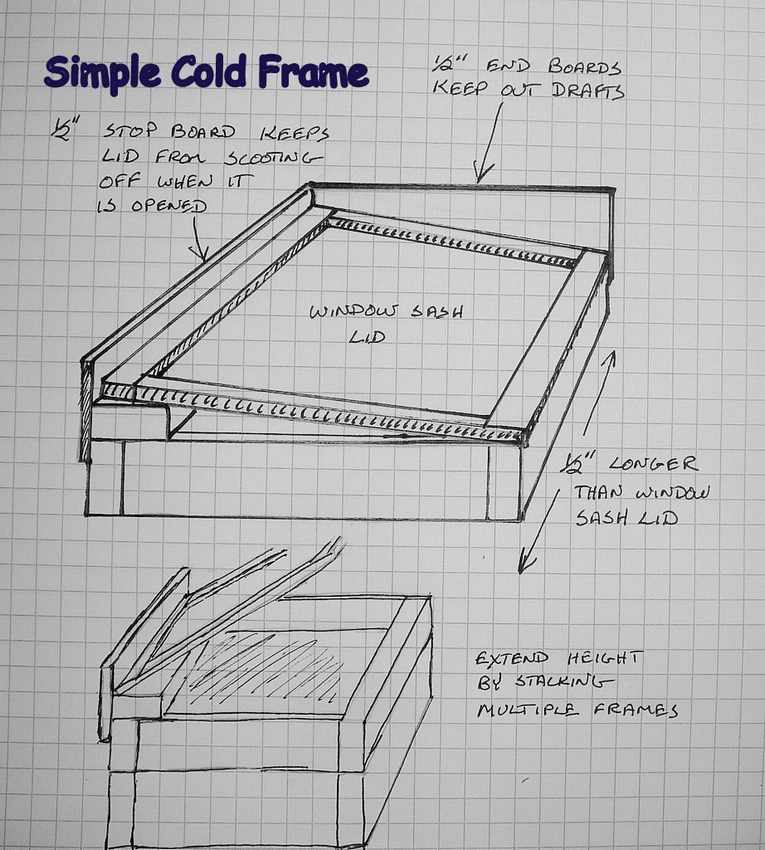
Cold greenhouse. (drawing scheme)
Do it yourself
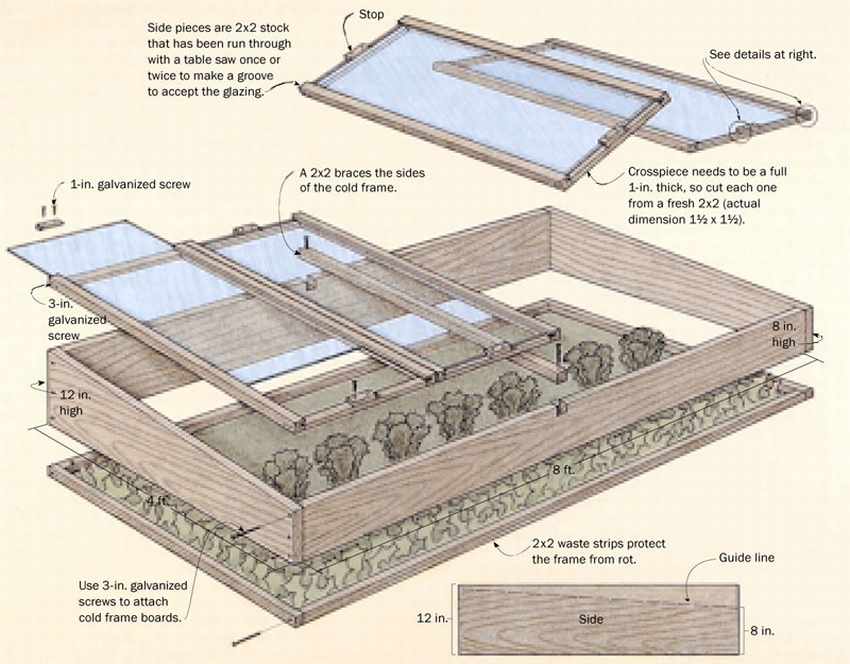
The greenhouse consists of a wooden frame and a glass lid. The glass of the lid should always be inclined to catch as many rays of the weak winter sun as possible.
The author claims that even in winter in sunny weather, this greenhouse can heat up to very high temperatures, so the lid must be able to open upward. In order to regulate the temperature, a thermometer must be placed in the greenhouse (see photo 5), and it should also be a mechanism for fixing the open cover at different angles was made (see photo 4).
Vegetables that can be grown in the early winter in a cold greenhouse
BUT, nevertheless, the main secret of such a greenhouse is not in its arrangement, but in the plants grown in it. These should be plants that easily tolerate cold. According to the author's research, five crops: spinach, green onions, mache, claytonia, and carrots can be successfully grown in the northern states of the USA. As well as arugula, Escarole, Mizuna, parsley, sorrel, European salad, mustard, spinach and turnips.
The author sows vegetables usually from mid-August to mid-September.
-
-
-
-
-
-
View the embedded image gallery online at:
https://i.expert-h.com/en/parniki-teplitsy/1119#sigFreeIdc6a1d9f617


https://i.expert-h.com/en/parniki-teplitsy/1119#sigFreeIdc6a1d9f617
My advice: make a cardboard sheet glued on one side with foil. At night, you can cover the greenhouse with this foil, which will reflect the heat coming from the earth back into the greenhouse.
Window frame and hay greenhouse
Greenhouse (greenhouse) IN plastic bottle
or "How to grow seedlings if the apartment is cold"
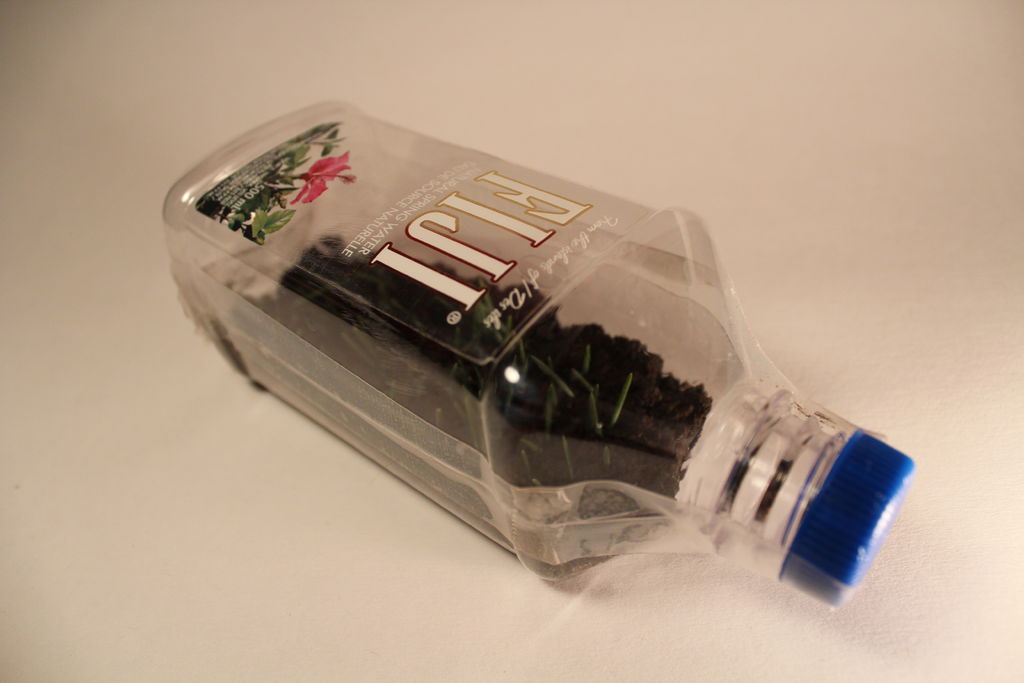 It often happens in our domestic apartments that for growing seedlings the room is not warm enough. Such a greenhouse in a plastic bottle can serve as a way out of this situation.
When sunlight enters such a greenhouse, the air in the greenhouse begins to heat up and remains warm for a very long time, even after sunset.
An important plus will be high humidity inside the bottleand, which will be created by heating pre-moistened soil. Such humidity significantly accelerates the process of seedling maturation.
The manufacturing process is simple.: Cut the bottle, rinse, place the soil with the seeds inside and seal it tightly with tape.
-
-
-
-
-
-
-
-
-
-
-
-
View the embedded image gallery online at:
https://i.expert-h.com/en/parniki-teplitsy/1119#sigFreeId2ec7d391ec


https://i.expert-h.com/en/parniki-teplitsy/1119#sigFreeId2ec7d391ec
How to do quick DIY greenhouse
Greenhouse made of wooden trellises
Advantages of such a greenhouse:
- - quickly build
- - is steady
- - Pmanufacturing growth
Minuses:
- not suitable for tall plants, you can use for growing early greens and seedlings.
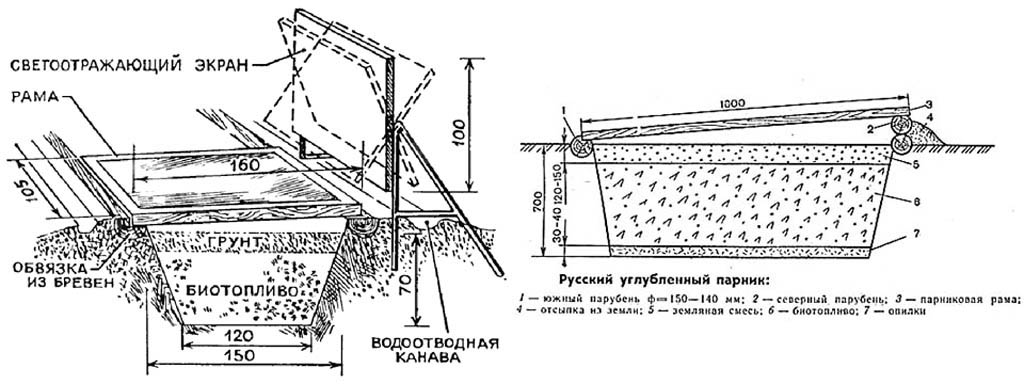
Russian in-depth greenhouse on biofuel
About Russian pits
The simplest greenhouse is a single-pitch greenhouse, recessed into the ground, with biological heating. For its construction choose a dry, well-lit and sheltered from the winds place. It is desirable that this was a low slope with a direction to the south. To protect the greenhouse from the wind, green spaces, fences or special reflective screens that are arranged on the north side can serve. Particularly convenient are swivel flat screens painted with white paint, which allow maximum use of solar energy. Illumination with reflected light increases the temperature in the beds by 2-3 °, which is equivalent to transferring your site, for example, from the Moscow region to the black earth regions of the country: Lipetsk or Voronezh.
Note: you can use any flat panels glued with aluminum foil for baking.
Construction begins with a strapping device around the perimeter of the greenhouse of four sanded logs with a diameter of 10-14 cm. The north side of the strapping should be slightly higher than the south. On the south side in the harness, a groove (quarter) is selected to support the frames.
At one time, the Russian greenhouse was a revelation to European farmers. It was from the “Russian pits” that the nobility of the time received in the winter a green onion, lettuce, dill, parsley, radish, and strawberry.
The foundation pit is dug to a depth of 70 cm. In cross section, it has the shape of a trapezoid. In dense soils, the walls can not be fastened, and in loose and floating soils, fastening with horizontal boards is used. To ensure that the greenhouse is not washed away by rain, a drainage groove is arranged around it, which can be closed with wooden shields that facilitate approaches.
Frames for the greenhouse are most convenient in the size of 160x105 cm. They are made of 6x6cm bars, joined for strength with wooden studs, and then properly stained with weather-resistant varnish PF-166 ("6 = s"). Glass reinforced with putty or glazing bead. To drain rainwater in the lower bindings, grooves are cut.
Biofuel in greenhouses is horse or cow dung.. Horse is considered the best, it gives more heat. Harvest it in the fall. Manure is collected in piles and carefully insulated on all sides with straw, sawdust, peat and covered so that the manure does not freeze. In the spring, before stuffing the greenhouse, it is transferred to another, more loose pile and warmed up. To do this, make several holes in it and pour a bucket of hot water into each, after which the stack is covered with burlap or matting. In two to four days, when the manure warms up to a temperature of 50-60 °, they fill a greenhouse. It is laid colder at the bottom, and hot from above and from the sides. After precipitation, after two to three days, a new portion is added. The manure must lie loose, and only at the walls it is necessary to slightly compact it so that voids do not form.
Greenhouses - pits were usually made 3-4, which ensured year-round use: while 1 pit was heated after refueling, the rest gave production. An indispensable condition for the successful operation of the Russian greenhouse is the stroke of the entire complex with a clay castle with a drainage ditch, otherwise the biofuel will become acidic.
Click on it to enlarge it.
After stuffing, the greenhouse is covered with frames and mats made of matting, straw or burlap. From above, on heated manure, soil is poured - garden or sod soil, compost or fertilized peat. An average of 0.2 cc per frame. m of land. Exceeding this amount is not recommended, since under the weight of the earth manure is compacted, air flow is hindered to it, and it ceases to burn. For the same reason, do not over-moisten the soil.
A greenhouse of even such a simple design will make it possible to grow vegetables much earlier than expected.
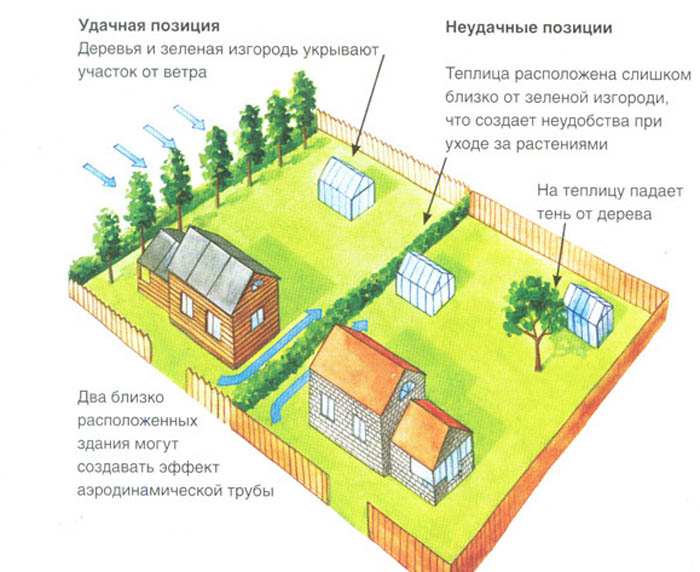
Greenhouse layout
where it is better to put a greenhouse on the site
Hello, I am the author of this article, so I look forward to asking questions for this article in the comments below, I will answer all !!!
If you have questions on another topic, ask them on our forum, we will answer you
- Two baskets of paper in 5 minutes (Master class)
- How to make a simple and compact table for a milling cutter from plywood
- How to make a soft headboard tile (Instructions + step by step photos)
- Cinder block benches: a convenient bench in 55 minutes
- How to make a bed with a niche: saving space (Master class)