Do-it-yourself metal bench. Photos, drawings, step by step instructions
 do-it-yourself metal bench
Garden furniture should not just be beautiful. It should be durable and comfortable, and last but not least, functional. Metal garden bench Meets all these requirements, and although the price is not a cheap material, they are in great demand in terms of aesthetic appeal and decorativeness.
In the article you will learn how to do do-it-yourself bench made of metal and wood, this is the most common option, but there are also examples benches on metal legs. Interesting solutions for a bench with a backrest from the hinged side of a pickup truck, original ideas for using a metal tank and even a cast-iron bathtub. And of course a few examples restoration of old benches. All submitted projects with step-by-step photos, a description and a link to the source site.
Do-it-yourself bench made of metal with a back
 If you had an idea to do DIY garden bench, but it’s not particularly wasted, this option will surely suit you. Simple design, not heavy construction and great project for beginners. Make a template, and then you can quickly and easily make a bench of metal not in one but in several copies. If not everything is clear with step-by-step photos, although the process on them is shown in detail, there is a video on the author’s website, you can click on the link located under the gallery and see.
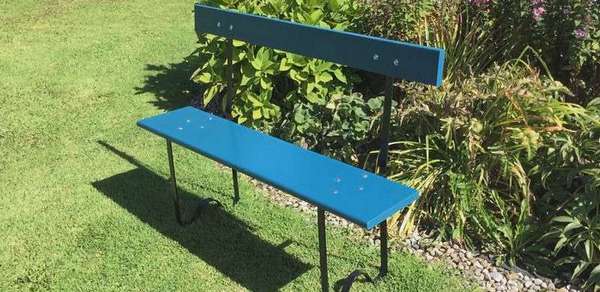 Steel 30 mm x 6 mm was used here, and for one bench two lengths - 2.1 meters, boards 75 mm x 50 mm. This is the basic design of the bench, you can resize as you wish. The structure is quite light, so the bench can be easily moved around the garden if necessary when cutting grass, etc.


https://i.expert-h.com/en/lavki/1070#sigFreeId44f367380e
DIY profile bench
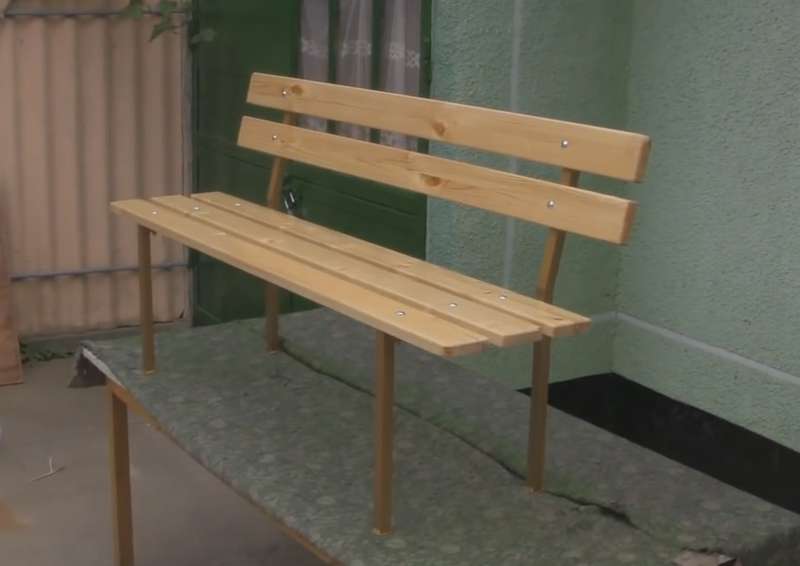 Metal benches look very stylish and are expensive. But if you have welding, then this is not a problem, look at an example, how to make a bench out of profile do it yourself. This can be called a budget option, at least in comparison with finished products.
To make a bench you will need 3 meters of a metal profile 25 x 25 mm and wooden bars 150 x 150 mm. In this case, the starting material was a wooden beam 6 meters long, which would need to be cut into 5 blanks.
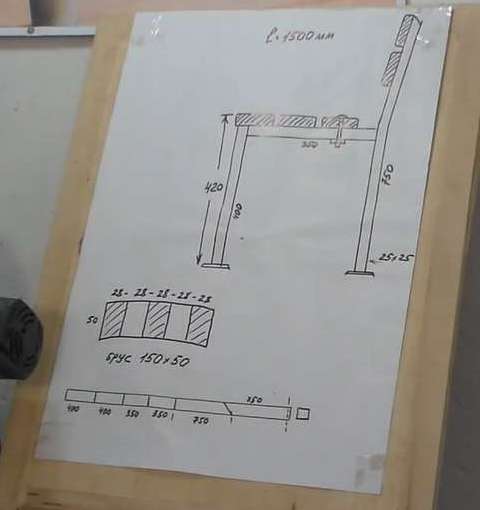 The manufacturing process is shown in step-by-step photos. On the right in the photo profile drawing of a bench with dimensions and sawing.
Basic moments.
Bench length 150 cm. Saw the timber into workpieces in size, as shown in the drawing. The sides must be adjusted to 90 degrees, because the timber after drying takes a semicircular shape. The bars must then be glued together, a blank of 95 in width will be obtained, then driven through the thicknesser, a miter saw. After that, make semicircles on the milling cutter, grind it, and coat with oil varnish twice.
Cut the metal parts, for this a special device for the grinder was used here, you can see it in the photo. Pinch them into the desired shape and weld. There will be a cut and a bend on the leg so that the back is at an angle. After that, grind the seams and paint with hammer enamel. You will also need to make 3 holes in the jumper and 2 in the back.
When everything is ready, assemble the bench. Screw the boards with M8 bolts.
That’s all, for short. All this can be very clearly seen on the video that is on the site.


https://i.expert-h.com/en/lavki/1070#sigFreeId53300cd761
Do-it-yourself bench from a profile pipe
 Shown here how to make a bench from a profile pipe with your own hands. If you are friends with welding, it will not be difficult to make such a bench. The essence of the design is simple, it is a frame with jumpers, legs and decorative details. At an angle of 90 °, weld the pipes, grind the seams with a grinder and primer. Drill eight holes to secure the seat boards. The boards are attached last, but before that they need to be prepared, that is, sanded, impregnated, painted.
The metal frame also needs to be painted with a special paint for metal. Close the bottom of the legs with plastic stubs. Here are all the highlights.


https://i.expert-h.com/en/lavki/1070#sigFreeId00f07bce21
Do-it-yourself bench made of metal and wood
 Good example if you want to make laminated do-it-yourself bench made of metal and wood. The base is made of steelsquare tube and treated with acid that the surface has acquired the appearance of "antique".
Start with a sketch. Draw the base, then perfect the shape until you get the style you like. Below is an example of the scheme of this bench, you can also draw something like that.
 Start work from the bench seat. In this case, the volume of 2x4 boards is what will determine the size of the bench. The reason is banal, just the author of the project did not have other boards. Perhaps you will use old boards, you can, and so, it does not matter. Just before you run the boards through the planer, be sure to remove all nails and staples.
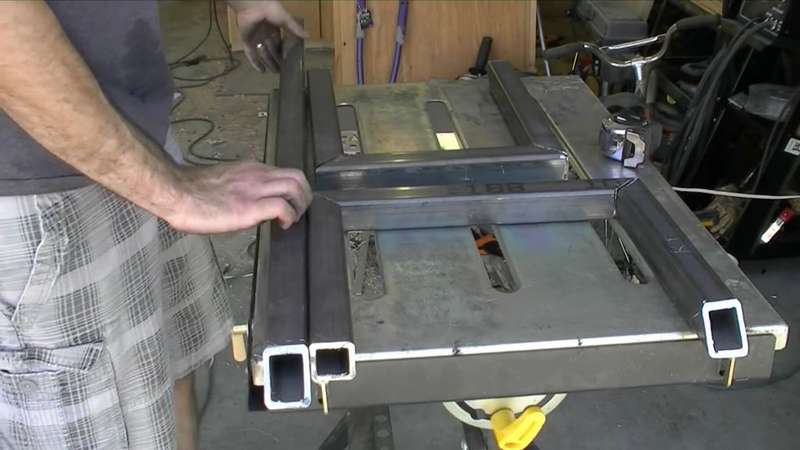 Now about metal and wood bench frame. For the base, a square steel pipe was used. All joints are cut at an angle of 45 degrees, where there will be 90 bends. Mark these locations clearly according to the original sketch. Of course, this is not so simple, so check three or five times to make sure that you cut at the right angle on the right side of each part. Be sure to wear proper protection when cutting with high-speed tools.
In addition to very detailed step-by-step photos, the site has no less detailed instructions, so if you decide to do such a project, you will not have a lack of information.


https://i.expert-h.com/en/lavki/1070#sigFreeIdc506cc61ea
Do-it-yourself bench made of metal with a back
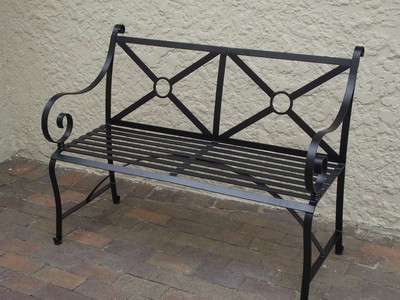 Metal bench with backrest will surely make your neighbors burn with envy. It would also be nice to look at their faces when you tell them that you did everything yourself. The task is not easy, but it’s worth trying.
Difficulty: average, estimated time: 5 - 7 days
Materials
A flat metal rod 30 mm x 5 mm must be cut into pieces, measuring:
- 2 x 108 cm
- 2 x 880 mm
- 2 x 440 mm
- 10 x 12 cm
- 1 x 890 mm
- 1 x 14o cm
- 2 x 115 cm
- 8 x 290 mm
- 2 x 100 mm rings
- 2 spacers
- 4 washers
Tools: hammer, tape measure, clamps, welding machine, electrodes, grinder (angle grinder), vise, clamping pliers, pencil
Instruction how to make a metal bench with your own hands
Step 1: Bend one end of the 108 cm rods into a V-shaped foot. Check that two the legs were the same shape.
Step 2: For the front legs, grab pieces of 880 mm and bend the ends again into V shape. Mark 350 mm from the other end. Set on a round object and bend each piece in the shape of L.
Step 3: To weld the front and back legs, measure 400 mm from V to the end of the hind legs. Weld pieces of 440 mm at these marks, they will serve support between the front and rear.
Step 4: Now take 8 out of 1.2 m pieces of flat timber. Leave a 25 mm gap between each strip of the flat bar and weld to your feet. The 8th strip should be on the curve of the front legs.
 Step 5: Make a curve at one end to match the curve of the front seat. Measure 475 mm from the other end to indicate where you want to bend the flat shaft so that it can support the back of the bench.
Step 6: Weld a piece of 1.4 m flat bar to the seat, it will serve as a support between the legs from below.
Step 7: Measure 420 mm up from the last strip of the seat and weld one of the two remaining strips of 120 cm flat rod. The last remaining strip is welded below the back of the hind legs in accordance with the front legs.
Step 8: Eight 290 mm pieces and 100 mm rings are welded into two rectangles of the back. Cut one end of each of the eight parts at an angle of 50 degrees. The remaining ends should be rounded inward.so that they fit snugly on the rings.
Step 9: The remaining pieces of 115 cm flat rod must be bent into the armrests. Make sure they match. The curled end is welded to the seat, but it is necessary to install a gasket between the armrest and the seat. It is enough to cut a piece of metal 30 mm. If you weld the armrest directly to the seat, it will create a gap where water can accumulate and the metal will quickly rust.
Step 10 : To the ends of the legs weld the washersso that the legs do not sink into the ground or spoil the coating, where the metal bench will be installed.


https://i.expert-h.com/en/lavki/1070#sigFreeIdb2774a4895
DIY metal bench 100 photos


https://i.expert-h.com/en/lavki/1070#sigFreeId93c54f4bbe
Reinforcement bench
 Cheap and affordable option benches from boards with legs made of reinforcement, the ideal project if you are just starting to master the welding machine. Simple split top design where absolute precision is not needed, great design to practice before making more complex projects. Top of benchmade of bivalve pine lumber with a size of 2 x 10. Of the reinforcement half a inch (14 mm) thick, it will be necessary to cut 8 pieces of 40 cm, 35 cm and 8 cm.
From the cut pieces of the reinforcement, make a rectangle and weld the corners, you need to weld three such figures. Then strip with an angle grinder. Drill holes in the fittings and screw the boards with 5 cm screws. Something like that, in short. However, the author was not too lazy and made excellent step-by-step photos, plus there is a video on the siteso there is enough information.


https://i.expert-h.com/en/lavki/1070#sigFreeId2667c6dbcd
Do-it-yourself metal and wood bench
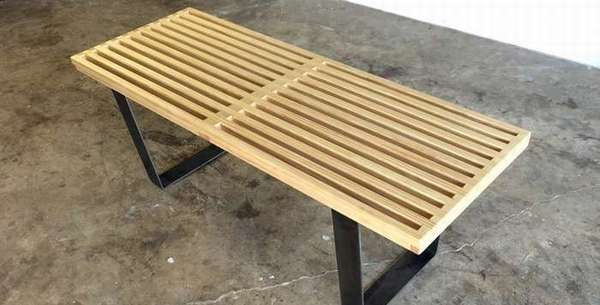 See how to do bench made of metal and wood stylish design. If anything, the dimensions can be easily changed, both in length, to fit more people, and in width, then the bench can be used as a coffee table.
 Materials:
- 16 "Trapezoidal Steel Legs (41 cm)
Wooden parts:
- 6 boards 1x2 8 feet (244 cm) long
- 1 x 2 6 x 183 cm board
- 1 block 2x2 6 feet long (183 cm)
- Wood glue
- Polyurethane
Saw the 1x2 boards into 12 pieces of 47 "(119 cm). You will need to make the grids according to the pattern shown in the figure on the right. The whole assembly process is well displayed in step-by-step photos.


https://i.expert-h.com/en/lavki/1070#sigFreeIdd1028e6335
Metal bench with wood
 If you like the combination of metal and wood, check out how to make a wonderful metal bench with wooden beams. There is something about this that looks both industrial and elegant. For this project you will need the following materials:
- 7x aluminum square tube 25 * 25 * 3 mm 1.2 m.
- 2x wood 1.2 m
- long threaded steel rods with bolt cap
- brackets for connecting legs 25 mm wide
- bolts for steel (with metal drillings)
- spray paint and varnish


https://i.expert-h.com/en/lavki/1070#sigFreeId4578b46b37
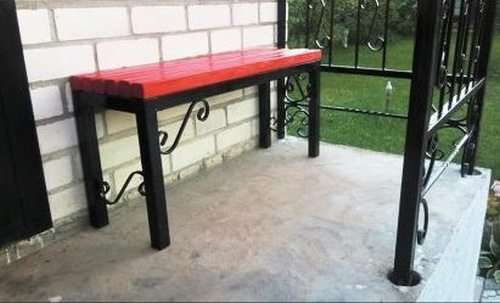
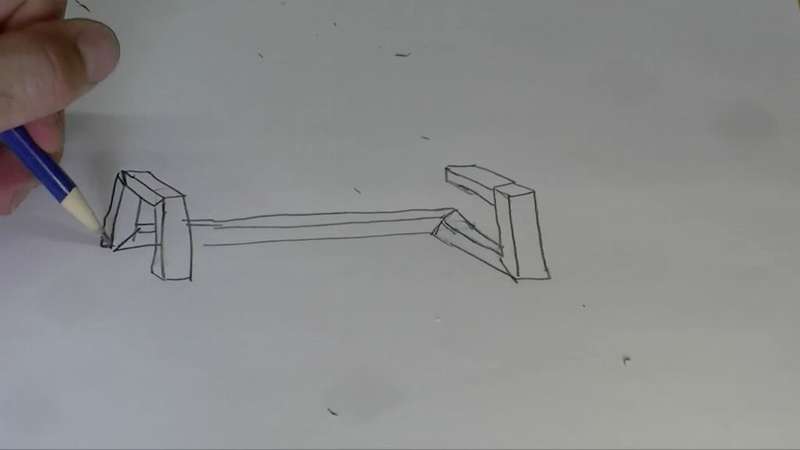
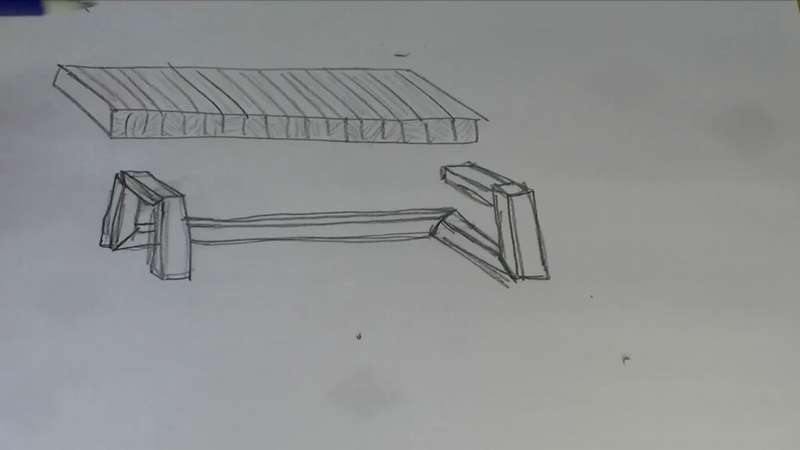
Metal bench

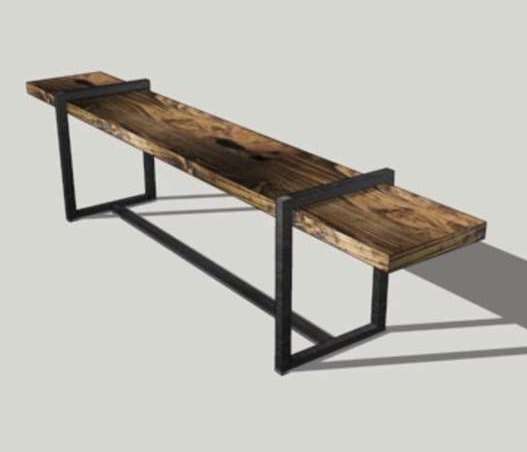 The design is similar to the one presented above, too wooden bench with trapezoidal steel legsbut much easier to manufacture. True, except for the fact that the legs were made by the author of the project on their own. Although, if you have a welding machine, then it will not be difficult to do. Trapezoidal legs are not the most complicated welded construction. For the rest, you will need everything one board and finishes - impregnation, varnish, paint, what you choose. The sizes are also at your choice, either you make the frames of the legs to fit the size of the board, or you adjust the board to the size of the frames. The idea of the design is as simple as doors; you weld the frames of the legs connected by the lower bar and with jumpers in the frames themselves, on which you then install the board.


https://i.expert-h.com/en/lavki/1070#sigFreeId9cedf2d327
Metal back bench
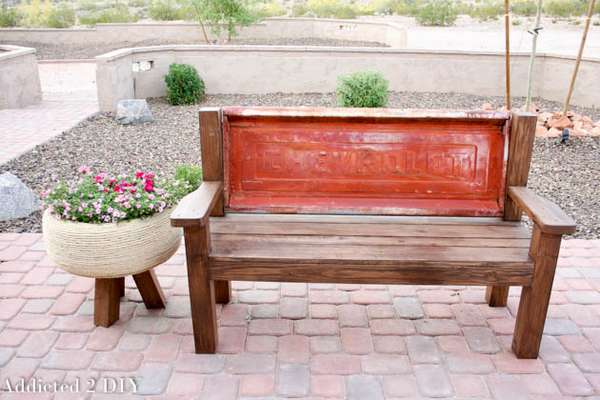 Original project, wooden bench with metal back from the rear tailgate of a pickup truck.
Here is what you need to get started.
Keep in mind that this is for the back door that the project author had: 50 3/4 "(129 cm) x 19 1/2" (50 cm). If your size is larger or smaller, adjust the bench length accordingly.
Material List:
- 2 bars 4 × 4 8 '(245 cm) long
- 2 boards 2 × 4 8 '(245 cm) long
- 3 boards 1 × 6 6 '(183 cm) long
- 1 board 1 × 4 length 6 '(183 cm)
- 1 board 2 × 6 8 '(245 cm) long
 kreg jig, brad nails, foot nails, wood glue, miter saw, jigsaw, 5 cm bolt, washers, angle brackets, tailgate
Sawing boards:
- 2 - 4 × 4 length 37.5 "(95 cm) hind legs
- 2 - 4 × 4 length 23 1/4 "(59 cm) front legs
- 2 - 2 - 2 × 4 length 13.5 "(16 cm) side guides
- 2 - 2 × 4 length 50 3/4 "(129 cm) front and rear staples
- 2 - 2 × 4 length 17 1/2 "(45 cm) center support
- 3 - 1 × 6 boards length 57 3/4 "(147 cm) bench
- 1 - 1 × 4 length 57 3/4 "(147 cm) seat
- 2 - 2 × 6 length 18 "(46 cm) armrests
Instructions for making a bench with a metal back on the site, and below see step-by-step photos.


https://i.expert-h.com/en/lavki/1070#sigFreeId12c13d6761
But second optionThe design is practically no different.
 Step 1: Find the tailgate
- Step 2: Prepare 10 2x4 Planks
- Step 3: Make a seat frame.
- Step 4: Cut the rest of the boards to the required length.
- Step 5: Sand, apply and soak three times.
- Step 6: Assemble the seat and screw the legs. Then install the metal board and screw the trims.
- Step 7: The bench is ready. The next day, several more layers of impregnation were applied.


https://i.expert-h.com/en/lavki/1070#sigFreeIdf6d68ed7d3
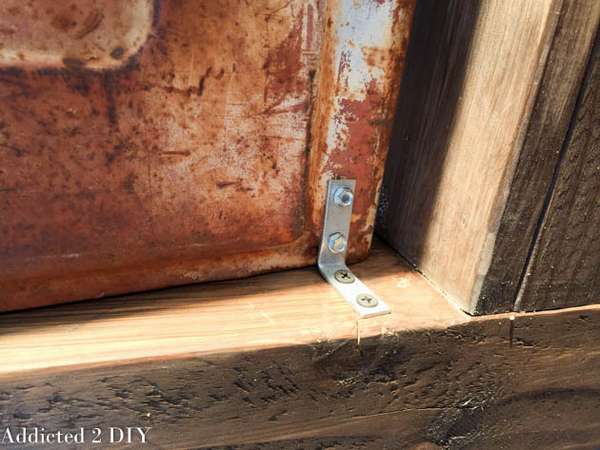
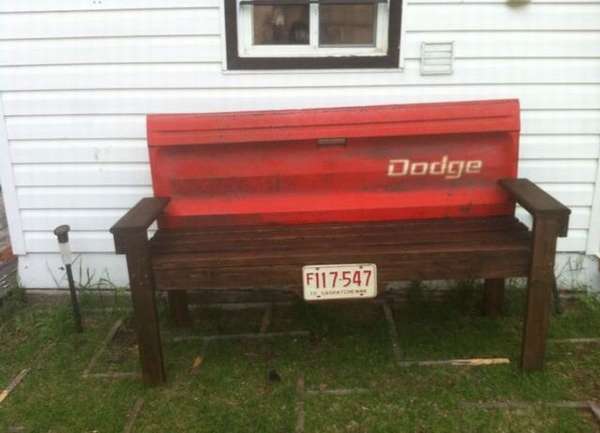
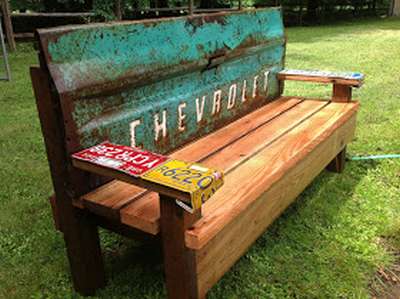 And the third example bench with metal back from the side of the pickup, as you see, is quite old.This bench looks a bit massive, as the front crossbar is added.
The frame and legs are made of 4x4 bars, the seat is made of 2x6 boards. In general, you can collect from what you have. Old boards, or better yet, pallets, are great here.
The backrest, depending on the condition of the metal board, is adjusted with welded brackets. The design can be supplemented with license plates, as shown in the photo.


https://i.expert-h.com/en/lavki/1070#sigFreeId215360673d
Another such bench with a back from the rear side of the Ford.
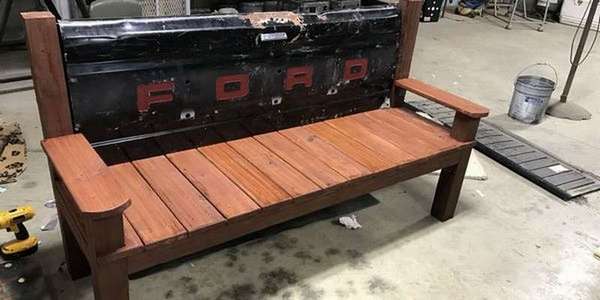 You can give a few more examples, but they all differ only in the source material for the back, and the design principle is the same for all.


https://i.expert-h.com/en/lavki/1070#sigFreeIdee3fad8d7d
By the way, benches with a metal backrest from the tailgate of a pickup truck are very popular. They are used in various ways, including other parts of the car. Look at the photo, here are selected more one hundred exampleshow to make a bench with a metal back from car parts.


https://i.expert-h.com/en/lavki/1070#sigFreeId71df8cafa0
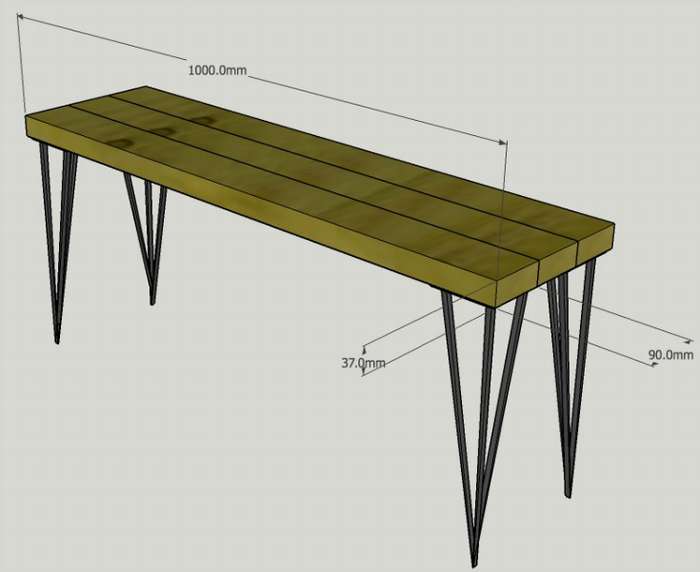
Bench with metal legs
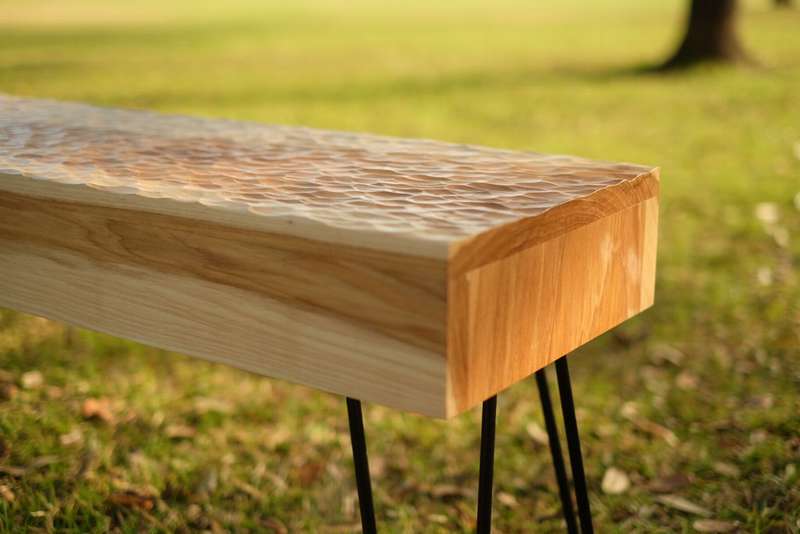
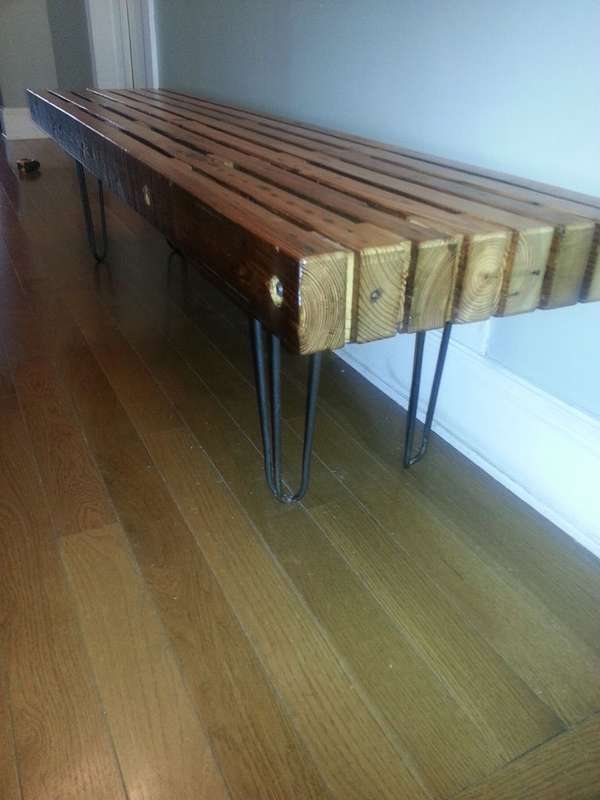
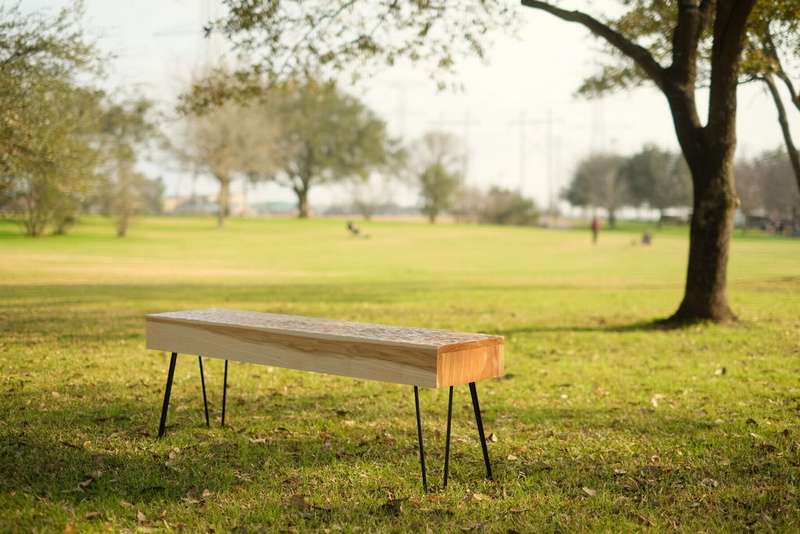 If you suddenly decided that you need a small bench - reliable, inexpensive and originalwhy not try to make a bench yourself! How do you like this example with a very beautiful texture? Of course, if you do not have special tools for woodcarving, you can get by with a flat surface. Metal legs for a bench were chosen because the author wanted something modern and angular in order to balance the organic texture.
Tools and materials:
- Hairpin legs (40 cm)
- Angle grinder (grinder)
- Drill
- Power screwdriver
- Orbital sander
- Grinding machine
- Miter saw
- Kreg jig
- Clamps
- Wood glue
- Tree brush
- Wooden putty
This metal bench made like a box without bottom: 4 sides and top. There is nothing complicated in the manufacture of parts and assembly of the bench, even a drawing is not needed. Dimensions were established spontaneously based on the size of the source material..
Everything is shown in step-by-step photos, instructions on how to make a bench are on the site, read if any nuances are not clear.


https://i.expert-h.com/en/lavki/1070#sigFreeId7767c7fb56
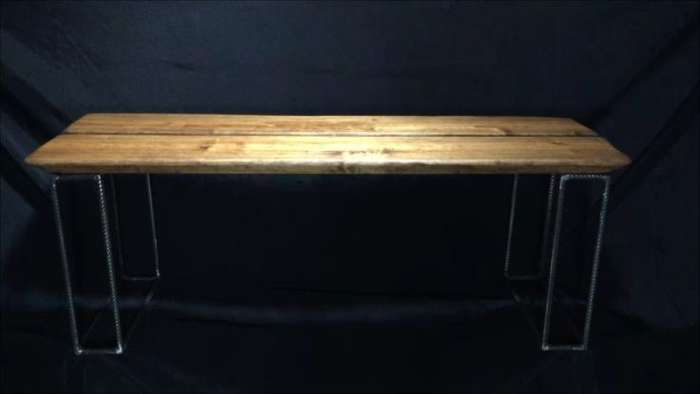
 Here is another option metal bench, even easier. If you need simple shop in the hallwaybut scary of the number of zeros on the price tags in furniture stores, this is a great project to solve this problem. The bench is really simple, even a person who is very far from the carpentry wisdom can make. You just need to buy or find the old three boards, strong enough to not be scared to sit on the bench. Four metal studs 40 cm high, metal plates for connecting boards and screws.
 You will need a saw from the tools, in principle, any one will do, but a circular is better, this is if you yourself will cut the boards. Grinder, drill, screwdriver.
You can set the dimensions as you wish, but if you want the exact same option, you can use the sizes indicated on bench drawing.
- If you already have boards of the right size, sand them to a smooth surface.
- Then connect the three wooden boards with a metal plate.
- Use metal ties to provide additional support.
- Attach the legs with screws. And this may have been the hardest part of this project.
In the end, you can varnish, or paint. And polish the boards a little after painting to give the bench a slightly weathered look. Well, this is if you want her to look like in the photo.


https://i.expert-h.com/en/lavki/1070#sigFreeId8f128d6ab7
Exactly the same design, only old ones were used boards from pallets.
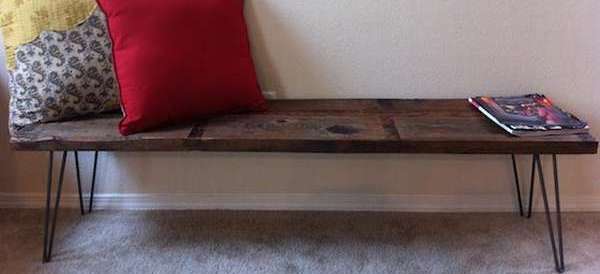 So you can not repeat the instructions. To get such a beautiful surface, we used teak oil. Apply two layers, and after a few days, sand again and add another layer.


https://i.expert-h.com/en/lavki/1070#sigFreeIdfa30070e65
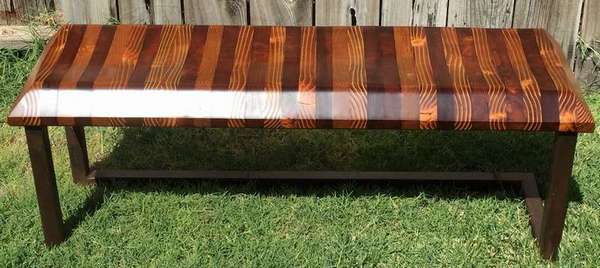
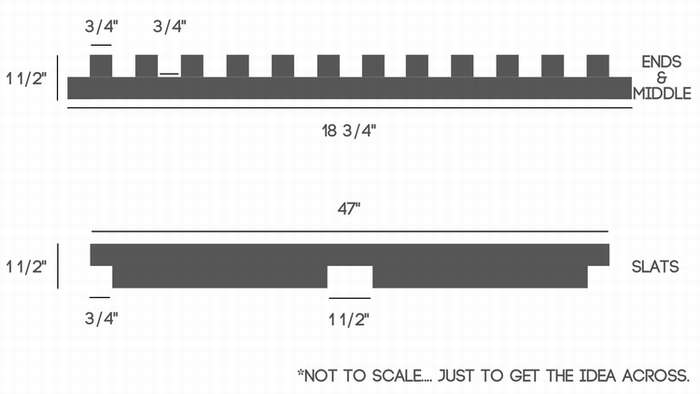
Metal bench with metal legs
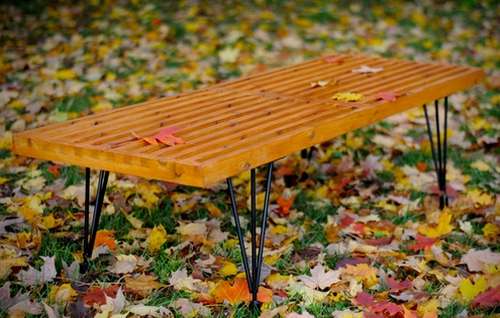 Do you like this model? Really pretty racks benchalthough this project cannot be called light. But if you do not have the whole set of necessary power tools, that's okay. Not all of them are required to complete the assembly. Most of the design is that you can buy trims of the right size and saw them. That is, you you can do with ordinary tools. Only a saw, a few clamps, a chisel, a drill and sandpaper are required.
Average lumber size 150 cm.
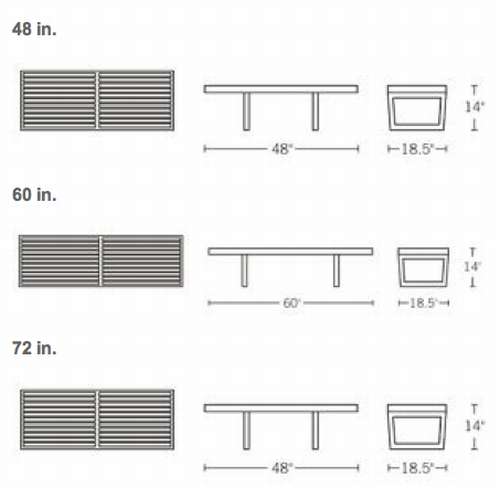 It will take a total of twelve planks for the width of the bench 47 cm. Thus, according to the calculations 47 cm divided by 23 (12 planks + 11 finger joints), you get a width of approximately 38 cm for each lattice.
- Since the seat is made with box-shapedjoints (also called finger joints), the height of each bar should be twice as large as the thickness. For this project, this is 45 mm.
- Assembly and gluing. The best part of using box seams is that there are no mechanical fasteners (nails, screws) holding this thing together, only glued joints. This makes the construction incredibly strong and lasts longer.
- The legs are steel studs, so they must be completely sealed. Coat them with two layers of metal primer, with an interval of 30 minutes between the layers. Then spray paint.
To make this bench it took 10 hoursbut if you do everything right, it will serve you for more than one year.


https://i.expert-h.com/en/lavki/1070#sigFreeId23270e8c30
 A similar project, too metal bench.
- First, cut the 2x4 boards on the end saw and sand it.
- Then drill holes.
- Make struts. Unfortunately, there are no photographs of this process, but the main goal was to make gaskets 15 mm and 80 mm wide, then align them with the holes made in the previous step.
- Assembly. You can simply use threaded rods to hold everything together, but it’s better not to be too lazy and use glue and nails.
- Pass the boards through the planer
- Round the edges.
- Final assembly, finishing and grinding. Glue the two halves together, pass the threaded rods through the holes and tighten. Cut the rods with Dremel. Make another pass with a grinder and apply several layers of polyurethane.
Fasten the legs.


https://i.expert-h.com/en/lavki/1070#sigFreeId4ff6de4a05
Benches on metal legs 100 photos


https://i.expert-h.com/en/lavki/1070#sigFreeId006c034b75
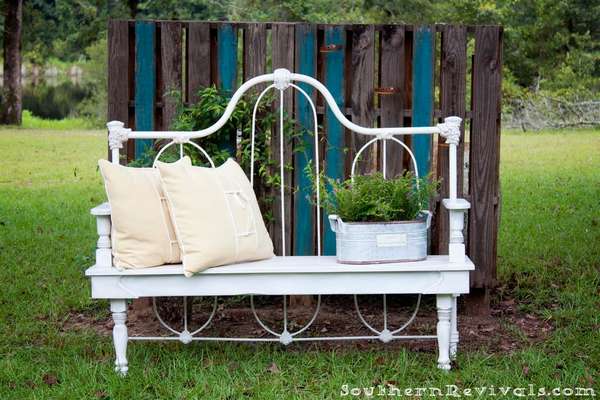
Metal bench
 Using old furniture to make new things is a very useful activity. Here's how make a bench out of a metal bed. This is not only a place to relax, but also a kind of work of art.
The headboard does not need to be cut, but the footboard needs to be cut and reconfigured to set the correct height as the armrest and seat.
 The seat height must be carefully calculated and all necessary marks made to indicate the location for the cuts. Cut out 15 cm of the total height of the footrest, mainly for the armrest. Then grind everything well.
- Now you need to weld the entire structure. After welding, use an angle grinder, smoothing the joints so that everything is ready for the paint.
- Then, from the 2x10 pine boards, make a seat. Saw each board to get three pieces of the same width and a straight edge.
- Then cut the front panel at the ends around the front of the armrest.
- Sand all and apply dark nut soak on the seat.
- Drilled holes in the metal supports to install the seat.
- The last one is painting. Paint the whole bench first. Then clean the decorative parts with Dremel.
- Finally, you can install the seat. From the bottom, tighten the screws through the holes, attaching the seat to the headboard.


https://i.expert-h.com/en/lavki/1070#sigFreeIdca47a932c7
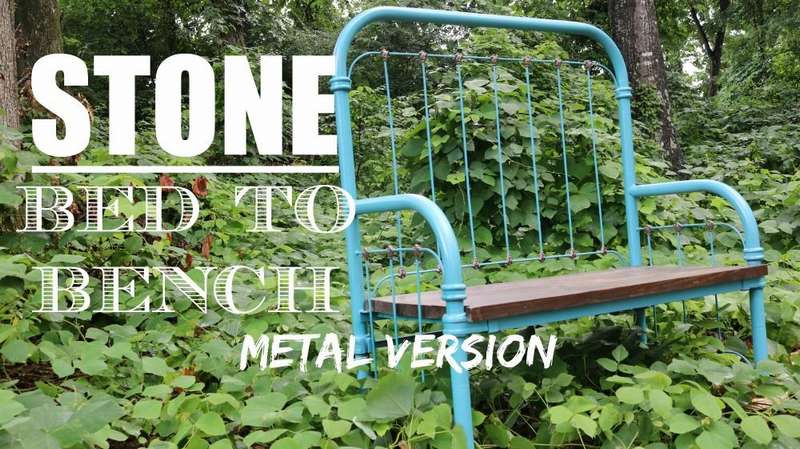
 Metal back bench
See another example, how to turn a metal headboard into a cozy bench. The task is not difficult, but there are a lot of nuances.
The main thing is make a solid wooden frameso that the bench does not stagger, but it’s not so simple. Unfortunately, the author did not provide step-by-step photographs, these are just pictures of individual parts of the bench, there is no detailed instruction either, but the main thing is the idea.


https://i.expert-h.com/en/lavki/1070#sigFreeId87a672e38b
See more examples of benches made from the back of a metal bed


https://i.expert-h.com/en/lavki/1070#sigFreeId5c4b7da2b0
Metal tray bench
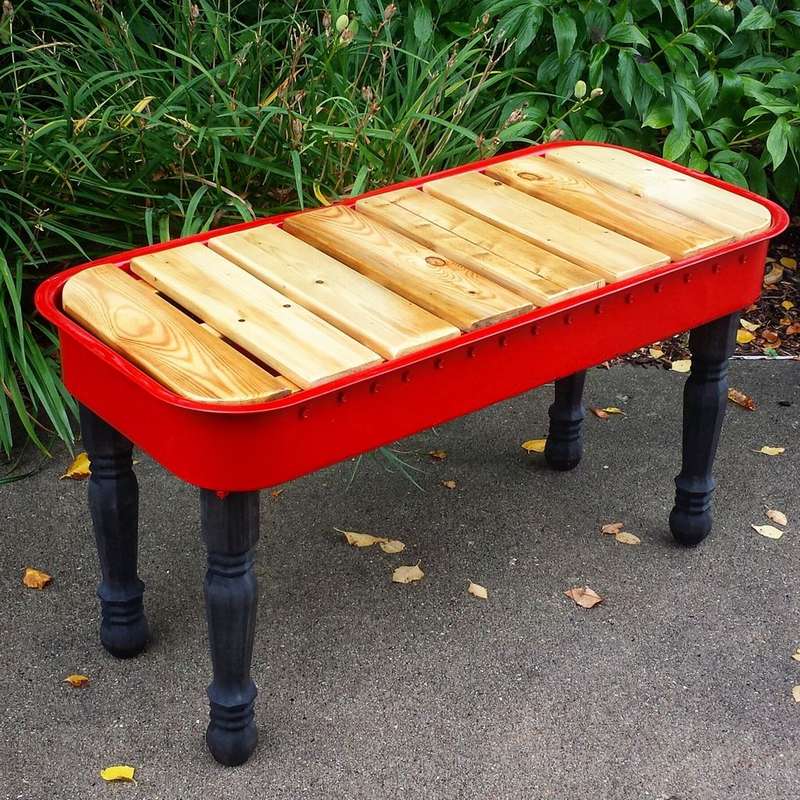 This project is relatively simple and requires only a few tools and supplies.
Materials:
- Metal tray
- Boards from pallets
- Finished legs from an old table or chair.
- Red paint
- Dark wood impregnation
- Quick drying polyurethane
- Small screws and bolts
- Wood glue
Tools:
- Saw
- Electric drill
- Abrasive pads
- Paint brushes
Step 1: Remove old paint from the tray
Step 2: Attach the leg supports
Drill holes of the same diameter in the plates and attach them to the tray.
Step 3: Saw boards from pallets into short boards. Make a shield by fastening with three slats.
Step 4: Then it is necessary to prime the tray, when dry, paint. Cover wooden legs with quick-drying polyurethane. Apply three coats to reveal the natural beauty of the tree.
Step 5: Screw the legs and place the wooden board in the tray. The bench is ready.


https://i.expert-h.com/en/lavki/1070#sigFreeId5ebaeaaa3b
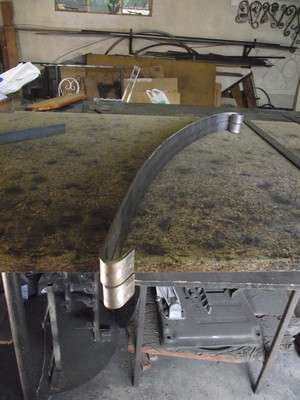
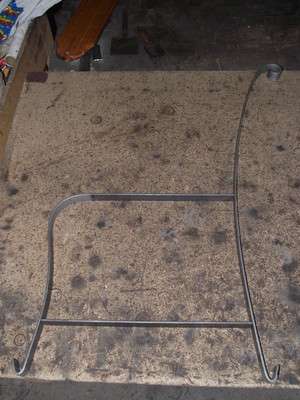
Semicircular bench made of metal and wood
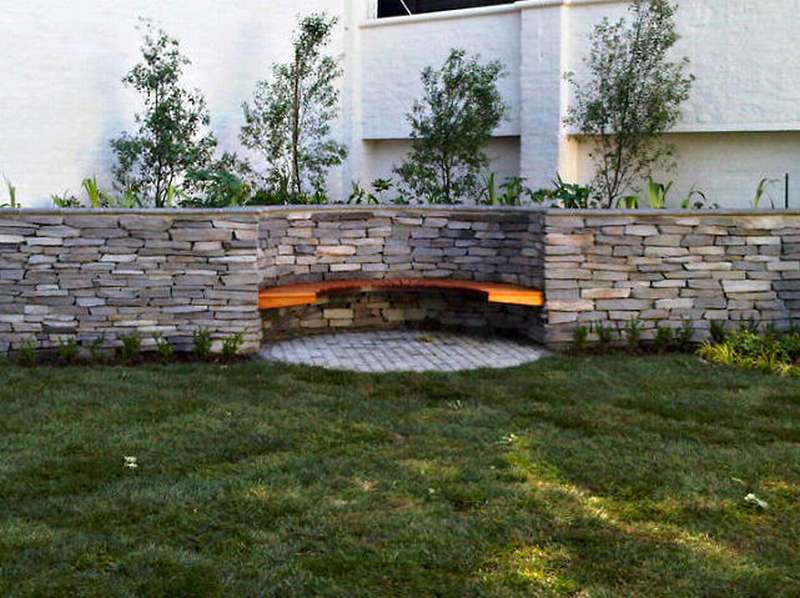 The bench is installed in a semicircular wall niche.
The basis of the design is a steel subframe embedded in the wall, which provides stability and rigidity.
Here, unfortunately, there are no step-by-step photographs, no instructions, this is just a beautiful example of landscape design.
But if you really want to make a similar metal and wood bench, the principle of constructing the design in the photo is shown, so that you can take the basis of the future project.


https://i.expert-h.com/en/lavki/1070#sigFreeId16c6bfcbd6
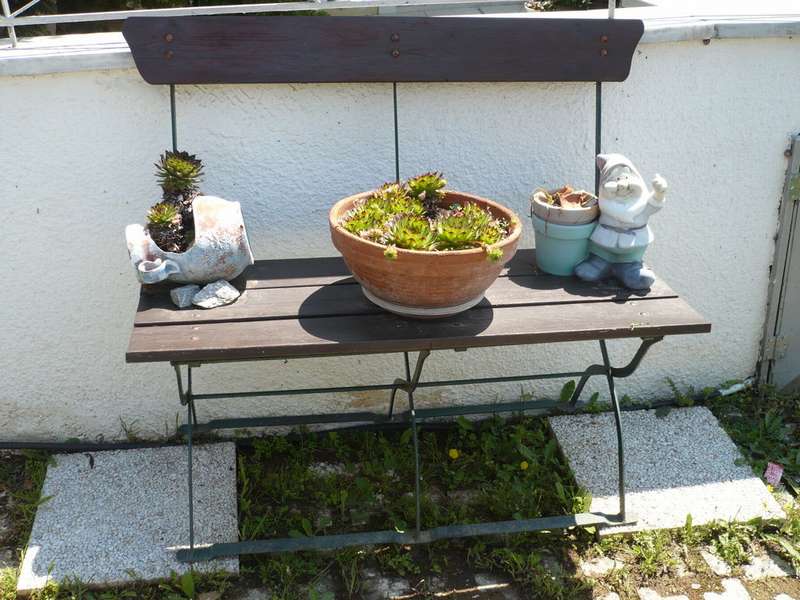
Metal bench ... with flowerbed
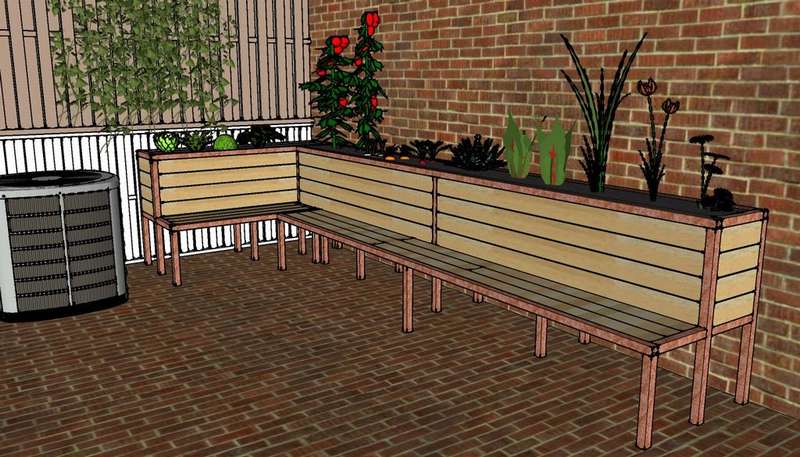
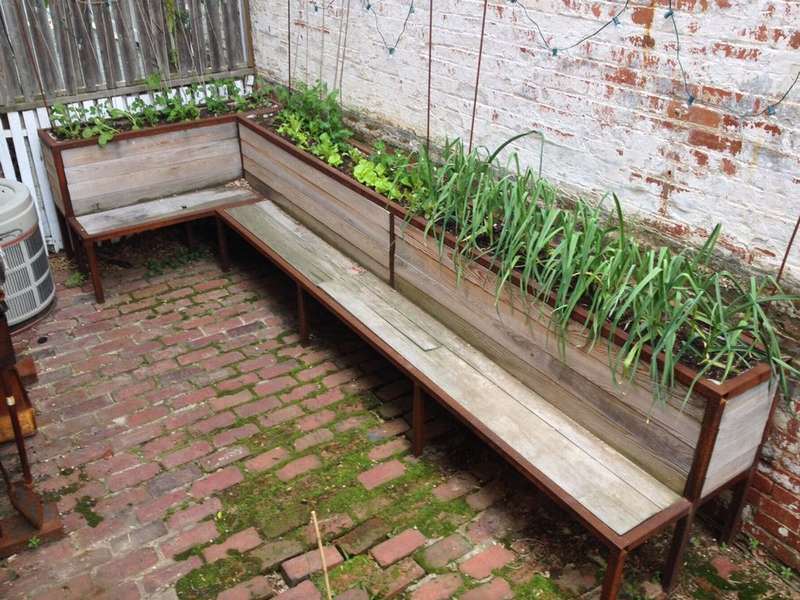 If you have a very tiny courtyard and you see only a neighbor’s fence through the window, then this project will certainly interest you. Make a tall flowerbed bench along the fence, then out the window you will admire the flowers, and in the evening you can sit on a comfortable bench in the yard. To make a metal bench with a flowerbed, draw a drawing, plan, diagram, in general, something that you can build on.
Creating a detailed plan will also help you save a little, so you will only use as much material as you really need.
 So, in this case, the design is a drawer 365 cm long, 30 cm wide and 20 cm deep. The bench seat is 120 cm short, 335 cm long and 38 cm deep.
The exact list of materials is not given here, since you still will not make exactly the same bench. What you definitely need are boards, 2x2 bars, plywood. For the frame, a square steel pipe, stainless steel screws with a special coating, a plastic lining.
For a flower bed, stones and earth with compost. But growing flowers is a separate issue.
Tools
- Welding machine
- Metal cutting saw
- Chop Saw
- Cordless drill
- Sander
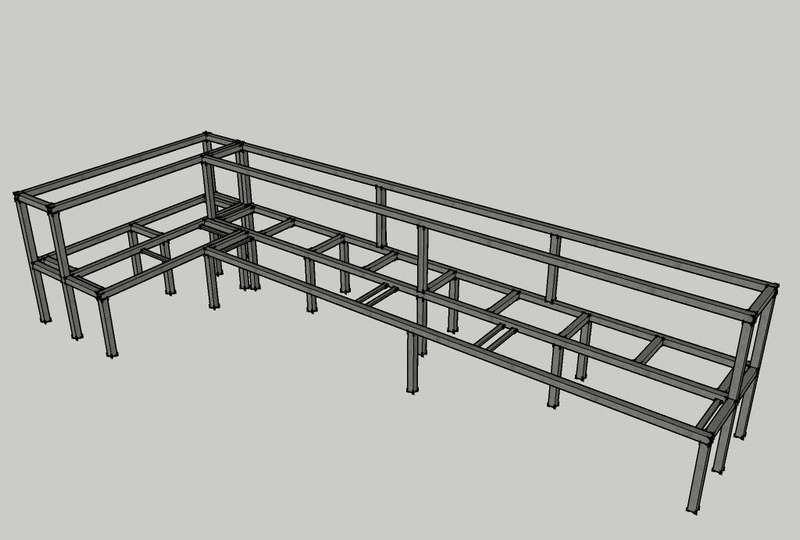 Step 1: Weld the frame. Given that the boxes will be filled with earth and stones, plus the metal will rust over time - in general, there should be a lot of supports.
Step 2: Install plastic and plywood on the frame. From the 2x2 bars, make inserts, fix them on the frame, drill holes in the plywood and plastic parts, then screw them on the inserts. When aligning the box with plastic, be sure to cut out the bottom so that water can drain from the holes you made.
Step 3: Screw the boards on top (on the seats) or on the plywood side (rear and side) so that no screws are visible. This will give the bench a modern look.
In short, that's all. For flower cultivation, look for information on gardening sites.


https://i.expert-h.com/en/lavki/1070#sigFreeIde243083ac4
Tank bench
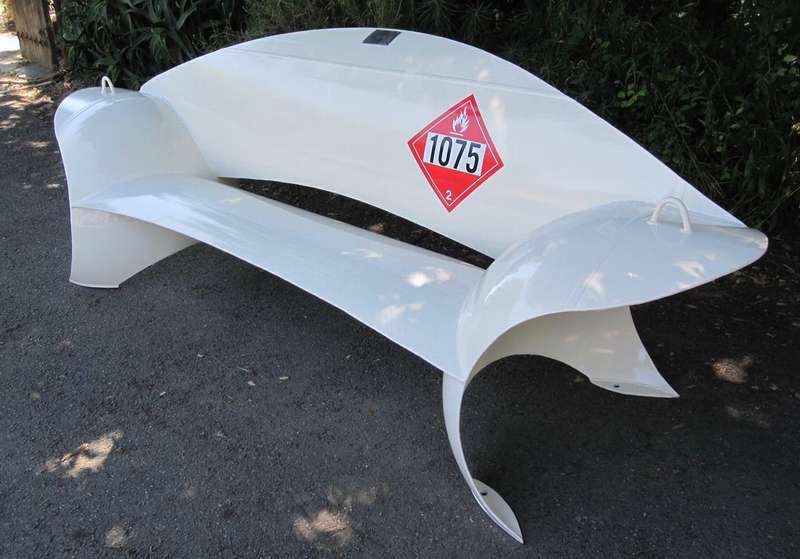 There are many original ideas how to make a metal bench with your own hands - here is one of them. If suddenly in your yard old tank of sufficient size (and that, anything happens), it’s a pity to just cut and pass on metal. Of course, you will earn something, and if you make a bench out of it, and even as chic as in the photo, you will undoubtedly win much more. By the way, after his first project, the author assessed what potential metal reservoirs conceal in themselves, and established mass production. You can see examples of his work in the gallery, last 20 photos.
To make the idea clear, below you see the drawings, or rather sketches
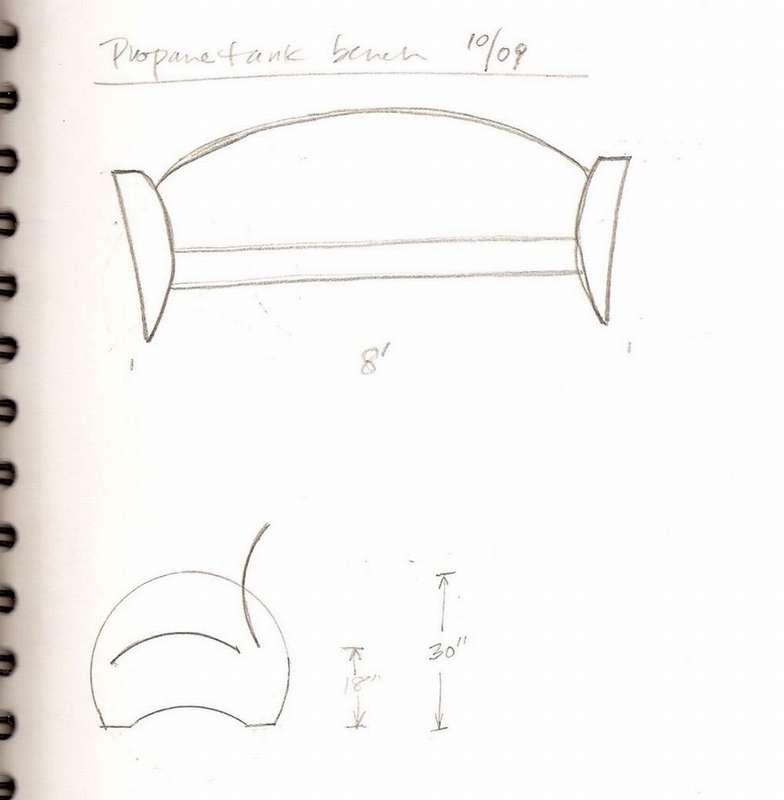
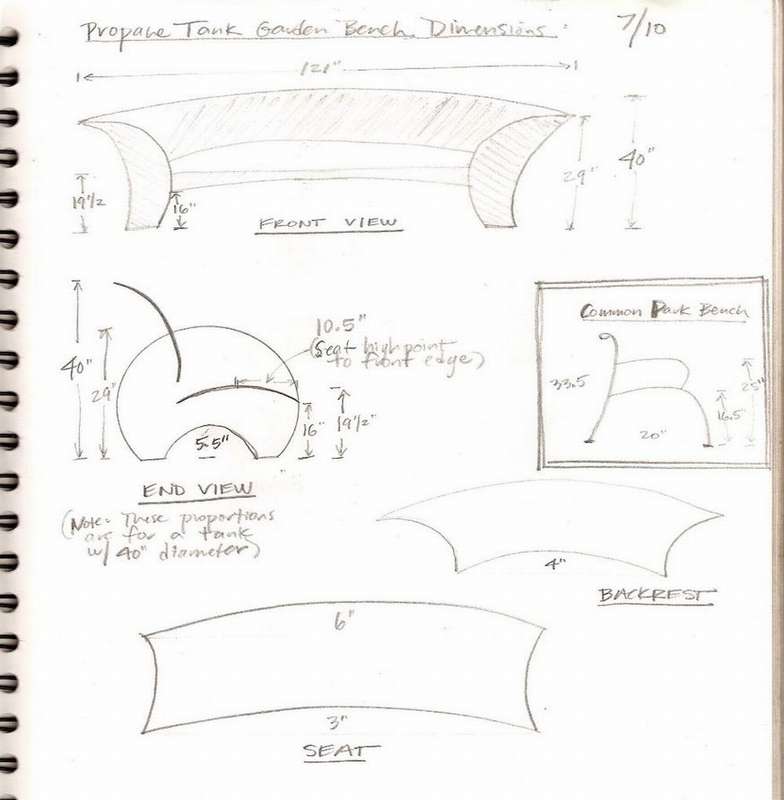 The goal was not to remodel or reform the metal, but simply to carefully cut the parts and weld them together. There is only one straight edge in the tank, along the cylindrical part, so this should serve as a seat and back. On step-by-step photos, all this is shown in detail, if there are questions, below is a link to the author’s website, where he wrote in detail each step of the bench manufacturing.


https://i.expert-h.com/en/lavki/1070#sigFreeIda917e2b3ef
Bench from an old cast-iron bathtub
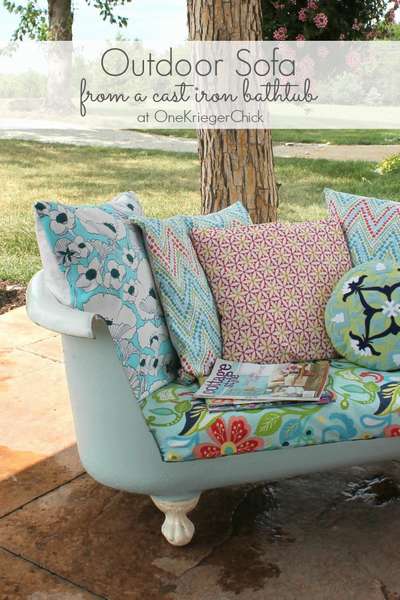 Of course, an unexpected idea, but why not. If you want an “eternal” bench - make it like this outdoor sofa from an old cast-iron bathtubEnough for both children and grandchildren. Cast iron, a heavy thing, so you have to tinker. Perhaps there are other ways to do this, most importantly, the result.
First measure and mark what needs to be cut.
Do it better in a straight line to facilitate the cutting process. Be sure to wear safety glasses and pants. Tiny the fragments of the bath are very sharp!
- Smooth the edges with a grinder.
- Now you can prepare the bath for painting. Using a hand scraper, scrape off as much old paint as possible.
- After that, you can start painting. On the bath itself, apply two layers of paint from a spray can.
- Clean the legs and put the primer. Then apply several coats of paint.
- We finished the bath, more precisely, now with the bench. The decorative part remained.
How to make a seat
Measure the inside width and length of the tub and add a couple of centimeters in length. It can always be trimmed later. Cut the foam, wrap with batting and fabric. It will be a "mattress" for the seat. Add a few more ordinary pillows and the cozy sofa is ready.


https://i.expert-h.com/en/lavki/1070#sigFreeId3d073ae680
Bench restoration
 With this example you can repair any metal benchif you have such a need. By design, this is a standard bench, similar can still be found in public parks.
Toolsrequired for this work:
- Table saw
- Cordless drill
- Table rotor
- Orbital sander
- Miter Saw
Materials:
- 2 boards 1x6 2.5 m long
- Wood varnish
- Black matte spray paint
- Bolts and screws
Below is shown step by step what to do with this bench to get what you see in the photo. It turned out great.


https://i.expert-h.com/en/lavki/1070#sigFreeIdac861b0a71
Cast iron bench restoration
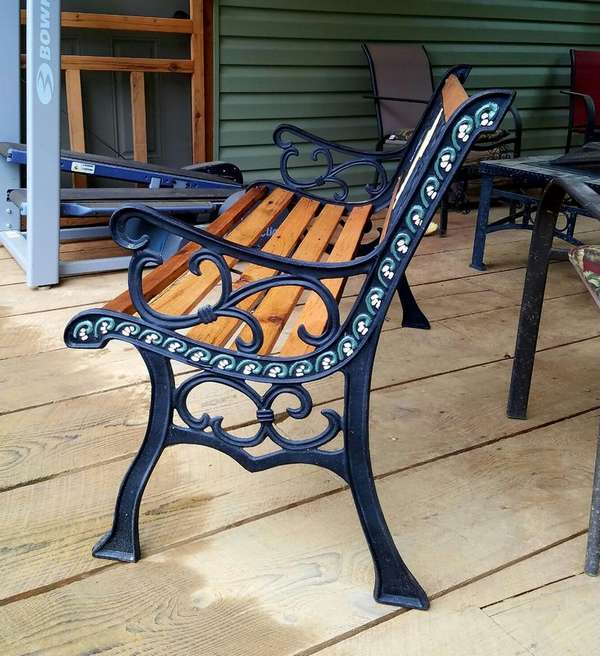 You can often meet old garden benches with cast-iron legs. Today, these, as a rule, do not, and those that are in parks and yards are usually in disrepair. if you havesuch in mind, see how to put it in order.
Hyou will need:
- Brush
- Artist's tape (painting)
- Spray paint or outdoor paint
- Boards if needed
- Wood screws
- Screwdriver
- Drill and drill set
- Bolts
There is nothing complicated in this work, just need time and patience. The site has instructions on how to correctly carry out each stage of work.


https://i.expert-h.com/en/lavki/1070#sigFreeIdd15623d976
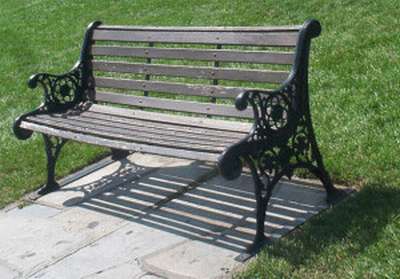
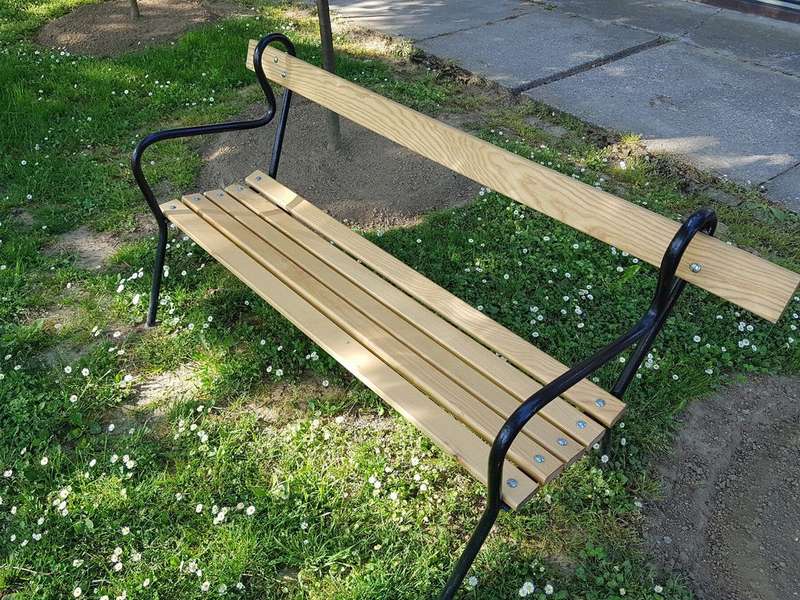
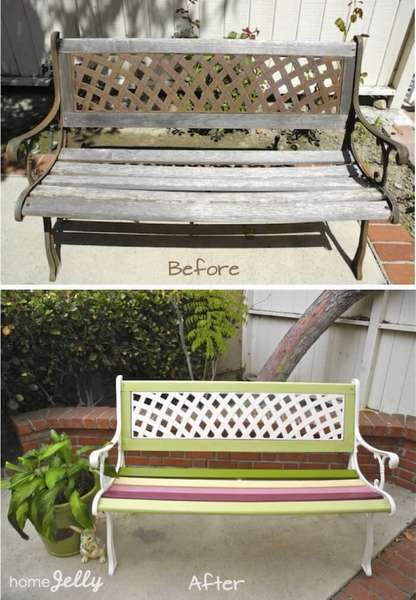 See another example restoration of an old bench, the photo clearly shows what the bench was before and what it was after the repair.
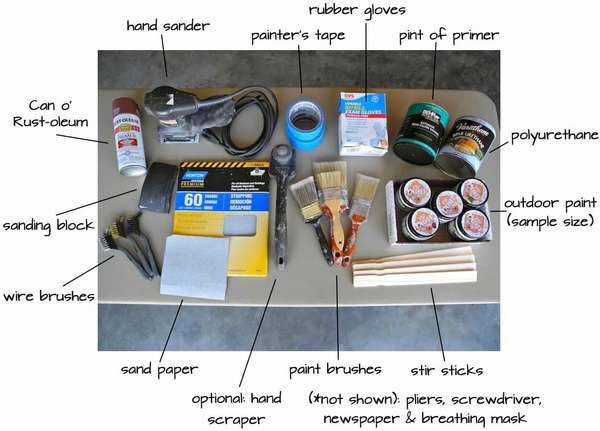
Consumables:
- artist’s tape
- rubber gloves
- wire brush
- primer
- half a liter of polyurethane paint (any color you want!)
- transparent polyurethane coating
- paint brushes
- sandpaper
- grinding block
- newspaper
- mask
Tools:
- manual grinder
- pliers
- screwdriver
Not necessary:
- hand scraper
Instruction manual:
 Wipe off dust and cobwebs.
- Tighten the screws.
- Use a hand grinder to remove rust.
- Wash cast iron with soap and water to remove excess dust and rust particles.
- Using a hand grinder, smooth out the rough surface on all rails, including the bottom.
- Round the edges of the wooden planks.
- Paint cast iron.
- Paint wood planks.


https://i.expert-h.com/en/lavki/1070#sigFreeId8faaa1af09
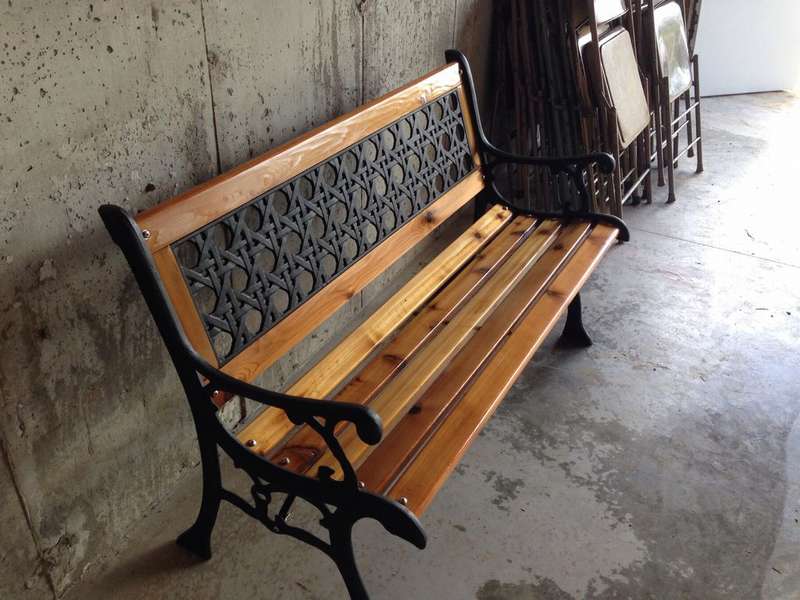
Bench Repair
 Cast Iron Park Bench It will stand for decades, you just need to update or change the bar from time to time. Shown here how to make a set of planks and install on a bench.
When the boards are ready, it is necessary to drill a through hole at both ends of each board so that the screw head is below the surface of the seat.
The benches shown here have nine 55 mm planks and three 30 mm planks. Smaller ones go to the inner curve at the back of the bench.
Round off all edges and sand boards. At the end, apply impregnation and paint.


https://i.expert-h.com/en/lavki/1070#sigFreeId8863d24f24
Repair of a metal bench
 Even from an old metal shop, in whatever condition it may be, you can make candy. The step by step photos show how to repair a bench.


https://i.expert-h.com/en/lavki/1070#sigFreeId5138f9623d
One more metal bench restoration example. Here it is shown how the author restored the bench from a completely unsuitable ruin to a stylish bench.
 For repair, such tools:
Miter saw
- Drill
- Orbital Sander
- Milling cutter
- Brushes, spray gun
- Angle grinder (grinder)
Other things:
- Polyurethane base coat 0.5L
- Polyurethane Coating 0.5L
- Paint for metal 0.2L
- Finishing paint for metal 0.2L
- Mounting bolts
Everything that was done with this bench is shown in step-by-step photos, so the process can not be described, but if you have questions, then there is instruction on the site.


https://i.expert-h.com/en/lavki/1070#sigFreeIdfe86664c28
This is how a cast-iron bench should look after restoration


https://i.expert-h.com/en/lavki/1070#sigFreeId6a743da4b8
Bench and chairs with metal legs
 It shows how an old dull bench was remade to beautiful bright set of a bench and two chairs. Here are two photos above - before and after.


https://i.expert-h.com/en/lavki/1070#sigFreeId55e55cbc2a
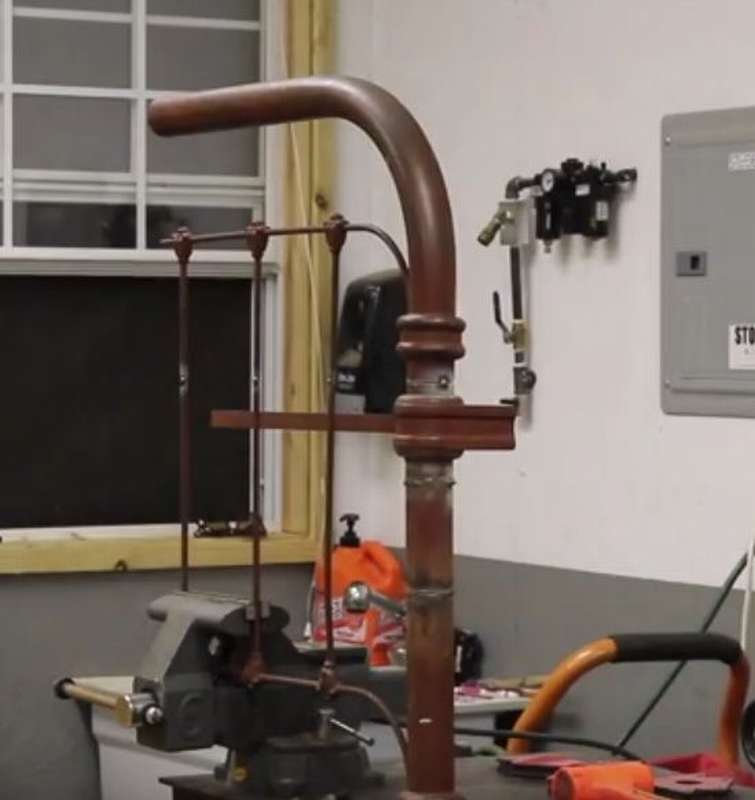
DIY pipe bench
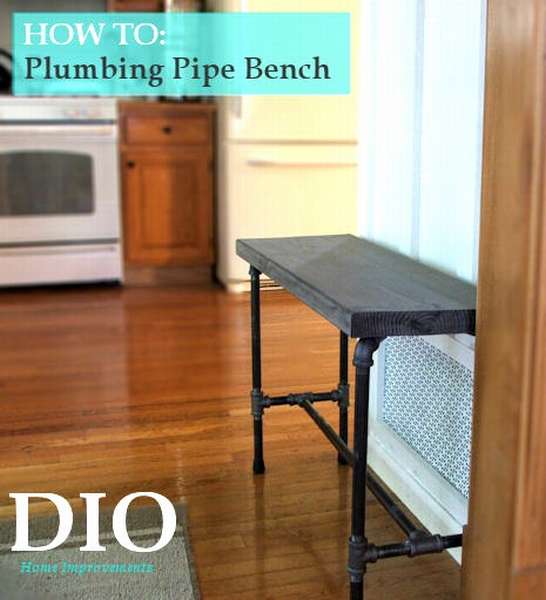 Check out a couple more examples, how to make a pipe benchonly plumbing.
The idea is to use flanges to attach a wooden top to the legs of the pipe. Since the distance between the legs is short, this can affect the stability of the bench. Therefore, it is better to use an elbow with a short piece of pipe on the top of the four legs and mounting brackets for attaching to the wooden top, this will slightly add to the height.
A nice feature of this bench is that you can easily turn it into a table by changing the length of the pipes on your feet!
Below on the right you see a diagram where the places where the pipes are attached are well shown. In the list of materials and in the diagram, the dimensions in inches, convert them to centimeters, multiplying by 2.54.
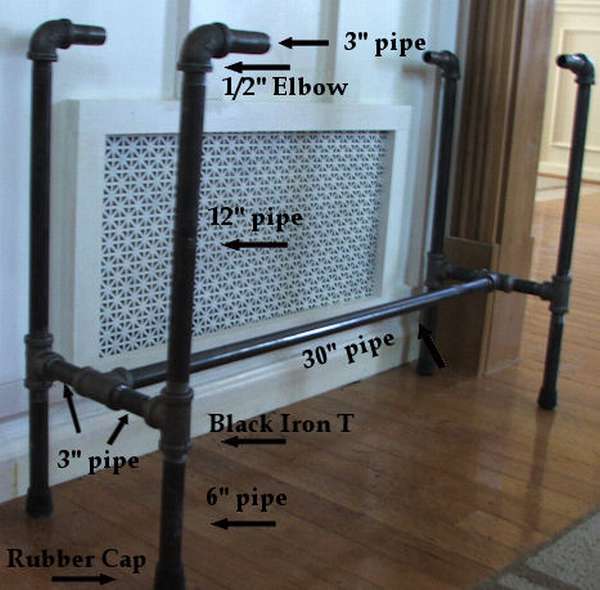 Materials:
- 1 PC. 2 "x 12" x 8 "32" (81 cm) fir board
- 1 PC. 1/2 "x 30" black iron pipe
- 4 things. 1/2 "x 12" black iron pipe
- 4 things. 1/2 "x 6" black iron pipes
- 8 pcs 1/2 "x 3" black iron pipes
- 6 pcs 1/2 "fitting
- 4 things. black rubber caps for the bottom of the legs
- 4 things. 1/2 "elbow pipe
If the board for the top of the bench is wider than 30 cm, use black iron flanges instead of elbows and clamps to attach the tree to the legs of the pipe.
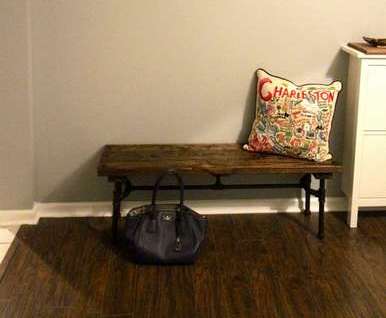
Before attaching the base to the wooden top, sand the boards, paint, then sand again and then fasten to the base.


https://i.expert-h.com/en/lavki/1070#sigFreeId4709721e64
 Or such water pipe bench similar design. 3/4 inch black iron pipes and fittings were used here, the bench width was only 30 cm. The assembly is very simple, you just need to tighten all the connections, so stock up good wrenchesat least two to hold one, tighten the other. The pipes are painted with oil paint with a bronze coating. Apply several layersthree or more and leave to dry for 36 hours outdoors or in well
For the manufacture of seats used boards 2x6 and 2x4 for connections. The boards are fastened with screws, the large bolts at each end of the board that you see in the photo are just decor, so that the bench matches the industrial style. At the end, apply impregnation on the wood and varnish.
The last step is to screw the bench to the pipe in the middle with a flange and deck screws, add glue to each of the side leg openings.
Below you see pipe bench drawings.


https://i.expert-h.com/en/lavki/1070#sigFreeIdf2c5603b6d
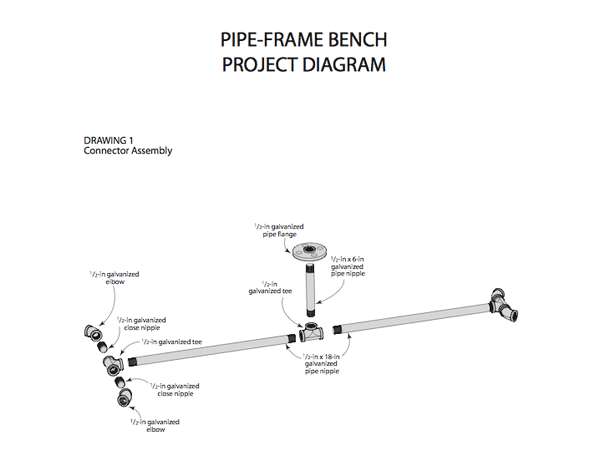
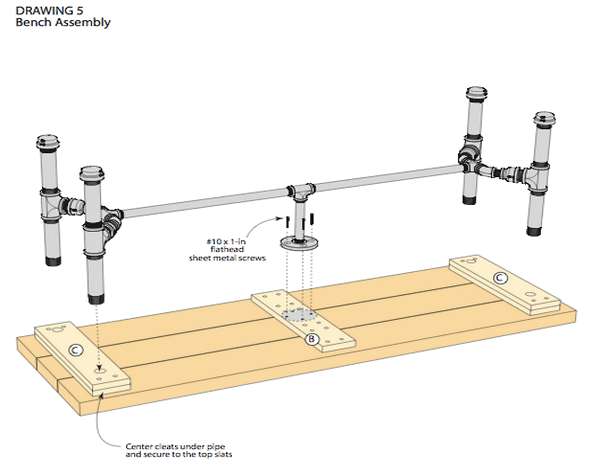
 Here is another example. Pipe bench, for andall you need is one board and a set of black galvanized pipes.
Materials and Tools:
- 2x12 "board 183 cm long
- roulette
- a circular saw
- safety glasses
- brush
- Sander
- dark nut impregnation
- polyurethane
- 16 inch black galvanized pipes 16 pcs
- 8 pre-tightened black galvanized elbows
- 4 threaded black galvanized pipes T-joints
- 4 metal end caps
Instructions:
Measure and cut a board 183 cm long. Sand, apply impregnation. When dry, apply polyurethane. Connect two 10-inch pipes to the T-joint and three 10-inch pipes to the other T-joint. Add an elbow joint at each end and connect both with two 10-inch tubes. Insert the metal caps and repeat for the second set of legs. Attach the legs to the bottom of the bench.


https://i.expert-h.com/en/lavki/1070#sigFreeIdc7dd951615
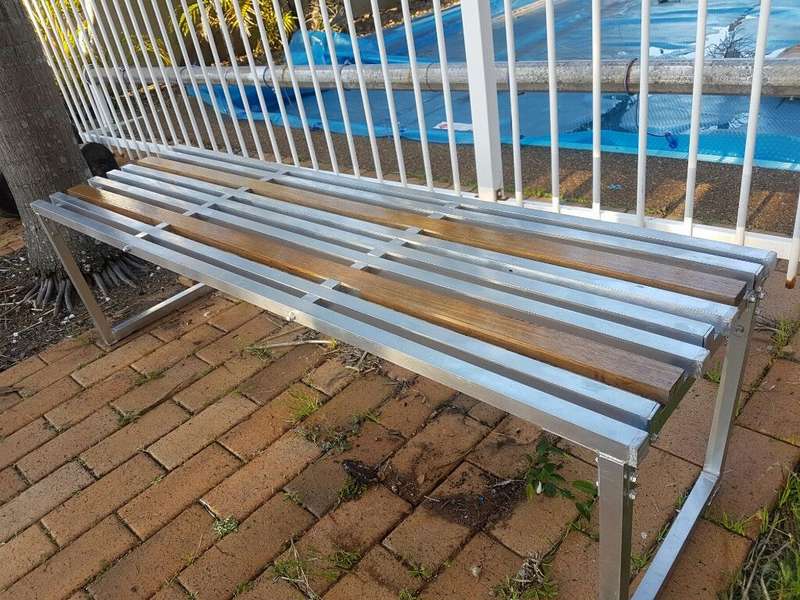
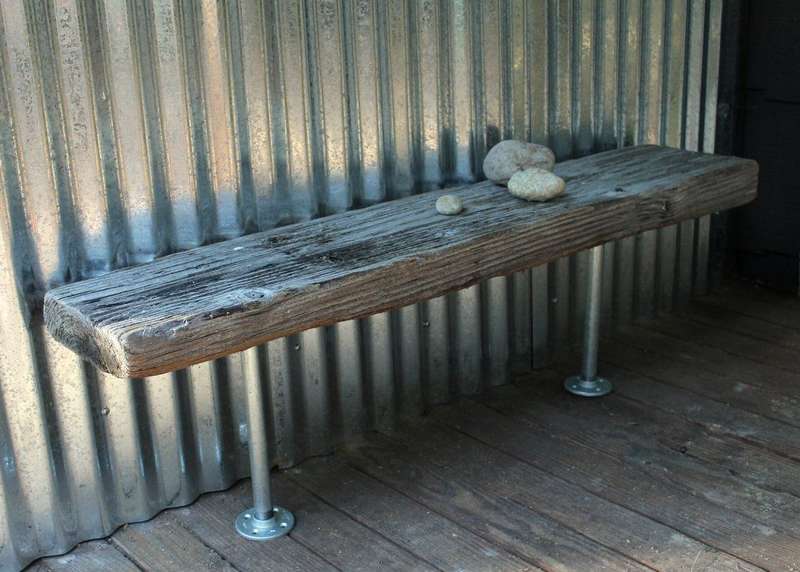 Simple and original at the same time. metal bench. An old seat board, it’s not “so happened”, it’s so conceived. In combination with metal legs from pipes it looks very stylish. And this shop is very easy to do, for this you only need a drill.
Cook for work galvanized pipe, flanges and metal brackets in the shape of L.
The only tools used for this project were a drillbut you might need a tape measure or even a saw, it depends on the board you find.
Be especially careful if using old boards. They often contain toxic chemicals and paints, as well as unpleasant surprises in the form of old nails.
Mounting the legs is very easy. Just assemble the galvanized pipe with a flange and screw it to the board. There is only one problem, wherever you put the bench, it will swing. For this, brackets are needed, in this case, with their help, the bench is attached to the fence. What to do, even such an ideal design has flaws. But as you can see, everything can be decided.


https://i.expert-h.com/en/lavki/1070#sigFreeId187a72cfdb
Wood and metal benches photo


https://i.expert-h.com/en/lavki/1070#sigFreeIda4a381d2cf
Hello, I am the author of this article, so I look forward to asking questions for this article in the comments below, I will answer all !!!
If you have questions on another topic, ask them on our forum, we will answer you
- Two baskets of paper in 5 minutes (Master class)
- How to make a simple and compact table for a milling cutter from plywood
- How to make a soft headboard tile (Instructions + step by step photos)
- Cinder block benches: a convenient bench in 55 minutes
- How to make a bed with a niche: saving space (Master class)