DIY headboard - ideas, photos, step-by-step instructions
 how to make a headboard
From a practical point of view, the head of the bed is part of the frame. And with the aesthetic - this is a great addition to the interior. Presented here headboard ideas different types, shapes and designs with step by step photos and instructions. All examples, this is what you can do with your own hands and, without special expenses, significantly refresh the interior of your bedroom.
Each room has a focus, one main piece of furniture that dominates visually, attracting attention. In the bedroom it could be beautiful headboard. The rest of the decor, design and decor complement the look of the room, which will affect our mood. Make a headboard not difficult, so it’s worth a little effort to make the bedroom more comfortable.
In the article you will find examples of how to do it yourself:
- Headboard with shelves
- Illuminated headboard
- Metal headboard
- Headboard of old doors and windows
- Book and cardboard headboards
- Fabric headboard
- Original headboards (from branches, ropes, flowers, pegs and pegboards).
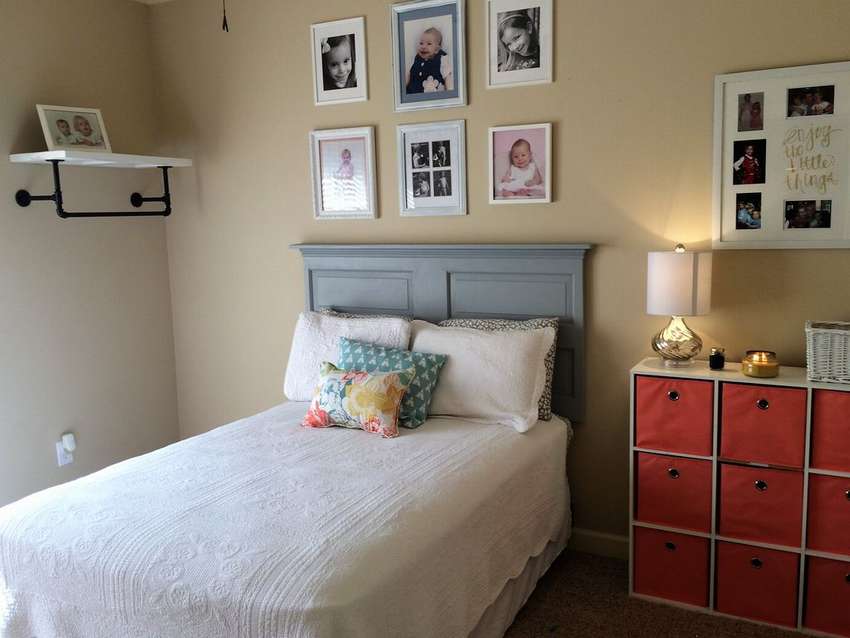
Headboard bed
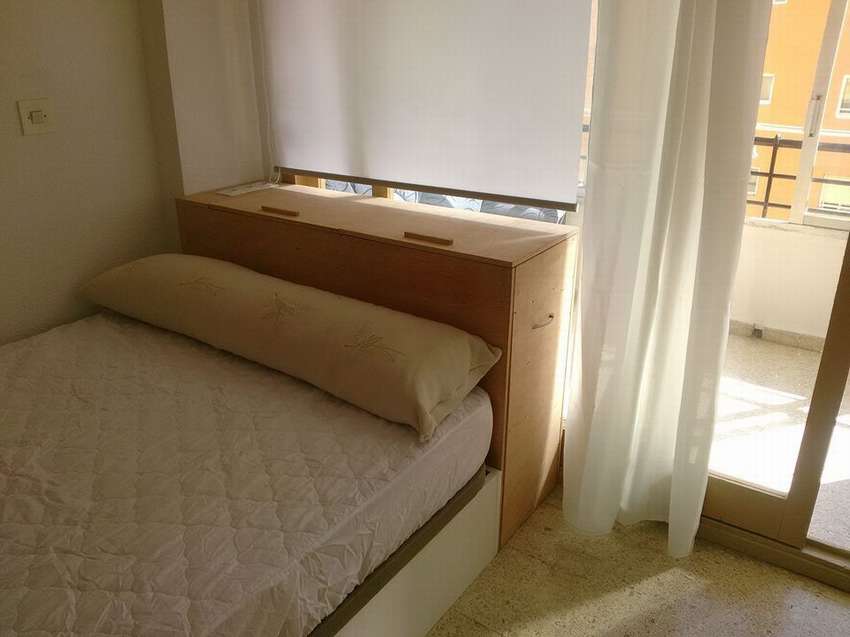 For those who value the free space in their bedroom, headboard combined with a bedside tableThis is a very practical project. The most important step is to take measurements relative to the space that can be used for work. That is, you need to sit down with paper, a pencil and calmly calculate everything. In principle, the assembly is not complicated. Use the shelf part for test measurementsso that there are no surprises. Otherwise, you will need a router to make some parts thinner to free up the shelf.
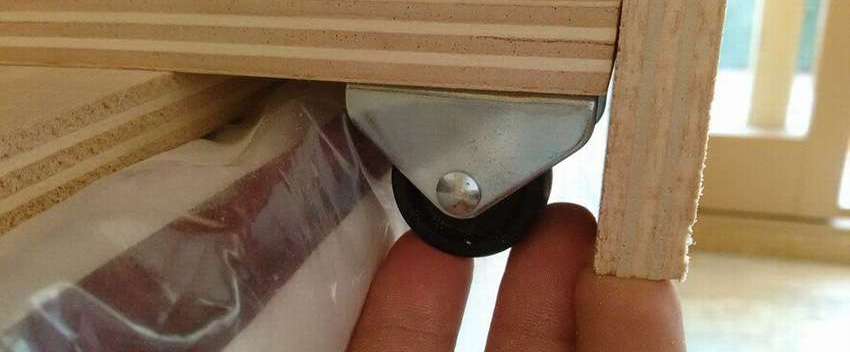 Another great idea to install plugs for smartphones and laptops, you just have to figure out where to make the holes for the wires. There are also wheels to make it convenient to roll out. In general, how to make a headboard look below for step by step photos on step by step photos.


https://i.expert-h.com/en/krovat/izgolove#sigFreeIdcbaeee2160
Universal headboard
(Secret compartments, lights and more!)
it multifunctional headboard was made as a gift. The design includes several ideas.
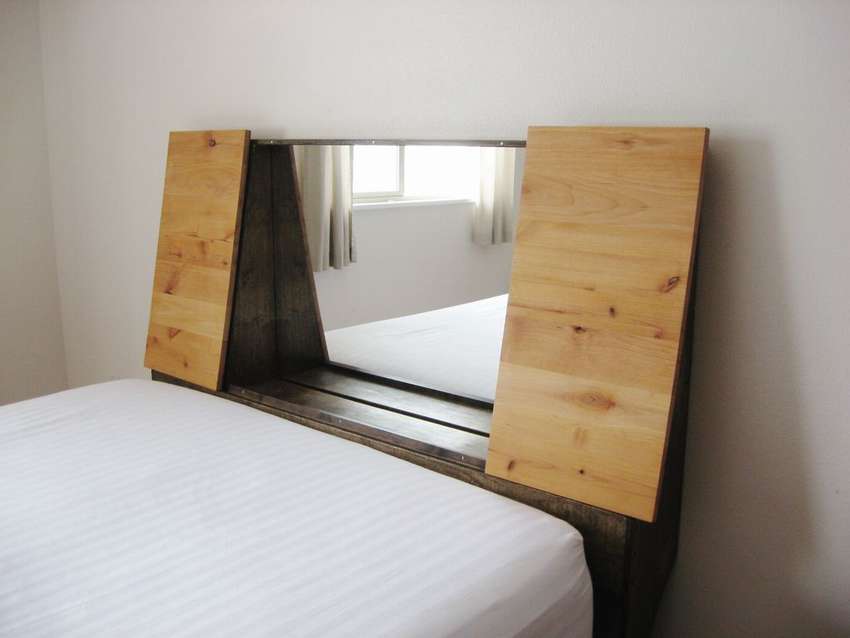 The headboard is mainly narrow cabinet with wooden front panelshaving the following features:
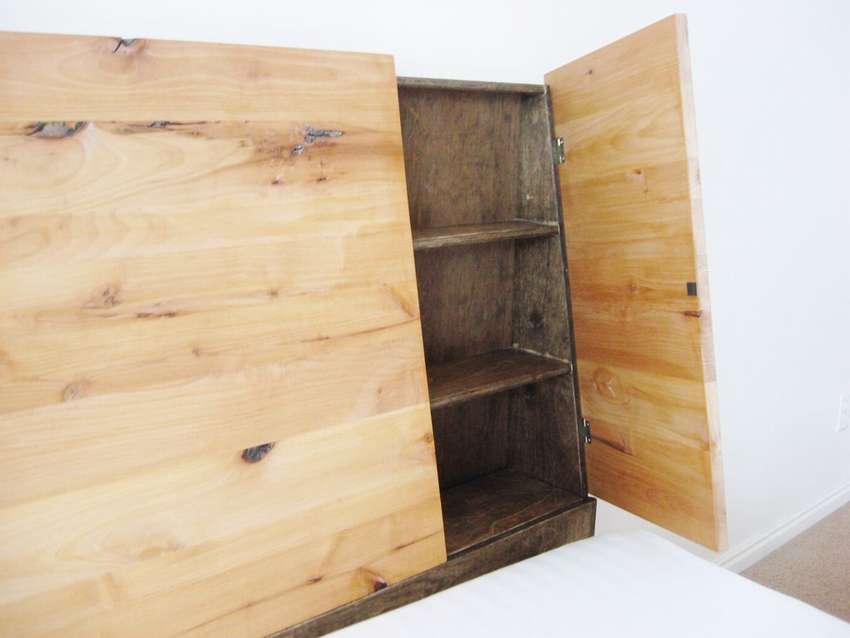 The two side panels are actually are the doorsthat open outward, opening up space for the shelf.
The middle panel is great for leaning while watching TV or reading in bed.
there is built-in adjustable backlight.
There are even three secret departments!
To find out how to make this amazing headboard with your own hands, read the very detailed instructions on the website of the author of this project, you will find the link under the gallery. The manufacturing process is shown below. in the master class on step by step photos.


https://i.expert-h.com/en/krovat/izgolove#sigFreeId1b54b26402
Secret shelves headboard
 There are many reasons why you need to make the head of the bed, the most commonplace so that the pillow does not fall. But the question can be approached more creatively, the head of the bed can be made not only beautiful, but also functional. Look at this example, here the headboard includes several functions, this hidden shelvesthat can serve as a bedside table and charging station, as well as hidden box for important documents. In some cases, the author used boards for pallets, but where more or more specific details were needed, an ordinary pine board. The boards are attached using dowels, which allows them to be removed, then glued and clamped to fix more securely. Hidden shelves must be clamped, when they are openas you can see in the photos. In addition, you must make sure that the shelves will correspond to other parts in order to smoothly close. The author also added a 3 mm thick plywood shelf for classified documents.
You can see the hole in the left part of the picture in the middle in the middle (hard to see) with two spring-loaded magnetic latches. How to make a wooden headboard with your own handscan be read on the site, see step by step photos below.


https://i.expert-h.com/en/krovat/izgolove#sigFreeId04c9cb9d5a
Headboard with shelves 50 photos


https: // i.expert-h.com/en/krovat/izgolove#sigFreeId4efe8b7775
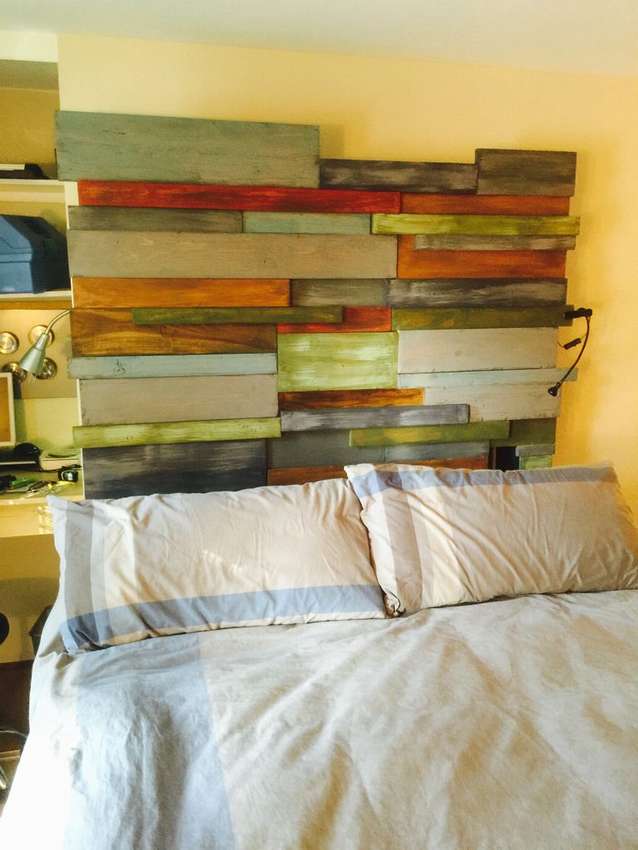
Illuminated headboard
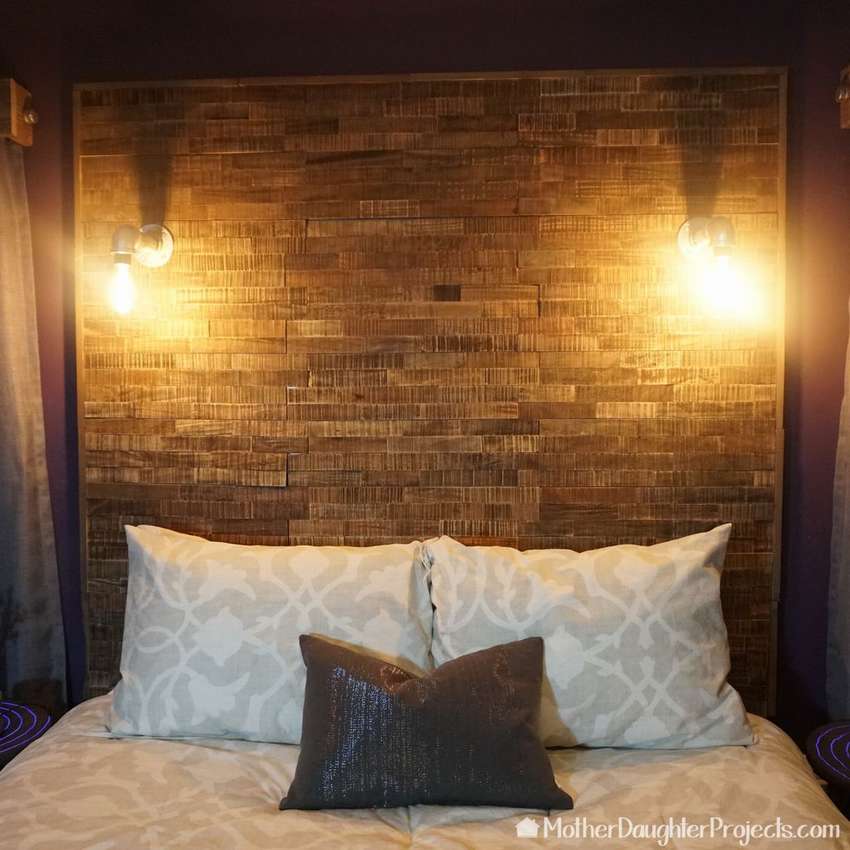 Look how to do large headboard with backlight from wooden tiles and two loft lamps. This project will require an auxiliary panel, 2x4 bars, fittings, Edision lamps and a pair of pendant light sets. Start by determining the size of the head. Mark and cut the circuit board with a circular saw. Sawn 2x4 bars in length using a miter saw. Attach the circuit board to the frame. Make support from 2 x 4 bars to the area under the horizontal seam. Lay the tile dryIf everything is smooth and in place, remove the protective base and lay the tiles in place. The protruding edges are cut at an angle.
Then install the lights. Just determine the installation location and drill holes. Fasten the pipe flanges, then screw on the remaining parts, screw the light kit through the elbow and into the hole. At the end, lead the headboard to the wall. For more information, visit the site of the author of the project.


https://i.expert-h.com/en/krovat/izgolove#sigFreeIdb8e22d976e
Headlights
See an example how to make a headboard with mounted lights.
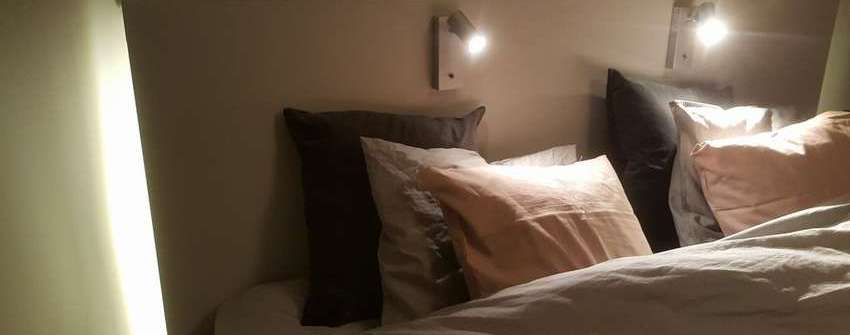 Making the headboard itself is quite simple; it is a regular MDF shield with internal crossbeams. The idea is to make LED headlight and fix the lights at the head of the head. How to do it in detail shown in the master class on step by step photos. Additionally, you can read the instructions on the site to find out how to make wiring for the backlight better and safer.


https://i.expert-h.com/en/krovat/izgolove#sigFreeId7b09b2fde2
How to make a CNC-backlit headboard
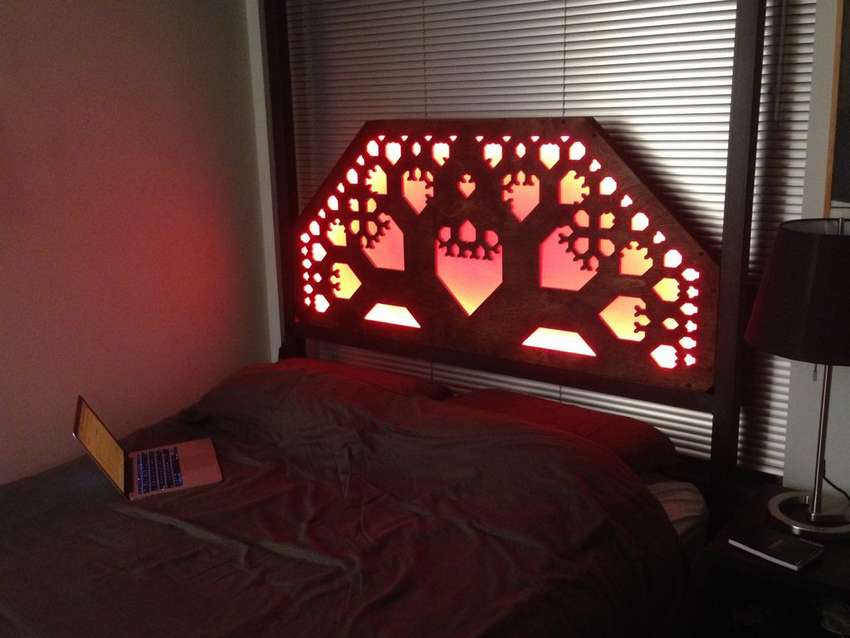 Here's how make a headboard based on the Pythagorean tree and highlight it with LEDs. This design can be modified to create similar light-box silhouette effects with CNC. If you don’t have access to the CNC machine, you can do something similar, albeit on a smaller scale, on the laser machine. It is important to find quality plywood. Cheap plywood will have many spaces that will be exposed after the CNC. To create a design, the author used Paper.js . Who does not know, this is a library, using which you can create and work with vector graphics. Also, for work, the author used JavaScript library for generating SVG in the HTML canvas element. To make the tree fractal, the Paper.js script was written.
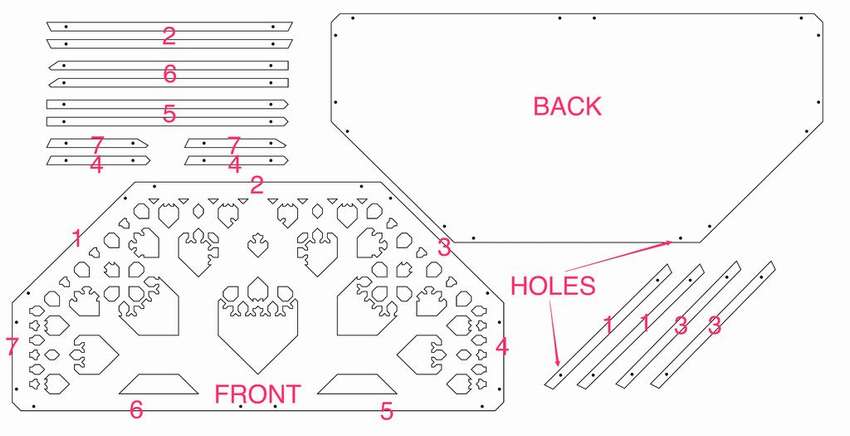 The plywood is cut into two main parts, the front and back of the head. Instead of using joints to add depth to the head, you can select a “frame” for the CNC. All these thin plates are in Illustrator file. They are marked with numbers that correspond to the edge of the front element. For each edge there are two identical plates with a thickness of one and a half centimeters, which are stacked on top of each other. More about the method of manufacturing the headboard with backlight read on the author’s website.


https://i.expert-h.com/en/krovat/izgolove#sigFreeId8330857f0e
LED headboard lighting
It is beautiful backlit headboard the author made for the bed in the bedroom of the daughter.
 The whole frame is made of scraps of 2x4 bars in size that correspond to the bed frame. As you can see in the step-by-step photos, the assembly is quite simple. pay attention to risers for LEDs. Read the instructions on the website.


https://i.expert-h.com/en/krovat/izgolove#sigFreeId5f41fcbb44
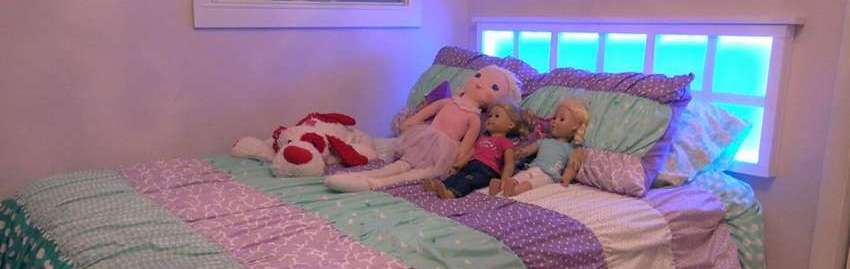
How to make a headboard with built-in nightlights
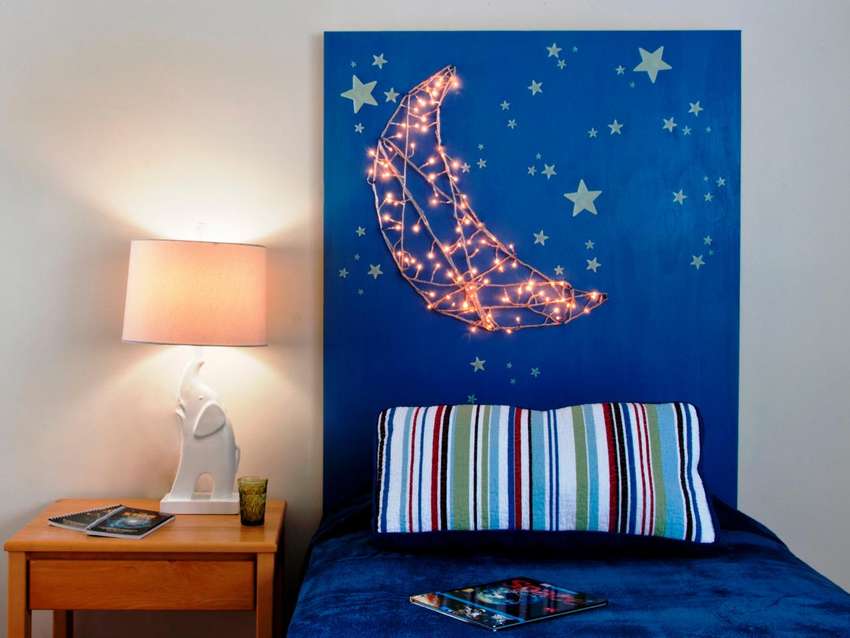 Look how make the headboard backlit for a children's room using festive garlands and plywood. For a children's room, this headboard with built-in night lights fits perfectly. Basically, you can do any designwhich you want. Paint the plywood in a dark blue color to simulate the night sky (blue is better because black will look a little dark), and then the stars are attached. The moon will act as a night lamp. This is a great project in which children can take an active part. In addition, the cost of manufacturing the head of the head is minimal, depending on what is already at hand. Luminaires can serve ordinary christmas lights, you probably have them and most likely more than one garland, so this is another saving point.


https://i.expert-h.com/en/krovat/izgolove#sigFreeIdfa068730ed
Headboard in the form of luminous swords of the Jedi
If your kids are big Star Wars fans, here's an idea, how to make the head of a crib in the form of luminous swords, the young Jedi will surely enjoy it.
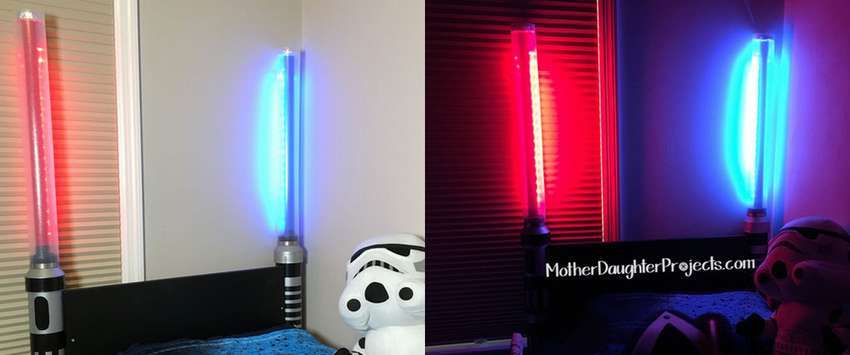 Make such a headingovier is not that very difficult, but many clarifications required. Therefore, it is better to visit our site of the author of this project for complete information, where there is also how-to video.


https://i.expert-h.com/en/krovat/izgolove#sigFreeId79819b44dd
Headboard with backlight 50 photos


https://i.expert-h.com/en/krovat/izgolove#sigFreeId3c01f67168
Metal headboard for bed
 An old wrought iron fence is great for make a metal headboard. If you do not have a fence, you can buy an old, rusty one at the scrap metal collection point. You need only one section, and you have everything you need to create a magnificent iron headboard that resembles the frame of a couch. It will only be necessary to remove the rust and paint with spray paint so that the headboard looks like new. All this can be done in less than a day.
So, with minimal effort you get beautiful iron headboardthat looks a lot more expensive than it really is.


https://i.expert-h.com/en/krovat/izgolove#sigFreeId1ab67ea393
How to make a headboard made of wood and fixtures
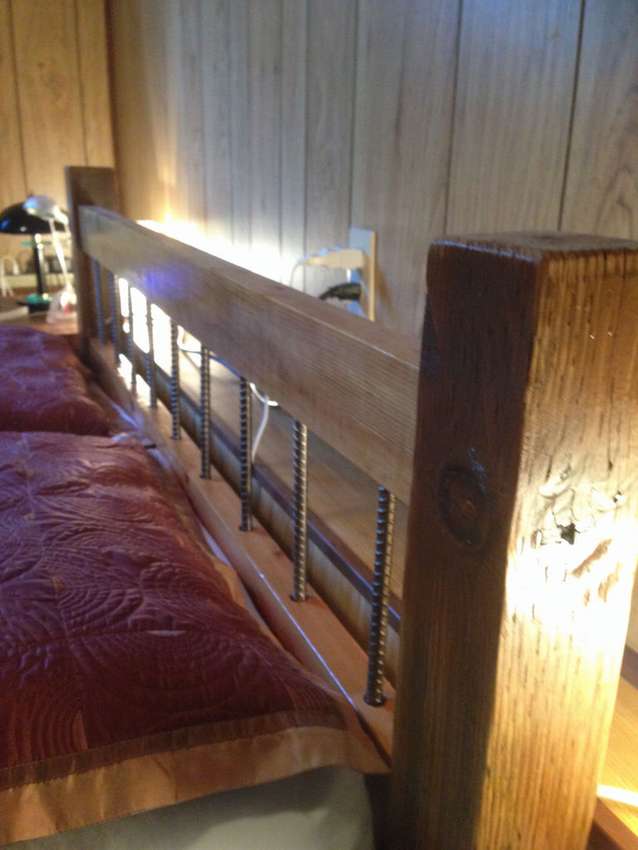 Start by measuring the width and height of the bed.
- This bed is 43 cm high and 152 cm wide, so cut the 2x4 bars to 138 cm, which will give the overall width a little wider than the bed frame itself.
- Trim the legs 90 cm in height. The lower bar is mounted at the height of the mattress so that the pillows do not slip off the end of the bed.
- Squeeze 2 boards and mark the holes for the reinforcement, starting from the center and every 15 cm, drill holes.
- Cut the reinforcement into 23 cm pieces, but this is for this headboard, if you have other sizes you can cut to the desired length, depending on the desired height of the headboard.
- Put all the cooked parts on the floor.
- Make sure the assemblies and parts are in the correct position.
- Attach to the bed frame with four screws.
Headboard assembly highlights shown below on step by step photos.


https://i.expert-h.com/en/krovat/izgolove#sigFreeId2f0a98ff2d
Metal headboards 50 photos


https://i.expert-h.com/en/krovat/izgolove#sigFreeId8a64b5c825
Door headboard
 FROMa ramming door is an excellent starting material for the head of a bed. Of course, to turn it into a headboard, it will take some work: saw the door to the right size, add an overlay to the railing, apply several layers of paint. But you can be proud useful thing: You recycled a thing that did not deserve to be destroyed, saved a ton of money, and created a unique piece of furniture. These are facts that should help you sleep soundly. How to do it headboard of an old door with your own hands, you can read the instructions on the site. Below are a few step-by-step photos that will give you an idea of what to do.


https://i.expert-h.com/en/krovat/izgolove#sigFreeId90b4c28f49
This is original door headboard will also look great in the interior of your bedroom.
 Making it a lot cheaper than buying it. The head itself is the old door that you just cover with a rope. An elegant idea that is easy to implement. Given that you have to carefully wind the door with a rope, it will take some time, but you can still make such a headboard in a dayand this is a really cheap project.


https://i.expert-h.com/en/krovat/izgolove#sigFreeIdabf442e2f8
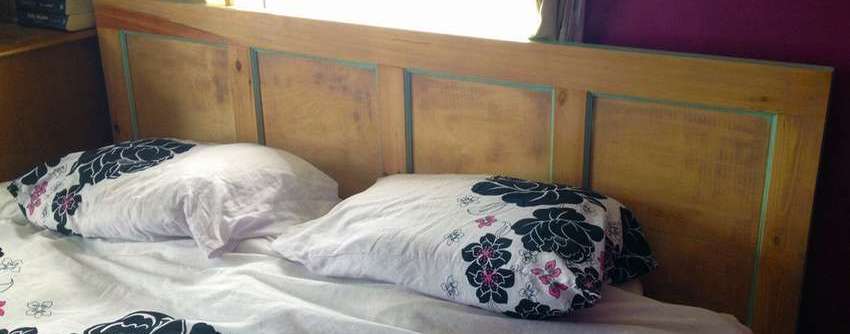
Glazed door headboard
 Some people think what to do glazed door headboardis not the best option. The author of the project does not agree with this and believes that with a good fastening, the headboard does not pose any danger. And most importantly, making such a headboard very easy, in the sense, nothing special needs to be done here. To grind, to paint, to attach legs, that’s practically all. However, given that this is recycled wood, many steps will be different for your bed, depending on the style and condition of the door that you will use. If you want to clarify all the details, step by step instructions can be read on the site.


https://i.expert-h.com/en/krovat/izgolove#sigFreeIdc9c29f7778
Headboard of kitchen cabinet doors
 If your old kitchen cabinet that you are going to throw away has good doors, then you can make them great headboard. Remove all equipment first. Cut slots into posts. Trim the upper and lower supports. In this case, the mattress size is 107 cm. It is necessary to cut the boards for the upper and lower parts of the cabinet door. Side racks can be heavy, so make extra support. The author used several old fences as support beams, then fastened the two supports together and guided the section so that the fences were cut into the supports. At the end, paint the color of cedar and apply two layers of varnish.


https://i.expert-h.com/en/krovat/izgolove#sigFreeId146f32bccd
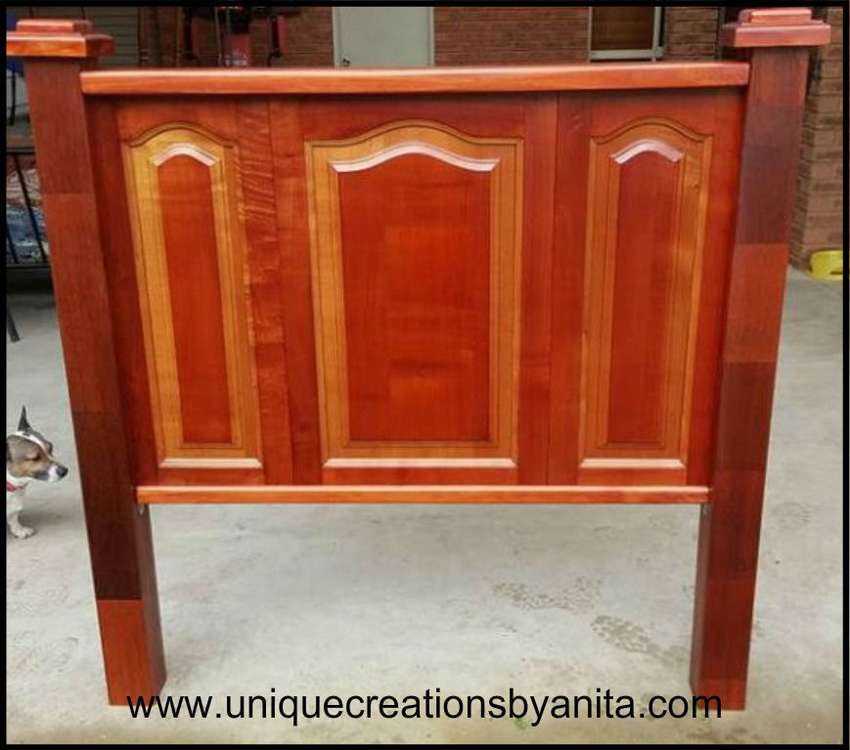
Headboard of an old wooden door
This simple tutorial will show you how to make chic. headboard from old cabinet door.
 Necessary materials: old unnecessary wooden door, stripper for removing paint, legs from the old headboard and a few screws. To get started, prepare the door: remove all fasteners, hinges and handles, remove the old paint with a stripper. The next step is grinding. It goes without saying that the more time and effort you spend, the better the result. Attach legs and color.


https://i.expert-h.com/en/krovat/izgolove#sigFreeIdadcb2305c4
Headboard of doors 50 photos


https://i.expert-h.com/en/krovat/izgolove#sigFreeId8057750d00
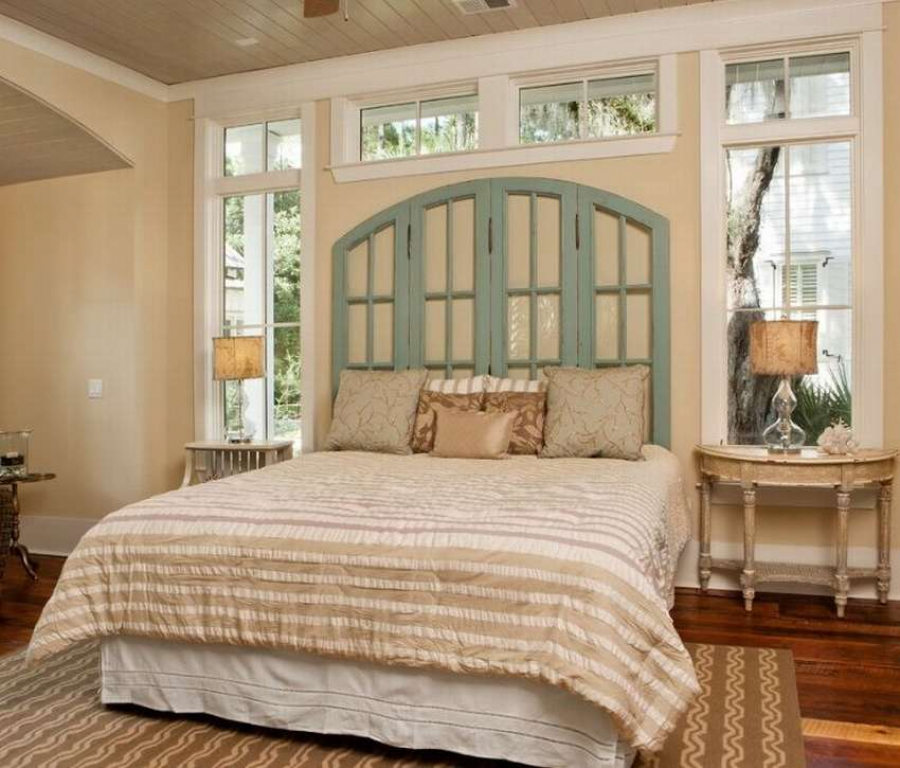
Headboard from the windows
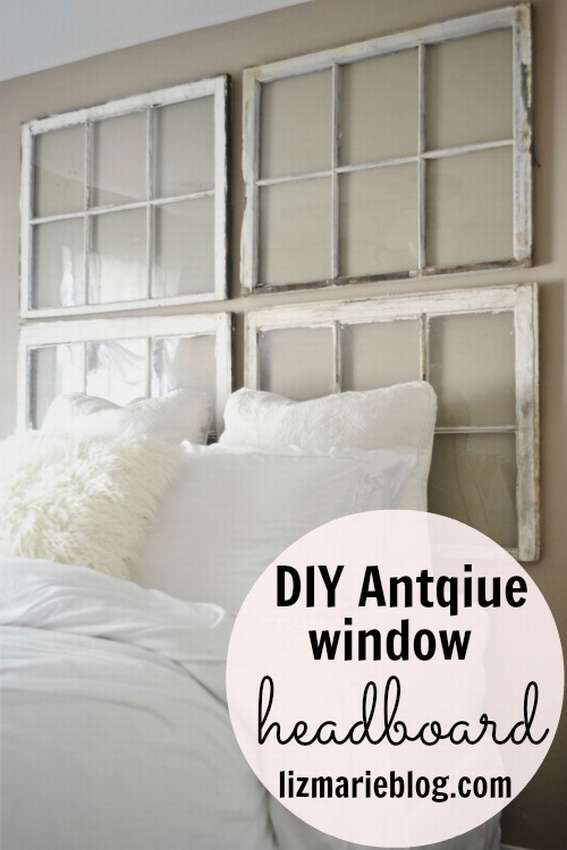 Imagine beautiful windows right behind your head when you are sleeping. Now imagine that no one can look into these windows. It is amazing old headboard from old windows not only looks great, but also costs quite a bit, depending on what is at hand.
Just mark where you want to install the windows above the bed, and then attach the picture hangers to the backs for hanging. Find old windows is not a problem, just make sure that there are no broken or cracked glass before hanging on the wall.
Fix all loose parts on the windows.
Attach picture hangers to the back of all windows to fit
weight of windows. Here we used one photo frame holder for each window.
Using a tape measure, level and screws, hang the windows as evenly as possible. This is difficult when working with old materials, therefore, as you can see, there are drawbacks, but you just have to try.
Drive the nails into the wall outside the windows so that they could not move back and forth if anyone hits them. Also, this step will help align the windows if they hang a little crookedly.


https://i.expert-h.com/en/krovat/izgolove#sigFreeId050c9c3e1c
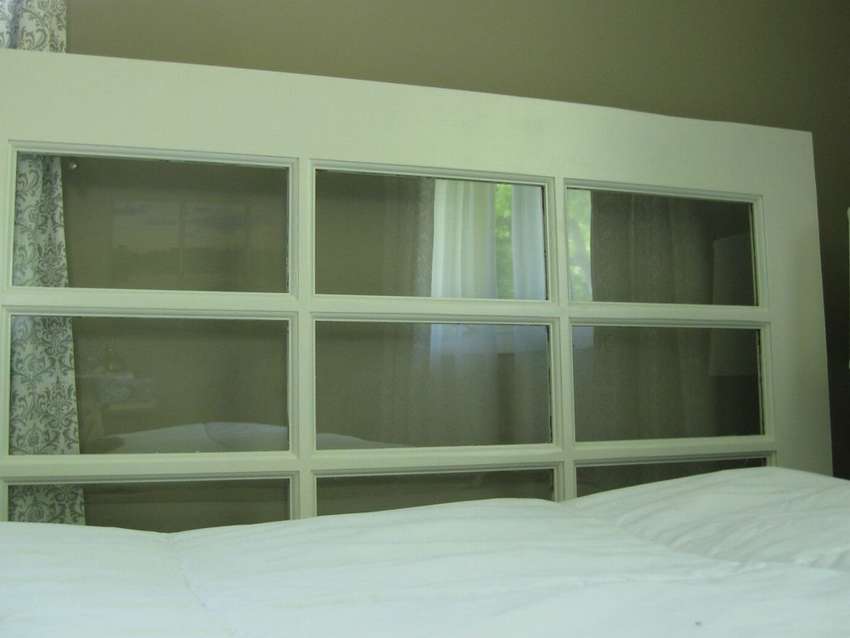
New headboard from an old window
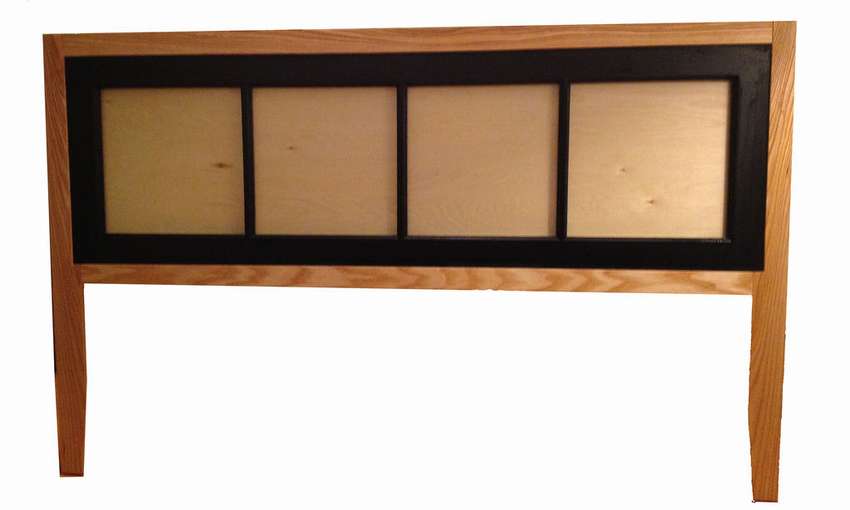 This guide will show you how to make frame and headboard with minimal cost and virtually no effort. This design is very easy to change to fit your particular bed frame and color preferences. If you like creative ideas and have a desire to dream a little, you can create light box in the window frame so that everything sparkles with multi-colored lights. In general, the main idea is to find the old window and make a simple frame, glue it and attach it to the bed.
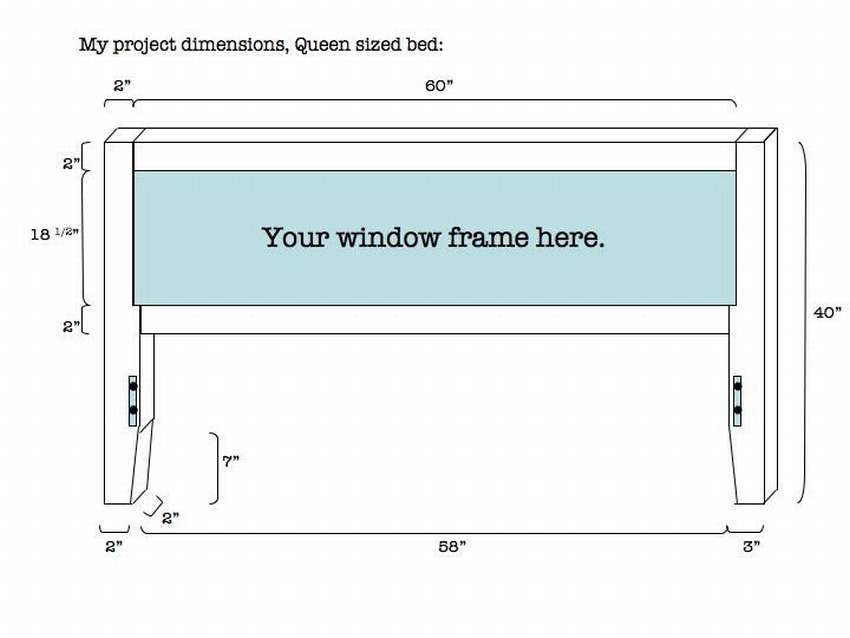 No need for complex joints, milling cutters and other ingenious tools, enough ordinary hacksaws and drills. Of the materials, one old window is solid, wooden, approximately 50 x 150 cm. Do not worry if the glass is broken, in fact we only need a frame. Still need a sheet of plywood 5 mm thick. The final size will exactly match the size of your window. Buy a spray can and a bracket for attaching the headboard to the frame. How to make a headboard, see below for step-by-step photosThey are few, but all the highlights are shown. If something is not clear, the author of the project wrote a long and boring instruction, but commented on each step, the link to the site is under the gallery.


https://i.expert-h.com/en/krovat/izgolove#sigFreeId3a46f72474
Headboard from the windows 50 photos


https://i.expert-h.com/en/krovat/izgolove#sigFreeId62666dc55c
Headboard from books
 If you like to read and collect books, this is the ideal headboard for you. Not only do this headboard easy and cheap, this is a great option for those who love books, and for those who just keep them at home and do not get their hands on their paper waste. To do the headboard do it yourselfBooks should not be in great shape. All you need to do is select the unnecessary items and nail to the plywood. Only need to be measured mattress height and choose where the books will open. The work is not complicated, just everything needs to be carefully adjusted and secured so that it looks beautiful.


https://i.expert-h.com/en/krovat/izgolove#sigFreeIded69c3430a
How to make a headboard from books
 Question. What if there are a lot of free walls, you need a headboard and you like books?
Answer. Make a headboard out of books.
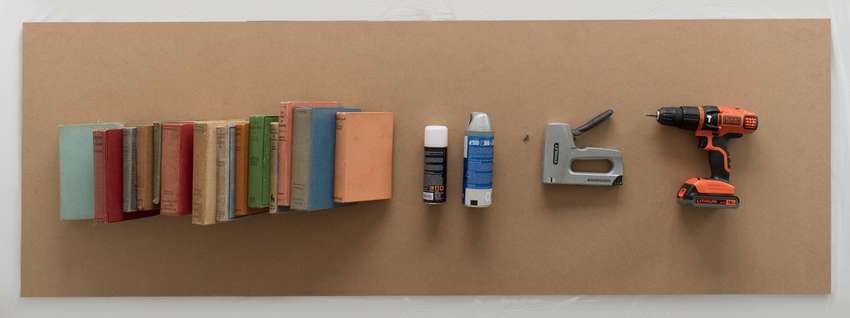
What do you need for this. A large assortment of book covers neatly cut out of pages with a knife or something similar. The glue, which should be able to glue wood and paper, be strong and clean. Polyurethane spray for decoration. a large sheet of plywood 6 mm thick and the width of your bed. Then everything is simple, see step by step photos and you can start making the headboard. True, there are some nuances, so do not be lazy and read the instructions on the author's website, it is not big.


https://i.expert-h.com/en/krovat / izgolove # sigFreeIdf92515a482
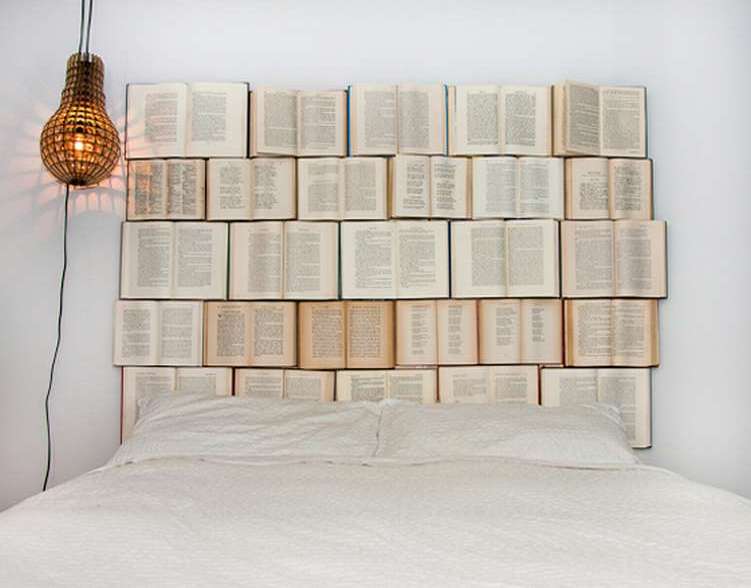
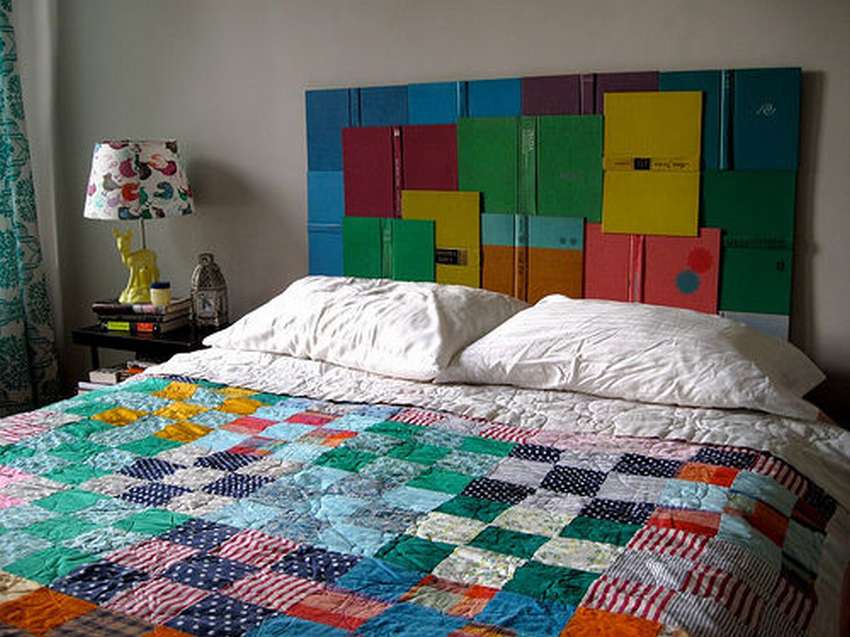
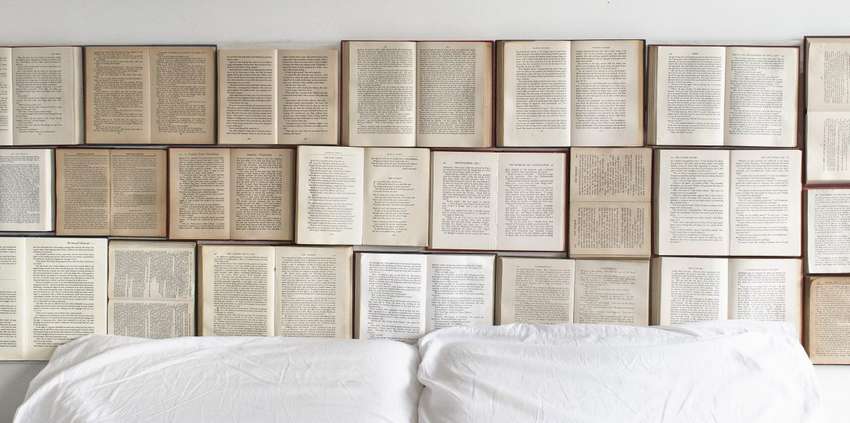
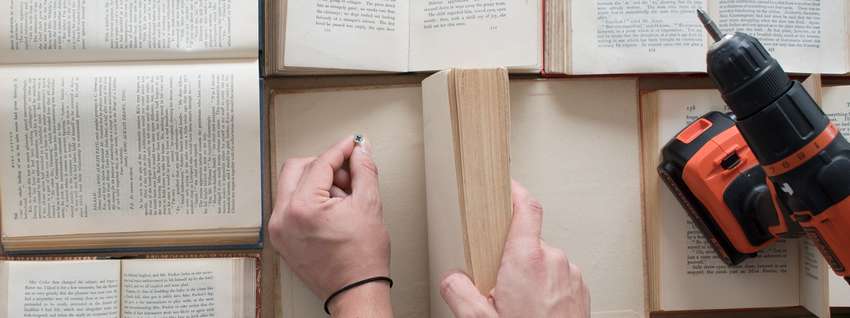
Headboard open book
Hardcover books are great material for original headboard.
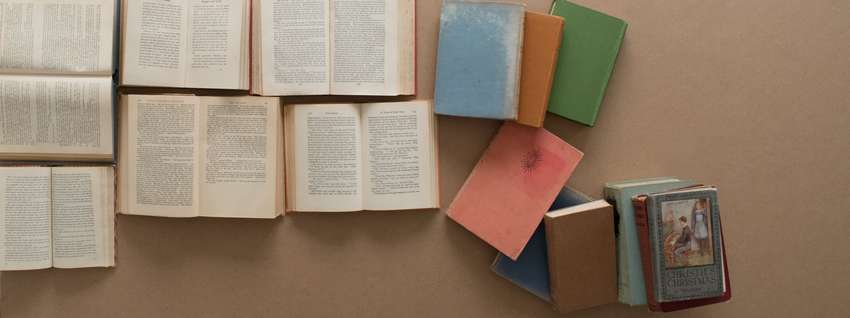
 A few simple steps to do this. do-it-yourself headboard from books. In the photo below, what you need.
 Take MDF sheet and cut to size. This one is about 30 cm wider than the width of the mattress, so there is a protrusion of 15 cm on each side. Paint the MDF in the same color as the wall so that the sheet does not stand out. After drying, open and lay books on the blackboardtrying not to leave large gaps between them.
 Now you need pin books in place. For each book, lift the pages up (leaving an even, solid front and back cover) and screw the cover onto the MDF. Two 10 mm screws for each side will be enough.
 Then need pin pages. Take the stapler gun, remove the two center pages (which will be visible after completion), and stap the remaining pages on each side.
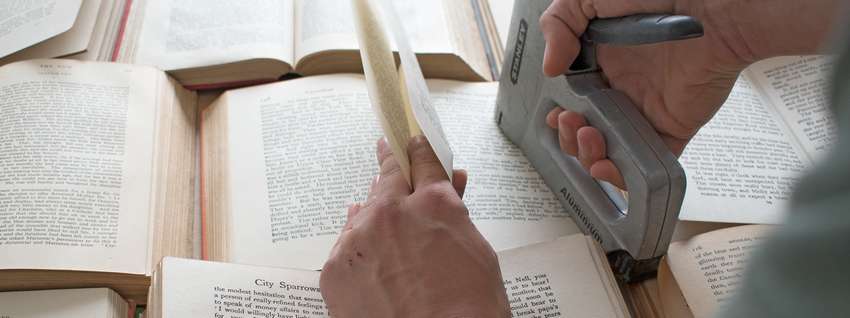 Everything should be fixed in the order you want, except two central pages every book. To stick, use aerosol glue.
 Hold the center pages for a minute (or until the glue hardens).
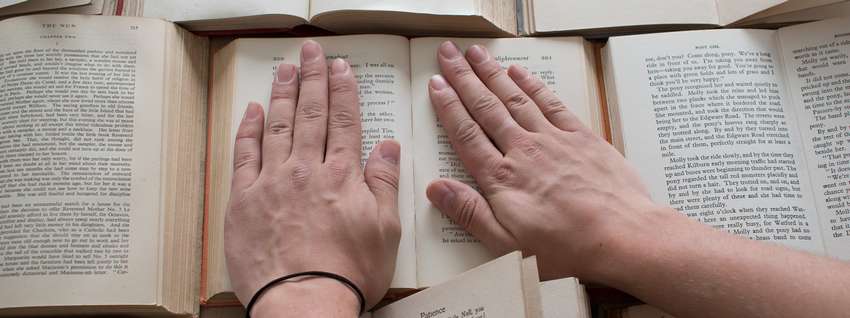 Now it remains only to hang the headboard over the bed.
Cardboard headboard
 Simple cardboard headboardthat everyone can do with a glue gun and mosaic. This is perhaps cheapest project, you will need only 2-4 sheets of cardboard 30x40 or everything that you can find in the trash. Another tape, a sharp knife and a jigsaw.
- First of all, draw a shape on a piece of paper and cut it out. It will be a template.
- Cut cardboard rectangles 1.5 cm wider and longer than the final template.
- Glue them together as shown in the photo, adding small drops between each part.
- Make stiffeners in the center.
- Put the stack in front of you, carefully glue the template and circle.
- Then remove the template, but do not remove far in case you need more edges.
- Cut at a time and separate the shapes.
What to do next, read the instructions on the site.


https://i.expert-h.com/en/krovat/izgolove#sigFreeId9bc8dbfe1c
Headboard from books 25 photos


https://i.expert-h.com/en/krovat/izgolove#sigFreeId1837f25766
Fabric headboard
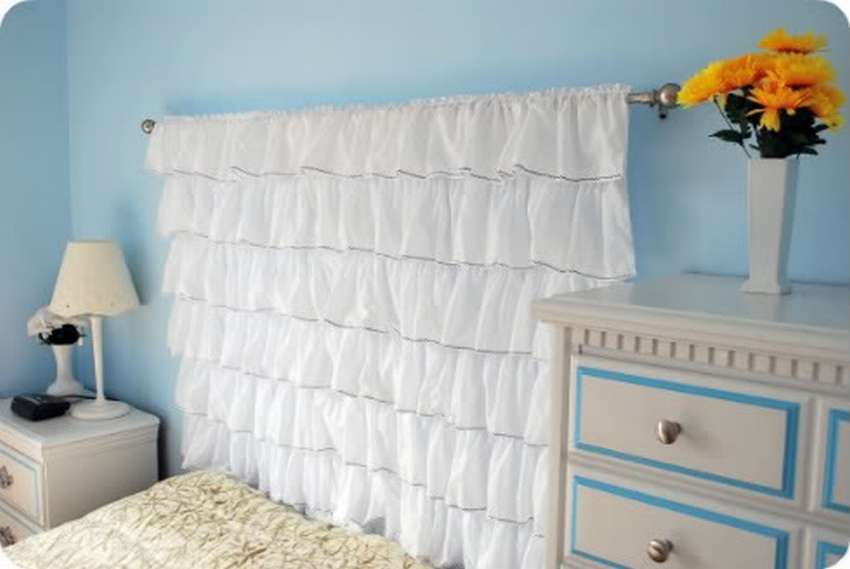 Such beautiful headboard made of fabric will cost you less than $ 30. If you like to sew, this is an ideal project, you can do it all in just a couple of hours. Everything is simple, in this case the headboard, just a beautiful curtainthat you hang on the wall in the head of the bed. This gives the bedroom a magnificent view. Everyone will think “there is a window”, therefore it is ideal for rooms where there are really not enough windows. What else makes the project ideal is the ease of manufacturing, and, of course, the fact that you can do it for less than $ 30, provided that you have to buy all the materials.


https://i.expert-h.com/en/krovat/izgolove#sigFreeId0ed62f7788
Headboard from a curtain
 Do you want a special design and preferably without cost? Let's do decorative headboard from shower curtains. Why a curtain? Well, if you have your own villa on the islands, then of course it is better to purchase an expensive tapestry, and if you live in an ordinary apartment, then the shower curtain offers an affordable alternative. With the curtain selected in your hand, which is usually 180 cm wide, no matter what you want to do, you need to cut the frame to such a size as to “wrap” the fabric around it. Do not forget leave 10 cm from each side. Then trim the 2x3 strips (it is better to choose strips of this size because they are light and inexpensive) to 160 cm. The same must be considered for the height of the shower curtain, which can be 180 or 185 cm. Attach the brackets, it's simple. Then take the curtain, lay face down on the floor. After that, put a square frame on top. If everything is done correctly, you should have 10 cm on each side (of course, if you do not need to make the headboard higher, shorter or thinner). Now just wrap the curtain around the frame and fasten it, one side at a time. As soon as you make the top and sides, pull the fabric tight (the fabric has some elasticity) and sew on the opposite side. Everything is ready, just insert the headboard over the bed frame or fix it on the wall.


https://i.expert-h.com/en/krovat/izgolove#sigFreeIda469d19968
Headboard cover
 If all you need is just cover up the old worn headboard, then this project is an ideal idea. It’s necessary to sew the cover so that it fits perfectly head sizeand then just put it on. Even if you have never sewed covers before, it is still very simple. You can even make a few if you want to change the look of the room. You will need to buy about four meters of fabric, which is actually not so expensive, so you can afford to make at least two covers for the back of the headboard and change them every time there is a mood.


https://i.expert-h.com/en/krovat/izgolove#sigFreeIda697288d8a
Headboard made of fabric 50 photos


https://i.expert-h.com/en/krovat/izgolove#sigFreeId9bcc9bb10d
Original headboards
The head of the branches
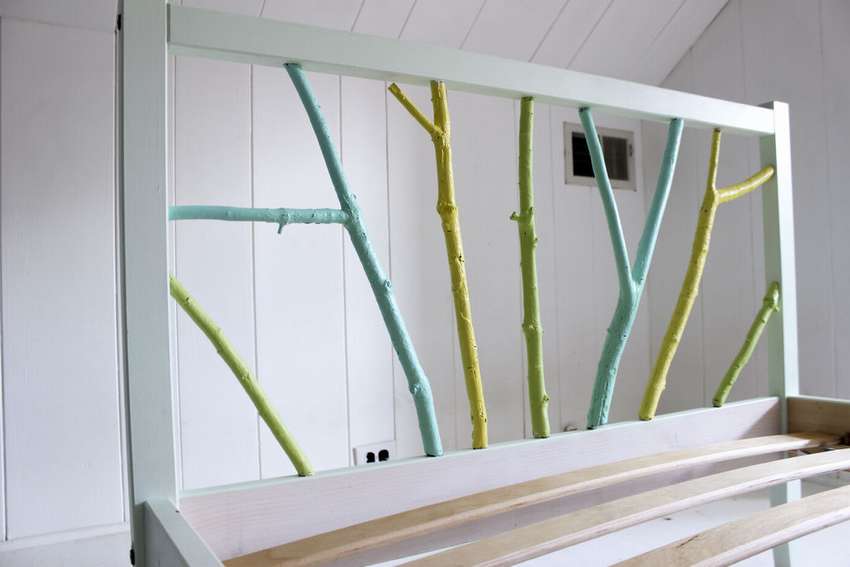 Do you like decorative things? See an example how to make a headboard and decorate with ordinary branches. Based on the Ikea bed, you need to assemble the headboard, eliminatingthree central spindles. Another thing to do is flip the upper horizontal part so that the groove and holes are directed upwards. Do the same for the bottom by turning it over so that the holes face down. These holes are used to fasten spindles that we do not use. Rotating the holes from the center will prevent bonding branches with headboard. Read the detailed instructions on the site, everything is very simple, you just need to follow the correct sequence.


https://i.expert-h.com/en/krovat/izgolove#sigFreeId86c0075094
Creative headboard
 Creative time. Make a headboard do it yourself in a bohemian style from unexpected materials. You will need a sheet of plywood 120 x 180 cm with a thickness of 15 mm, 400 wooden clothespins, chalk acrylic paint in different shades and a dye for Rit Dye fabric in sunny orange, apple green and golden yellow. Chalk acrylic paint in pink and calm blue tones. Another grinder, jigsaw and wood glue. First, disassemble the clothespins, that is, just remove the springs. Prepare liquid dye in a large bowl of hot water and soak 300 clothespins for 30 minutes. Paint the remaining 100 clothespins in Yellow Rit Liquid Dye. Put clothespins on the newspaper, let them dry. Mark the center of the plywood. Make a headboard shape from newspaper sheets, lay on plywood and cut and sand the edges. Paint the headboard in the colors you have chosen. Spread the colored clothespins according to the design. Align and adjust until you do it right. Glue each piece carefully with wood glue and let dry.


https://i.expert-h.com/en/krovat/izgolove#sigFreeIdc7be337f10
Headboard with an unusual design
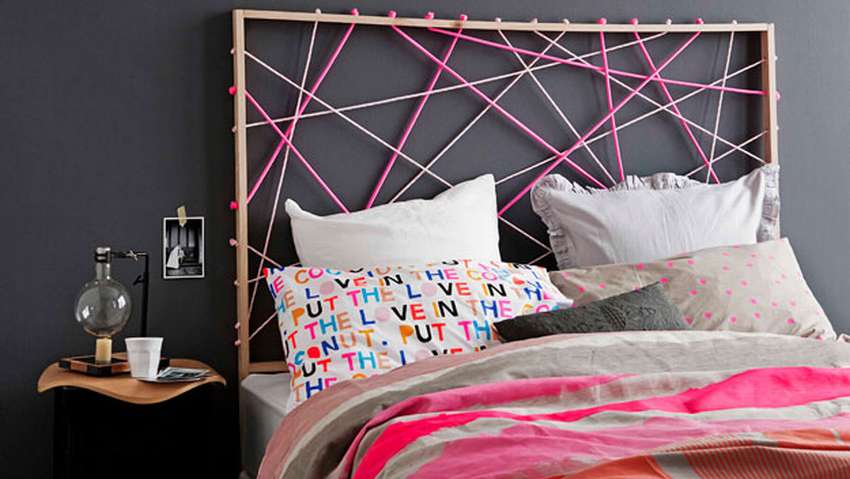 You will surely like this original rope head. To make it you will need a pair of thick wooden planks and at least two types of rope of different colors. A few other accessories, such as glue, screws and a hand saw. What needs to be done is just trim the trimsto make a frame, and then decide which design you want to depict using a rope. This is an ideal headboard for teenagers because they love creative things, and then, children can do it themselves, it’s not at all difficult.
Head of indoor plants
 If your bedroom is quite spacious with high ceilings, you can think of something to fill the space without dimming it. The author had an idea to create a “living” wall, but so much soil and water above his heads seemed like a bad idea. Instead, a thought appeared hang plants over the bed on a wooden bar, this is what you see in the photo. Most of the time, an hour or so, you will need to hang everything correctly. The rod should be screwed tightly into the studs and aligned so that you can get it out, this may take some time. Overlay small pieces of masking tape on each foot on the sides of the wall to see where the bar will come from. Then install the boom brackets. Use masking tape and level to make sure that the brackets are level. Drill small holes for the screws and hang the brackets, then tighten the lower screws. Remember, earth pots are heavy, and wet plants are even heavier. And, given that they will be above your head, lock the brackets very securely.


https://i.expert-h.com/en/krovat/izgolove#sigFreeIdec7c17da96
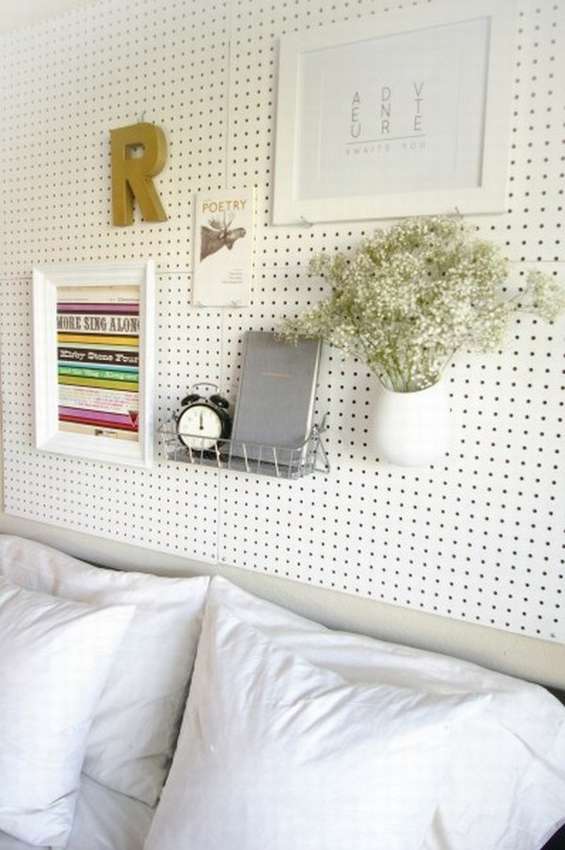
Pegboard for headboard
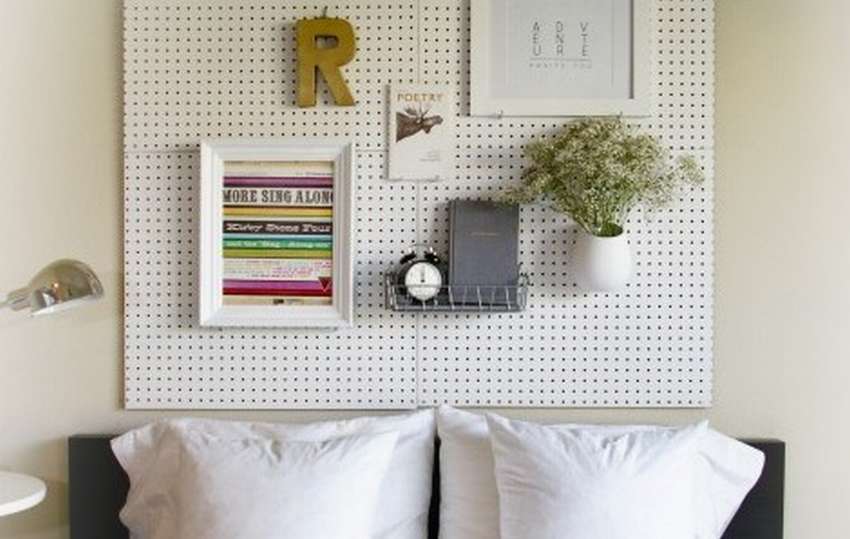 Pegboard for headboard? Why not? it great headboard design for teens because it provides an ideal place for storing anything. You can add baskets for mobile phones and other gadgets, and generally decorate the headboard as you like. You will need four pegs, and equipment to hang directly on the wall. Add hooks, baskets or something else you want so you can attach photos or store your favorite items directly above your head.
You will need a pegboard, wall screws, transparent spacers, and conventional mounting tools.
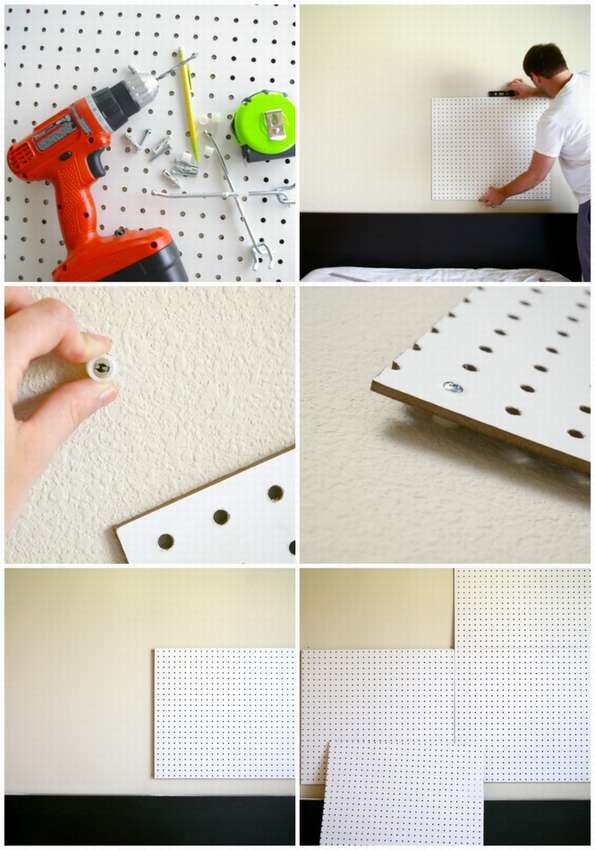 Then need fasten the pegboard to the wall and add everything you need.
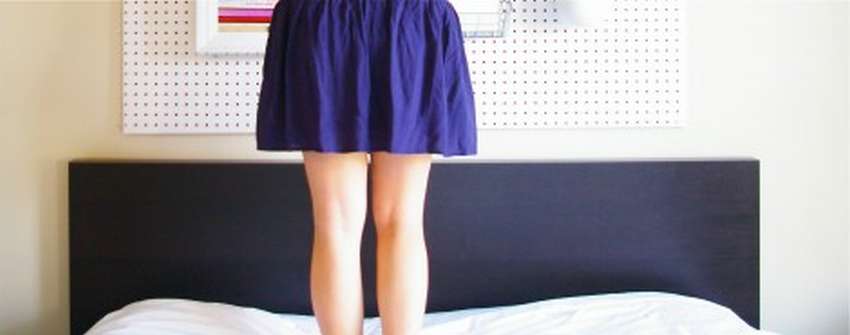 Very beautiful and modern.

 Everyone can make such a headboard.
Original headboard 100 photos


https://i.expert-h.com/en/krovat/izgolove#sigFreeId956e2cf7bf
Hello, I am the author of this article, so I look forward to asking questions for this article in the comments below, I will answer all !!!
If you have questions on another topic, ask them on our forum, we will answer you
- Two baskets of paper in 5 minutes (Master class)
- How to make a simple and compact table for a milling cutter from plywood
- How to make a soft headboard tile (Instructions + step by step photos)
- Cinder block benches: a convenient bench in 55 minutes
- How to make a bed with a niche: saving space (Master class)