Beautiful garden swing with your own hands !!! Photo
 Swing
Swing
Step-by-step and simple instructions on how to make a swing yourself. These swings strong, reliable and most importantly - aesthetic !!!
Below are photos and a description of the manufacture: the order, tools, material, progress and
You can build your own “classic” swings in size, which will allow them to be embedded in the available space.
Hanging swings are subjected to severe weather tests, so they must be very durable.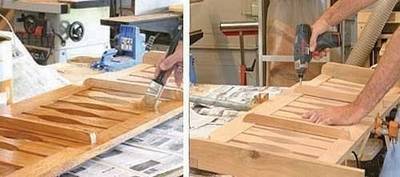
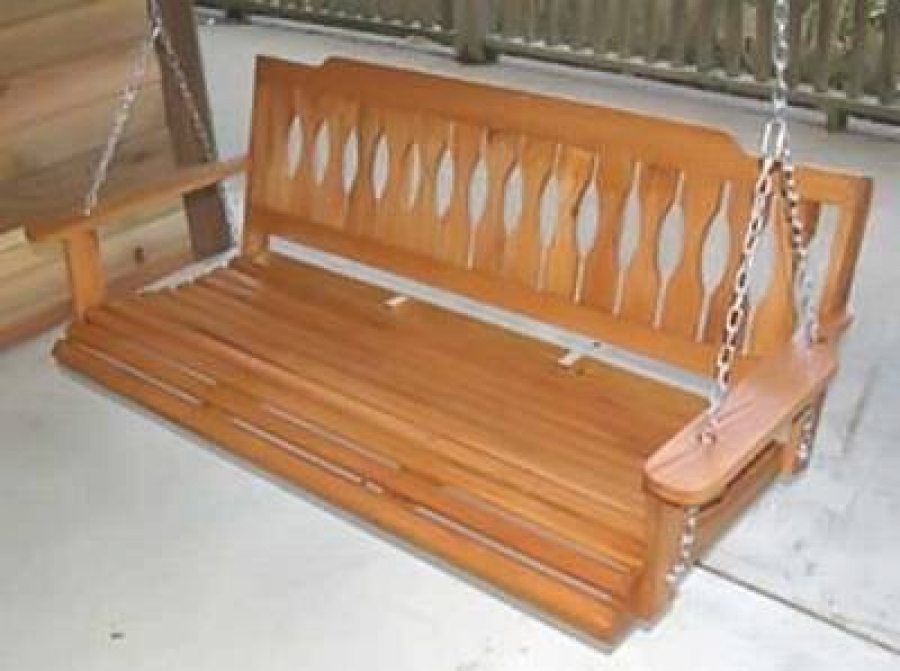
These handmade swings are made of red oak. The parts are made of dry plank humidity. In the design of these swings, this is very important, since there are spike joints that are very demanding on the seats.
Oak is used not only because this tree is stronger and better tolerates bad weather.
The aesthetics of the design are important here - hardly anyone will like to put so much effort into making a swing to make it look like a cheap Finnish bench. However, understanding that working with oak is more difficult and not easy to buy, dimensions will also be given for the pine version of the swing.
Despite the fact that in the photographs the manufacture of a swing looks quite simple, but the work requires a special tool and carpentry skills.
True, if you simplify the design and assemble it not on spikes, but only self-tapping screws, everything will turn out to be much simpler.
The base bearing bars are cut from solid red oak planks with a thickness of 20 mm. If you use ordinary pine, the thickness needs to be increased to 30 mm.
The back and seat trims are 13 mm thick in the same red oak. For pine battens, thickness 18 mm.
You can buy wood of these thicknesses in a finished planed form. Then there will only be work on finishing grinding. Or you can buy a non-planed board and pass it through the planer. In this case, you need to give a margin of thickness. With a two-sided jointing, the losses on the oak will be 4 mm, and on the pine 6 mm.
Even if you've never done anything like this, remember the golden rule: You never know what you can do till you try!!! A little patience and you will succeed.
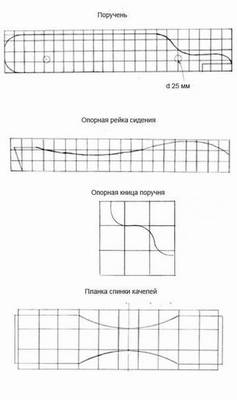
The first step in making a swing is to enlarge the drawings in this article to their actual size.
The ideal option is to use a vector graphics program. Copy the drawing, translate it into curves and enlarge to the desired size. If this path is unacceptable, you will have to draw the natural dimensions by eye.
No need to draw all the elements of the back, just one model-template. Moreover, it is not necessary to precisely observe the dimensions. You can change the angles and radii as you wish.
The template is first drawn on paper, then transferred to thick cardboard. Even better is to transfer the template to the fiberboard sheet. Cut it with a jigsaw and, if necessary, clean the ends and radii with large emery paper.
On paper, only half of the part needs to be drawn. Then bend the sheet in half - you get a mirror copy. In this way, you will create a perfectly symmetrical, accurate sample of the workpiece.
According to the template, cut the desired number of workpieces and process them with a grinder. Partially and significantly facilitate the work will be able to belt grinding machine.
Even if you don’t have one, you can fork out for such a purchase for the sake of a smart bench. A powerful and heavy grinder is not needed, but you need to pay attention to the possibility of stationary fastening. It must be of high quality and reliable. Sanding boards in weight is bad. Firstly, the workpiece will have to be clamped in a vice. Traces of sponges may remain, but even worse - the labor required to re-fasten every part will take a lot of time. It’s hard to keep the vibrating grinder on weight.If you can still cope with the lateral planes of the bars, then the ends will not work out in any way high-quality and even.
The seat rails also need to be grinded, and everywhere it is necessary to bevel. This will protect you from splinters, and in general, the rounded details of the swing bench will look nicer.
Assembling the seat is not difficult, as it is twisted into self-tapping screws. The only subtlety - before twisting under a screw, you need to drill a hole. In this case, the diameter of the drill must be selected slightly thinner than the main “body” of the self-tapping screw. This will protect the board from cracking.
And further: so that the head of the self-tapping screw does not protrude on the surface, you need to drill a rail (countersink) along the diameter of the hat head of the self-tapping screw.
In order not to drill too much, it is necessary to put emphasis on the drills.
You have to tinker with the back. There are two options: if you know how to handle a chisel, then the design, as in the photo, will be up to you. If not - let's be honest - it’s better not to try, but to immediately simplify the design of the back of the swing.
To do a back on self-tapping screws, as well as the main seat.
To make the backrest look too artisanal, you can make double longitudinal planks, which will actually imitate the inset.

The longitudinal bars will cover the vertical parts of the back on both sides. The lower trims should be left rectangular, and the upper ones rounded. When assembling, each connection must be coated with a good glue for wood, and only then assemble with self-tapping screws.
After assembly, the swing must be primed and varnished. The varnish is not furniture, but for the floor or yacht deck. Only these varnishes will withstand the abrasive load that the swing seat is exposed to.
But, if after assembly the appearance does not seem ideal, you can simply paint the swing with alkyd paint.

The chain suspension is fixed through a bolt with a diameter of 10-14 mm. On both sides you need to put wide thick washers. This ensures a secure fit and protects the board from cracking under load.
And then ... you just have to lean back and enjoy your work.
250+ photos of interesting swing for a summer residence
For you, we have selected a unique selection of ideas for the most interesting photo of a swing for your personal plot. Materials are collected from all over the Internet, ours and foreign. Unfortunately, it was not possible to establish the authorship of many photos. Sources of certain photos are indicated in the footer of the article.
-

-
-
-
-
-
-
-
-
-
-
-
-
-
-
-
-
-
-
-
-
-
-
-
-
-
-
-
-
-
-
-
-
-
-
-
-
-
-
-
-
-
-
-
-
-
-
-
-
-
-
-
-
-
-
-
-
-
-
-
-
-
-
-
-
-
-
-
-
-
-
-
-
-
-
-
-
-
-
-
-
-
-
-
-
-
-
-
-
-
-
-
-
-
-
-
-
-
-
-
-
-
-
-
View the embedded image gallery online at:
https://i.expert-h.com/en/kacheli/krasivye-sadovye-kacheli-svoimi-rukami-foto#sigFreeId2e680c1b42


https://i.expert-h.com/en/kacheli/krasivye-sadovye-kacheli-svoimi-rukami-foto#sigFreeId2e680c1b42
Wooden swing. 30 photos
-
-
-
-
-
-
-
-
-
-
-
-
-
-
-
-
-
-
-
-
-
-
-
-
View the embedded image gallery online at:
https://i.expert-h.com/en/kacheli/krasivye-sadovye-kacheli-svoimi-rukami-foto#sigFreeId71bf3851fc


https://i.expert-h.com/en/kacheli/krasivye-sadovye-kacheli-svoimi-rukami-foto#sigFreeId71bf3851fc
Swing made of logs. 80+ photos
-
-
-
-
-
-
-
-
-
-
-
-
-
-
-
-
-
-
-
-
-
-
-
-
-
-
-
-
-
-
-
-
-
-
-
-
-
-
-
-
-
-
-
-
-
-
-
-
-
-
-
-
-
-
-
-
-
-
-
-
-
-
-
-
View the embedded image gallery online at:
https://i.expert-h.com/en/kacheli/krasivye-sadovye-kacheli-svoimi-rukami-foto#sigFreeIdf4e92fa81e


https://i.expert-h.com/en/kacheli/krasivye-sadovye-kacheli-svoimi-rukami-foto#sigFreeIdf4e92fa81e
- Brick grill: 44 drawings, 18 projects + photos
- Collapsible barbecue: 50 drawings, 20 master classes +300 DIY photos
- ✿ Flowerbeds:> 34 turn-based master classes + photos (248 ideas) - do-it-yourself
- DIY sauna in the apartment: bathroom, balcony, storage room. Projects and photos
- Shelves in the bath with your own hands: +200 photo. Drawings of bench benches in the steam room