Flowerbed along the path
 Flowerbed along the path
Not a red path in the garden with stones, but red with flowers.
We suggest that you plant a flower bed along the path, then you can read the detailed guide.
Flowerbed along the path
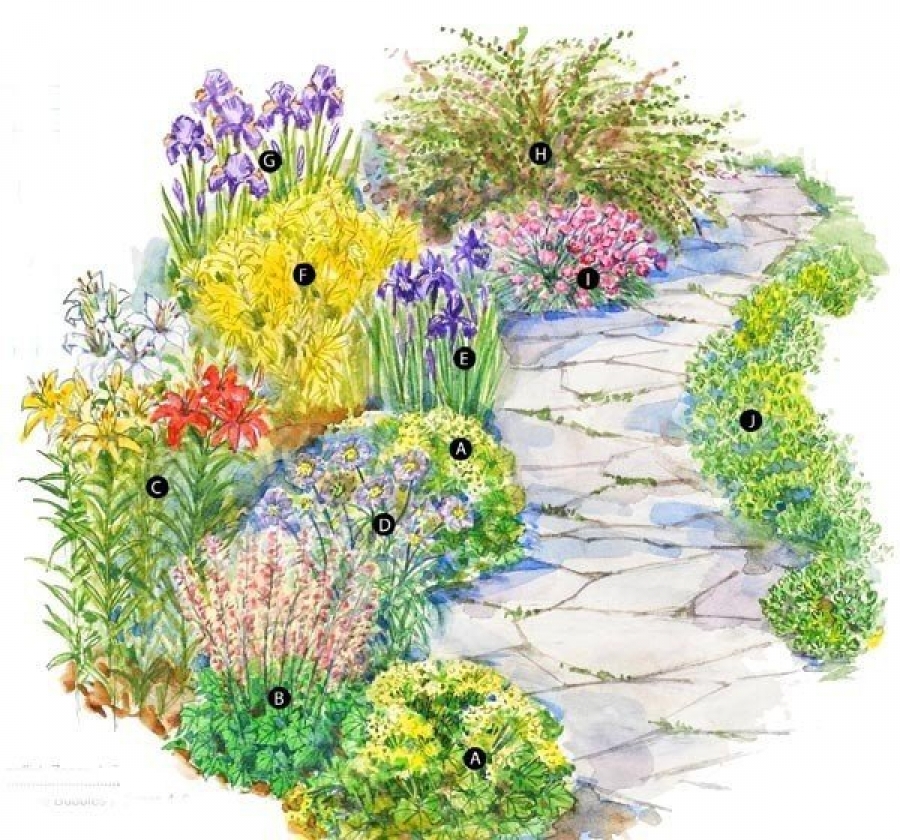
Plants that will be needed to create such a flower bed:
- - Alchemilla mollis (soft cuff) - 2 pcs.
- - Heuchera ‘Champagne Bubbles’ (Heicher "Champagne Spray") - 1 pc.
- - Lilium (Lily) - 3 pcs.
- - Scabiosa ‘Butterfly Blue’ (Scabiosis "Blue Butterfly") - 1 pc.
- - Iris sibirica (Siberian Iris) - 3 pcs.
- - Spiraea japonica ‘Goldmound’ (Japanese Spirea Goldmown) - 1 pc.
- - Iris (Iris) - 3 pcs.
- - Berberis thunbergii (Barberry of Thunberg) - 1 pc.
- - Armeria maritima (Armelia seaside) - 3 pcs.
- - Sedum kamtschaticum (Sedum Kamchatka) - 9 pcs.
1. Preparation
First of all, you need to answer some questions when preparing this flower bed:
• Do you have a place to create this flower bed. The diagram shows the approximate size of the flower bed, but if you wish, you can increase or decrease it, maintain the existing ratio of the number of plants of each species (or remove it from the plan like some plants).
• Check if the soil needs special fertilizer. Most of the selected plants are not capricious, but the soil must be well moistened to create an excellent environment for their development. To check the soil, soak a small area and wait 24 hours. After that, squeeze a lump of earth in your hand, a lump should be formed, but it is easy to crumble when pressed. If the soil is more clay or more sandy, then this means that it is necessary to apply the appropriate fertilizer to the soil before planting.
Gradinka the edge of the Patch
2. Marking the flower beds.

To properly mark the flowerbed, you can use the garden hose to mark the boundaries of planting. Or use the absorbent available to you to mark the boundaries of each planting. After that, use a shovel to dig out the borders for each plant to see where it will be necessary to plant.
If the place for the flower bed is covered with grass, then dig over the area so that the grass becomes a natural fertilizer. If you do not want to deal with weeds in the flowerbed, then treat the point with a chemical preparation and soak before planting the necessary time, which is indicated on the labels of the drug you used.
Regardless of how you decide to cultivate the site, it will be necessary to dig the soil to a depth of at least 15-20 cm.
3. Landing
After marking the flowerbed, the time for planting the plants comes. Ready plants (seedlings) from the pots (bought or planted in advance) and place them in their places in the flower bed. Make sure that the plants are at a sufficient distance from each other to be able to grow and develop normally.
The work is completed. Now you must water the flowerbed in time and enjoy the beautiful view.
- Brick grill: 44 drawings, 18 projects + photos
- Collapsible barbecue: 50 drawings, 20 master classes +300 DIY photos
- ✿ Flowerbeds:> 34 turn-based master classes + photos (248 ideas) - do-it-yourself
- DIY sauna in the apartment: bathroom, balcony, storage room. Projects and photos
- Shelves in the bath with your own hands: +200 photo. Drawings of bench benches in the steam room