DIY playground: 800 photos, step-by-step instructions
 children's playground for giving
If you worry that your children are moving too little, do it for them. do-it-yourself playground let them enjoy and spend more time in the fresh air. There are so many interesting projects and fun ideas to organize a playground in the country or in the yard. And this does not mean that you need to spend a lot of money on the purchase of expensive equipment, because very much you can just do it yourself.
The main thing is that energetic outdoor games contribute to physical development at this critical stage of childhood. Whatever you say, laziness, addiction to video games and “sofa syndrome” are very common these days. Our responsibility for responsible parents is to provide children with the opportunity to spend more time outdoors. Collected in this article examples of playgroundsmay inspire you.
Playground project
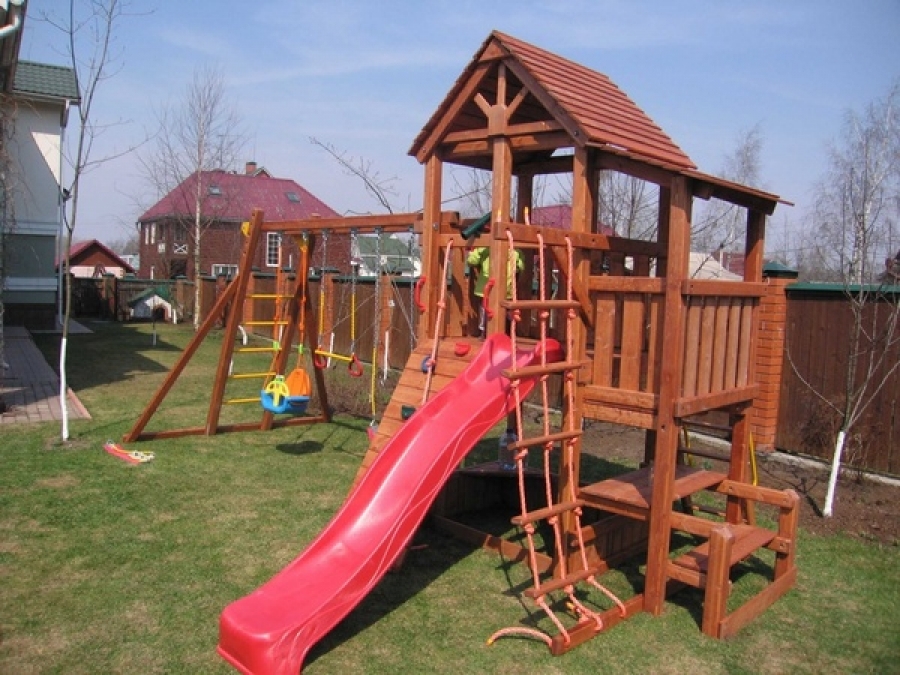
 Do-it-yourself playground not that hard, the standard design with all the equipment is not particularly difficult. This business rather responsiblethan complicated. When dealing with children, safety comes first. Always think about the safety of those who will enjoy the playground. The author of this project modeled it on a computer, as he did not find a model that would completely suit him.
3D modeling this is certainly fun, but you must remember your skills and tools for carpentry. Basic knowledge in the field of woodworking is also necessary, and if we take the matter seriously, then theoretical mechanics.


https://i.expert-h.com/en/detskie-ploshchadki/svoimi-rukami-foto#sigFreeId91f70d3b32
The author, it seems, approached the matter really seriously, and first built a 1: 5 scale model from 20 x 20 mm sticks to test the structural strength. Until there was a detailed plan, scale model revealed all the flaws in the original design, which saved a lot of time, because these shortcomings would have to be eliminated on an already finished design.
Now about the assembly. Firstly, none of the parts were made of prefabricated structures. Pine was used from wood. So, what you need from lumber:
- timber 100 x 100 x 6000 mm for vertical posts.
- timber 100 x 50 x 6000 mm for diagonal and horizontal lintels.
- Sawn and planed boards 120 x 40 x 600 mm for flooring.
- sawn and planed boards 100 x 25 x 600 mm for side walls.
- Shields for the roof of the tower.
- 80 mm round slats for suspension bridge
Metal parts:
- galvanized metal tripods for fixing the bar to the ground;
- rods, bolts and washers;
- metal cables.
Tools:
- Manual Electric Circular Saw
- Drill and drill
- Saw
- Jigsaw
- Grinder machine
- Hand tools: hammers, screwdrivers, ax, chisel, etc.
Put all the parts in place first:
- Mark the posts for the posts, then drive the metal mounts into the ground, insert the posts into them and fasten them firmly.
- Diagonal boards are needed to support a vertical position. Using a circular saw, an ax, a chisel, and a hammer, make 30 mm clearances in the uprights to connect 50 x 100 mm horizontal boards.
- All main pin connections are made using a threaded rod with a diameter of 8 mm (somewhere 10 mm), steel nuts and washers.
- First, pre-saw the wooden workpieces, then clamp them together, drill holes, connect with a threaded rod, put on the washers and tighten the nuts - done!
Suspension bridge
- To make a bridge, buy some garden fence posts. They are usually swept at one end, so cut them first.
- Then I drilled two holes in each, and pull on steel cables 6 mm thick.
- Tie them to the beams fixed between the uprights.
- Strong wooden grilles above the bridge serve as handrails and support rods.
- The white rope in the photo serves as a fence so that children do not fall from the bridge and, well, for decorative purposes
Stairs
Make racks from the boards. The ends of the bars can be rounded with a jigsaw. Measure the distance for the crossbars, usually 30 cm is taken. For crossbars you can buy shovel cuttings, the ideal material, you just need to carefully sand it. A sawn cut in half is just 50-60 cm, for the crossbar it’s the most. Stain and varnish.
Well, the playground is basically ready.


https://i.expert-h.com/en/detskie-ploshchadki/svoimi-rukami-foto#sigFreeIde444625c72
Playground in the yard
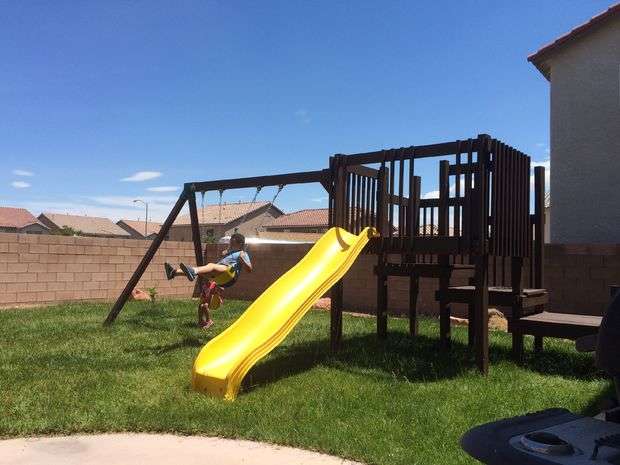 Modern children are becoming too inactive, the age of technology, gadgets and the Internet take them much more time than necessary. And parents are often too busy with work and other things to find time and take them to the park. Children should walk and spend more time outdoors, but preferably not on the street. Well, if you have your own yard, but this is not enough, it is necessary that the children there be interested. So, we conclude that playground in the yard a great solution for both children and parents. The author offers his own version of a makeshift platform.
Where to begin? Of course with design. You can act as an author - from the sticks to simulate the future design, you see it in the first photo in the gallery. No matter how you negatively relate to earthwork, but you will have to dig four pits for the supports, this is the best option for a multi-level platform.
- First you need to install four three-meter 4x6 corner posts. They are flooded about 60 cm in the ground and flooded with concrete. There are four 4x6 minor pillars that are not tied to concrete, but simply rest against the ground on a gravel pillow.
- The base frame, which consists of 2x6 bars, is bolted to the uprights.
- The floor of the 2x4 bars is attached to the frame using external screws. The vertical barrier consists of 2x2 bars secured with screws.
- Then set the slide and the crossbar for the swing. The adjoining side of the swing installation kit is attached using a wooden bracket, which the author made himself.
- At the end, paint the designs. In the future, you can add a rope ladder.


https://i.expert-h.com/en/detskie-ploshchadki/svoimi-rukami-foto#sigFreeId512bc1e5c0
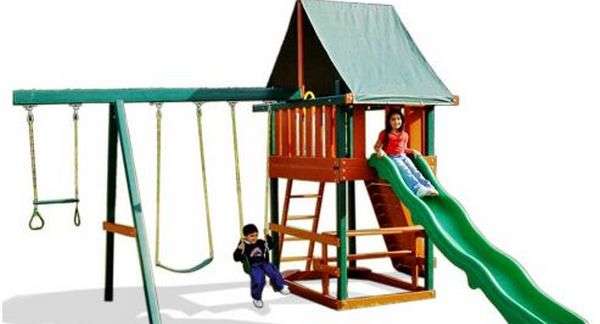
How to assemble a playground
 If you want to design and build a children's playgroundthat will meet all your needs, but don’t want to start from scratch, buy a playground kit. There are many companies that sell ready-made packages containing parts and equipment to create a full-fledged playground. Some sets include only wood, but mostly these are combined options. Available dozens of different designs: From the base platform to complex multi-level playgrounds with many advanced features. Most systems are designed for installation on concrete supports, but in some cases they are simply prefabricated structures. If you decide not to fill the supports, it is very important that the surface for the site was very flat. To level and smooth the playing field and stop the grass and weeds from growing, cut the turf in the playing area or at least in the area where the structure is located before you start building. Some sets of playgrounds include all the necessary drills and drivers. If the kit does not fit, you will need a standard choice of bit bits for blades and drill bits, as well as countersinks for screws No. 6 and No. 8.
Note. The instructions provided here are for as a general guide for installing a playground kit, which includes finished lumber. But it all depends on the type of playground you buy, so you may need different materials and methods that are different from those presented here.
- Prepare the installation area. Use twine and plank to outline the area, and then remove the turf in the playing area. Level the ground using the lowest point, add landscape fabric.
- Start assembling the house. Pylon houses, or they are also called towers, are the main structural elements in any set of playgrounds.They support slides and other accessories. As a rule, they consist of boards and horizontal bars. For the kit shown here, connect the frame of the house on one side and then the sides on top of the flat parts 2 × 6 or 2 × 8. For drilling, use the template that is usually included in the kit. Install metal brackets that cover the bolts. Lift the tower.
- Screw the brackets to the corners of the frame the house, making sure that the bolt hole on the long side of the bracket is centered. Using the large holes in the brackets as guides, drill holes for the bolts, then insert and tighten them.
- Install the center beamsthat connect the platform frames. Make sure that the screw heads do not protrude above the surface.
- Fasten the boards. Make sure that the ends of the floorboards are aligned while installing the block stop clip or separation block to the deck board. Slots for drainage between floorboards should be less than 5 mm.
- Install the external frame. To support the roof of the playground, install an external 2 × 4 frame using the included angle brackets.
- Add an extra frame to strengthen the side of the tower. Framing on the right will help maintain the twine, ladder and upper crossbars; 2 × 4 on the left side are used to mount the slide.
- Install the lower railing. Fasten a straight bar over the railing at point 1 to simplify installation. Saw off the gaskets so that you get an even clearance even.
- Railing, lining and decoration. Attach the railing and casing. Install the front railing first, then add trim. This step will be easier to do if you tilt the structure back to the ground, but do not try it without an assistant.
- Roof. Install the rest of the roof frame. Check the center vertical parts with a level to make sure they are vertical.
- Swing Support. The swing design shown here is supported by a pair of corner posts in an A-frame configuration. Connect the 3 legs of the hinge together, and then fasten the triangular bracket for each leg. Assemble the structure by securing the triangular brackets, and then fasten the crosspiece. Add small brackets to the inside of the jumper.
- Connect legs and crossbeams. Screw the two crossbars into the brackets, making sure that the legs are parallel. Drill bolt holes using the brackets as guides.
- Attach the swing equipment. Turn the swing unit first and place it on the crossbar. Drill guide holes and secure the sides with the bolts. Drill guide holes for the swivel hangers and screws and install them so that the moving part rotates perpendicular to the crossbar.
- Add a side bar to the tower. Lift the turn into place and attach to the tower with the bolt through the swing beam and the 2 × 4 jumper next to the base, fixed with metal corners and bolts.
- Installation of a lifting wall. Attach the supports for the climbing wall to the site frame with brackets. Attach the upper and lower rungs to the external supports. Then, center the middle base plate and screw it in by running the floor screws through the jumpers into the base.
- Add the remaining rungs to the climbing wall.
- Start assembling the lifting beam. The metal bars function as a ladder that attaches to the tower on the side opposite the climbing wall.
- Attach metal rails to make sure the racks are parallel
- Attaching the staircase to the tower. First, dig up the leg pits for the racks. Install the legs in them, and then secure the upper ends of the uprights to the tower using the brackets.
- Establish support. Attach all sides using screw anchors. If the fastening is not strong enough, fill the pits with concrete. Attach the anchor to the structure with screws.
- Set the slide. First put the slide back in place, and then attach it to the tower with fasteners, as described in the manufacturer's instructions.
- Install other accessories, including a swing, a roof, and a climbing wall.
To reduce the risk of personal injury and property damage, read the instructions and information about the product manufacturers well.
Skill level: Newbie. Estimated build time: one day off.


https://i.expert-h.com/en/detskie-ploshchadki/svoimi-rukami-foto#sigFreeIdc4ea510f99
Children's playground for a summer residence
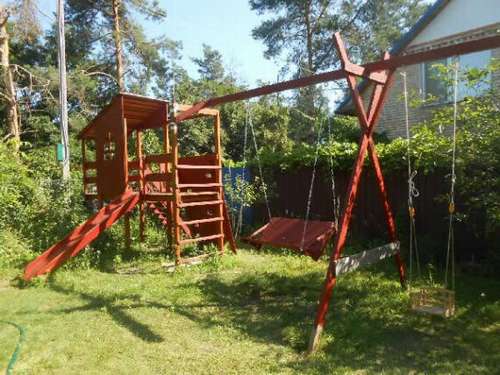 Here is an example how to make a children's playground for a summer residenceas they say, from scratch. Surely this step-by-step instruction is useful to many, because it is clear that not all parents can afford a kit for 3-4 thousand dollars. Of course, if you have never done carpentry, it’s hard to venture on such a project, but as they say, your eyes are afraid - your hands are doing. Basically, to make a playground, you don’t need much experience, the main thing is to approach the matter responsibly, strictly adhere to instructions and think about the safety of children. In extreme cases, at the final stage, you can invite a specialist to inspect the design for safety. In general, I will not rewrite the working procedure here, you can familiarize yourself with the detailed instructions on the site, even on two, I don’t know which of them is the source. Links are under the gallery. Also on the last photo are drawings of animal figures that you can do with your own hands and install on the playground.


https://i.expert-h.com/en/detskie-ploshchadki/svoimi-rukami-foto#sigFreeId74e3e529b9
And second
How to make a do-it-yourself playground
 Like children playground it’s easy to build, you can also make a drawing yourself, but if you are satisfied with this plan, at least you can save a little time. You can use the same design to build a detached complex, without a house. The main task is to find large and flat area. Everything else is not difficult to do, the main thing is not to forget that this design is for children, which means safety, first of all. Tighten each bolt with a wrench and periodically check that the nuts do not loose.
You can see the sizes in the photo. The legs of the farm consist of 4 × 4 pillars.
Step 1: Saw 4x4 columns and lay them on a flat surface.
Step 2 Bolt the upper supports to the legs.
Step 3 Attach the lower supports.
Step 4 Install the swing beam.


https://i.expert-h.com/en/detskie-ploshchadki/svoimi-rukami-foto#sigFreeIdcfbfe628df
DIY wooden playground
This classic backyard playground is partly made from a set, and partly from wood. Follow this instruction and in just one weekend you can build a solid and comfortable do-it-yourself wooden playground for their children, complete with a wave slide, trapezoid, sandbox, etc.
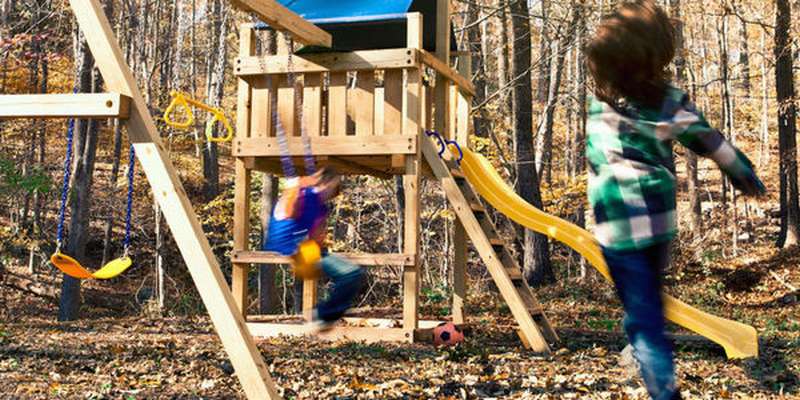 You can hire specialists or try to build a site from scratch - but it’s better not to do either the first or the second. The first is expensive. The second is risky: do you know what equipment is strong enough to hold a swing swing? In general, the best option is to buy a kit from a reputable company with lumber, plans and drawings. in which there will be everything you need for two swings, a trapeze, a sandbox, a three-meter slide and a ladder. The kit usually includes detailed construction plans, bolts, screws, brackets. Prices for such kits are different, a relatively inexpensive kit will cost about $ 300. Two people can assemble a site in one and a half to three days, depending on their skill level. But it’s better not to rush and involve children in this matter, at least if they will participate in the construction, then the attitude to their playground will be more careful.
We are building a fort.
- Cut to size all the necessary parts.
- Where possible, drill holes for screws and bolts.
- To build a tall fort, take four 4 x 4 pillars, two 2 x 4 boards, two 2 x 6 baseboards for the sandbox and connect them together into subnodes, each of which consists of a pair of pillars, a sandbox board and a board.
- Install the knots and fix them in place, then install horizontal support 4 x 4 decks between each pair of poles.
- With the holes pre-prepared in each deck support, align it and fasten.
- Use the bolt holes in the support to mark the position of the holes in the uprights.
- Remove the support, drill holes through the posts, then secure the deck supports in place.
- Then install the canopy racks.
- Drill bolt holes through the deck and pillar supports. Measure the distance between the racks of the canopy with the 2 x 4 bracket at their tops and screw them to the ends of the joints. Raise the canopy racks vertically and use the meter level to ensure a vertical position, then tighten the nuts on the bolts.
- After that, fix the deck boards to the supports. Note that eight of the 11 boards are cut 2 x 6. The other three, written separately in the list of materials in the form of dividers, are cut from 2 x 4 and are located between the fort racks and canopies. Install the wall panels.
- Make a ladder and install. Saw off the top of one of the legs to properly install the ladder.
- Attach the six swivel mounts to the beam. Then connect the two 4 x 4 paws with the bracket.
- Install the pivot beam support to the fort, then screw the bracket to the support. Using an auxiliary device, install the uprights in an upright position and install the beam.
- Fasten the swing beam to the leg bracket and to the support bracket.
- Finally, install the cross-beam cross, the safety panel next to the sandbox, the front panel above the slide and the remaining sandbox boards.
- Build a border from the boards around the playground and fill the sandbox with sand.
- Install the remaining equipment and attach the wave slide to the fort.
- Final step: play with your children in the new playground.


https://i.expert-h.com/en/detskie-ploshchadki/svoimi-rukami-foto#sigFreeId9dcce76c23
Playground device
 Dream about simple and safe playground for children? And how do you like this option, in the photo? True, this was not all done from scratch, but assembled from the kit, but the preparation of the site and the assembly, all this with their own hands. Interestingly, at first the author planned to just make a wooden sandbox, but as they say, the appetite comes with eating, so the result is children's play playground, such a miniature park for children.
What you need:
Boards and bars of 2.50 m each, although this will depend on the size of the playground you want to build, a hammer, a drill. Once again, make sure that you buy enough material to cover all the land under the site.
Playground Size, this is the first thing you need to decide. How to solve this issue, you can make a list of materials. As for location, if possible, choose a nice flat area. In this case, the chosen place has a slope and is also quite bumpy. Therefore, I had to carry out additional preparatory work on the construction of a playground.
- Prepare a future place.
- Prepare the assembly kit.
- The next step is to install a perimeter fence. Make sure you are happy with the position of the rectangle you are building. You can use the square to get 90 degrees angles
- Build the walls.
- Remove the weeds.
- Fill the playground cover.
- Assemble kit


https://i.expert-h.com/en/detskie-ploshchadki/svoimi-rukami-foto#sigFreeIdef8cc95a91
Children's house with a hill
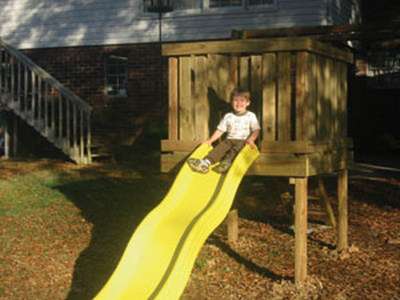 Children need something to occupy, and even if there is no way buy a children's playground in the kitso simple children's house with a slide can bring a lot of pleasure.
The design presented here is a platform with a slide mounted on four piles and secured with galvanized fasteners.All fasteners in the open air must be weatherproof, galvanized or made of stainless steel.
All you need is standard tools, that is, a saw, drill, hammer, tape measure and level.
- Soles are required to support the pillars, and as a rule, they should be buried at a depth of 15 cm below the freezing line - in many places it will be 60 cm. The diameter of the workpiece should be three times the diameter of the column. Also note that you need to make a pillow 12 - 15 cm of gravel for drainage. Pour the dry, instant concrete mixture into the pit until it reaches about 10 cm from the top. Recheck with a plumb line that the racks are level. Pour water onto the concrete mix and let it soak. A 50 kg bag of dry mix requires about 4 liters of water. When dry, fill the rest of the hole with dirt, moving it away from the rack. Repeat this process for each of the four pillars, making sure that the outer corners of each pillar form a square with adjacent pillars. Concrete grabs after about 40 minutes, but wait about 4 hours.
- Fix four beams on 2-6 floors around a square of pillars. Fasten the joints with bolts at each end. Connect the beams together to make a 90 ° angle flush. The central beam supports the flooring. Add corner locks on corner posts to ensure a solid surface under the boards at the edge of the platform. Inside the square frame, fasten the third center drum to move perpendicular to the direction of the decks. You can align the center beam or use metal pendants to secure the ends. After the beam system is installed, you can remove the time reference.
- Then fix the flooring, leaving a small distance of 5 mm between the drainage boards. At the edges of the platform, you will need to trim the flooring so that it fits between the corner posts.
The railing should be about 90 cm high. Use a hand saw to cut the posts flush with the top of the 2 by 4 frame. - The front and back of the platform must have passages, one to enter the platform, the other to slide off the platform. Width is half a meter, on the sides set the posts. Cut the tops flush with the top edge of the frame and securely fasten on the inside. The distance between balusters should be kept to a minimum so that small arms or legs are not stuck.
- Fasten the square frame of the 2 to 4 faceplates surrounding the corner posts. The upper and lower railing frame should ensure the strength of the platform walls. You will need to leave a hole on the bottom boards of the frame where the “door” posts meet to allow entry and exit of 50 cm.
- To determine the number of steps for stairs, measure the lift (vertical height) from the ground to the top of the platform and divide this distance by 18 cm (standard tread height). The resulting number indicates the number of steps that you will need. However, since these stairs are built for short legs, you can choose a shorter tread height.
- Plastic slides are usually sold with the necessary equipment to install them. Therefore, you just have to drill the mounting holes and tighten a few large bolts and washers, and the slide is ready for use.
- Add an upper bar above the slide so that children can push off to give maximum speed.
- You can also screw a pair of plastic handles on the entrance racks, at a height of about 20 cm above the floor of the playground, so that children have something to grab when lifting.


https://i.expert-h.com/en/detskie-ploshchadki/svoimi-rukami-foto#sigFreeId86e93ab853
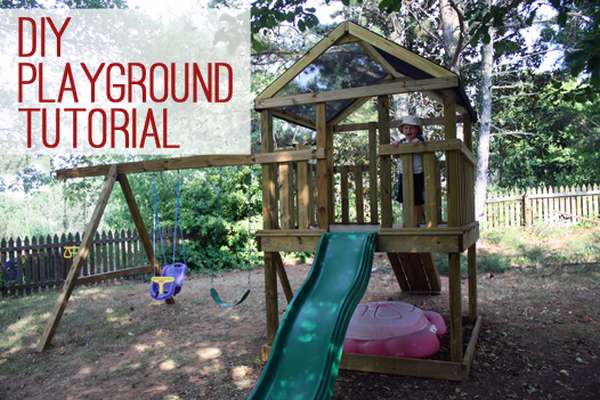
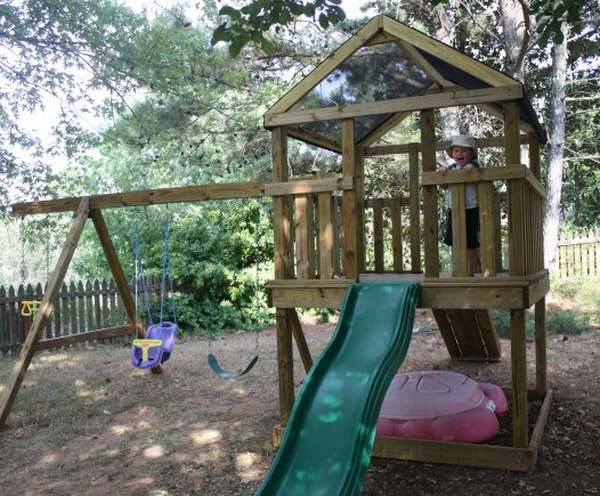
Playground in the garden
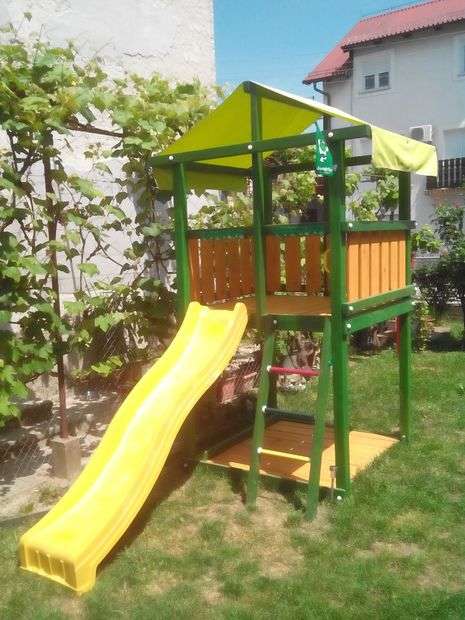 If you decide to arrange playground in the garden, this small photo gallery will help you. In this case, the construction cost the author very cheaply, since the structure is made of residual materials after replacing the roof of the house.Basically, these are boards from the old roof, which were in good condition, and also the scraps left after the construction of the new roof were used. The only timber purchased for this purpose is the four main vertical beams. This instruction does not provide a detailed description or plans for the construction of a playground in the garden, but contains some useful tipsthat you will definitely need during construction.
That's about what you need:
- 4 wooden beams 10x10x250 cm
- About 4.5 square meters of boards (about 2.5 cm thick)
- 20 wooden beams (8x5 cm), length from 140 to 170 cm
- 6 bags of cement (25 kg)
- 3 wooden or metal rods with a diameter of 3 cm and a length of 50 cm
- Different size screws
- 4 metal pins for attaching to the ground
- Slide
- Tablecloth
Playground assembly procedureand:
- Step 1: Prepare Lumber. If you will use a used one, check for the presence of nails and other objects that need to be removed. And naturally, there should not be cracks and rot on the wood.
- Step 2: Treatment. For boards use a belt sander, small parts can be processed manually with sandpaper. Fill the holes with wood glue and sawdust. Large openings must be filled two or three times.
- Step 3: Drilling. Pre-drill all the through holes so that when assembling the tree does not split, and the parts are firmly pressed together. The size of the holes should be one or two millimeters smaller than the thickness of the screw. For thin screws, holes can be omitted.
- Step 4: Painting. The author used two colors, yellow and green, but this, of course, is at your discretion. Important to carry painting before assemblyso that parts that are not available after assembly are protected.
- Step 5: Stairs. The design of the stairs is quite simple. On both sides there is a wooden beam in which steps are fixed. The holes drilled in the beams should be slightly smaller than the pitch that goes into it. The step is hammered into place and fixed with a screw at the rear of the wooden beam.
- Step 6: Pits. To ensure stability and avoid rotting wood, the site is installed on a concrete base. The base consists of four separate holes filled with concrete, as the playground is installed on four vertical beams. Make markup first. Dig with a narrow shovel so that the top of the hole is small. This is done for safety reasons, the top of the concrete pouring should be the same size as the support so that the child does not hurt when falling. The hole has the shape of a pyramid., i.e. the bottom is wider than the top of the hole (approximately 40x40 cm). So less likely that the playground will sag due to the large footprint.
- Step 7: Frame manufacturing. The frame consists of front and rear connected by beams. The easiest way to do it is to assemble the parts by laying them on flat ground. When the structure is assembled, align the frame. Then add the metal pins to the beams that connect the pad to the concrete. Let them just stand in empty pits for now.
- Step 8: Pouring concrete. Used in this case ready dry mix. After mixing, simply fill the holes. The upper part is made conical, so the top of the hole has the same dimensions as the beam. Fill the gap between the edges of the hole and the concrete with soil so that the solution has nowhere to go, so it is pressed against the beams, so they will actually stand on it.
- Step 9: Playground installation. Usually they make a sandbox under the platform, but if you have it separately, at the bottom can flooringas the author did. Place a film under the boards so that the plants do not germinate. In winter, the floor can be removed.
- Step 10: Installation of slides and stairs. The slide is attached with four screws to the frame. Ladder with a threaded rod passing through the stair beams and the beams of the playground. Since the staircase is connected at only two points, it can rotate, which is unsafe. Therefore, the metal plate passing between the staircase and the frame must be screwed on each side of the stairsthen she cannot turn around.
- Step 11: Roof installation. For the roof, the author used an old tablecloth (woven polyester), which is fastened with screws in the beams of the playground (4 screws on the beam). Be sure to put plastic washersso that the fabric does not tear.
- Step 12: Playground is finished. In the future, you can attach a beam for a swing, make a wall for climbing and generally come up with a lot of interesting things.


https://i.expert-h.com/en/detskie-ploshchadki/svoimi-rukami-foto#sigFreeId06fbd44d44
Simple do-it-yourself playground
 Do you want your children to have a good playground, but no experience, and there is not enough money to buy a ready-made kit? All this can be decided, why else do you need the Internet. Of course, do-it-yourself playground is not so easy, especially since the issue concerns children, which means reliability and safety should be in the first place. But here example of a simple playground, built by a math teacher, a man very far from carpentry. So there is nothing impossible, and the drawings and step-by-step photographs presented here will certainly help you.
You will need the following tools:
- hammer
- Miter saw
- hand saw
- 5/16 "long drill
- 1/2 "socket or key.
- house
Operating procedure:
- First find a safe, level construction site.
- When you have prepared all the materials, saw out and assemble two frames that will become sides of the house.
- Drill holes for the 5/16 bolts, put on the washers and fix with the nuts.
- Then we connect the two sides of the orphanage.
- Now you can install the support and flooring. Saw and install the supports, fix with screws.
Then install the flooring on top. - Now the 2 × 2 frame around the outside of the pillars is ready and secured to the top of the deck using the set screws as shown.
- Saw and fasten the 26 slats that will serve as the fencing of the site.
Do not forget to leave openings for stairs and slides. - On the side where you plan to install the swing, leave a hole in the middle so that you can subsequently make supports.
- Make a ladder, cutting the sides at both ends at an angle, screw the steps parallel to the ground, and then attach it all to the house.
- Set the slide.
Now you have a magical children's stilt house, which is sure to become a favorite pastime for your children.


https://i.expert-h.com/en/detskie-ploshchadki/svoimi-rukami-foto#sigFreeId3b3b7cc734
Part 2 Swing bar
 So, you already have a platform on stilts, or a house. Now you need to install the swing. You will probably be happy to hear that the second part of the playground, that is, a crossbar with a swing, it is much easier to build than a house.
The first step is to make supports. You have two options: the heroic version - do it yourself, or, more simple and reasonable - buy in the store.
- Option 1: If you go the easy way and buy at the store. Then you just need to take and attach the supports of the A-frame using the frame brackets, as in the photo.
- Option 2: Do it yourself. You can cut out the grooves so that the beam "sits" on top, resting on the top of the notch. This method is much more complicated, but it is free.
Then, in a large beam with a long drill, drill holes for attaching the swing. To install it, you definitely need an assistant, and better than one, this is a job for three. First, install one end of the beam at the top of the tower, let one person hold it, and the other two raise the frame and put it in place. Use galvanized frame brackets for fastening. Secure the upper part with a bracket.
Fasten the swing and other accessories using the holes that you previously drilled into the large beam.


https://i.expert-h.com/en/detskie-ploshchadki/svoimi-rukami-foto#sigFreeId0898906ebc
Part 3 Some changes
 Of course, this part could not be shown, here are some changes that the author made to his project in order to correct errors. But I think it’s necessary, all the same, experience, a useful thing, but it learns better from the mistakes of others.
In general, what has been fixed.
First of allIt turned out that it is difficult for a child to climb such a ladder, so it was replaced by a ramp. The author used the same floorings from which the floor of the tower was made.2 × 4 sides with a 45-degree cut at both ends. Fasten all this with the same screws that were used for the flooring. Then attach to the tower with loops so that you can put the ramp and hold it in place. The entire ramp has a length of 180 cm and a width of 60 cm. To make it, put 4 pieces of flooring on the ground with a small gap between them, and then screw the transverse boards. Attach the side rails from below with screws. If you don’t like the idea of a hinge, you can simply fasten it to the tower.
Secondly, entry and exit openings are too low. This is understandable if you made a platform for the growth of your child, but if guests come with their children, and they turn out to be larger than yours, it was still not enough for someone to get a head injury. So it’s better to play it safe, especially since the problem is easily solved, you just need to buy a couple more two-meter boards 2 × 4. Then make wider openings in this order.
- Move board number 1 up.
- Remove boards 2 and 3, make them a little shorter to fit in a new place, tighten with screws.
- Boards 4 and 5 are the ones you had to buy.
- Cut them to the desired length, and then reinstall them.
- Repeat all these steps on the other side of the tower. (Note that board number 1 is too protruding left and right. Everything is in order - it is necessary to build a roof.)


https://i.expert-h.com/en/detskie-ploshchadki/svoimi-rukami-foto#sigFreeId47ae449a91
Part 4 Roof installation
 Roof installation for a house of a children's playground, the result of an author’s experiment, which, according to his own statement, had never before been engaged in carpentry of this magnitude. Therefore, you can use a hundred different ways, this is just an example. If you do not like the material that the author used, do not hesitate to change it. In this version, a black tarp was chosen for the roof. It protects from the sun, breathes, which is good for air circulation and most importantly, it does not cost much. But before you pull it, you need to build a structure for the roof.
Since the coating is not heavy, there is no need to reinforce the racks. There are probably a thousand different ways, but if you do the same as in the photo, here is the plan.
- Saw off the rafters at the right angle and desired length using the square of the frame.
- Saw off the ridge with a length from the front to the back.
- Saw the lintels, they make the roof a little more durable.
- Twist it all together.
In the photo there are inscriptions in English so that they do not waste time translating, then briefly, rafter - rafter, ridge - crest, colar tie - collar, in this case a jumper, inches - inches, one inch, this is 2.54 cm.
Step 1: Rafter preparation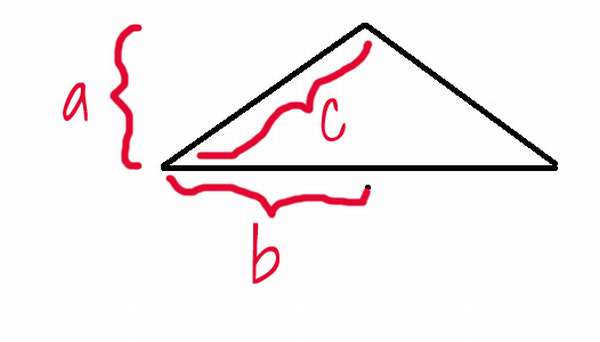 Before you begin to trim the rafters, you need to decide which ramp you want. The author used a roof pitch of 8/12, which means that every 30 centimeters the roof rises by 20 cm. Since the platform has a width of 1.80 m, each line will pass more than 90 cm, and since a pitch of 8/12 is used, it will grow by 60 cm. If you are confused, look better at the photo, there it is more clear. Or remember the math :) A 2 + b 2 = c 2 Pythagorean theorem
- Now that we know the length of the rafters, we need to cut the corners. To do this, you need to use the square of the frame, while remembering that we are taking a step of 8/12 Now you just need to draw a line to mark where to make the cut. You need to do this only once, because all rafters need the same angle, that is, in the future you can use it as a template.
- Now saw off the rafters to the desired length, which in this case is 108 cm. Note that the two ends are parallel. Make four of the same size. Just draw a line perpendicular to the end of the rafters and saw off.
- Then cut the jumpers. The easiest way is to lay the rafters on the ground, and mark where you need to make an incision on the lintels. Use a square to draw a cut line, and then saw them. You can use the first blank as a template to make the second exactly the same.
- Now we cut the board for the ridge and fasten it all with screws.
Finally, the last step: mounting the tarp. If you have a special gun for attaching brackets, then excellent. If not, it will have to be done with nails, upholstery is better, they are sold in furniture stores, used to make upholstered furniture. First fasten in front. Then pull and do the same at the back, then on the sides.
It's all!


https://i.expert-h.com/en/detskie-ploshchadki/svoimi-rukami-foto#sigFreeId0d976c8403
Playground with slide pipe
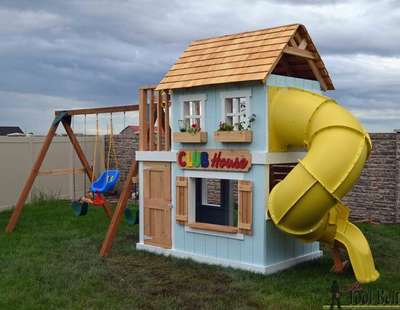 Playground with slide - the perfect solution for summer fun. This game kit with a house boasts a large pipe slide, a swing, a climbing wall and a playground. Since this is done by yourself, you can change the design as you wish.
Manufacturing procedure:
- Assemble the base frame and make sure the base and walls are square.
- Install the floor boards and fasten them with screws on each beam.
- Install the slide tube frame and assemble it according to the instructions.
- Make frames for windows and walls, install the railing on the top of the site.
- Assemble the rafter strip and install on the railing, fix it with screws.
- To fix the tiles, install the roof rail along the rafters. Fix the wooden tiles in accordance with the manufacturer's instructions.
- Add decorative beams to the front of the roof, fasten with screws.
- Set the railing of the balustrade along the open part of the site. Fasten the balusters with screws.
- Make a ladder and fasten the tread with screws. Make a climbing wall and install plastic parts in accordance with the manufacturer's instructions. Attach the ladder and wall to the site of the game kit.
- Cover the platform with plywood or other material. Cut the window that opens on the rear panel and fasten it to the frame with screws.
- Fasten the lining with 2-inch nails or screws.
- Install the door.
- Assemble the swing kit in accordance with the manufacturer's instructions. Attach to the game house or install separately.
- Sand the surface lightly and prepare for painting. Be sure to process the wood so that it does not deteriorate from moisture.
- Attach the steering wheel and telescope.


https://i.expert-h.com/en/detskie-ploshchadki/svoimi-rukami-foto#sigFreeId205ecbf0ec
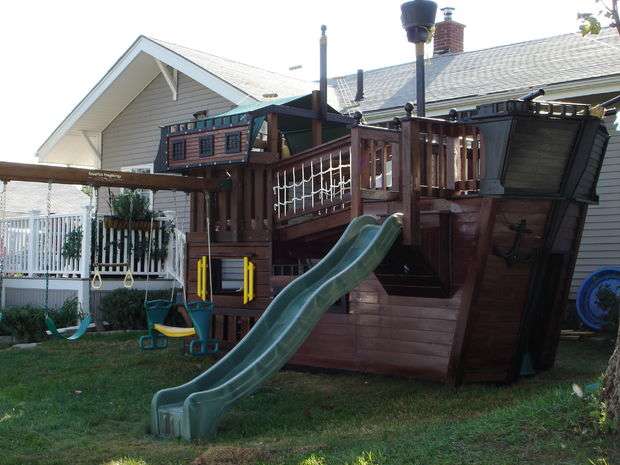
DIY pirate ship
 Have decided build a kids pirate ship? Here's how to do it. at first draw sketches of what you think would be cool, and develop basic engineering ideas. The idea of the author was to use standard flooring sizes to minimize waste. Moreover, it was supposed to be full playground with swings, stairs, etc., which can be observed from the back porch of the house.
- First, assemble the outer frame, form a square and place it in place of the future site. After installing the posts in the holes, align the frame and fix with screws.
 Then repeat the steps for the second level.
- Determine the height of the upper deck, given that the back of the ship will be slightly larger.
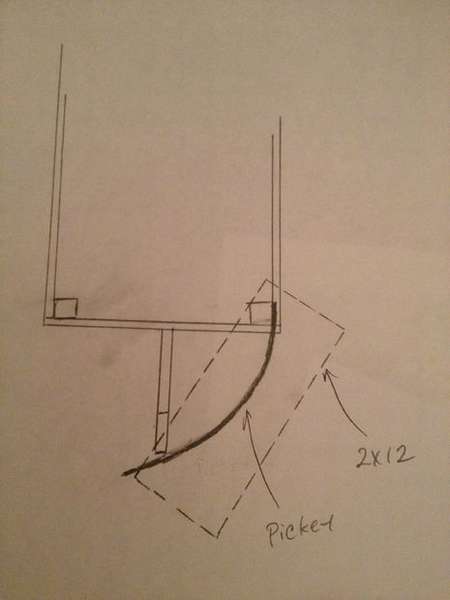
- Slight difficulties may arise with the curved nose. Draw a sketch of how it should look, then cut out the form and set it with the screws for the lag. Curved side rails also saw off 2x12. The main forms require a lot of refinement, but here, what happened, what happened ...
- For cladding, boards from the fence were used. If you wet them, you can bend a little. The photo shows how this happened with the author.
- Once the main shape of the bow is completed, add another level that will be advanced a bit more than the first.
- Side rails should be high enough for child safety.
- After building the ship, make a swing.
- Attach a metal strap to your nose as an extra support and wooden frame so that you can attach a small deck. Then install deck boards on all surfaces.
- After that we build a pirate cabin.
- The next stage is the manufacture of a ladder with a platform. Three racks on each side of the bottom of the stairs are twisted together with 6-inch screws and then wrapped with rope. You can add steering knobs and strips of wood to the gangway for traction.
- For the mast, the author used an 8-centimeter column as the main mast and a bar with a diameter of 5 cm for the transverse beam and flag fastening. Fasten the bottom of the mast so that it is firmly fixed to the 2x6 deck support. Drill a round hole using a large drill and simply insert the mast. For the sail, you can use a tarp or other dense material, for example from an old street awning.
The author found an antique wheel in the market, added pens from miniature candlesticks and mounted it on the bow of the boat covering the back of the metal strap that was used to support the bow. In the future, you can beautifully hang light bulbs so that children can play in the evening, and just for beauty. I hope the author’s project will inspire you to be creative.


https://i.expert-h.com/en/detskie-ploshchadki/svoimi-rukami-foto#sigFreeId71dcb1041f
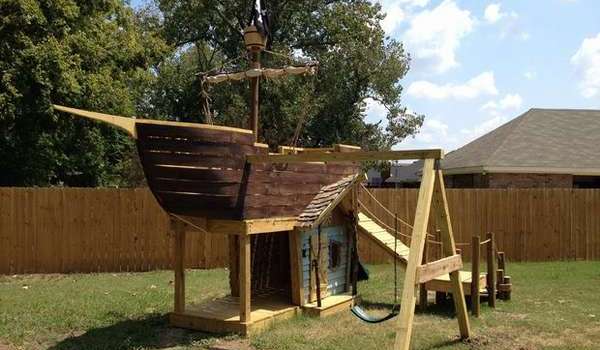
 Children's pirate ship
Here is another one pirate ship in all its splendor. True, this is all custom-made, not a set that you buy in the store, with the exception of the original creative gameNIS But if you wish, you can do it yourself, the photo in the gallery shows the main details, use them as a model for your own project. It may not turn out so beautifully, but the main thing is for the children to like it, and the project can always be improved.


https://i.expert-h.com/en/detskie-ploshchadki/svoimi-rukami-foto#sigFreeId71a5f2d2d8
Playground for home
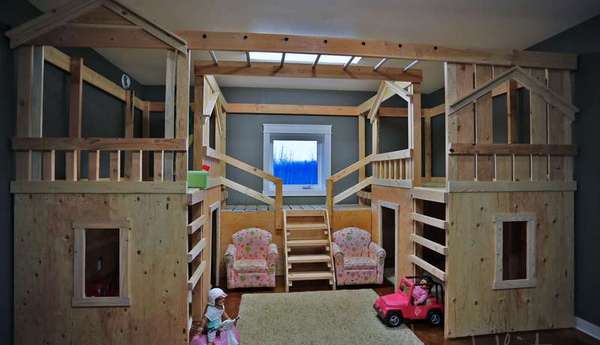 Playing in the open air is wonderful. But the weather or the cold season should not be the reason limiting children's activity. Build home playground with a horizontal staircase, or, as they are called, a “handle bar”. Play houses can be used as bunk beds, so there will be double benefits. The easiest way to make the structure strong enough to support the stairs in the middle is to build two play houses and then connect them together. The authors of this site took three days to make this childhood dream. If you follow the plans presented, it will be much easier.
Take all necessary precautions, observe safety precautions. Work on a clean surface, free from defects and debris. Always check wood, especially if you are building for children, use straight boards. Check the angles after each step. Pre-drill holes for large diameter screws so that there are no chips or splits. Remove excess glue from wooden surfaces as the dried glue will not stain.
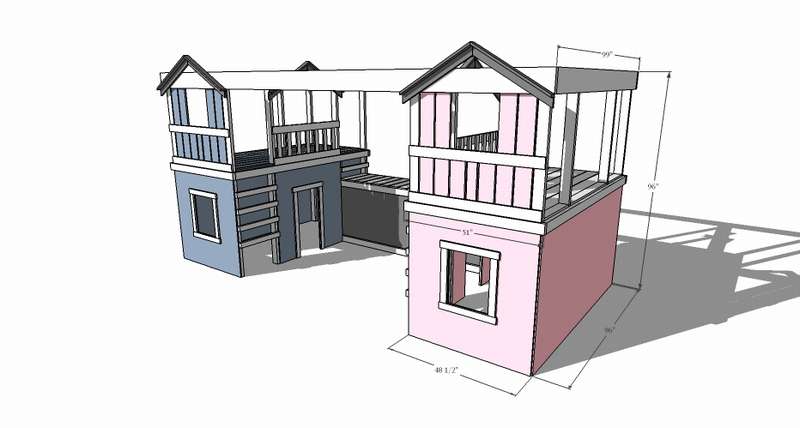 Overall dimensions: The minimum dimensions are 240 cm x 1457 cm x 240 cm, it all depends on the height of the ceilings. The room in which this site is built is 4.5x6.5 m.
Since in this example the walls are three meters high, the author simply took the boards 2.5 m 2x4 and screwed 2x8 lengths to the top and 2x4 near the center with 8 cm screws - without the need for trimming. One precaution is to check the length of the boards.
- Thus, four frames for the walls were made (for two play houses).
- Then take two frames and sheathe plywood. This will create a solid structure and also protect the walls inside the playhouse. Plywood is fastened with 5 cm self-tapping screws.
- Use the floor of the plywood sheet for the remaining two walls. Doors and windows are sawn with a jigsaw.
- Do the side steps.
- Attach a half-sheet of plywood to create the end walls.
- Make frames for windows and doors, and then attach them with small screws half an inch from the inside to the plywood. Also at this step you can install the floor, because as soon as you tie the two game houses together, you will not be able to climb and screw the floor.
- Slide the play houses a little away from the wall, and then fasten them together with long rails.
- Add a screw through the top of the wooden bar to the top of the pipe.
- Drill holes for the horizontal rungs.
- For floor cladding, screw the frame to the outer beams.
- For a bridge, attach 2x4 boards between two playhouses. If you will not put plywood under the bridge or make longer gaps, you may need a wide board to support the bridge (2x6 or 2x8). Also add a stair step so that you can climb to the upper level.
- Sheathe the top with 1x6 boards and plywood.
- Small roofs are easy to make. Better to collect them on the ground, and then install. This is just a 30-degree angle and beveled sections.
- The last step is the installation of stairs and railings.
Fill all holes with wood. Sand all the details with sandpaper. Remove sanding residue on work surfaces. Wipe clean with a damp cloth. Use a primer if necessary.


https://i.expert-h.com/en/detskie-ploshchadki/svoimi-rukami-foto#sigFreeId5d7150c963
Interesting ideas for organizing a playground in the yard
In the summer, children spend a lot of time outdoors. For parents, this is even a cause for unnecessary concern, because it is harder to control small fidgets, but on the other hand, it is a great opportunity to relax and calmly do their homework. Regarding anxiety, to keep children busy you can turn backyard in a fun playground. There are many great ideas that you can try, and for everyone to be interested, involve children in their projects.
- Board on the wall. Of course, you can draw with chalk on the track, which is what children usually do. But sometimes they draw on the roadway. Take the blackboard, and set it on the fence, in the backyard.
- Cableway. Great entertainment for children, however, as well as for adults, which makes it an ideal summer project. Your children will like it, and their friends too. A simple way to earn popularity and have fun. Just make sure it's safe.
- Children tent. In childhood, everyone loved to make a house under the table or a tent, covering the chairs with bedspreads. Surely your children will like the idea of having their own tent, especially if you install it outdoors. It would be a fun adventure for them.
- Hanging chairs. How much children like to run and play, but sometimes you need to sit down and relax a bit. But you can relax so that it is fun, and hanging chairs are just for this purpose. Hang them in the backyard, and the whole family will be able to relax and enjoy the precious moments of joint relaxation.
- Swing. Swing is an integral part of children's entertainment. Of course, there are many options, but in order not to be particularly puzzled, a swing can be made simply from an old chair and a strong rope, it is fun and not difficult.


https://i.expert-h.com/en/detskie-ploshchadki/svoimi-rukami-foto#sigFreeIdd633743119
- Old tire swing. Why not. A very good option for a children's swing, just make sure that they are reliable and safe for children.
- Sandbox with pool. Children of all ages love to play in the sand, so the sandbox is a necessary attribute of every playground, and if you also put a small mini-pool, then it is not necessary to go to the beach. Water and sand, what else does a child need for happiness.
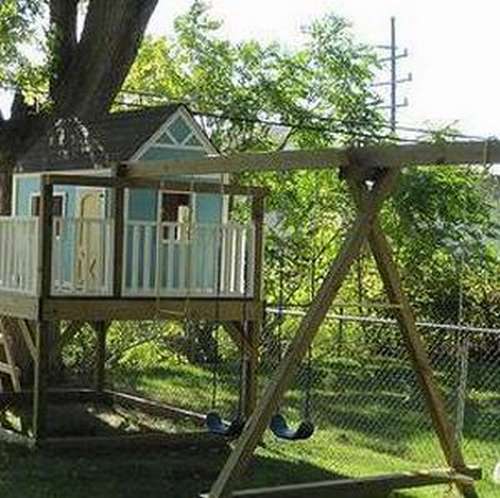
- Tree house. This is without options, every child’s treehouse. If you can’t build a full-fledged castle, you can make at least a small platform. This is a great place where children can play and have fun all day. So, if you already have a house, make it better, give it a quick make-up, and if not, start building with your child.
- Musical fence. To make a musical fence, you need at least one span and any things that make sounds when you knock on them. You can use old pots and pans, wooden spoons and other things that you will find in a house or garage. Even better, if the children themselves are engaged in their search.
- Climbing wall. Climbing wall, a cool thing and not only for children. This is not only a pleasure, but also a useful exercise. Just not bad to lay a mat or something else soft, at least for the first time.


https://i.expert-h.com/en/detskie-ploshchadki/svoimi-rukami-foto#sigFreeId00b6e18931
- Twister on the grass. Cut a stencil and buy a spray can of paint, that's all you need to make a popular game of twister on the grass. Of course, you just paint the grass and the paint will wash off after the first rain, but this is a fun idea for a summer party.
- Water balls. Simple and fun.
- Waterfall on the wall. A simple and inexpensive idea to make a water wall. You just need to collect a bunch of bottles or other plastic containers that you need to attach to the fence. Arrange them in random order so that the water flows beautifully from one container to another.
- Water sprinkler. Playing with water is fun, especially in the heat. Make a sprinkler out of a plastic bottle. Connect it to the garden hose and enjoy.


https://i.expert-h.com/en/detskie-ploshchadki/svoimi-rukami-foto#sigFreeIdc327b11f81
- Geyser. You can such a fountain in the yard, laying a platform of non-slip tiles. It is fun and useful for children.
- Soap Bubble Fun. We all loved to make soap bubbles in childhood. Share your knowledge with your children and take this simple fun to the next level. Take a small plastic pool, a hoop and dilute a lot of soapy water to make huge bubbles.
- Wall passage. Want your kids to be more active? Make a wall with holes from the tarpaulin, draw goals, cover the edges of the holes with tape. Write a marker for the number of points for each hit, and that’s it. {Found on spoonful}.
- Hammock. What can you think of better to relax in the open air, how to tumble in a hammock. Believe me, children like it no less than adults. Photo by Rob Cariss
- Summer cinema. Organize a summer cinema in the courtyard. Take picnic bedspreads, pillows and everything you find soft and comfortable. Install a projector and you can watch children's films with the whole family.
- Unusual garden. If you have a garden or a simple plot, you can organize an unusual greenhouse. Bring children to this project, let them use old shoes or other unusual things for gardening to plant flowers.
- Street box for toys. Toys that children play on the street, it is better to store somewhere separately, so as not to put dirt into the house. Make a secret vault inside the bench, children will also like this idea.


https://i.expert-h.com/en/detskie-ploshchadki/svoimi-rukami-foto#sigFreeIda3ed2968a3
from
Schemes and drawings of children's playgrounds


https://i.expert-h.com/en/detskie-ploshchadki/svoimi-rukami-foto#sigFreeIddc791c3a4c
Children's playground 300 photos


https://i.expert-h.com/en/detskie-ploshchadki/svoimi-rukami-foto#sigFreeIdcc45ea9226
Hello, I am the author of this article, so I look forward to asking questions for this article in the comments below, I will answer all !!!
If you have questions on another topic, ask them on our forum, we will answer you
- Two baskets of paper in 5 minutes (Master class)
- How to make a simple and compact table for a milling cutter from plywood
- How to make a soft headboard tile (Instructions + step by step photos)
- Cinder block benches: a convenient bench in 55 minutes
- How to make a bed with a niche: saving space (Master class)