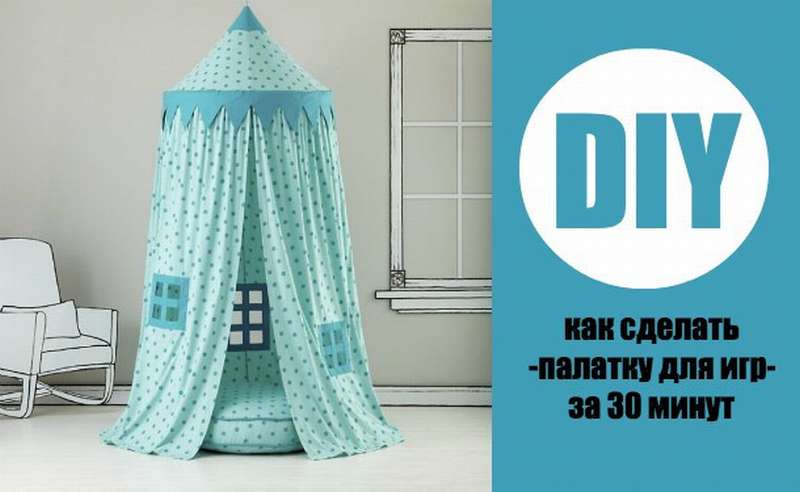
DIY tent for children 500 photos, step by step instructions
 do-it-yourself children's tent
Each person in childhood wanted to have his own secluded corner, a place where he could fence himself off from the world around him and create his own magical world that would exist only in his imagination. It is for this reason that each of us in childhood built various kinds of huts and tents from everything that he finds at home. Everything was literally material - bedding, boxes, armchairs, fabrics, chairs, because nothing limited imagination.
I would really like to have such a place for your children, so give them a nice gift, make a game tent for them yourself. On the Internet and stores you can find a large number of different models, they all differ, both in appearance and price. But sometimes the purchase does not make sense. Why, if you can do do-it-yourself children's tent. If you do not know how - in this article you will find a sufficient number of types of home-made children’s play tents, as well as photos, useful tips and instructions for creating them.
How to assemble a children's tent house
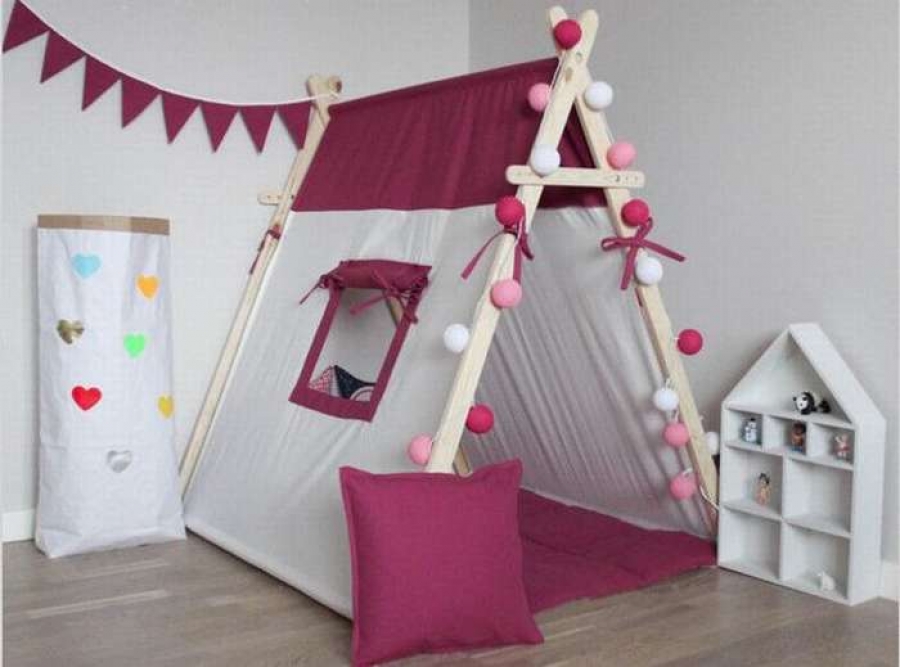
 A children's play tent is the best gift for children, they can play it both at home and on the street, especially since the beginning of summer is now. Each model of tents has its own advantages and disadvantages, you only need to choose which one suits you and your children. Here you will find out how to put together a children's tent. Let's start with the standard folding triangular version.
Make it very simple, and if you belong to those people who in their childhood made a semblance of huts, then you have a little experience, more and do not need to!
To create a children's tent you will need:
- fabric (about 115x215 cm) or one large sheet, a couple of small ones can be;
- wooden blocks - 4 pcs. 120 cm each;
- wooden crossbeam (in diameter 20 mm) - 1 pc.;
- a drill with a drill on wood (according to the size of the crossbar);
- roulette;
- elastic;
- pencil or marker;
- scissors.
Manufacturing procedure:
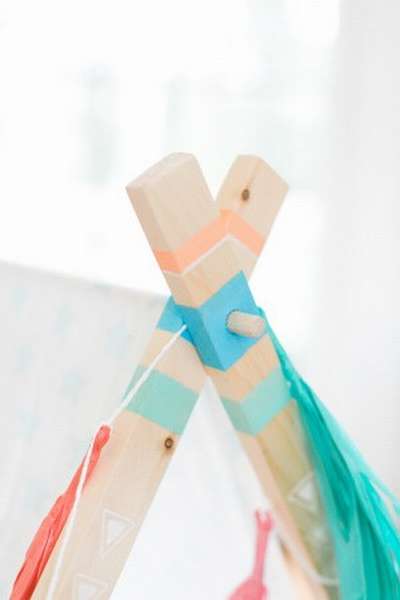
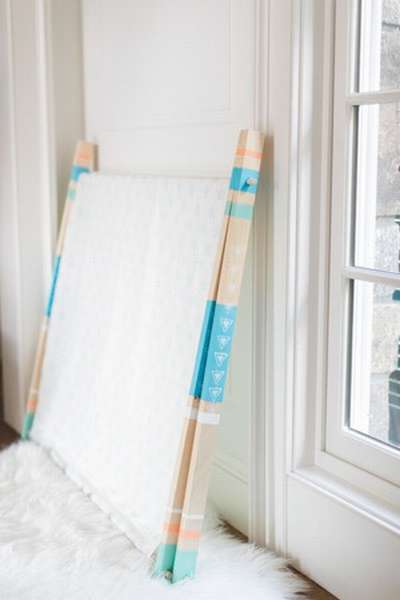
- Cross 2 bars on each side on each side, this will be the tent frame, and drill one hole at them at the intersection.
- Insert the crossbar into the holes, thereby connecting the 2 parts of the tent to each other.
- Sew the edges of the fabric, if necessary.
- Cut 4 pieces of elastic, each should be 10 cm.
- Sew elastic bands in half to each corner of the fabric.
Done, just pull the fabric over the bars and the kids play tent is ready.


https://i.expert-h.com/en/detskie-domiki/971#sigFreeId4cf7e4316b
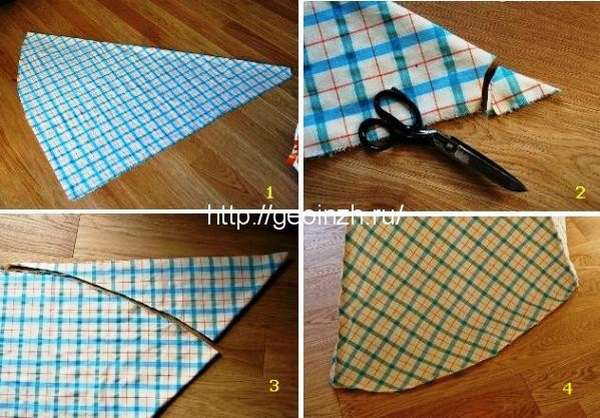
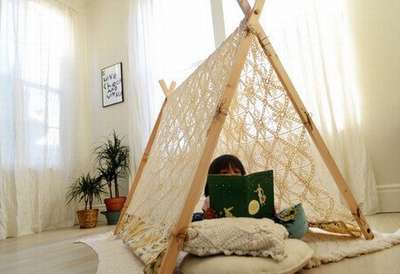
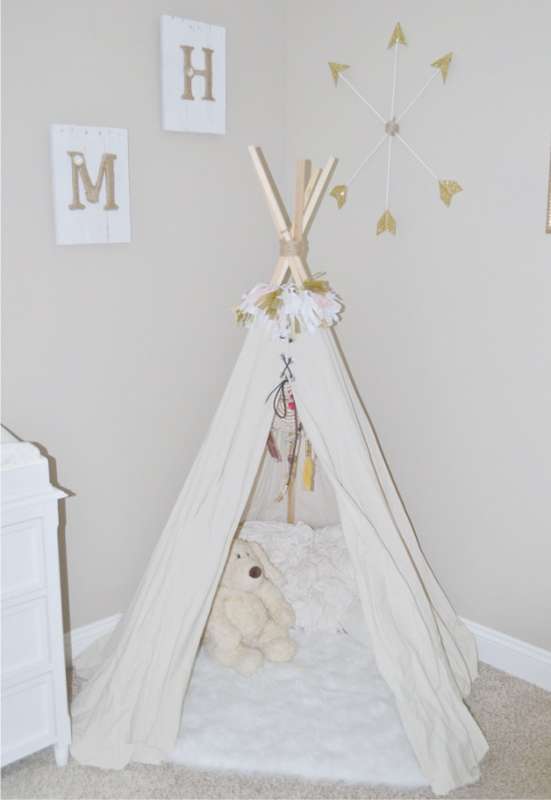 Children's do-it-yourself wigwam
In general, a children's play tent can be attributed to a variety of children's play houses, but there are so many a huge number of types of children's tentsthat they deserve special attention. Therefore, they are given a whole article, so that you can better familiarize yourself with the methods of construction and choose an option for yourself. So in this section you can find out how to make a teepee children's tent. What will be required for its assembly?
Materials for the frame:
- 6 wooden bars-racks 2 to 4 cm thick and 2 m long.
- Twine or other strong rope.
- Durable elastic (not needed if you have a drill).
Materials for the "awning" (fabric canopy):
- A piece of cotton or linen cloth 3 m long and 1.5 m wide. It is desirable that the fabric is dense.
- 6 strips of fabric (cords, ribbons or ribbons) 30 cm long.
- Needle and thread in tone of fabric.
- For edge trimming: thread matching fabric.
- For the door: eyelets of small diameter + lace or any other fittings (buttons, rivets, laces, etc.).
Tools:
- Roulette.
- Drill and drill (optional, but desirable).
- Sewing machine (if any) or self-adhesive tape with iron (for processingedges).
- Pencil.
- Pins
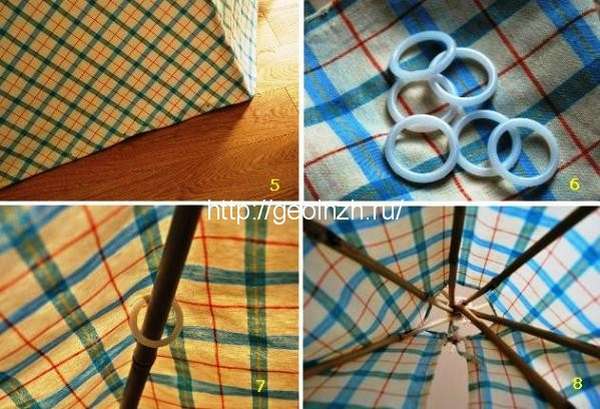
There are two ways to set up a wigwam tent frame.:
- The first. The easiest way to put all the poles together and tie them with an elastic band, at a distance of about 10-20 cm from the top edge.
- And the second one. A little more complicated - in each pole with a drill, drill through the through hole, backing 10-25 cm from the top edge.
Then loosely tie the poles together as shown in the photo. This takes a little longer, but guarantees the strength of the tent. Next, follow the photo instructions and then you will succeed!


https://i.expert-h.com/en/detskie-domiki/971#sigFreeId7566705fc5
Wigwam for children do-it-yourself master class
 When creating a children's play tent, you can experiment in every way with the shape and texture, let alone the design of the tent itself, it can be completely different, both with the same model and with different types of tents. For example, this do-it-yourself wigwam for kids has its own distinctive feature.
You might not have noticed this, but on this model the fabric canopy is fixed in a completely different way: it does not hang carelessly on the frame (although this one has its own highlight), but is neatly fixed on each column. The author calls this difference “the result of trash,” because I had to do it because of a lack of fabric, but as for me, it turned out pretty well, even attractively. The thing is that a special canopy pocket was created for the children's wigwam (cut fabric in the form of a trapezoid sewn together), into which the bars (legs of the frame) were inserted, which gave such a result. Also, thanks to this tension of the fabric, the tent turned out to be a neat door! And for greater comfort, you can throw pillows on the floor of the wigwam tent.


https://i.expert-h.com/en/detskie-domiki/971#sigFreeIde3b15b4b93
DIY tent for children
 If you do not want to use a tree for the construction of your children's play tent, then this option is just fine for you do-it-yourself baby tentmade out of a hoop. Everything is made quickly and easily, and if you make such a tent with your children, you will also receive a bunch of positive emotions and pleasant memories, in addition, it will strengthen your relationship with children.
To make a children's tent-tent from a hoop, you will need:
- fabric for drapery (5.5 m for a large hoop, 3.5 m for a small)
- fabric for the top of the tent (about 2 m);
- hoop;
- textile fastener, Velcro;
- a hook in order to hang the tent from the ceiling;
- pins
- scissors;
- a pencil;
- pattern for decorating the dome;
- sewing machine.
When you have collected all the necessary materials, you can start assembling (for such a model of a children's tent, pick up all the necessary elements than to assemble the tent itself). According to the photo instructions attached to the fragment of the article, you can easily and quickly assemble the structure with your own hands.


https://i.expert-h.com/en/detskie-domiki/971#sigFreeId7aeb94d260
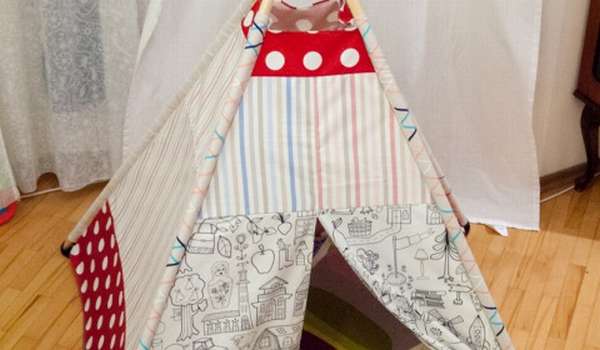
How to sew a children's teepee
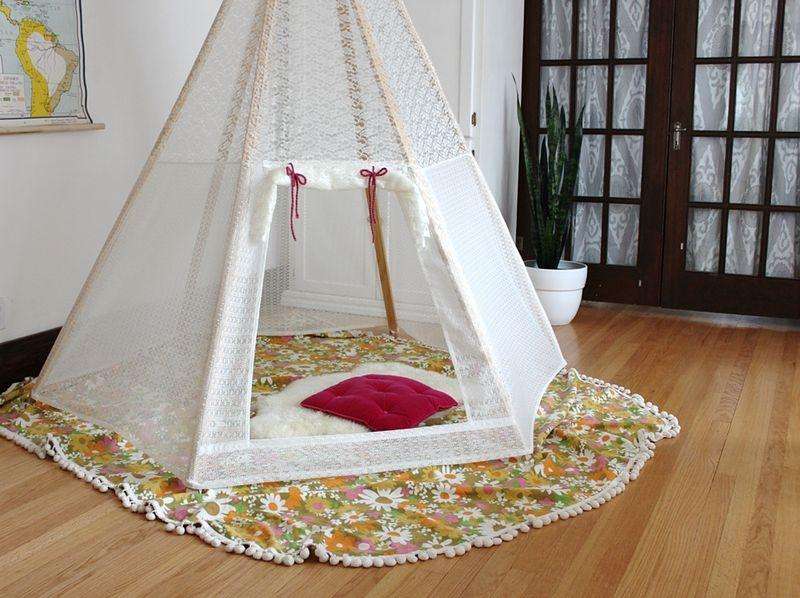 Here is another version of the children's wigwam, this model is most likely suitable for little princesses than for boys who want to test their strength. Since the frame is covered not with dense fabric, but with a thin translucent white tulle, with a finely embroidered pattern. And indeed, the tent itself does not look like a solid structure, because the tulle is attached to the frame with push pins, and the door is tied with thin laces. Although this children's wigwam looks attractive, it may look different in different interior rooms, so that, as they say, is an amateur, but among you readers, there are those people who like the idea sew children's teepee from tulle. This option is listed only to emphasize once again that the type of tent depends only on your imagination.
Unlike the two previous types of wigwam, this tent does not have a fixed floor, it is just put on some soft rug.But it looks pretty nice, and after her installation is completed, a young “resident” can play in it.
The advantages of this model of a children's play tent-wigwam:
- Pleasant appearance;
- Easy assembly;
- Fast manufacturing time;
- It will be combined with some types of interior.


https://i.expert-h.com/en/detskie-domiki/971#sigFreeId46f2559f8b
DIY play house tent
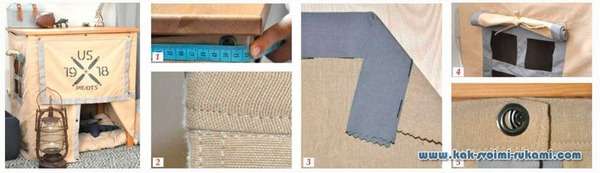 As already mentioned, you can make any kind of tent, it all depends on your desires, for example, this model of a children's play tent is completely unlike the others that I have already described, and it looks pretty beautiful and original. Make such do-it-yourself children's playhouse not be difficult!
To do this, you will need the following materials and tools:
- Thick beige cotton fabric 2? 1.5 m;
- A piece of gray fabric 0.5 cm long for the edging;
- Threads in the color of fabrics;
- Scissors: straight, curly and manicure (or you can use a clerical knife);
- Measuring tape for sewing;
- 14 eyelets with a diameter of 1.2 cm;
- Hammer;
- Black acrylic paint for drawing on fabric;
- Sponge;
- Brush;
- Stencil paper;
- Pencil;
- 5 screws;
- Tailor pins;
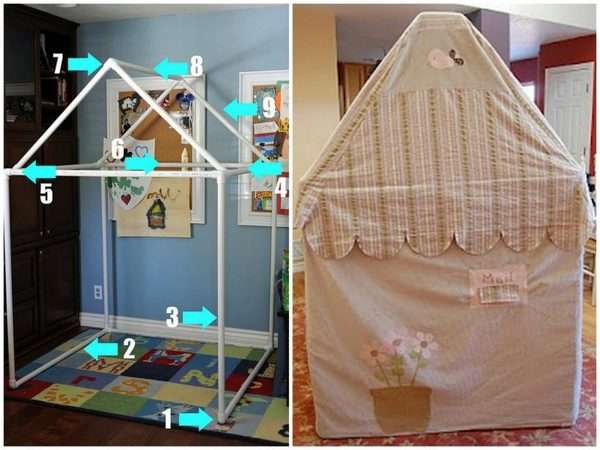
Scheme of a children's play tent
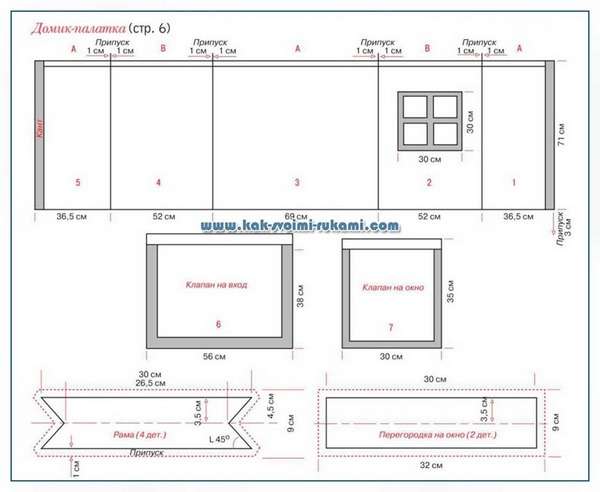 First you need take measurements from the tableThis will be the frame of your tent. Further, according to the scheme (but with its dimensions), we cut out the details of the fabric with allowances: 1 cm - on the sides and 3 cm - on the lower sections (where the parts will be edged, allowances are not needed). Wrap these allowances in one direction and secure. Sew all the details into a single fabric, which will cover the table. It is desirable that the walls of the tent lay on the floor. For the window, cut a square hole on the side, and separately make a frame of gray piping. Install the grommets in the tent: 1 pc. on the upper edges of the walls and 4 more pcs. - in places where the legs of the table will be. On the front jumper of the table itself (under the countertop), screw the first screw. Having hooked one top edge of the tent on it, wrap the table legs with a cloth and fix the second edge of the product on the same screw. Screw in the other screws through the remaining grommets. Sew the buttons to the tent and you can fasten the finished door-valve with a pattern on them.
 How to assemble a children's tent
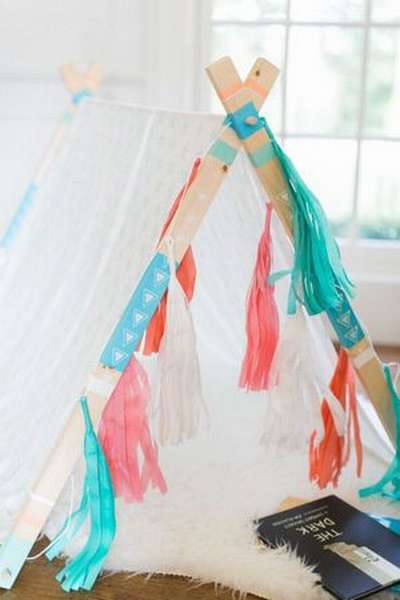
Here’s another simple option. how to put together a children's tent for children in the house. Of course, how to make such a type has already been described above, but for children, and especially kids, it will be much more interesting if the tent looks bright, and even more so, on this model of the children's tent there are hanging ribbons that literally attract the attention of the baby! So, it’s worth a little more detail to consider this model.
Making such an option will require a little more time, in addition to assembling, since the paint should dry out, but even in this case, the game tent should not be done for long.
To design this model, you will need:
- Masking tape;
- Brush;
- Acrylic paint;
- Rope or lace - 2 pieces, approximately 2 meters long;
- White marker;
- Rain or any pieces of cloth.
The steps for assembling the frame of such a children's play tent with your own hands are the same, for design after completing the first stage (after you have drilled holes), but before connecting the bars with a crossbar, you should paint the bars in this way: glue each part with masking tape, creating stripes pattern. Paint the boards on all sides and leave to dry for 1 hour. Mark with a marker a series of triangles on the front of each part.
 To arouse interest from the little ones, it is best equip the tent with hanging tapes, for this, cut ribbons from colored rags, or you can buy ready-made ribbons, you can also use the New Year's “rain”, you can decide for yourself, just fasten such ribbons to the rope / string and fasten to the frame, as shown in the photo.
 Children's tent from pipes
If you think that only a tree can be used to create a framework for children's tents, then you are mistaken. You can make the base frame absolutely from any materials that are convenient and accessible to you.Be it metal rods, wooden bars or even plastic pipes! By the way, the last option is children's tent from pipes presented in this fragment of the article.
Why is it better to use PVC pipes to assemble the framethan, for example, wood bars? There are several reasons, such as:
- Easy to connect PVC pipes to each other. You will not need to drill or tie anything, just get a couple of fittings to hold plastic pipes together.
- PVC pipes are a malleable material. If a flexible frame is needed for a children's play tent, then plastic pipes are much easier to bend than, say, wood or metal. And during heat treatment they will be able to maintain their curved shape, if necessary.
- Build stability. The frame of plastic pipes will not “corrode” in different directions, such as the same wigwam frame of 4 connected bars.
- An opportunity to show imagination. A simple assembly of the frame allows you to perform it, no matter how paradoxical it may sound, of any complexity, because nothing limits you.
All these pluses make it easy to create a children's play tent with your own hands and make it much more interesting, you just need to create a frame and put on it a “cover” made by you, which you can come up with yourself, or find ready-made schemes and options on the Internetto take them as an example!
 Such a cover can not be fixed on the frame at all (since it will fit tightly enough in shape), and tie it with just a few laces / straps made on the inside of the cover.
How to make a tent for a cat
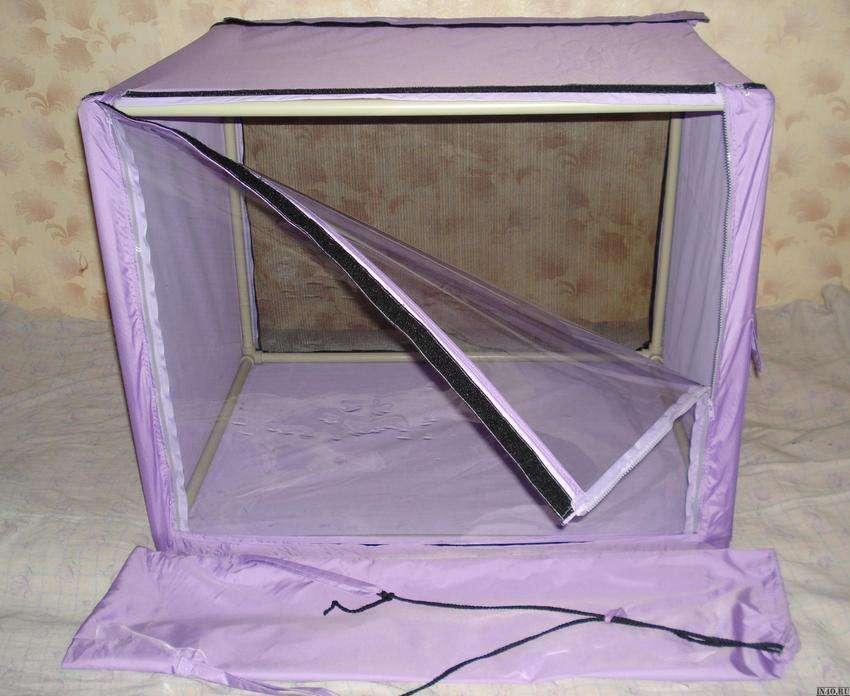 Here is one example of what a simple children's tent can be made with your own hands from PVC pipes, as described above. I must say right away that this model was originally intended for other purposes, the author came up with it for his cat, but it is just as ideal for children (a larger tent) and pets (a smaller tent option), while it looks it will be no worse than some kind of children's tent in the store.
So, how to make a tent for a cat and what you need. Not so much, namely:
- PVC fittings (three-way) - 8 pcs.;
- PVC pipes are 20 mm in diameter and 1.5-2 m long (depending on what size the territory is) - 12 pcs.;
- Cloak fabric, approximately 2x8.5 meters;
- Grid - 2 pcs. 2x2 m or 1.5x1.5 meters (depending on what size of the tent you have chosen);
- Zippers with plastic dogs (you can also with metal ones, but plastic ones are cheaper, and it is more convenient to use them) - 2 pcs. 8 or 6 meters long;
- Sewing machine;
- A piece of chalk.
Then everything is simple. First you need make a frame of plastic pipes in the form of a cube. Then you take the raincoat fabric (if the tent is 2x2 in size, then the fabric is 2x8.5, and if the tent is 1.5x1.5 in size, then the fabric is 1.5x6.5m in size; a margin of half a meter so that the fabric can be sewn) and begin wrap it around the frame, starting from the left wall and ending with the bottom. At the bottom you will have a supply of fabric, make a note on the fabric, at the corner between the side edge and the bottom of the frame. Sew the seam on the sewing machine at the indicated mark. Sew to the two sides of the fabric and to the zipper net. Put the tent cover on its frame. Your tent is ready!


https://i.expert-h.com/en/detskie-domiki/971#sigFreeIdd8d7b3016a
How to make a teepee for children do it yourself
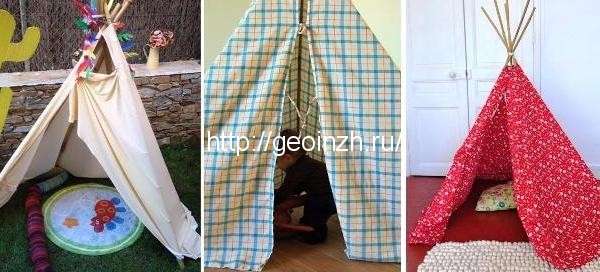 If you do not know how to make the teepee for children do it yourself strongerthen bamboo rods can be used instead of ordinary wooden blocks. Now the tent, due to the fact that the sticks are connected, but not fixed, can be easily folded, and removed, if necessary, and then laid out again.
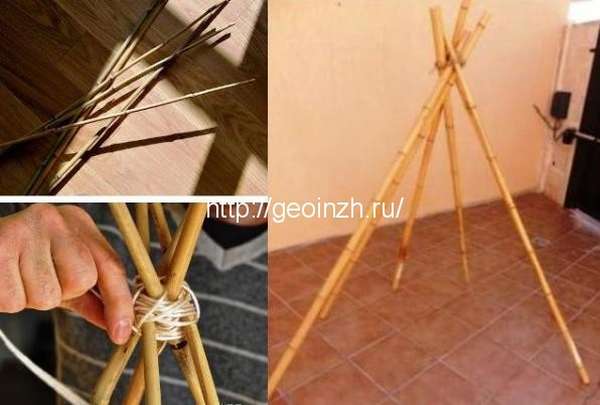
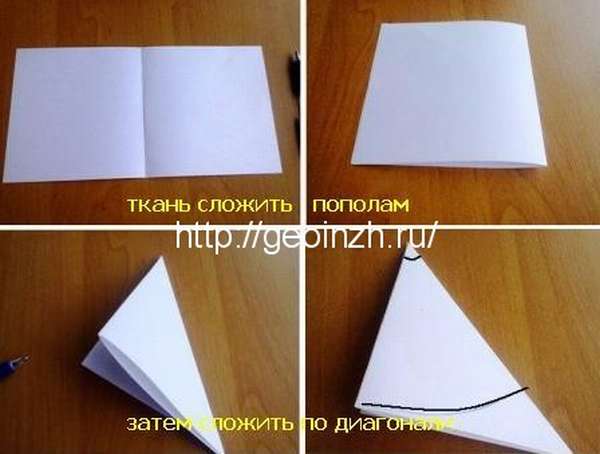 In the same way, you can take it with you if you are traveling with children to relax in nature - it fits in the trunk without any problems. This option of the tent will be much easier than the usual wigwam made of bars, and due to the fact that the sticks will be up to 2 cm in diameter, the model will look neater. The upper edge can be braid, leaving the ends for tying. If you can - the top can be sewn with the main fabric and hem the bottom of the canopy. Put the canopy on the frame and tie on top.
On the bottom of the canopy in those places where the frame ends, sew rings at a height of 10 cm from the floor to attach the frame to the canopy. If there are no rings, then you can sew pieces of braidto snap a canopy.
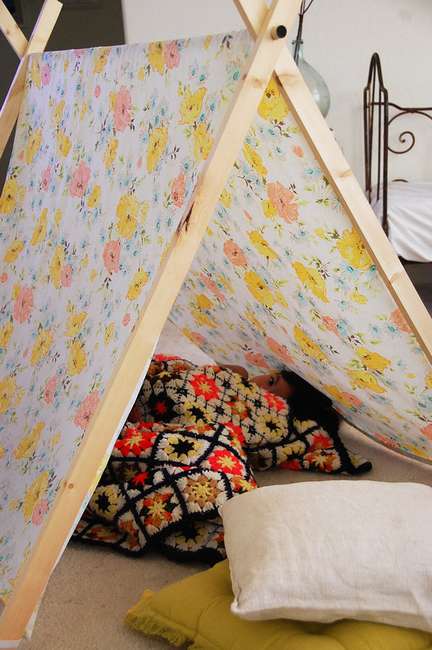
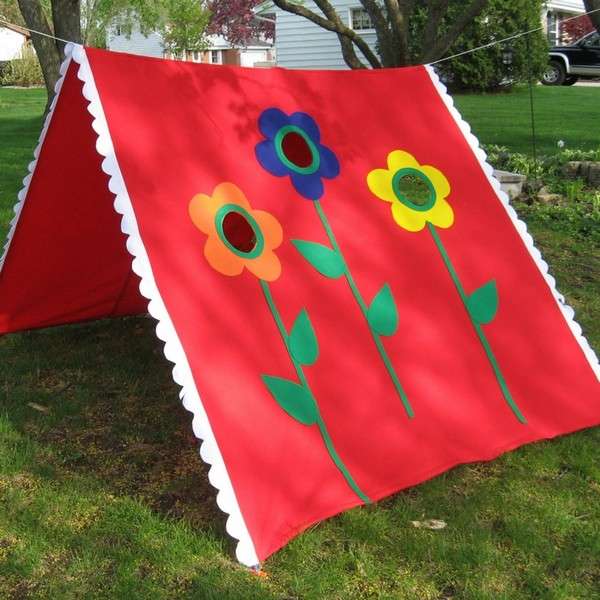
Children's game tent for the house
 An easy children's play tent for the house will help not only to create a secluded corner for your child, but also become a part of the room interior. Therefore, choosing the model of the children's play tent that you are going to make, it is very important to consider the design and the material from which you will make it. So here is another model children's play tent for homemade from wooden blocks. It can be very interesting for children to sit in a tent without leaving home. And exciting for kids who love new experiences and want to have their own secluded corner. That's why DIY tent frame tent can be useful in the children's room. A tent should not be made big. There should only be enough space for the baby to sit comfortably, play with friends or take a nap. Creating a corner for the child, you can use any light tissueThe same tablecloths may come in handy. Or knitted openwork fabric. Another plus of such a do-it-yourself folding tent is that the air can circulate freely inside, which is very important, since the tent is indoors.


https://i.expert-h.com/en/detskie-domiki/971#sigFreeIdd272f9605a
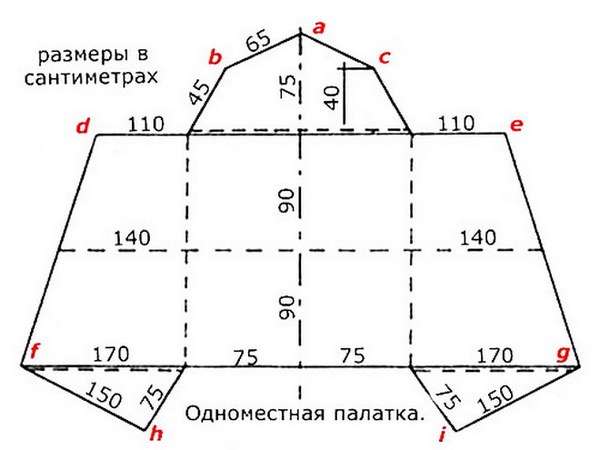
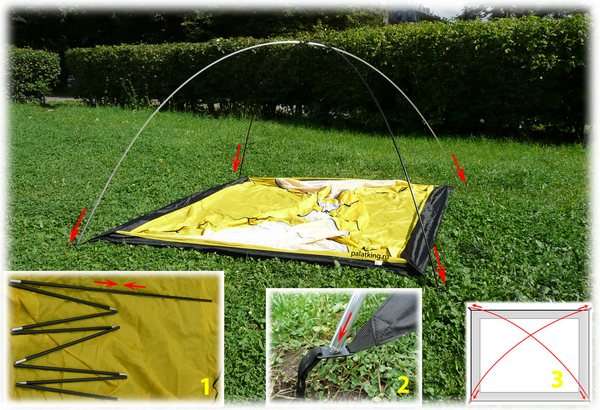
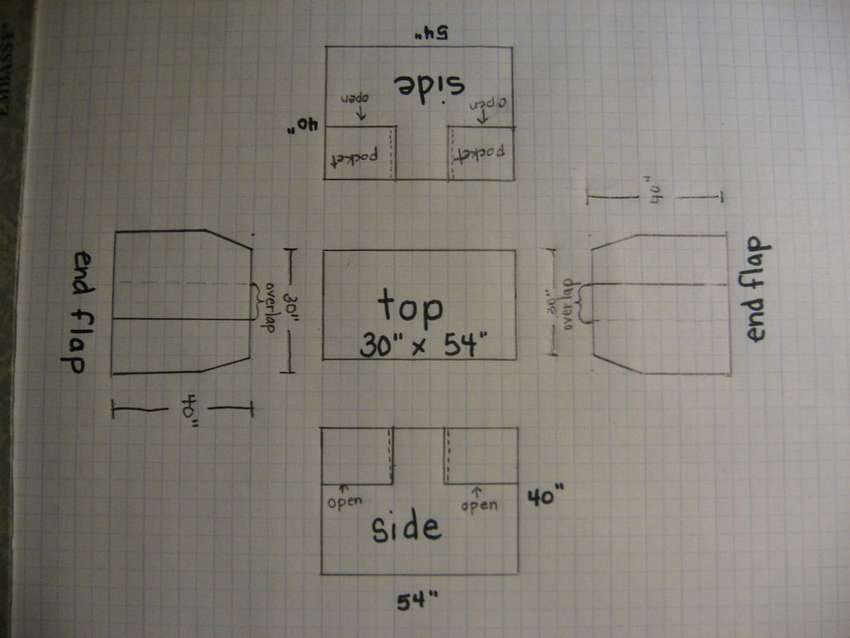
Case for children's tent
 If you want to make some more interesting and practical version of a children's play folding tent with your own hands, then metal rods can be used for its frame. This model is very similar to a camping tent, but it is smaller and its cover is brighter. What will it look like case for children's tent - depends on your imagination and skill, you can come up with anything you want! The photo on the right shows cover pattern, you can easily cut something like that from any kind of fabric by choosing the right sizes. The advantages of this model is that its easy to disassemble and assemble, and installation will require only two metal rods. Several ribbons need to be sewn onto the tent cover so that it can be tied to the frame.
Children's tent for a summer residence
 To make a simple children's tent for a summer residence, it is enough to stretch the rope between the trees, throw a sheet over it and fix its edges with wooden pegs or other suitable means. To make your baby comfortable, lay soft rugs, blankets or pillows on the ground. And though there is nothing supernatural in such a “structure”, but a child’s imagination can fill it with an exciting story. Homemade kids tent on the street. will give a lot of interesting games and, in addition, will save kids from solar overheating.
This model is suitable just for the case if you want to make for children something simple at once, for example, in the country, when the children get bored and have nothing to do, this option of a home-made children’s play tent can help you out! Installation takes almost no time - 5 minutes and you're done. And you can take any fabric for it, which one will come across. Most importantly, the children will immediately have a place for games, believe me, they will be happy and will find what to do in their own tent! Also, this type can be installed not only on the street, but also the house, especially if the tent is for the baby, it will be simply interesting for him to crawl.
The photo: #
A few more examples of such home-made children's tents that you can do in the country, in the garden or just while relaxing in nature.


https://i.expert-h.com/en/detskie-domiki/971#sigFreeId923c240ea6
Children's tent on the street
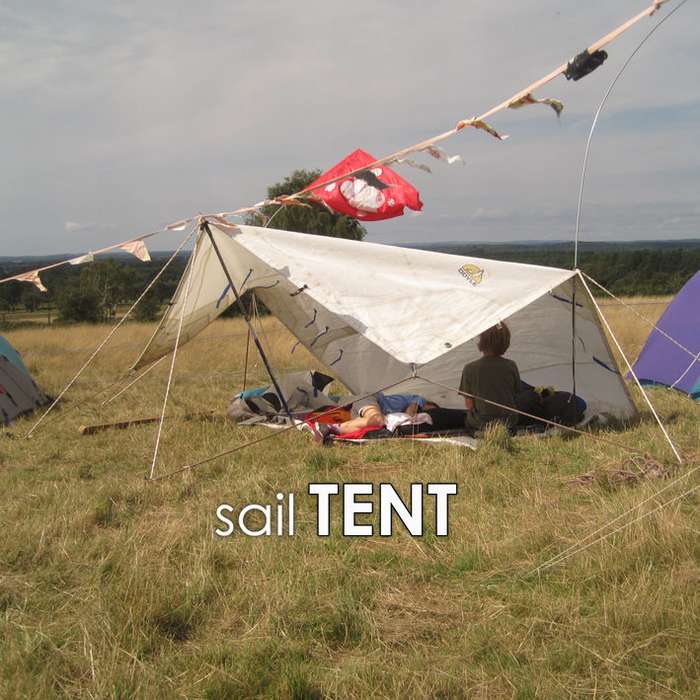 Here is another option simple children's tent outsideusing ropes. This model is a very simple open tent, so it’s better to install it on a street for children in calm weather, but you won’t be able to set up such a tent at home, because there is nowhere to drive pegs, but you can try it if you want. First you need lay out sail / triangular fabric. You need to fold it into the shape of a tent, as shown in the photographs, but first you need to cut off the top so that you get a trapezoid, not a triangle. Draw the cut off top into 2 triangles and sew them to the sides, thus, the doors of the future tent turned out. Set up the tent using ropes tied to pegs, pegs fix the base of the tent (as shown in the step by step photos). You can experiment with the design of this model!
To create such a model you will need:
- Old sail, you can use just a large fabric (cut from it a triangular shape);
- 10 metal pegs (can be made wooden);
- Rope;
- Hammer for hammering pegs (optional)
- Scissors;
- Threads;
- Needle.


https://i.expert-h.com/en/detskie-domiki/971#sigFreeIdbb7a4cade2
How to make a children's tent from plastic bags and plastic bottles
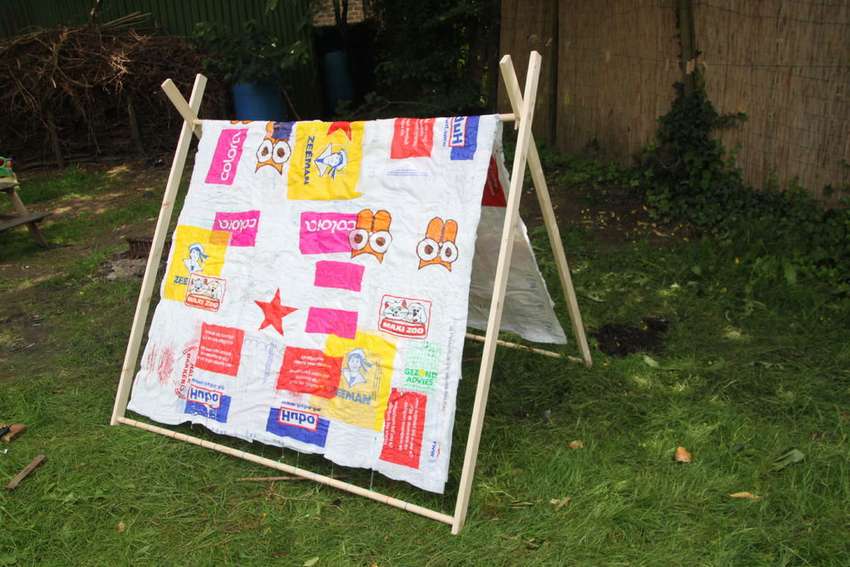 Useful and environmentally friendly! So in three words you can describe this model. The creator’s idea was to make a tent out of used bottles and bags, instead of throwing them away, thereby polluting the environment, it also allows you to make a children's play tent with your own hands even more original and cheaper.
To make such a children's play tent out of plastic and polyethylene you will need:
- A lot of plastic bottles;
- Lots of packages;
- 4 bars;
- Cylindrical crossbeam (20 mm in diameter);
- Drill;
- Special cutter.
Ropes are made of plastic bottles using a wooden cutter, which is shown in the photographs. Basically, the concept of building a tent frame is the same, the changes affected only the tent cover, it is made of plastic bagsfolded in several layers and fixed to special plastic rope from bottles. In general, all this only affects the design of a home-made play tent for children, and of course the price, also, if the tent is on the street, rain will not be afraid of such a model, because a thick layer of polyethylene will not allow it inside!
Pluses of model:
- Compact, can be folded;
- Thrift;
- Environmental friendliness;
- Low price;
- Weatherproof - the rain will not be allowed!


https://i.expert-h.com/en/detskie-domiki/971#sigFreeId2bcfbb20f0
DIY tent made of PVC pipes
 Another model do-it-yourself tent for children from PVC pipes, which once again proves my words that with the help of plastic pipes you can make a design of absolutely any shape, which is very convenient. In addition, PVC fittings and pipes are not very expensive in order to make a child happy. The author says that he was inspired by the type of tent that he himself had in childhood, and mentions that you can make a tent from PVC pipes with curved shapes, for this you just need to subject the pipes to heat treatment, due to which you can make any, I emphasize again, the shape of the tent.
To create the frame of such a tent, you will need :
- 2 pieces of two-way fitting;
- 4 pieces of a three-way fitting (not angular);
- 2 pieces of four-way fitting;
- 6 pieces of a three-way corner PVC fitting;
- And also, 8 three-meter PVC pipes (but you can choose the sizes you want).
Insert the pipes into the fittings and you're done - the frame is assembled! You just have to throw some fabric or a blanket on top. Inside, instead of the floor, you can make a blanket or a soft rug, it’s also good to have lighting, some New Year's garlands are just right for this purpose! Just a little effort and an ideal place for children's games made! Even if necessary, you can easily remove the tent, because with the help of PVC pipes and fittings it can be easily disassembled. Fold all the details in a bag so as not to lose, and then again, if desired, collect it back.


https://i.expert-h.com/en/detskie-domiki/971#sigFreeIda12391adfb
Hut from chairs

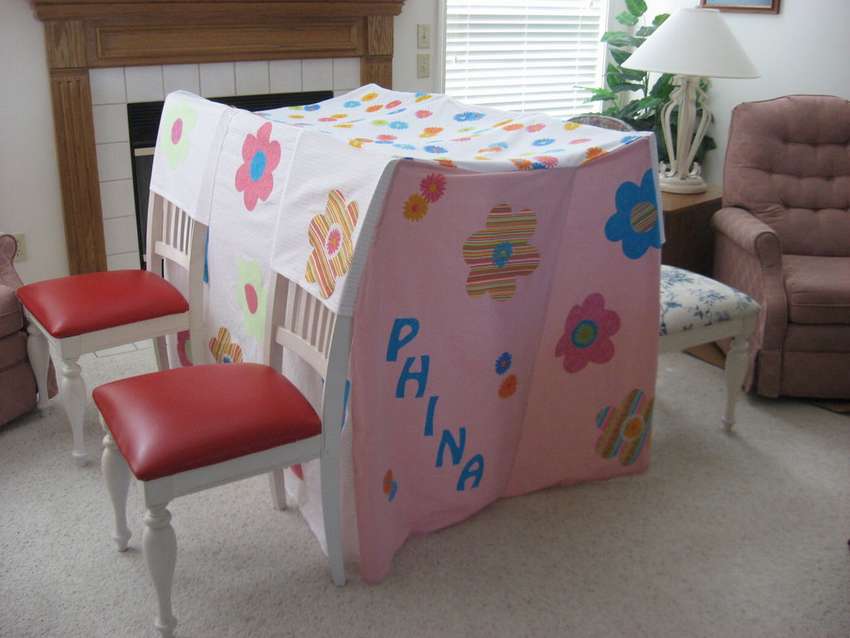 Hut from chairs is the child’s highest knowledge of making tents. Usually this version consists of several (two, three, four) chairs or armchairs, on the backs of which are thrown blankets that hold pillows, the pillows are also inside the tent itself.But such a construction is not worth a long time, it all boils down to the fact that after several visits to the makeshift house, the blankets just fall to the floor and you have to start all over again. Thanks to the photo instructions shown in this fragment of the article, you can come up with a new version of the old-fashioned children's “tent” for your children!
 The key role is played only by the covermade from fabric that you can always fold and clean. Even if you are celebrating a holiday in nature or in the backyard (whether it's a birthday or something else), you can always put this tent to the delight of children! To create such a tent, you just need to carve out a scan of a cube without a bottom from the fabric (a square in the center, with four squares on the sides), cut it and sew the corners together, leaving one side not sewn (for the door), or do the same the most of 5 squares sewn together, if the fabric is not so big. The main thing is decor, you can draw anything on the “case”, or sew various patterns. The most convenient thing in the tent is that it is put on chairs for several seconds and just as quickly removed, your children will no longer have to suffer when building tents that will collapse.


https://i.expert-h.com/en/detskie-domiki/971#sigFreeId0094530f66
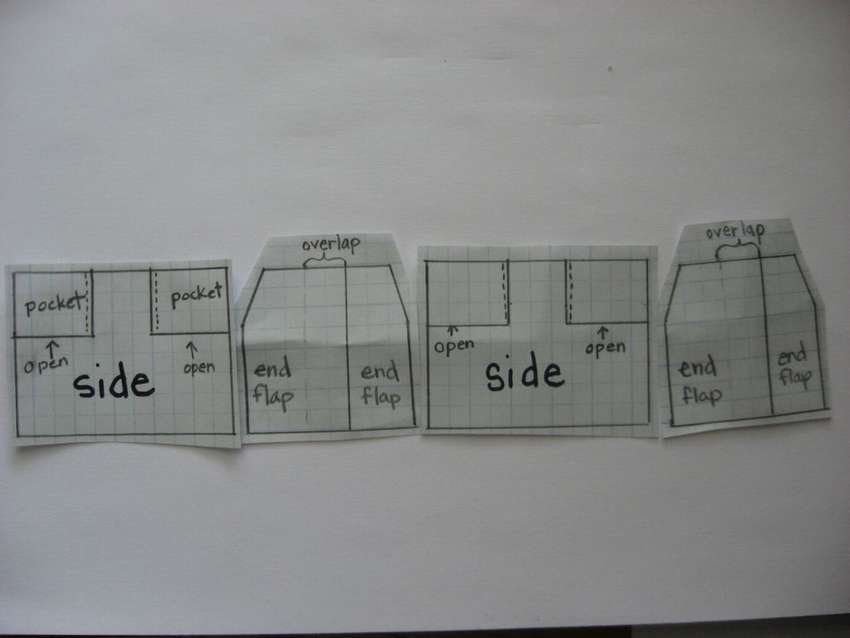
Children's canopy for home
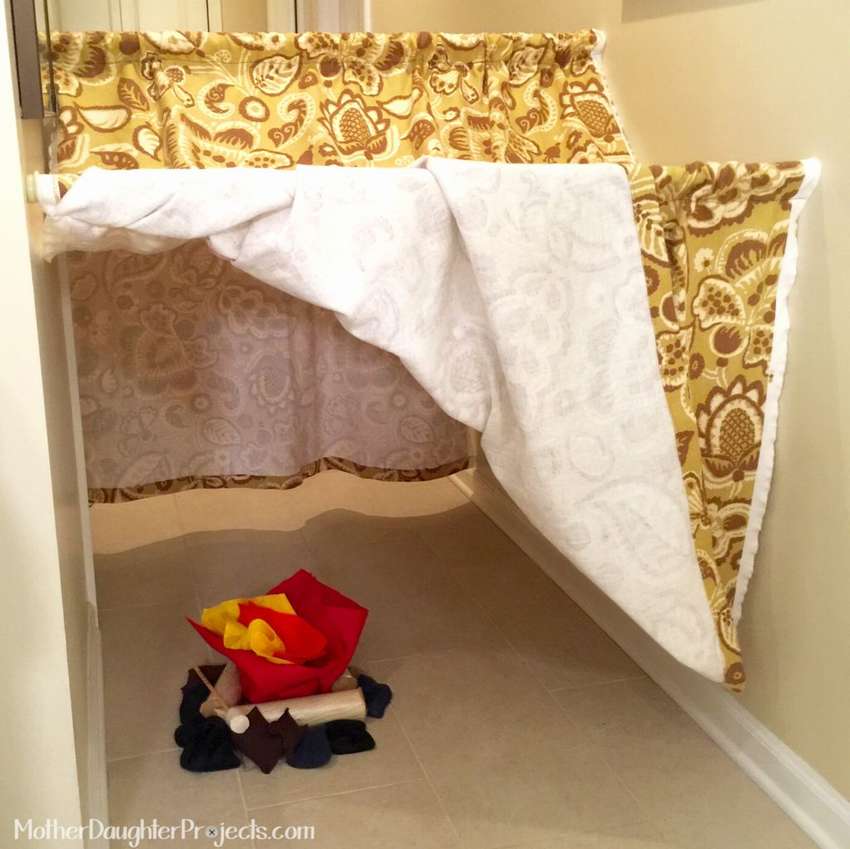
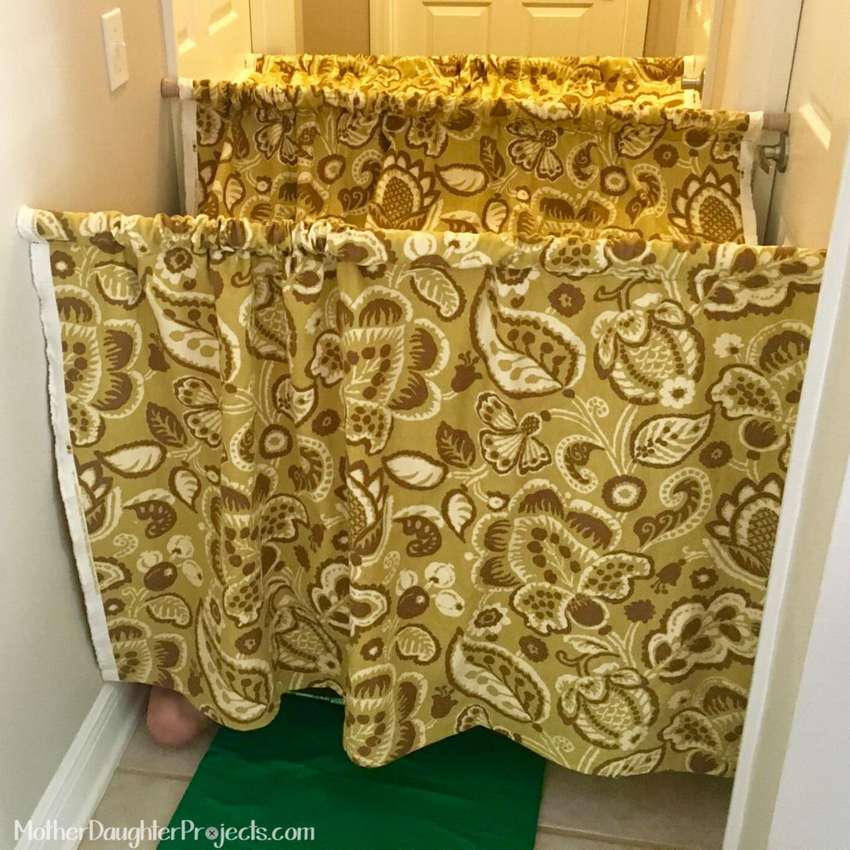 Such children's canopy for homeAccording to the author, it is portable, compact and does not take up much space, since it can be installed right in the corridor.
Materials and tools that will be needed to make the canopy:
- Three tension rods;
- The cloth;
- Threads;
- Sewing machine;
- Sewing tools, as needed.
The canopy is made by simple sewing, it consists of three cases and an additional fabric hem of your choice. Fabrics should not be tightsuch as jerseys, they should not be jammed.
Place the three bars of the beam at a distance of about one meter from each other, and secure the middle rod just above the other two bars, so that a gabled roof forms at the canopy. Place two pieces of fabric on the rods, on both sides of the central crossbar and take measurements - where the hem touches the floor, mark and cut off the excess piece. Sew the pieces of fabric together. When you hang the fabric on the rails, make sure that they slightly sagged down, so you can adjust the desired length of the "door". You can make special "pockets" in which crossbeams will be inserted.


https://i.expert-h.com/en/detskie-domiki/971#sigFreeIda02558ac97
200 photos of home-made children's tents, wigwams, huts and awnings


https://i.expert-h.com/en/detskie-domiki/971#sigFreeId107ec448d2
Hello, I am the author of this article, so I look forward to asking questions for this article in the comments below, I will answer all !!!
If you have questions on another topic, ask them on our forum, we will answer you
- Two baskets of paper in 5 minutes (Master class)
- How to make a simple and compact table for a milling cutter from plywood
- How to make a soft headboard tile (Instructions + step by step photos)
- Cinder block benches: a convenient bench in 55 minutes
- How to make a bed with a niche: saving space (Master class)