DIY tree house 147 photos
 tree house
There are things that all children dream of. And this is not only a bicycle or a game console, the child still wants to have a place where he will feel like a complete master. Children are always looking for a staff, so make it easier for them, build a tree house and the joy of the child will have no limits.
Of course, this is easier said than done, but time and effort will certainly not be wasted. We need to try a little, think carefully through everything so that the design is reliable and safe.
Houses can vary in platform mount, number of trees, construction, design, and so on.
DIY tree house for children
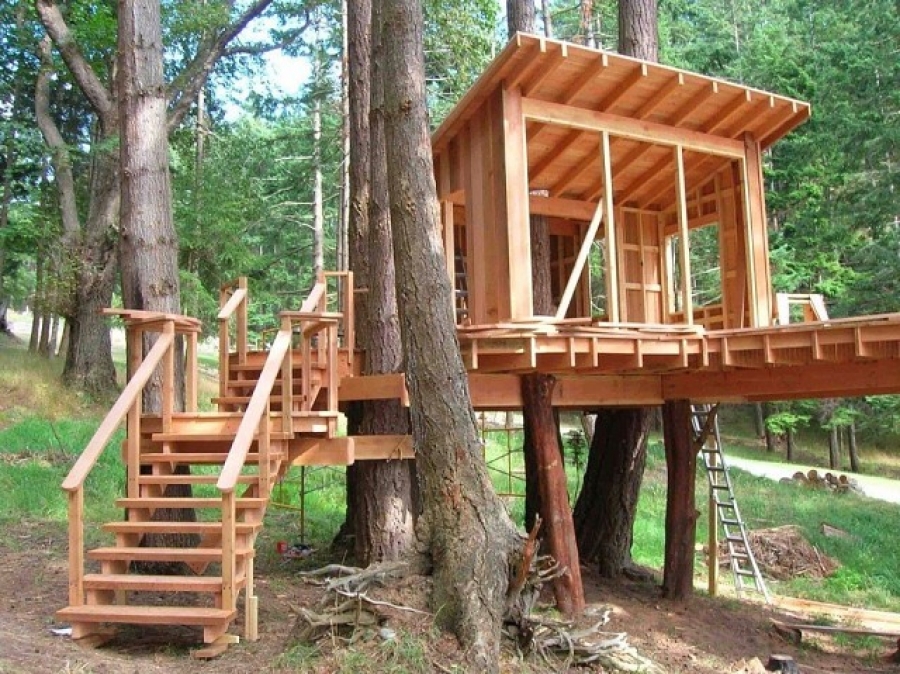
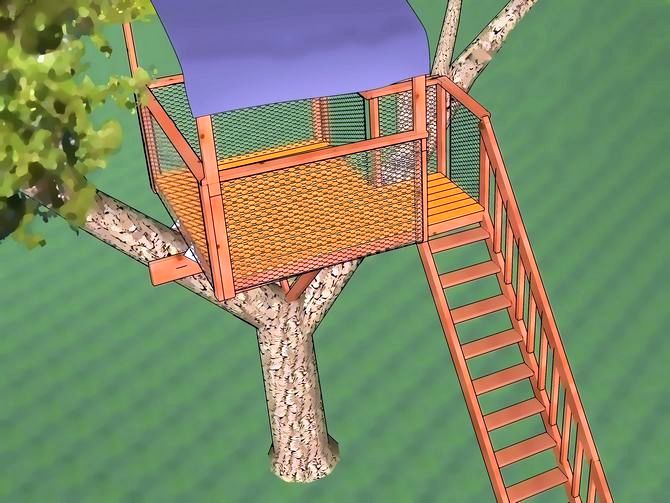
 This project of a treehouse Designed for safety, reliability and maximum safety of trees. The design is completely autonomous, so it can be installed anywhere, even where there are no trees. The house is supported by a universal triangular structure and, in principle, even no need to dig support pillars into the ground, if there is a rocky flat ground, the structure will hold perfectly. Of course, the house is not small, and you can’t build it in one day, but it will be interesting, especially if you attract children.
So, how to build a do-it-yourself treehouse. Start, of course, with the preparation of materials. I won’t give the entire list here, it is very large, it’s better to look at the site, everything is listed in detail, separately for the platform, roof, walls, even a bunk bed, which is in the house.
Tree house drawing
 Start with a triangular frame.
- Cut one end of each front leg at an angle of 30 ° as shown in the drawing. Screw the legs to the beam with 10 cm screws. It’s better to do it on earth.
- Temporarily fix the corner ends in the center of the support. Fasten the ends of the crossbar and secure it over the legs.
- Drill a through hole through the legs and center post. Make careful grooves at the ends of the holes for the bolt head, nut, and washer. Then tighten all bolts.
- Assemble the rear frame.
- Now prepare the plumb line and level and find yourself an assistant to install the frame. This is the most difficult stage, but if you have a flat area, then it will be much easier to work.
- It will be necessary to determine which of the four foot positions is the lowest. To do this, use a level and a long straight board.
- Start the assembly with this lowest leg, fix it so that it is sheer. Check that the beam is at the correct height and is evenly fixed.
- Do the same with the other legs. Check again that everything is smooth, parallel and perpendicular.
- Attach the diagonal cross-pieces to the legs and fix with screws.
- Drill two holes on each leg and tighten with bolts.
- Then two more holes of smaller diameter at the intersection of the brackets, tighten with 10 cm bolts.
Site assembly
 Fix all corners of the platform frame with metal brackets.
- Nail the hanging anchors to the front and rear connecting beams.
- Saw the boards for the floor of 2.5 m. Temporarily screw one board in the middle of the frame, then begin to lay the boards, starting from the back.
- Before attaching the end boards, cut openings for the hatch. It is advisable to pre-drill holes at the ends of the boards so that the wood does not crack during fastening.
- When you get to the middle, remove the time bracket. From the boards, make a connecting element so that it stands between the beams.
- Fasten the bottom plywood and the remaining floorboards.
- Screw the cruciform braces to the hind legs, removing the extra length.
Stairs
- Screw the two steps to the beams (stringers), at the same angle as the legs, to attach the ladder.
- Attach the beams to the platform.
- Starting from the top, fasten the steps of 10 cm with screws to the stringers.
- On the right side of the stairs, screw the railing into the stringer.
House
- On the ground, assemble the side wall cladding, as in the photo.
- Then screw one wall through the bottom plate to the platform.
- Assemble the back wall and mount it on the platform.
- Make sure it fits snugly against the bottom plate of the side wall.
- Then install the other side wall in parallel.
- Attach a temporary bracket to the inside of the back wall.
- Mount the front panel without rafters and rods, add them after installation.
- Connect all the parts together and install the two halves of the wall on the site.
- Staple them so that the wall is stable.
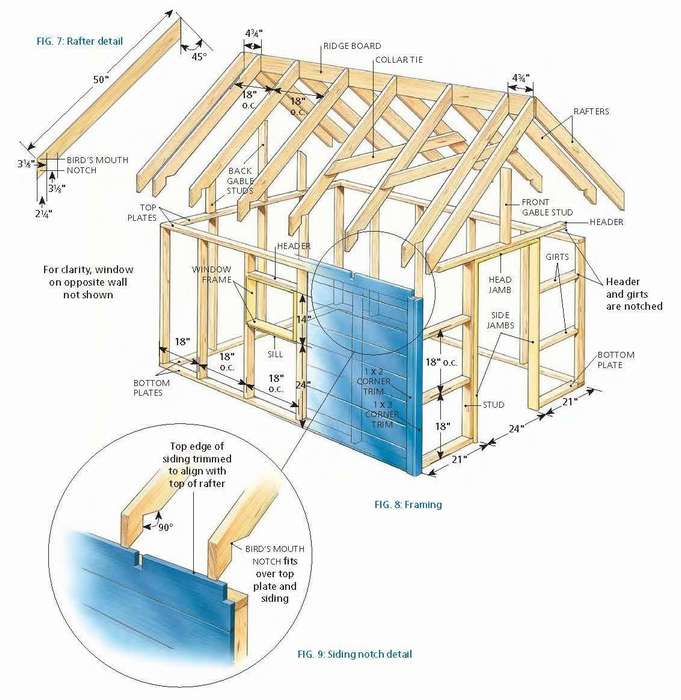
- Attach the sheathing and make sure that the cutouts for the rafters are in the right place.
- Cut the front panel so that it fits around the rafters.
- Screw it to the door frame and rafters.
- Remove all curly braces.
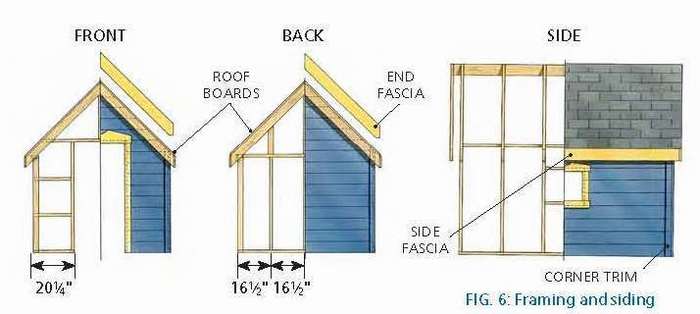
- Attach the boards to the rafters, starting from the front edge of the roof.
- Cut the side panels and screw them to the rafter shanks.
- Install the door jamb and window frames.
Railing
- Screw the handrail to the handrails and round off all sharp corners.
- Nail or fasten the balusters to the beam and the lower part of the handrails. The distance between them should be no more than 10 cm.
- Install the safety chain with a latch.
Remember children will test everything for strength, so do not save on equipment and do not buy low-quality material.
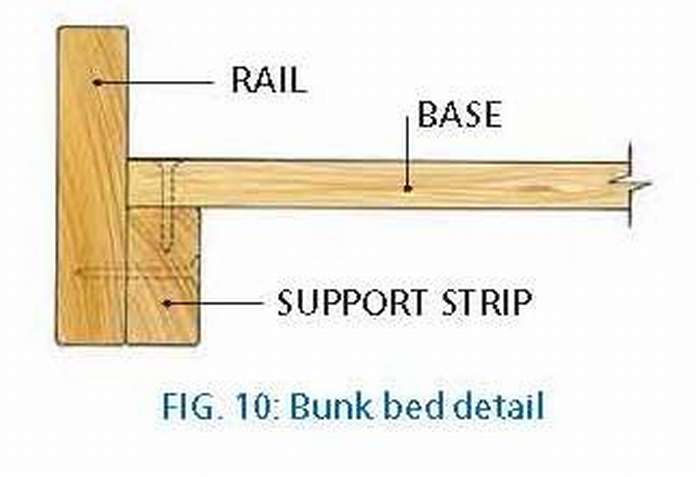 Think about the interior of the treehouse for yourself, discuss this issue with the children. The author decided to make a bunk bed, but you can put a table, benches, shelves or something else that suits you and the children more. In this case, the bed is shelves made of plywood with an attached side staircase, which is better to fix in the center of the bed so that there is an additional protective barrier. Well, the door. The author just bought it at the store, but you can do it yourself.


https://i.expert-h.com/en/detskie-domiki/901#sigFreeIdaa8011e03c
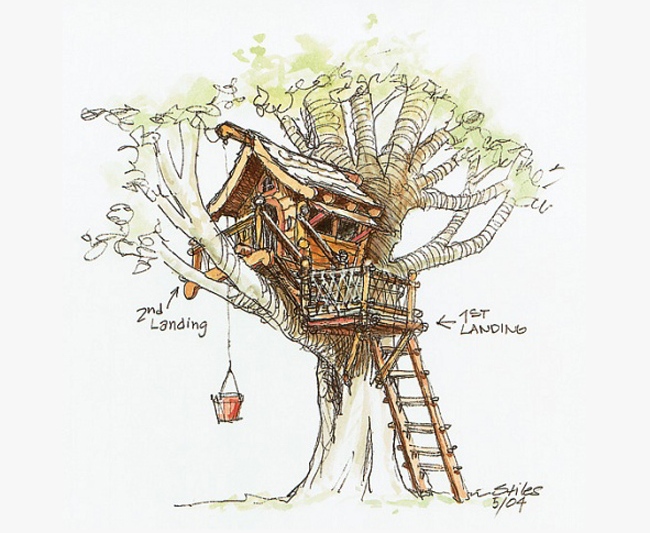
A step-by-step diagram of the construction of a tree house
The following is a generalized scheme of building a house, more precisely, platforms on a tree.
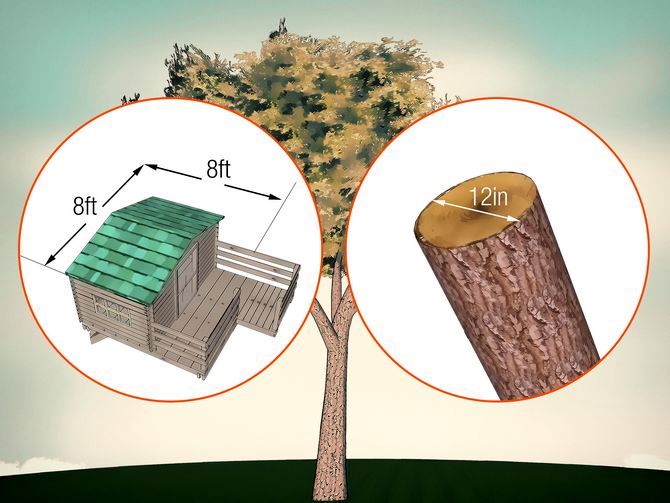 Difficulties can begin already when choosing a tree. Naturally, it must be large and strong. Maybe on your site and there is no suitable. And if not in your territory, then maybe the neighbors will be against it. Well, let’s be optimistic, if we pick up a normal, healthy tree, make sure that the trunk diameter is not less than 30 centimeters and that there will be no diseased and dry branches where the platform will be attached.
 In your mind, you probably already imagine what your house will look like, but it is advisable to transfer your fantasies to paper. Carefully thought out scheme, this is the first step to a successful construction. It’s better not to reinvent the wheel and look at the projects of finished designs on the Internet or auxiliary literature and of course add your own touches to the design. For clarity, you can make a cardboard model, so even more interesting to build. The main thing is not to forget, wood, this is brickwork, it grows and changes, all this must be taken into account when you think over the fastening details.
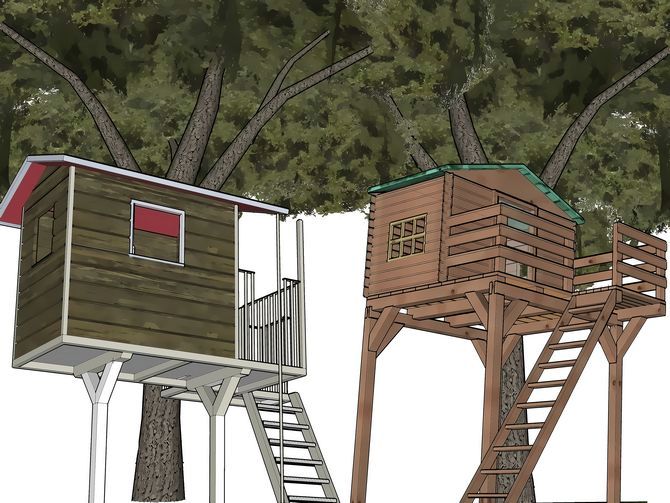
 Trees are swinging, this is another important point, so you need to find a way how to better fix the structure so that the house does not break, and the tree survives. The easiest way is to fix the beams on which the house will be installed to the tree with bolts. But there are two drawbacks, firstly, the tree is a pity, the method is still barbaric, and secondly, special materials are needed to make the construction as easy as possible. It is more reliable to fix the house on supporting poles or hang it on cables (ropes, chains, etc.). Of course, there are also disadvantages, but the tree will suffer less.
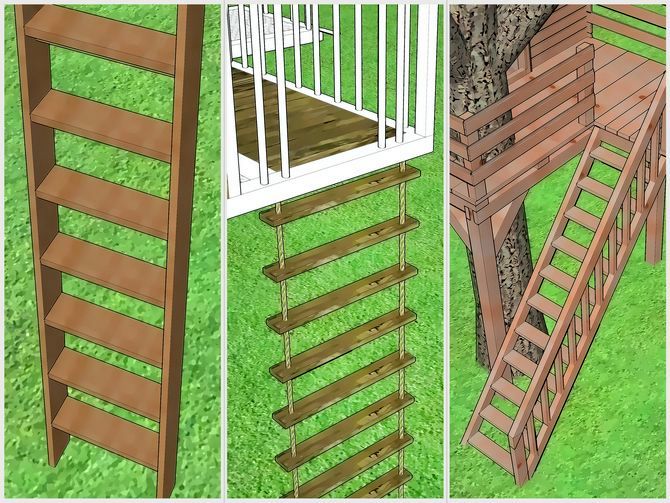 Now you need to choose a way to get into the house. Here again, the easiest way is to nail the plank to the trunk.But if we are worried about the integrity of the tree, then this method is better to exclude, moreover, it is not the safest. If the design allows, it is naturally best to make a fixed flight of stairs - beautiful, reliable, and if you attach a railing, then it’s safe. The rope ladder looks very romantic, like on a pirate ship, the children will be delighted, only adults, probably not really. In principle, you can’t make a problem out of the stairs, buy an ordinary extension, make grooves for it in the platform for reliability and the issue is resolved.
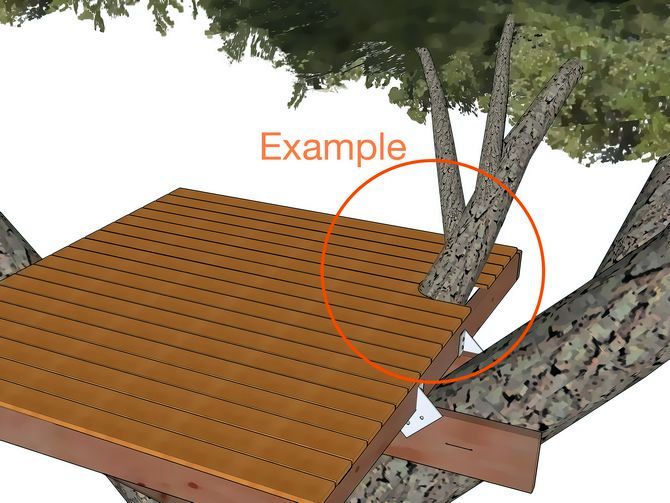
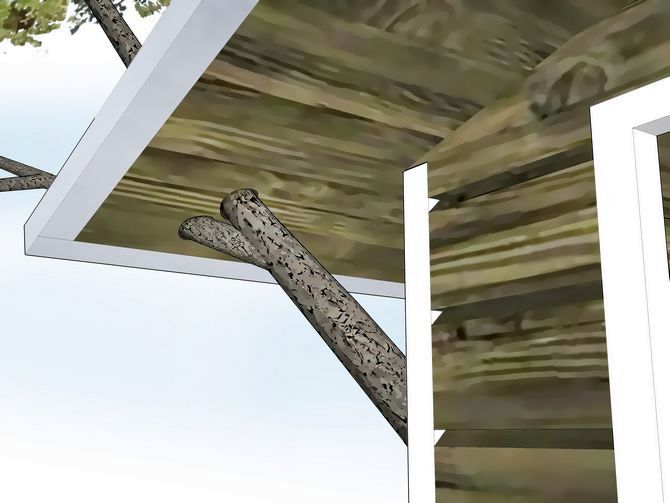 What to do with various obstacles? This refers to "extra" branches. You need to look at the situation, if you want to preserve the tree as much as possible, think over the design so that there are suitable holes in the right places, in extreme cases, you can cut something.
 Falling from a tree, even from a small height, is an unpleasant thing, and dangerous for children. Well, if you know where you can fall, lay straws there. Not literally, of course, but something mitigating for insurance can come up with, for example, sawdust. It’s better to think over safety measures to prevent falls, if you build a house exclusively for children, build at a safe height. Make a reliable protective fence on the platform, and most importantly, convincingly instruct the child how to use the house.
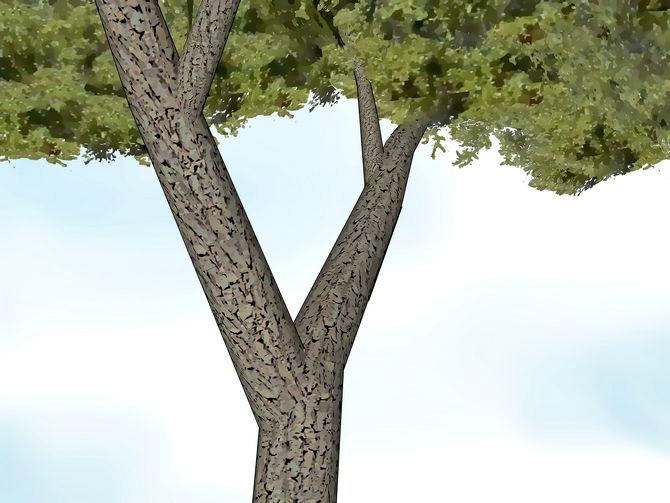
About how to choose a tree, it has already been said, and yet, it is good if it is V-shaped. Simply, in this way, you will solve many issues with fastening.
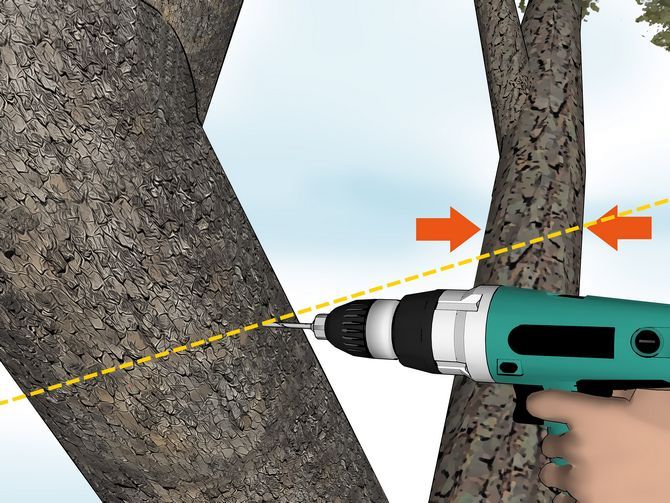 It is necessary to carefully calibrate the level and make holes with a depth of 10 centimeters. Here, as the saying goes, you only need to measure not seven times, but twelve.
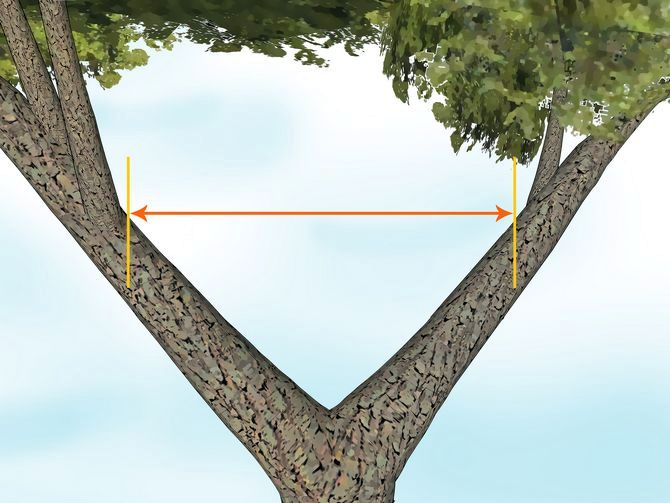 Measure the distance as shown in the picture.
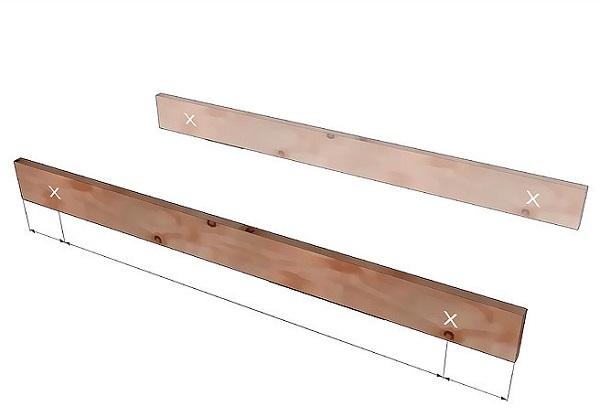 For proper weight distribution, you need to carefully mark in the beams where there will be reference points.
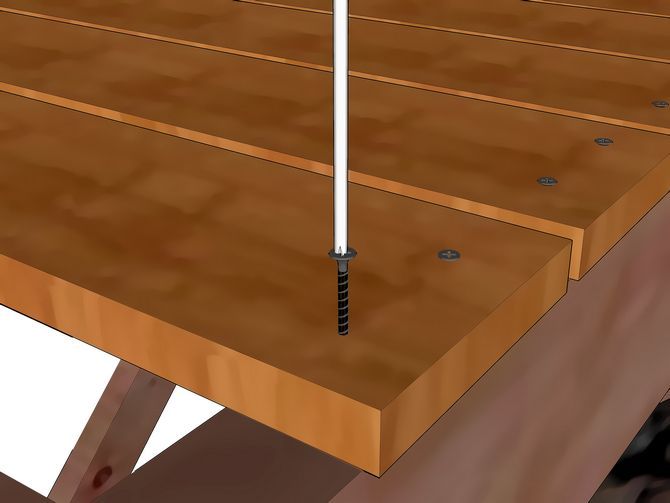
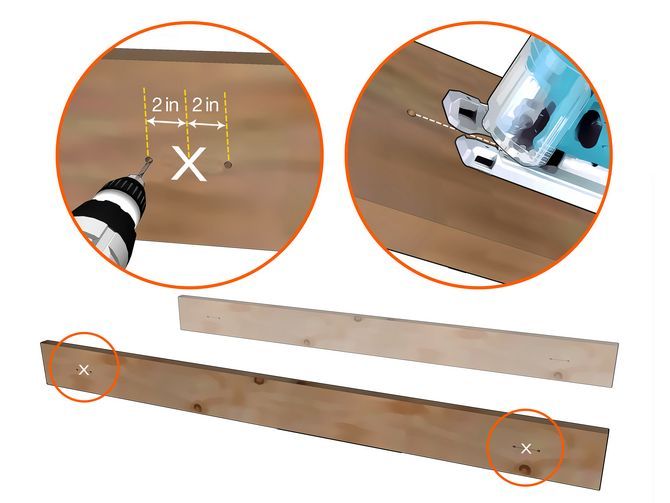 So that when the tree sways, the structure does not collapse, make grooves in the beams of 10 centimeters. The photo shows how this can be done with a jigsaw through the holes.
 At the selected height, fasten two main supporting strips to four screws 20 centimeters long. Use turnkey hex head screws. Then install parallel to the beam on the other side.
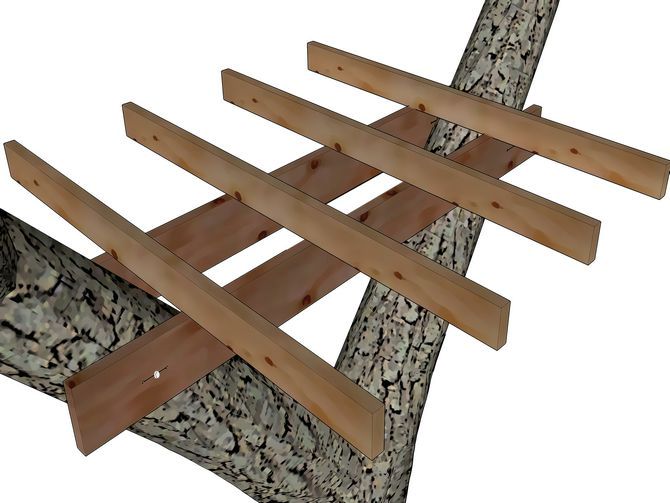 After that, we install the transverse beams perpendicularly. Fasten with screws 8 centimeters long
 We take two more beams and complete the design to get such a "frame".
 We attach to the main supports perpendicular to the platform on 8 cm galvanized bolts.
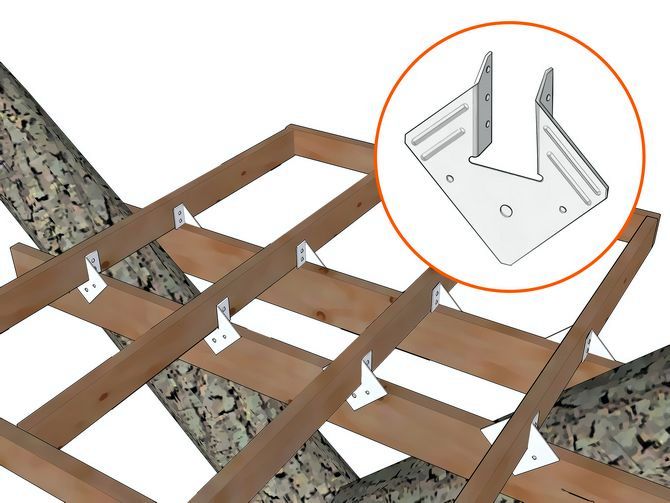
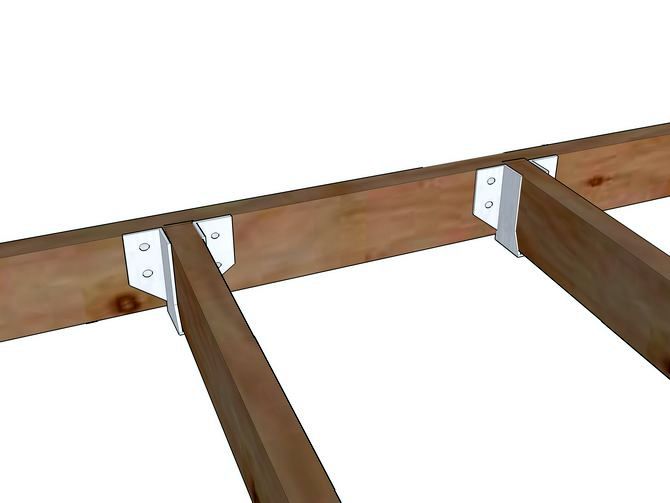 Using special fasteners we fix the external beam to the "frame".
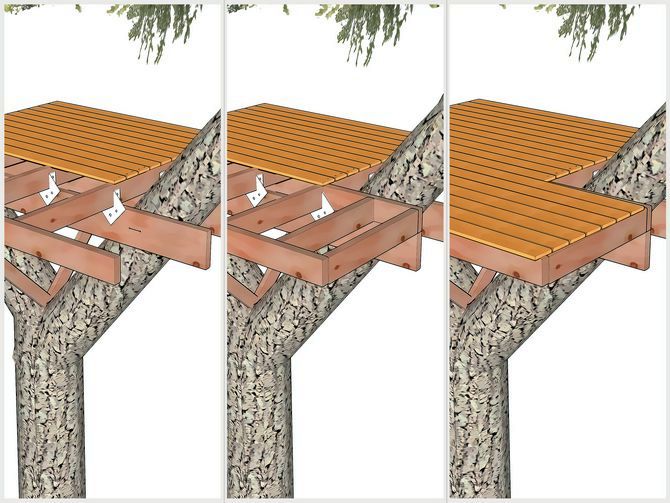
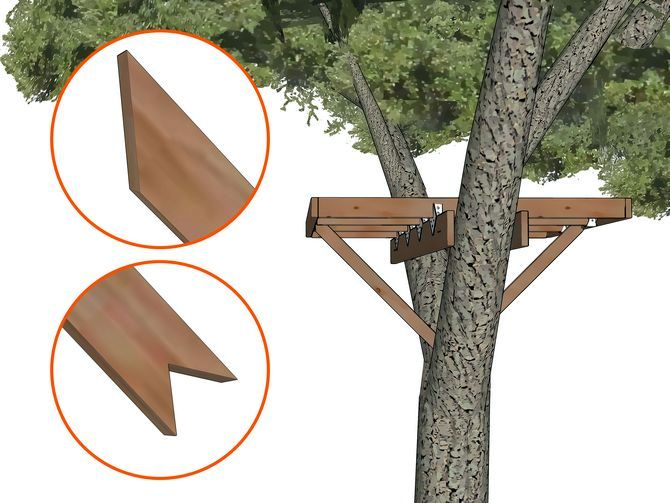 To give stability, we will need two more beams, as we see in the photo, they will serve as a support for the platform. To do this, it is necessary to adjust the upper ends for firm attachment to the platform, and from below we make a V-shape. We attach these supports with nails.
 Now we are preparing the site, that is, we remove the branches that interfere.
 The easiest step is to mount on the floorboard platform. By the way, it is not necessary to closely fit, it is even desirable to leave a gap of 0.8 - 1.2 centimeters.
 We make an entrance from the main supports under the platform
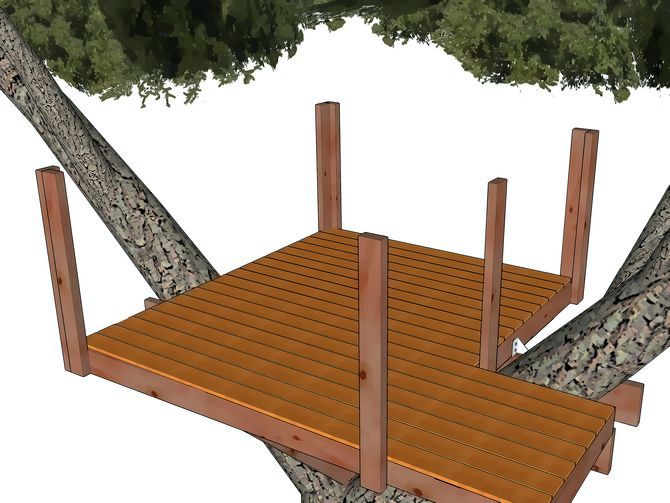 We establish guides for support
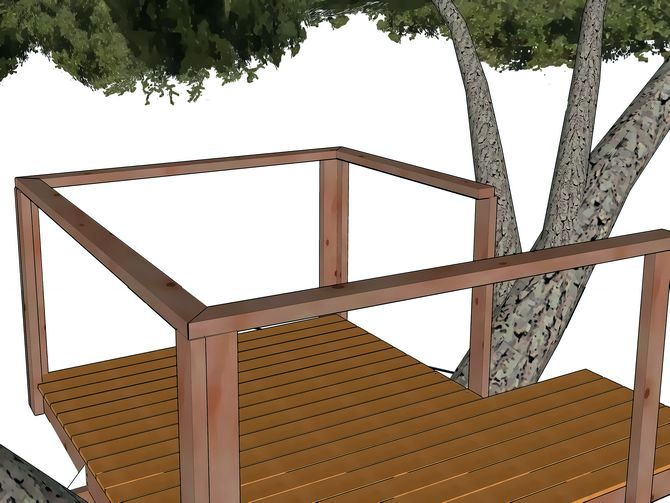 We install the railing so that it is neat, the ends of the beams can be cut at an angle of 45 °, then the joint will hold better.
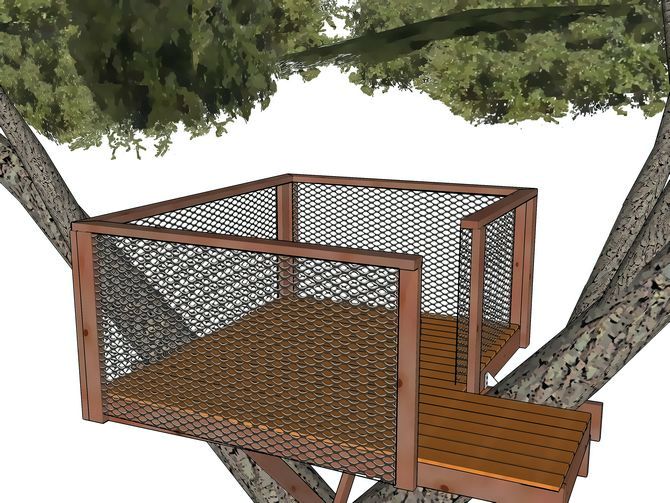 The space between the guides and the railing can be protected with mesh, plywood, wooden planks, in principle, it does not matter, think of something to make it look beautiful. The main goal is security, and the decor is up to you.
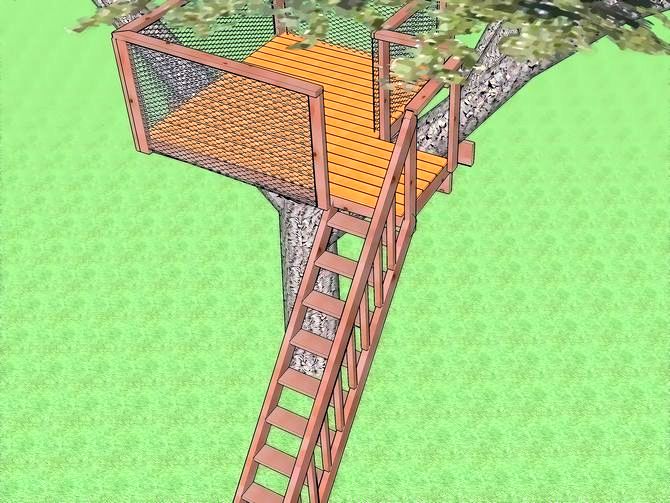 The next stage, we fix the stairs. How to do this depends on the option you have chosen. The picture is classic with a railing, but for fun, you can try the rope. Then every climb will be a whole event.
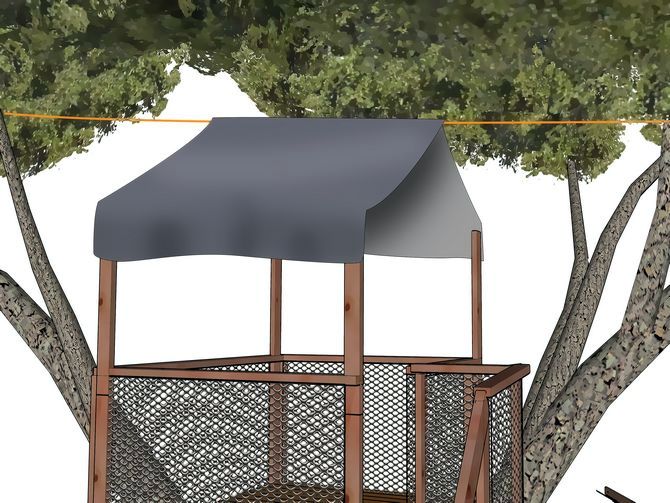 The house needs a roof. Since there is no load on it, you can choose any option, in this case it is proposed to use a regular tarp. It is possible, as in the picture, to pull the cable, it will serve as a ridge, and the ends should be fixed at the ends of the support beams, then they need to be built up or initially made necessary long.
 How to make a decor, probably do without tips.Involve children in this process, together choose a color for the house, decorate it with flags, and come up with some kind of furniture. In general, arrange a holiday.
 As you can see, the task is quite doable. Then you can see how the construction phases in the photographs go. A more reliable option if the house will not be mounted on one tree, but two or three, or at least find a tree with a triple branching.
DIY tree house
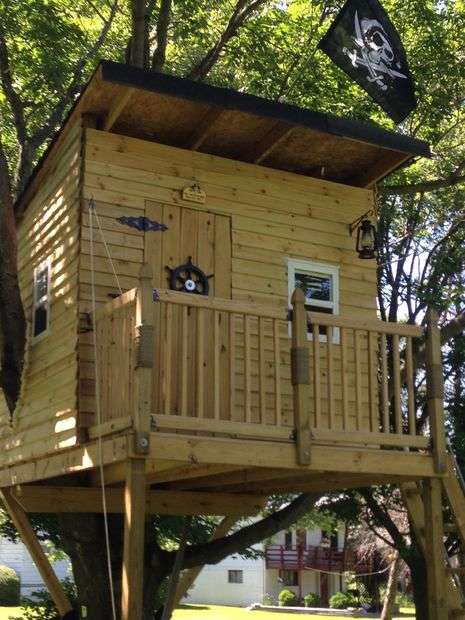 Here you can view step-by-step photos and read some tips, how to build a do-it-yourself treehouse. The author did not shoot in detail all the stages of construction and equipment that he used. You can find all this information in other blocks of this article.
So, advice from the author on building a treehouse.
Use 2x6 boards for the floor, as well as three-meter 4x4 rails for additional support.
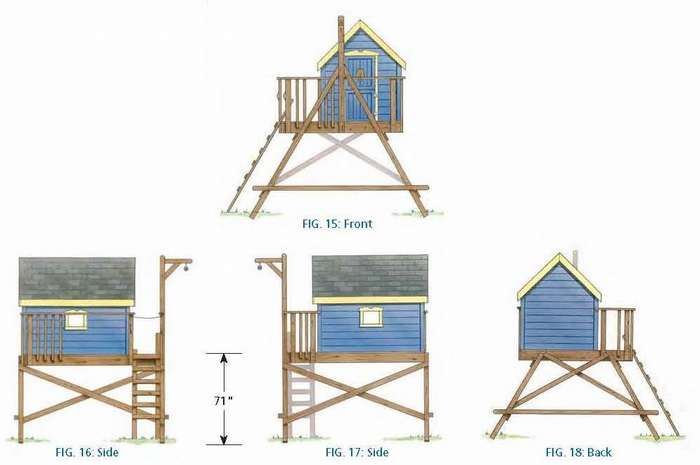
Frame. The house itself is 2.5 x 2.5 m, with a length of 70 cm from the porch and stairs.
Walls. For interior cladding, the author used plywood and cut the branches of trees. Outside, a crafted wooden fence is installed.
Door and staircase. The author made a door from floor boards and screwed them with a Z-shaped fastener. The staircase consists of 2 x 2 x 6 solid planks and 2 x 4 side for steps.
Roof. To support the osb-panel, the author used 2x6 boards.
Decor of your choice, for this treehouse all entourage bought in a store.
Time and cost. The author spent about 100 hours and met in the amount of about 1800 $. Just keep in mind that the information is taken from an American site, so the cost for our conditions can fluctuate significantly.


https://i.expert-h.com/en/detskie-domiki/901#sigFreeIdb20ae7179c
How to build a treehouse for children
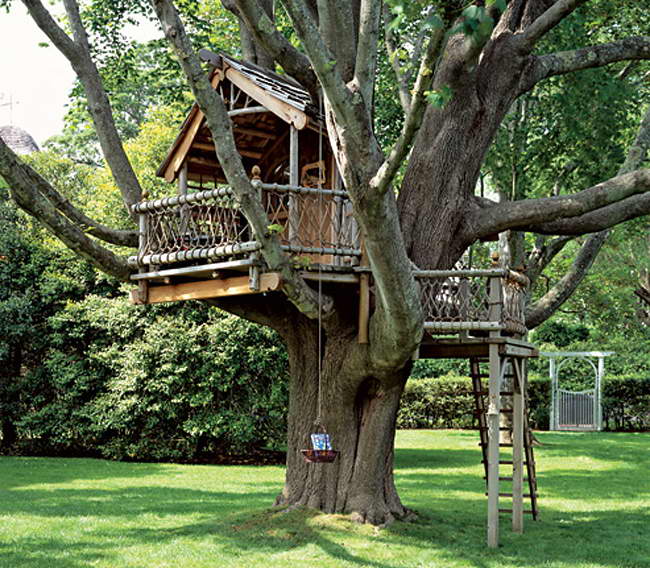
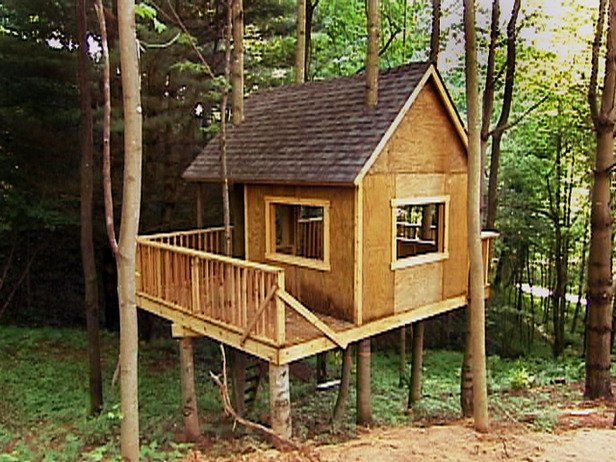
 Here is such a classic fort - tree house for children You can build on your summer cottage or in the garden. The main thing is to find a suitable tree, everything else is a matter of technology. The most important part, of course, is the construction of the platform. If you don't take it seriously in the first step, it will create problems later.
- The first task is to attach the two lower crossbars to the tree. They run parallel to each other in one direction, then the second set, the upper perkladina will be directed in the opposite direction from above the lower rays.
- To provide space between the crossbars and the tree (for growth), use two half inch galvanized washers on the side of the tree on each of the screws.
- The lower rungs are 20 cm long, which are sometimes difficult to handle. Please note that the latched screws are deliberately centered on the width of the beams.
- A lot of things to think about when you screw the screw for the lag, and it depends on what type of tree and what kind of tree house you are building.
- After marking the mounting location, drill a hole and use the socket wrench to tighten the screw. You may need more leverage. Therefore, the author installed a pipe clamp at the end of the socket wrench and was able to easily tighten all the snap screws.
- Repeat the process with the upper rungs. This time, the author was able to use the lower beams as a support.
- The most difficult thing is to set the level for the frame correctly. It may be nice to insert the gaskets while attaching the rail ... this will give stability during frame assembly.
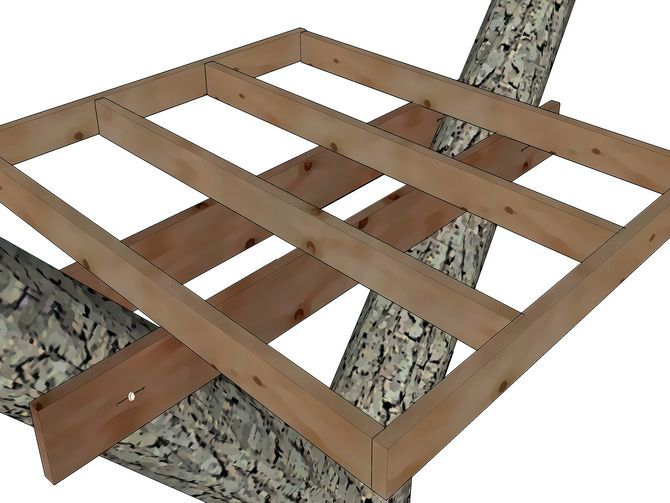
Facing beams and floor
The author cut the beams of the rim to size, and then drew up a fastening plan to attach them to the upper crossbars. If you work alone, then no one will hold the beam of the rim. The author attached a section of the board to the bottom of the upper rungs to make a small shelf, it will be easier to work with. Even after fixing all the beams, the platform of the treehouse can still move a little. To fix it firmly, the author attached knee braces ... they really strengthen the foundation. To do this, saw off the ends of the mounting boards at an angle of 45 ° and attach to the tree through special gaskets.


https://i.expert-h.com/en/detskie-domiki/901#sigFreeId138344d3b4
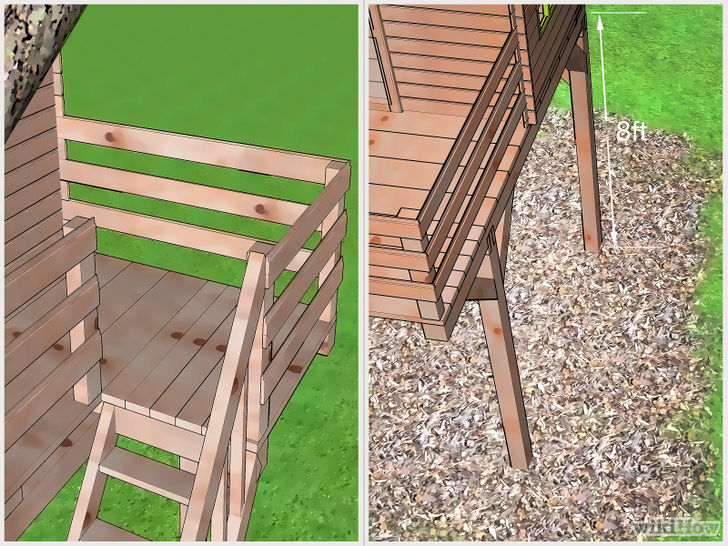
Floor and railing
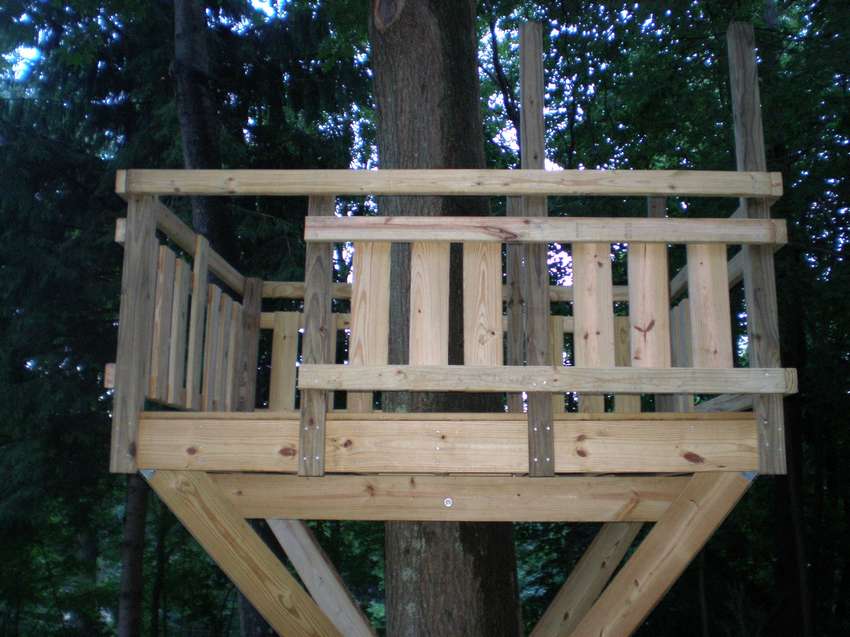 Having finished the frame, proceed to the site. When installing the floor, calculate the cut points around the hole for the tree trunk. Leave distance of about 5 cm to ensure tree growth. Install supports that support the railing and roof of the treehouse. The design is simple, only half a circle at the bottom of the rack, which fits flush on the outside of the rim beams and flooring. Test each support and plumb. Then install the upper and lower railing bars. it simple treehouse, therefore, the author rejected the idea of a semicircle or carpentry and made simple joints. Saw off the lower bar where the entrance will be. Leave the top rail in place for safety reasons so that someone does not accidentally fall out. Then install the middle bar, which actually supports most of the boards that make up the railing.


https://i.expert-h.com/en/detskie-domiki/901#sigFreeIdd376b8f741
Staircase, door, roof
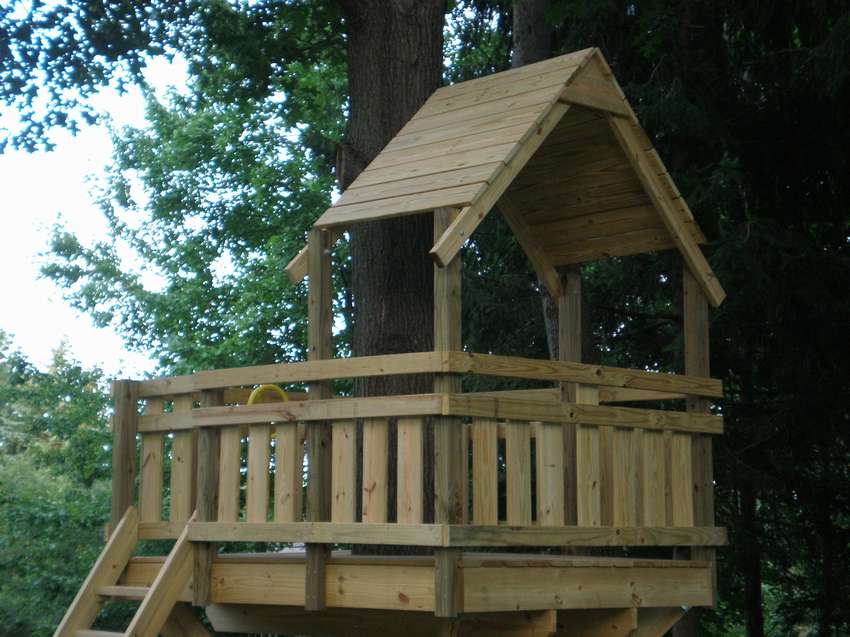 Under the stairs it is necessary to level the platform, and in order to successfully install it, it is necessary correctly calculate the slope. The author trimmed an angle of 65 degrees and set the beams on flat stones to slow down possible rot.
- Remove grass and ground to level the stones.
- Saw and install the stairs (2 x 4) using galvanized nails.
- Then make a wicket. Of course, there is not much need for it, but for security reasons it is still better to do it, especially since it is not difficult
- All that remains to finish the children's treehouse is to install a roof.
- It's quite simple, a couple of farms with 5/4 sides nailed to them. Perhaps not the most ideal option, but from sudden rain and water from the leaves of the tree will cover.
- The author simply cut the boards for the top, and then screwed them together with a 5/4 board attached to each side.
- Screw the two trusses to long racks attached to the frame and railing.
- Use bolts with lock washer and nut.
That's all. Of course, not the most detailed instruction, but under the photo there is a link to the source site, where you can read more detailed step-by-step instructions.


https://i.expert-h.com/en/detskie-domiki/901#sigFreeId12c043bf2c
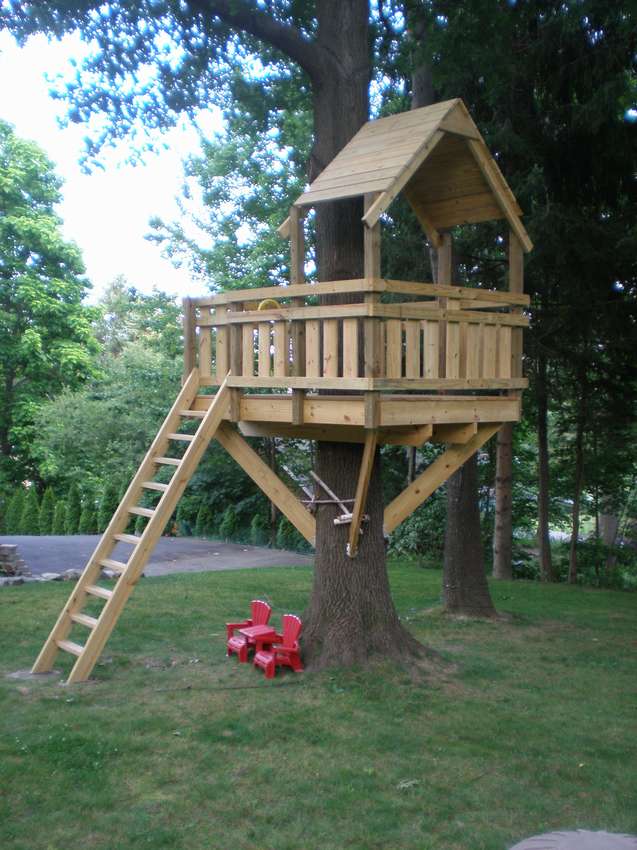
How to build a treehouse
 Step 1: Beam Installation. The top set will be at the height of the floor of the treehouse. Drill straight through holes. Make a square frame and install the floor.
Step 2: Platform level. Level the platform with a level.
Step 3: Install diagonal supports. Once the platform is level, you can install permanent supports that will support the house. The author used two 2x6 boards twisted together and cut at an angle of 45 degrees.
Step 4: Install flooringThis is the best part of the project, because you can stand on the platform when this step is completed. Start from one end and let the boards hang along the edge so that you can saw off the ends with a saw. When you reach the tree trunk, leave a gap of about 5 cm to leave room for the growth of the tree and there was a gap when rocking the tree in the wind.
Step 5: Frame and wall installation. Saw the walls on the ground. Make sure that parts of the wall coverings overlap the ends of the walls that they touch. Bring friends to help you at this point, the walls will be heavy.
Step 6: Install the roof. To make the roof of the treehouse, determine what the slope will be. The author planned to install the tile, so he used the slope of 4:12. Once you calculate the height of the rafters, you can install the center beam of the roof, making temporary support to keep it in place until you attach the rafters. After that, lay the plywood, leaving space around the trunk so that the tree can swing in the wind without crashing into the roof. Fix the tiles.
Step 7: Set the stairs and the door. The door is made of pine boards. For the stairs, the author used processed wood, as it is in contact with the soil. The crossbars of the steps are located at a distance of 25 cm from each other.
Step 8: Set the railing. The railing is 90 cm high, and the balusters are 10 cm apart. Start the installation from the middle. The openings between the floor and the railing and the floor are preferably planked. In conclusion, you can do the appearance, for this be sure to attract children.


https://i.expert-h.com/en/detskie-domiki/901#sigFreeId5f7bd4c801
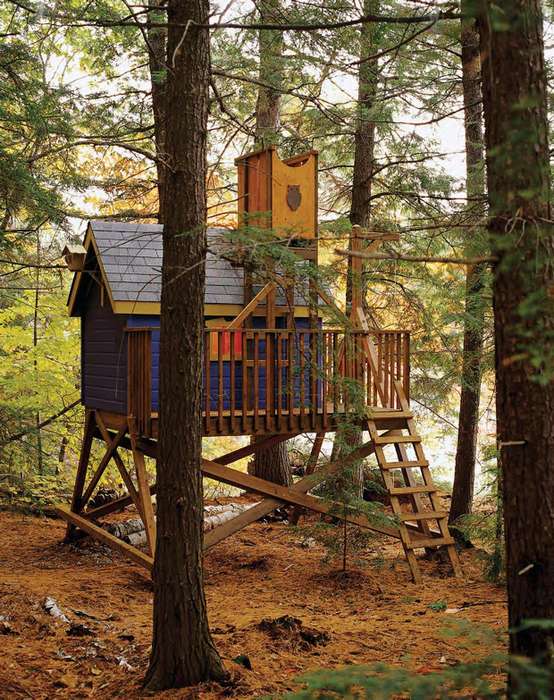
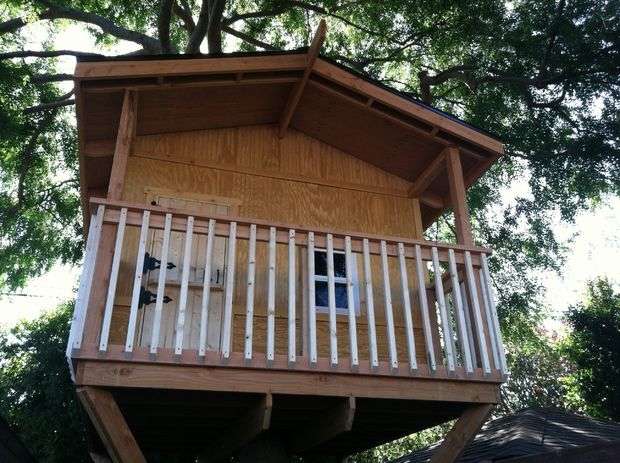
DIY tree house for children
 Beautiful and reliable tree house for children, although not very large in size, but perfectly designed and can be a great place for games.In addition, a simple design will look good on any site. Well-chosen step-by-step photographs are presented below, so detailed instructions are not necessary. The author assembled the entire house in the garage, then disassembled it and again assembled it already on the platform. This will save a lot of time, since all the tools in the garage are at hand, and you don’t have to go up and down the stairs a hundred times. In general, see the photo and good luck to you.


https://i.expert-h.com/en/detskie-domiki/901#sigFreeIdda7cde6bb9
Treehouse on three pillars
If you are lucky and find what you need, then the task is simplified, although the steps are almost the same.
- First of all, it is necessary to draw up a construction plan, prepare the necessary tools and materials.
- Then we fix the main supports. It is not recommended to place a children's house on a tree above two meters, so fasten the lower support in height of average height, just above your head, so it will be easier for you to carry out fixing work. The beam must be attached horizontally to the first trunk, carefully aligned, it is better to use the building level and only then attach the other end to the second trunk.
- Cut the crossbeams to size and fasten them to the main ones. They must be mounted at the same distance so that the load is distributed evenly. For reliability, secure more diagonal supports under the frame.
- In order not to tuck and do not stretch with the tool during work, use the rope mechanism. To do this, you need to buy a carabiner, which climbers use and secure it at the bottom of the rope.
- How to install the floor is already described in the previous instructions, but in this case it is still correct to calculate and cut holes for the trunks. Stock from the edge to the trunk do up to 10 centimeters, this is taking into account the growth and cancer of the tree.
- It is better to make the railing and the space below them solid, then the child will definitely not be able to slip into any hole. The same applies to the walls of the house.
- About the installation of the stairs, it was also said, the main thing is that it be reliable. In this case, a grooved board was used, not the most comfortable option, but reliable.
- Roof optional. For an ordinary game house, it is enough to make a light canopy from plywood or tarpaulin.
View the embedded image gallery online at:
https://i.expert-h.com/en/detskie-domiki/901#sigFreeIdb39149eb2a
-


Shown here are diagrams and mounting features.that you can use in construction. A couple more tips. When attaching any parts directly to the tree, use large bolts rather than a few small ones. So, firstly, it’s more reliable, and secondly, if you drive a lot of iron into a small section of the trunk, it will begin to deteriorate and this area will turn into dust. Also try not to overload the structure, the lighter it will be, the less various supports and fasteners will be required. For a tree is better, and again, safer.


https://i.expert-h.com/en/detskie-domiki/901#sigFreeId6a7f8c05e3
Here's another an example of the phased construction of a house where three trees are used as supports. This is a variant of a one-piece construction


https://i.expert-h.com/en/detskie-domiki/901#sigFreeIdce9806bd3d
Hanging tree house
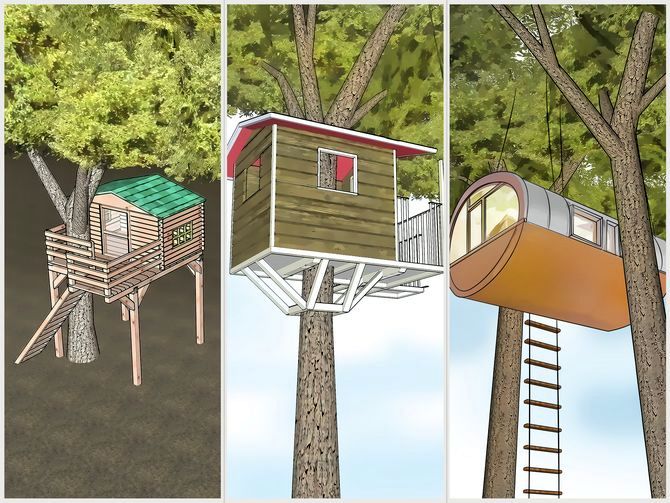
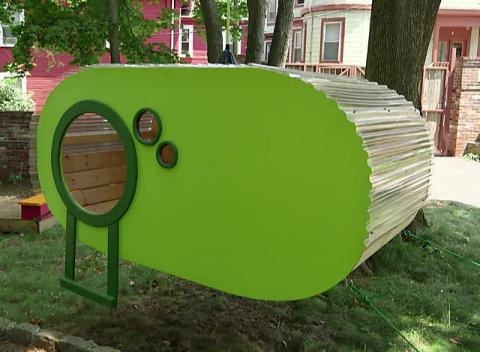 Tree houses can be of various shapes and designs. If you want to get creative, you can use not the classical scheme, but something unusual. Such a solution could be the construction of a suspended house with a rounded transparent roof, you see him in the photo. The design is unusual, but your eyes are afraid - hands do, see step-by-step photos and everything will work out.
- Step. Cut the desired shape out of the cardboard and draw a line on the working surface of the plywood sheet.
- Step. Saw a protruding corner along the line with a jigsaw, then you can use it as a template so that you do not constantly apply the entire shape. Trim the remaining corners.
- Step. Draw a door on the work surface. To make an even circle, drill a hole in the center of the future door, insert a screw, attach a pencil to the thread and outline the surface.
- Step. To cut the door, drill a hole in the circle line, install a jigsaw blade into it and slowly cut along the line.
- Step. Draw portholes (windows).
- Step. Cut them in the same way as a door.
- Step. To make the back wall, lay flat a sheet of plywood, attach a ready-made side wall and cut the plywood to the base.
- Step. To make a transparent window on the roof, just mark the rectangle in the ratio of 2x3, drill a hole and cut out how you made windows and doors.
- Step. Primer and color the exterior walls.
- Step. Now it is necessary to make a frame, as in the photograph we fasten three bars with two side bars.
- Step. Lay the flooring panels along the frame. Use a carpenter’s pencil to mark. The distance between the planks of the panels allows you to create an air flow and protect the wood from warping. Secure the boards at each end with pincers.
- Step. Attach both walls to the deck. If you have a special nail gun (nuler), then the work will go faster. Each end of the bar must be driven with at least two nails.
- Step. Having fixed the side walls, attach two slats where there will be the back (back) of the wall.
- Step. Since our house will be suspended, it is very important to strengthen the points at which the cables will be attached to the stacks.
- Step. We fasten the roof beams, the distance between the bars 25 - 30 centimeters.
- Step. We align the beam on which the house and the supporting beam will be held.
- Step. It is advisable to fix the beam on hexagon bolts, having previously drilled holes so as not to split the load-bearing beams and plywood.
- Step. Cut rectangles for the roof from transparent polycarbonate, fix them in the middle 5 centimeters from the edge of the walls. Use screws with washers for fastening.
- Step. Make a rope hole in the center of the support beam.
- Step. Use the remaining curved pieces of plywood to make the trim around the door and windows. Draw a second circle outside (5 centimeters for the doors, and a little thinner for the windows). Cut the inner circle with a hacksaw for the door and windows.
- Step. Handle and trim the door and window trim.
- Step. Prepare a strong rope, put the washer on the inside of the beam and make a knot.
- Step. Now you have to raise the house. How much a person will need for this is difficult to say, in general, call for more. It will be necessary to fix the rope on a very strong branch, this must be selected in advance.
- Step. To make it convenient to enter the suspended dwelling, make such a step under the door (pictured).
- Step. To prevent the house from swinging much, make stretch marks. Fasten the screws at each corner.
- Step. Drive in pegs, you can buy a tourist tent or make it yourself.
- Step. How to equip a house in the middle, a matter of taste, most importantly, do not overload with unnecessary things.
That's all, it remains to boast of its original ideology and enjoy your vacation. This house will appeal to both children and adults.


https://i.expert-h.com/en/detskie-domiki/901#sigFreeIdfe8ce37088
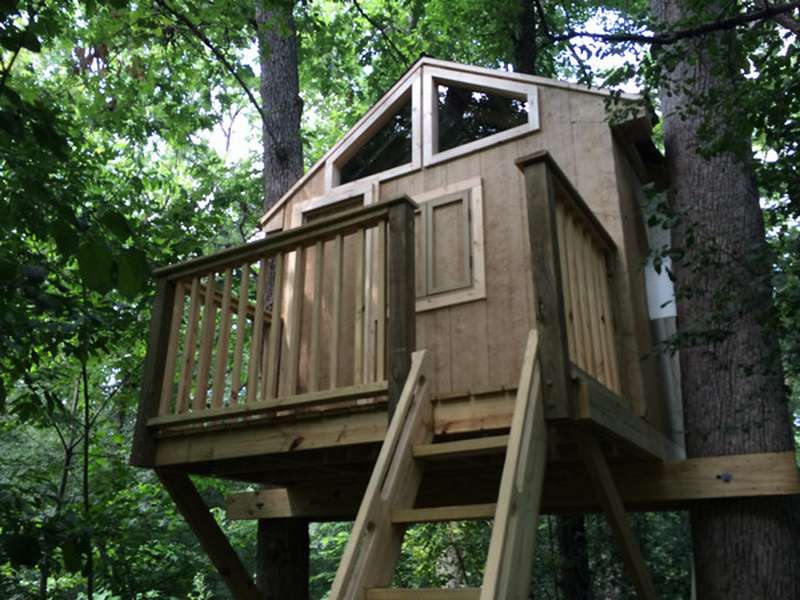
How to build an original treehouse
 A treehouse is not only fun. The construction process will bring satisfaction to the parents, which can be more pleasant than doing something joyful for their child, and this is also an experience for children, at this age they are very active in absorbing information. Therefore, be sure to take them as assistants, even if it will cost you extra hassle, because you will have to repeatedly strengthen security measures.
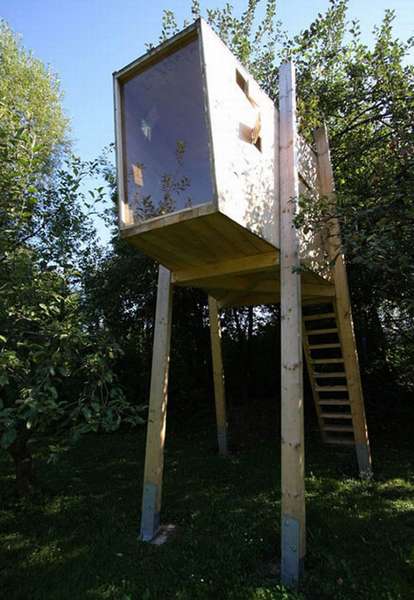
This option without direct attachment to trees is simple, stable and versatile - a box with plywood and a set of wooden stilts. Tree house construction national team, so that if necessary it can be easily disassembled. If there is a suitable tree, for greater stability, of course, it is better to attach a house to it. To build a treehouse for children, the author used standard beams, boards and sheets, as well as supports with ready-made steel anchors for simplicity and stability.
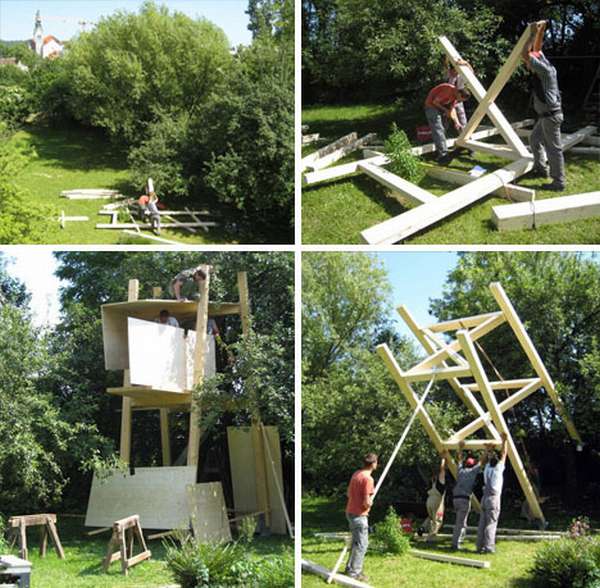
The basic basic skills of carpentry work allow several people to easily assemble it all from scratch, and the presented drawing and step-by-step photos of building a tree house give a general idea of the assembly order.
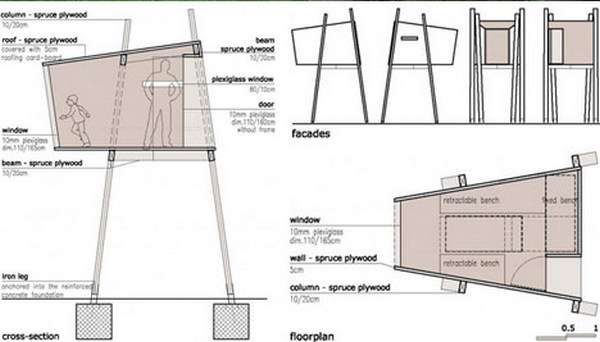 The idea of building a treehouse consists in mounting the prefabricated frame on the ground, although this is not important, you can first install piles, then cross brackets added after vertical installation.
 The result: a cool little all-weather villa or four-story cottage. And also great playgroundwell-lit, in a modern style, where children can spend time in bad weather. Also, on the basis of this design, you can add a lot from yourself, for example, install frames from plexiglass or add additional equipment for children's games.


https://i.expert-h.com/en/detskie-domiki/901#sigFreeIdf56ce2cdda
Open treehouse
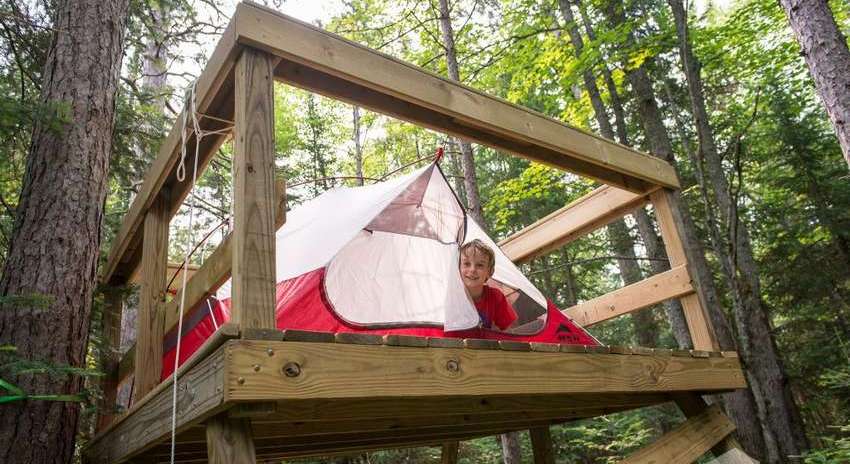 The options for children's tree houses can be different, such as this - a simple open platform at a distance of about 1.80 m from the ground, measuring 2.5 x 2.5 m. For children, this is enough, and you can install a small tent or hammock.
For the construction of such tools are needed:
- A circular saw
- Extension
- Hand saw
- Cordless drill with multiple batteries
- 1/2 inch drill bit 15 cm long
- Hammer
- level
- Roulette
- Square shovel
- 12 ½ inch stainless steel bolts 15 cm long (for legs and side posts)
- 12 washers, also made of stainless steel, 50 mm mounting screws (for attachments)
Boards and bars
- 2 × 6 2.5 m long - 13 pieces
- 4 × 4 length 2.5 m - 8 pieces 2 × 6 length 3.5 m - 2 pieces
- 1 × 6 floorboards - 30 pcs.
- Cinder blocks - 4 pcs.
Construction stages
- Prepare the materials.
- Level the platform and install the cinder blocks where the tree house supports will be.
- Use a square shovel to install the blocks.
- Measure the edges of the platform
- Screw the boards together and then drill holes for the bolts.
- Assemble the wooden poles
- Then install the beams.
- In this regard, the supports are attached to two 2.5 m boards, and then beams are installed at 35 cm from each end and 40 cm from each other. This can be seen in the diagram.
- For the stability of the site, angular side supports are installed.
- Then the railing is attached. To keep things simple, cut 4x4 parts in half, each of them will be 1.20 m. Then fasten them so that they sit a meter higher than the upper part of the floor structure.
- Add the top railing. It is necessary to measure the internal angle and add a centimeter.
This completes the assembly of the tree house. The instruction is incomplete, but you can take more information on the site, the link is under the gallery.


https://i.expert-h.com/en/detskie-domiki/901#sigFreeIdf00054730c
Children's castle on a tree
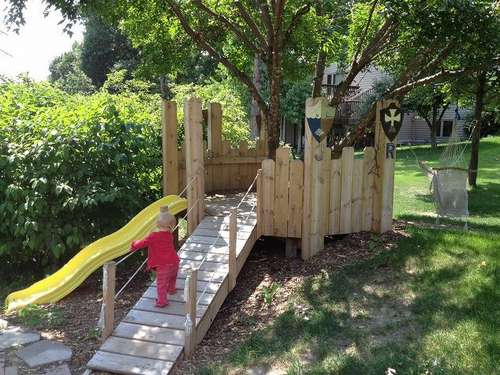 Children want a treehousebut there are no big trees in your yard? Try this option. The author faced the same problem, no suitable tree was found on his site, so he found two young trees about 6 m tall. It remained to come up platform designthat was magnificently called the "castle". You can also take advantage of this idea, because in this case tree size doesn't really matter. Surely the children will like it. Of course, the castle should have towers, a bridge, a hill.
- Build a site around a small tree, leaving room for tree growth.
- First you need to install 4 support pillars, can be cemented for reliability.
- On them you make a square of 4 beams and from the top install the beams to support the decks.
- Finally, lay the floorboards.
- After that build the walls.
- Then install the ramp and slide.
That's all, basically the site is ready. To turn it into a castle, turn on the imagination. Make various attributes - hand-painted shields, flags, combat banners .... Connect to the design of children.


https://i.expert-h.com/en/detskie-domiki/901#sigFreeId0b3edc564b
How to build a simple treehouse for children
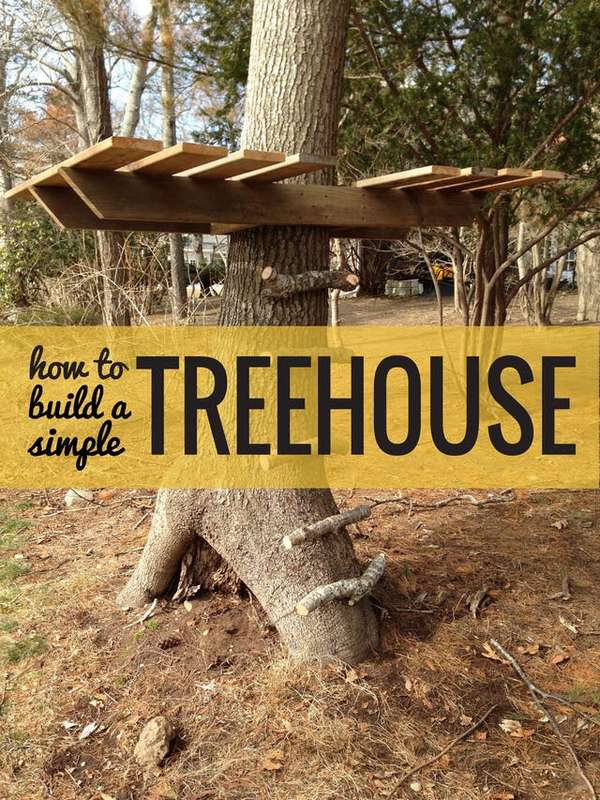 This, of course, is not a full-fledged tree house, but rather a playground, but if there are no opportunities, then why not. By the way, a lot of advantages. First of all, you can build such a tree house in one day, Secondly, he is in not too high, and this is less of an experience that something will happen to the child. Then, a very simple design, you can always add more details, lightweight, open and easy to climb and descend. This wooden house is built from old planks and branches. Strong enough construction, there is no need to reinforce anything, except what you see in the photo.
What do you need
- cross drill
- level
- frame screws or nails
- 3 inch pad screws
- flooring boards
- small logs
- hand saw
- Rugs, pillows and accessories for clothes
Instructions
- Choose a strong tree, but not too thick and with branches that start a little higher. Prepare the two main parts, attach it to the flattest part of the tree, and then to the opposite side. This house is at a height of 1.80, made for a six-year-old child. Use only one screw in each mount so that you can adjust them before tightening the four more screws. Better to use a level.
- Although this design is not intended for several children, it is actually very sturdy. This is not surprising, the author twisted 10 screws in each side, plus crosses. After measuring the width, cut out the two crossbeams and insert between the support brackets. Then screw into the tree (5 screws), and into the base (2 screws). Now you have a stable box around the tree that will hold the platform.
- After you saw off the deck boards to 1.20m, even them out evenly from above and tighten with screws. Leave gaps in the floor to make the platform lighter.
- Make flooring between both the front and back of the platform.
- Install the stairs. Take the small logs and fix them firmly with the screws. The load on the steps will be large, so do not spare the screws.
- Decorate your treehouse. Colorful rugs are perfect for the floor. Leave it to the child.


https://i.expert-h.com/en/detskie-domiki/901#sigFreeIdce2f74955a
Drawings of a treehouse


https://i.expert-h.com/en/detskie-domiki/901#sigFreeId28bb2c86bb
Treehouse for children 300 photos


https://i.expert-h.com/en/detskie-domiki/901#sigFreeId33eabe75dc
Hello, I am the author of this article, so I look forward to asking questions for this article in the comments below, I will answer all !!!
If you have questions on another topic, ask them on our forum, we will answer you
- Two baskets of paper in 5 minutes (Master class)
- How to make a simple and compact table for a milling cutter from plywood
- How to make a soft headboard tile (Instructions + step by step photos)
- Cinder block benches: a convenient bench in 55 minutes
- How to make a bed with a niche: saving space (Master class)