Pergolas for summer residences. Step by Step Instructions! +400 photos. Do it yourself
 Gazebos for giving with your own hands made of wood. Photos, drawings and progress.
In this article we will consider the most beautiful and simple garden arbors for a summer residence. The text below presents: detailed step-by-step photos of manufacturing, instructions for creating and installing, as well as drawings, diagrams, layouts and sizes. Such types, options and models of wooden arbors are considered: open and closed, large and small, inexpensive and cheap (budget - economy class), with single-pitched and gable roofs, hexagonal and adult.
Basically, these are the simplest projects of square and rectangular arbors made of wood with sizes of 3x3, 4x4, 3x4, 3x5 and 3x6, which you can easily and quickly do with your own hands. There are interesny and simple ideas of small (mini) collapsible, portable, open with a canopy and closed summer verandas that you can build on your summer cottage.
From this article you will learn:
Layouts of SIMPLE country summerhouses
4 models square (with step by step photos) 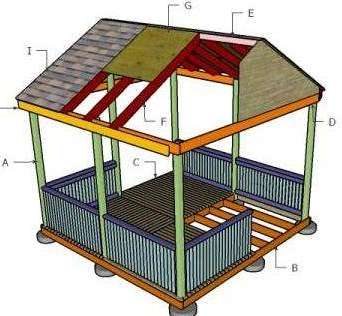
6 models Rectangular arbors (+ drawings) 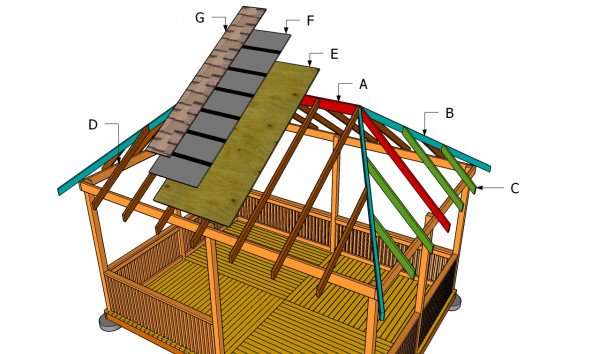
Octagonal and hexagon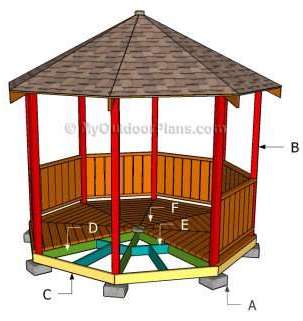
Step-by-step photo of manufacture
Collapsible
(step by step photos) 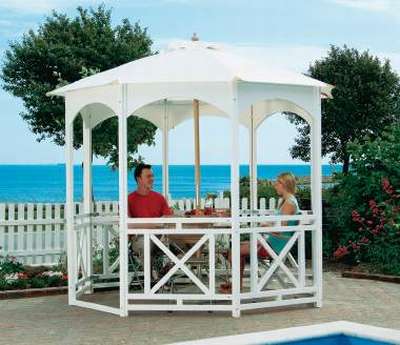
Wall
(with step by step photos)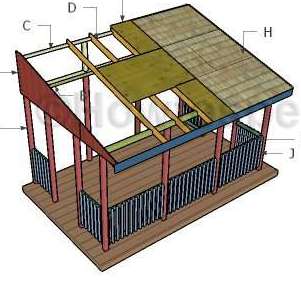
Open
(with step by step photos)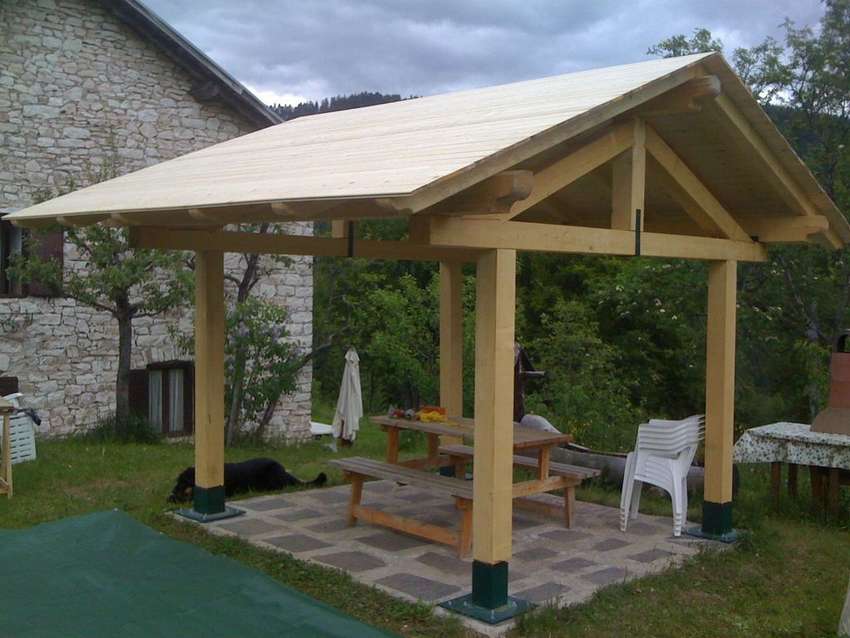
Gazebo on stilts fromsewer pipes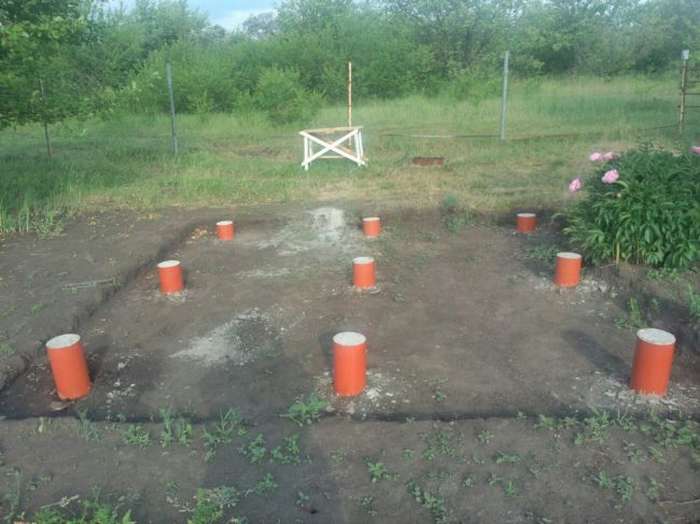
Gazebo with porch
(instructions for creating)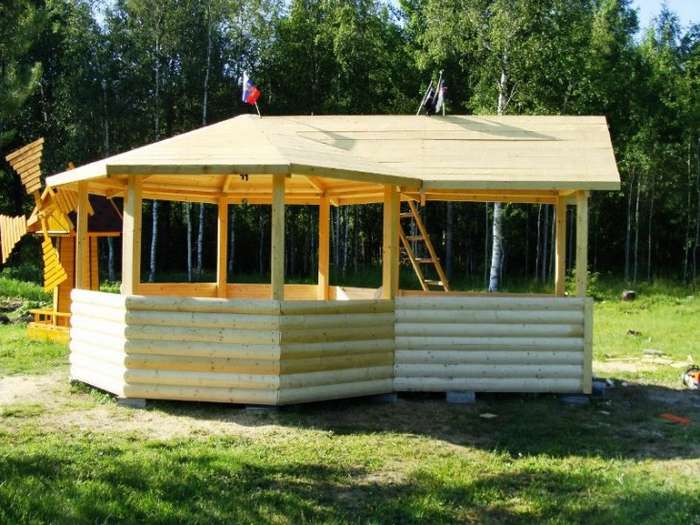
Big gazebo
+ roof drawings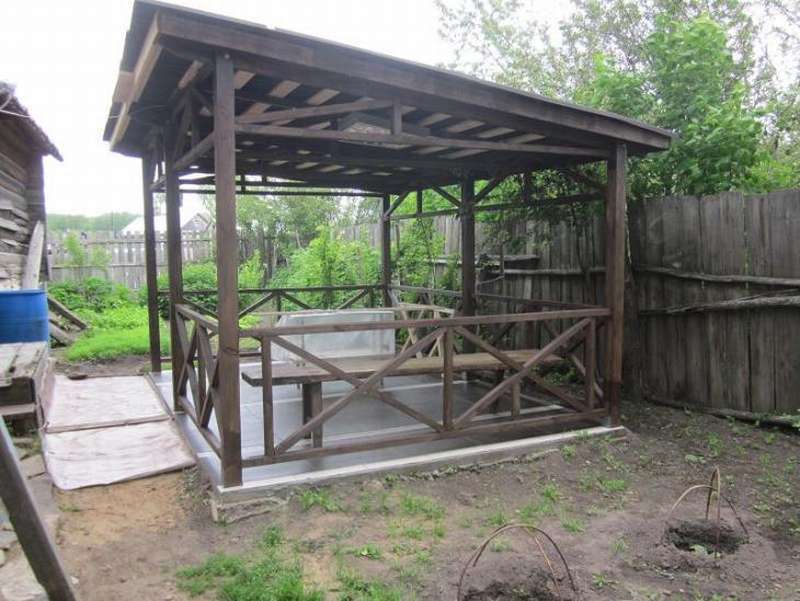
Blueprints
70 drawings sketches and layouts with dimensions Square pergolas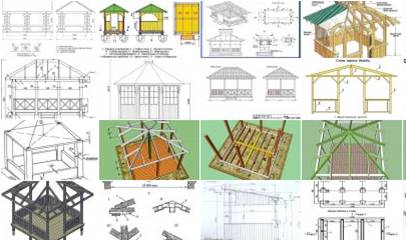
90 drawings and layouts eight- and hexagonal pergolas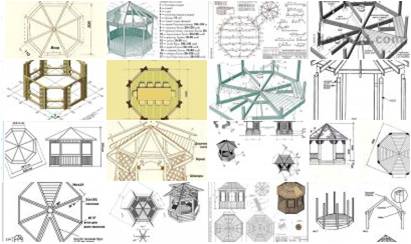
Photo gallery
At the end of the article, huge photos of a selection of the most unusual and beautiful arbors (more than 150 selected models) 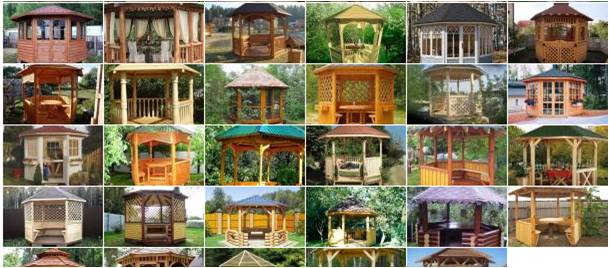
 Do-it-yourself rectangular arbor
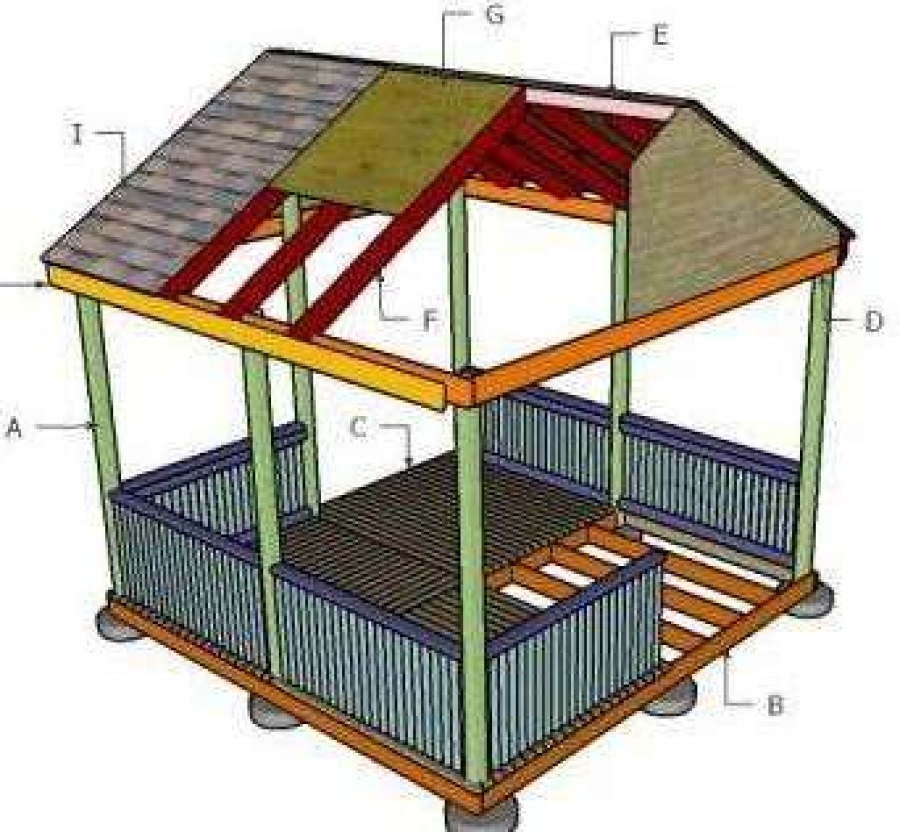
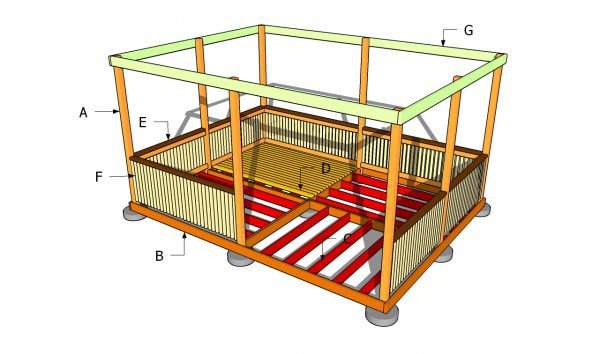
It’s not so difficult to build a rectangular gazebo with your own hands, and it will undoubtedly decorate your site, but it is a little more complicated than the square shape design. Always plan to form everything at the very beginning, if you want to get a good result. In addition, proper planning can prevent many costly mistakes. Choose materials with great caremaking sure all parts are straight and in good condition. The construction of a rectangular arbor is slightly different from the construction of a square, but anyone with average skills in carpentry can easily cope with this task. We will not describe the process in detail, all the steps are shown in the diagrams, more detailed information can be obtained on the website, a link under the photo with drawings.


https://i.expert-h.com/en/besedki/dla-dachi-poshagovye-instruktsii#sigFreeIdf2437f99cb
The second part shows how to make a roof for a rectangular arbor. Building a roof for a rectangular gazebo is a difficult task, as it includes many cuts and measurements. In addition, you will definitely need an assistant. To make everything turn out beautifully and reliably, observe building codes and select high-quality materials. It is also necessary to use weatherproof lumber of good quality and without defects. The sequence of works is shown in the pictures in the gallery, details of the stages of construction can be found on the source site.


https://i.expert-h.com/en/besedki/dla-dachi-poshagovye-instruktsii#sigFreeId8d0cde5b40
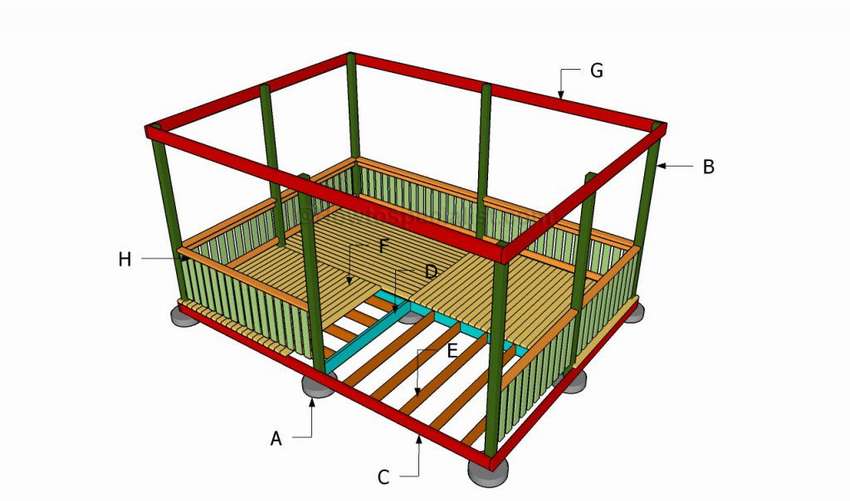 Another option, how to make a rectangular do-it-yourself arbor. If you have financial opportunities, then of course it is better to buy quality wood, such as cedar, pine or mahogany. Also make sure that the material used is suitable for the climatic conditions. For this project, if all materials are available the gazebo can be built in one day.


https://i.expert-h.com/en/besedki/dla-dachi-poshagovye-instruktsii#sigFreeId242f4a5253
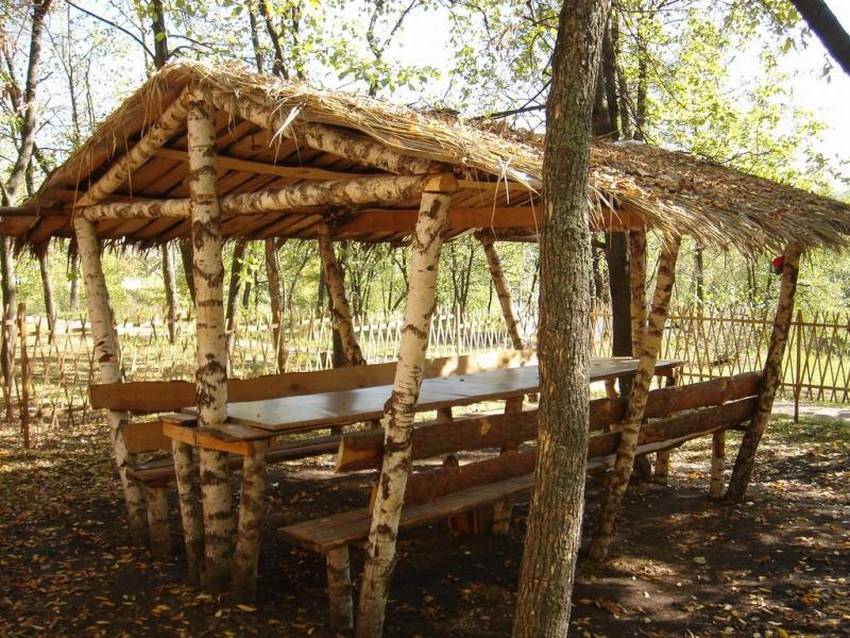
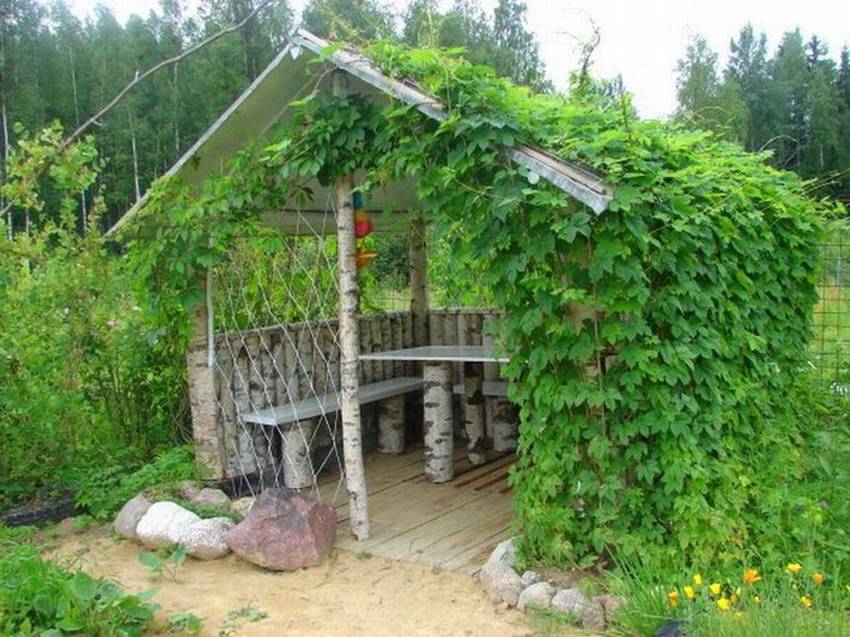
2 interesting Photo: Gazebos from birches
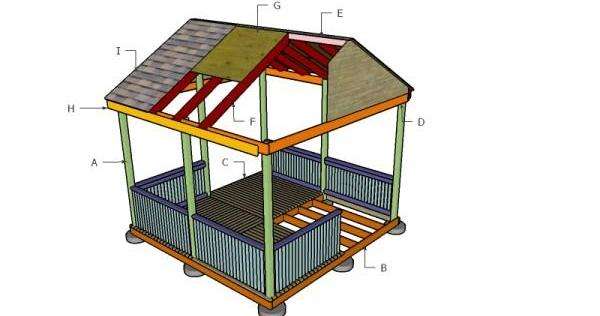
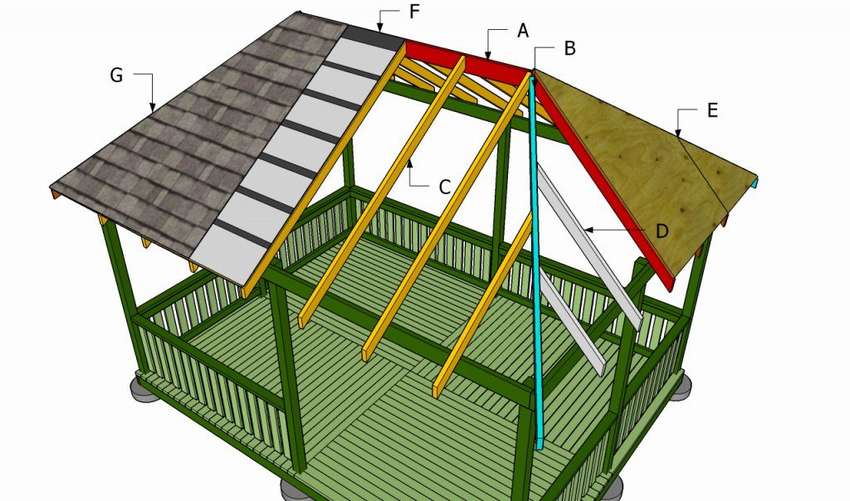 How to build a gable roof for a rectangular gazebo.
The first stage is the manufacture and installation of the upper ridge and rafters. As you see in the picture, it is necessary to cut off the ends of the rafters of the correct size and fix them to the upper crossbars with screws. Make sure that the top ridge is horizontal, otherwise the roof will not be symmetrical. Next stage installation of rafters on both sides of the roof. You should center the beams. Cut the rafters to the desired size (45 °) and shape and install them in place. Drill holes and fasten them galvanized screws. Attach the rafters to the front and rear edges of the rectangular gazebo. Install the side rafters. Fasten the roofing sheets. In order to protect the gazebo from the rain, it is recommended to cover roofing sheets. Fix the slats to the rafters, it is very important to cut off the ends of the slats at an angle of 45º, if you want the roof to look beautiful.


https://i.expert-h.com/en/besedki/dla-dachi-poshagovye-instruktsii#sigFreeId409dd60b81
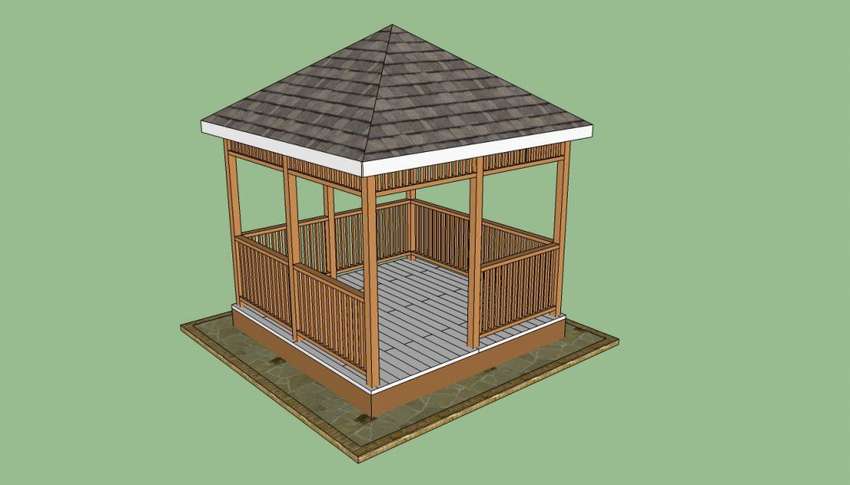
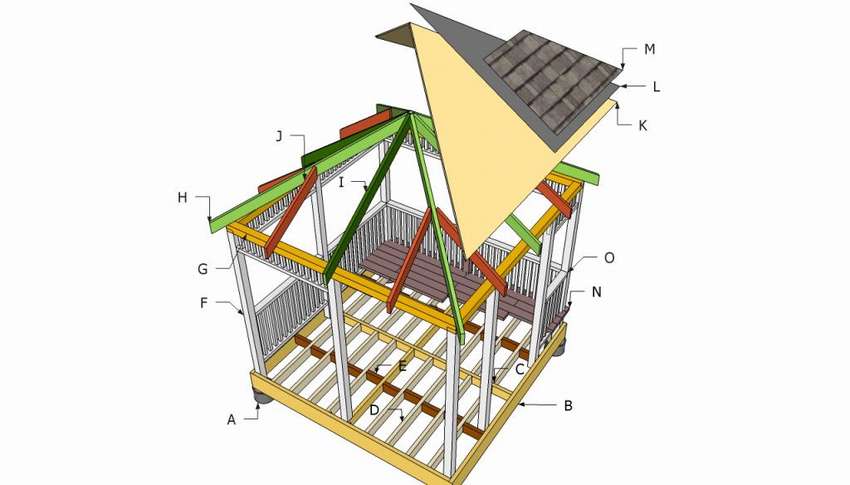
DIY square gazebo
Here are detailed diagrams for building a square gazebo.
 The simple design and construction of this gazebo may interest you. Dimensions in inches and feet in drawings (1 inch - 2.54 cm, 1 foot - 30.48 cm), of course, you can set your sizes, keeping the proportions. Construction begins with a markup, measure the diagonals so that they are exactly the same.
- Dig holes under the posts and set the molds in the holes.
- Fill the pipe molds with concrete and allow to dry for several days.
- Install the horizontal beams and fix with screws to the posts. Use an alcohol level to make sure that the beams are strictly horizontal.
- Next, you need to install the middle logs to the floor of the gazebo.
- Align the edges and make sure the corners are square.
- Then install the intermediate beams on the gazebo floor. Lay the floor, fixing the boards with screws.
- Using a level, set the upper beams.
- Align the edges and use the corner connectors to secure the top ridge.
- Do not leave any gaps between the parts.
- To protect the gazebo from dampness and improve the appearance, varnish it or paint it.


https://i.expert-h.com/en/besedki/dla-dachi-poshagovye-instruktsii#sigFreeId3fa90a399c
How to dogable roof for square gazebo.


https://i.expert-h.com/en/besedki/dla-dachi-poshagovye-instruktsii#sigFreeIddac8ebb1e5
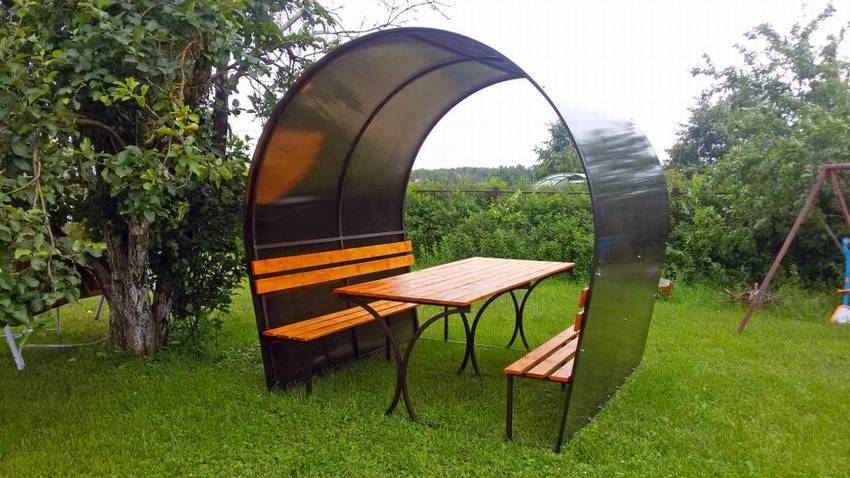
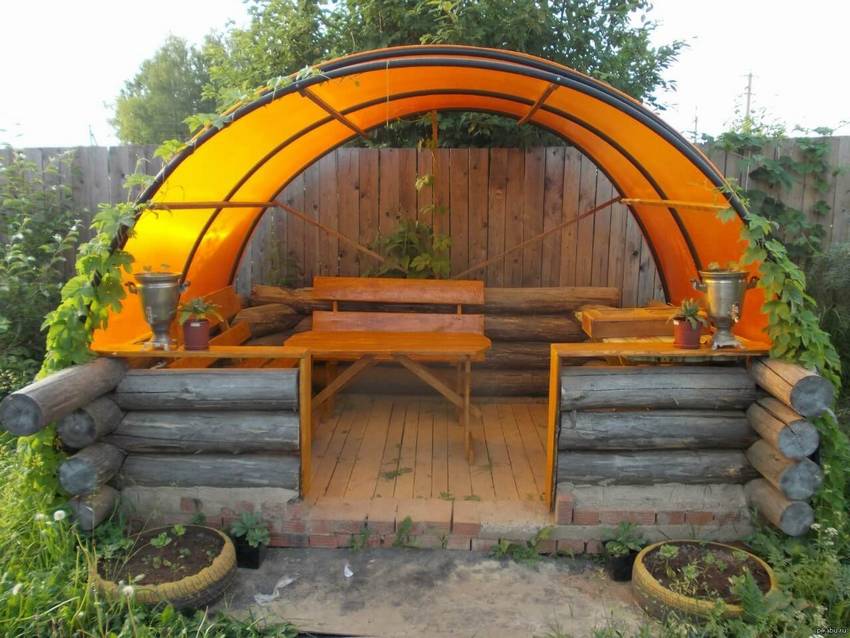
And here are a couple of options for gazebos using polycarbonate
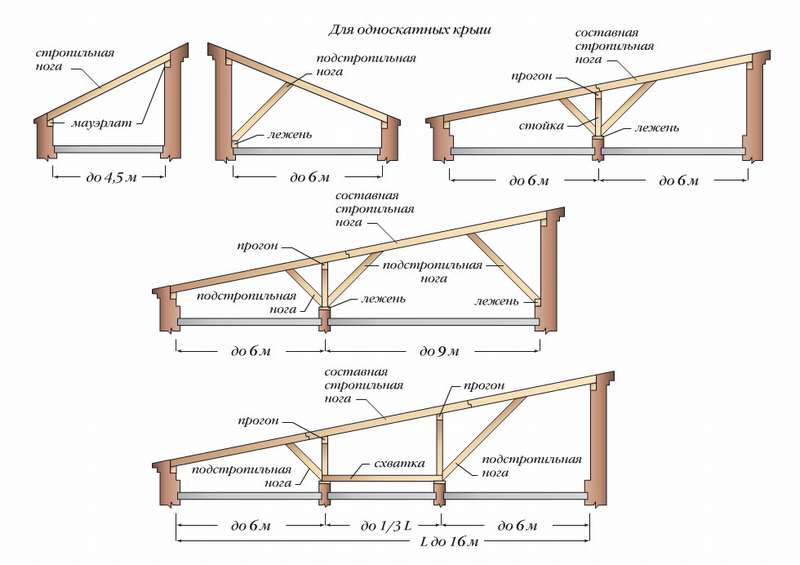
Gazebo with a pitched roof do-it-yourself
 Building a square gazebo with your own handsand it’s not a simple matter, you need to take into account the skills that you must master, as well as the tools and materials necessary to complete the work. Nevertheless, if you correctly draw up a plan that will meet the tastes and needs, and of course the budget, as well as use the right woodworking methods, you can build a pretty decent gazebo. Buying a ready-made kit or hiring a professional is also an option, but if the budget is limited, perhaps do-it-yourself gazebo will be the best solution. Choosing the right plans and design is a real challenge, as there are tons of alternatives. Therefore, from the very beginning you must write down the necessary functions and budget on paper. Then necessary develop a plan taking into account the necessary materials and tools. Buy the right materials for outdoor structures so that the arbor does not crumble in a month. In general, step-by-step diagrams in the gallery, a description of each step can be read on the site.


https://i.expert-h.com/en/besedki/dla-dachi-poshagovye-instruktsii#sigFreeIdd4361dd1d9
 One more example, how to make a square gazebo with a gable roof. In principle, this is the same as the previous one, only shown in more detail, how to make a roof for a gazebo and railings. You need to properly design an open gazebo. You need to decide what sizes will be and if, for example, you want add a barbecue or barbecue, this should be taken into account when planning. The options are almost endless, but you must remember that each additional function involves additional costsTherefore, we must balance the benefits and costs. Choosing the right design for the gazebo is a tough decision, since there are many potential alternatives: on the one hand, you can build octagonal gazebo rectangular design or just square. This article shows how to build a square gazebo in a couple of weekends, while significantly saving. All this is not so difficult, provided that you know how to hold a hammer in your hands and use a hand saw.


https://i.expert-h.com/en/besedki/dla-dachi-poshagovye-instruktsii#sigFreeId95c244538a
Still a couple unusual arbors: angular and wall

Layouts and step-by-step photos of the manufacture of arbors:
How to do simple DIY gazebo
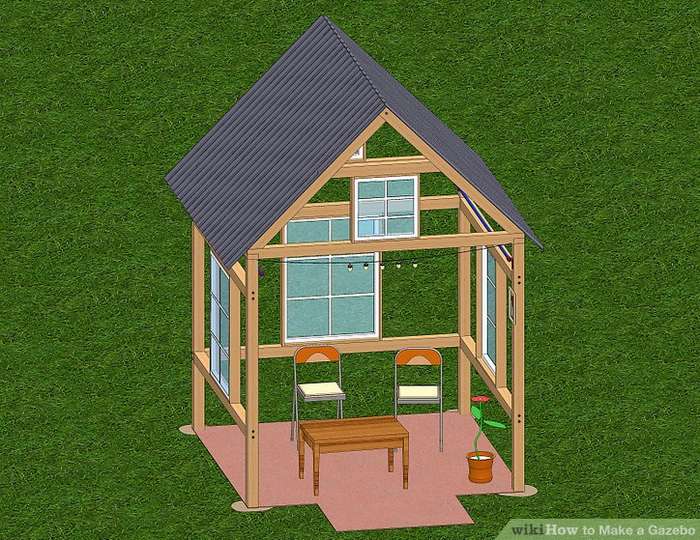 The famous wikiHow website, as always, offers a simple solution for complex tasks.. Unless, of course, this is a problem for you. Do not know, how to make a gazebo do it yourselfFollow this guide.Of course, the photo instruction is not very detailed, but the pictures are colorful and clear. So you can save money and make a unique gazebo of cool design, which will certainly impress your family and neighbors, and all this for a third of the price!


https://i.expert-h.com/en/besedki/dla-dachi-poshagovye-instruktsii#sigFreeIde8bbb75a37
 Arbor for a summer house made of wood
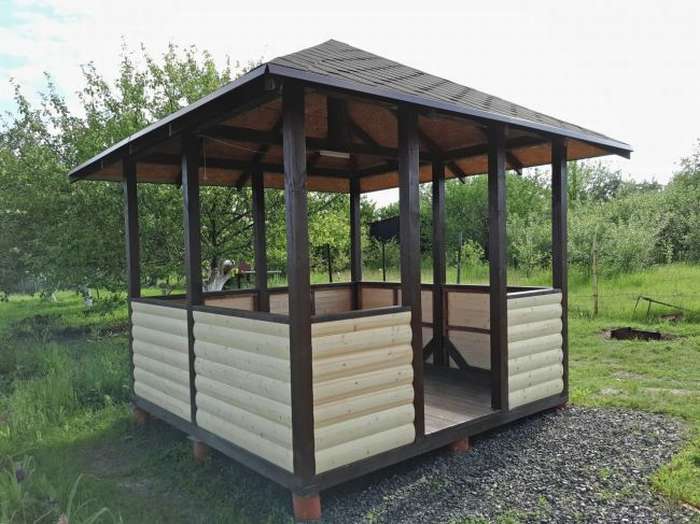
Shown here how to make a square garden gazebo with a gable roof not in diagrams, but in visual step-by-step photos. For the construction, standard material was used - board, timber, roofing material. It was only non-standard solutions to use a sewer pipe with a diameter of 125 mm for the construction of the foundation under the support pillars. The photo shows all the stages of work, from the marking and pouring of the columnar foundation to the fastening of the roof. In my opinion, a great option for a summer residence, lightweight and simple design without any complaints.


https://i.expert-h.com/en/besedki/dla-dachi-poshagovye-instruktsii#sigFreeIdd0f25de059
 Beautiful arbor made of wood with your own hands
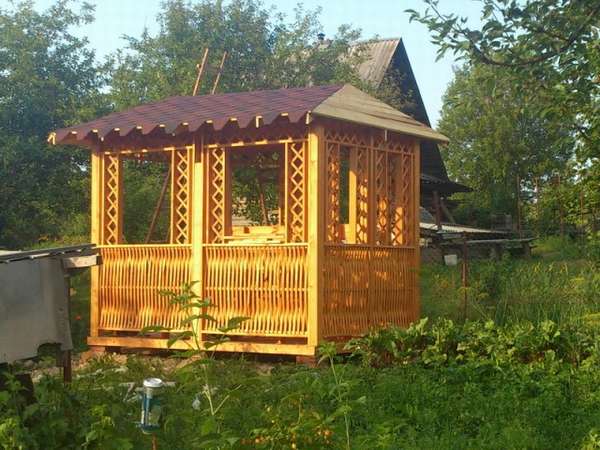
A simple rectangular design with a gable roof and beautifully designed side walls. The gazebo is assembled from ready-made forms., all project details were made to order according to the author’s personal drawings. The third photo shows the modules made in the workshop. The structure is installed on a red brick foundation. See assembly steps in step-by-step photographs. Due to the unevenness of the terrain, the arbor is slightly raised, the stairs apparently did not enter into the author’s plans, so a temporary option was made.


https://i.expert-h.com/en/besedki/dla-dachi-poshagovye-instruktsii#sigFreeId9c2cb38c22
 DIY garden gazebo
This project, of course, is more ambitious. To build a garden gazebo with your own hands it’s not necessary to be a high-class carpenter or jack of all trades, although it would not hurt. All stages of construction are shown here.
- Work begins with markup. To ensure proper drainage and prevent grass and weed growth remove sod and about 10 cm of soil.
- Then fill the prepared area with gravel.
- Then install the forms for the point foundation and fill them with half concrete.
- Use a level to make sure that the vertices of each shape are at the same height.
- In this case, the relief is slightly sloping, so the height of the shapes for each hole is different.
- In the second photo you see the device, the laser level, which was used for marking.
Further I will not describe all the details, everything is shown pretty well in the photographs, and detailed instructions can be read on the website, the link is under the gallery.


https://i.expert-h.com/en/besedki/dla-dachi-poshagovye-instruktsii#sigFreeIdb81e20826b
DIY octagonal gazebo
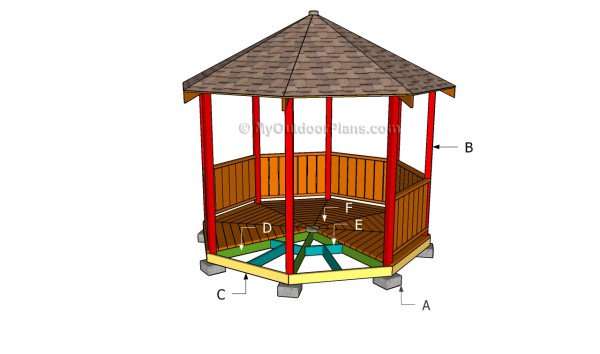 Three stages of construction are shown here - the main part, the roof and the railing.. An octagonal gazebo is a more complex construction compared to a rectangular or square shape, as it requires more materials and more complex wood operations. Nevertheless, this is not a reason to abandon construction if you use the right drawings for work and plan every aspect of the project. According to the presented plans, you can build an octagonal gazebo with your own hands in 2 - 3 days. I will not write detailed instructions, you can read them on the site, but a few tips.
- The first step is the markup. The easiest way to lay out an octagon is to make a square and trim the corners until you get the shape you want.
- Set the middle beams using the template shown in the pictures.
- Use a good saw to cut corners, this is necessary to create stiff seams.
- Use waterproof adhesive for joints to strengthen the bond.
- Check that the main beams are perpendicular with a joiner square.
- When installing the flooring, do not forget about the countersink of the screws and about the small gap between the drainage boards.
- When installing the upper rungs, cut off the ends of the upper trims at an angle of 67.5º. Install a wooden plank between the racks and secure with galvanized screws.
- When installing a new component in place, plumb each support.


https://i.expert-h.com/en/besedki/dla-dachi-poshagovye-instruktsii#sigFreeIdd8f8d26b48
 How to make a roof on the gazebo
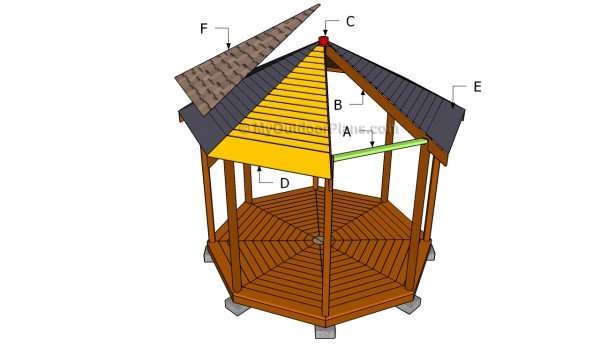
Roof installation it's the next step in the construction of an octagonal gazebo do it yourself. The presented phased construction schemes will give you a better idea of the process. If you plan every aspect as detailed as possible, you can, First of all, prevent possible errors, and Secondly, make a roof even with minimal experience. How to install the pillars and cover the flooring you already know, for the construction of the roof, of course, you need more skills,so if possible, contact your friends who may have more experience in this business. Roof construction for an octagonal gazebo at first glance it seems complicated, but everything is not so scary, most importantly, attention and accurate calculation.
- Start with rafters, you need to cut both ends at 63.5 degrees with a miter saw. Fasten one end to the posts, and the second should be fixed in the center of the rafters. Make sure you align everything perfectly, otherwise the roof will not be symmetrical.
- In general, the fastening of the rafters and the fastening of roof rails, but do not forget that it is better to fix it with galvanized screws. Alternatively, you can cut triangles from plywood and fasten them with nails.
- Regardless of choice, accurate measurements are needed and appropriate cuts made with a circular saw.
- Then cover the entire roof surface with roofing material, starting from the bottom to the top. Make sure the roofing strips overlap at least 5 cm to create a waterproof cover to frame the roof.
- After covering the entire surface, cover the edges with strips of roofing material and fix them with brackets.
- One of the last stages is the installation of tiles. To do this, it is better to read the instructions if there is no experience in this area.


https://i.expert-h.com/en/besedki/dla-dachi-poshagovye-instruktsii#sigFreeId2ec4c34338
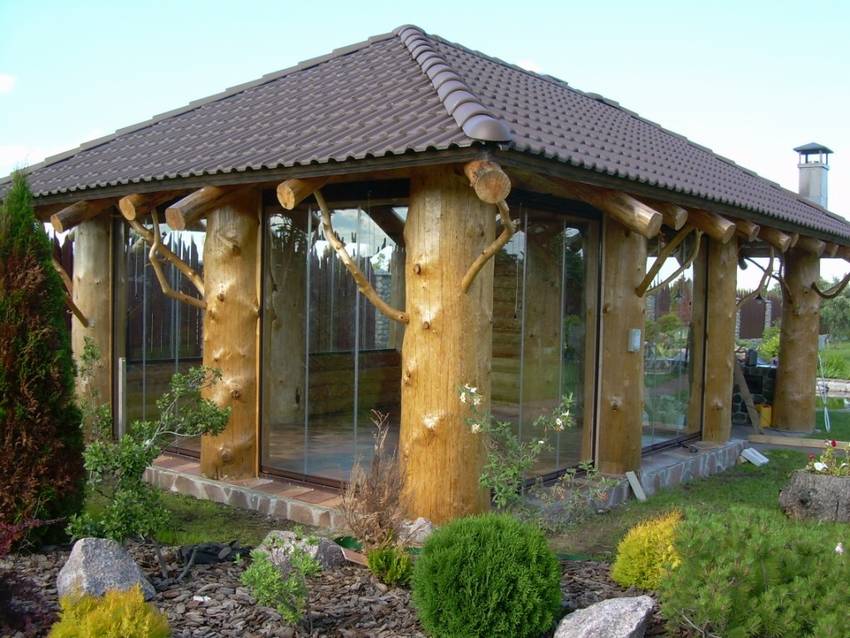
Cool arbor model with double-glazed windows
 Railing for gazebo
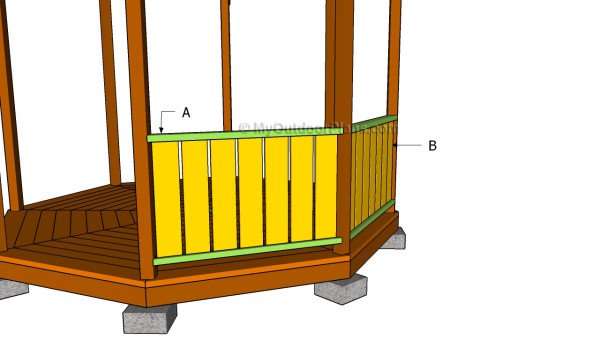
Railing, this is the final stage. There are many plans by which you can make a railing for an octagonal gazeboso make sure their appearance consistent with the style of the gazebo and your tastes. The first step is to create the lower and upper guides. Use the router to make a wide and deep channel in the rails, as shown in the diagram. These channels will tightly fix balusters. Then comes the installation of the lower crossbars, check the level so that they lie strictly horizontally. Repeat the process on the remaining 6 sides of the gazebo. And the last step is the installation of the railing. Before drilling guide holes and tightening screws, make sure they are evenly distributed.. Place a wooden block between the planks to create consistent spaces. It is very important to fix the bar with screws before installing the upper crossbar. Check that all parts fit snugly; the screws are flush with the wooden surface.


https://i.expert-h.com/en/besedki/dla-dachi-poshagovye-instruktsii#sigFreeIdd0e442a9f8
How to make a wooden gazebo
 Shown here how to build a do-it-yourself octagonal wooden gazebo with a tent roof. This is not an exhaustive treatise of the whole process, although the author tried to display all the stages in rather detail in step-by-step photos. Note: inevitable changes in the construction process will require some details to be changed. All sizes are given for this particular gazebo, you can change them at your discretion. All lumber is designed for external use, and fasteners are galvanized. The roof is made of plywood “CDX”, which by rating means low quality, but certainly the strongest type of plywood in the construction industry. Now about planning, the scheme is pretty simple. An octagon is just a square with cut corners. Start by creating a square. To do this, using a tape measure, pegs and a cord, a square is marked, divided into 8 parts and using the building level and the cord, the corners are cut off. As a result, we get regular octagon. Further, the order of work, look at the step-by-step photos, if something is not clear, you will find very detailed instructions on the site, a link under the gallery.


https://i.expert-h.com/en/besedki/dla-dachi-poshagovye-instruktsii#sigFreeIdd755c14bc8
How to build a gazebo do it yourself 3 projects
Here are three projects with step-by-step photos on how to build a wooden hexagonal gazebo with your own hands.. All stages of construction have already been described above, they are simple and understandable. Of course, there are a lot of options for construction, as well as types of wooden arbors, each project has its own nuances. These three projects are not particularly difficult, but if a more detailed description of each stage is of interest, links to sites are located under the galleries. Here is the first project, hexagonal arbor with a "porch".


https://i.expert-h.com/en/besedki/dla-dachi-poshagovye-instruktsii#sigFreeIdaaab81cd30
Here are some diagrams and introductory photos of the construction stages.


https://i.expert-h.com/en/besedki/dla-dachi-poshagovye-instruktsii#sigFreeIdf8e0c49ec5
15 steps to build a wooden gazebo with your own hands. This is a project that anyone can implement with a little help in two days. Of the tools you will need mainly a drill and a hammer.


https://i.expert-h.com/en/besedki/dla-dachi-poshagovye-instruktsii#sigFreeIdba8a0f7bf9
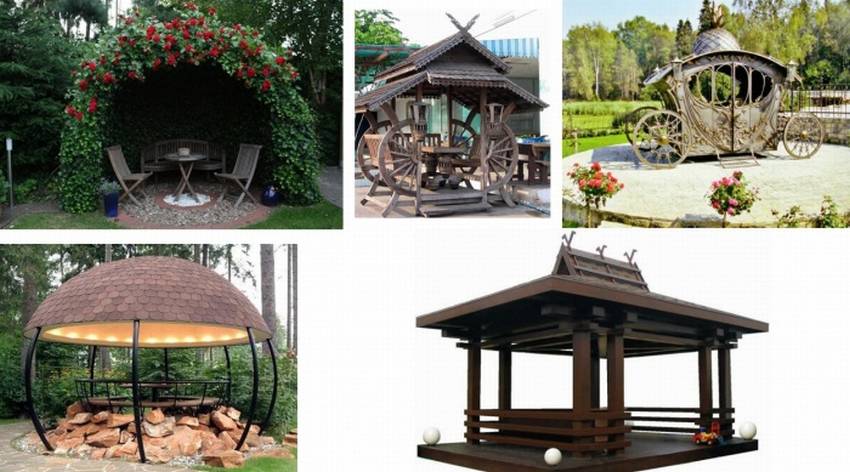
5 unique of ideas for arbors:
(click to enlarge)
The arbor is folding for giving
Portable arborRnaya for giving on all occasions. Design easy to fold and suitable for any terrain. It is a good addition to any site, can be installed in different placesproviding a new perspective from which it is pleasant to enjoy the garden or landscape. Perfectly provide shadow from the sun and shelter from the rainthat gives more time to enjoy nature. Parts of the gazebo do not take up much space and can easily be stored in a garage or under a canopy. This design eliminates the carpentry fantasy, which is usually associated with an octagonal roof and walls. Instead, the author used hinges on which walls and a roof umbrella are mounted. The construction cost is approximately $ 200, plus an umbrella. The finished design is decomposed into four mounted pairs of wall panels and eight complete sets of boards. Wall sections connect with twelve loops, it takes less than 30 minutes to assemble or disassemble the gazebo. However, the structure is very stable, even with strong winds. The author used a heavy base base for an umbrella of about 40 kg, the ribs of the umbrella are attached on the sides with special hooks. With the manufacture of walls, everything is simple, because all eight sides have the same overall dimensions, and seven of them are identical. This means that for each part, you only need to measure once - and then transfer the labels to other workpieces. Detailed instructions for making a portable gazebo can be found on the website.


https://i.expert-h.com/en/besedki/dla-dachi-poshagovye-instruktsii#sigFreeId12cac51557
How to make an open gazebo
 If you want to create a recreation area on the site, you should think about the construction of an open pavilion or pavilion, canopy. In fact, this is one and the same, only I have slightly different design features. Open gazebo, the same as the classical one, only without walls or railings, and the canopy is even easier, that is, just a roof that rests on several pillars where there is no entrance or walls. This project includes instructions for building a gazebo from improvised materials. Such an open gazebo can be built by every amateur in a few days. In the end, such a canopy can be used for different purposes: it can be an open gazebo for relaxing, a summer kitchen or a barbecue, you only need to change the design a little. The stages of construction are presented in the diagrams in the gallery, the instructions for each step can be read on the website, the link is under the photos.


https://i.expert-h.com/en/besedki/dla-dachi-poshagovye-instruktsii#sigFreeId0120d75db0
Check out from what else can be done (4 photos):
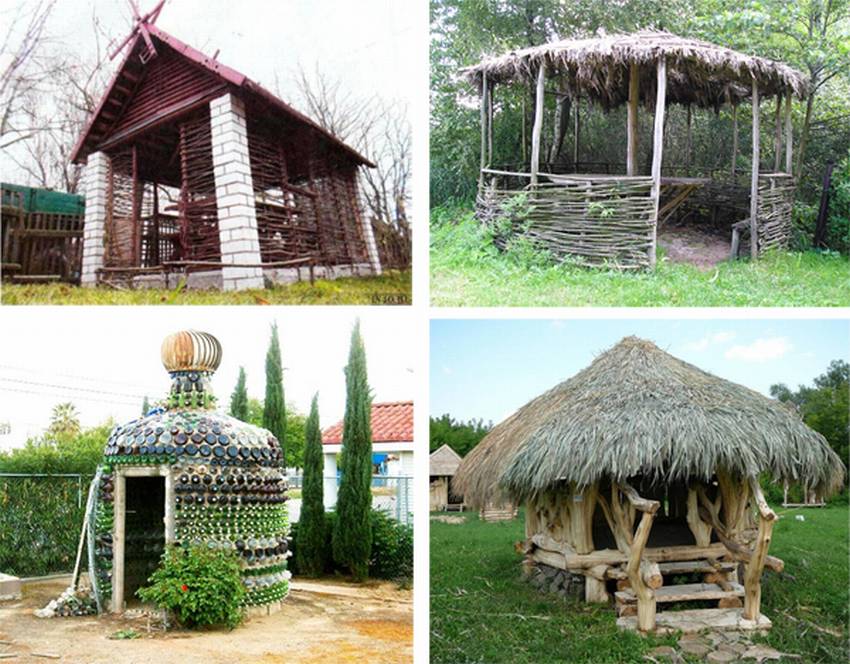
DIY open gazebo
Shown here how to build an open gazebo with your own hands from a tree. The design, as you see, is solid. The main building material will be wooden beams, volume, and quantity will depend on the size of the structure, the author does not give figures, so you have to choose for yourself. The second necessary material two types of metal rods T-shaped and L-shaped. And still need the screws, very large screws, twice as large as the thickness of the beams. Do not forget about a ladder, preferably strong, in this project this is the main  tool. Concrete is another necessary material for the construction of your gazebo, it will be used as the basis and anchor for the entire structure.
After you make the drawing, you can see what dimensions are needed for all wooden parts. If you have tools, you can file all the components yourself. This is the cheapest option. If there are no skills or tools, you need to find someone who will do it ..
 The first step is to build a foundation.
- Prepare the site and fill the slab of the desired size. If you want more strength, add metal reinforcement to concrete.
- Next, install wooden beams and metal supports in concrete at an angle of 90 degrees.
- If there are gaps between the metal and the wooden parts of the supports, use tar and silicone to fill them and create a waterproof seal.
- Repeat this step for all supports. Four pillars are usually installed, but if you choose a different design, more legs may be required.
- The next step, install the wooden beams on the supports, do not forget to measure all sides and make sure they are equal. Then secure them in place with the screws.
- The next step is attaching the side rails to the ones you mounted on the poles.
 Then you need to make a triangular structure that will support the roof. The triangular shape of this part of the structure is designed to distribute the weight down to the supports, which will be especially useful if you live in areas with high rainfall, especially snow.
- Use metal rods to securely fix the diagonal pieces. Pass the metal rod through the two wooden parts to make sure they are firmly held in place.
- Now install the upper crossbar where the roof will be mounted. To do this, you may need to use a rope or get extra help to keep the pieces together.
- Now it's time to put the roof supports that will help keep the weight down. Place support approximately every 55 cm. Securely fasten the supports with screws.
- Cover the roof with sheets of plywood, this layer must withstand heavy weight, it must be fixed very securely.
- After that, attach a waterproof layer. There are different types of roofs, you can choose which one you prefer, but layered tiles are popular and effective choice.


https://i.expert-h.com/en/besedki/dla-dachi-poshagovye-instruktsii#sigFreeId4864b47a34
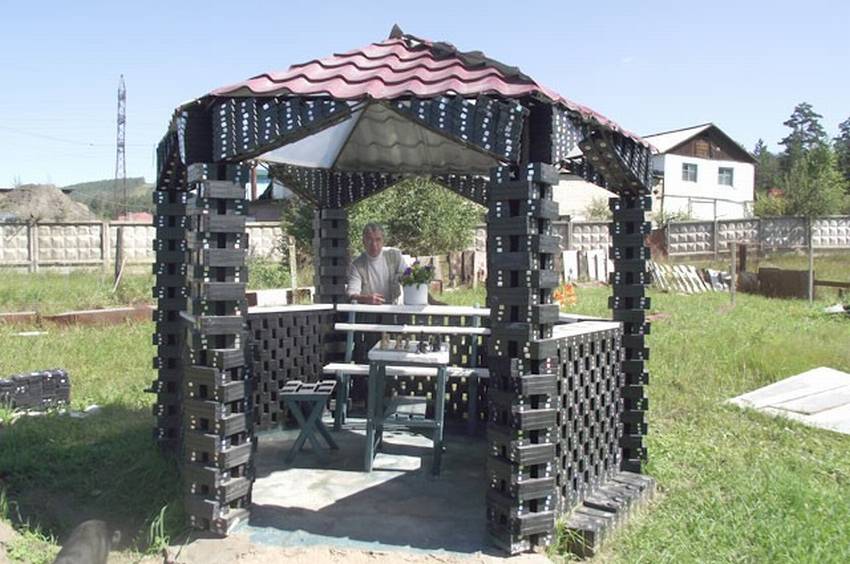
And this is a gazebo from VIDEO CASSETTE !!!
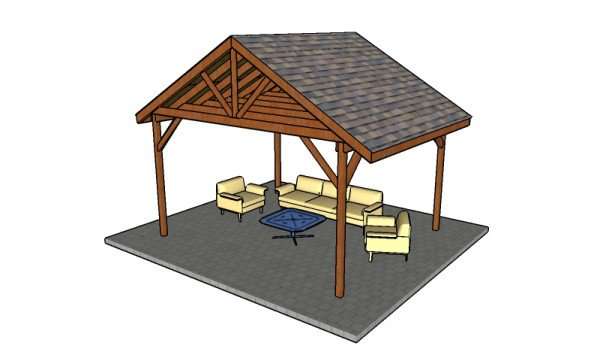
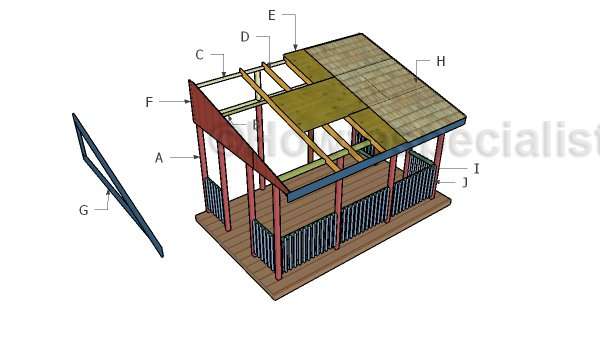
Arbor Pavilion for a summer residence
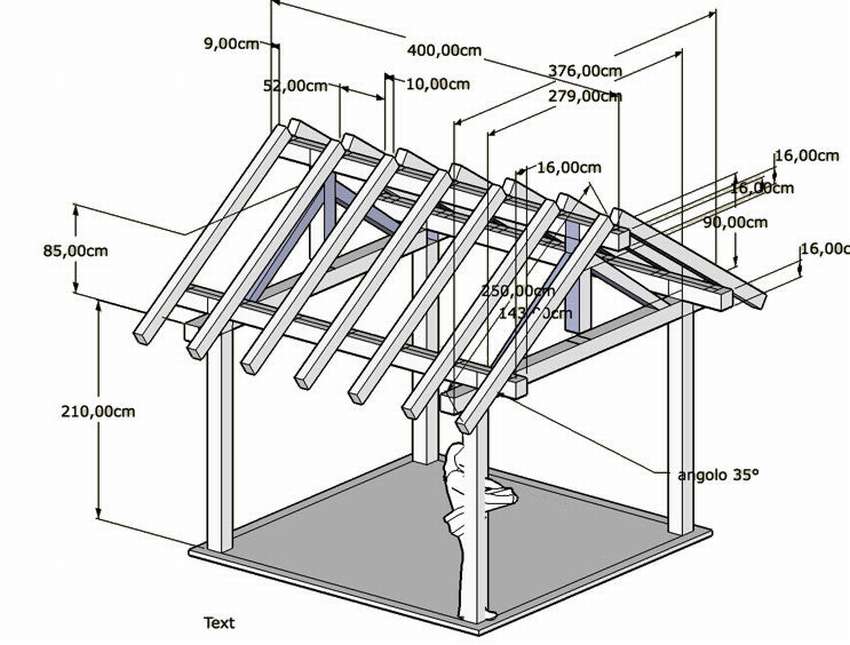
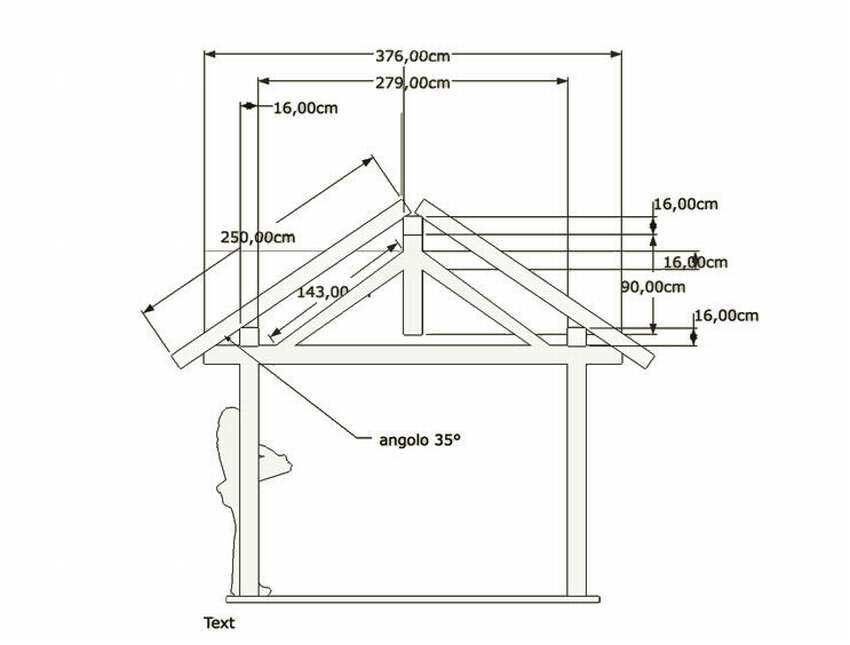
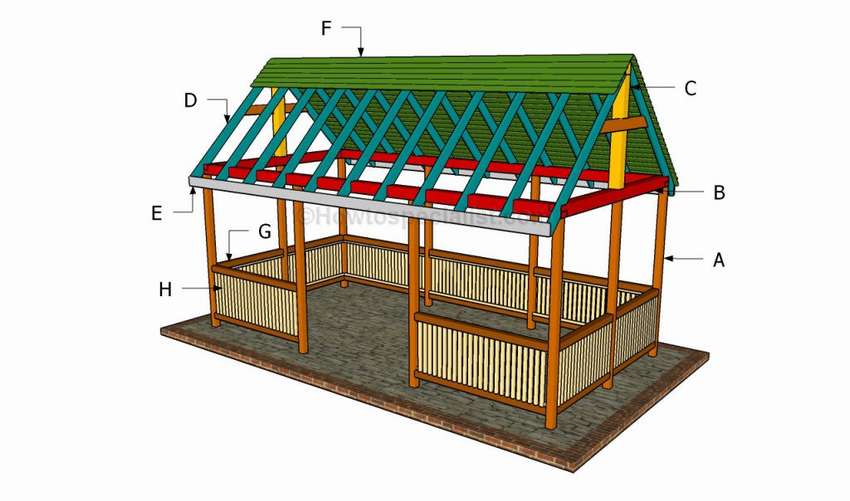 This, of course, is not the easiest project, but Pavilion for summer cottageIt is an ideal place for a summer dining. You can always change the size and design of the pavilion for your needs and budget, but it is better to use the instructions and tips indicated on the diagrams. Gable roof will improve the appearance of the structurebut it will require large investments and a lot of materials. If you want to build a simple pavilion for a pleasant feast with family and friends, there are several options that you can choose. On the one hand, you can build a gazebo or a simpler structure, like this wooden pavilion. You can do it yourself, but you must plan every construction step from the very beginning. It is recommended to buy the best materials that you can afford. They must be weatherproof, such as pressed wood, pine or cedar. Carefully take accurate measurements before adjusting sizes. Pre-drill holes in the parts before screwing in to prevent the tree from splitting. All stages of construction are shown in step-by-step diagrams, detailed instructions on the site.


https://i.expert-h.com/en/besedki/dla-dachi-poshagovye-instruktsii#sigFreeIdb8b1985ef2
Big arbor made of wood with your own hands
This large gazebo can be called rather a pavilion. A good option if you have a large yard or enough space on the site. A good project in the sense that in perspective under such a canopy you can install a barbecue or barbecue, or even organize a stationary summer kitchen. To build such a gazebo you need column foundationbut perhaps the hardest part is the roof. To do this, the horizontal contour of the gazebo must be installed. Then fix them with screws to the supports.
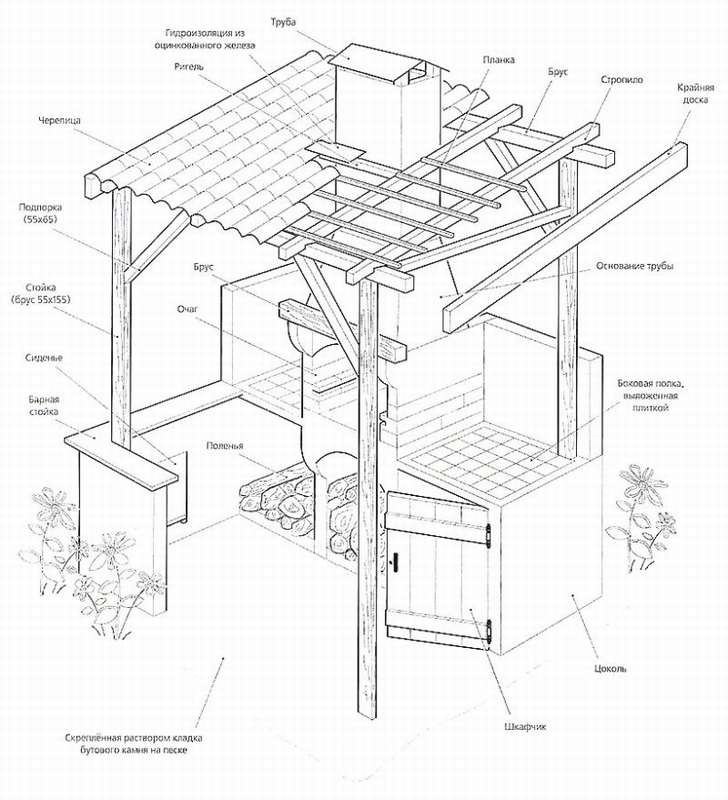
 For reliability screeds must be fastened with metal strips. Then fasten all other parts. At the end, saw off the central support flush and lay the crate.
note that the crate is made in different ways, depending on the roofing material, if under slate, then it can be either single-layer or double-layer. But this is a separate issue. The whole process of building a gazebo is shown in step-by-step photos, if you have questions, instructions are on the source’s website, the link is under the gallery.


https://i.expert-h.com/en/besedki/dla-dachi-poshagovye-instruktsii#sigFreeIde6a4ab7335
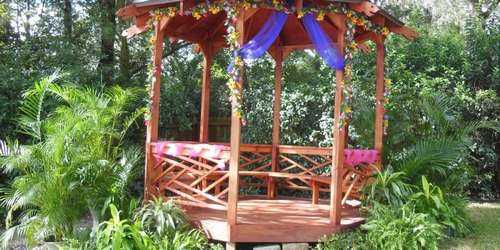
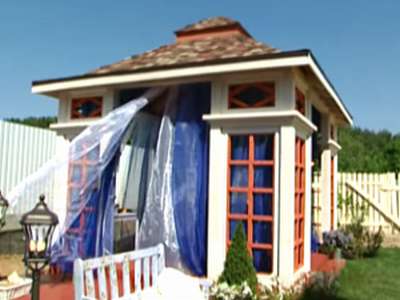 Beautiful gazebo do it yourself
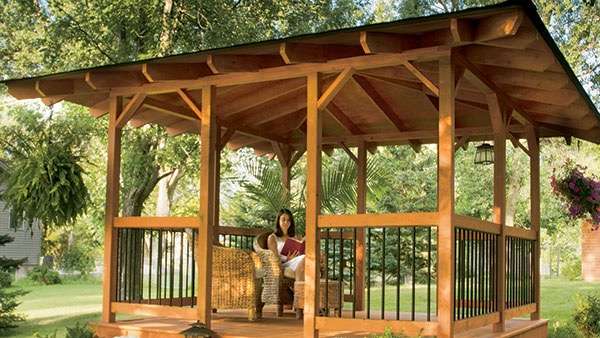
Such a beautiful open-type gazebo can decorate any garden or cottage. In order not to repeat, we will not describe the whole process, how to make a wooden gazebo with your own hands, all steps are the same as in the previous examples. True, there are a lot of decorative elements and the original roof structure, so if you are interested in any nuances, you can read on the site.


https://i.expert-h.com/en/besedki/dla-dachi-poshagovye-instruktsii#sigFreeId666830aff1
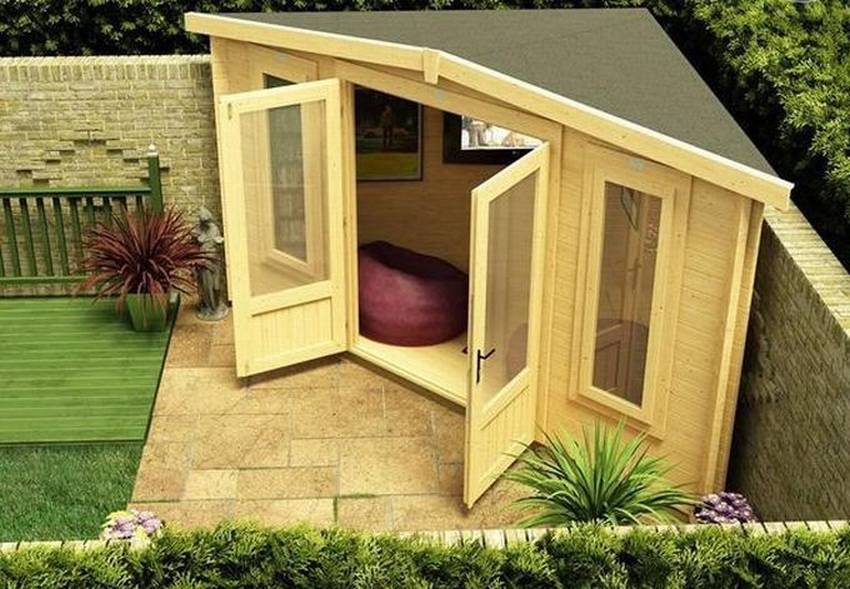
Do-it-yourself wall arbor
 No matter how small the stand-alone gazebo is, it still takes up enough space. The ideal option for a small yard is make a wall arbor with your own hands. Indeed, in this embodiment, there are many advantages. First of all, saving, because less materials are needed. Secondly, compactnessb, because you need half the space than for a stand-alone gazebo. Thirdly, it is very comfortably, you don’t have to go far, that is, it acts as a veranda and most importantly, such a gazebo can serve different purposes, for example, you can put a workbench, here’s a workshop in the fresh air. Sleep on a stuffy night, organize a summer dining room. To that building a wall gazebo is even easier than a regular. Here, step-by-step diagrams show how to do this, and you can read step-by-step instructions on the website.


https://i.expert-h.com/en/besedki/dla-dachi-poshagovye-instruktsii#sigFreeId4fc3df462a
Blueprints:
70 drawings square (rectangular) arbors for a summer residence
Here are drawings and diagrams of square and rectangular arbors for giving (5х5, 3х3, 3х2, 3х4, 3х4, 4х4) both from a tree, and from metal. Many sketches are indicated by the dimensions of parts of structures. In this collection there are models of simple garden gazebos with gable and gable roofs, with a table and benches.


https://i.expert-h.com/en/besedki/dla-dachi-poshagovye-instruktsii#sigFreeIdbae1397ffc
50 drawingshexagonal pergolas
Below is an archive of drawings with the dimensions of a summer cottage hexagon arbor, which you can do with your own hands. Here, as in previous albums, there are photos, models and sketches of garden arbors made of wood and metal.


https://i.expert-h.com/en/besedki/dla-dachi-poshagovye-instruktsii#sigFreeId46123cc7c4
50 drawings octagonal pergolas
According to these dimensional drawings, you will understand how to make an octagonal (octagonal) garden gazebo for your own do-it-yourself cottage. Among the layouts and sketches you will find drawings of the roof, base, table, bench and porch.


https://i.expert-h.com/en/besedki/dla-dachi-poshagovye-instruktsii#sigFreeIdc611cd0682
DIY wooden pavilions 300 photos, drawings, diagrams
Here you can find a small gallery of DIY wooden arbors. Of course, you can collect more photos, because there are millions of options. Each gazebo, made not according to the template, but by one’s own hands, even according to standard drawings, is still a work of art. Relatively simple constructions are collected here, which can be done by every master who does not have much experience. There are, of course, examples of industrial products, it may come in handy.
Square drawingspergolas
https://i.expert-h.com/en/besedki/dla-dachi-poshagovye-instruktsii#sigFreeId5ada0681b4
Square arbors 150 photos


https://i.expert-h.com/en/besedki/dla-dachi-poshagovye-instruktsii#sigFreeId457faad387
Drawings of hexagonal arbors
https://i.expert-h.com/en/besedki/dla-dachi-poshagovye-instruktsii#sigFreeId94337e37c5
DIY hexagonal gazebo 50 photos


https://i.expert-h.com/en/besedki/dla-dachi-poshagovye-instruktsii#sigFreeIdd44ba8b697
Drawings of octagonal arbors
https://i.expert-h.com/en/besedki/dla-dachi-poshagovye-instruktsii#sigFreeIdcc2e795133
DIY octagonal gazebo 100 photos


https://i.expert-h.com/en/besedki/dla-dachi-poshagovye-instruktsii#sigFreeId5bbbaa169f
- Brick grill: 44 drawings, 18 projects + photos
- Collapsible barbecue: 50 drawings, 20 master classes +300 DIY photos
- ✿ Flowerbeds:> 34 turn-based master classes + photos (248 ideas) - do-it-yourself
- DIY sauna in the apartment: bathroom, balcony, storage room. Projects and photos
- Shelves in the bath with your own hands: +200 photo. Drawings of bench benches in the steam room