DIY summer grill (5 models), drawings +200 photo
 Garden grill
From this material you will learn how to make a barbecue grill with your own hands for a garden from brick and blocks. The following article presents mock-ups, diagrams, instructions, drawings and step-by-step photos of master classes for manufacturing these furnaces. At the very end of the article you will find a photo gallery with a huge number of photos of finished models.
Check out one more brick making technology for your own handsand for your beautiful summer house)))
To build such a useful thing, you do not need to be a great bricklayer and a professional builder. The material also needs a minimum - brick, mortar, tile adhesive and grill. Here, the main thing is to choose the right place, after all, a stationary structure, and not a portable barbecue, so it should look beautiful and appropriate. Further on the photo shows in detail in what sequence to carry out the work.
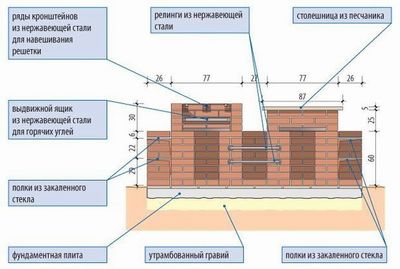
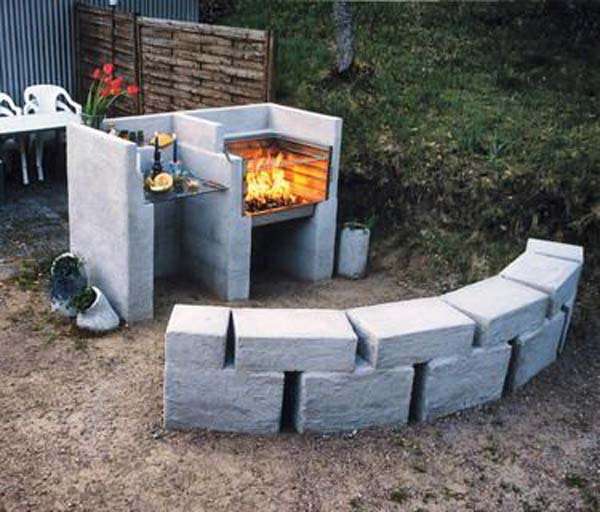
The options, of course, can be different, for example, lay out such a grill, the scheme, as you can see, is simple
To build such a useful thing, you do not need to be a great bricklayer and a professional builder. The material also needs a minimum - brick, mortar, tile adhesive and grill. Here, the main thing is to choose the right place, after all, a stationary structure, and not a portable barbecue, so it should look beautiful and appropriate. Further on the photo shows in detail in what sequence to carry out the work.
If your experience in this business is tight, pay attention to such nuances:
- install side slabs to a depth of at least 35 centimeters;
- do not forget to ram the concrete in the foundation, for which prepare a block of wood;
- to hold the plates, use the glue that was prepared;
- do not forget to pre-make grooves for the grill;
- if you have never laid a brick before, you can first do the masonry without mortar, in order to level everything and where necessary - trim, so it will be more accurate;
- do not use a lot of solution at once, the design is small, so you can cook in small portions.
When lay the masonry, you can figure out how to decorate the grill, tile, for example, or paint, in general, think of something, the main thing is to stand firmly.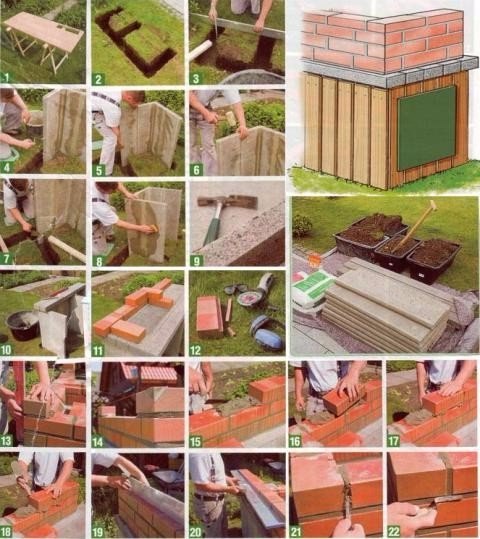
So, somehow.
Grill from brick do it yourself
 An example in step-by-step pictures is how to lay out a simple grill of bricks.
- Prepare the materials. You will need: cinder blocks, gravel, dry mortar, putty knife, tape measure, carpentry square, upper grill and bricks.
- Choose a place for barbecue. It will be necessary to mark the area for the pit 150 to 90 cm. First clean the area from the roots and turf.
- Remove soil to a depth of 20 cm. Align the bottom of the pit with your hands.
- Pour gravel and smooth to a layer of approximately 5 cm.
- Prepare a solution. Apply a 5 cm layer on top of the gravel and smooth with a spatula.
- Install cinder blocks along the inner edge of the pit, leaving a small space for draining water. Check the corners as well as the level of evenness of the masonry.
- Apply the mortar to the cinder blocks and start the brickwork with a double layer. Do not forget to remove the excess solution when it dries, it will be difficult to do.
- Using a spatula, apply the mortar to the sides and bottom of the brick, removing excess.
- Continue laying until you reach the planned height. Check the level and angles regularly.
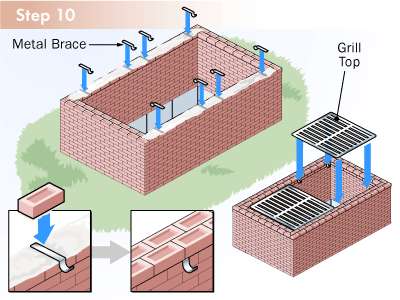
- Place metal staples in the final layer of the solution while it is still wet. The brackets should look inward, as they will hold the top of the grill. When the solution has dried, and this is at least a day, install the grill on the staples.


https://i.expert-h.com/en/barbekyu/dachnyj-gril-svoimi-rukami#sigFreeIdbc332c51a0
B-B-Q from blocks
 The barbecue was built in a dry way - no mortar was used. So it’s much easier to assemble and, if the location is not comfortable, it’s easy to move to another place. In addition, if the bricks are cracked by heat, and as a rule, this happens often, they are easy to replace.
NOTE. We will not pay special attention to the engine that was used in this project.Suffice it to say that you will need an old electric motor (from a stove or dryer) with a gearbox that can slow down the speed of rotation. The combination of bicycle gears can be customized to do the same.
Step 1: List of Materials
These are the materials that the author used, they are listed here simply as a suggestion. If you are lucky, you can get other materials, perhaps much better. Not to be confused, the dimensions are indicated in inches, that is, 8 "means 8 inches, 1 inch 2.54 cm, then 8" - 20.32 cm
Construction box
- 25 building blocks 8 "x 8" x 16 "
- 15 indoor units 8 "x 8" x 16 "
- 4 blocks 8 "x 8" x 8 "
- 22 paving tiles 12 "x 12" (optional)
- 8 boards
- cord
For barbecue:
- Steel plate 16 "x 12"
- 6 to 8 24 "reinforcement bars
- 2 - 3 cubes of sand or gravel
- 2 metal pipes 4 'x1.5 "
- Steel barrel from food products (sunflower oil, etc.)
- Corner 20 'x 1.5 "
- Wooden hockey stick
- 5 "x 5/16" Bolts (with nuts and washers)
- 2 threaded rods 2 'x 1/2 "(with nuts and washers)
- Steel plate 7 'x 12 "(1/8")
- Heat resistant black barbecue paint
Step 2: Equipment list
- Shovel
- Gloves
- Hammers
- Long level
- Short level
- Safety glasses
- Roulette
- Old chisel or ax
- Marker
- Manual grinder
- Metal cutting discs
- Familiar welder
Step 3: Dimensions
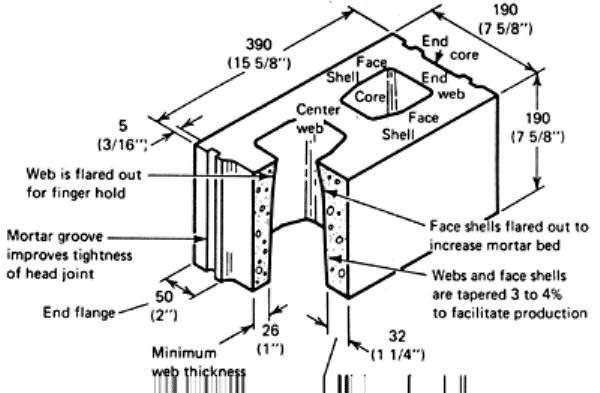 Using standard concrete blocks, you can fold a box of any size. Blocks can be found at most hardware stores.
Step 4: Location
Before you build a barbecue, think a little. Remember, during operation there will be a lot of smoke and heat. Therefore, choose a convenient place that is at a safe distance from trees and playgrounds. If you will use an electric motor, think about a power outlet.
And yet, since you have to dig a hole, think about the roots of trees that could be a fire hazard. Fire can penetrate the roots and smolder underground for a long time. The author recommends always keeping buckets of water nearby ... just in case.

 Step 5: Foundation
Each unit weighs approximately 20 kg, so forty pieces is a solid weight. A solid foundation is needed. After leveling the ground, first lay the 12 "x 12" paving slabs to help distribute the weight and keep the bricks from slipping.
Calculate the area. To mark the outside perimeter of the patio, use stakes with tape for marking.
Step 6: Base and walls
Now you can tightly stack the blocks against each other, constantly checking with the help of a level. Position the holes correctly as shown in the photo.
In some places you will need “half blocks” to complete the row. Closed blocks will also be needed, at a cost they practically do not differ.
Step 7: Top row
- On the paving slabs lay 3 rows of cinder blocks.
- At one end of the third row, install half the block to leave a gap for passage.
- Using the supports (next step), the passage should go a little higher, but not touch the second row of blocks.
- Pour a layer of sand at the bottom, approximately 5 cm.
- In the top row of blocks at both ends, mark the holes for the holes. This is necessary to secure the hinge brackets on both sides.
Step 8: Coasters
For the stand, the author used an 8-foot black steel pipe with several holes drilled in length. For support, grab a 1.5-inch pipe and drive it 60 cm into the ground at both ends of the barbecue. On the tops of the pipes, weld the horizontal corners, and the staples v - shaped staples will hold the rotating pipe.
To grill, weld horizontal steel hands to the support pipe, and V-brackets to support the extra pipes.
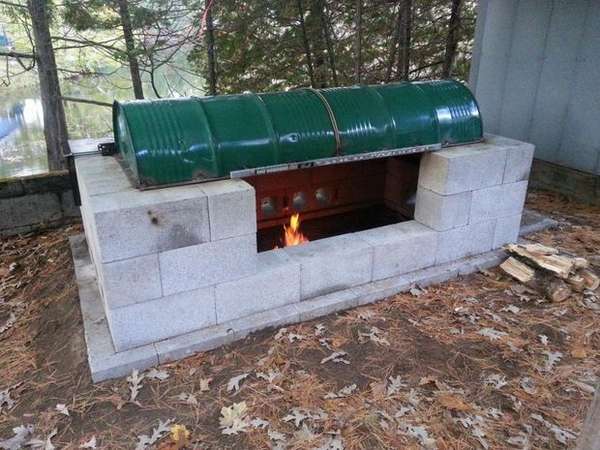
Step 9: Barrel lid
- To cover the barbecue, the author used an old 200 liter food barrel.
- The container must be cut lengthwise and welded at the ends, it will get such a big lid.
- A corner is welded around the perimeter, threaded rods with a corner are welded to it at two ends. In general, such a simple mechanism to make it easier to open is clearly visible in the photo.
- There is a club in the list of materials, and now it will be needed to make a pen.
Step 10: Useful enhancements
The highlight of this barbecue is the adjustable heating stove. The steel drum was not wide enough, so the author added a steel plate 30 cm wide. This is an excellent surface for storing dishes and plates during lunch. To make the lid rotate, weld a 30 cm threaded rodto the back of the cover (on the corner bracket), which is then fed into the vertical hinge brackets from the side of the blocks and bolted.
To protect the steel from rust, paint the surface with black refractory paint.
Take a look at the step by step photos of making barbecue:


https://i.expert-h.com/en/barbekyu/dachnyj-gril-svoimi-rukami#sigFreeIdee2ea10cdb
Portable block grill
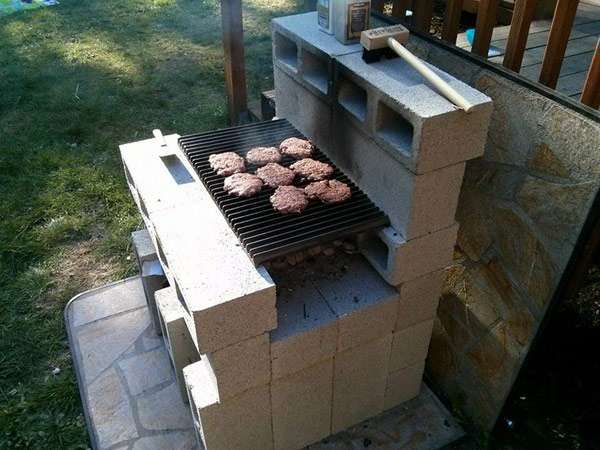
 The main feature of this project is that you can always disassemble it, put it in the car body to transport it to where you need it. Since there is no mortar, glue, nails or the like in its construction, the grill from the blocks can be easily moved with minimal effort. You can install it anywhere and forget about it, since the design is resistant to weather conditions and generally does not require maintenance. How to build a grill, I think, instructions are not needed.
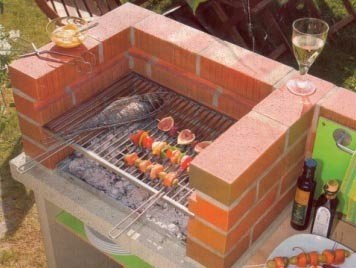
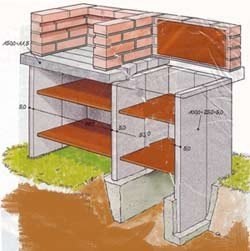
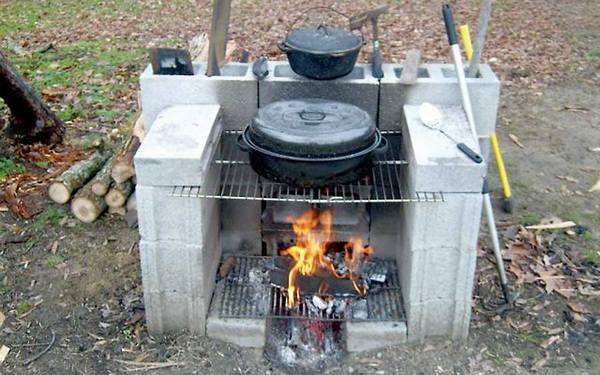
 If we are talking about blocks, look at a few more options. Like this collapsible barbecue grill from blocks with a shelf. It can be assembled as a designer, in any place and after a picnic, it can also be disassembled and put in a barn until the next event.
But it is desirable that you have a permanent platform, tiled or stone, usually around the grill is always crowded, everyone wants to see how to grill meat, tested by practice. Therefore, it is not bad to provide a laid path, it is possible from the same material as the platform, then you have a chance to save the lawn.
In the photo, the barbecue is located directly under the veranda, which, in general, is not advisable for security reasons. But if you install it near the house, then place it on the leeward side, otherwise in a couple of hours everything in the house will be saturated with smoke. In short, do not forget about these nuances.
 And here is another block barbecue complete with a bench from the same material. If you put pillows on the bench, and even hang a couple of flashlights, you get a very cozy place. And, most importantly, you can do all this beauty yourself. Everyone loves barbecue, and if everything is done with imagination, it will delight your family and guests, but in fact, you don’t need to do anything, just pull the blocks for an hour :)
The grill from the blocks takes up very little space on the site, but how much immediately adds coziness and even some chic. And if you still do not regret time for design and beautiful design, then this will be a favorite place for hanging out of your family. Moreover, the possibilities to make various furniture and parts of the interior out of blocks are unlimited, you can see examples in this article.
Here's a step by step shown how to make barbecue grill from blocks. This is a stationary design with trim and a top frame. However, for such designs there is no need for instructions, you yourself can add any combination. 
Grill smokehouse from blocks
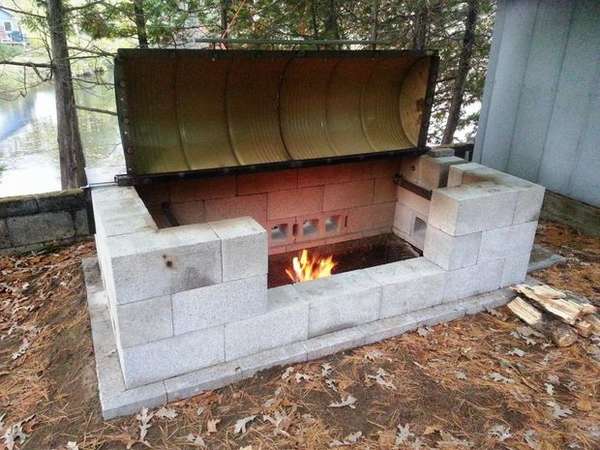
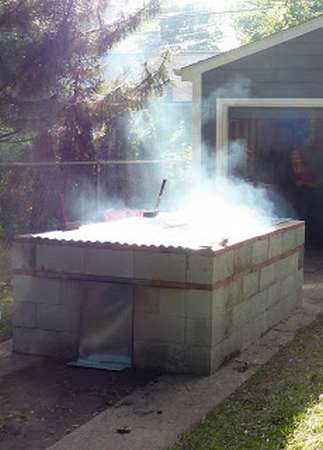 Or such a grill smokehouse, on which you can cook at a time well, a lot of things. This project is time-consuming, but simple and you can do everything in just one day. The work does not require high qualifications - it does not look like you will interfere with something or insert reinforcing supports, but you need to be precise when laying the foundation.
All materials are available, although sheet metal is likely to be the most expensive component, so don't be too lazy to go shopping.
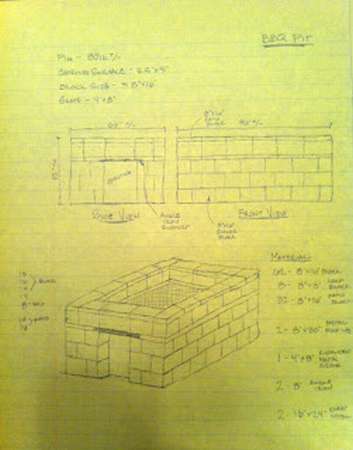
The main thing is to make a plan.
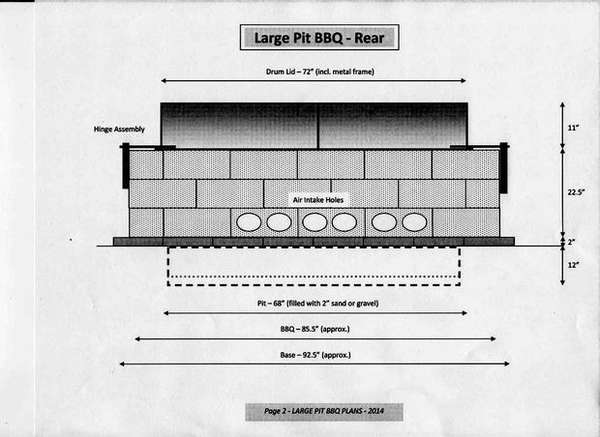
First, sit down and decide what size do you need grill. The author decided that he needed a barbecue of 1.5 x 2.5 m, which, of course, is respectable. After that, you need to decide at what height the working surface will be located, so to speak. In this case, it is 60 cm.
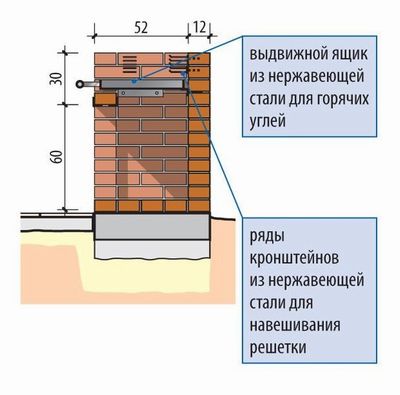
Then you need to think about where you are going place holesto lay coal. For such a large grill, holes from both ends are needed. This is for two purposes. First of all, heat is needed at each end to distribute it evenly over the entire surface. SecondlyThe presence of two holes at opposite ends will help with temperature, since now you can control the air flow.
 About the materials. The quantity, of course, will depend on the size.In addition to blocks and a metal grill, you will need metal roof - corrugated metal roofing is used to cover the pit during cooking. Such material can be bought at most hardware stores, but you will not cook on a galvanized surface, as it releases toxins. However, as a coating it works perfectly without any risk of infection.
Yes still metal corners., they are needed to support the unit and as supports for the grill.
Building
Everything is very simple here! It will take from 30 to 60 minutes, depending on how many breaks you take to go to the fridge for a beer.
Stacking unit. Make sure that the surface where you will install the grill is fairly flat. If there is grass, it is recommended to remove the sod. The smell of burning grass, this is not exactly what you need for a barbecue. In addition, it is not recommended to install the structure on asphalt or concrete road.
- Start laying blocks and make one continuous row. Make sure it is square on all sides. If there are floor corner posts, remember that they will be placed on both sides of the unit.
- Then lay the second row using the sashes in the corners.
- The third row will be laid in the same way as the first, including half blocks. It should look like the one shown in the photo.
- After laying the first three rows, you will be ready to install the grille. But first, you need to install angular metal supports.
- Measure and cut the two supports to the width of the grill and reinstall. They will look like an inverted “L”, with the lower part connecting between the side parts of the block.
- Now install the grill. In width, it should rest on the block by about 3 cm on each side.
- After that, it will be necessary to cut four more supports 15 cm more than the holes at each end. They will be located above the hole, on top of the grill, in front and behind the block below, at each end, similar to two vertical “Ls” facing each other.
Now you can start the installation of blocks.
- There are only two things left to do. Install metal roofing sheets so that they overlap each other. Using two sheets is convenient if you need to check or do something with food, shifting one hefty sheet will be difficult, and besides this is a big heat loss.
- And the second thing that is desirable to do is install a temperature sensor. Drill a pair of holes at each end and install thermometers.
- In addition, put bricks along the edges of the metal roof, it will be better to keep warm and prevent the wind from moving the sheet.
Now you are ready to start cooking. Apply coal and go.
Step-by-step photo of manufacture:


https://i.expert-h.com/en/barbekyu/dachnyj-gril-svoimi-rukami#sigFreeId48385b4827
Barbecue grill from blocks photo


https://i.expert-h.com/en/barbekyu/dachnyj-gril-svoimi-rukami#sigFreeId0a5107930e
50 Schemes, drawings and layouts brick grill


https://i.expert-h.com/en/barbekyu/dachnyj-gril-svoimi-rukami#sigFreeId6bad8e2958
DIY brick grill (90 photos)


https://i.expert-h.com/en/barbekyu/dachnyj-gril-svoimi-rukami#sigFreeId59031f9287
- Brick grill: 44 drawings, 18 projects + photos
- Collapsible barbecue: 50 drawings, 20 master classes +300 DIY photos
- ✿ Flowerbeds:> 34 turn-based master classes + photos (248 ideas) - do-it-yourself
- DIY sauna in the apartment: bathroom, balcony, storage room. Projects and photos
- Shelves in the bath with your own hands: +200 photo. Drawings of bench benches in the steam room